
Chapter Six: The Capital
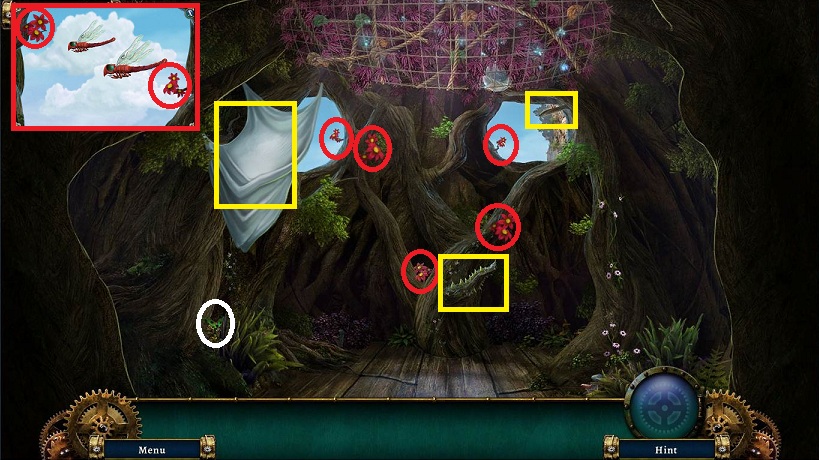
- Pick up CLOTH
- Pick up collectible
- Pick up PIECE OF WOOD
- Use the PIECE OF WOOD on the thorns
- Receive SHARP WOOD PIECE
- Use the SHARP WOOD PIECE to pick up 6 RED FLOWERS
- Examine the netting above
- Use the SHARP WOOD PIECE on the netting
- Receive a LENS
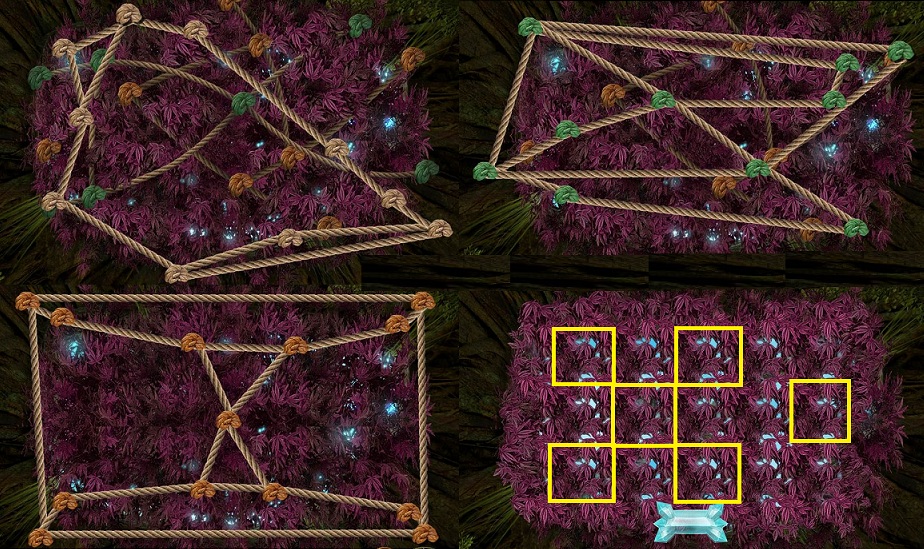
- Move the rope pieces so none are crossing over another
- There are two layers behind the first puzzle so you will see some ropes that are not active behind
- Then click on purple leaves to open the way (solution above can be done in any order)
- Head out
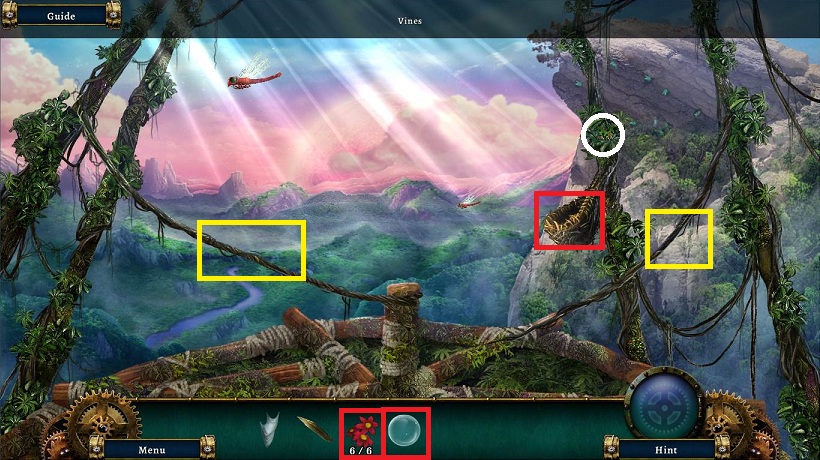
- Pick up collectible
- Pick up 2 VINES
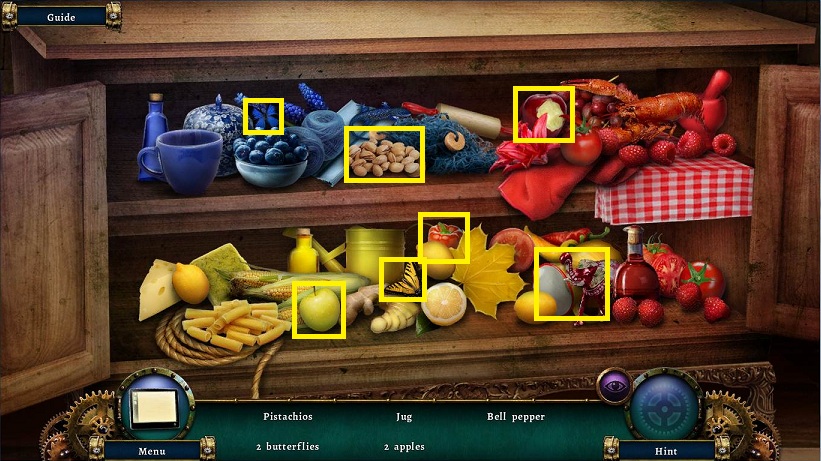
- Place the RED FLOWERS in the basket
- Place the LENS on the basket
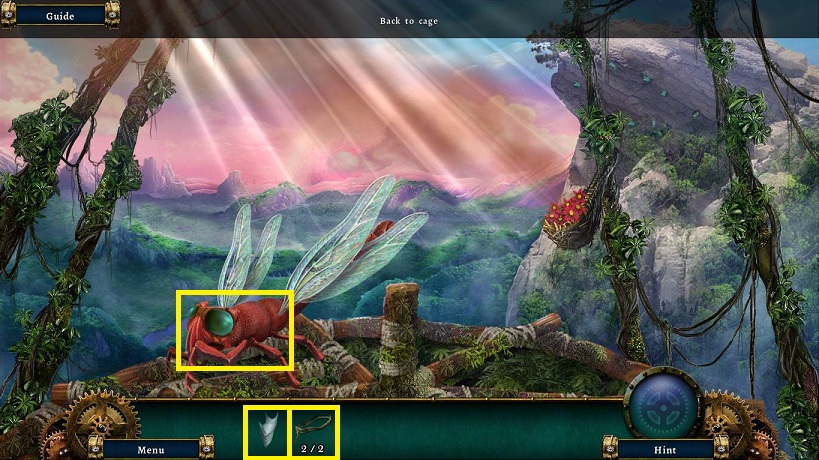
- Use the CLOTH and then VINES on dragonfly
- Click on dragonfly
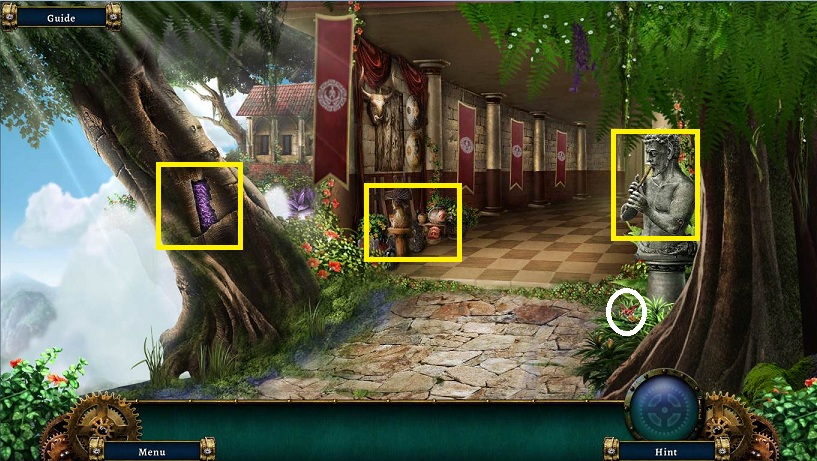
- Examine the purple mushrooms on the tree; need something to peel bark
- Pick up collectible
- Examine statue; need a screwdriver to remove arm and dart gun
- Examine weapons rack
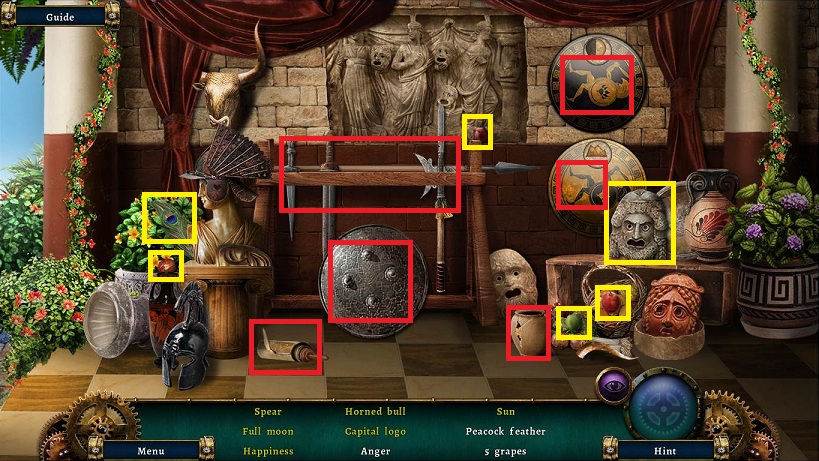
- 5th Grape: Break pot
- Capital logo: click on scroll
- Spear: Move the 3 weapons down
- Happiness: Move shield to the right.
- Full moon: Rotate top right shield
- Sun: Rotate bottom right shield
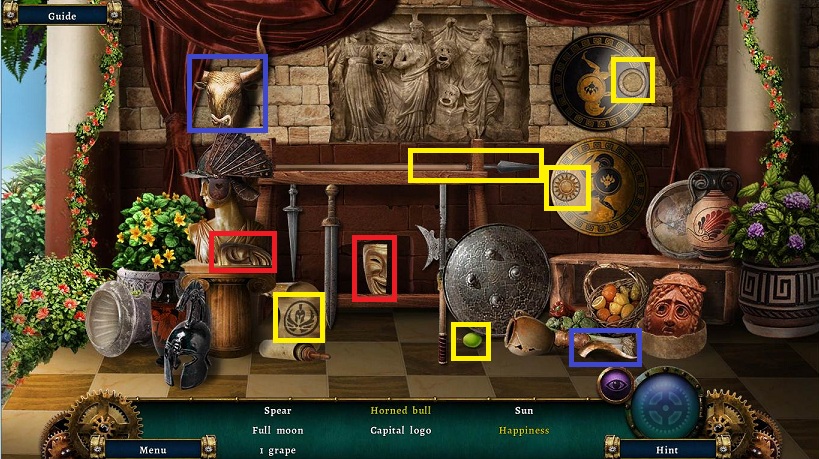
- Happiness: Move half of happy mask to other half
- Horned bull: Place horn on bull
- Receive SPEAR
- Go forward
- Examine door to left
- Need something long to pick up the key
- Pick up GEM (1/6) to the right of the door
- Pick up collectible from statue
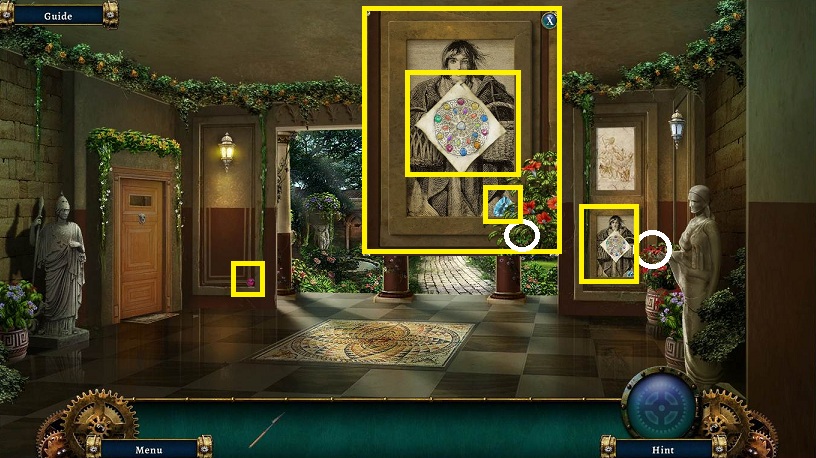
- Examine painting to right
- Pick up the BROOCH DESIGN and GEM (2/6)
- Pick up collectible
- Examine tiles on floor
- Move tiles to complete pattern
- Pick up METAL ROD and GEM (3/6)
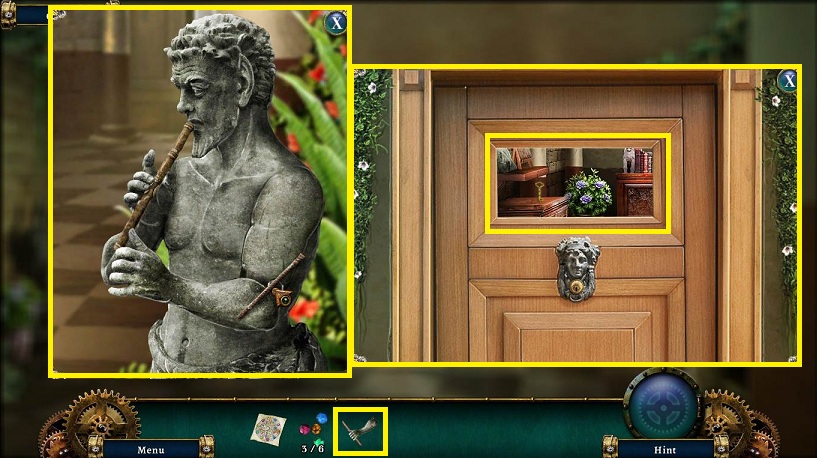
- Return to landing and examine statue
- Use the METAL ROD on the elbow twice
- Place the SPEAR in the hand
- Receive LONG ARM
- Return to the Lobby
- Examine the door
- Use the LONG ARM on the window to pick up the key, which you drop.
- Pull the rug out and pick up the KEY
- Use the KEY in the lock
- Enter the guards' quarters
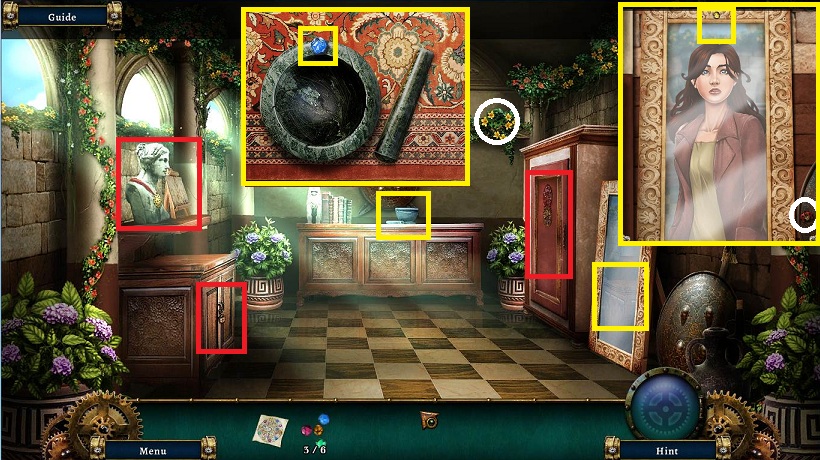
- Examine the back cabinet counter
- Pick up GEM (4/6)
- Examine the mirror
- Pick up the GEM (5/6)
- Pick up collectible
- Examine the wardrobe
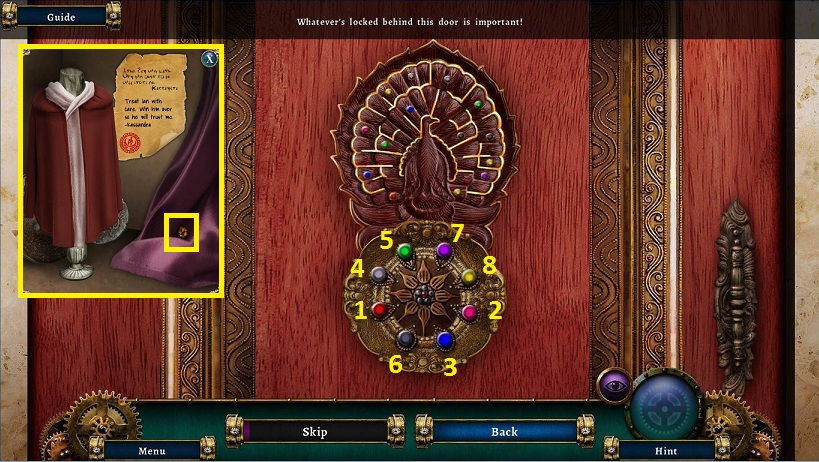
- Look at the maze and press the gem colors in the order you come across them in the correct path
- Pick up the tablet and botanist's kit
- Pick up the GEM (6/6) behind this
- Examine the bust on the left
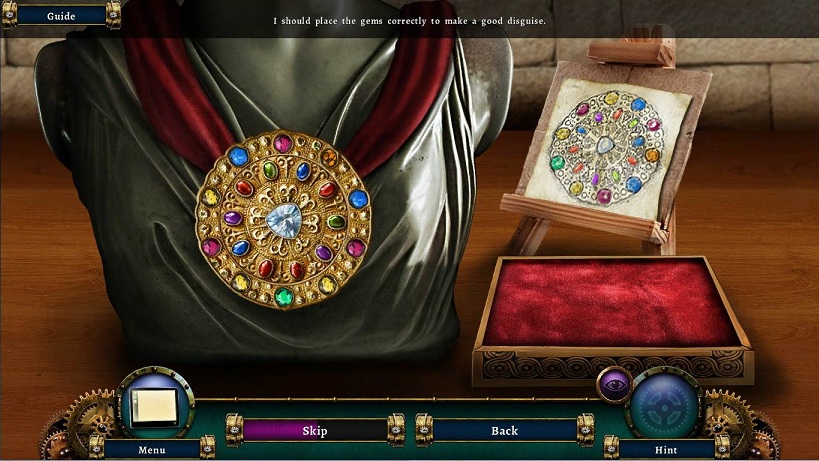
- Place the BROOCH DESIGN on the easel
- Place the 6 GEMS in the tray
- Place the gems onto the brooch to match the design
- The brooch is about 1/4 turn off from the design
- Receive the BROOCH
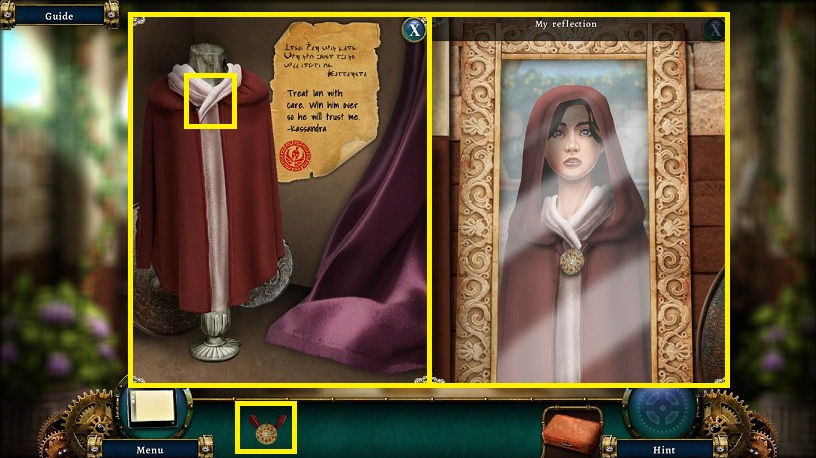
- Place the BROOCH onto the cloak in the wardrobe
- Pick up the CLOAK
- Examine the mirror
- Place the CLOAK on your reflection for a disguise
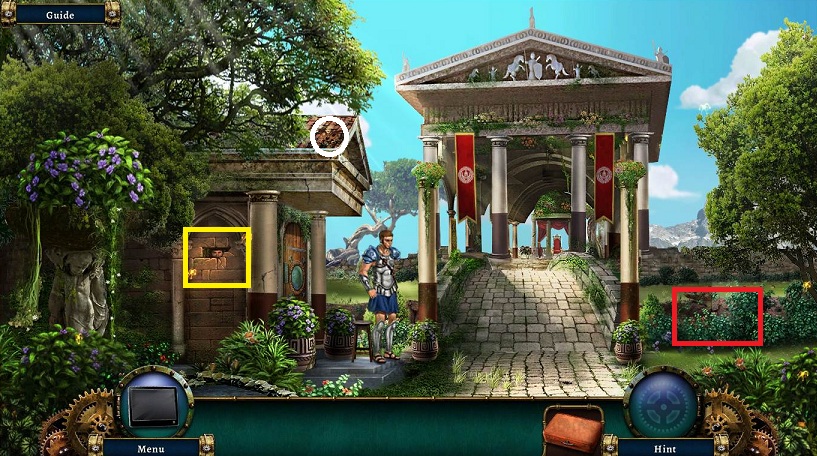
- Exit and go forward to the courtyard
- Examine the guardhouse wall
- Slide the brick
- Speak with Ian
- Pick up the note
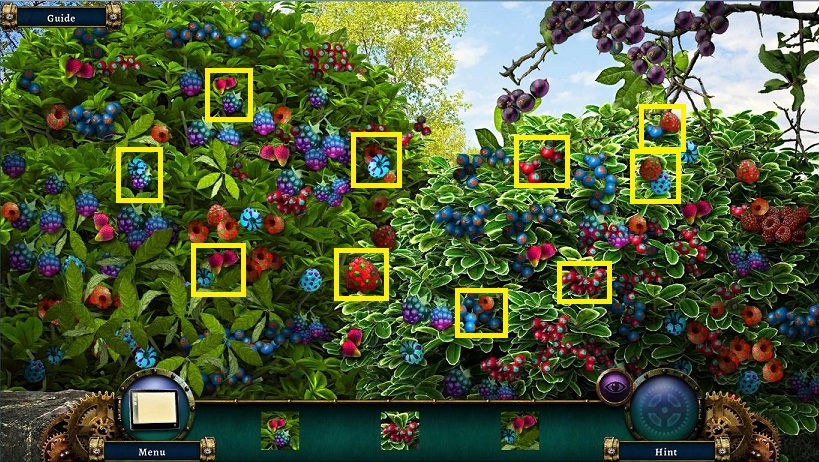
- Examine the bushes to the right
- Match the pictures of berries with the ones in the bush
- Receive BERRIES
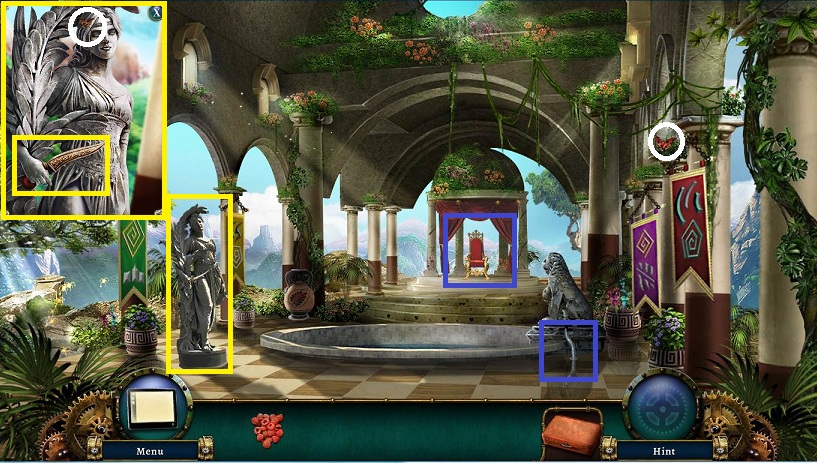
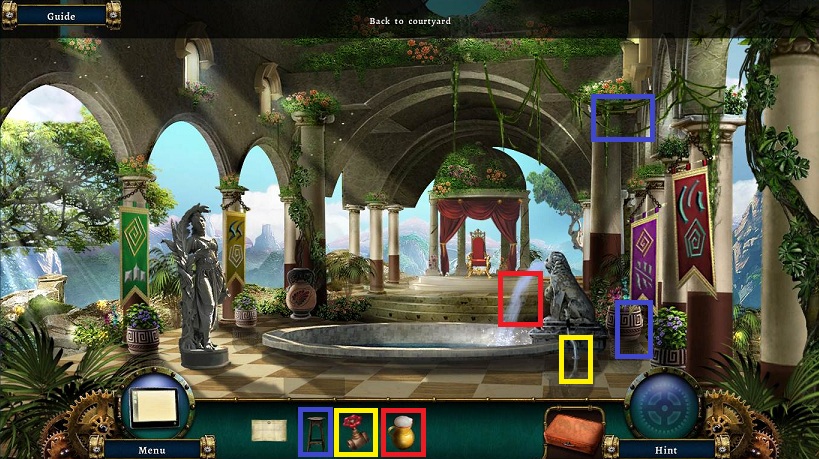
- Go forward to the throne room
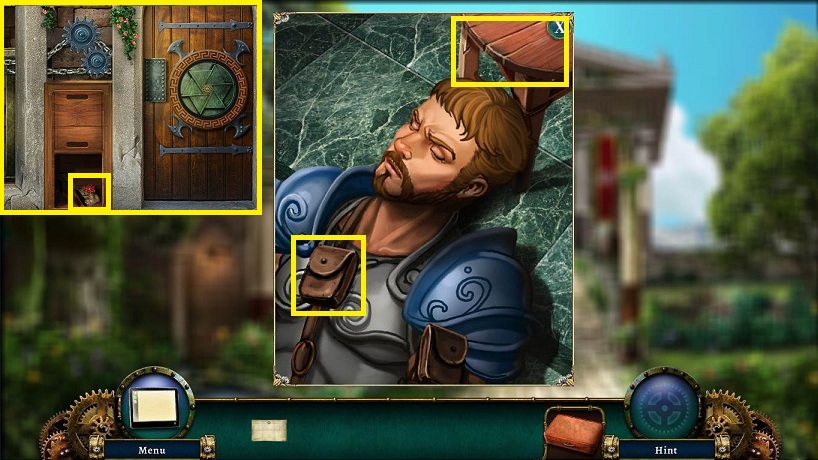
- Examine the statue
- Pick up the DAGGER and collectible
- Note the missing valve for the fountain
- Pick up collectible
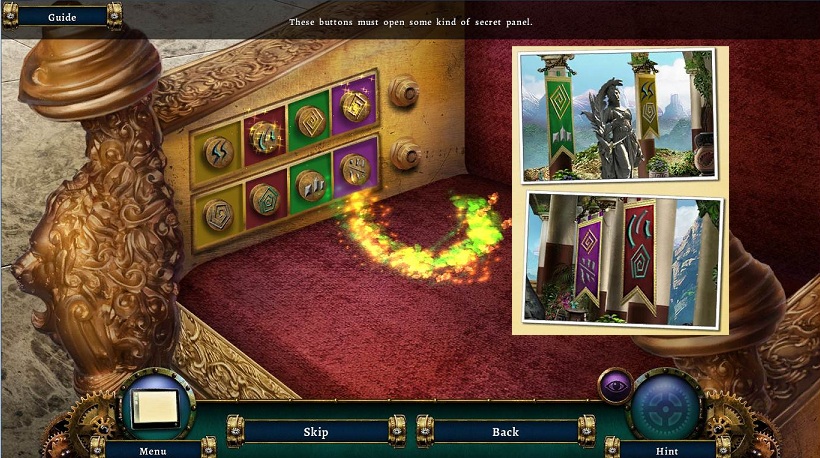
- Click buttons on the side until you get yellow, red, green and then purple squares
- Examine the flags (in your journal) and match the symbols by the flag color
- Pick up note
- Pick up BLOW DART which goes into the Botanist's Kit
- Back up 3 times to landing
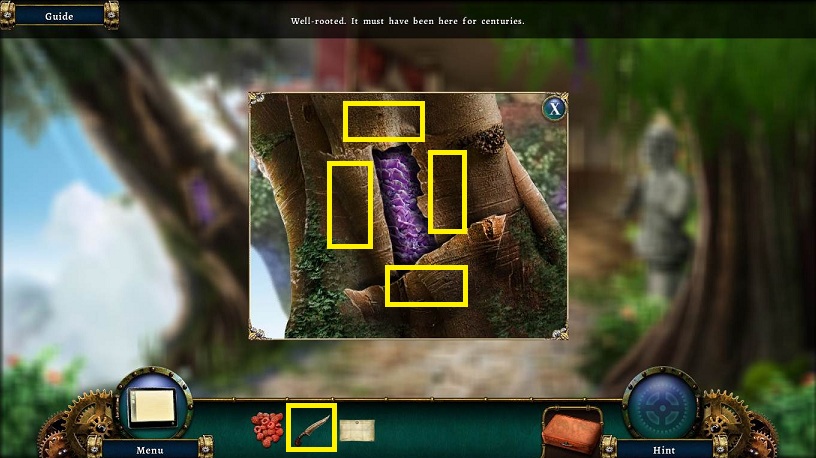
- Examine the tree
- Use the DAGGER on each edge of the bark
- Pick up the MUSHROOMS
- Return to the guard's quarters
- Examine
- Use BERRIES in the mortar and drag the pestle around until the berries are ground
- The berry powder will go into the kit
- Use the MUSHROOMS in the mortar and pestle to get mushroom powder
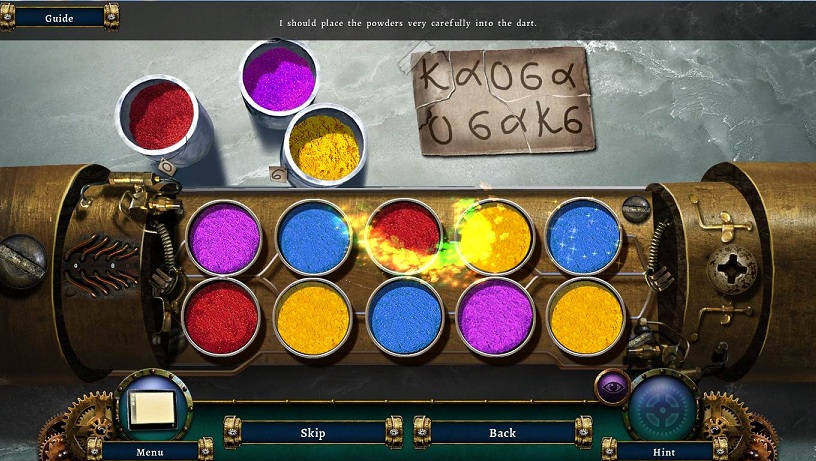
- Examine the kit
- Put the scraps of paper together
- Note the red powder has a circle tag on it
- Note the yellow powder has a 6 tag on it
- Place those two colors in the dart as listed
- Try the other two colors for the other shapes
- Receive the SLEEPING DART
- Back up twice to landing
- Examine the statue
- Place the SLEEPING DART in the dart gun
- Pick up the LOADED DART GUN
- Return to the courtyard
- Use the LOADED DART GUN on the guard
- Examine the guard
- Take the PANTRY KEY from the center pouch
- Pick up the STOOL
- Examine the door
- Pick up the VALVE
- Return to guard's quarters
- Examine the pantry to the left
- Use the PANTRY KEY
- Find the hidden items
- Receive an EMPTY JUG
- Return to the throne room
- Examine the fountain
- Place the VALVE
- Use the EMPTY JUG to get a JUG OF WATER
- Use place the STOOL to the right of the fountain
- Pick up the ROPE above and receive back the STOOL
- Back up once
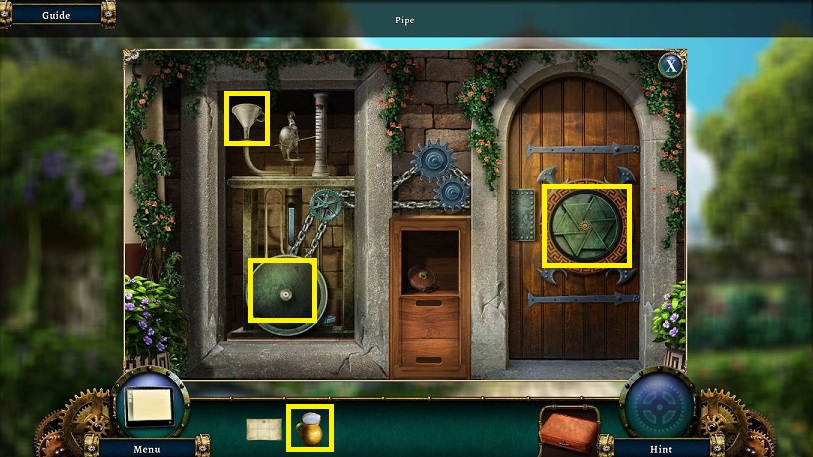
- Examine the door
- Slide the center panel down
- Drag the funnel to the top left
- Drag the center panel from the right circle to the left circle
- Use the JUG OF WATER on the funnel
- Enter Ian's cell
- Watch cut scene
- Speak with Ian
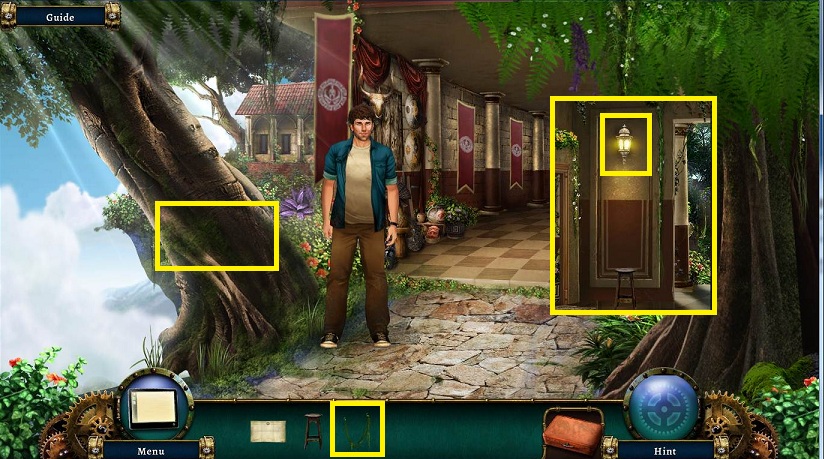
- You need ROPE (from the throne room) and LANTERN (from the lobby)
- Use the ROPE on the tree trunk
- Speak with Ian
- Watch cut scene
- Place the LANTERN on the branch to the left
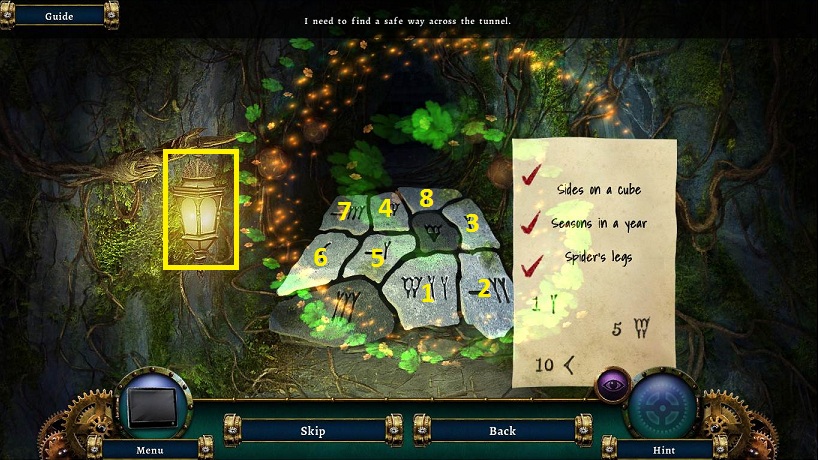
- Use the PORTAL SKETCH on the stones
- Use the sketch with the answers to the questions and the numbers in the system to add and subtract according to the stones
- 7 - 2 + 1 = 6 sides
- 5 - 1 = 4 seasons
- 10 - 3 + 1 = 8 legs
- Go forward
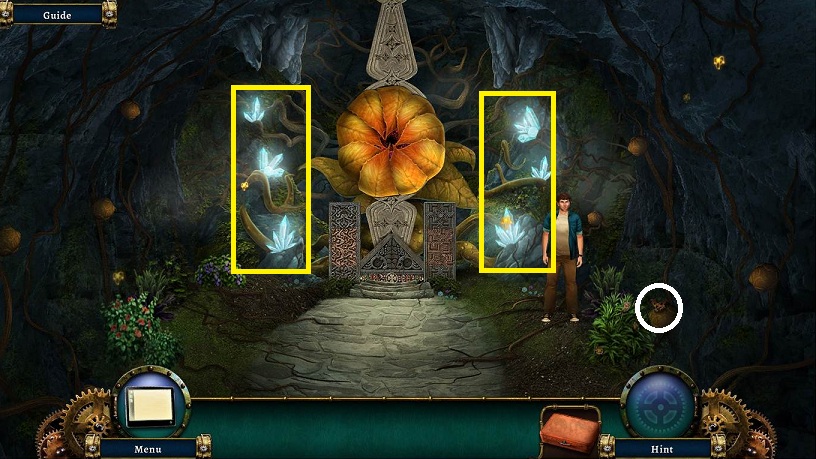
- Click on the 6 crystals to illuminate the cave
- Pick up the collectible
- Examine the pedestal of the flower
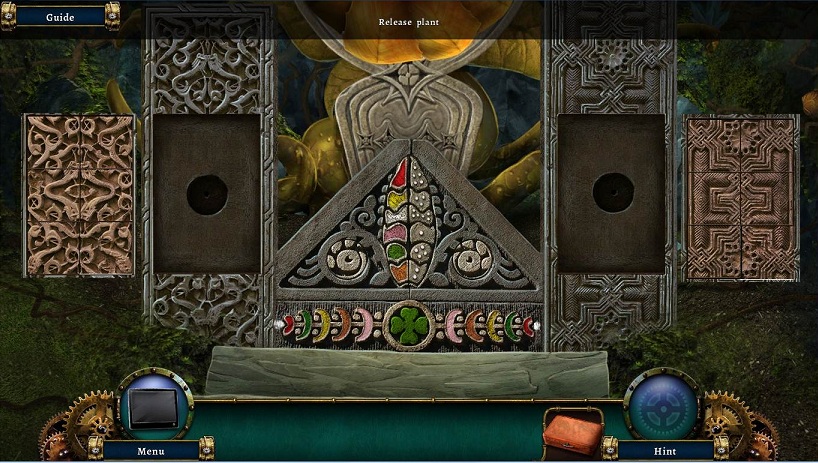
- Click on the tiles to rotate them to complete the pattern
- Place both circles onto the openings
- Rotate them to complete the pattern
- A color will be matched with a number of dots
- The white color is at the far end, so work down from there.
- Press the center flower when done to open the bloom.
- Approach the portal
- Watch the cut scene
- Speak to Kassandra and Ian
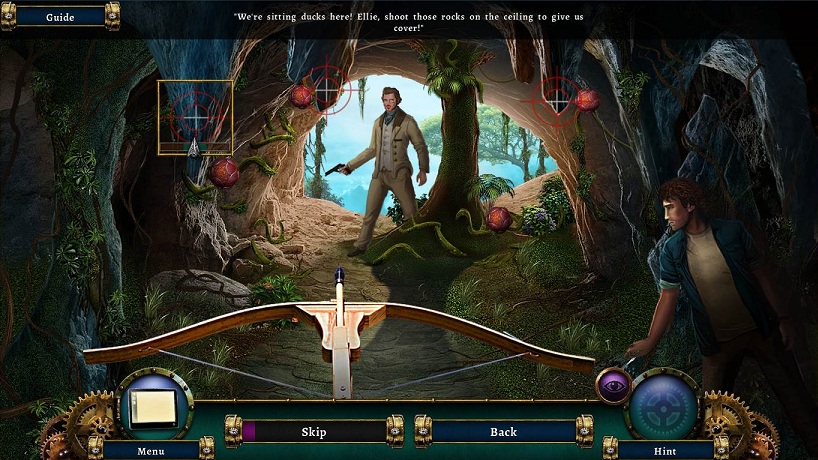
- Pick up the CROSSBOW
- You will need to shoot down 3 rocks, then 4 spores, then Gustav's hand.
- Center the crosshairs in the box.
- Click when the indicator is in the green zone; this will slow down as you wait.
- Finish the game!
Comments will load when you reach this part of the walkthrough.