
GREAT DESERT (interlude)
- No building on this level.
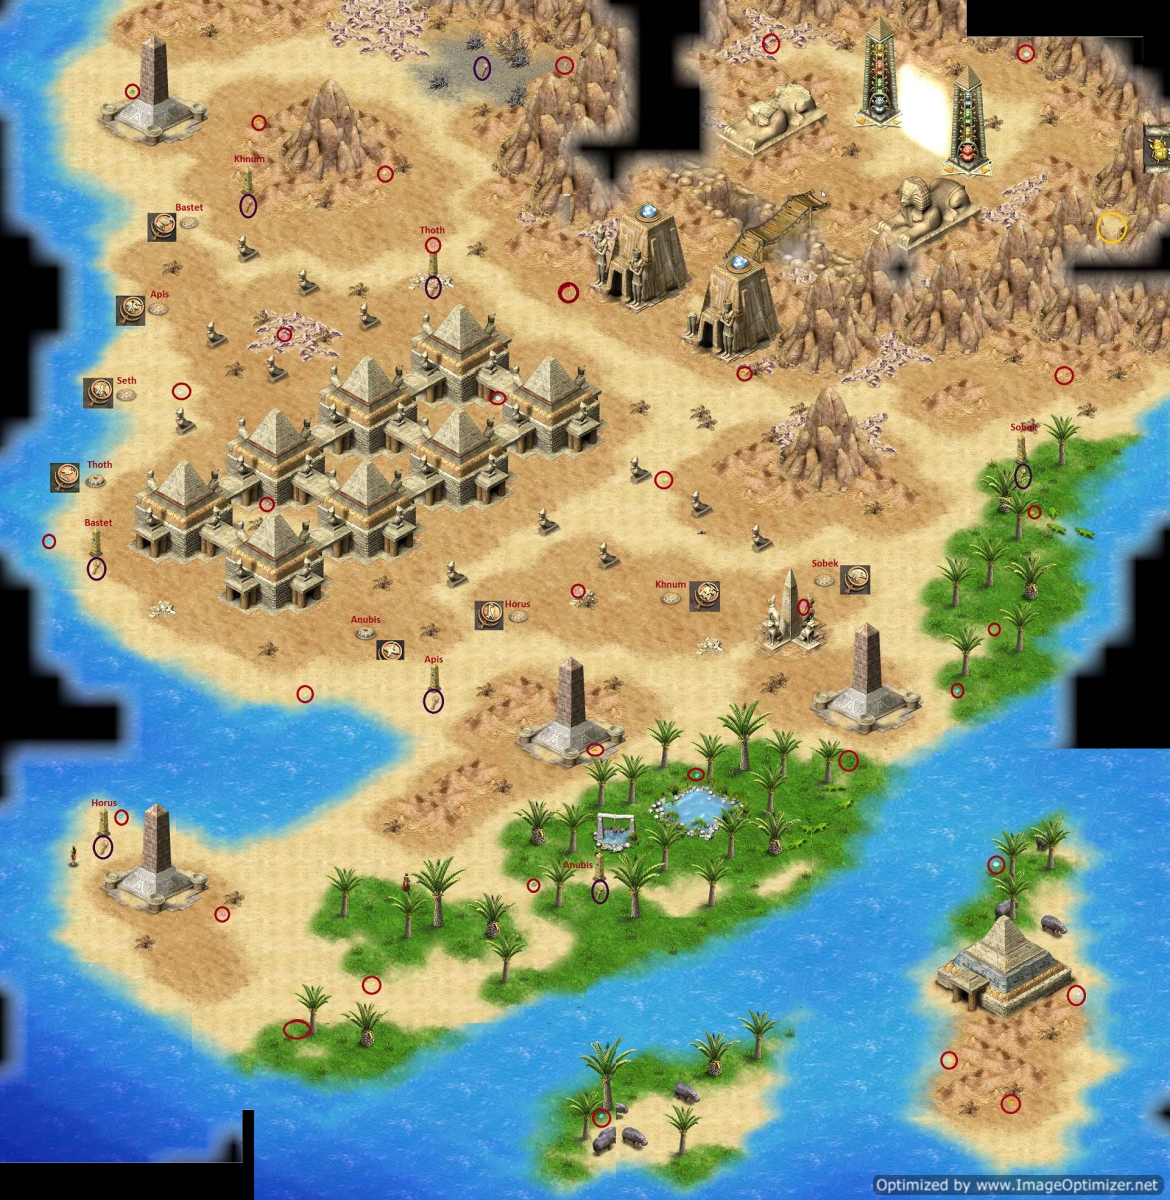
- Explore the Desert. Send Scouts in one direction and the army in the other.
- Click on all 7 obelisks and 7 staffs will appear.
- Use your army to open the Skull Chest to get the 8th staff.
- Use the clues on the obelisks to place the staffs in the proper holes. The staffs don't have names attached to them but you can guess by the images on the staffs (or just look at the map!)
- If you place the staff in the wrong hole, the staffs will be dispersed randomly around the desert.
- To get more holes to show, you need to solve the light puzzle as you go. The lights from the staff need to go up to the top of the building. Needless to say these become more complex the further out they go. You need to click on the small statues in between to move the light balls. Move the lowest light ball next to the staff first and then work your way up to the largest.
- Solving the puzzle causes the gate to open.
- Pick up the scarab.
- Explore behind the gate.
- Note the scarab puzzle; you need a total of 8 scarabs, which are available on Red Rock Island, Great Desert, Oasis, Abandoned City, Skull Island, Mist Island, Volcano Island, and Beetle Island.
- Explore the mountains just east of the eastern sphinx to find the yellow gem of power (yellow circle)
- You will need to return multiple times to this level. The walkthrough is written so that you return only twice; once to solve the scarab puzzle, and another to use the rosary to get an amulet piece and to find gems once you have scuba gear.
- First return to The Great Desert
- Place the Scarabs in the puzzle in the north between the 2 sphinxes.
- Each Scarab becomes a different color.
- The left arrow for each device swaps the bottom two scarabs.
- The right arrows moves each scarab up.
- You need to match the colors on the scarabs to the colors on the buildings; the only problem is that the color closest to the coast will be at the top. Yellow, red, green, blue for the left and blue, green, yellow, red for the right.
- Once solved, a new area will open up, Gazing Canyon
- Second Return to The Great Desert
- Find the 4 obelisks that have 3 cups on them. Their location approximately matches the location on the rosary you now have.
- You want to copy the bead pattern on the rosary onto the obelisk cups using the black and white oils.
- When you do this properly for all 4 obelisks, your view will be switched to a temple, which will light up.
- Click on the Temple and you will receive an amulet piece.
- Swim to get the gems from the 2 islands in the southeast to finish up.
Comments will load when you reach this part of the walkthrough.