
ABANDONED CITY (interlude0
- You will be attacked quickly, so build a Barracks first, then 2 Towers (to the northwest and northeast), and then a Workshop and Archery Range.
- Upgrade the 2 Towers to Arrow Towers.
- Build everything.
- If you have waited to play this level, you will have more to build and more strength. If you are not waiting, be sure to build an extra Archery Range. The map is my first time through the level as soon as it became available. The second time, I used 8 Shaman Tents and the Hall of Mysteries in addition to Barracks and an Archery Range.
- You'll be able to see where the enemies come from so build a couple more Arrow Towers. I built one between the first two Towers and the second time I needed one further up the east coast to protect my buildings.
- Once you have your army built, explore with the army.
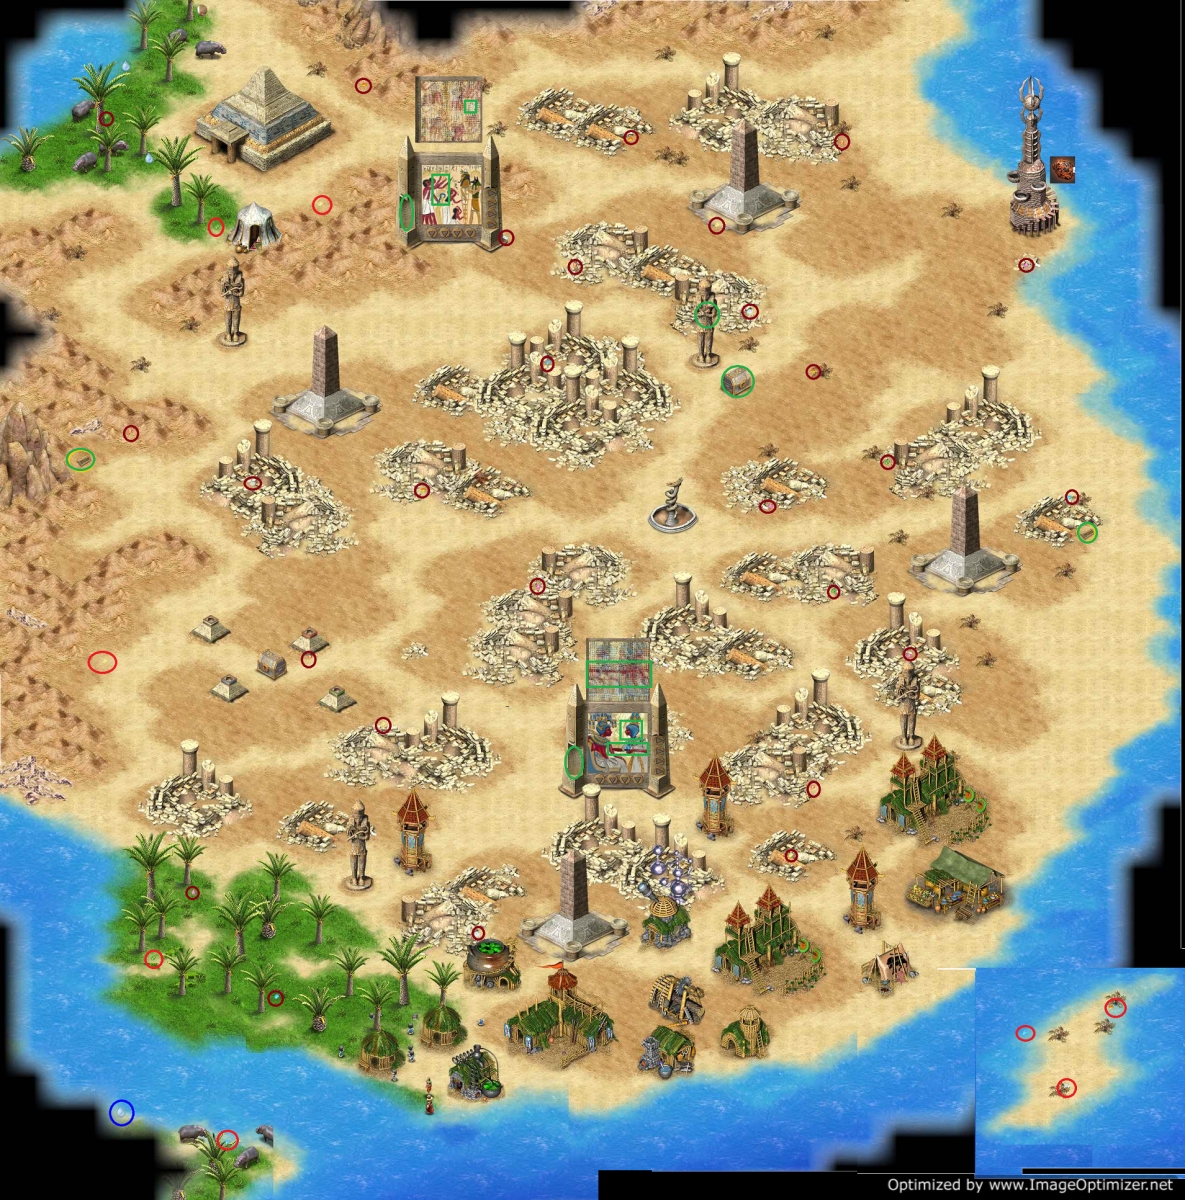
- Pick up the items your enemies drop when they die as you go. You will be picking up 10 Hearts of Stones, 10 Demon Wings, 9 Lava Stones, and 23 Water Drops.
- A Nomad in a tent in the north will take the stones and wings for a Glyph of Air and Glyph of Earth.
- The Lighthouse on the northeast coast needs 9 Lava Stones; you will receive a Glyph of Fire.
- There is a fountain in the center that needs the water drops. However, you need one more to make 24. There is a drop on the island in the southwest. You should be able to see the island, but if you can't see the water drop then build a tower.
- Deliver 24 water to the fountain and you will receive a Glyph of Water.
- On your exploration you will discover a locked chest surround by 4 pillars; place the glyphs to match the colors.
- You will receive the Scarab.
- There are also 2 wood chests that contain name plates (see green circles). Those go on the big screens with triangle buttons on it.
- This screen puzzle is difficult to solve. There are two and I would suggest doing the southern one first.
- Basically you have 4 semi-transparent images that need to match up to make a solid picture.
- Each image has its own horizontal and vertical arrow.
- The first goal is to get the 4 images lined up and then you need to get the final image framed properly.
- The map has the final image shown plus a few spots that are easier to use to line up.
- Unfortunately you can't really tell which button to use so if you move the wrong one, you'll need to move them all.
- On the first one, I found the horizontal red line the easiest to line up using the down arrows. You can actually see the line move down as you press the button.
- Once those are all lined up, use the right arrows to line up a head. Again, you can actually see the head that is not lined up moving as you press the button.
- If you go out of focus, then press the other buttons once to match up and try to remember which ones were the ones that were already lined up.
- Once you have a solid image, you need to press each down button once and then again until the image is correct on the bottom and then repeat for the right.
- The second picture is a bit harder to do and I used the blue crook and the arms above. Good luck, and be patient!
- See the map; the final image is in the screen and the image in progress is above to see what I'm talking about.
- The devices will give you a Crook and a Flail. The statue behind the last locked chest needs those. Receive the last Gem of Power.
- You will need to return later with scuba gear for gems and the rosaries for an amulet piece
- Obtain the amulet piece in the same fashion as the Great Desert.
- Swim to an island in the southeast for gems.
Return to Tetala Island
- Place the Gems of Power on the columns surrounding the chest.
- Click on the chest and pick up a Magnifying Glass piece.
Comments will load when you reach this part of the walkthrough.