
Chapter 2: Staff

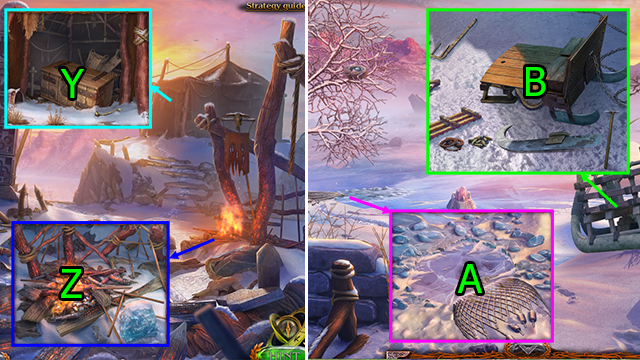
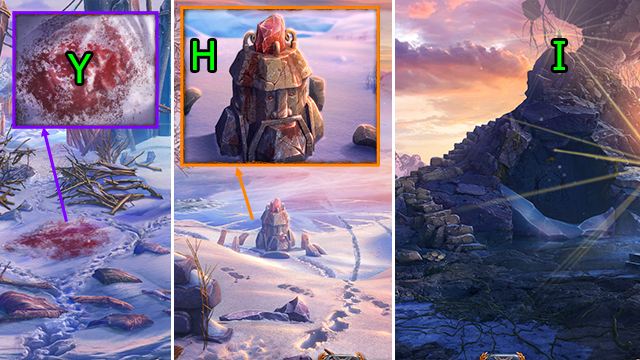
- Get HILAMIR’S PENDANT (Y).
- Go Drak Square.
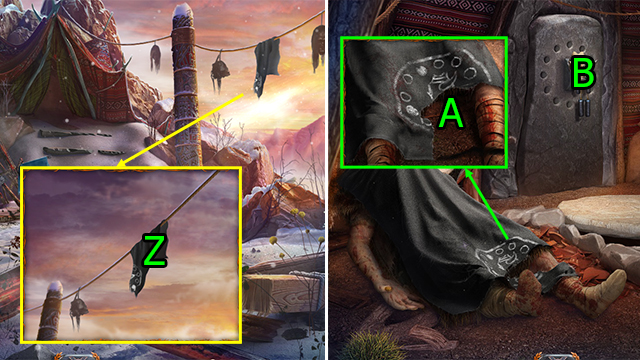
- Use HILAMIR’S PENDANT on (Z).
- Go (A).
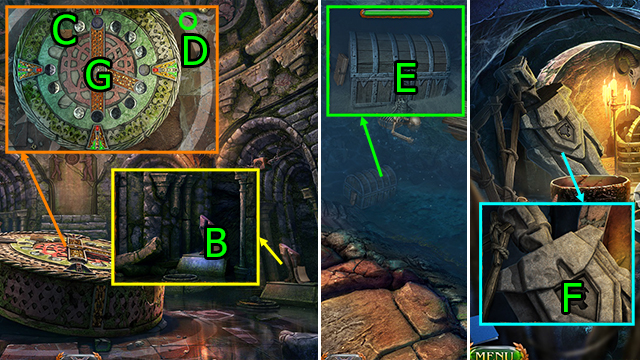
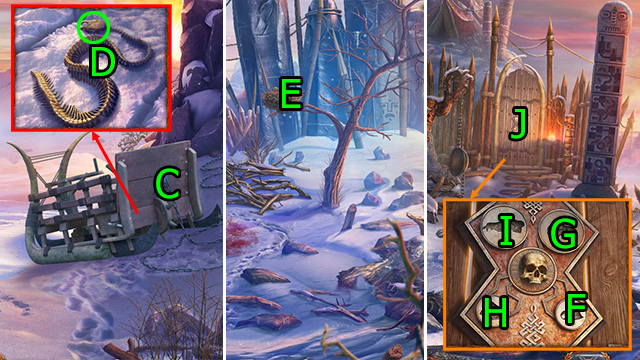
- Press (Bx3); use HILAMIR’S PENDANT on (C).
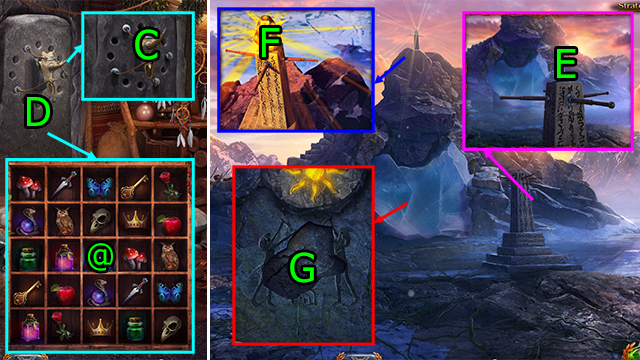
- Press (D).
- Go (E).
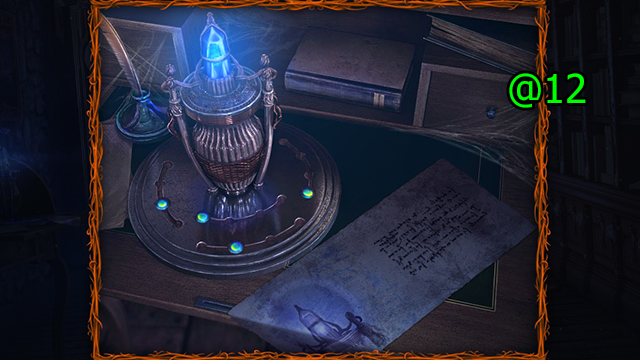
- Solution (@12).
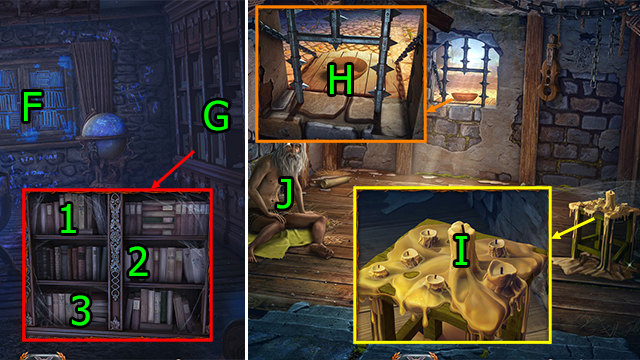
- Go (F).
- Press (1-2-3).
- Go (G).
- Press (Hx2).
- Use KNIFE on (I); get CANDLE.
- Use CANDLE on (J); get BURNING CANDLE.
- Use BURNING CANDLE on (H); get BOWL.
- Go Drak Square.
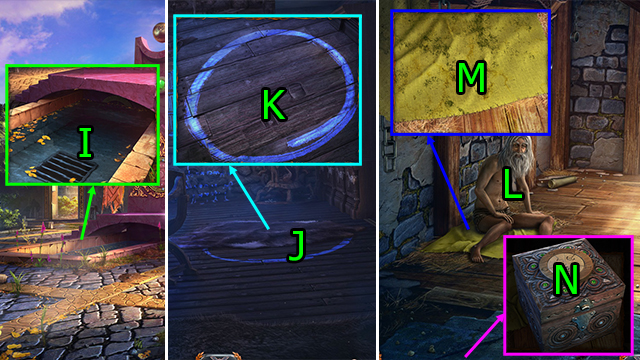
- Use BOWL on (I); get BOWL OF WATER.
- Go Hilamir’s House.
- Press (J).
- Use KNIFE on (K); press (Kx2), get HILAMIR’S CASKET and AXE.
- Go Hidden Room.
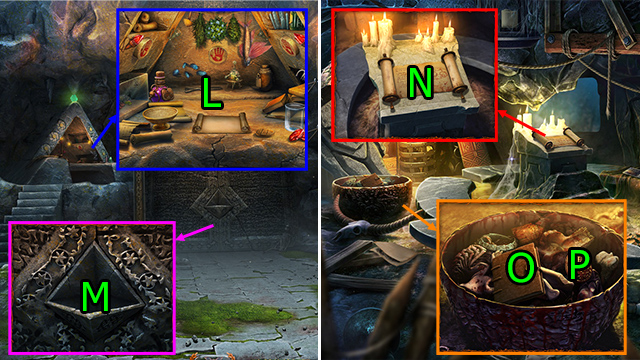
- Use BOWL OF WATER on (L).
- Press (Mx2).
- Use HILAMIR’S CASKET; press (N).
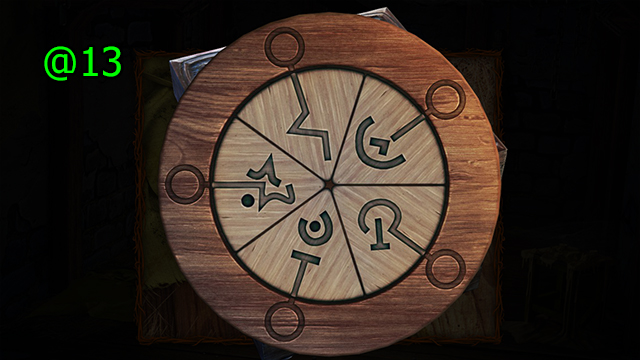
- Solution (@13).
- Get ROUND TILE and DIARY OF HILAMIR.
- Go Hilamir’s House.
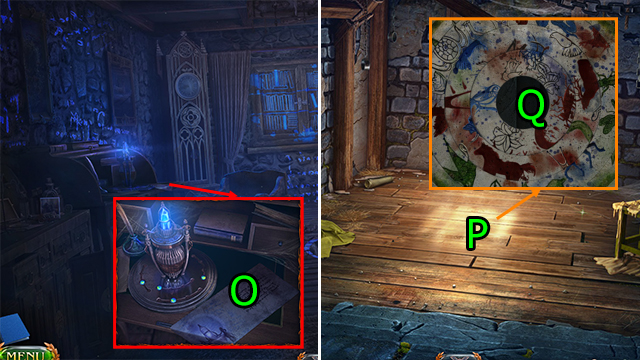
- Use DIARY OF HILAMIR and press (Ox2).
- Go Hidden Room.
- Use AXE on (P).
- Use ROUND TILE on (Q).
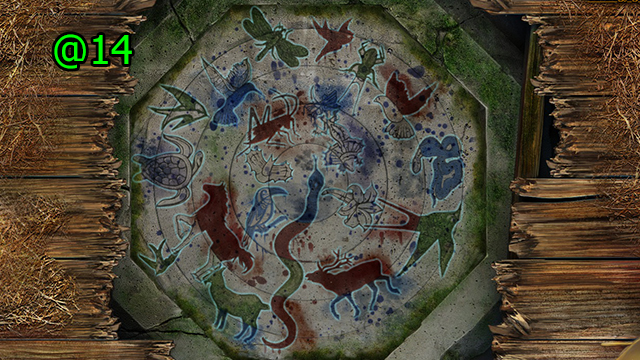
- Solution (@14).
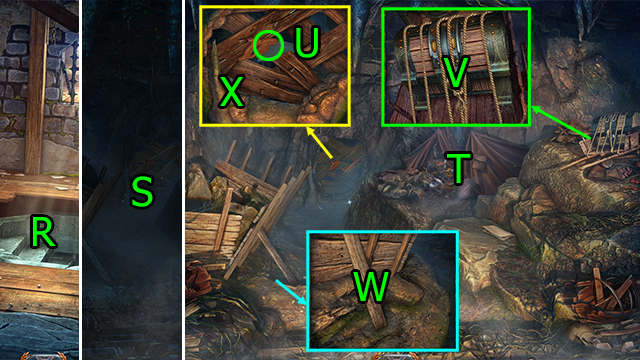
- Go (R).
- Use FLASHLIGHT on (S).
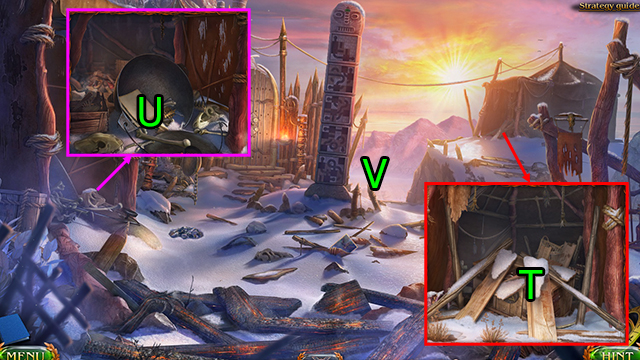
- Solve HOP (T); get MECHANICAL PALM.
- Get SAW (U).
- Use KNIFE on (V); get ROPE.
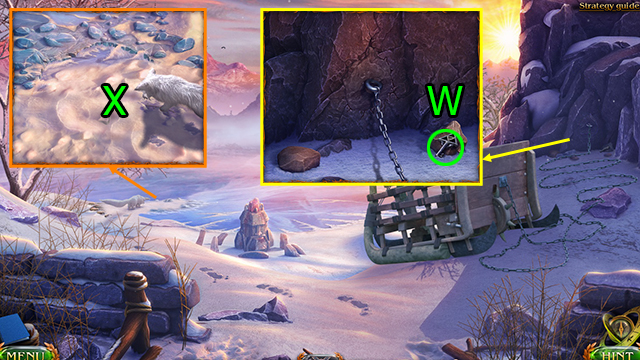
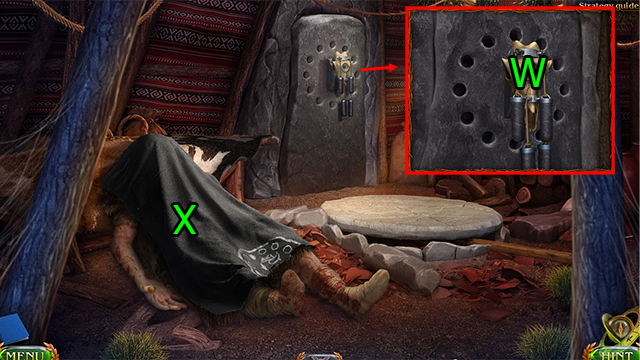
- Use SAW on (W); get METEOR STONE.
- Use ROPE and press (X).
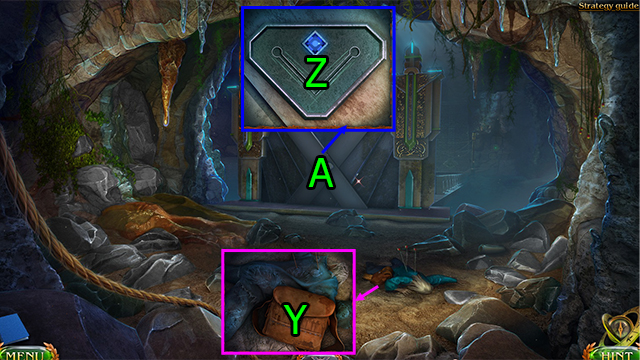
- Press (Yx3); get MECHANICAL PALM.
- Use MECHANICAL PALM and MECHANICAL PALM on (Z).
- Go (A).
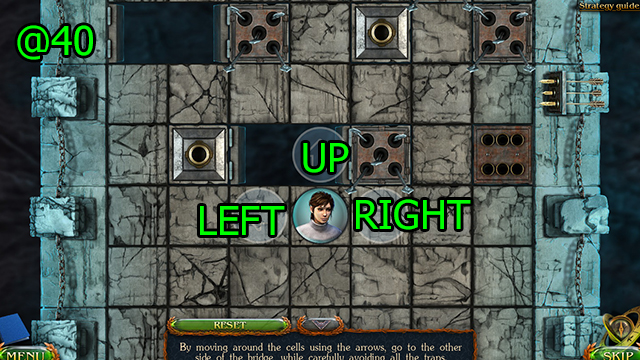
- Solution (@40): Go (UPx3)-(UPx2)-(RIGHTx3-UPx3)-(UP-LEFTx2)-(LEFTx4-UP)-(UPx3)-(RIGHT-UP)-(UPx3)-(UPx2)-(UPx2)-(RIGHTx3)-(UPx2-LEFT)-(UPx2)-(LEFT-UPx2)-(UPx2).
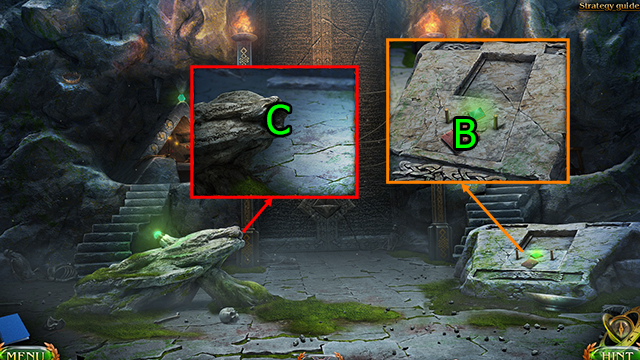
- Press (Bx4).
- Use METEOR STONE on (C).
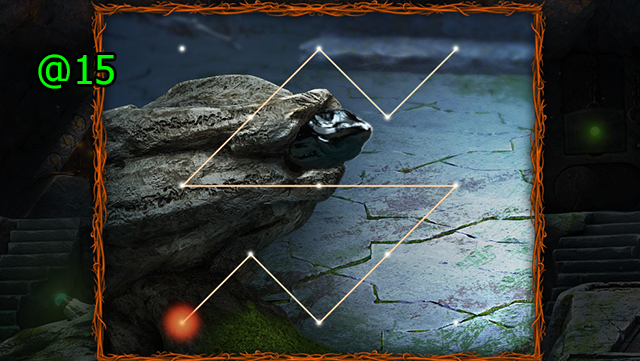
- Solution (@15).
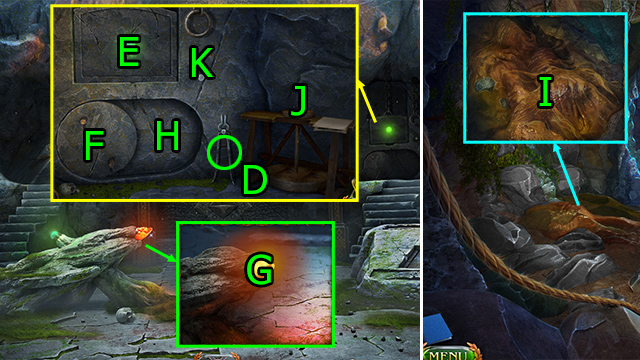
- Get BLACKSMITH TONGS (D).
- Press (E-F); get BLADE.
- Use BLACKSMITH TONGS on (G); get FIRE SHARD.
- Use FIRE SHARD on (F); get BLACKSMITH TONGS.
- Press (H).
- Go Bridge.
- Use BLADE on (I); get NATURAL CLAY.
- Go Temple Door.
- Use NATURAL CLAY on (J); press (J-E)-(K).
- Use BLACKSMITH TONGS on (E); get BAKED BOWL.
- Use BAKED BOWL on (L); solve HOP, get POTION OF EQUALITY OF FORCES.
- Use POTION OF EQUALITY OF FORCES on (M).
- Press (Nx2); get MOON TILE.
- Press (Ox2).
- Press (P).
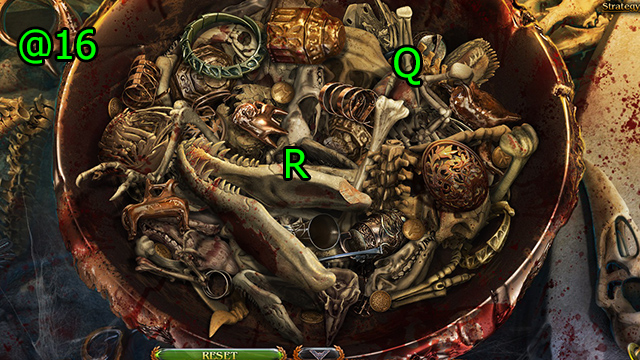
- Solution (@16): Drag (Q-R) until tile is uncovered.
- Get MOON TILE.
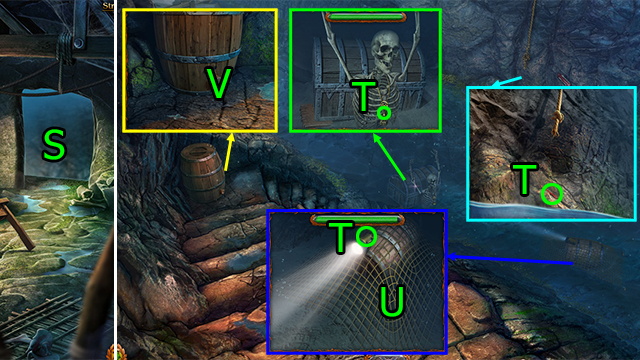
- Go (S).
- Get DAMAGED MULTITOOL, KEY, and FLASHLIGHT (T).
- Use DAMAGED MULTITOOL on (U); get GREEN BARREL.
- Use DAMAGED MULTITOOL on (V); get BLUE BARREL.
- Go Hideaway of Ulakian.
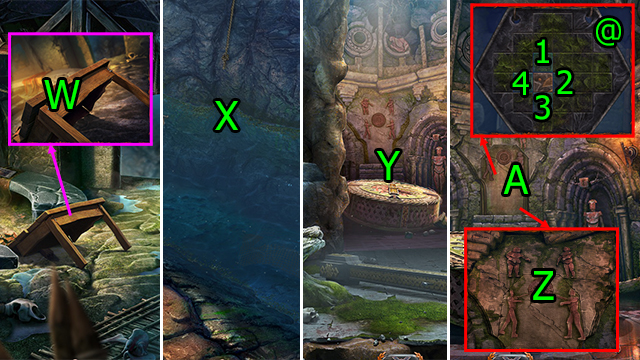
- Use DAMAGED MULTITOOL on (W); get TABLE COVER.
- BLUE BARREL and GREEN BARREL on TABLE COVER; get RAFT.
- Go The Bottom of the Gorge.
- Use RAFT on (X).
- Go (X).
- Go (Y).
- Press (Z).
- Solve HOP (A). HOP Solution (@): Press (1-2-3×3)-(4-1-4-1-4-1)-(2-1-2-1-2)-(3-2-3-2-3-4-3).
- Get MOON TILE.
- Press (Bx2); get SEAL OF UL.
- Press (Cx2).
- Get KEY (D).
- Go The Bottom of the Gorge.
- Use KEY and press (E); get MOON TILE.
- Go Hideaway of Ulakian.
- Use SEAL OF UL on (F); get MOON TILE.
- Go Temple of the Universe.
- Use MOON TILE, MOON TILE, MOON TILE, MOON TILE, and MOON TILE on (G).
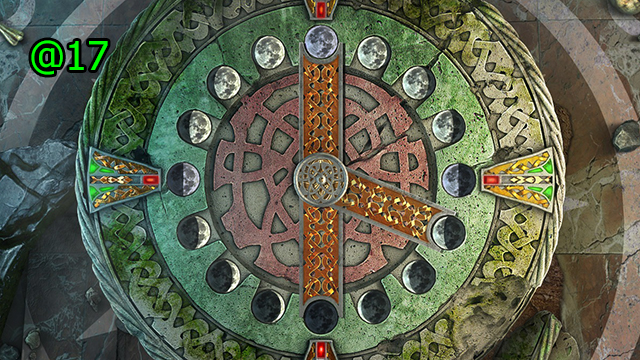
- Solution (@17).
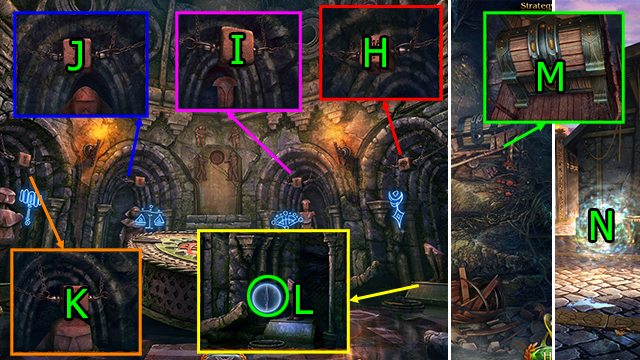
- Press (Hx2), press (Ix2), press (J), press (Kx3).
- Get THE SPEARHEAD (L).
- Go Secret Descent.
- Use KEY and press (Mx3) get THE TOPPER.
- Go Drak Square.
- Go (N).
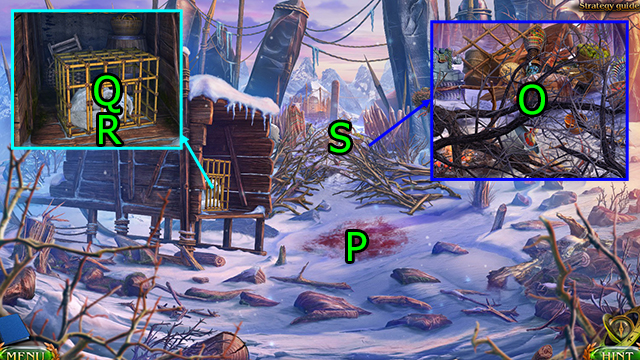
- Press (O); solve HOP, get PIECE OF CLOTH.
- Go (P).
- Press (Qx3); use COOKIES on (R), get HORN.
- Go (S).
- Press (T).
- Press (Ux3); get WOLF SKULL.
- Go (V).
- Get KEY (W).
- Press (X).
- Go Settlement of Giants.
- Use KEY and press (Yx2); get DRAWING OF SLEDGES and SCOOP.
- Use SCOOP on (Z); get THE SCOOP WITH EMBERS.
- Go Mountain Lake.
- Use THE SCOOP WITH EMBERS on (A); get FISH SKULL.
- Use DRAWING OF SLEDGES on (B).
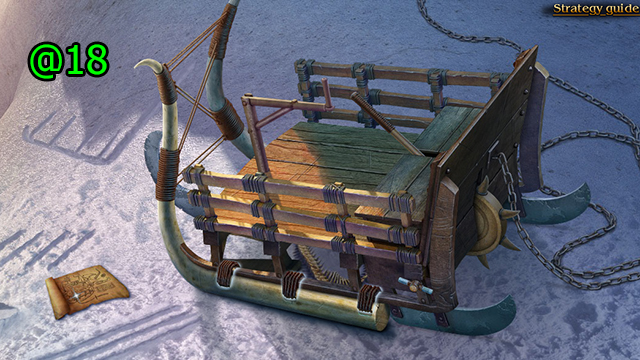
- Solution (@18).
- Press (C).
- Get THE SKULL OF SNAKE (D).
- Go The Trail of the Giant.
- Go (E); get EAGLE SKULL.
- Go Settlement of Giants.
- Use THE SKULL OF SNAKE on (F), use EAGLE SKULL on (G), use FISH SKULL on (H), use WOLF SKULL on (I).
- Go (J).
- Get BOARD WITH NAILS (K).
- Go (L).
- Press (Mx2).
- Go Settlement of Giants.
- Use BOARD WITH NAILS on (N); drag (O-N), get GIANT’S NAILS.
- Go Mountain Lake.
- Use GIANT’S NAILS on (P); drag (Q-P)-(R-P).
- Press (S).
- Go (T).
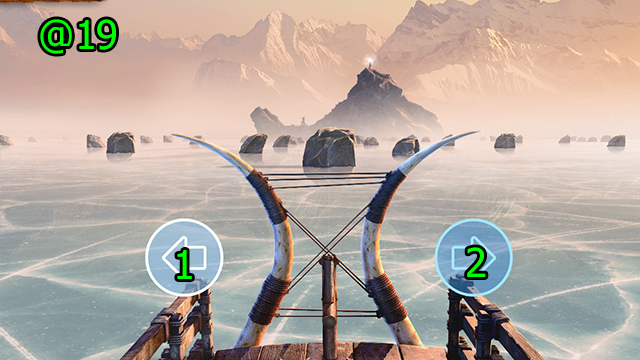
- Solution (@19): Press (2-1-2-1-2-1-2-1-2-1-2-1-2-1-1).

- Press (Ux4); get PIECE OF BARK.
- Go Sacred Hill.
- Go (V).
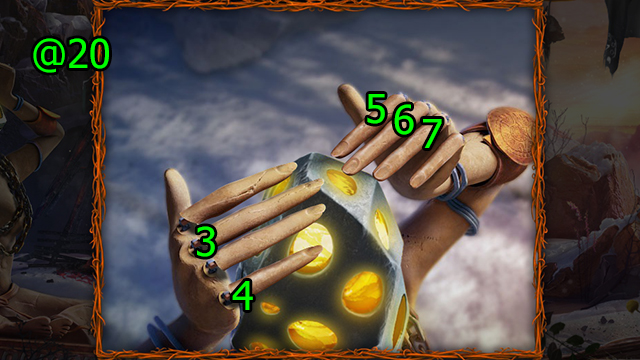
- Solution (@20): Press (3-4-5-6-7).
- Get SHARD OF THE SUN.
- Go Shaman’s Tent.
- Use HORN on (W).
- Press (X); get THE BROKEN JAR and LONG STICK.
- Go Sacred Hill.
- Use LONG STICK on (Z); get PIECE OF CLOTH.
- Go Shaman’s Tent.
- Use PIECE OF CLOTH and PIECE OF CLOTH on (A).
- Go (B).
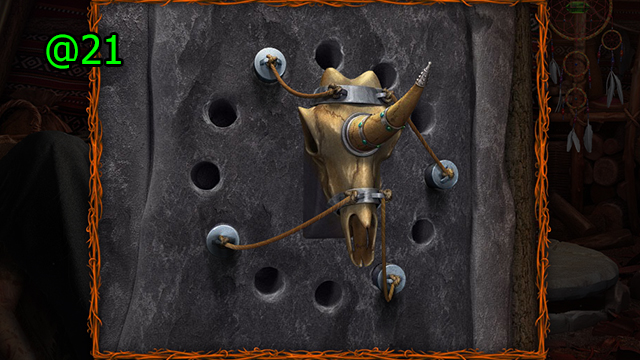
- Solution (@21).
- Press (C).
- Solve HOP (D). HOP Solution (@).
- Get TABLET OF KNOWLEDGE.
- Go Dragon’s Tooth Rock.
- Use SHARD OF THE SUN on (E).
- Press (Fx2).
- Press (E).
- Use TABLET OF KNOWLEDGE on (G).
- Get PIECE OF BARK.
- Go The Trail of the Giant.
- Use THE BROKEN JAR on (Y); get GIANT’S BLOOD and STONE KNIFE.
- Go Mountain Lake.
- Use GIANT’S BLOOD on (H).
- Go Dragon’s Tooth Rock.
- Go (I).
Comments will load when you reach this part of the walkthrough.