Chapter 2: Cloud Court
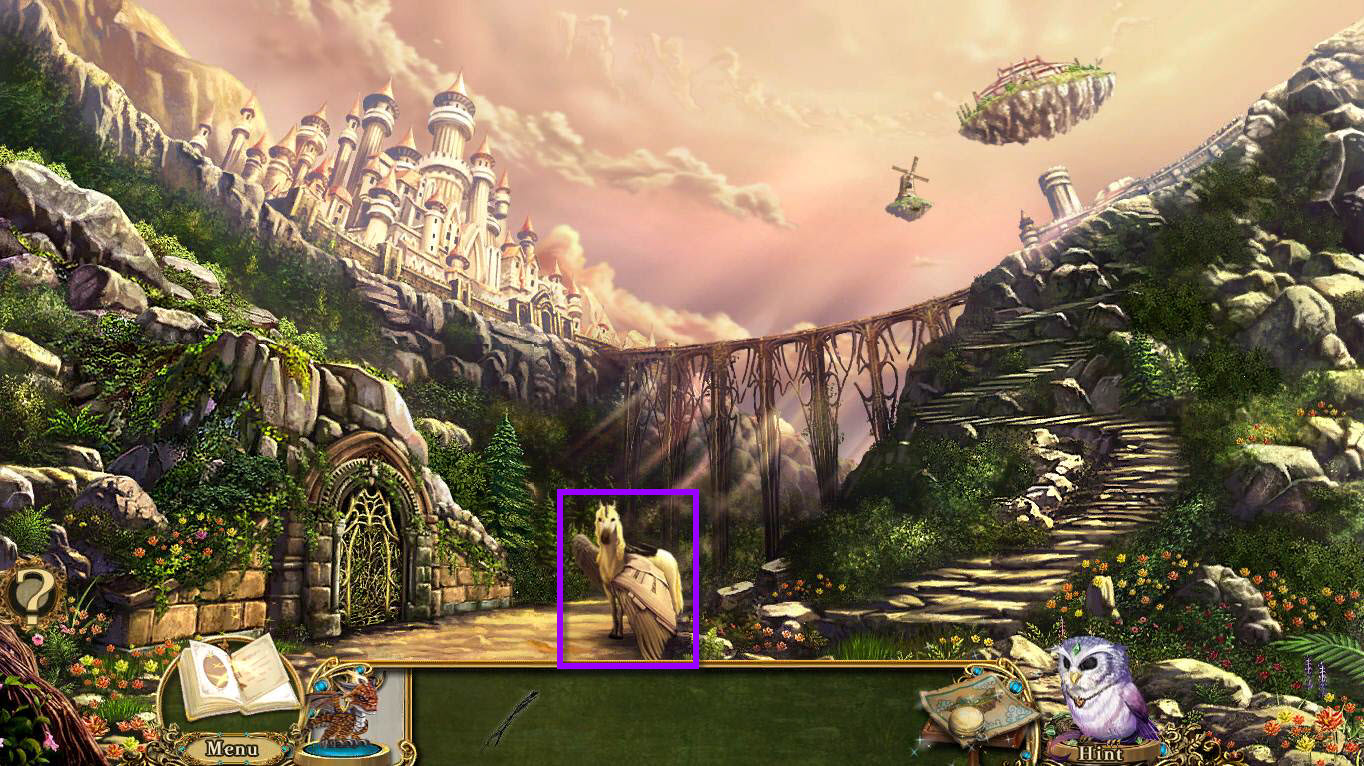
- Click on the unicorn. You'll discover that you still need something else to heal him.
- Move up the path on the right toward the barracks entrance.
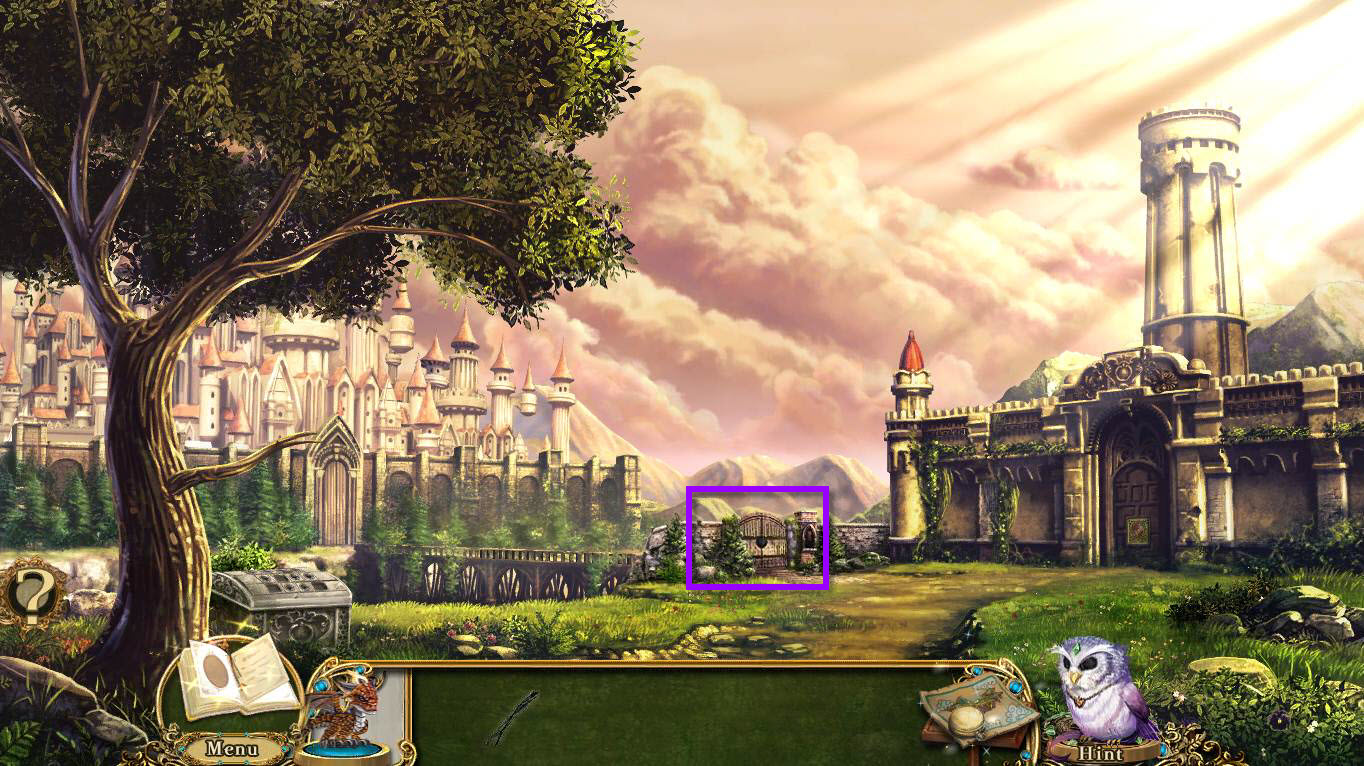
- Take note of the stone chest and the barracks gate.
- You can't do anything with them yet though so move toward the Castle Bridge.
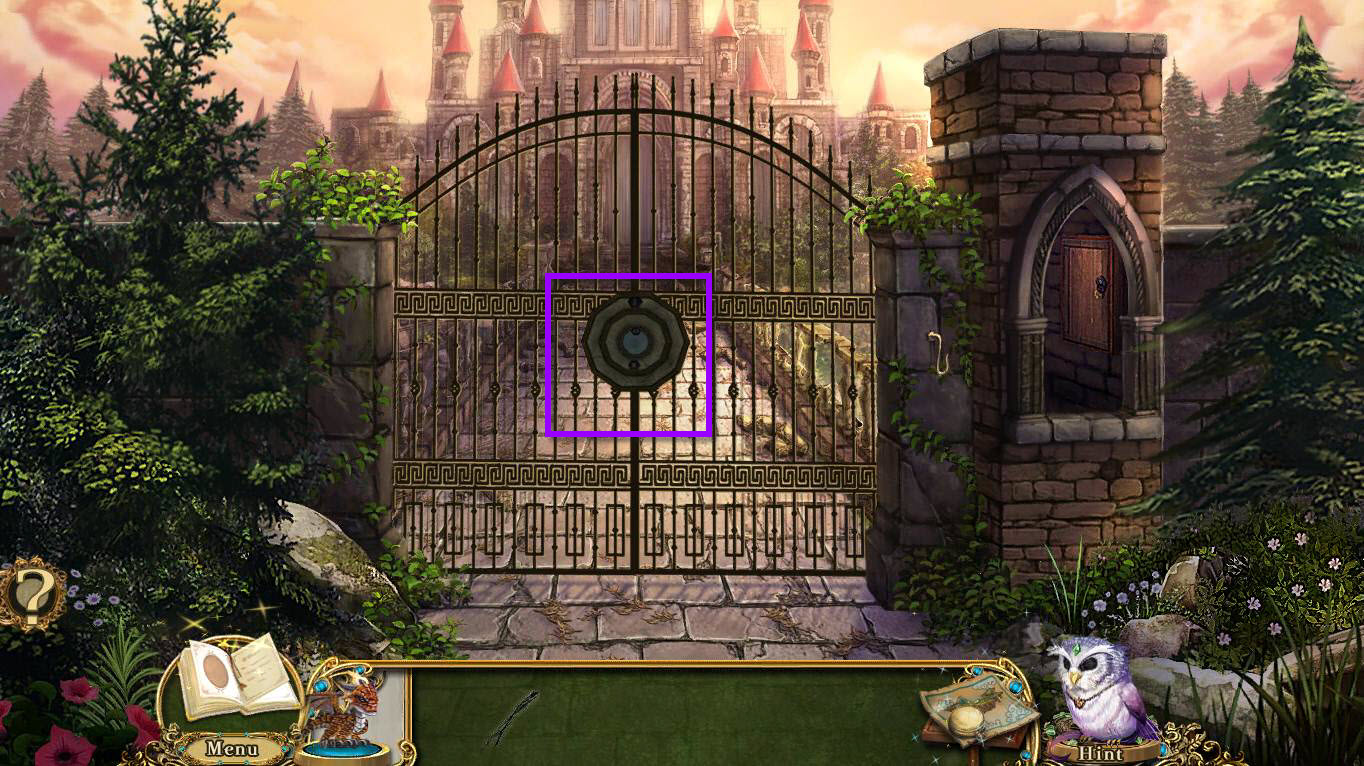
- Click on the gate to start a mini-game.
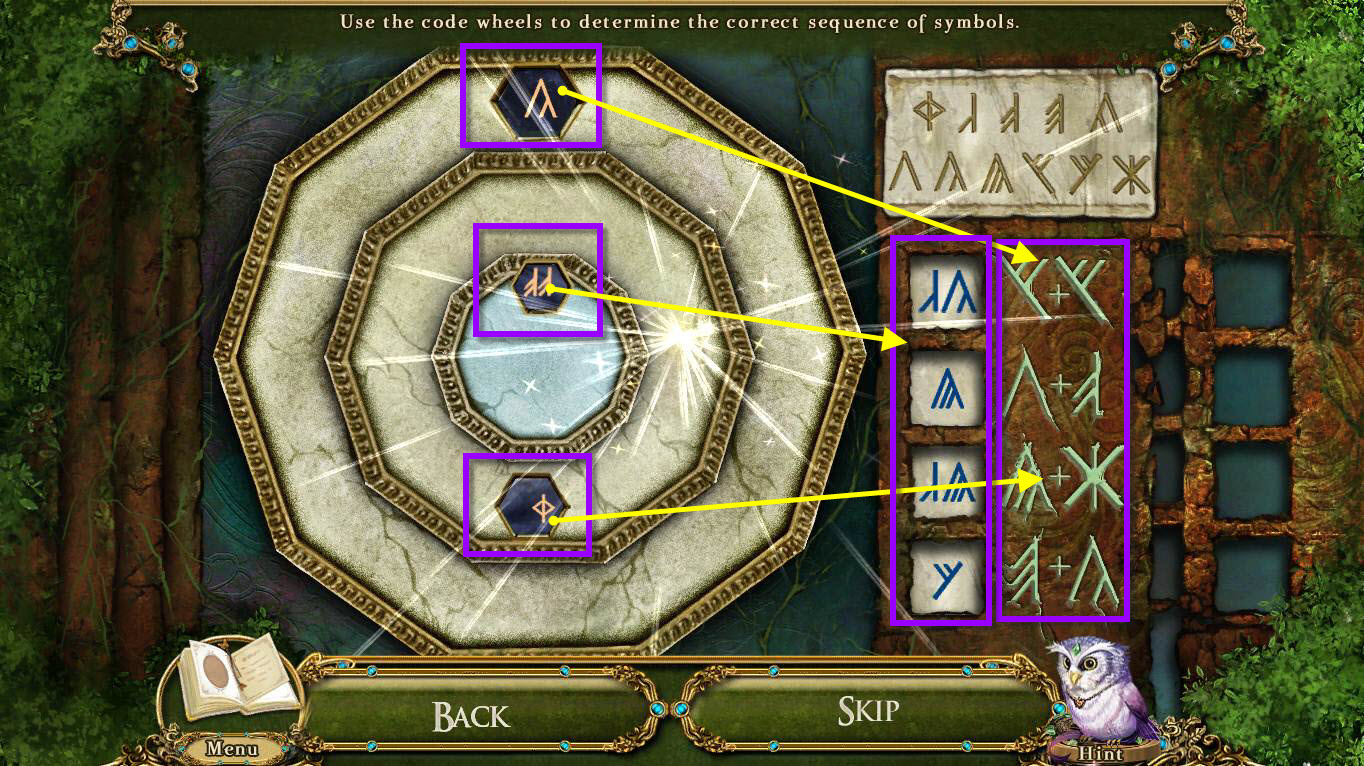
- The goal of the puzzle is to put the correct code on the right where the symbols are.
- You need to turn the wheels on front of you to get the right combination.
- Turn the outer wheel first until you have a pair that patches the pairs on the right.
- Then on the right, turn the white area next to the pairs to match the symbol in the center.
- You need to do this for all 4 sets of symbols.
- See the screenshot above for the solution.
- Once completed, walk forward.
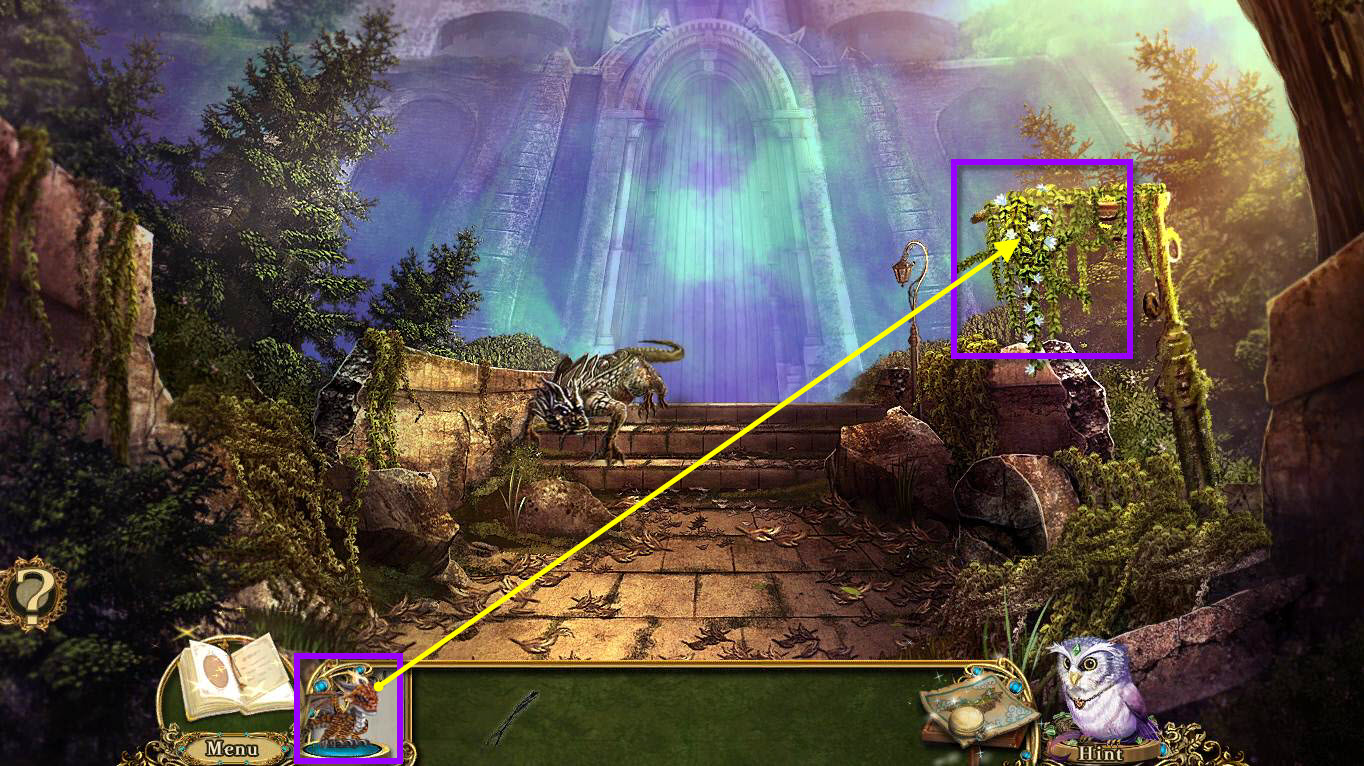
- Try to walk forward into the castle.
- You will be stopped by the dreadmyre and he will leave a basilisk in your path.
- Use your Pocket Dragon on the dead vines on the right to burn them.
- Take the OLD KEY.
- Go back one screen.
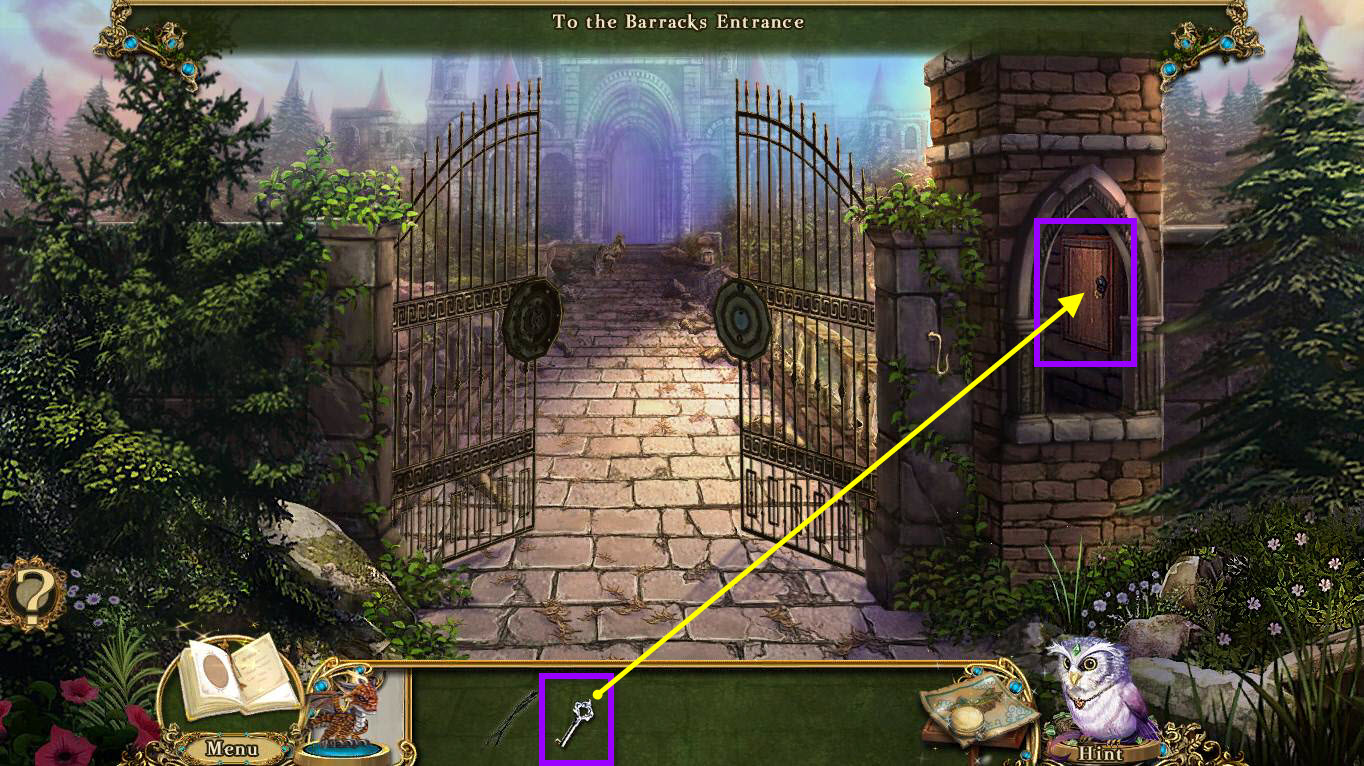
- Click on the cabinet on the right in the gatehouse to zoom in on it.
- Use the OLD KEY on it to unlock it.
- Click again to open the cabinet.
- Take the OAK RING.
- Use your map to fast travel to the Castle Landing.
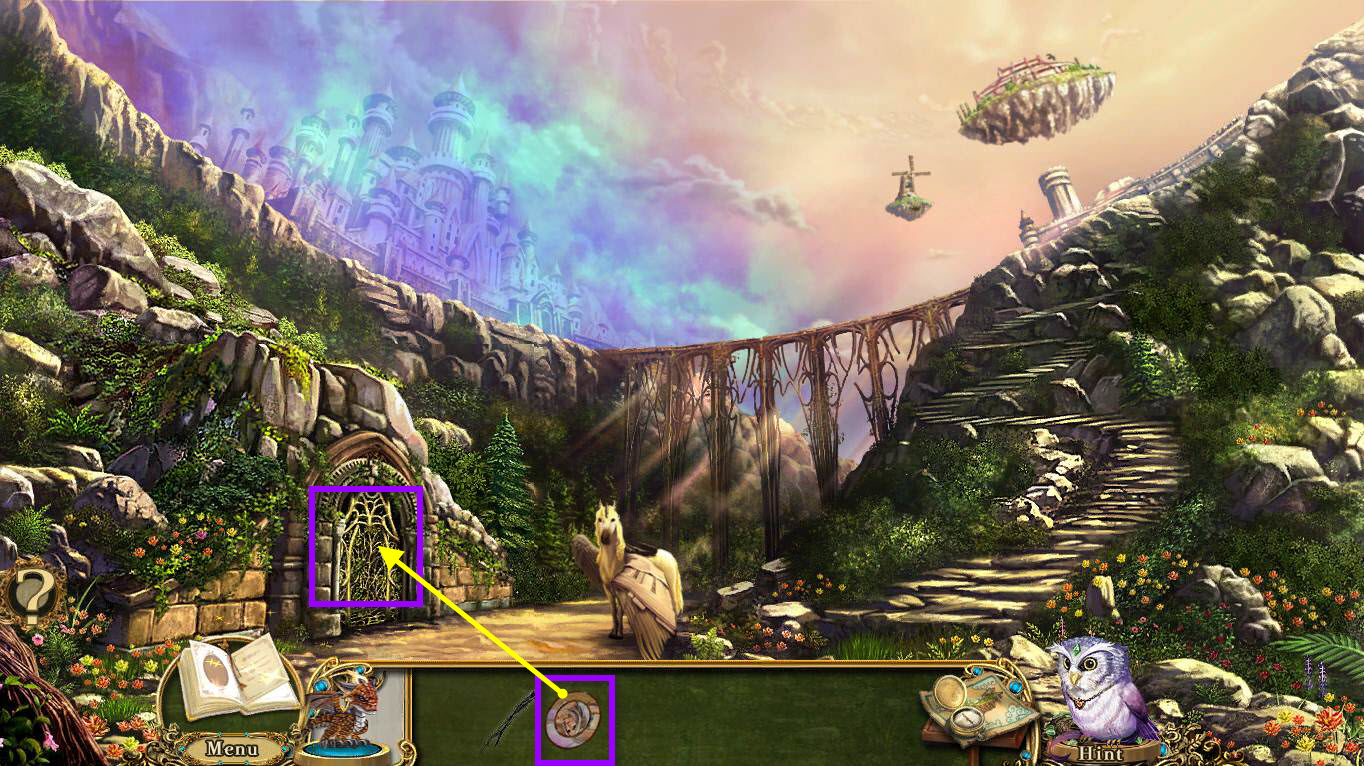
- Click on the Briar gate to zoom in.
- Use the OAK RING on the gate to start a puzzle.
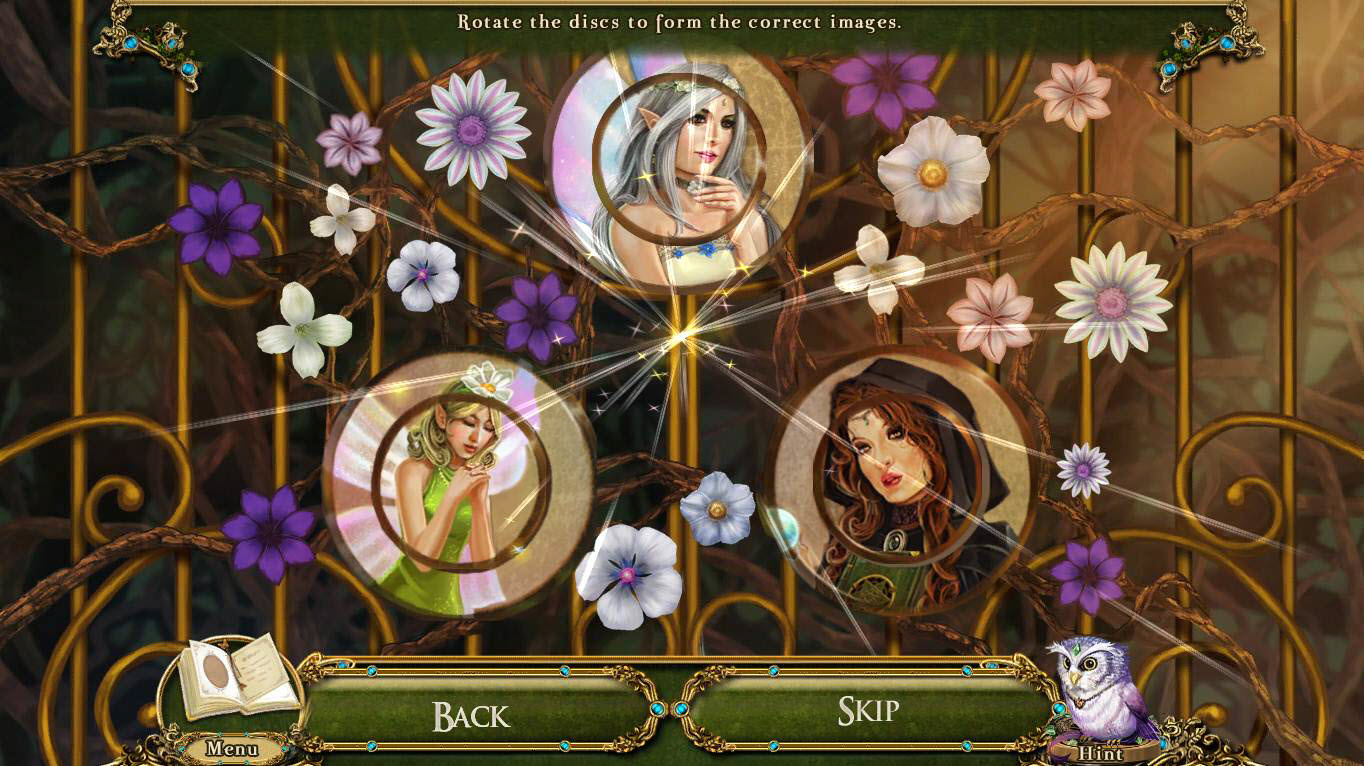
- You will need to rotate the outer and inner rings of each picture in order to restore them.
- See the screenshot for the solution.
- Once you've completed the puzzle, enter the High Gardens.
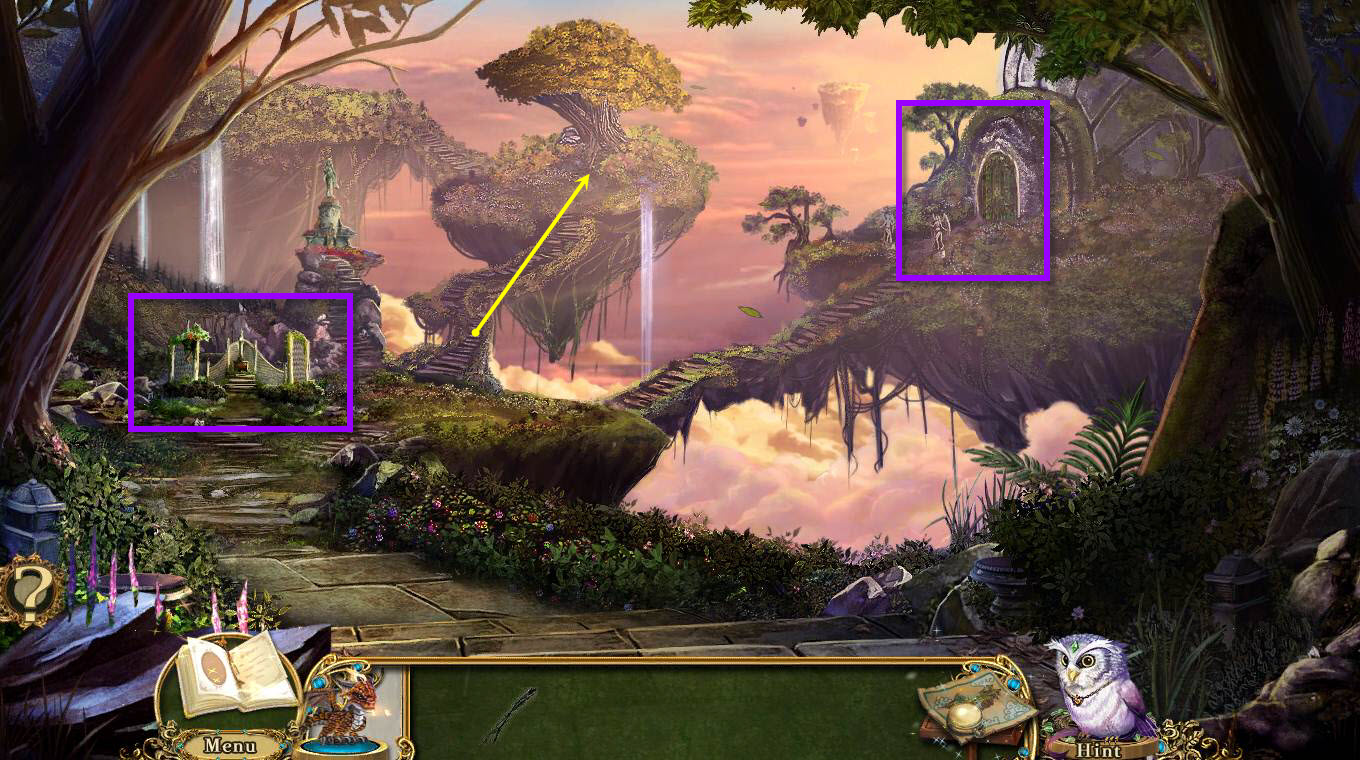
- Once you enter the High Gardens, you'll notice the greenhouse an the crystal lattice.
- You can't do anything in this area yet, so move forward one toward the Giant Goldleaf Oak.
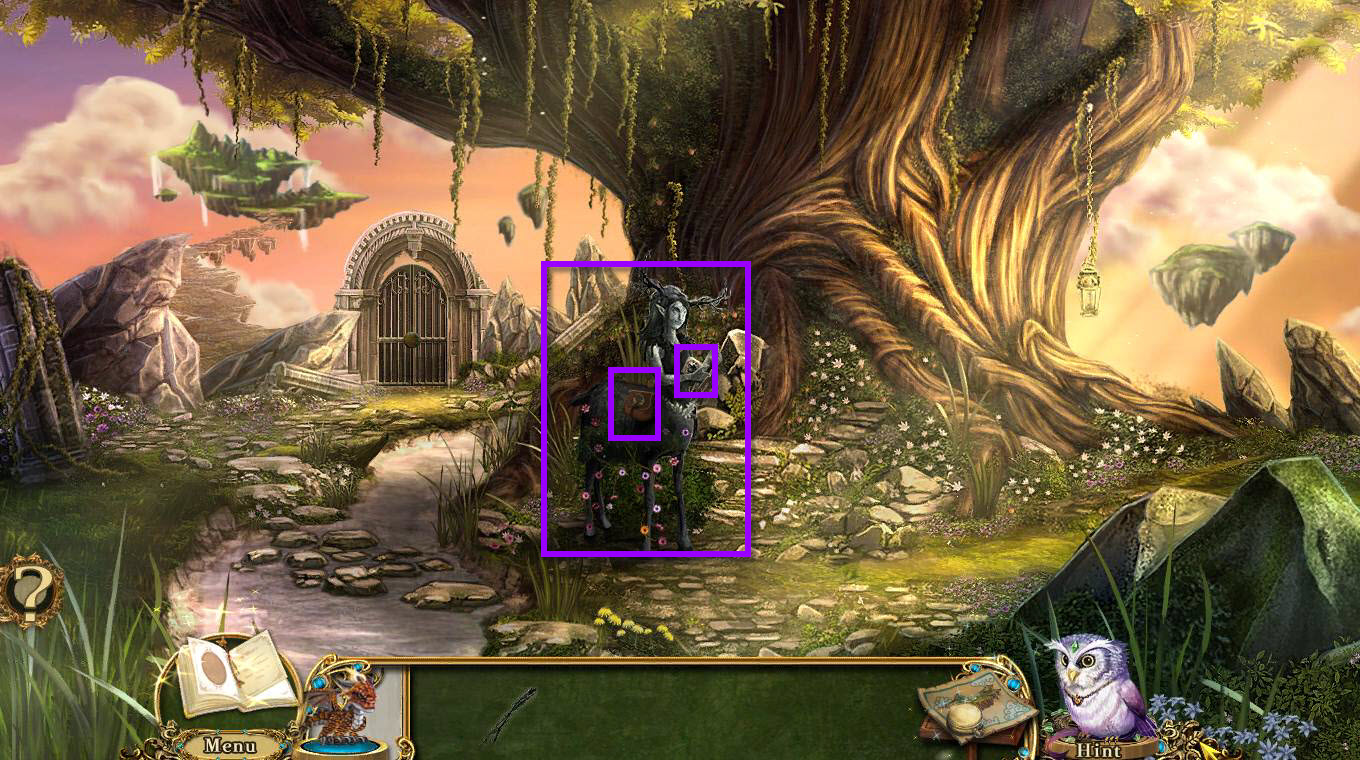
- Click to zoom in on the Petrified Faun.
- Click on her bag to open it.
- Take the 1/4 QUILT PATCH and the GREENHOUSE KEY.
- Take the STONE TABLET in her hands.
- Take the 1/3 GEMSTONES at her neck.
- Go back one screen.
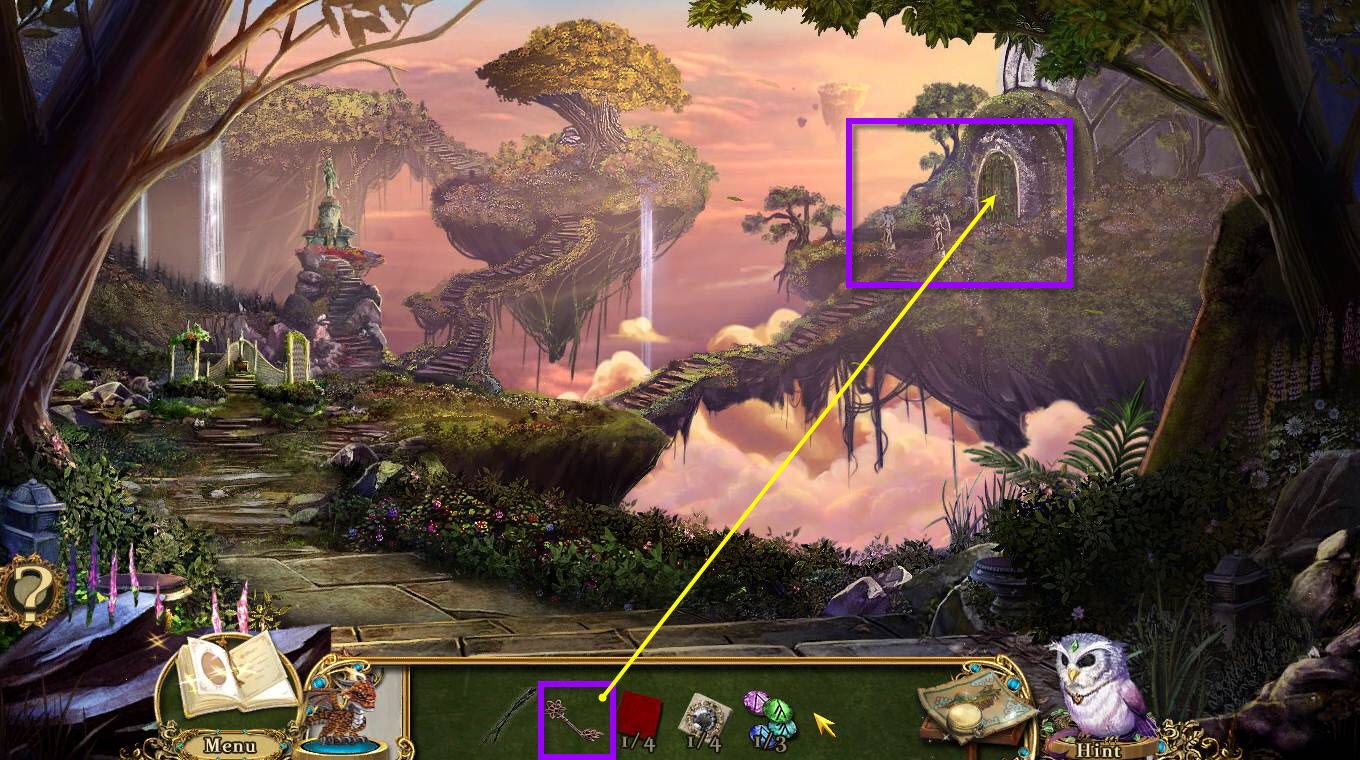
- Click on the greenhouse to zoom in.
- Use the GREENHOUSE KEY on the clock to start a mini-game.
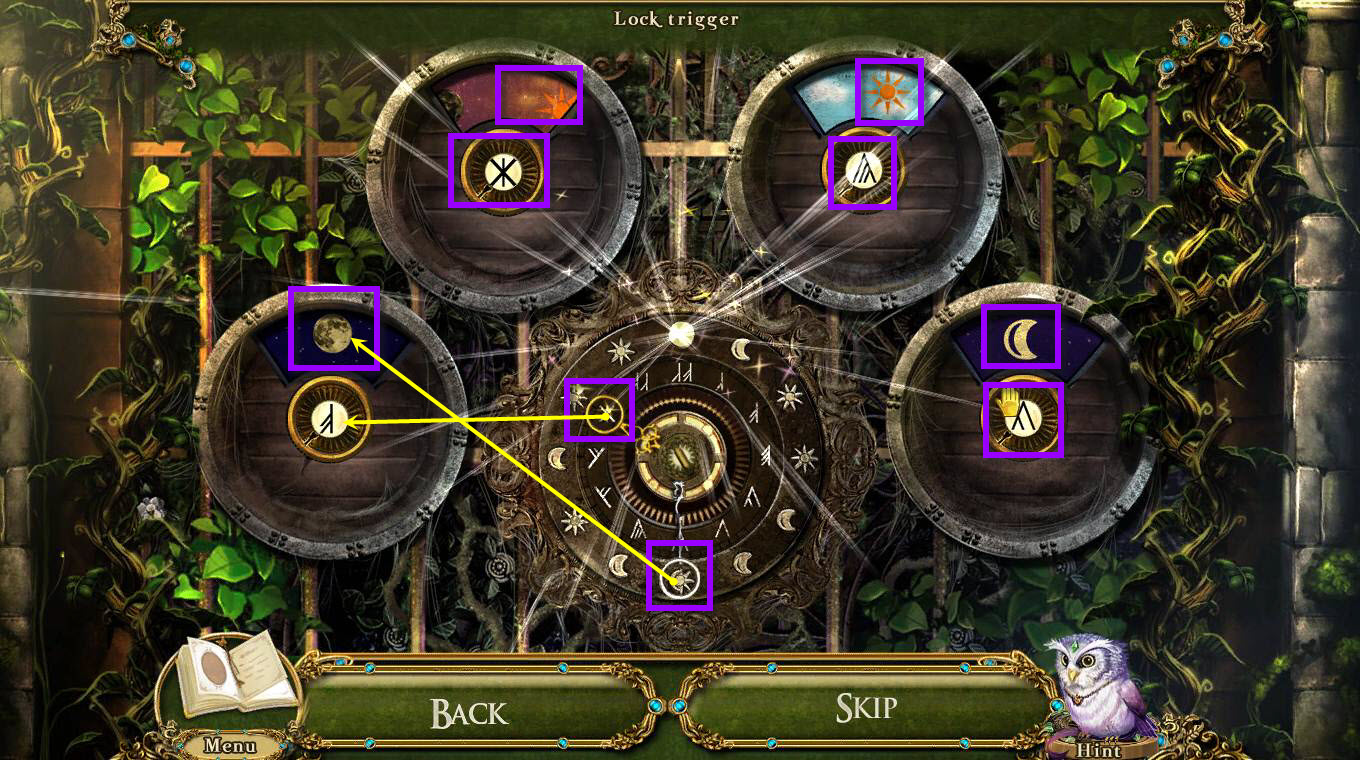
- The goal of the game is to match the symbol with the right celestial phase, i.e. sun, moon, half moon.
- Click on the center clock to make the gold and silver hands move.
- Once the gold hand lands on one of the symbols in the other 4 locks, note the placement of the silver hand.
- Then change the celestial phase on the lock so that it matches what's in the silver hand.
- See the screenshot above for the solution.
- Once completed, go to the Greenhouse.
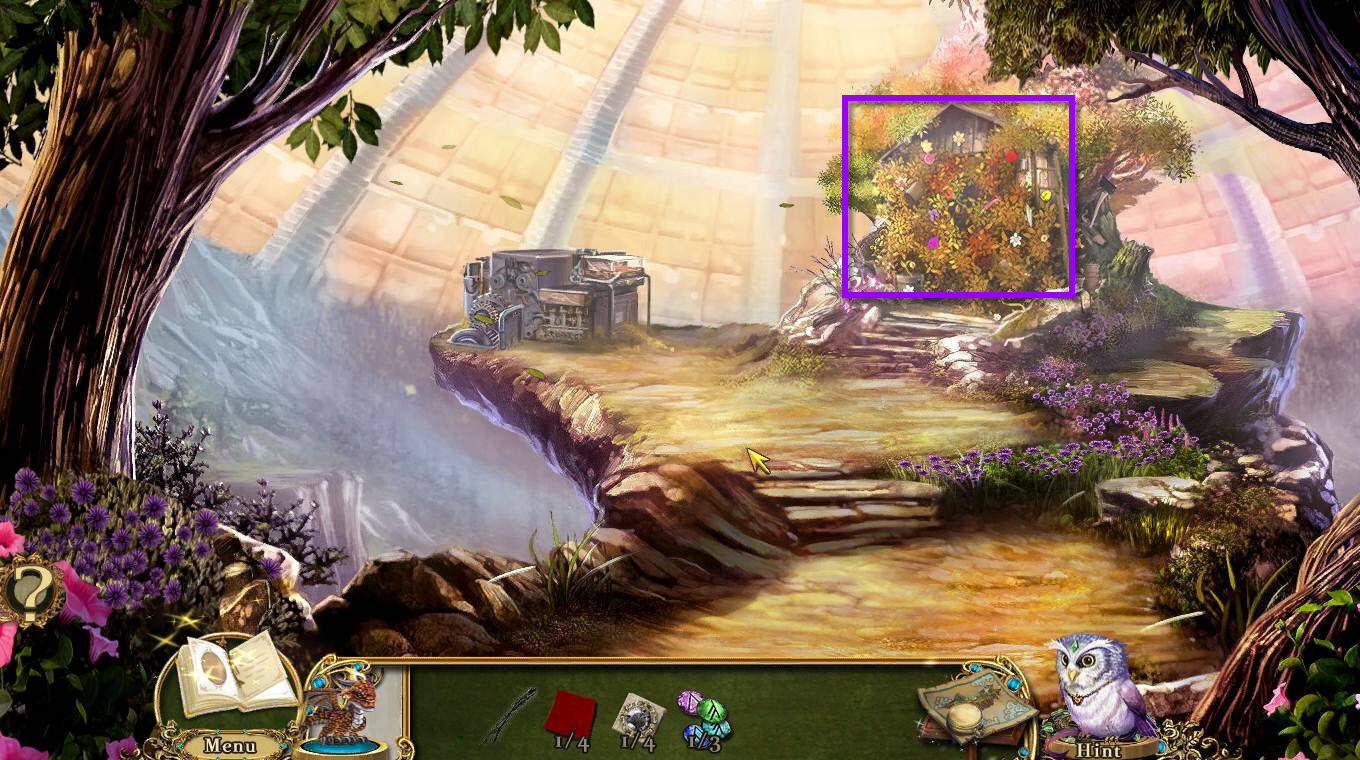
- Click on the Garden Shed.
- This will begin a hidden object scene.
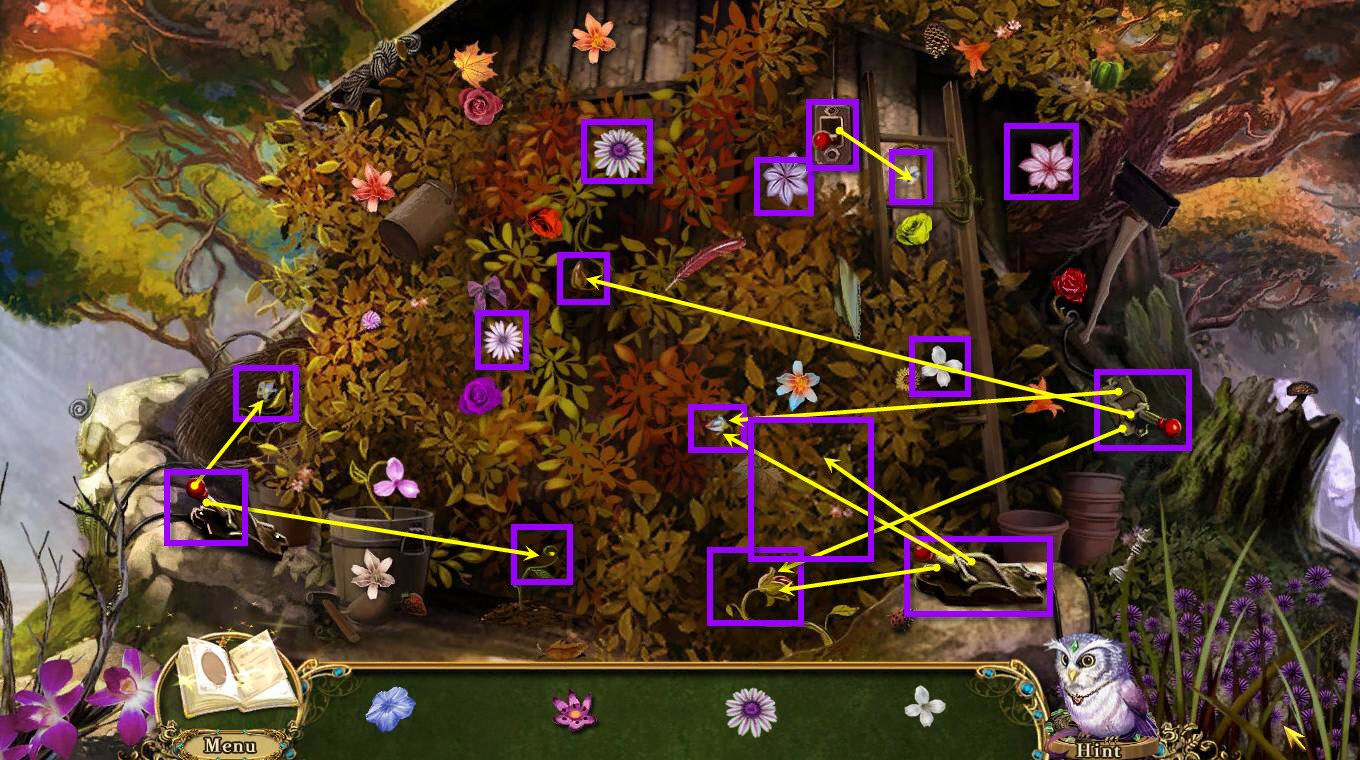
- You will need to find all the flowers on the bottom panel.
- Some flowers will need you to flip the switches before they will bloom.
- Some flowers need more than one switch on.
- The Garden Shears are hidden so flip the switch on the right.
- You will receive the GARDEN SHEARS.
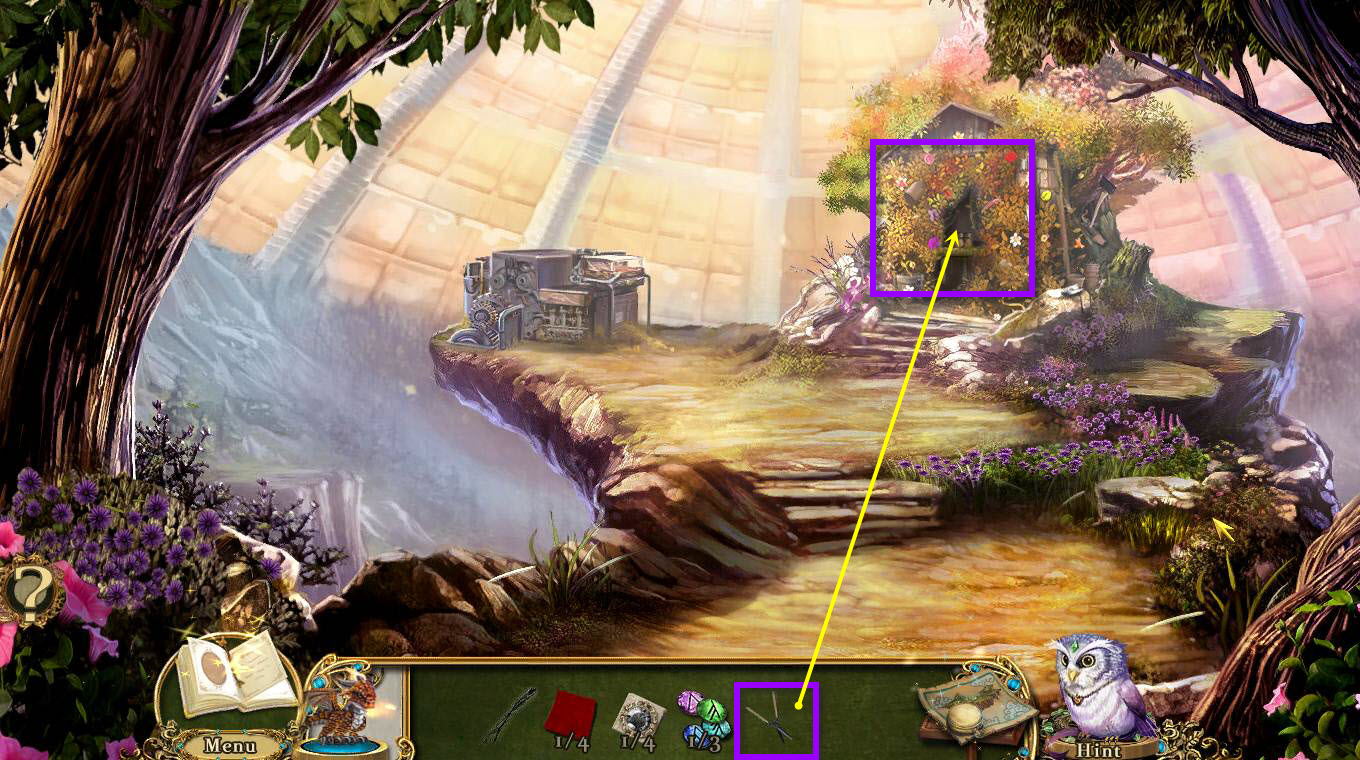
- Click on the garden shed again to zoom in.
- Use the GARDEN SHEARS on the overgrown vines to get rid of them.
- Click on the emerald to get the 2/3 GEMSTONES.
- Go back one screen.
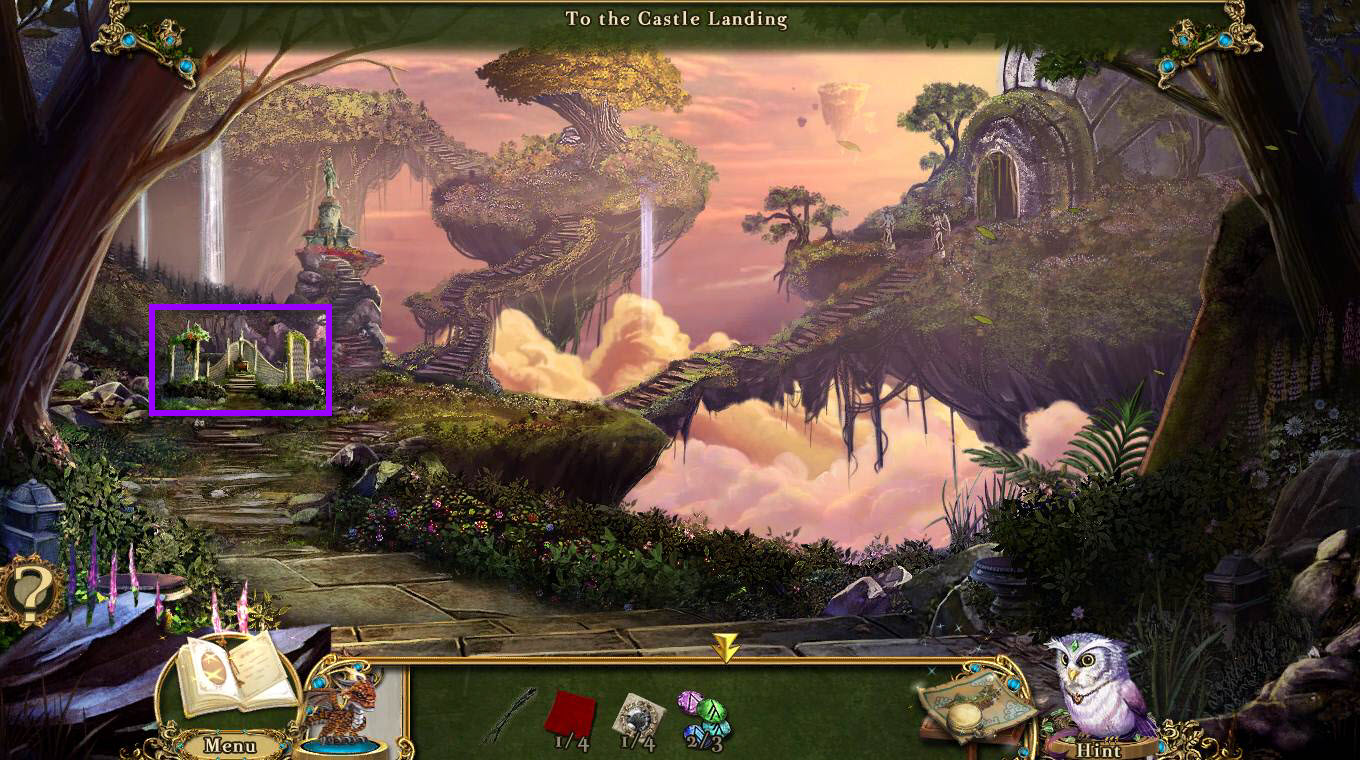
- Click on the Crystal Lattice on the left to zoom in.
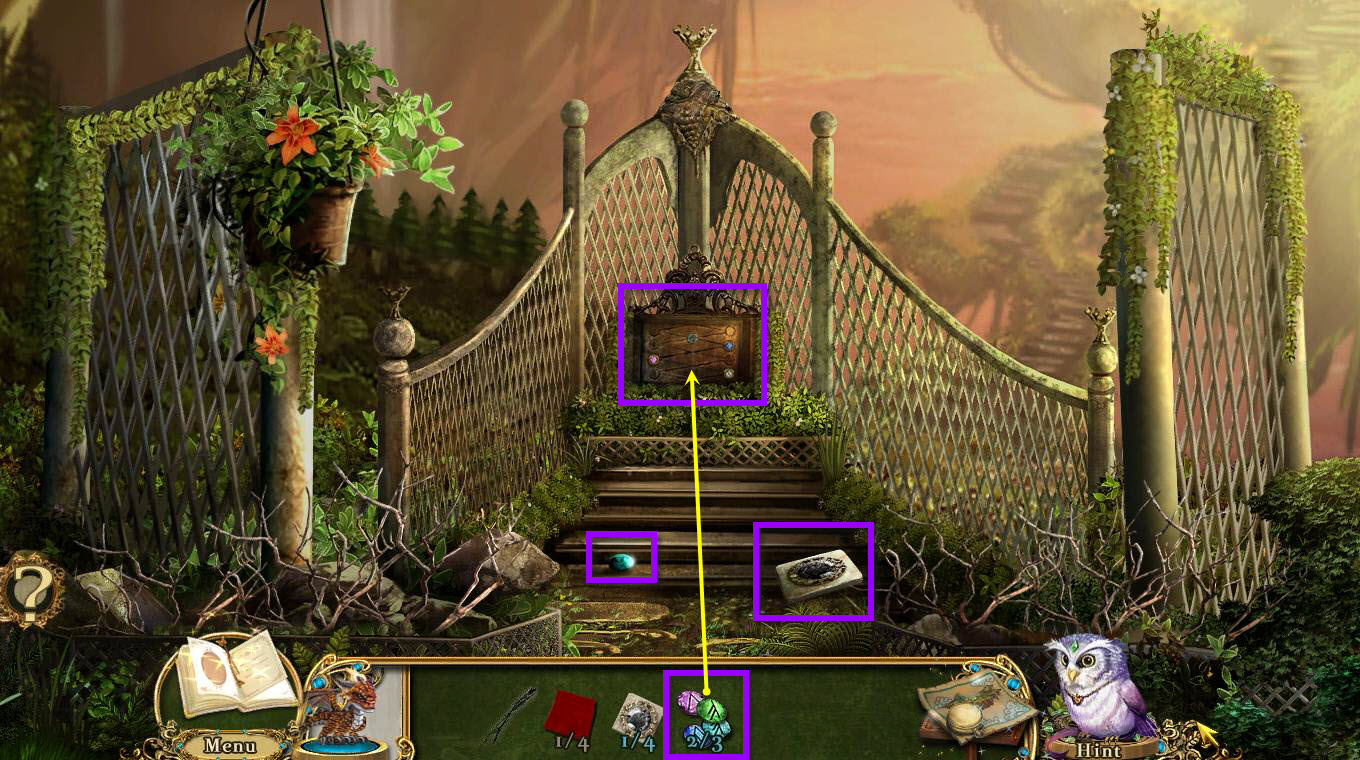
- Click on the Turquoise to get the 3/3 GEMSTONES.
- Take the 2/4 STONE TABLET.
- Use the 3/3 GEMSTONES on the panel in front of you to start a mini-game.
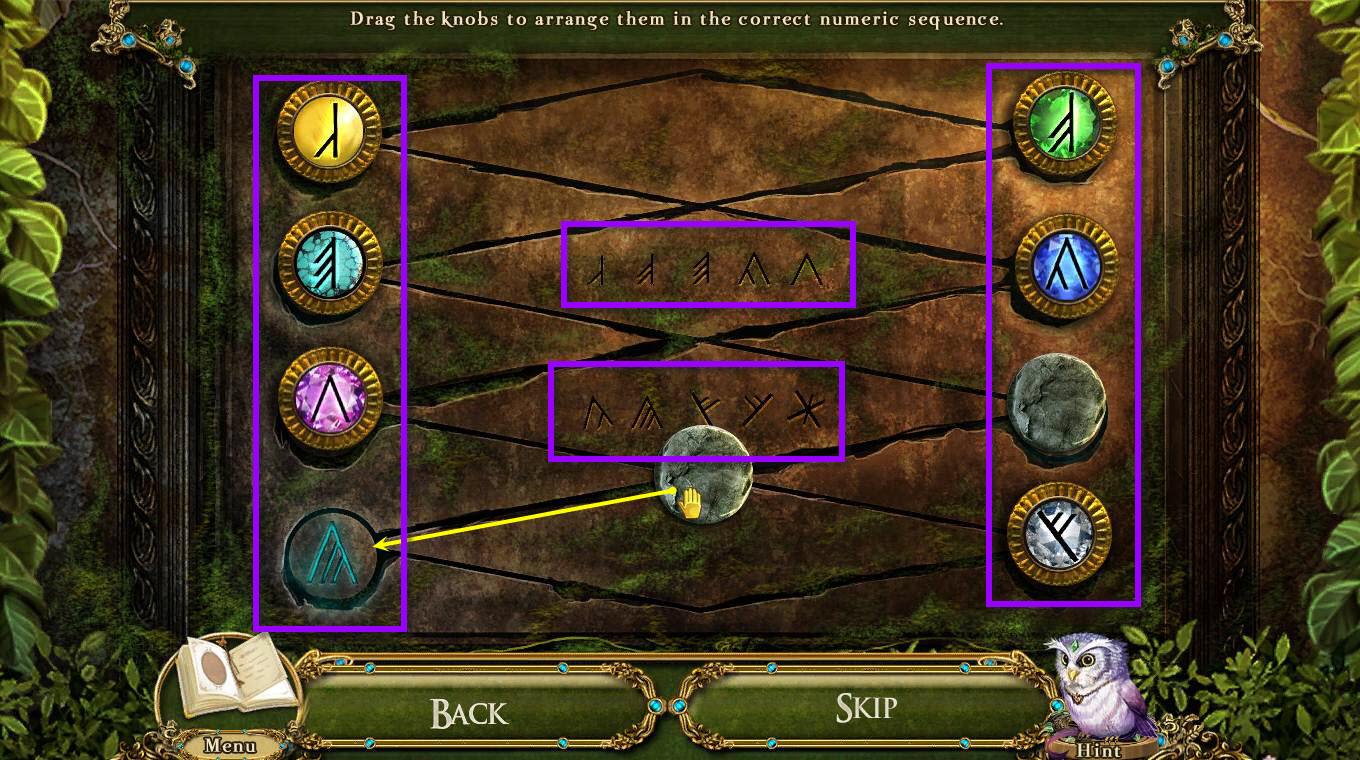
- The goal of the game is the drag the knobs to the correct position.
- You'll see in the middle there are symbols.
- The knobs need to be on both sides of the panel.
- Go from left to right following the symbols carved in the wall.
- Some knobs will have hints under them.
- The gray stone knobs are for any symbols you don't have.
- See the screenshot above for the solution.
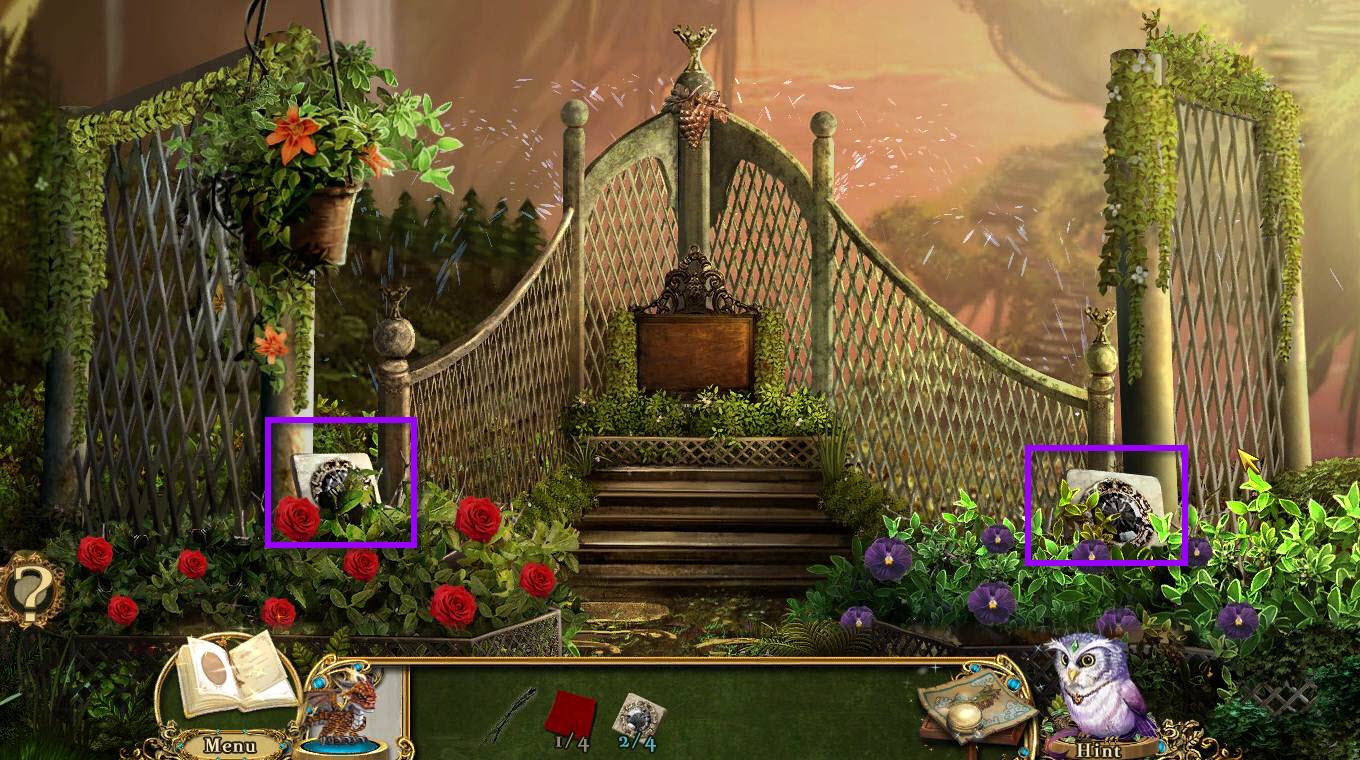
- Click on the tablets to get 3/4 STONE TABLET and 4/4 STONE TABLET.
- Use your map to fast travel to the Barracks.
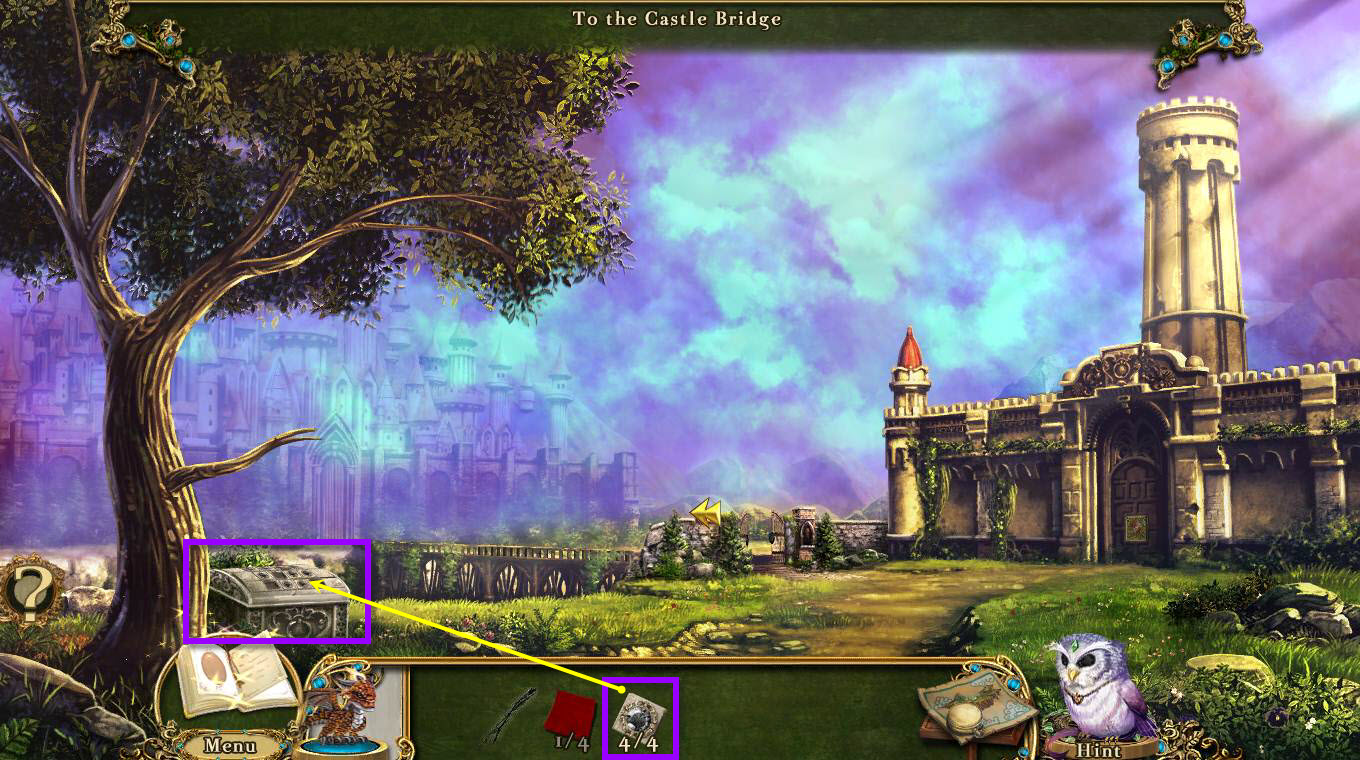
- Click to zoom in on the stone chest on the left.
- Use the 4/4 STONE TABLETS on the lid.
- This will start a mini-game.
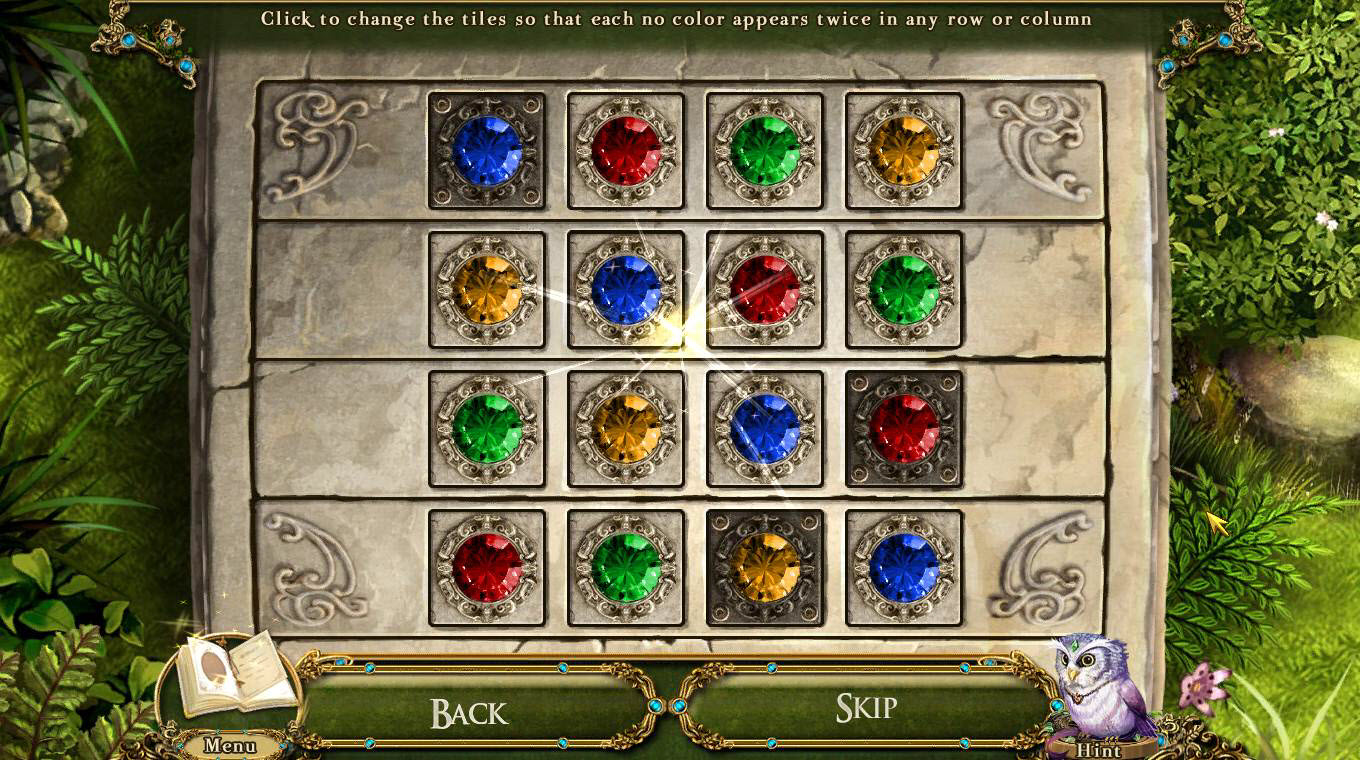
- The goal of the game is to have so that no color is repeated in any row or any column.
- Click on the tile to change the color.
- See the screenshot above for the solution.
- Once you have completed the puzzle, the chest will be open.
- Click to take the TORN BOOK and the BROKEN HILT.
- Use your map to fast travel to the Giant Goldleaf Oak.
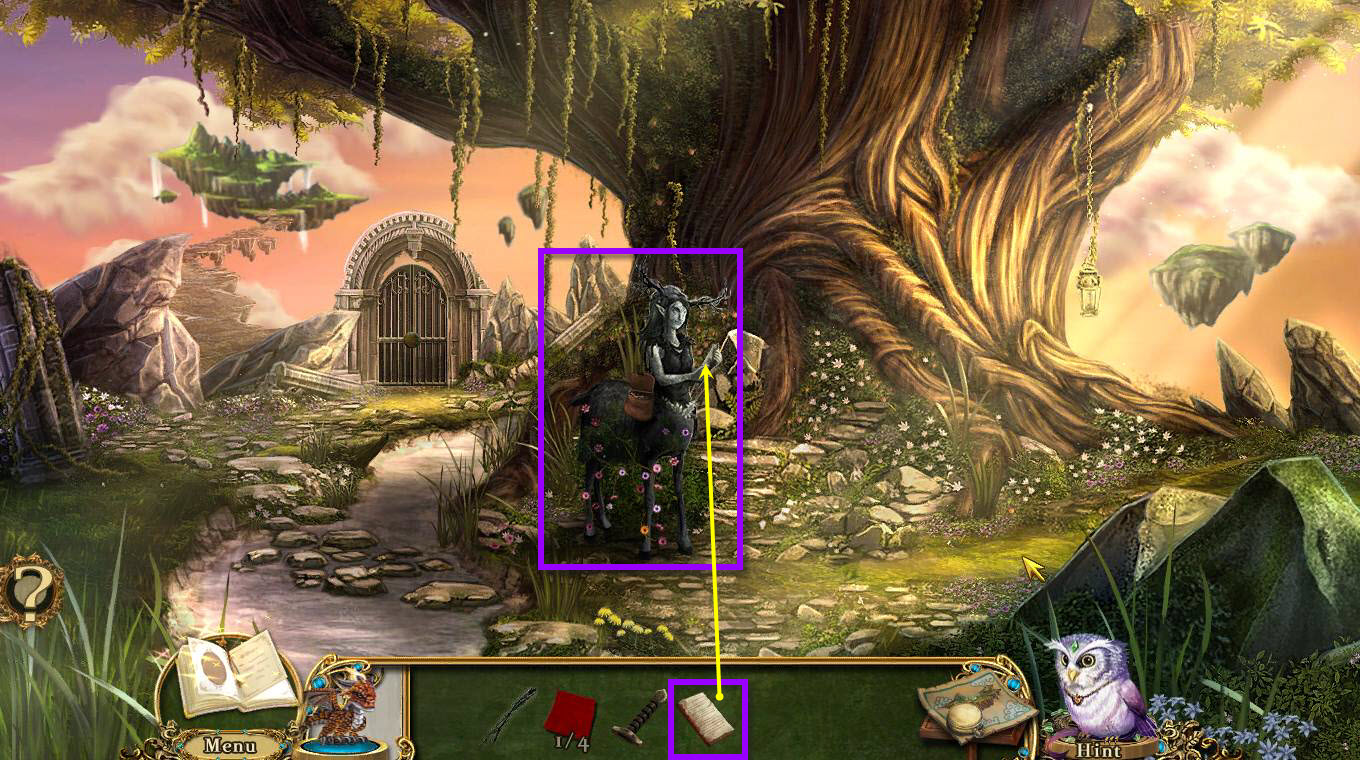
- Click on the petrified faun to zoom in on her.
- Use the TORN BOOK on her to bring her back to life.
- Click on her to talk to her.
- She will give you the SCROLL OF MEDICINAL HERBS.
- Use your map to fast travel to the Greenhouse.
- Click on the garden shed to enter.
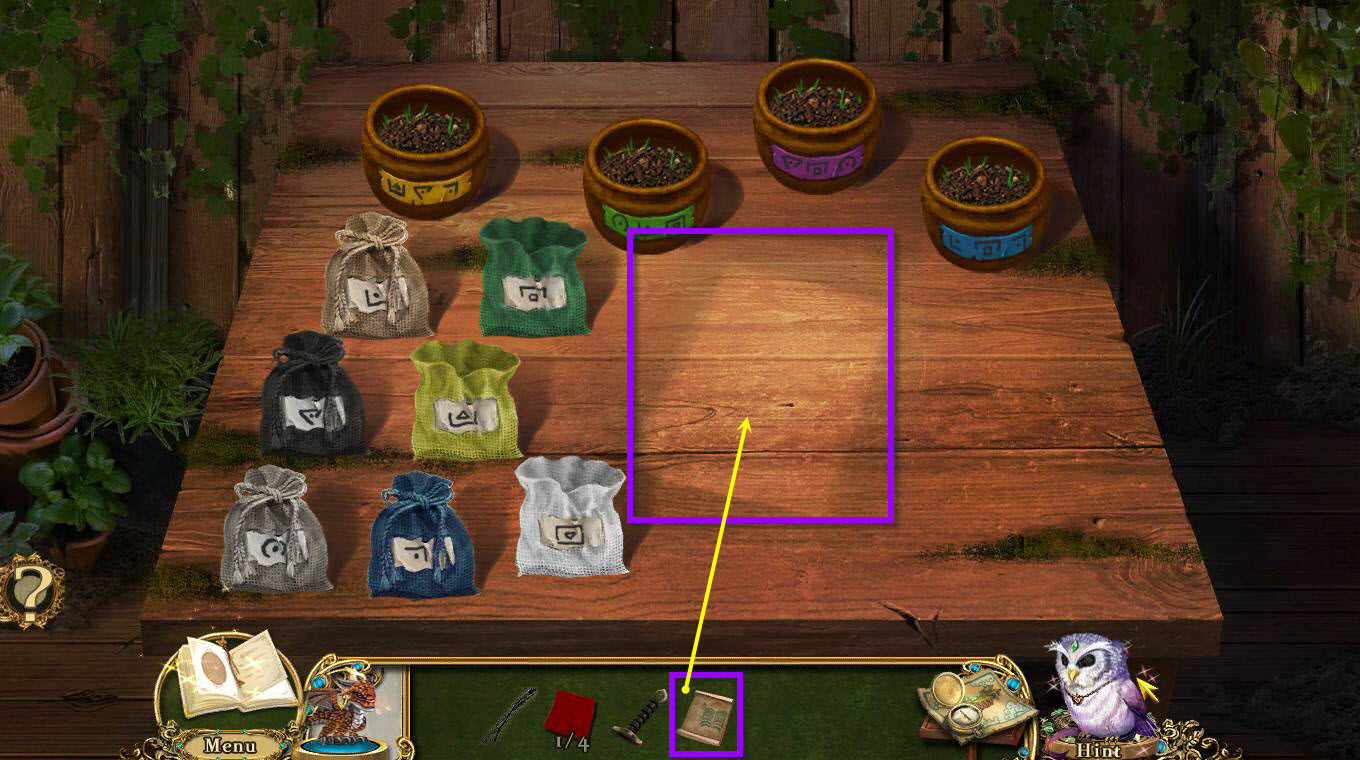
- Use the SCROLL OF MEDICINAL HERBS on the table.
- Click on the crate of eggs that appears to begin a mini-game.
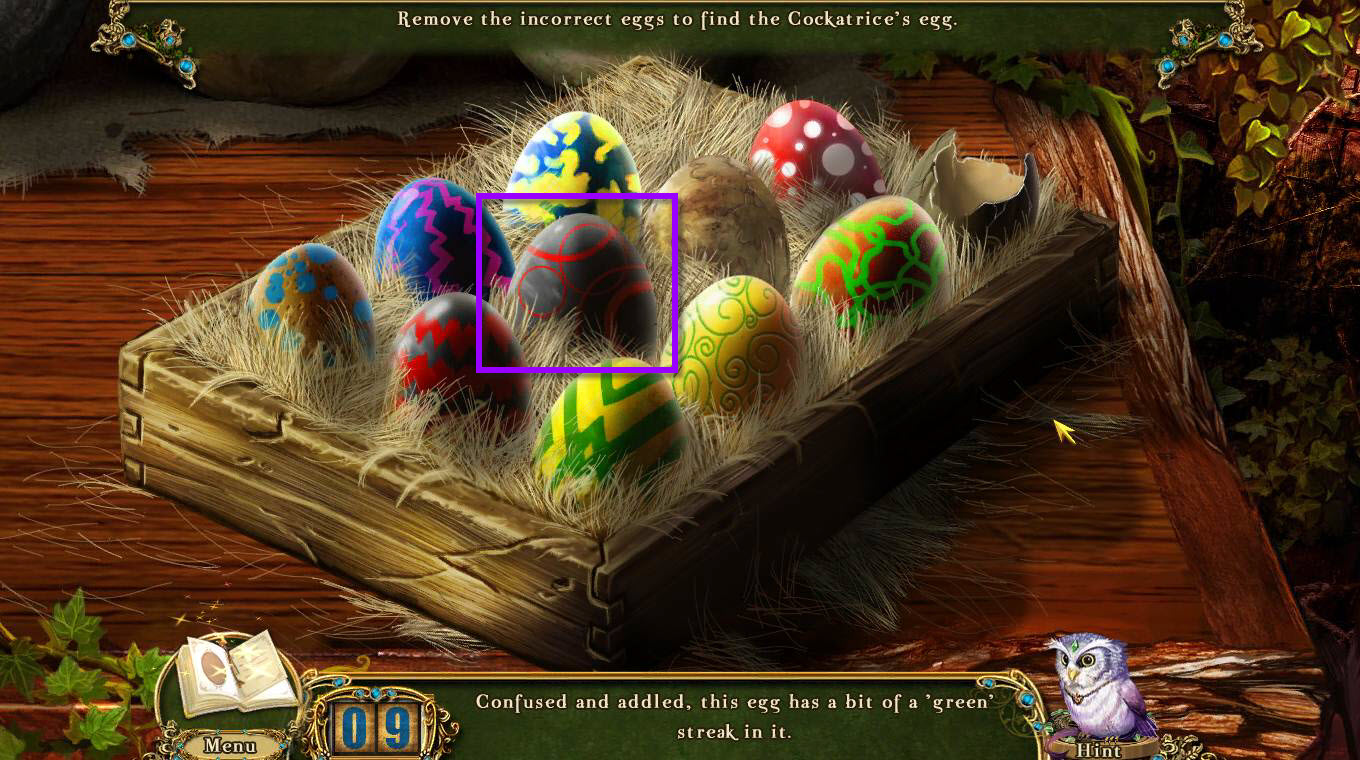
- Click on the eggs by following the clues at the bottom.
- This will remove all the incorrect eggs leaving the Cockatrice egg for the taking.
- The Cockatrice Egg is the black and red one in the middle.
- Once you're done, the COCKATRICE EGG will be added to your inventory.
- Now go to the Giant Goldleaf Oak again.
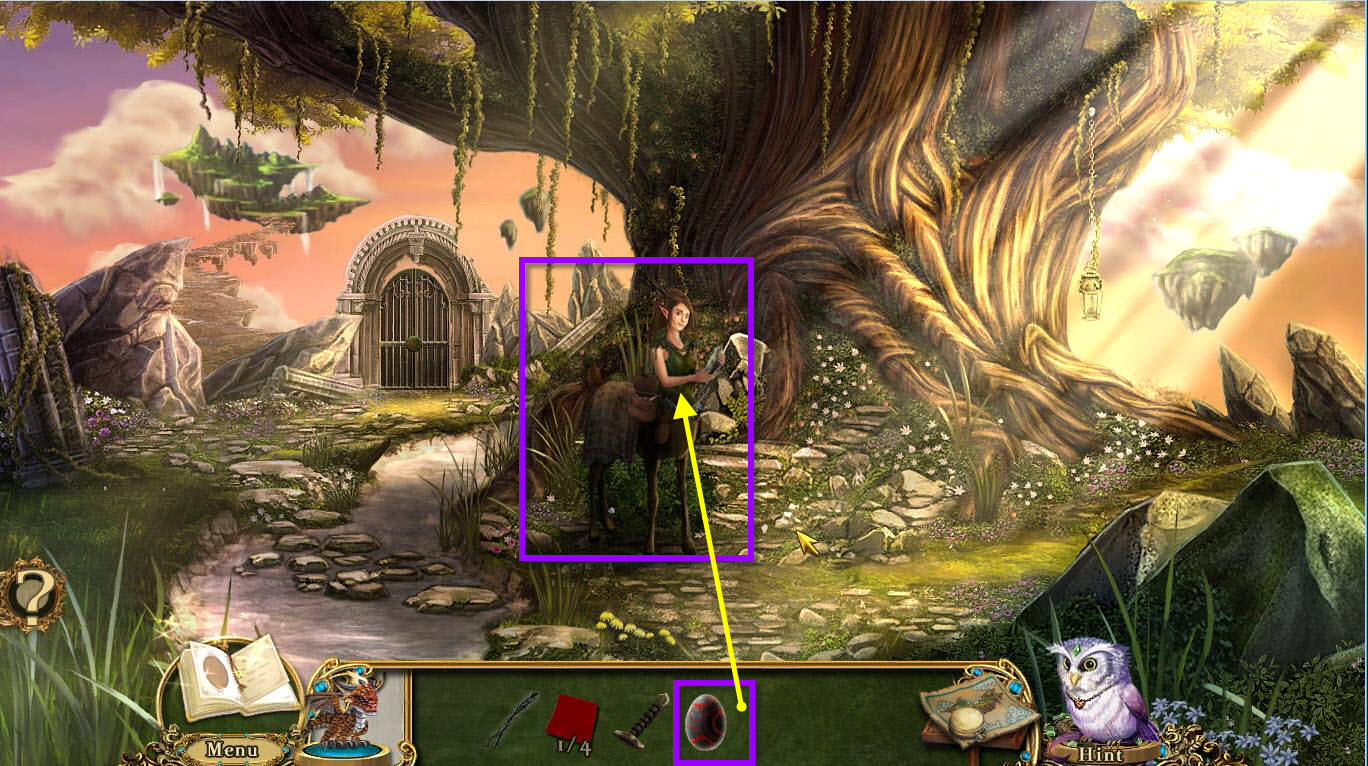
- Once you're back at the Giant Goldleaf Oak, use the COCKATRICE EGG on the faun.
- She will then give you the BARRACKS PASS.
- Use your map to fast travel over to the barracks.
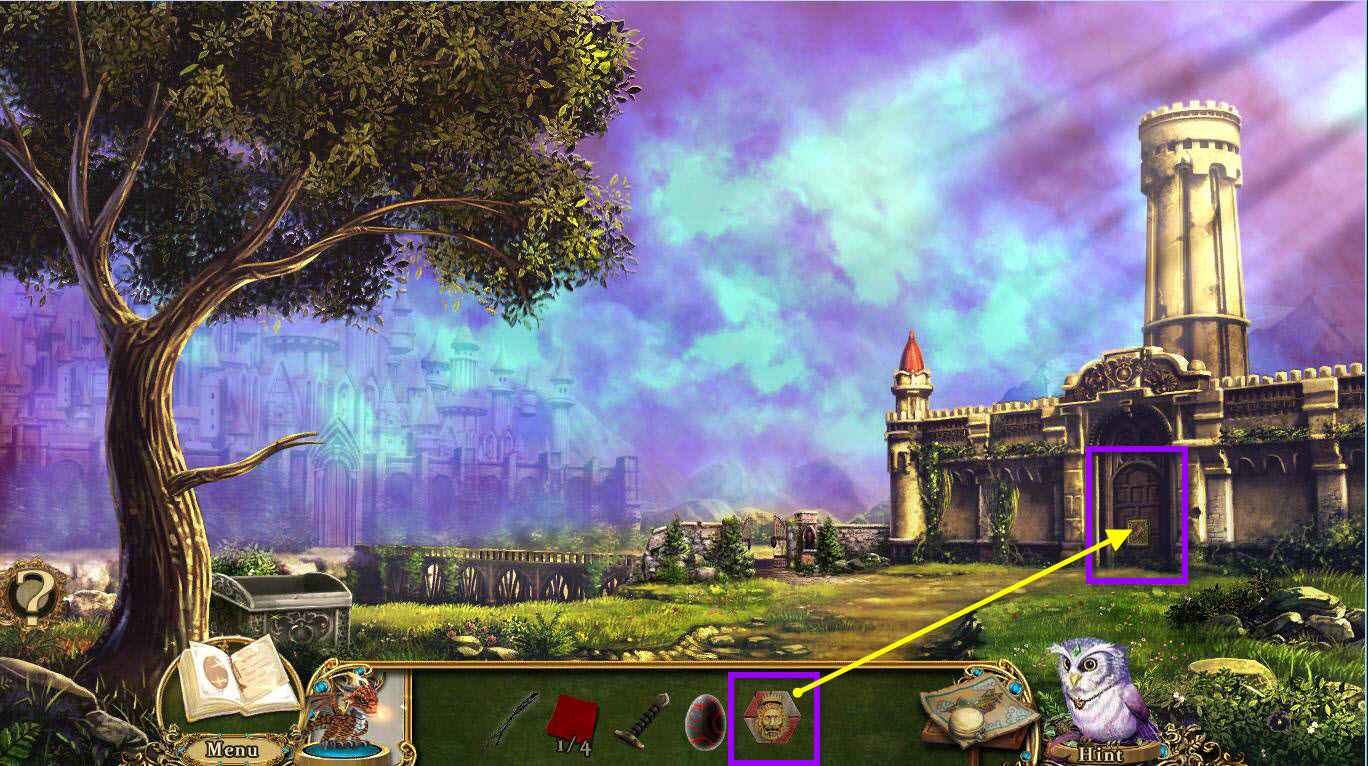
- Click on the barracks gate to zoom in.
- Use the BARRACKS PASS on the shield.
- This will start a mini-game.
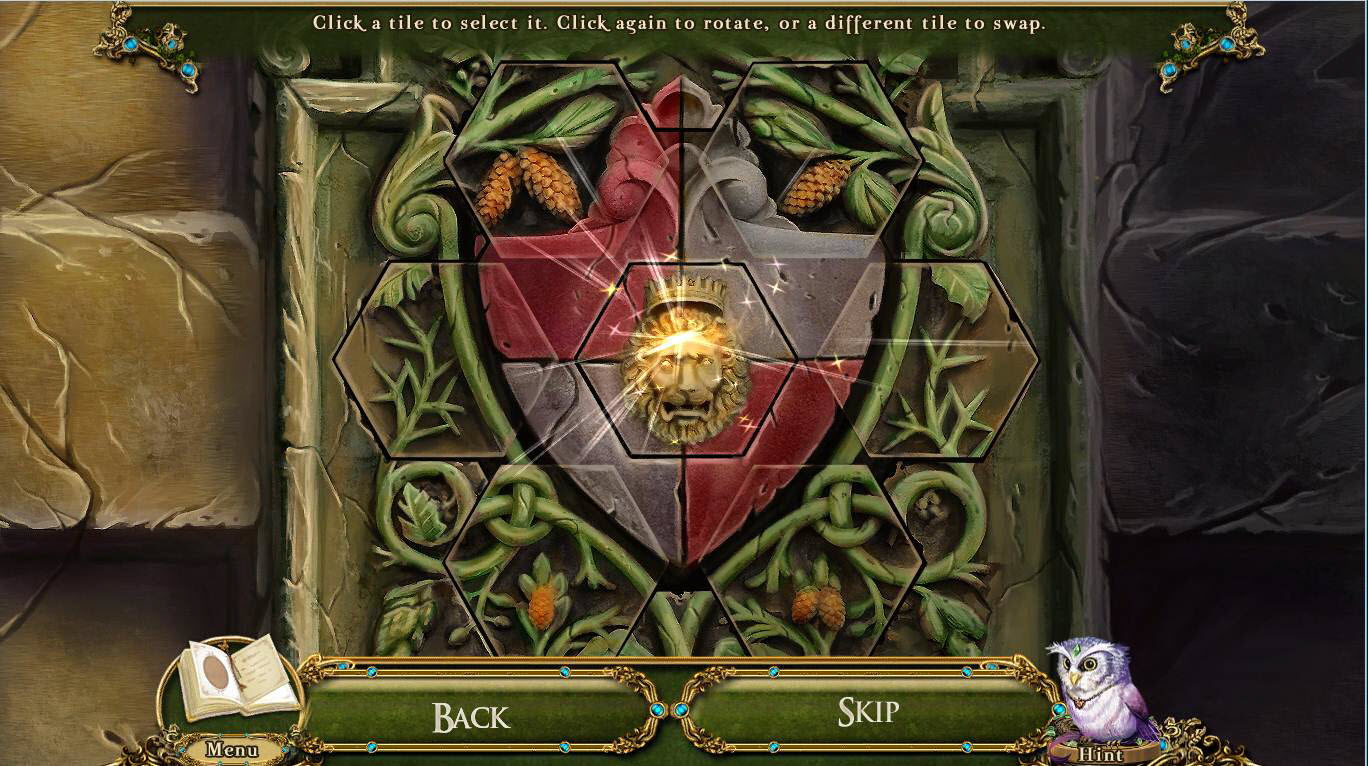
- The goal of the game is to put the carving back together in the right place.
- Click on the lion head until it's upright.
- Now click on the outside tiles to rotate them.
- Click on two tiles to swap their positions.
- See the screenshot for the solution.
- Once you've complete the puzzle, head into the Barracks Courtyard.
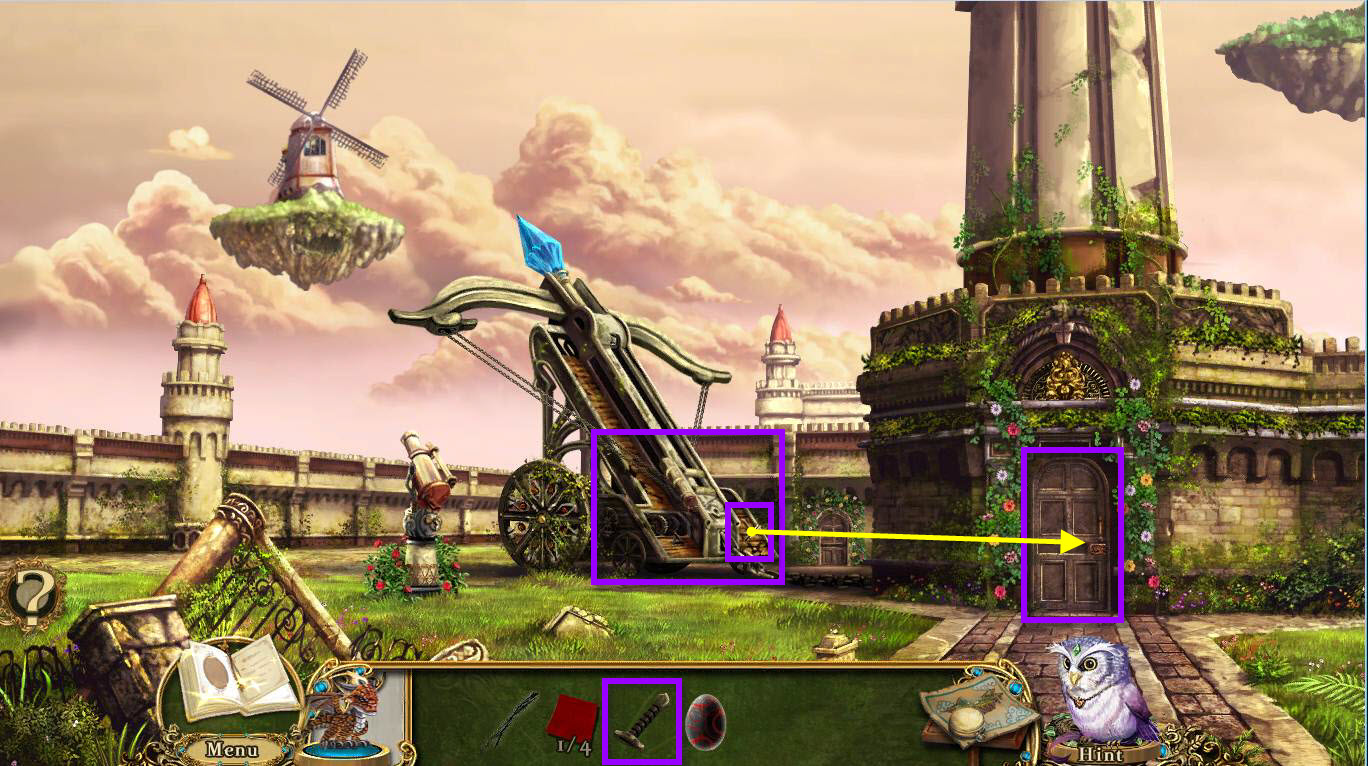
- Click on the ballista in front of you to zoom in.
- Use the BROKEN HILT on the blade on the right.
- You will receive the RUSTY SWORD.
- Click on the firing level and you'll see that it's jammed.
- Click on the armory entrance.
- Click on the note to read it.
- Use the RUSTY SWORD on the lock.
- Go into the armory.
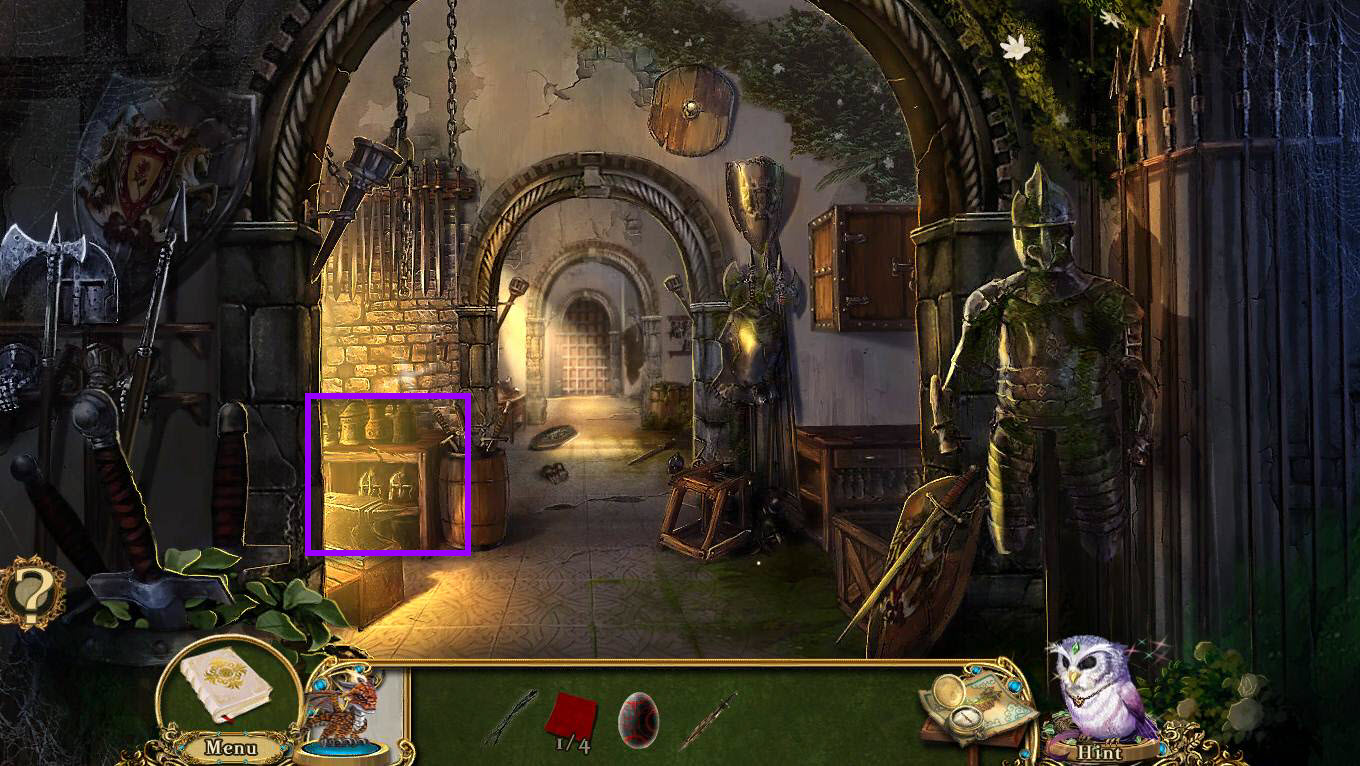
- Click on the Blacksmith's Forge on the left to zoom in.
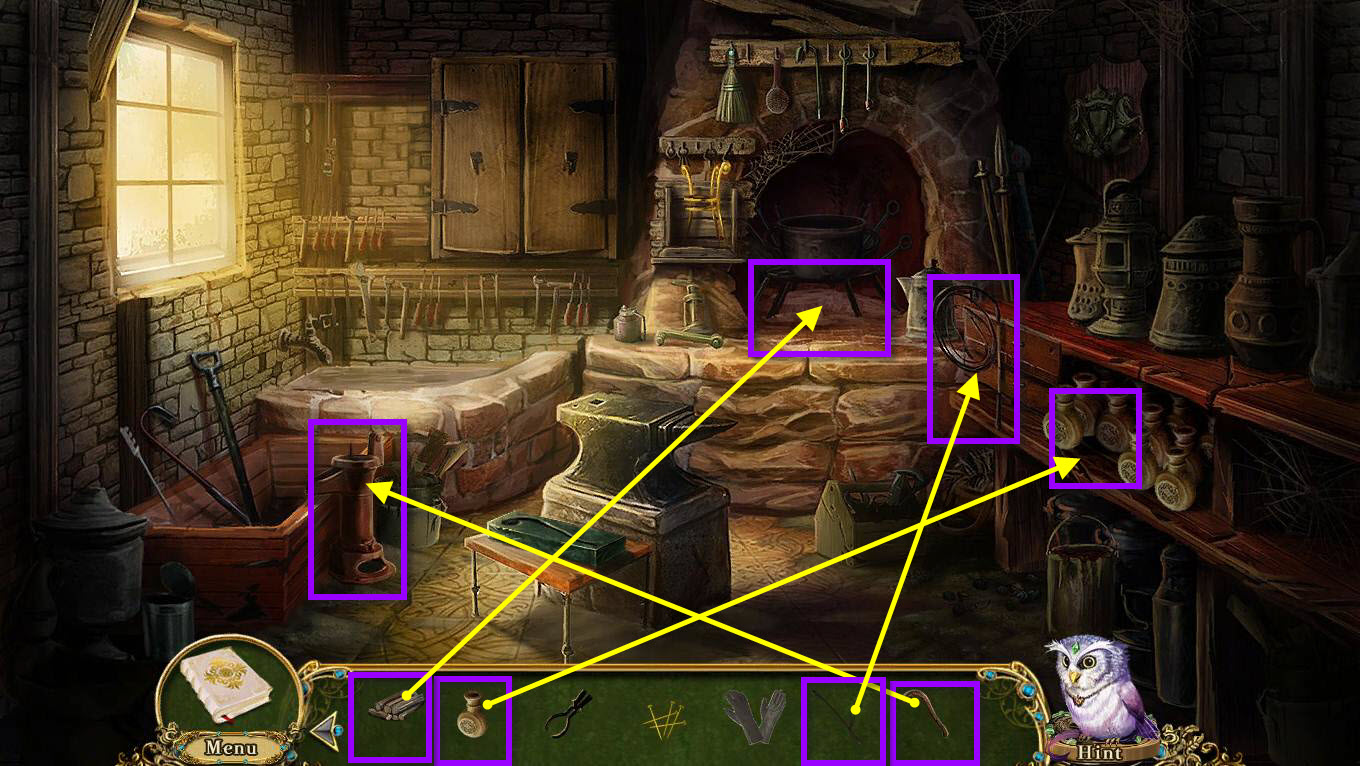
- Use the handle on the red pump on the left.
- Now, click on the handle to pump the water into the water trough.
- Use the bottle on the shelf to put it with the other bottles.
- Place the wood in the forge.
- Place the riding crop next to the whip.
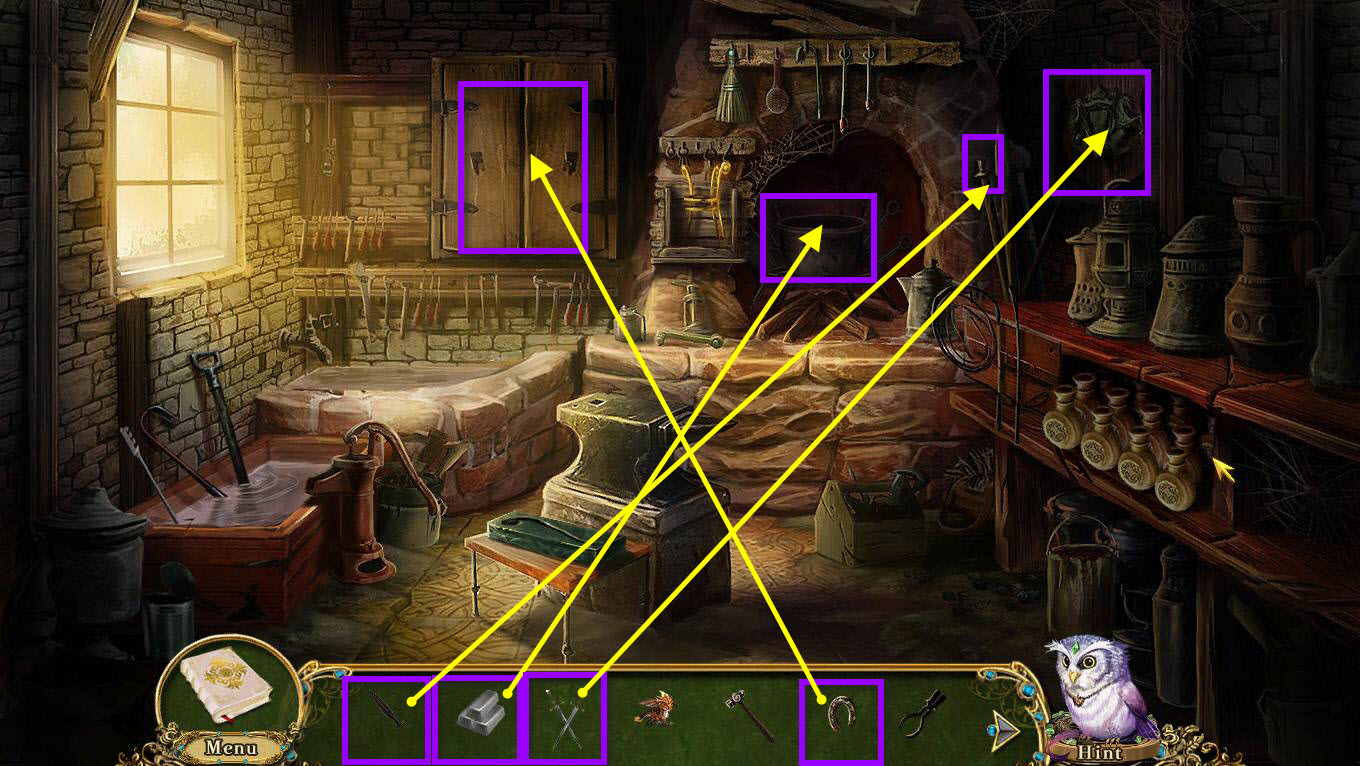
- Use the spear tip on the spear.
- Use the metal bars on the casting vat.
- Use the swords on the shield on the wall.
- Click on the cabinet doors to open them.
- Use the horseshoe on the shelf inside the cabinet.
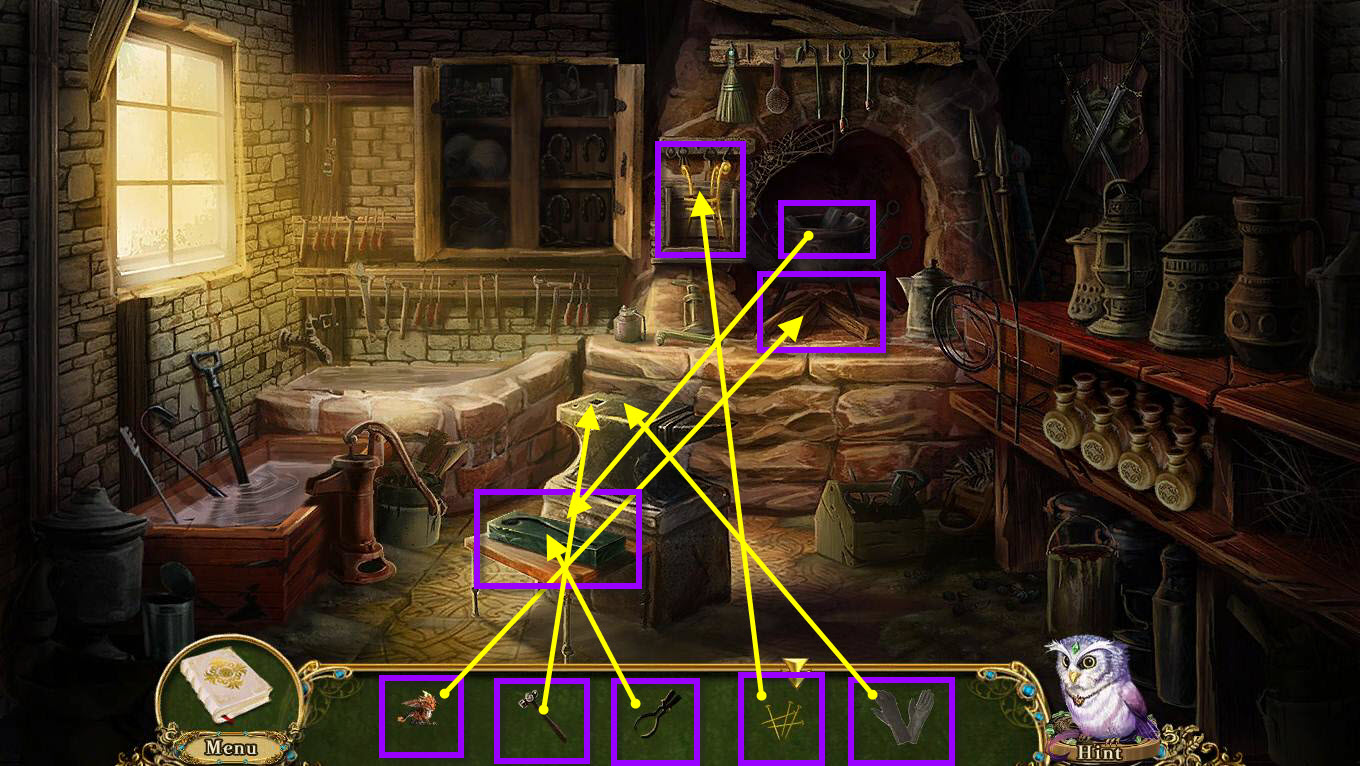
- Use the Pocket Dragon on the wood to light it.
- This will melt the metal.
- Take the casting vat and use it on the mold.
- Use the tongs on the mold.
- Use the hammer on the anvil.
- Use the gloves on the anvil.
- Use the nails on the incubator frame.
- You will receive the 1/3 INCUBATOR PARTS and GREASE.
- Go back one screen to the courtyard.
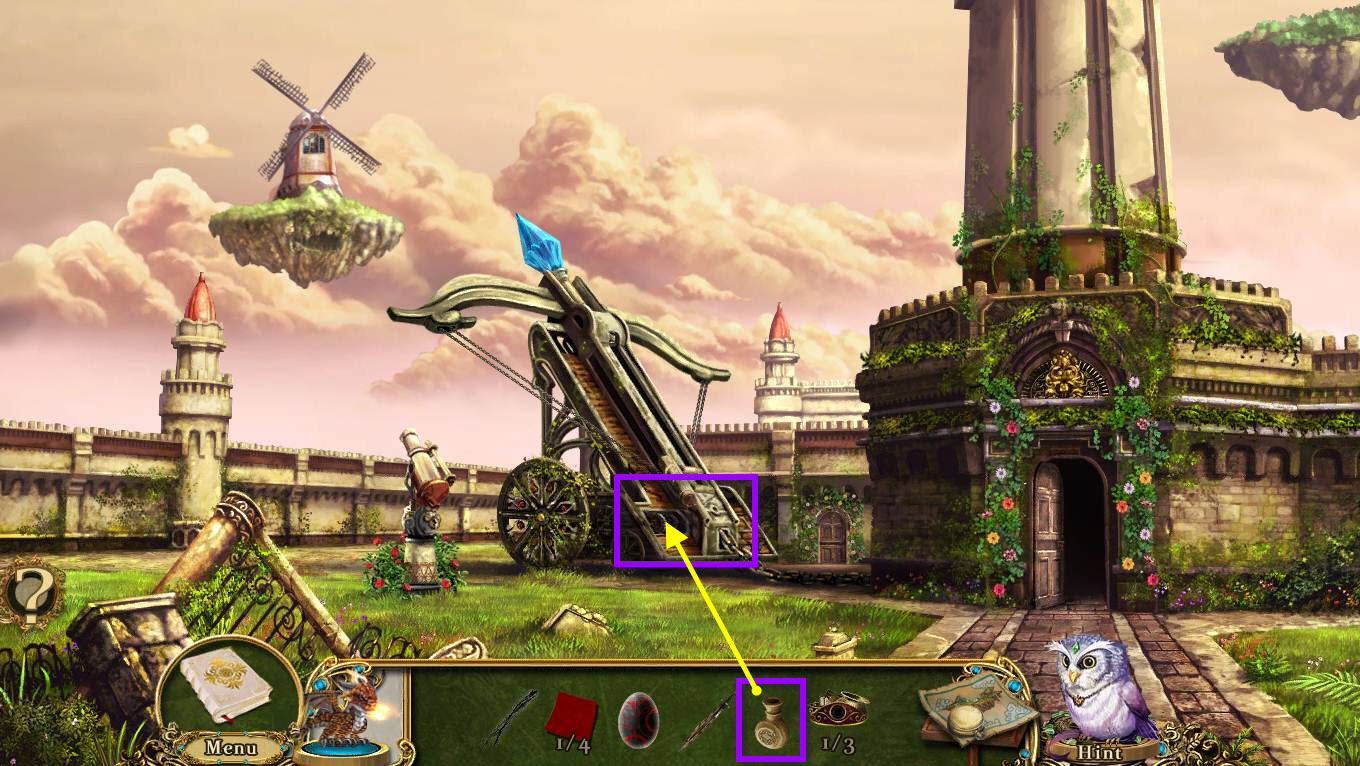
- Click on the ballista to zoom in.
- Use the GREASE on the gears.
- Click on the lever.
- This will start a mini-game.
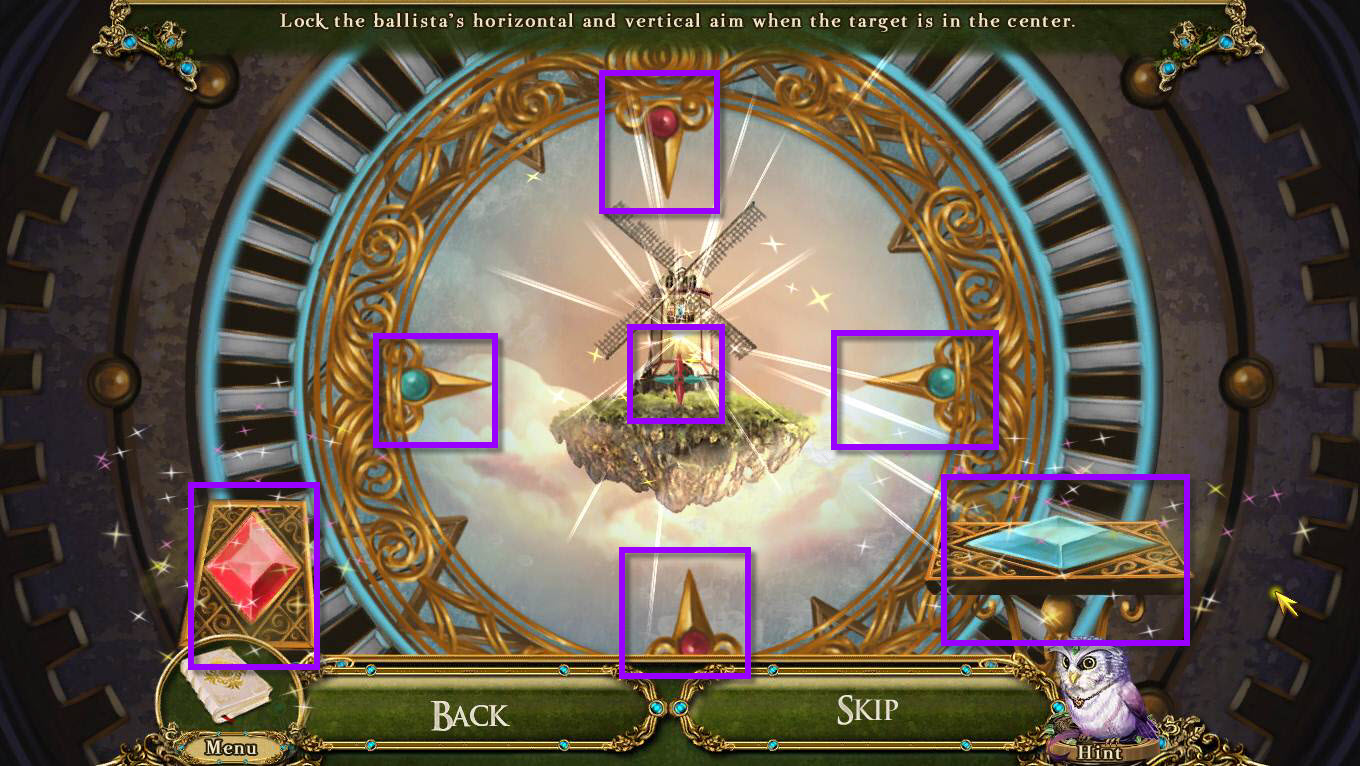
- Click on the red button when the two red hands are in the vertical position.
- Click on the blue button when the two blue hands are in the horizontal position.
- Once completed, go inside the windmill.
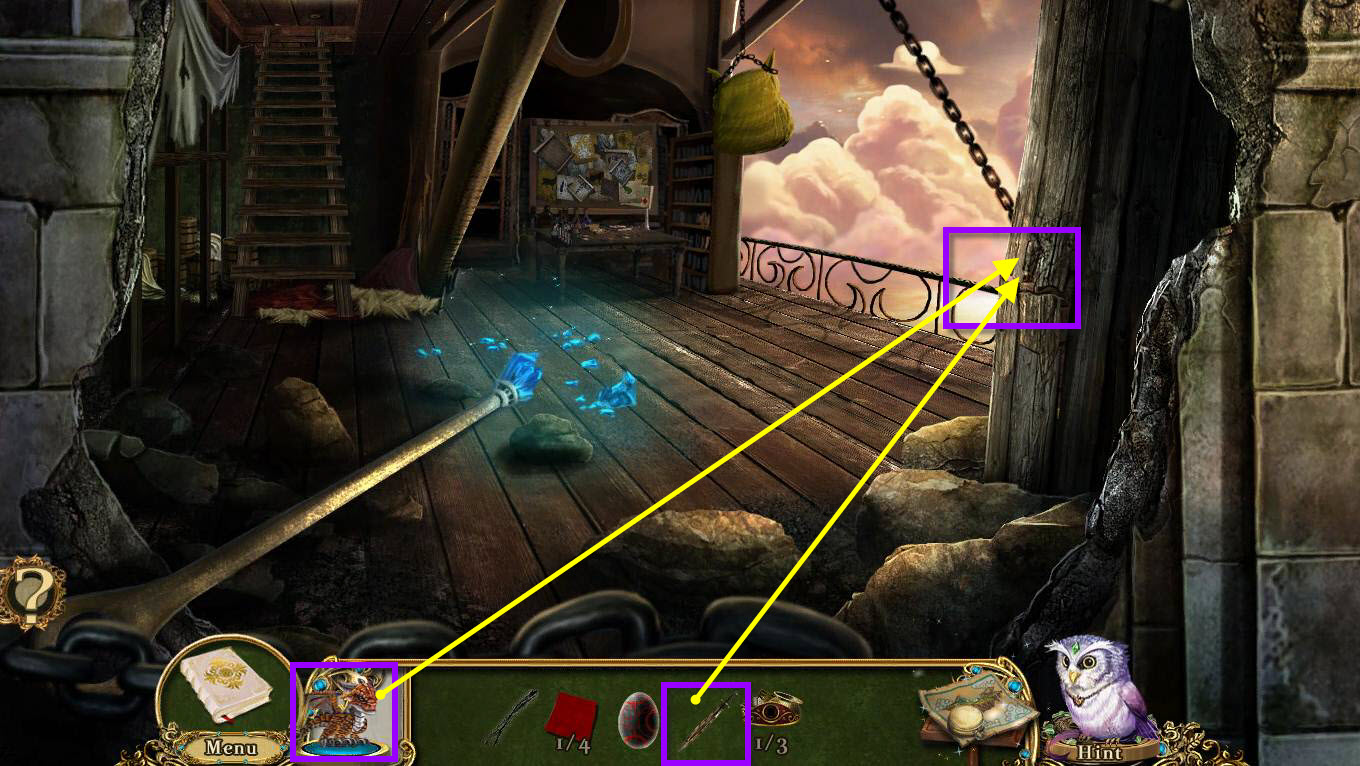
- Click on the damaged pillar to zoom in.
- Use the RUSTY SWORD 4 times.
- This will remove the boards.
- Use the POCKET DRAGON on the chain.
- Go down to the cave entrance.
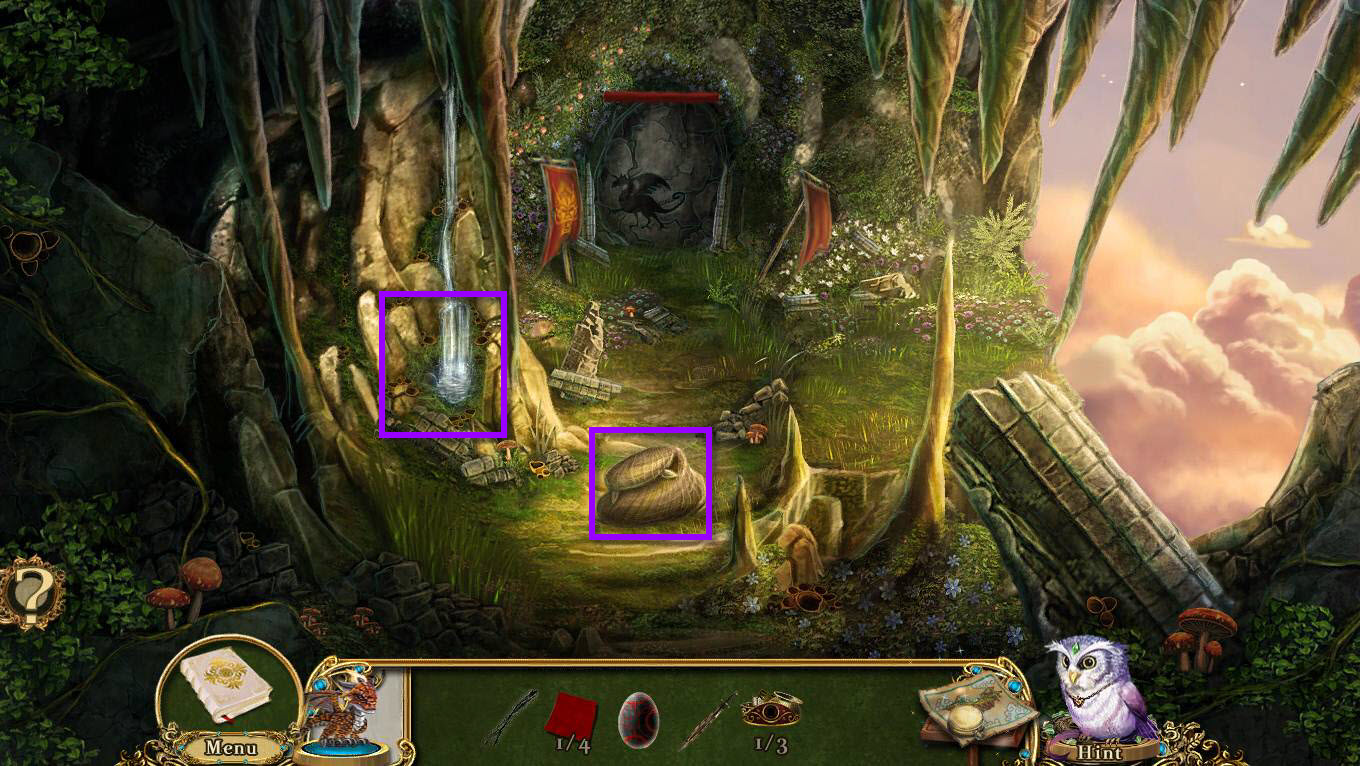
- Click on the SANDBAG to take it.
- Take the peat moss which will turn into the 1/3 SOIL CONDITIONERS.
- Go back two screens and enter the armory.
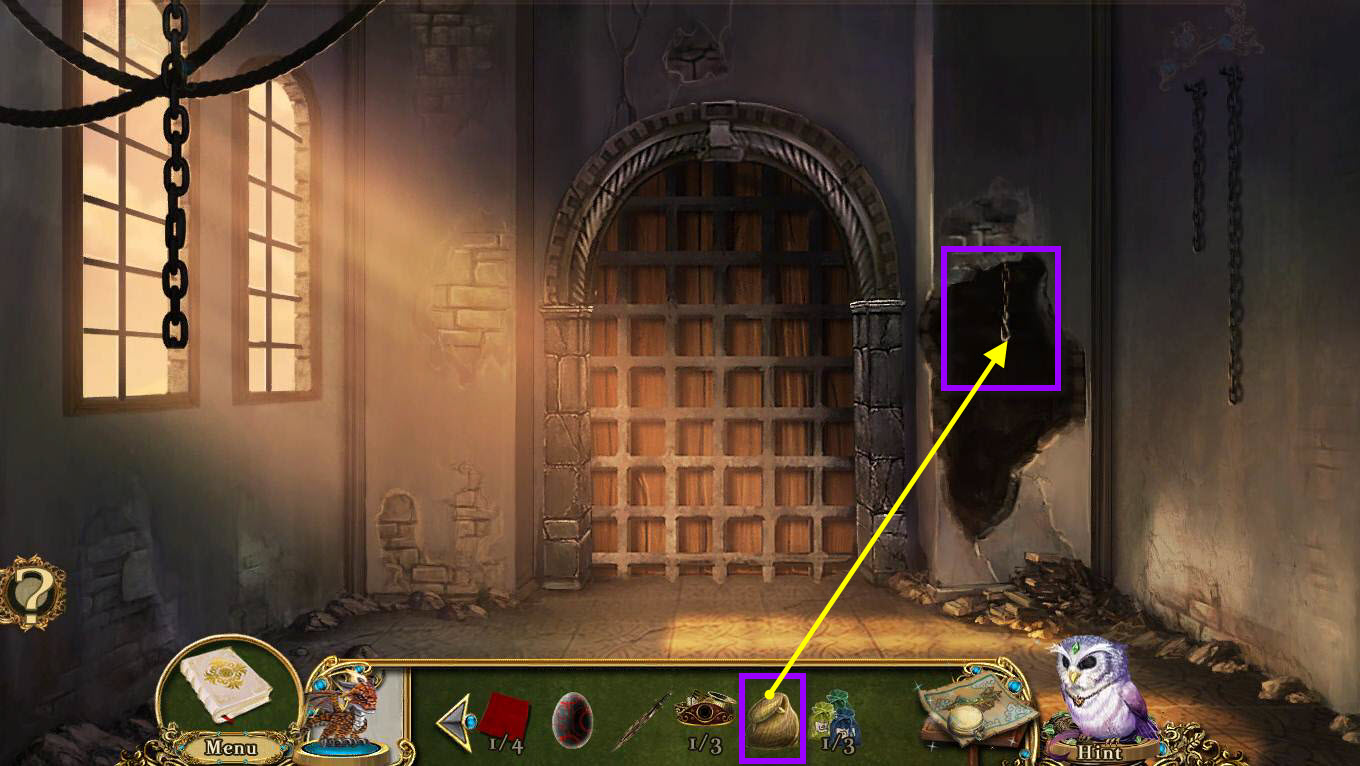
- Click on the portcullis to zoom in.
- Use the SANDBAG on the hook.
- Enter the barracks.
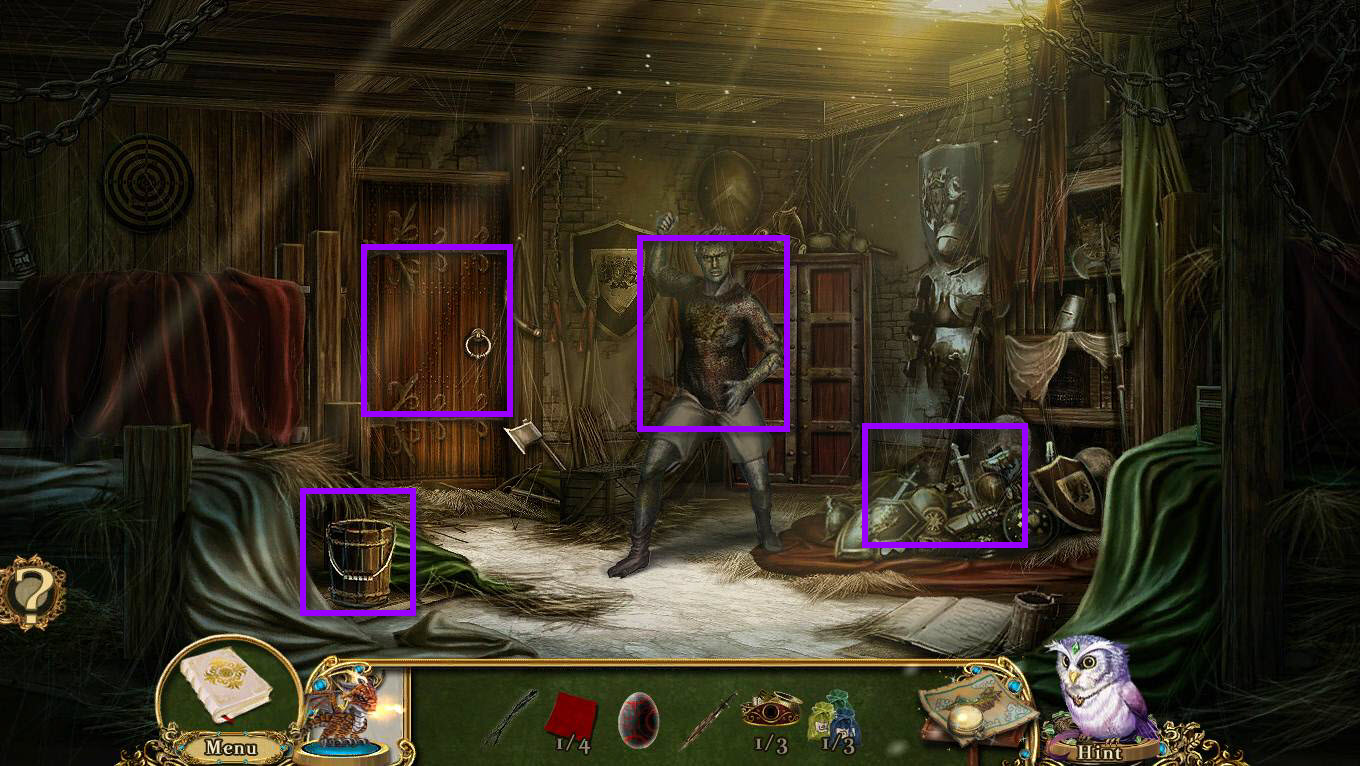
- Click on the petrified guard captain to zoom in.
- Take the CRUSTY CHAINMAIL.
- Take the 2/4 QUILT PATCH on his shirt.
- Click on the barred door to open it.
- Click on the bucket on the left to zoom in.
- Take the chalk which turns into the 2/3 SOIL CONDITIONERS.
- Take the SAND BUCKET.
- Click on the scrap metal pile to access a hidden object scene.
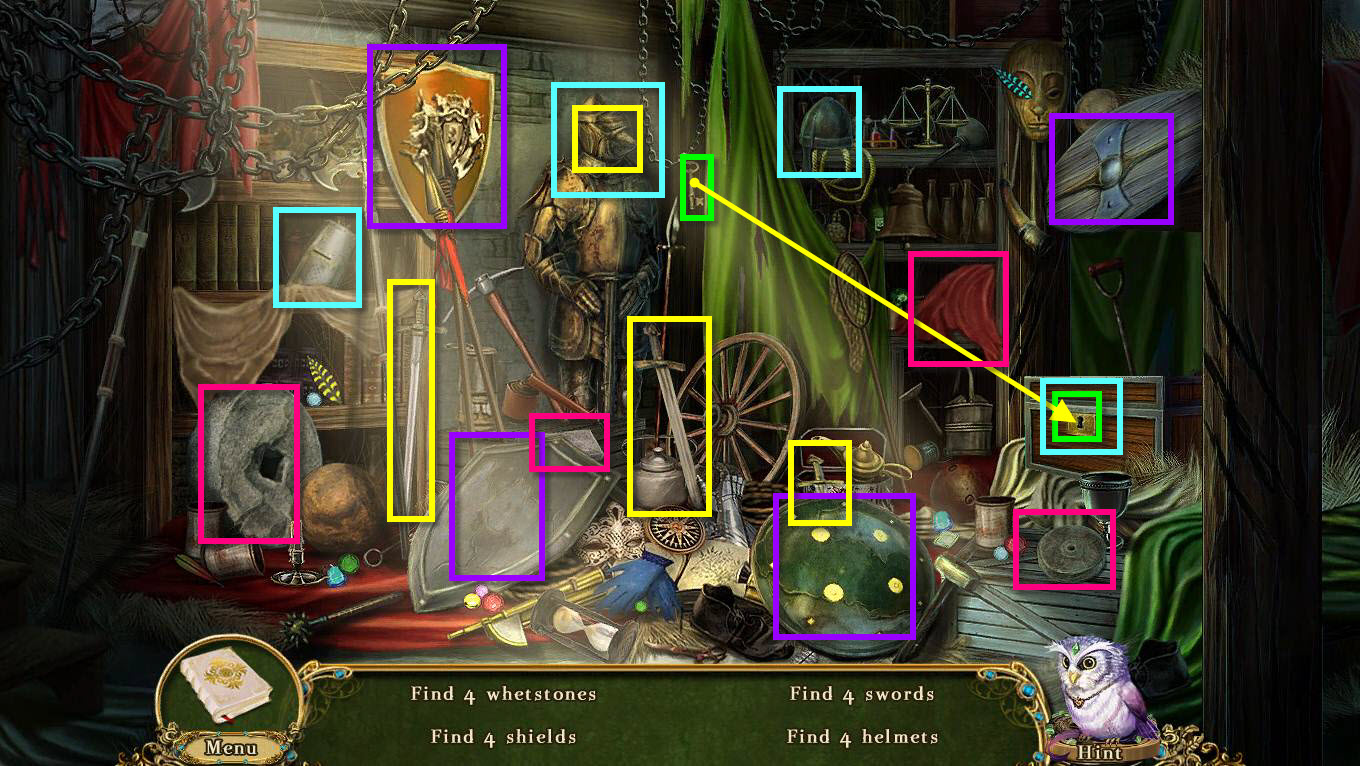
- Find all the items on the list.
- See the screenshot above to the solution.
- The swords are in yellow. One is in the suit of armor.
- The helmets are in blue. One is in the chest. Use the key to open it.
- The shields are in purple.
- The whetstones are in pink. One is behind the cloth on the shelf.
- Once you have found all the objects, you will receive the ROUND WHETSTONE.
- Go back one to the armory.
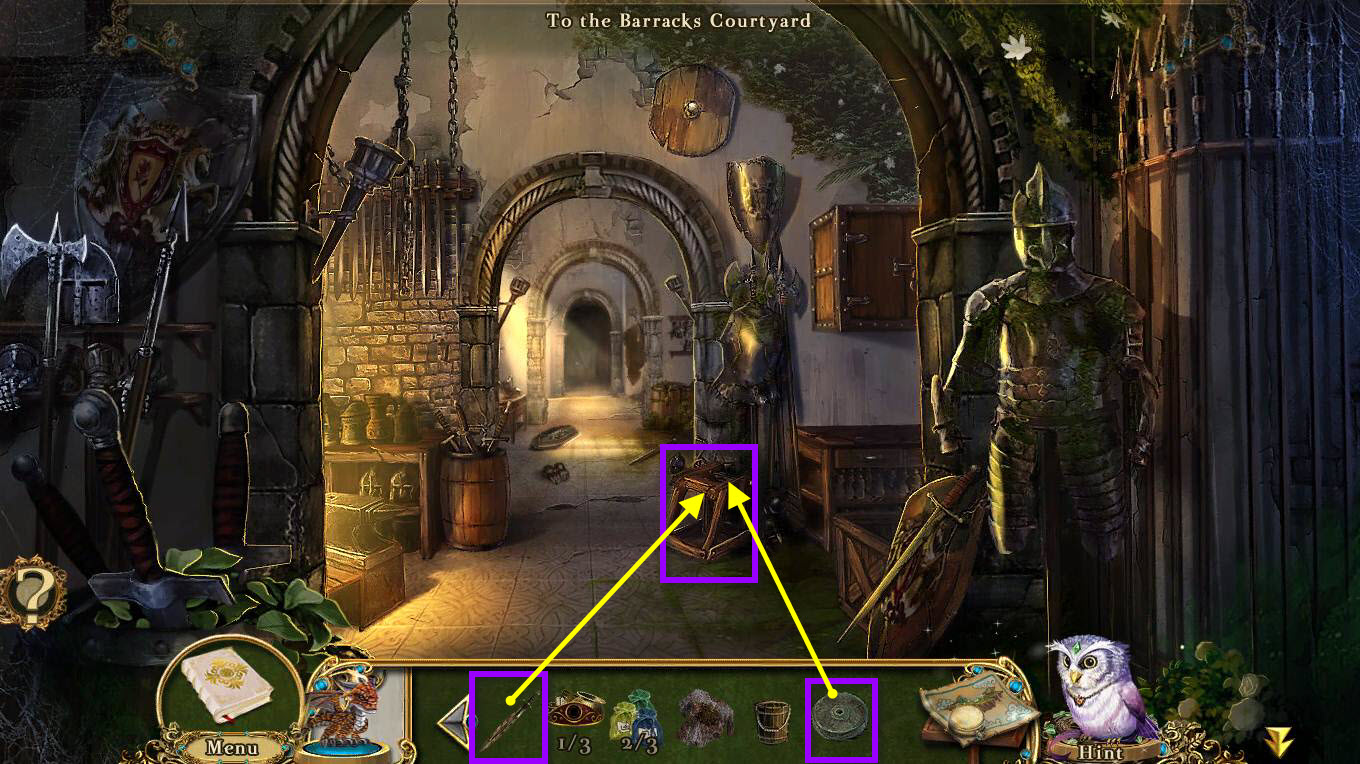
- Click on the grindstone to zoom in.
- Use the ROUND WHETSTONE on the grindstone.
- Use the RUSTY SWORD on the whetstone to sharpen it.
- Click on the whetstone and move your mouse in a counterclockwise motion.
- You will receive the SHARP SWORD.
- Go back to the windmill and enter the hole in the floor again.
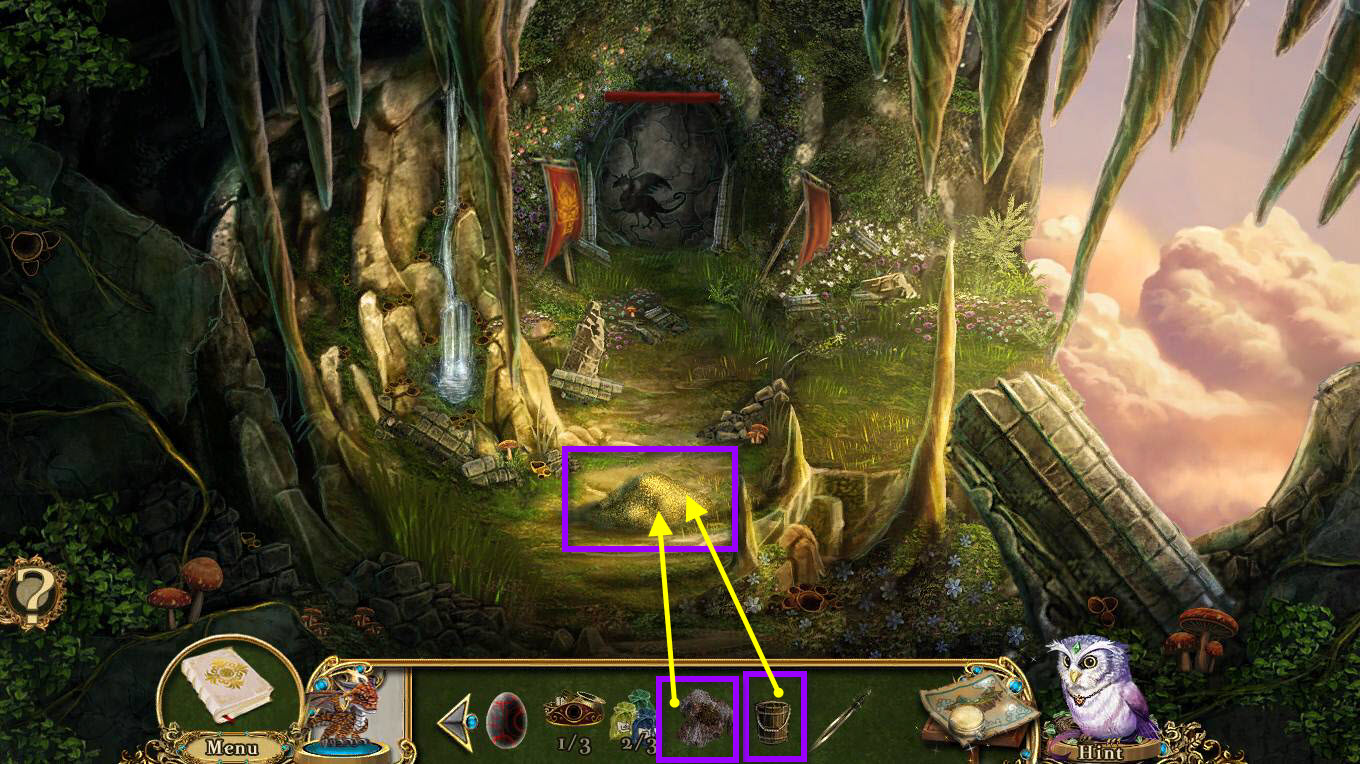
- Click on the sand on the ground to zoom in.
- Use the SAND BUCKET on the pile to put some sand in the bucket.
- Use the CRUSTY CHAINMAIL on the bucket.
- Click on the CRUSTY CHAINMAIL and then move your mouse back and forth.
- You will receive the CHAINMAIL.
- Go back to the barracks and the petrified captain.
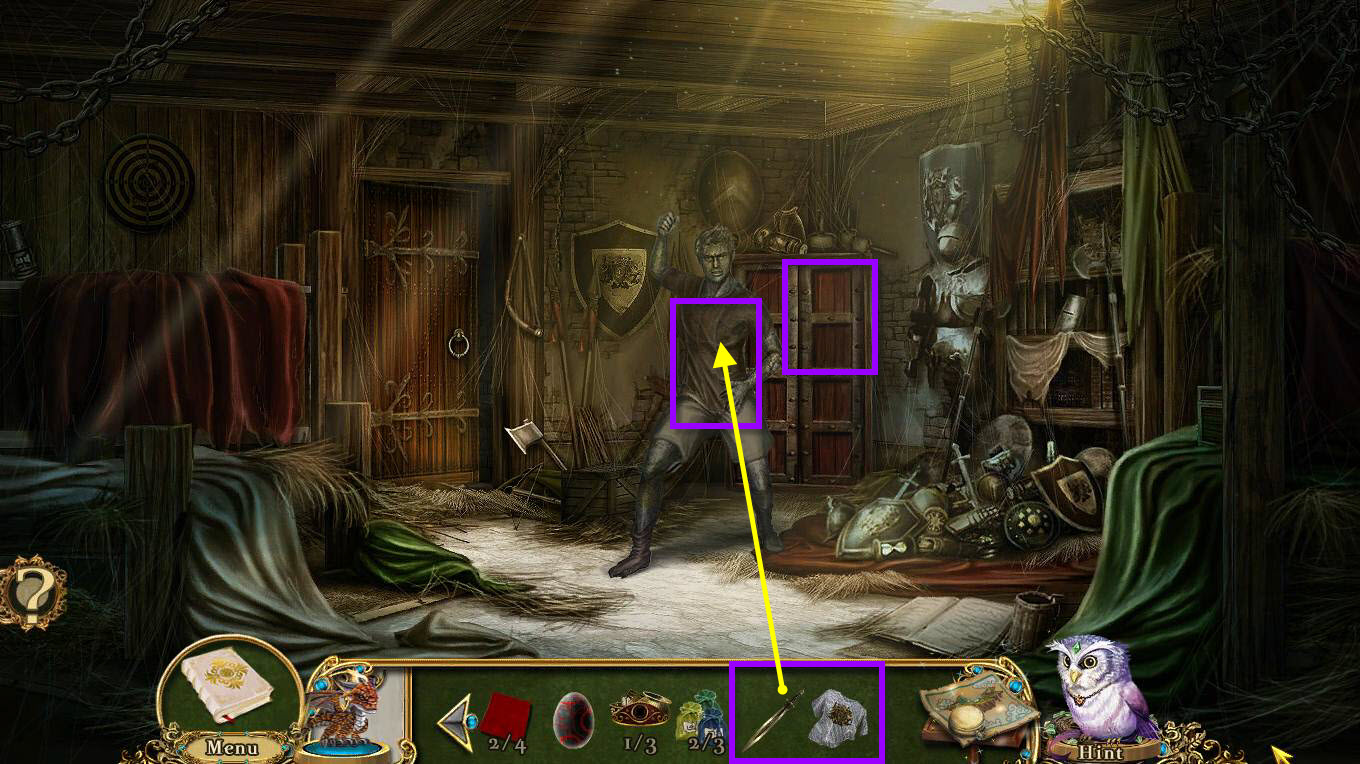
- Click on the petrified guard captain to zoom in.
- Use the SHARP SWORD and the CHAINMAIL on him.
- He will turn back to normal.
- Click on him to talk to him.
- Click on the locker to start a mini-game.
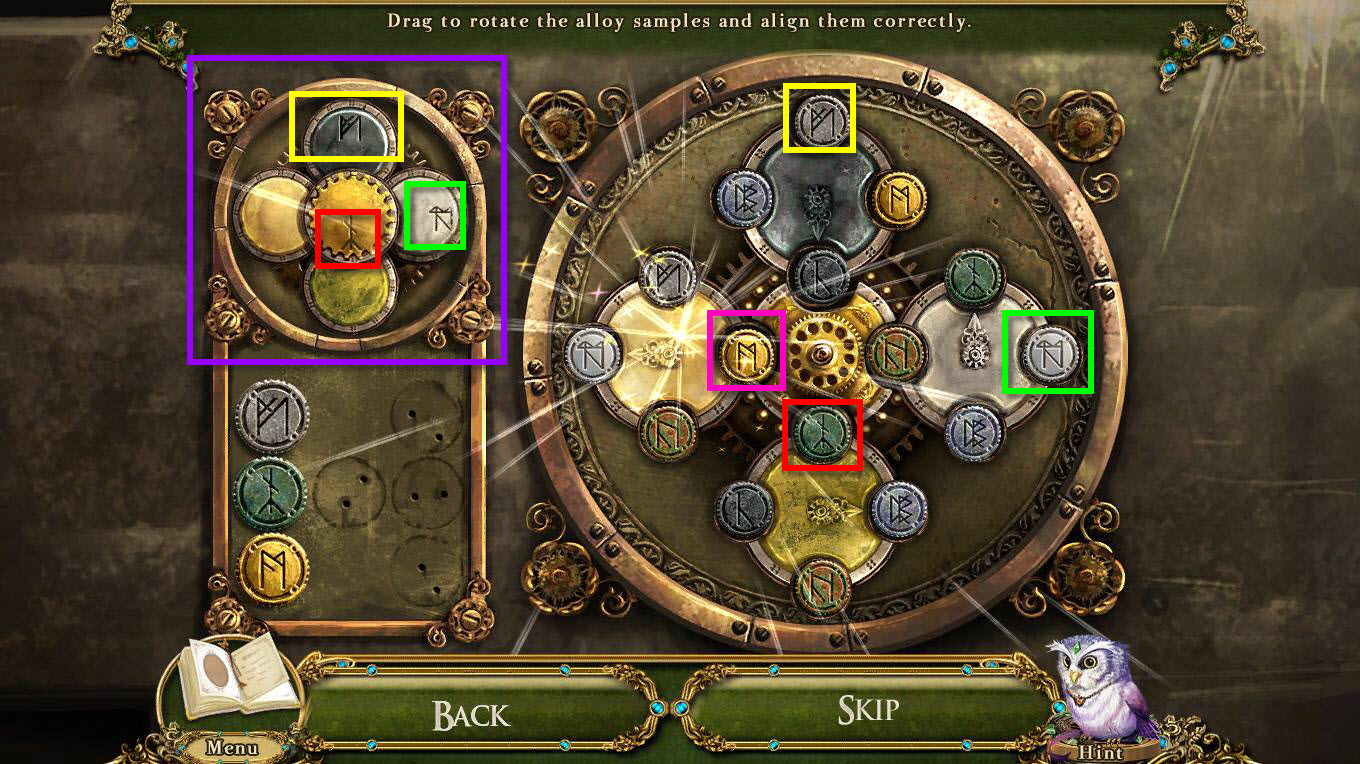
- The goal is to spin the wheels so that they match the smaller section on the left.
- You can spin the entire wheel and then each of the smaller wheels on all four corners.
- Spin the entire wheel so that the dark gray wheel is on the top.
- Then match the symbols as seen in the screenshot.
- Take the sulphur which will turn into 3/3 SOIL CONDITIONER.
- Take the incubator base which will turn into 2/3 INCUBATOR PARTS.
- Go forward one screen through the door.
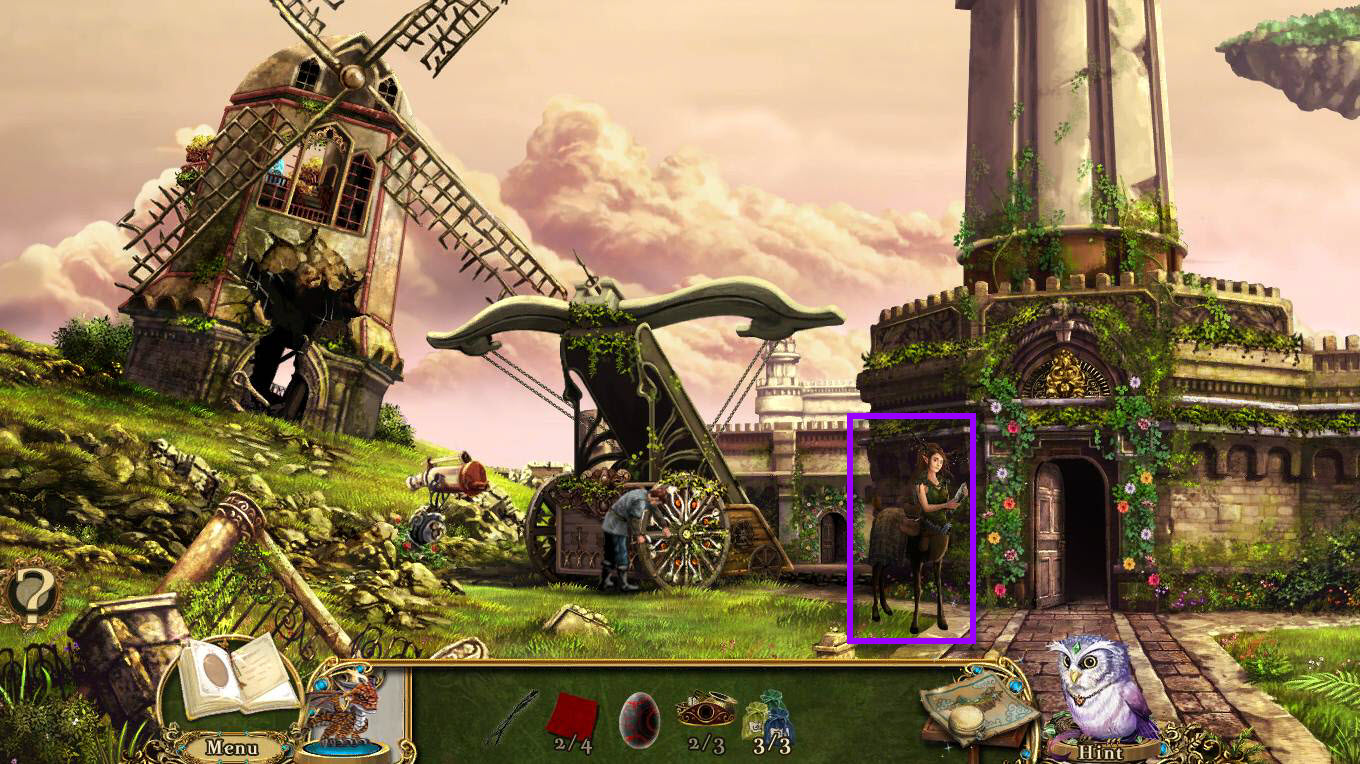
- Click on the faun to talk to her.
- She will give you the MEDICAL NOTES and the HERB SEEDS.
- Use your map to fast travel to the greenhouse and click on the garden shed.
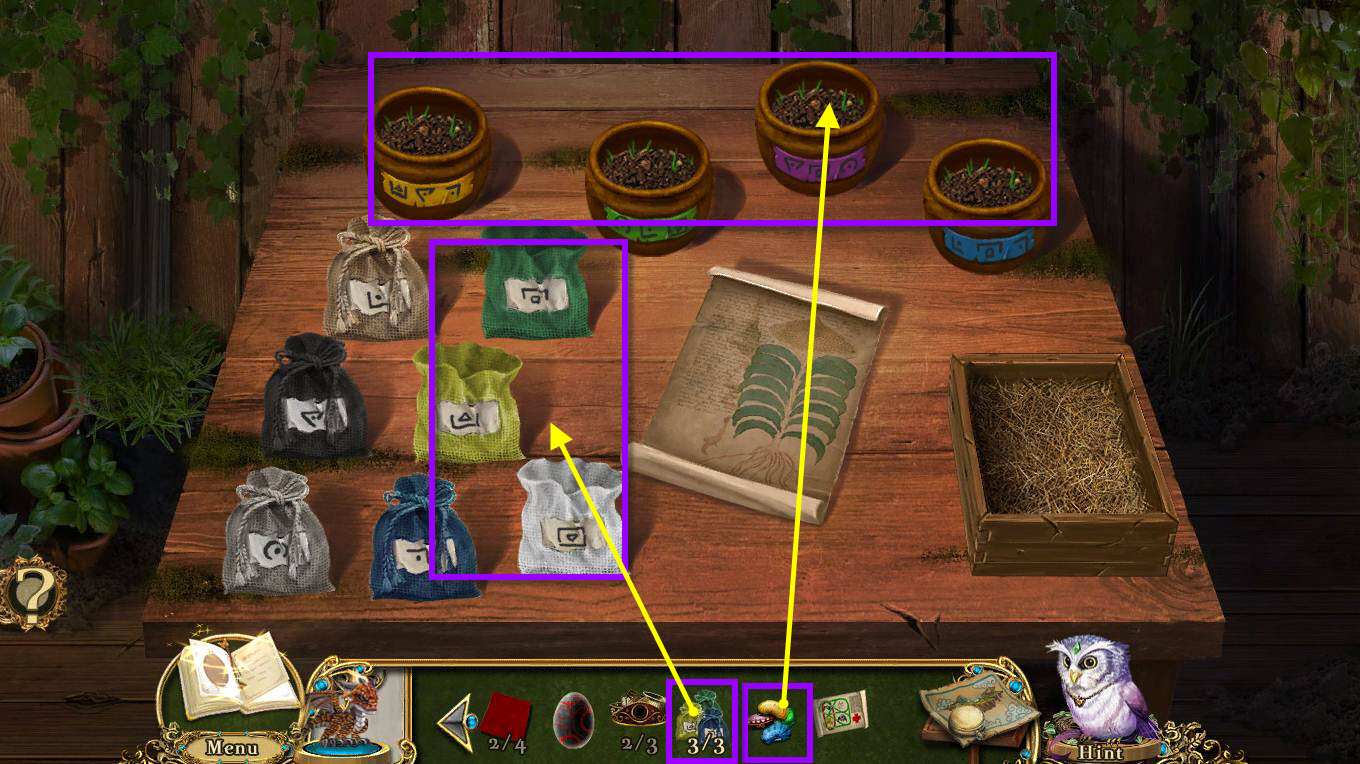
- Use the 3/3 SOIL CONDITIONER on the table.
- Use the HERB SEEDS on the pot.
- This will start a mini-game.
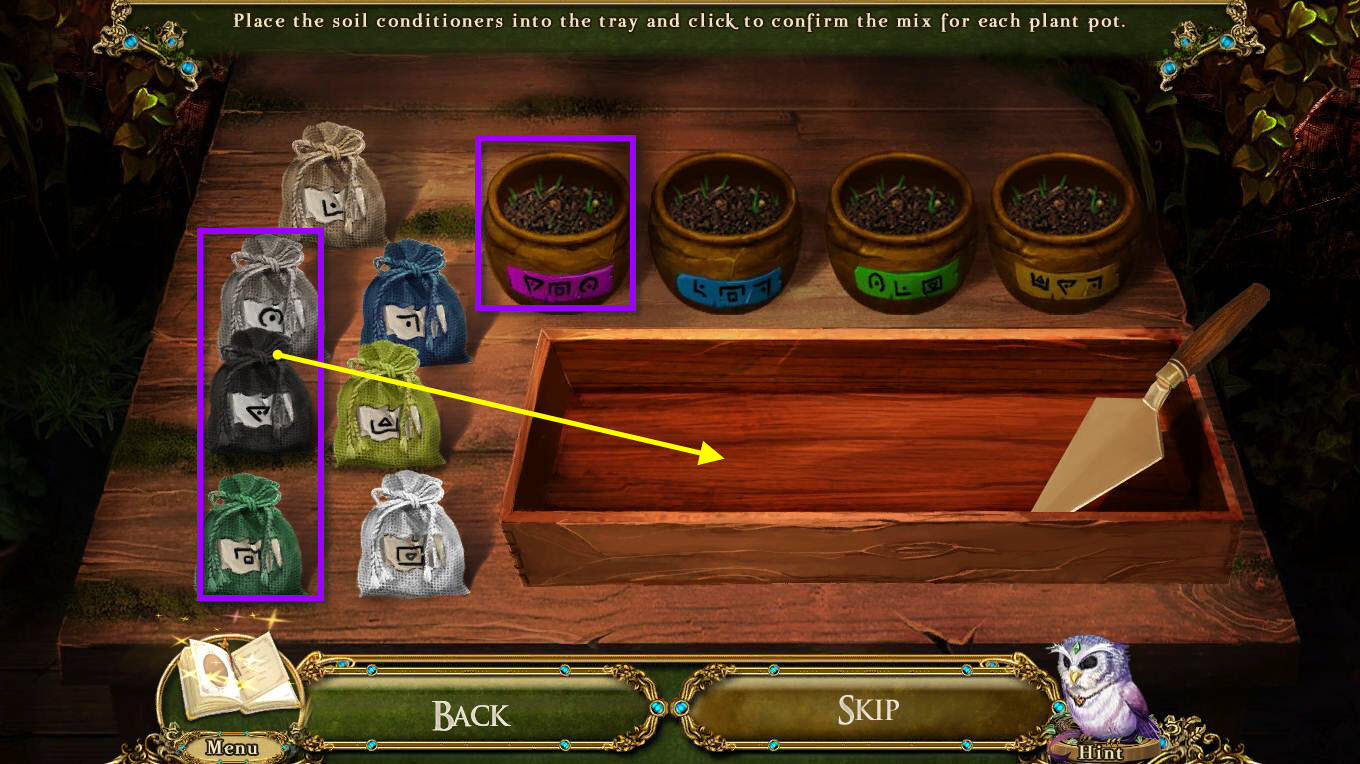
- The goal of the puzzle is to find the bags with the symbols that match the symbols on the pots.
- Find the first three symbols for the first pot.
- Place them in the box.
- Then click on the mixture to combine them.
- See the screenshot for the solution.
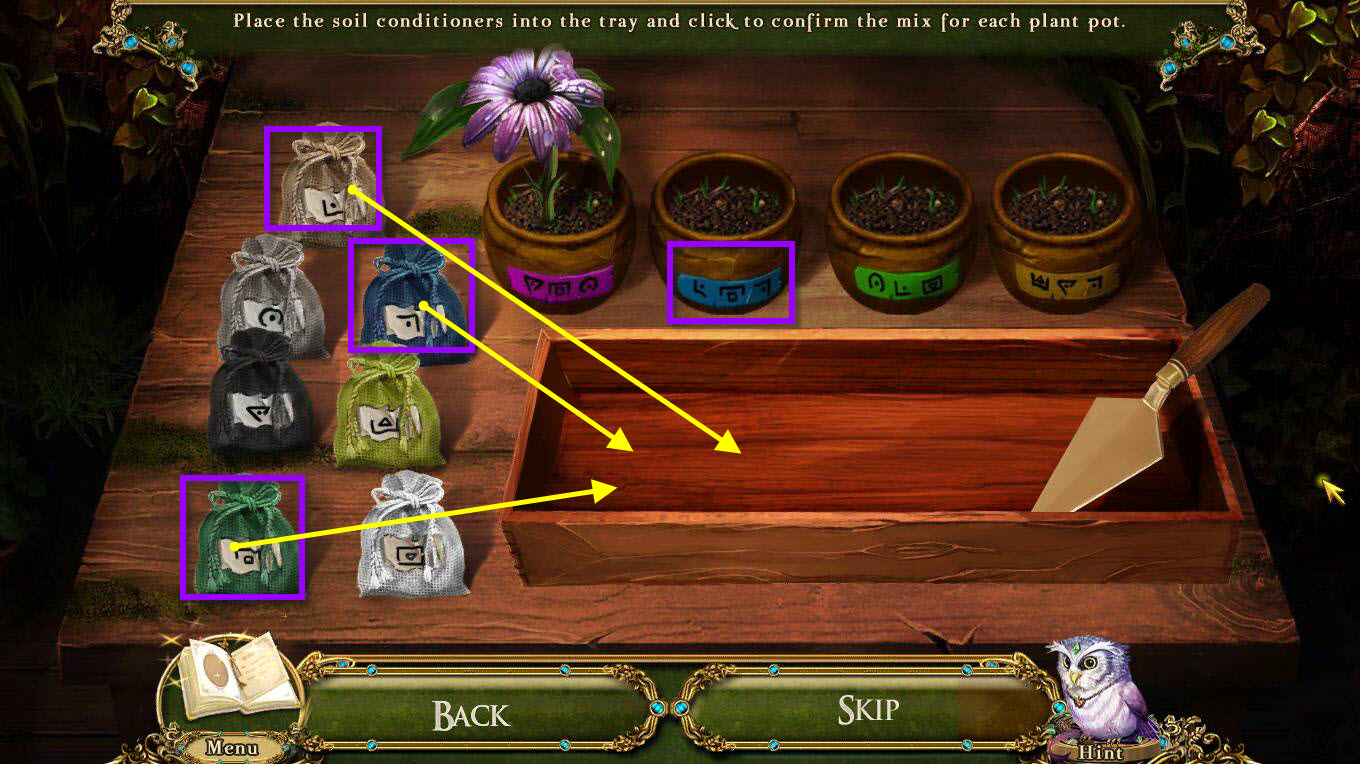
- Find the three symbols for the second pot.
- Place them in the box.
- Then click on the mixture to combine them.
- See the screenshot for the solution.
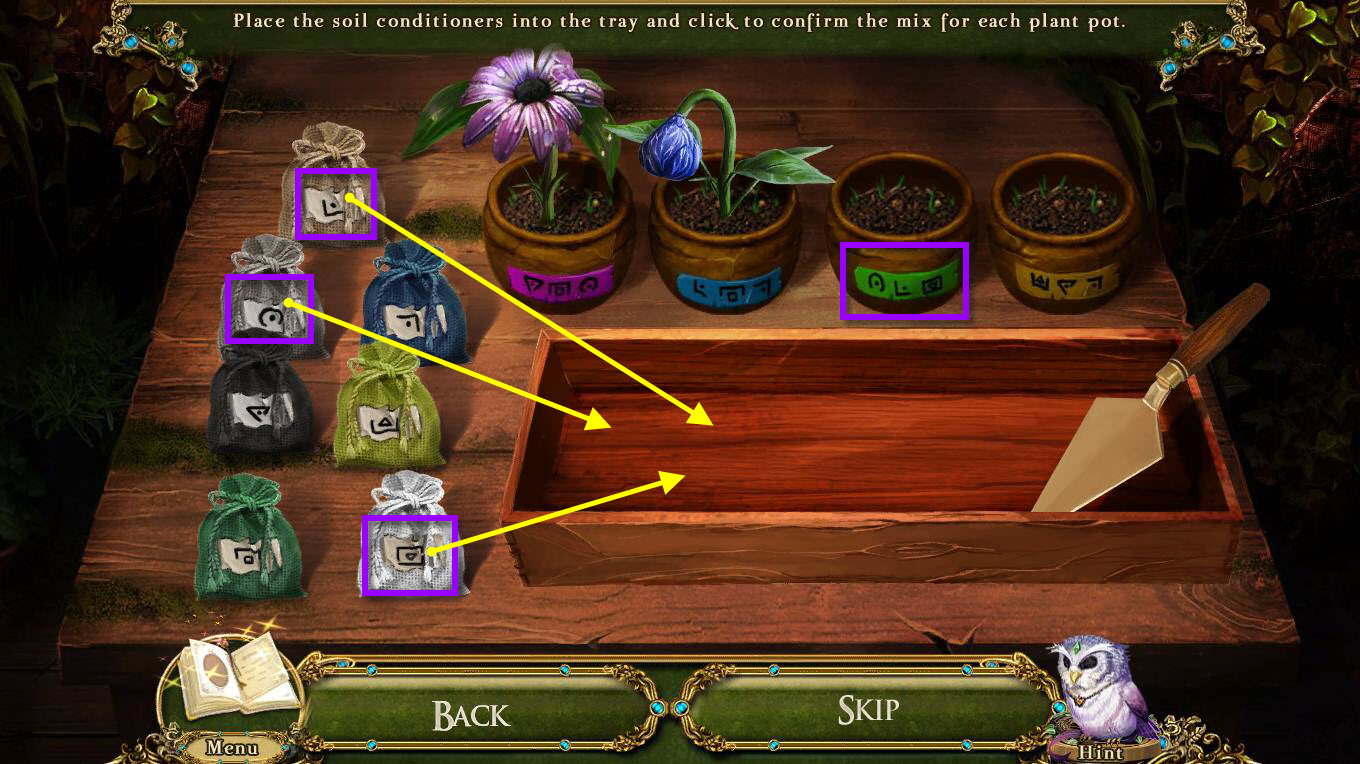
- Find the three symbols for the third pot.
- Place them in the box.
- Then click on the mixture to combine them.
- See the screenshot for the solution.
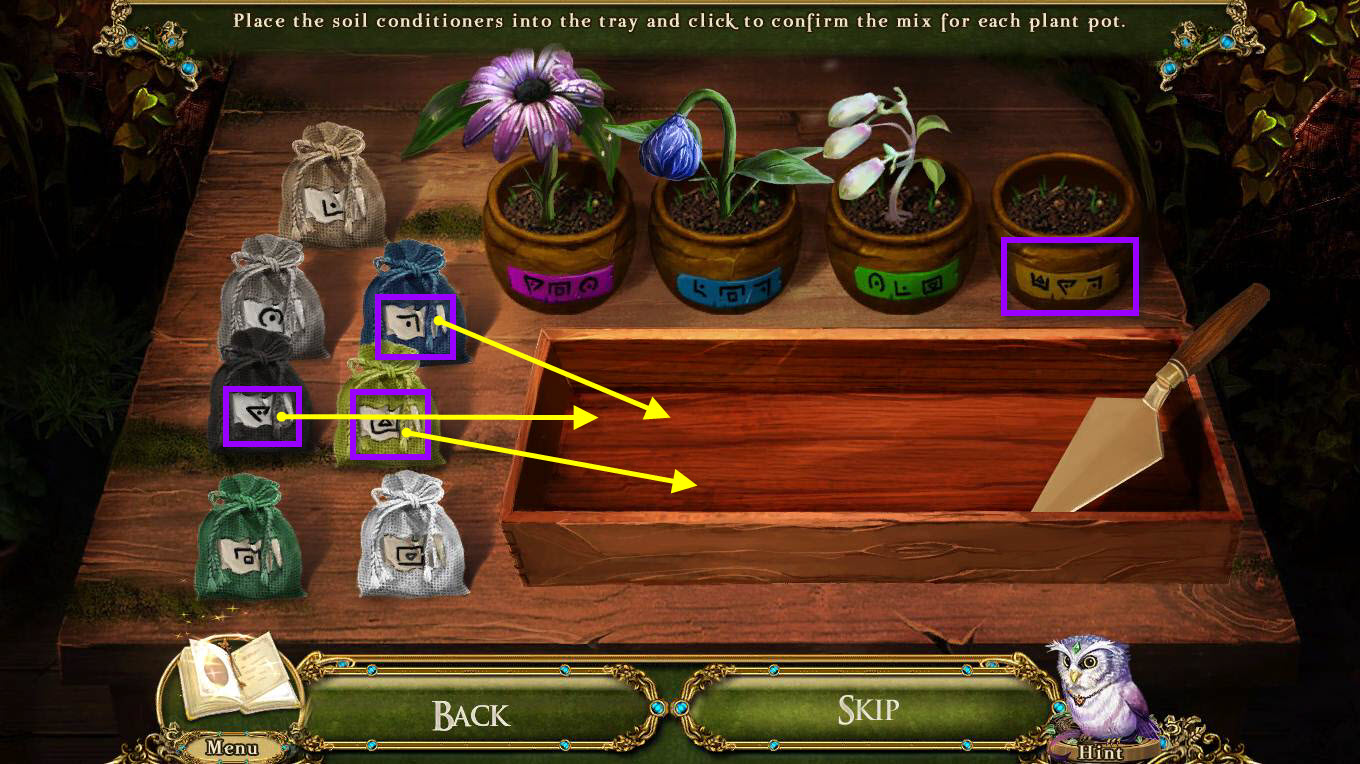
- Find the three symbols for the fourth pot.
- Place them in the box.
- Then click on the mixture to combine them.
- See the screenshot for the solution.
- You will receive the HERB SAPLINGS.
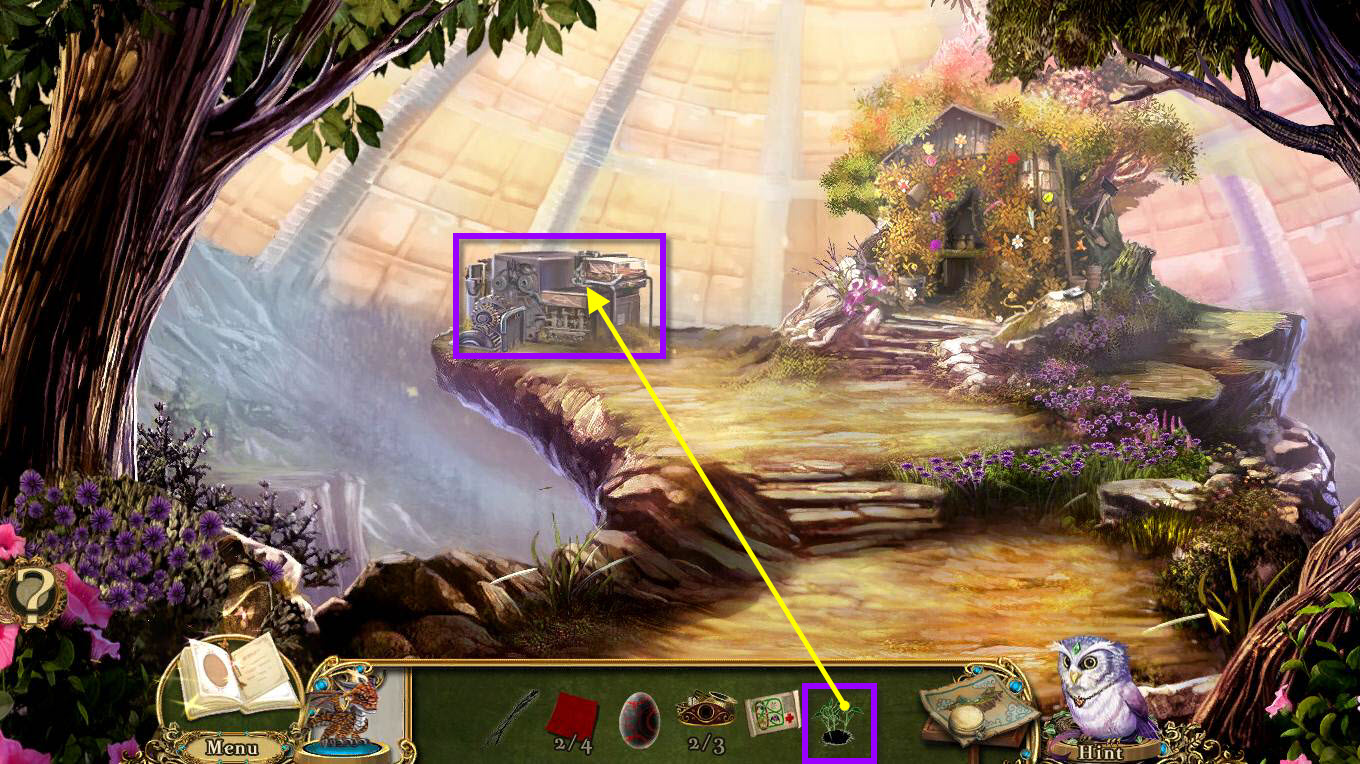
- Click on the plant cultivators to zoom in.
- Use the HERB SAPLINGS on the plant cultivator.
- This will start a mini-game.
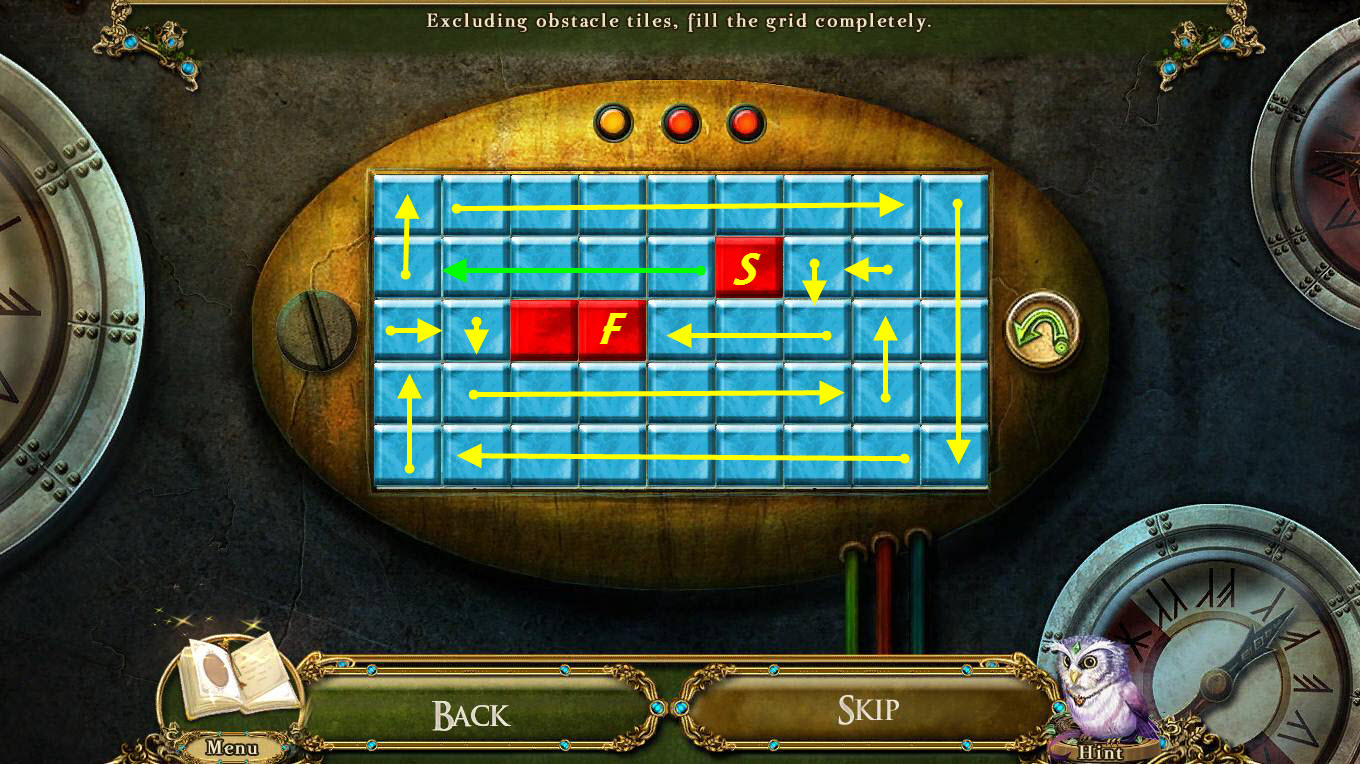
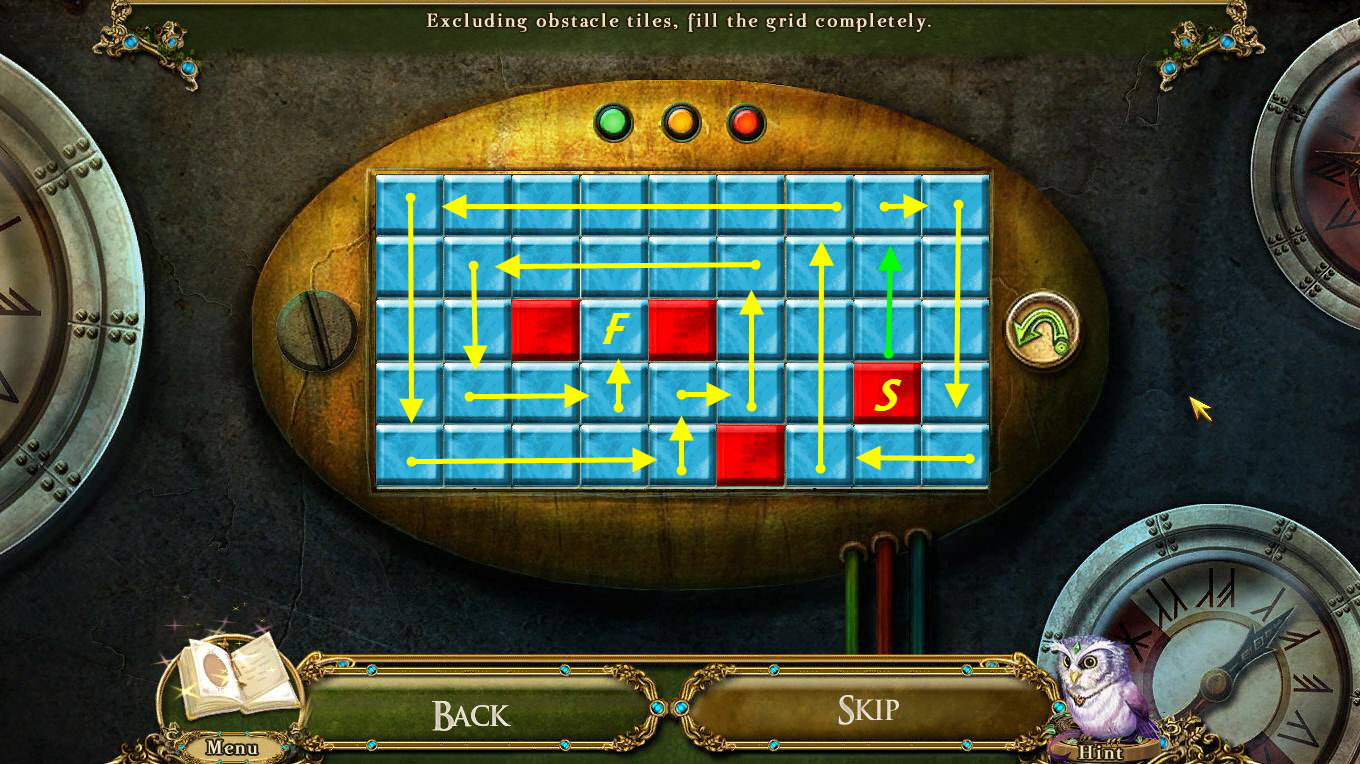
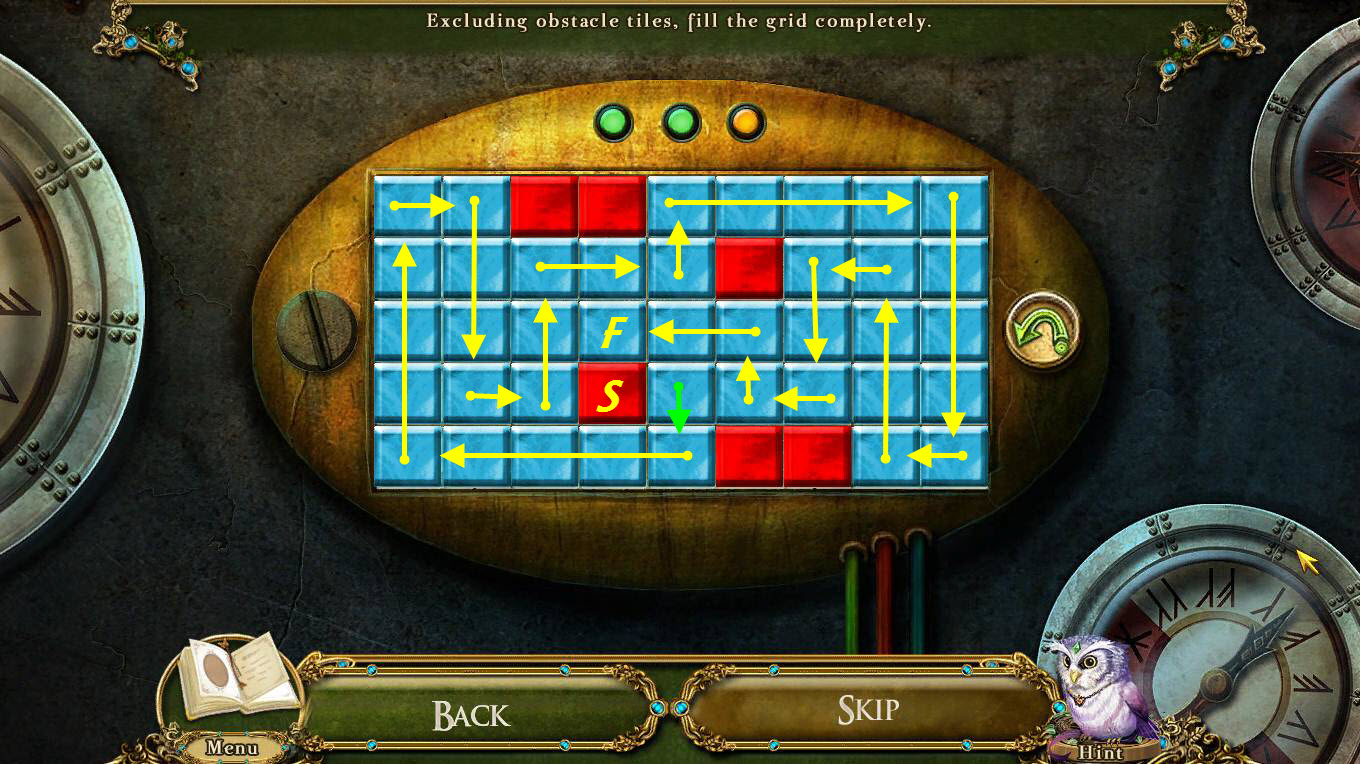
- The goal of the game is to fill in all the squares.
- You will need to complete three rounds of this puzzle.
- See the screenshots above for the solution.
- You will receive the DEWGLINT, the SAPPHIRE BUD, SPARKLELEAF, and SUNBRIGHT.
- Use your map to fast travel to the windmill.
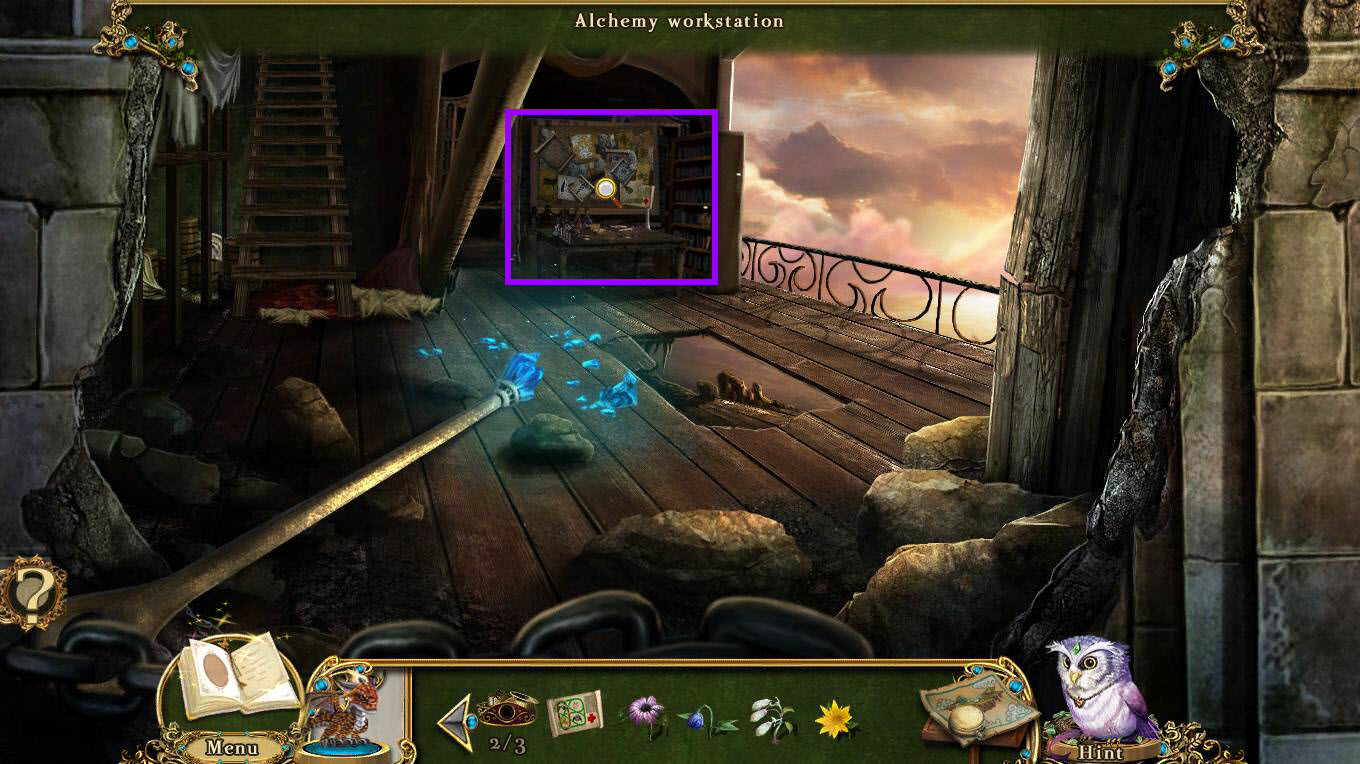
- Click on the alchemy station to zoom in.
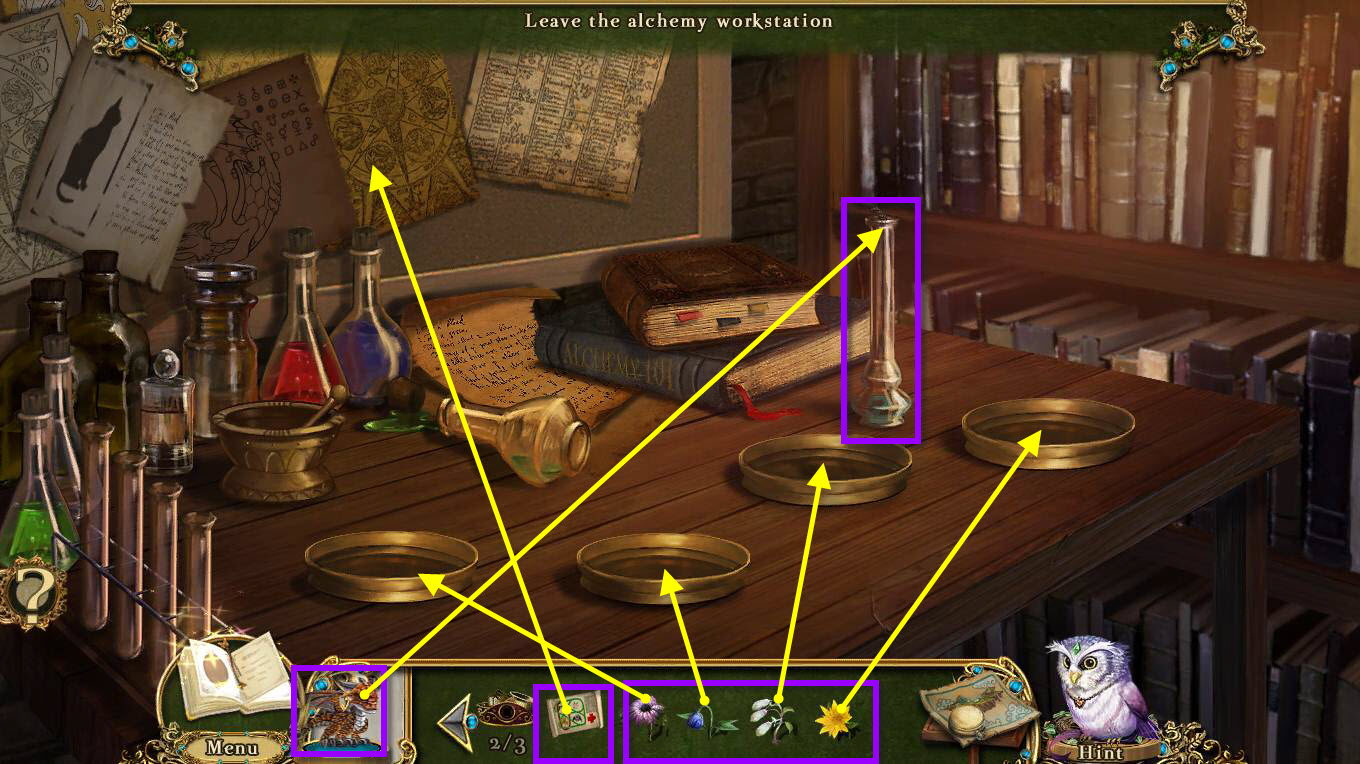
- Use your Pocket Dragon on the bunsen burner to light it.
- Use the DEWGLINT, the SAPPHIRE BUD, SPARKLELEAF, and SUNBRIGHT on the dishes.
- Use the MEDICAL NOTES on the board.
- This will start a mini-game.
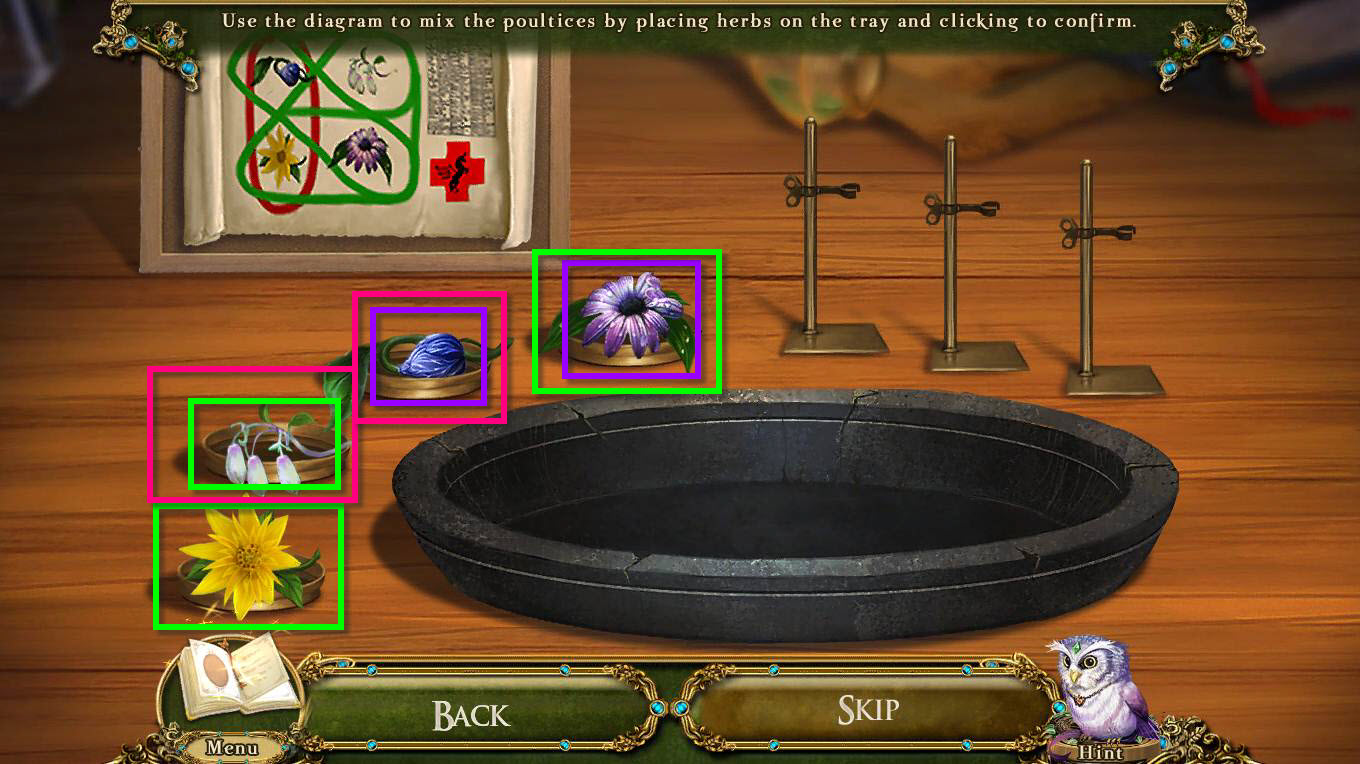
- The goal of the game is to mix the right herbs.
- Use the diagram to help with the right mixtures.
- Click on the herbs and place them in the pan.
- Click on the pan to mix the herbs.
- The combinations are: Dewglint and Sapphire Bud, Sapphire bud and Sparkleleaf, and finally... Dewglint, Sparkleleaf, and Sunbright.
- You will receive the HEALING POULTICES.
- Use your map to fast travel to the Castle Landing.
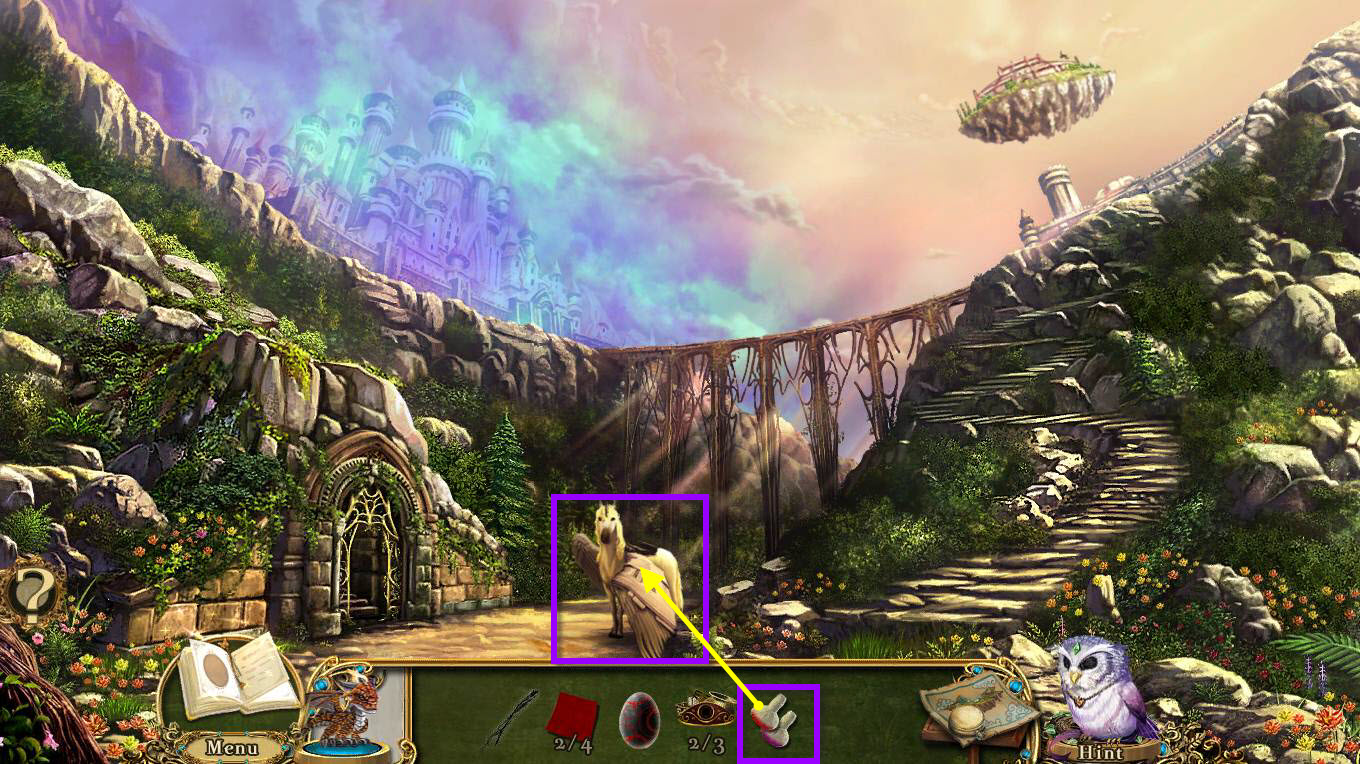
- Use the HEALING POULTICES on the unicorn.
- This will start a mini-game.
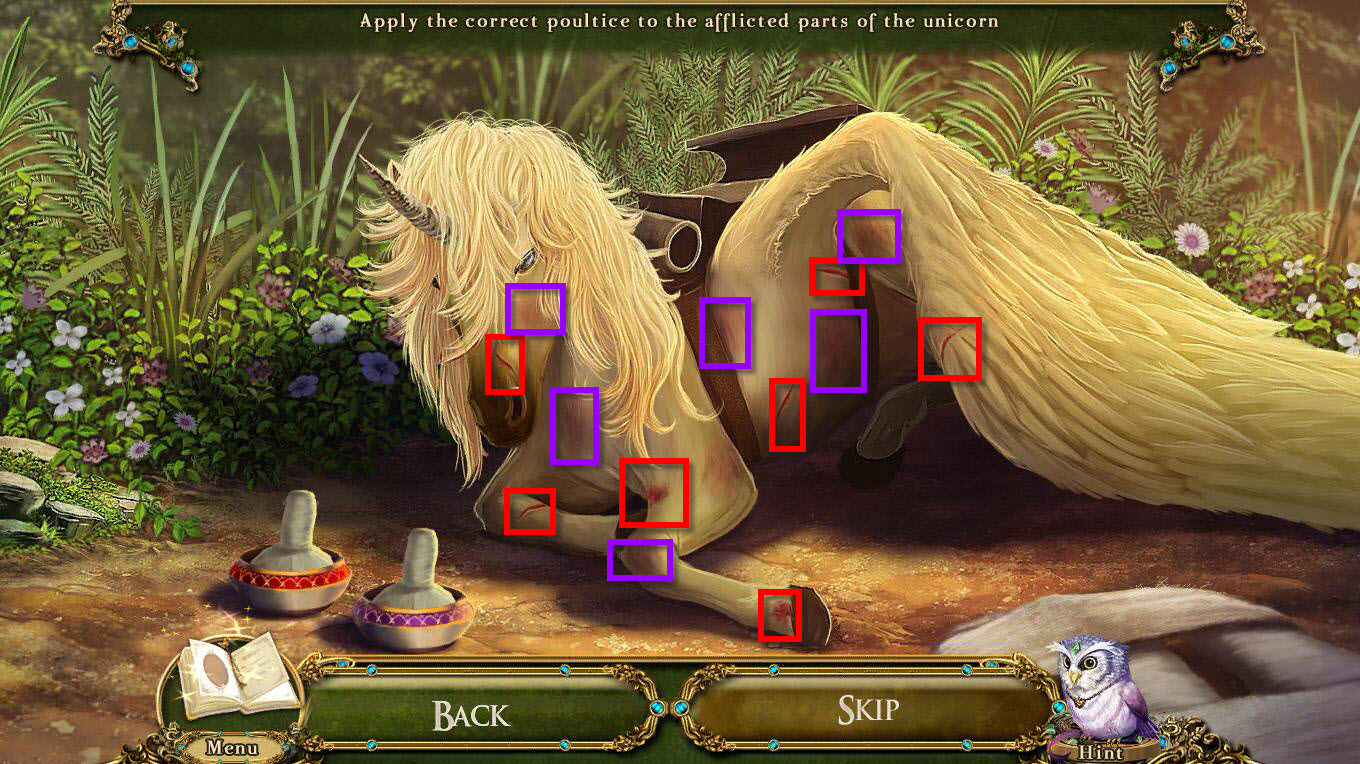
- The goal of the game is to use the correct poultices on the right injuries.
- Simply match the colors.
- Use the red poultice on the red scratches.
- Use the purple poultice on the purple bruises.
- You may need to use it on an area more than once.
- Once you are done healing the unicorn, click on the unicorn and you'll be taken to the map screen.
- Click on the Aviary in the top right corner.
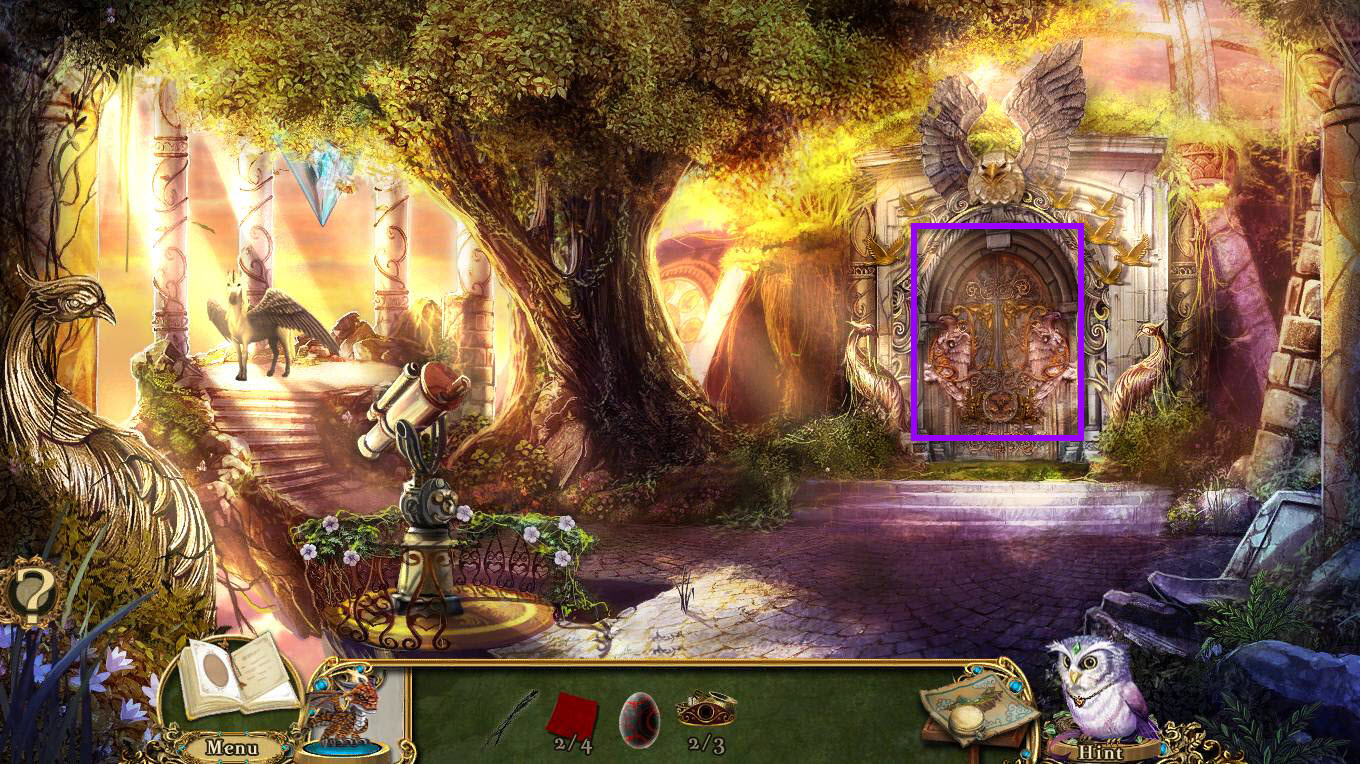
- Click on the Aviary Entrance.
- This will start a mini-game.
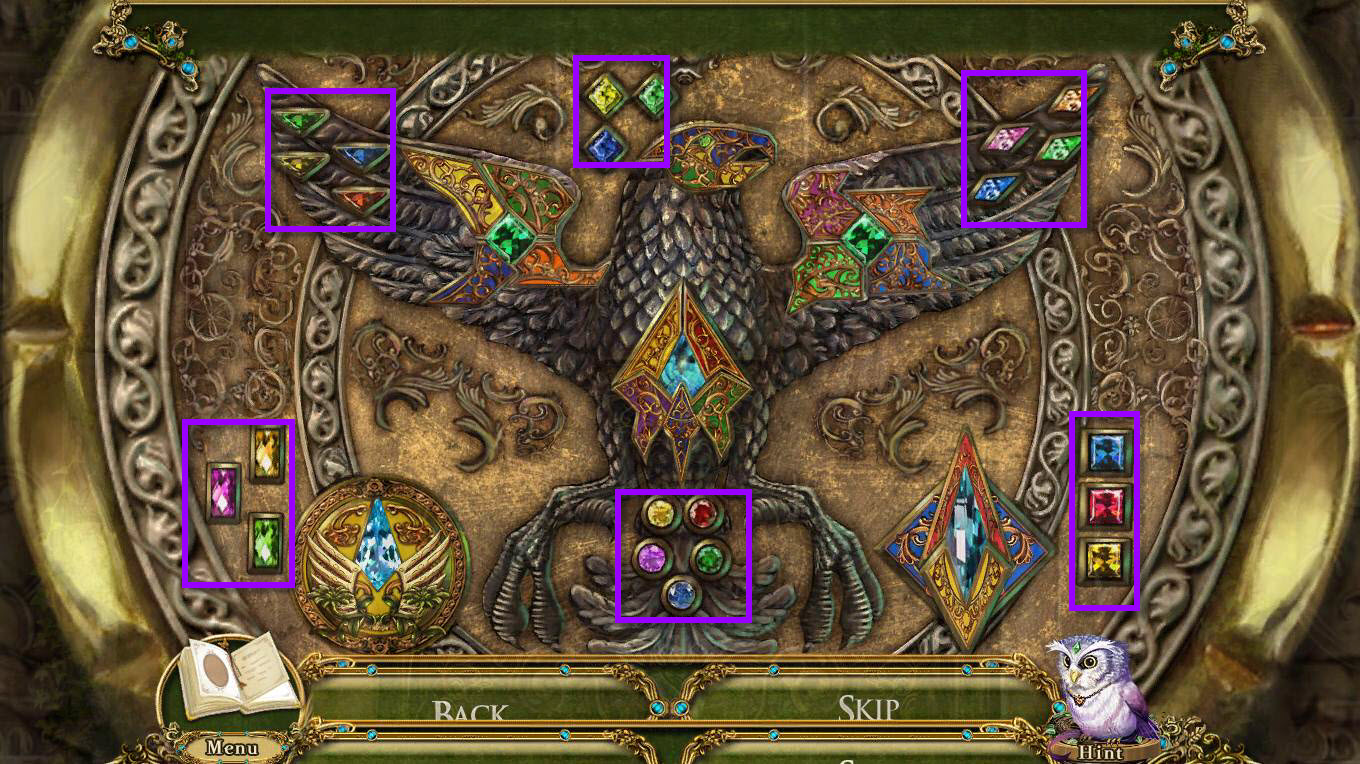
- The goal of the game is to restore the pieces of the falcon crest using the buttons.
- There are 6 sections of buttons to restore the crest.
- Each colored button correspondence to its matching color in that particular section.
- Simply rotate the pieces until they are in the correct position.
- See the screenshot for the solution.
- Enter the aviary.
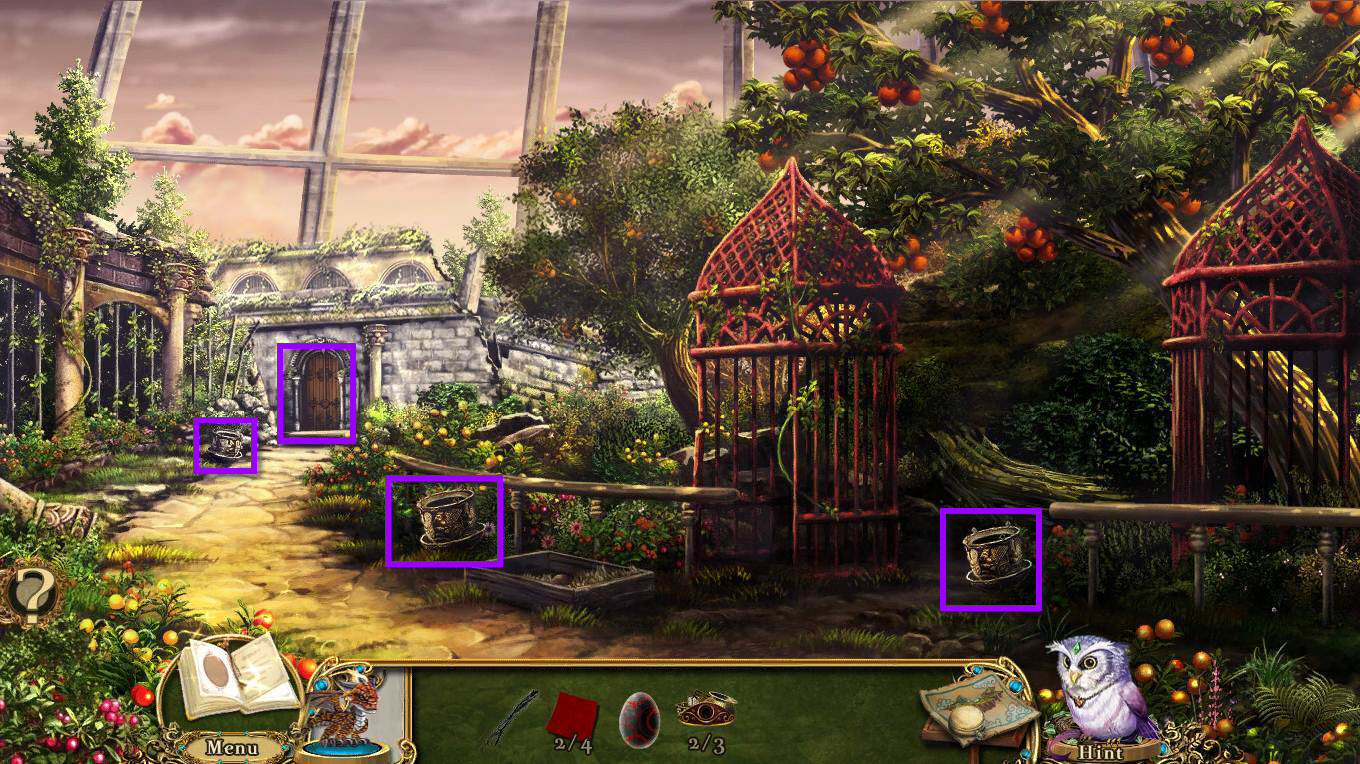
- Click on the 3 BIRD FEEDERS to take them.
- Click on the storeroom to start a hidden object scene.
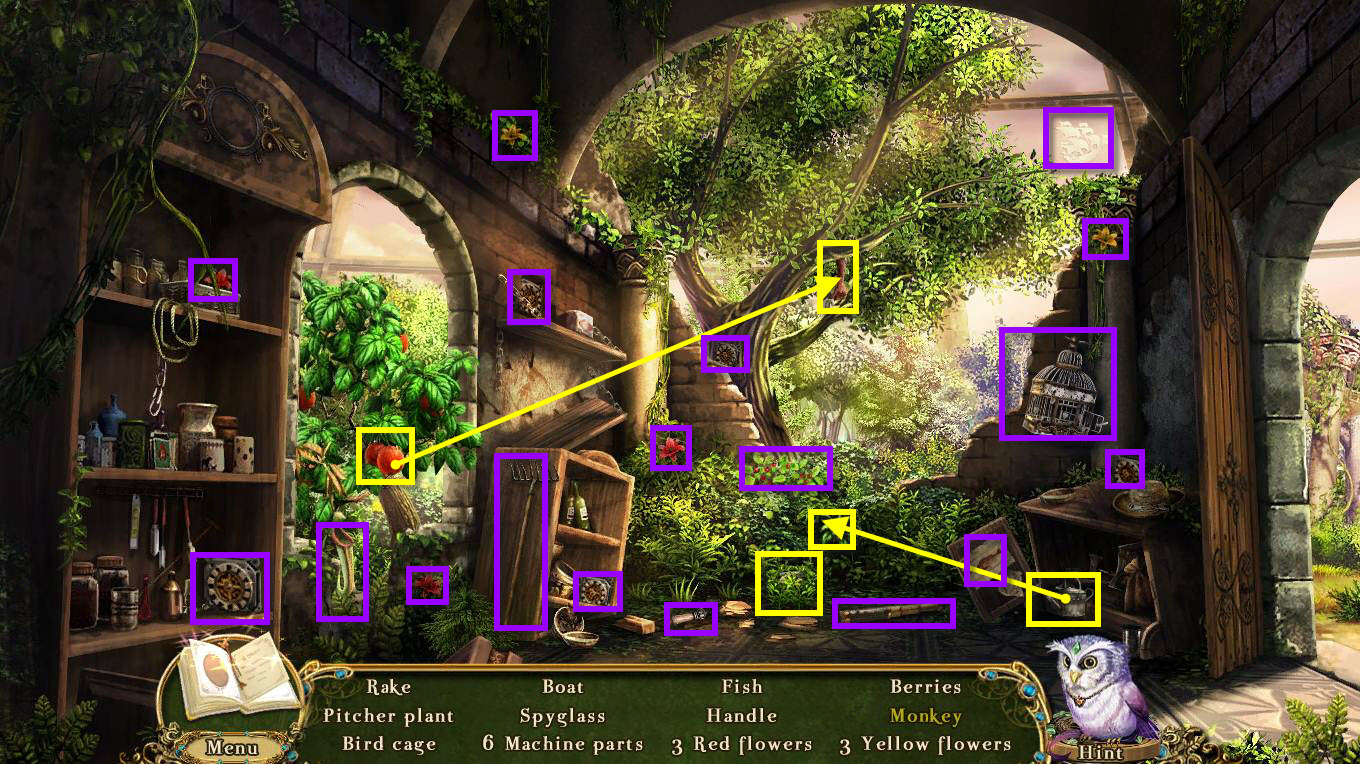
- Find all the items on the list.
- Click on the fruit on the left and use it on the monkey hand hanging from the tree to find the monkey.
- Use the watering can on the bushes area to find the last yellow flower.
- Move the bushes to find the last machine part.
- You will receive the 3/3 INCUBATOR PARTS and the HANDLE.
- Use your map to fast travel to the Windmill Crystal Forge.
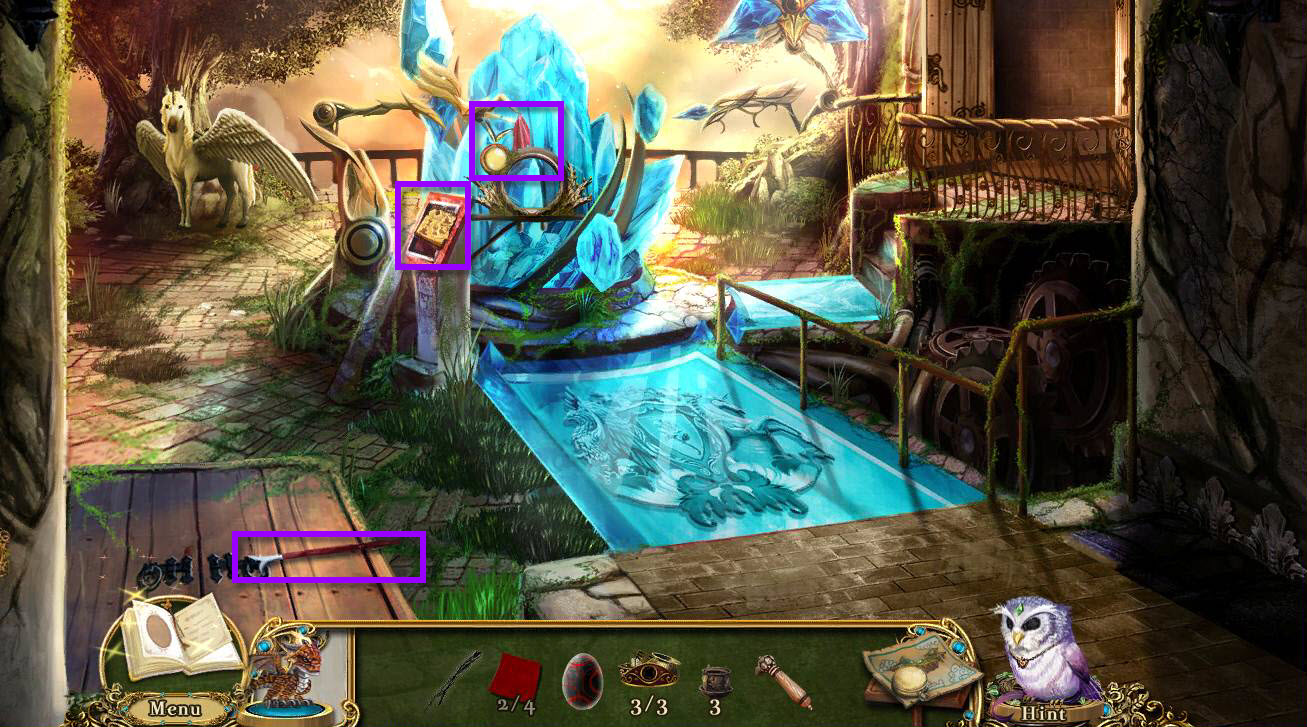
- Click on the Crystal Forge to zoom in.
- Take the 3/4 QUILT PATCH.
- Click on the essence of fire chart to read it.
- Take the GAFF HOOK.
- Go to the right to the Gear Room.
- This will start a hidden object scene.
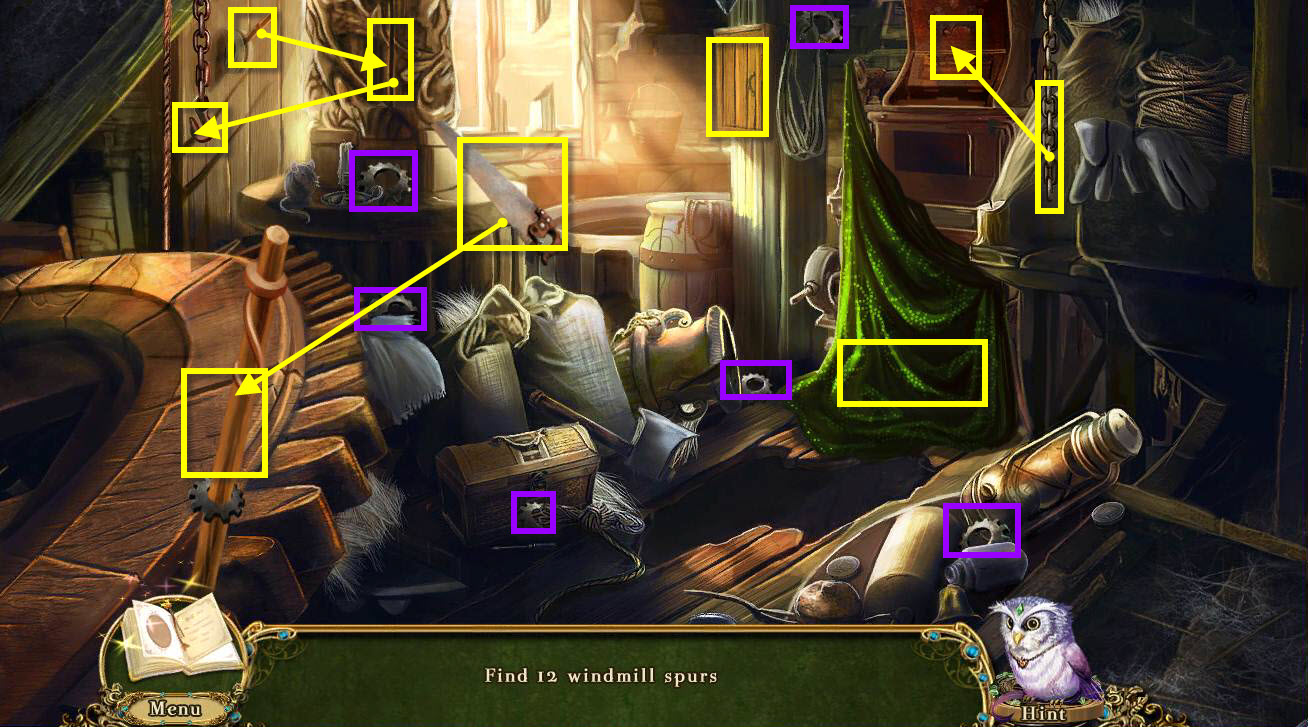
- You need to find the 12 windmill spurs.
- Click on the chain on the right to pull it.
- Click on the green cloth to move it, click on the drawer to open it.
- Click on the cabinet to open it.
- Pull the lever to open the pillar.
- Take the weight that was in the pillar and hang it on the chain on the left.
- Use the saw on the pole on the left.
- You will receive the WINDMILL SPURS.
- Go to the right to the gear room again.
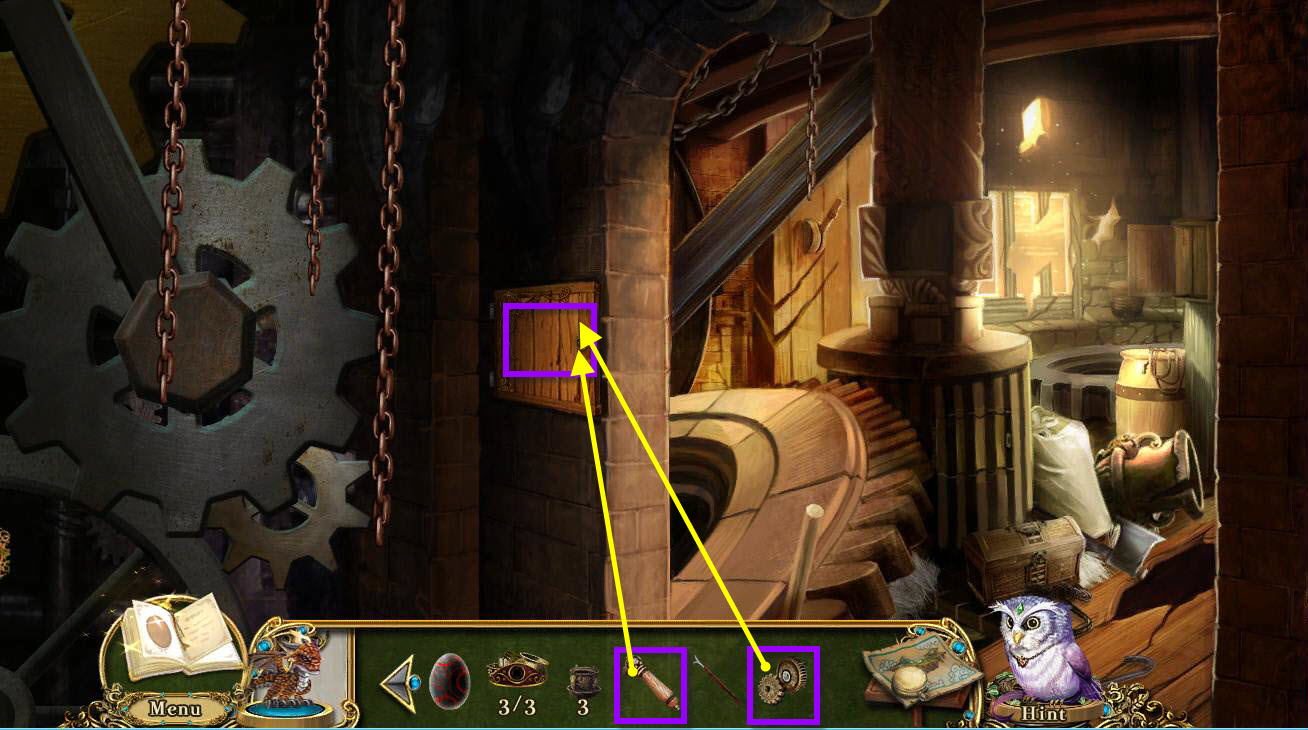
- Click on the gear box to zoom in.
- Take the letter.
- Use the HANDLE on the gear box.
- Click on the handle to open the gear box.
- Use the WINDMILL SPURS on the gear box.
- This will start a mini-game.
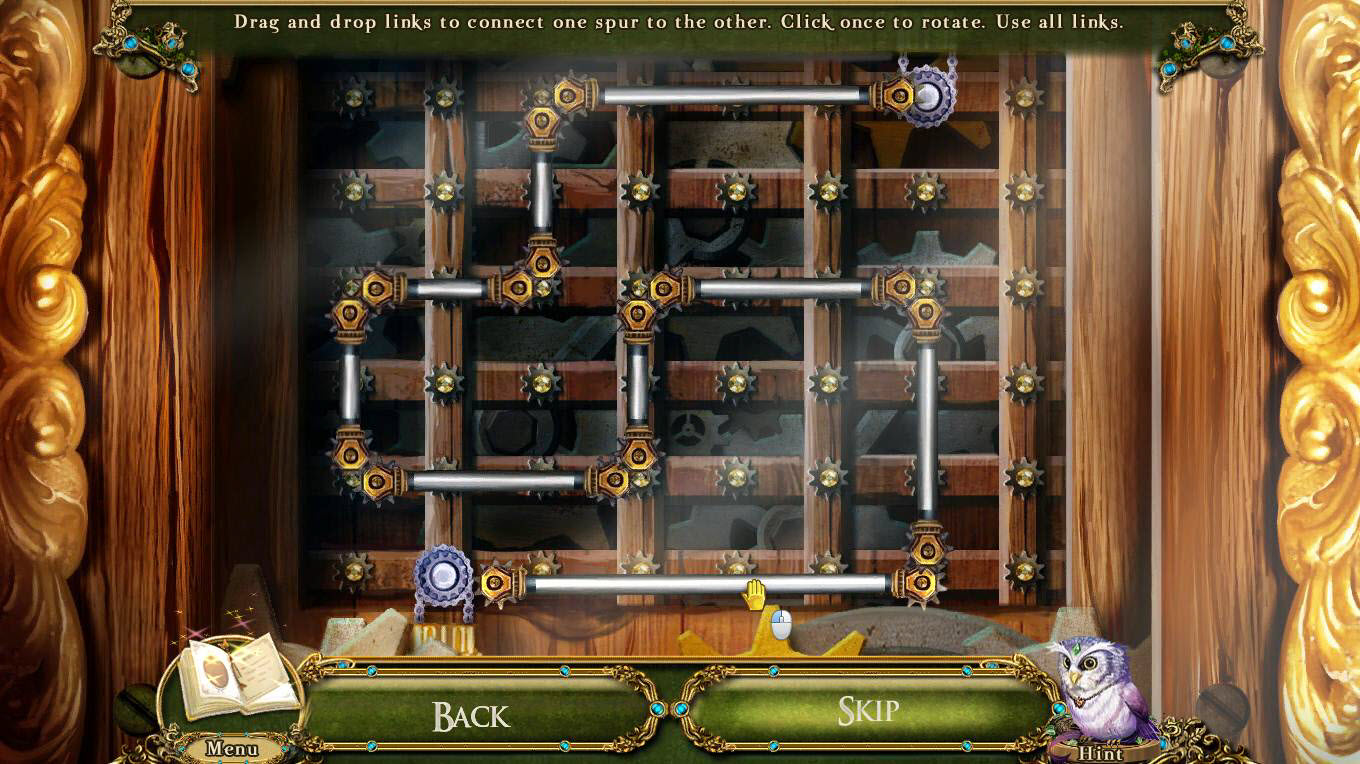
- The goal of the game is to use all the links to connect the gears at the top and the bottom.
- Simply pick up a link and drop it into place.
- Click on a link to rotate it.
- See the screenshot for the solution.
- Take the BROKEN BOW.
- Use your map to fast travel to the High Gardens.
- Click on the Crystal Lattice to zoom in.
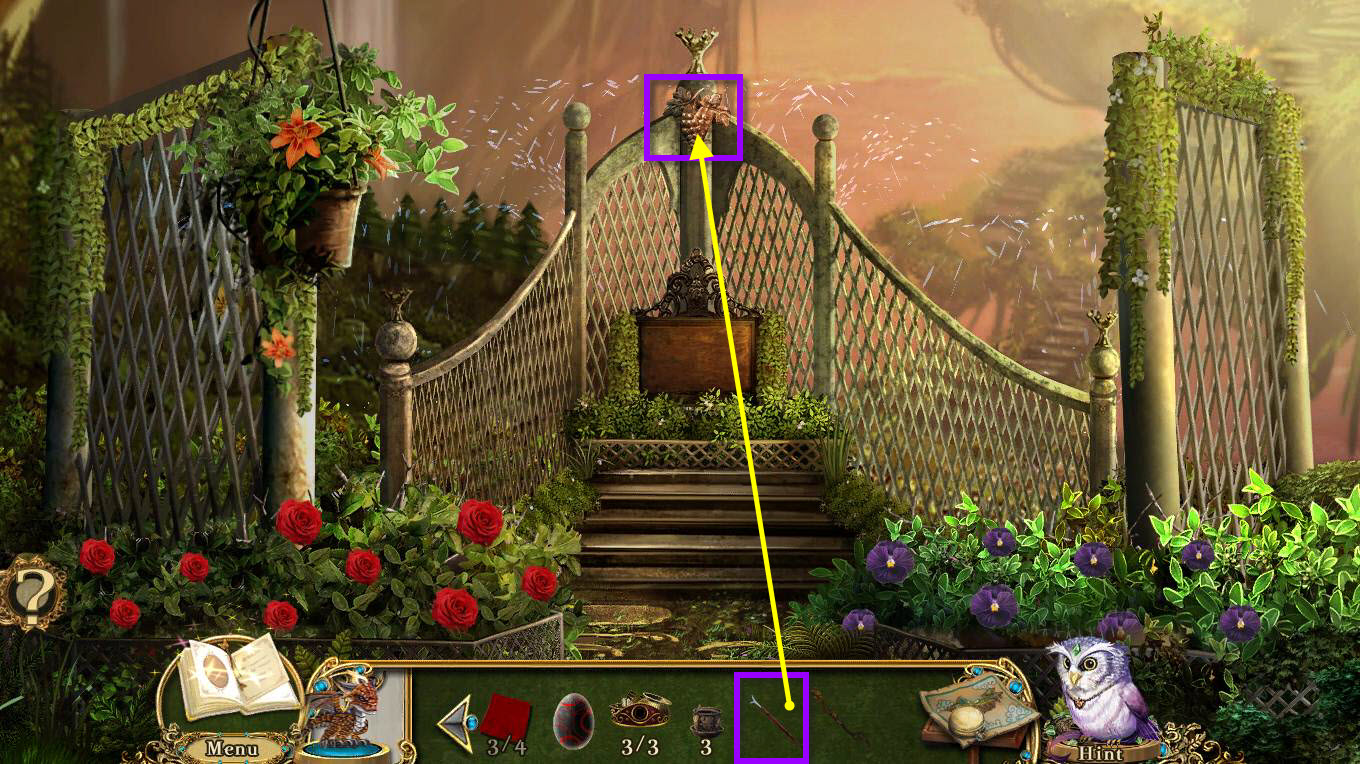
- Use the GAFF HOOK on the BRONZE GRAPES to grab them.
- Go to the Giant Goldleaf Oak.
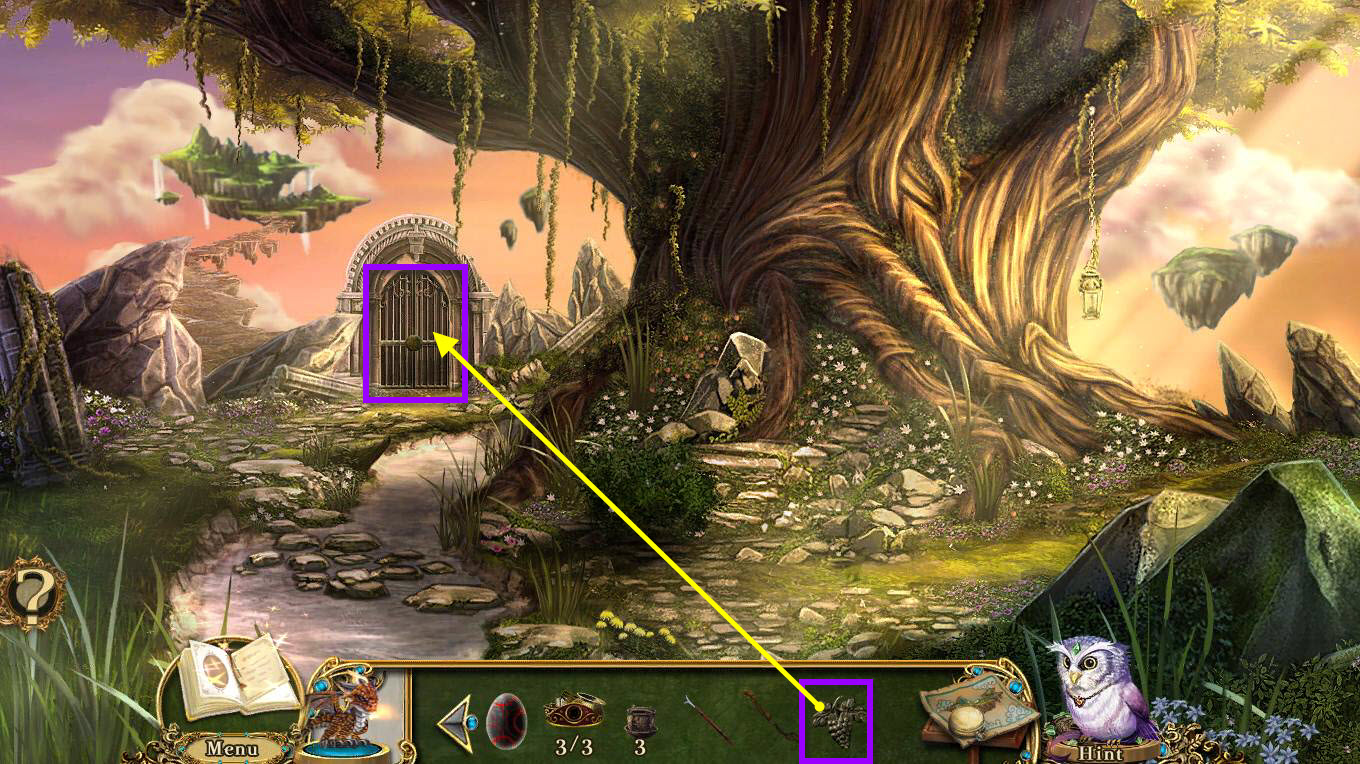
- Click on the vineyard gate to zoom in.
- Use the BRONZE GRAPES on the gate.
- This will start a mini-game.
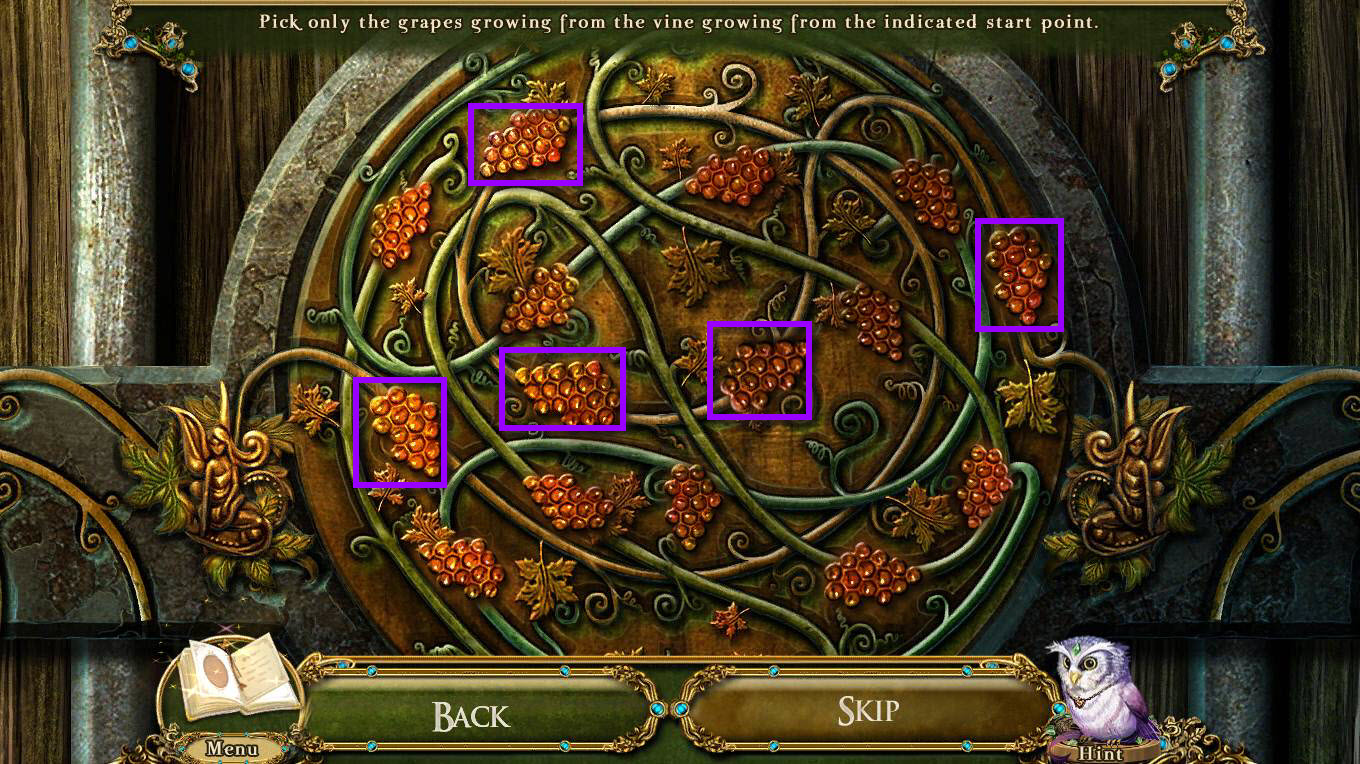
- The goal of the game is to follow the vine that goes between the two fairies.
- You need to click on the grapes that are on that vine.
- Enter the vineyard when you are done.
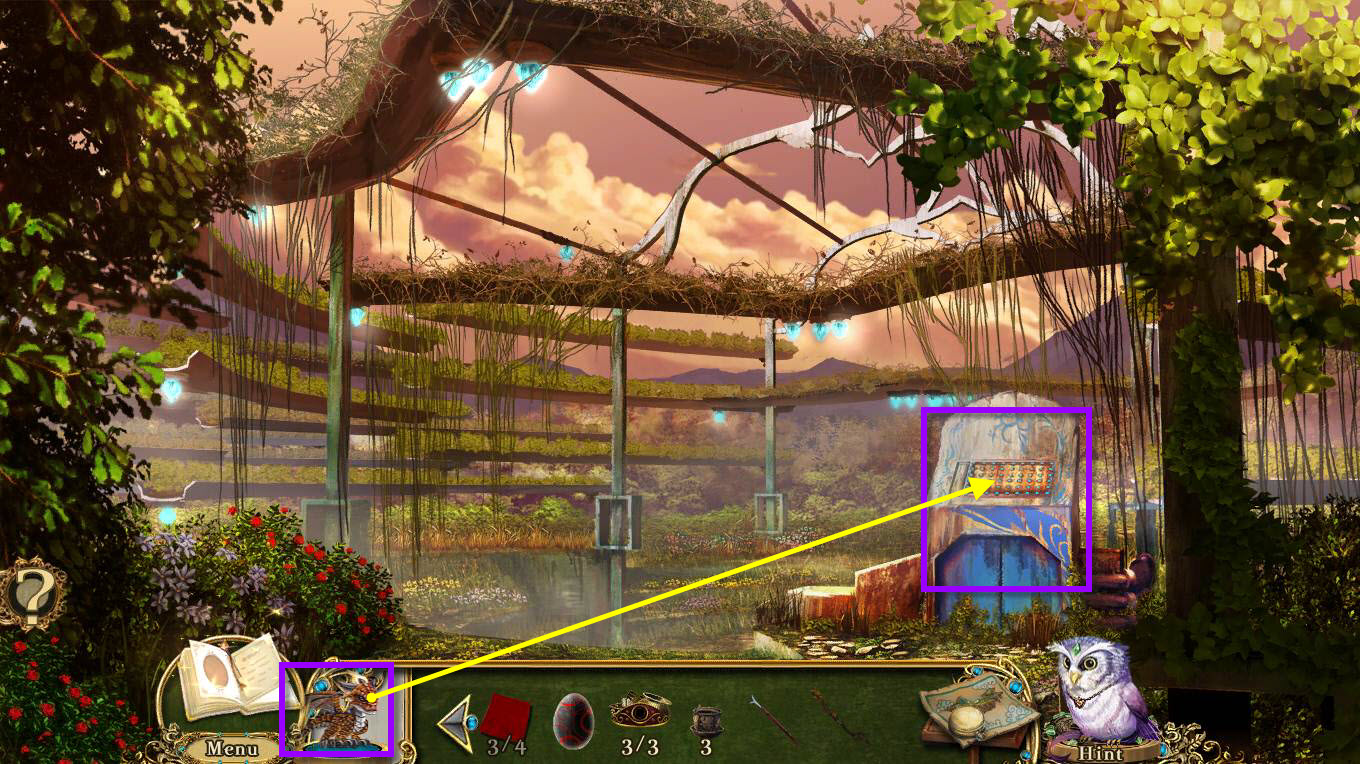
- Click on the water pumping controls to zoom in.
- Use the Pocket Dragon on the cover panel 3 times to get access to the controls.
- Click on the controls to start a mini-game.
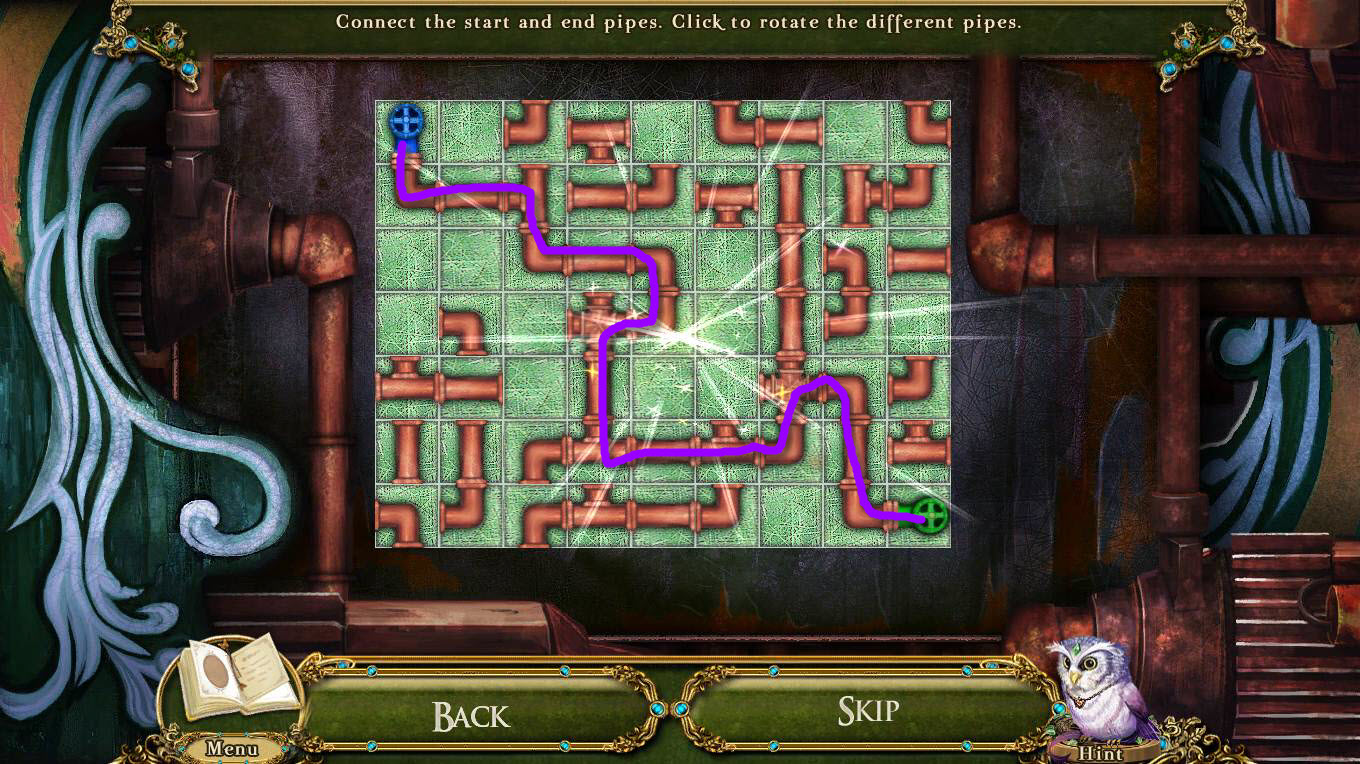
- The goal of the game is to rotate the pipes so that the green and blue pipes are connected.
- Click on a pipe to rotate it.
- See the screenshot for the solution.
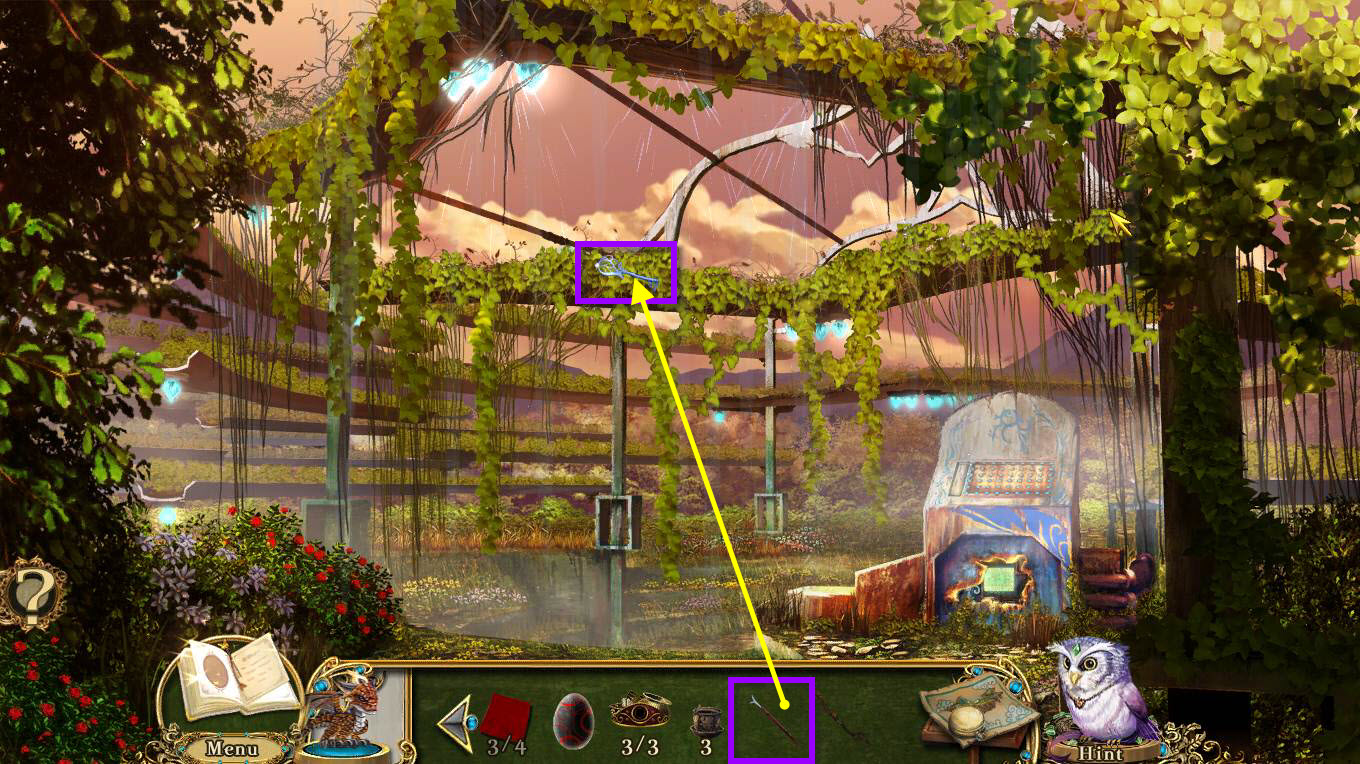
- Click on the vine bed to zoom in.
- Use the GAFF HOOK on the blue key.
- This will start a hidden object scene.
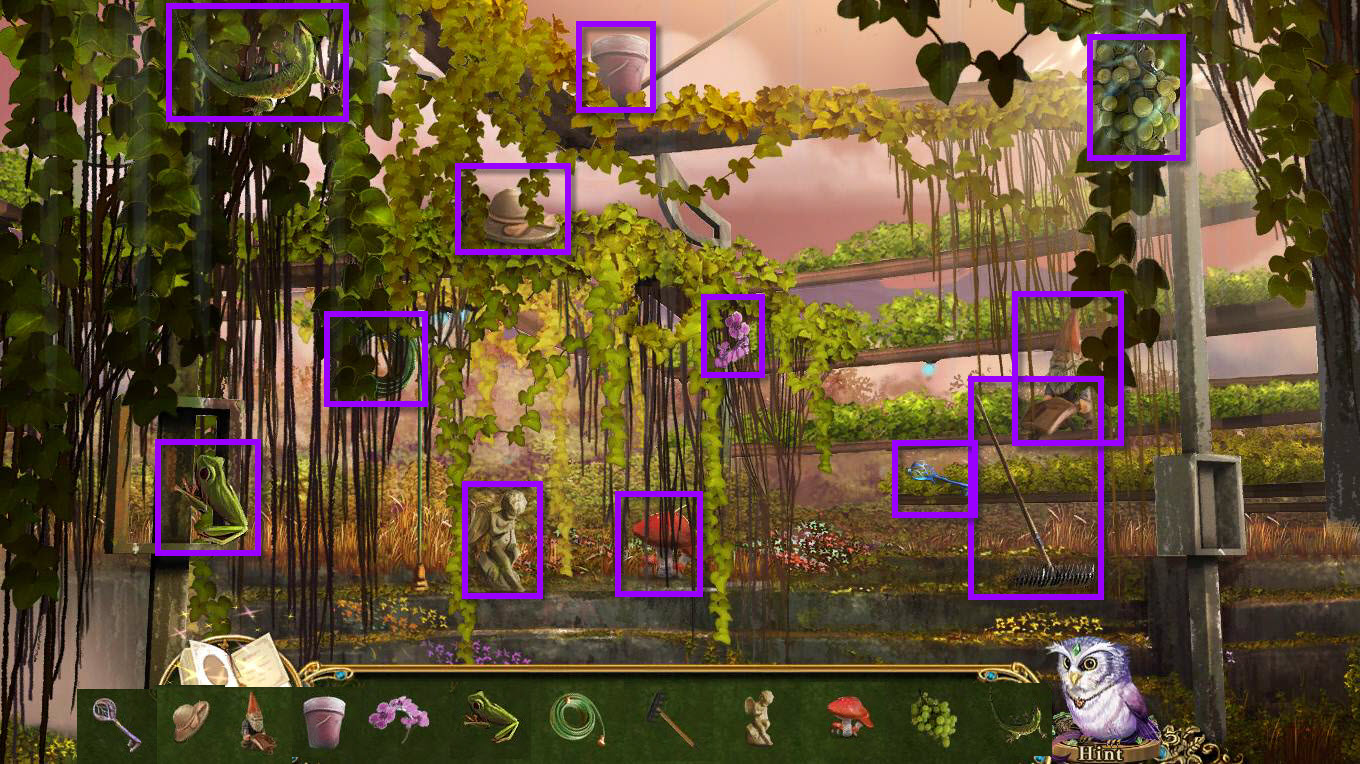
- Find all the items on the list.
- You will receive the WEAPONS CABINET KEY.
- Use your map to fast travel to the Barracks.
- Enter the armory.
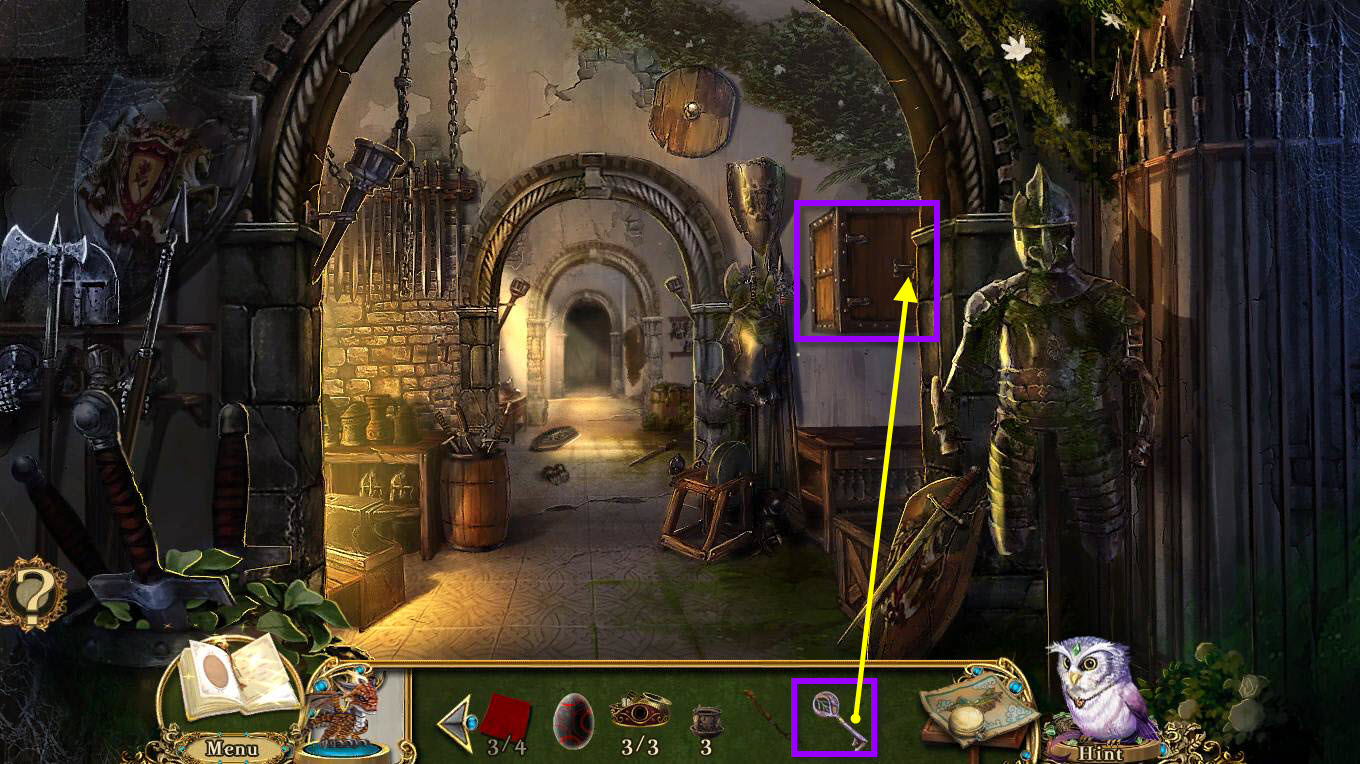
- Click on the Weapons Cabinet on the right to zoom in.
- Use the WEAPONS CABINET KEY on the lock to open it.
- You will receive the 1/8 DRAGON'S TOOTH.
- Click on the cabinet to open it.
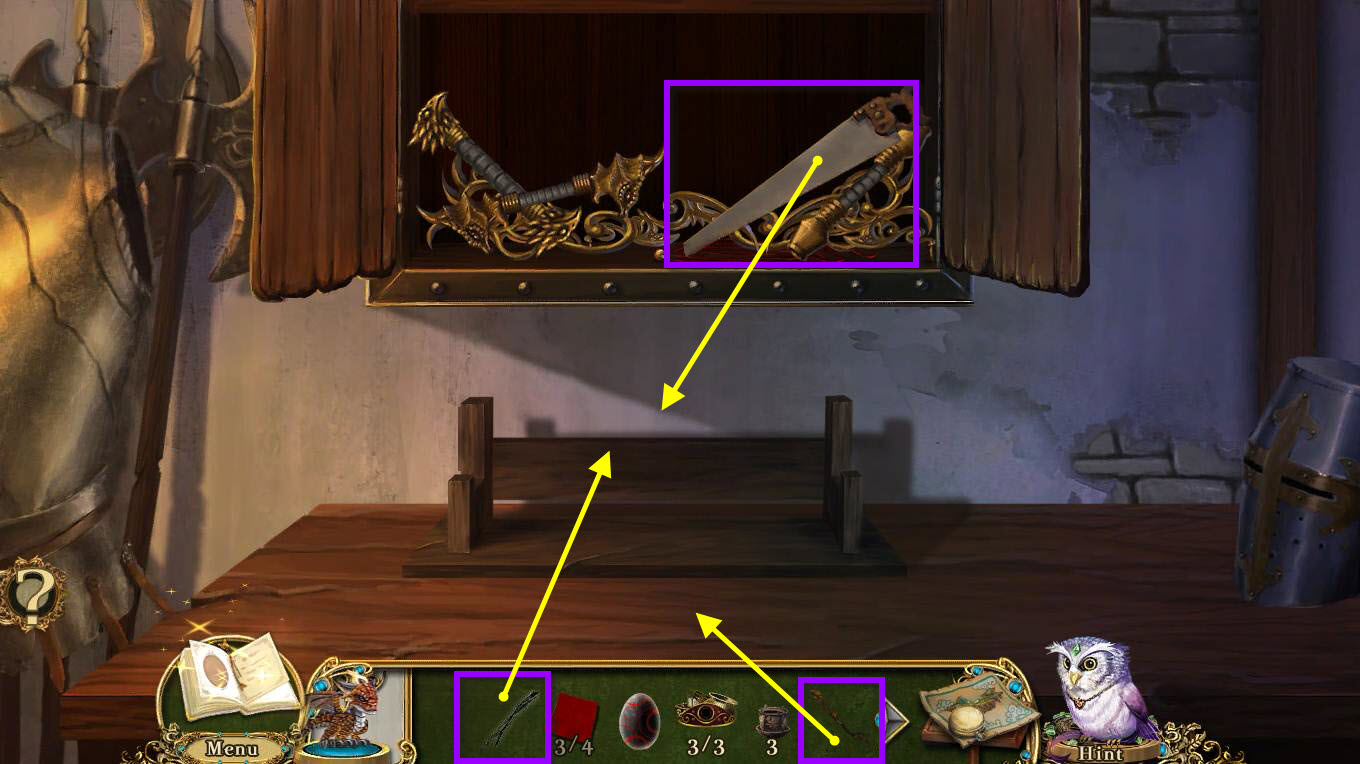
- Use the BROKEN BOW on the table.
- Use the GOLDLEAF BRANCH on the stand.
- Use the saw on the branch.
- This will start a mini-game.
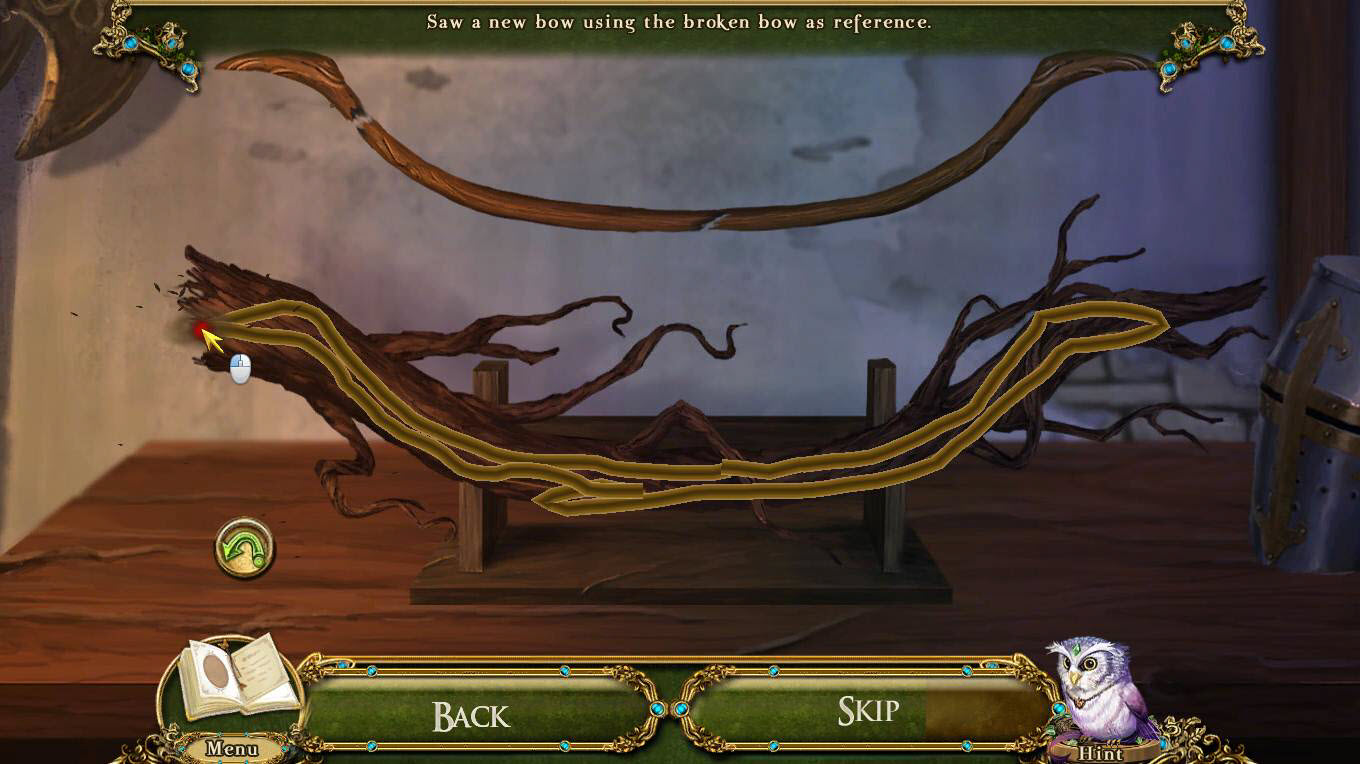
- Click and hold the mouse along the pattern to cut out the bow.
- It doesn't have to be perfect as you can see from the screenshot
.
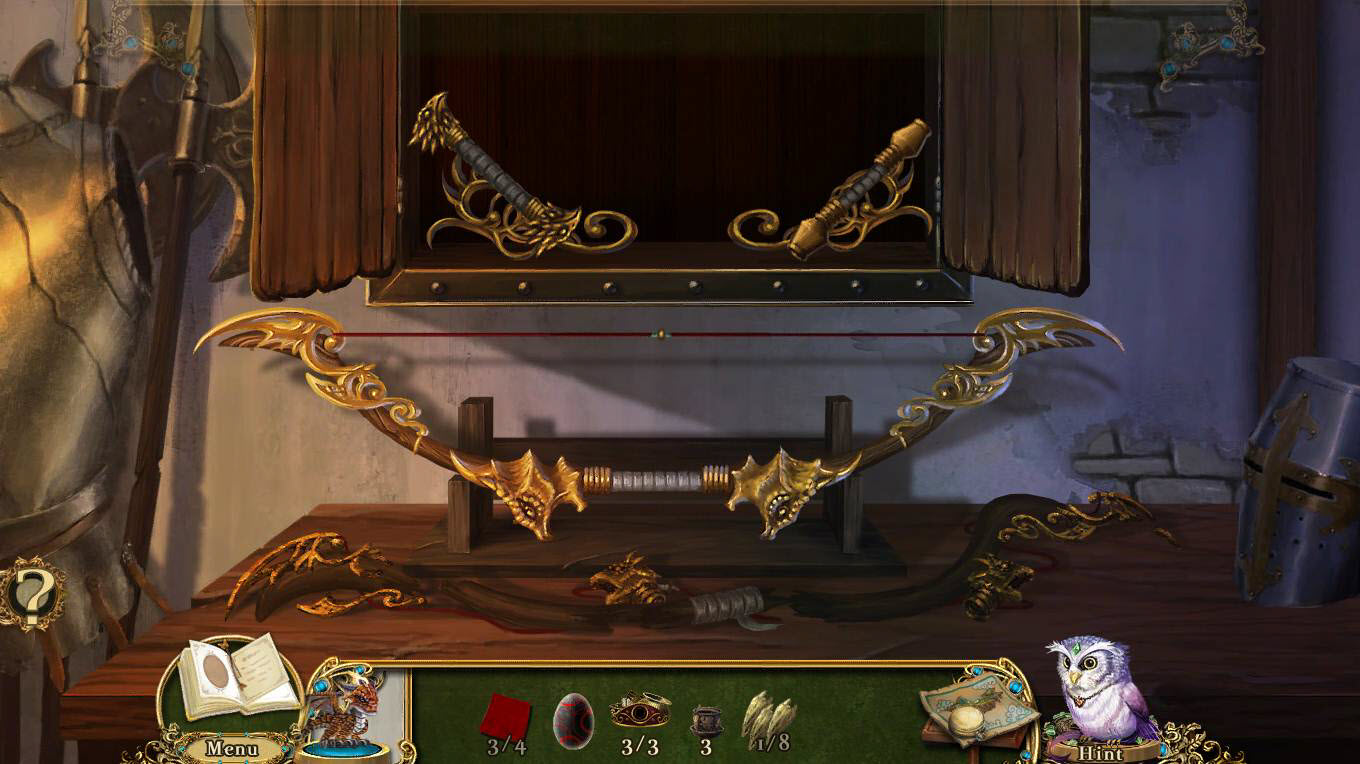
- Now it's time to put the bow together using the parts in the cabinet.
- You won't use all the parts. Use the broken bow as a guide.
- You just need the two end pieces, the handle and the string.
- See the screenshot above to see what the final bow looks like.
- Click on the bow when you are done and you will receive the GOLDLEAF BOW.
- Use your map to fast travel to the windmill.
- Go down the hole to the cave entrance.
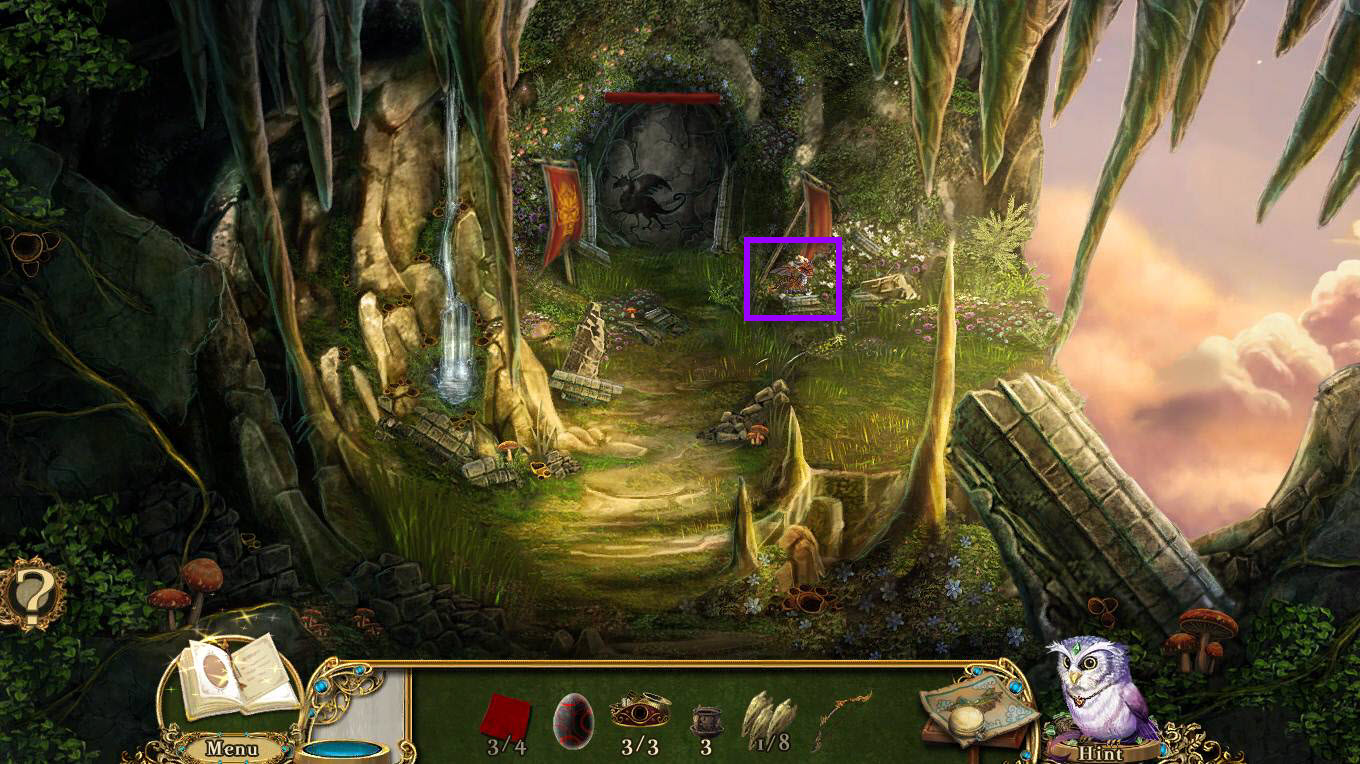
- Click on the pocket dragon to zoom in.
- Click on the pocket dragon to pick him up.
- Use the Pocket Dragon on the tapestry to burn it.
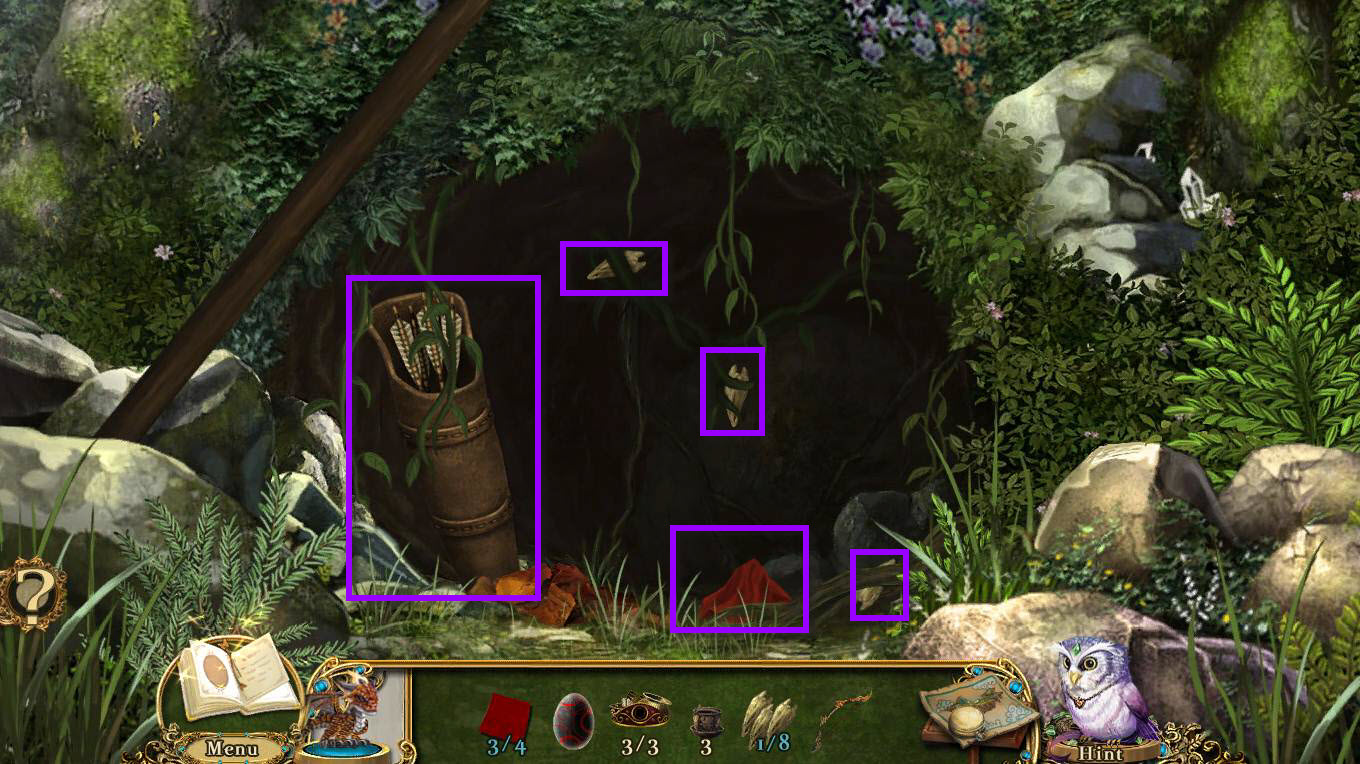
- Take the 4/4 QUILT PATCH
- Take the 4 DRAGON'S TEETH.
- Take the QUIVER which will combine with the bow to give you BOW AND ARROWS.
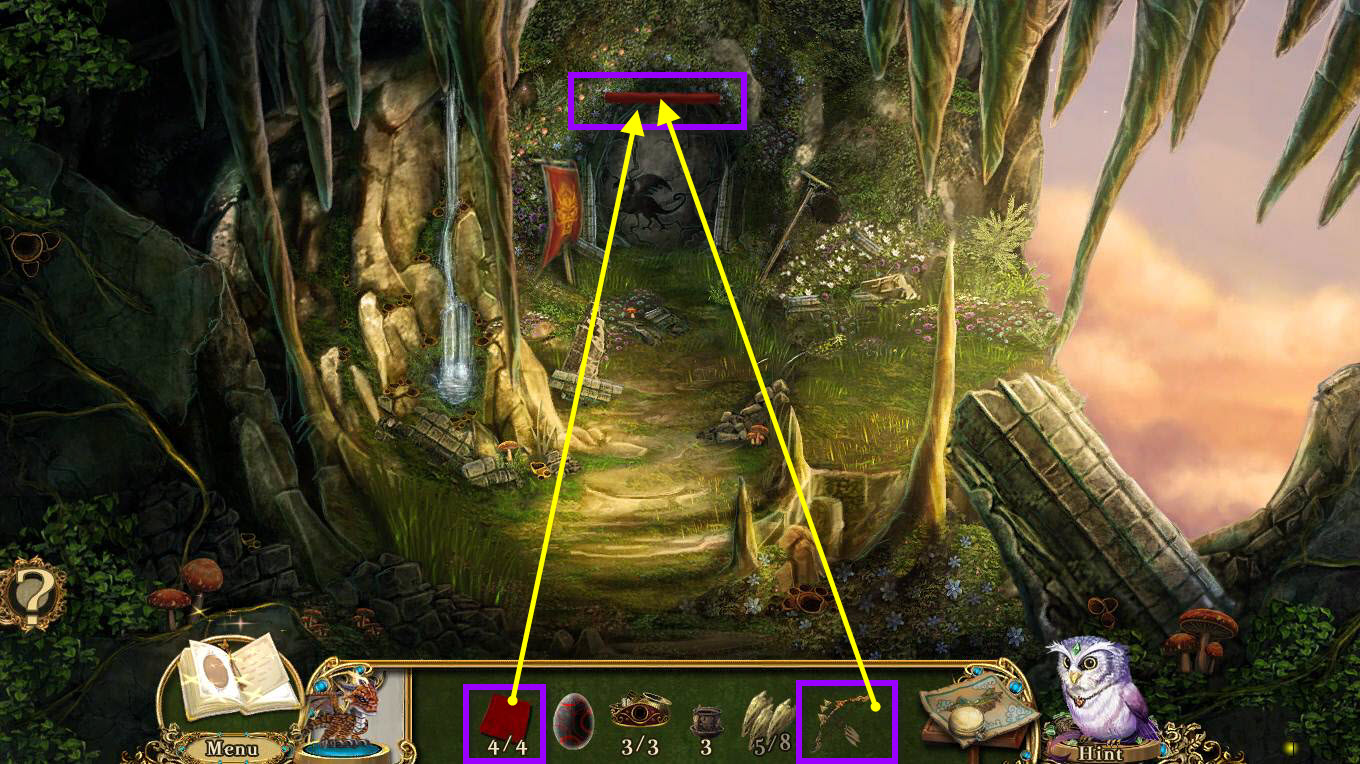
- Click on the entryway to zoom in.
- Use the BOW AND ARROWS on the rolled up fabric.
- This will reveal the Dragon's Tapestry.
- Use the 4 QUILT PATCHES on the tapestry to start a mini-game.
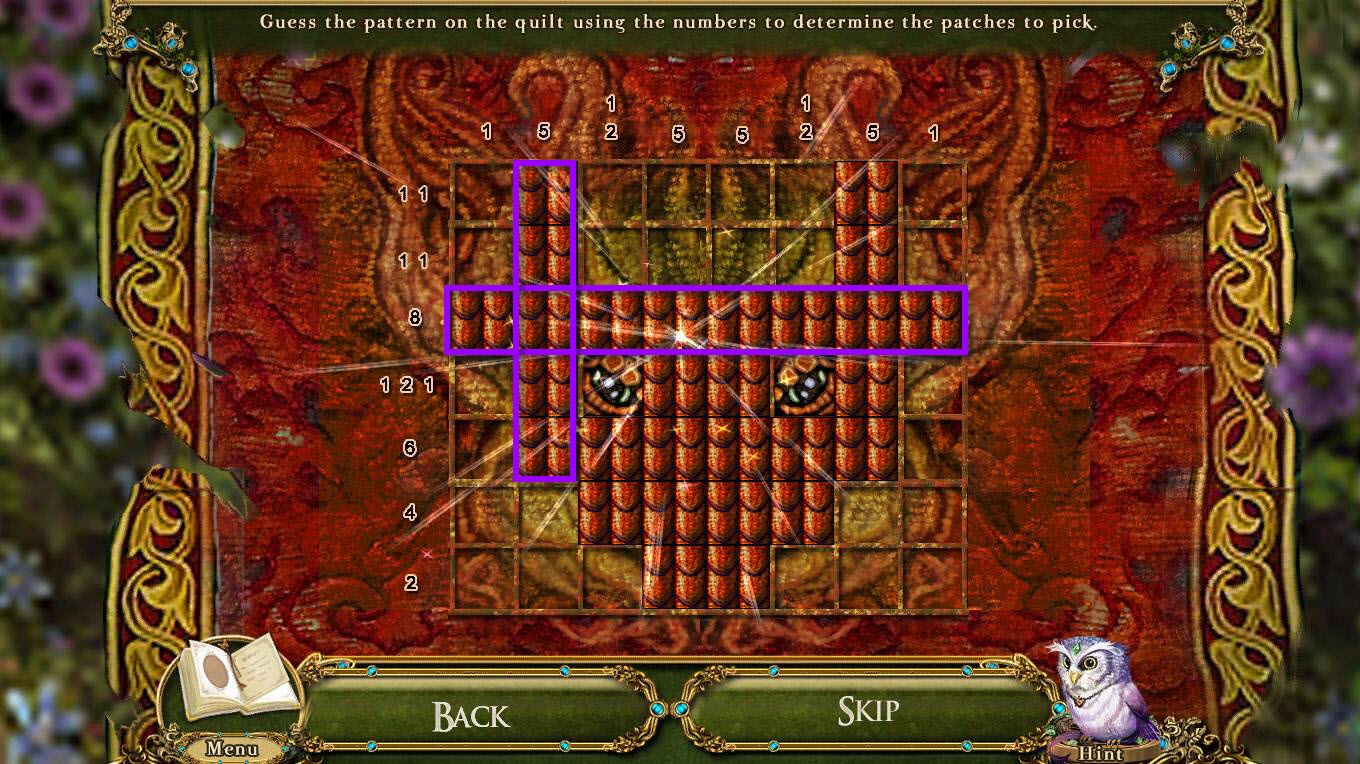
- The goal of the puzzle is to select the right tiles according to the numbers on the top and the left.
- So if the left says 8, there should be 8 tiles selected in the row.
- If the top says 5, then 5 tiles should be selected in that column.
- If it says 11, add the two numbers together to get 2 and that's how many tiles should be selected.
- See the screenshot above for the solution.
- Click on the 6/8 DRAGON'S TOOTH when done.
- Move forward into the Cliffside Caves.
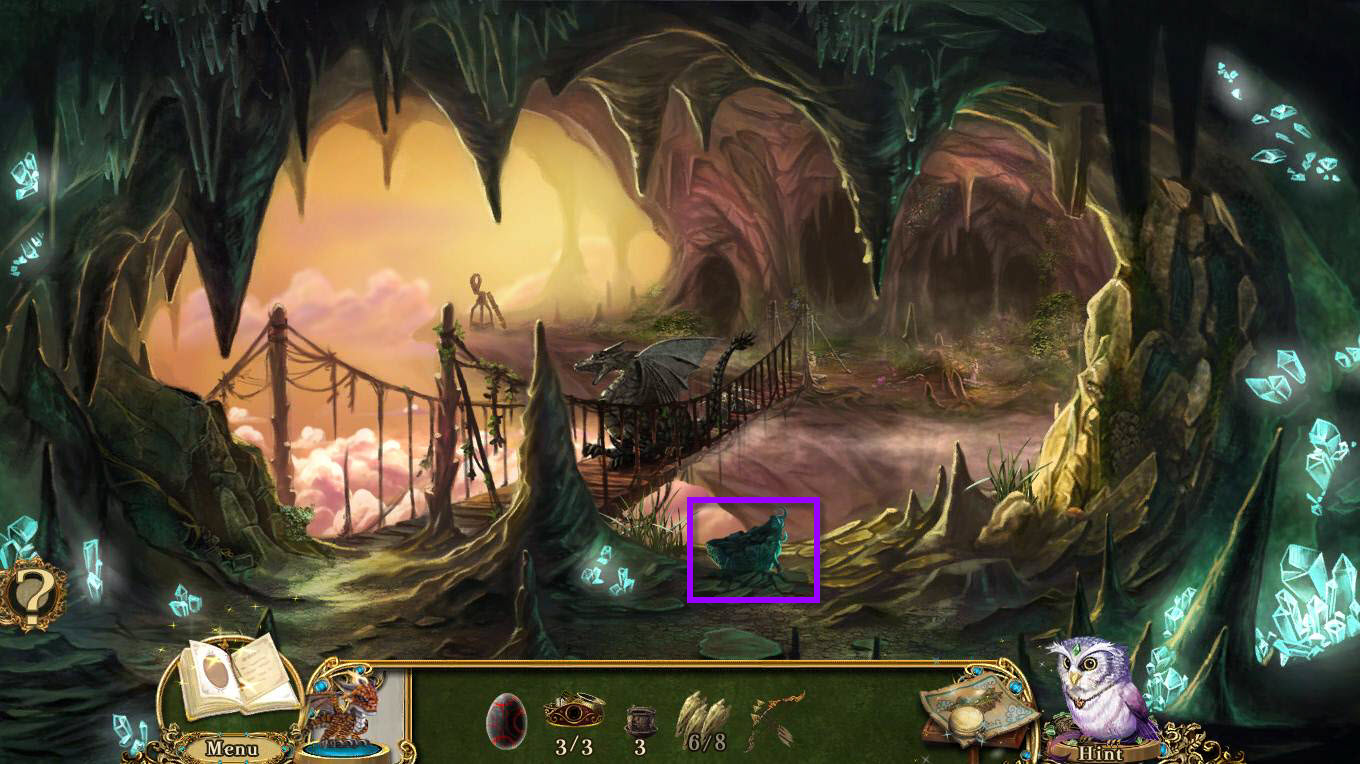
- Click on the broken brazier on the right to zoom in.
- This will start a mini-game.
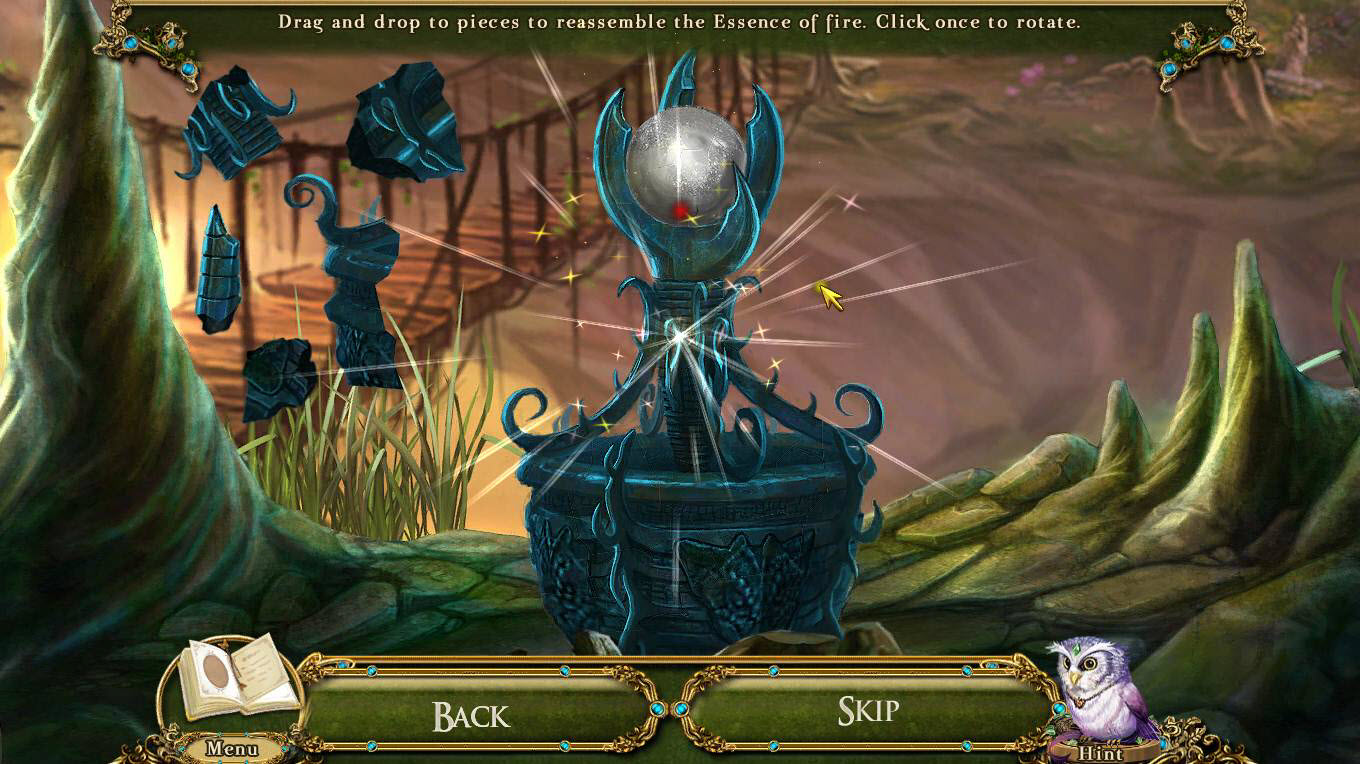
- What makes this puzzle somewhat complicated is that you won't use all the pieces.
- Just drag and drop the pieces to complete the puzzle.
- Click once to rotate.
- See the screenshot for the solution.
- I also moved all the pieces I didn't use over to the left so you could see that as well.
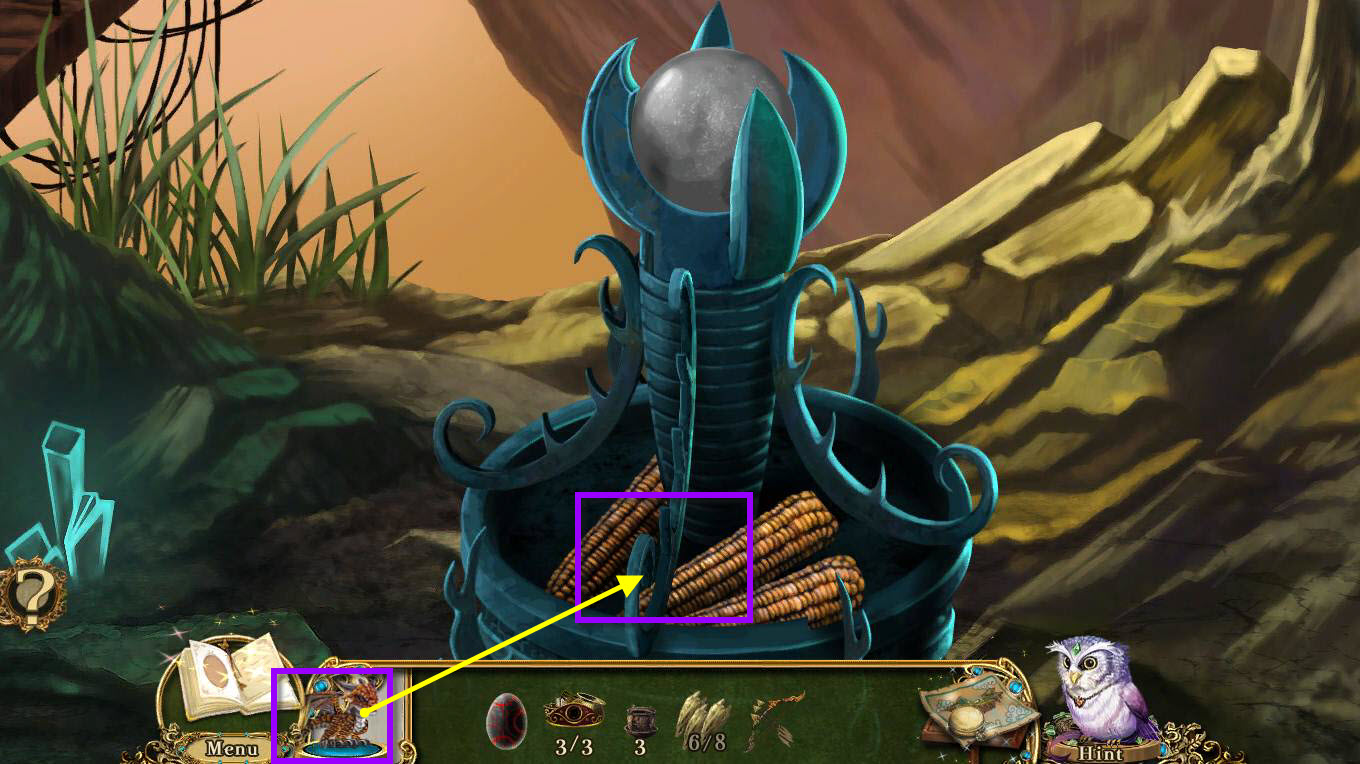
- Once you complete the puzzle, you'll see the completed piece and some sablecorn.
- Use the pocket dragon on the sable corn to pop it.
- Take the POPPED SABLECORN.
- Take the 2 DRAGON'S TEETH.
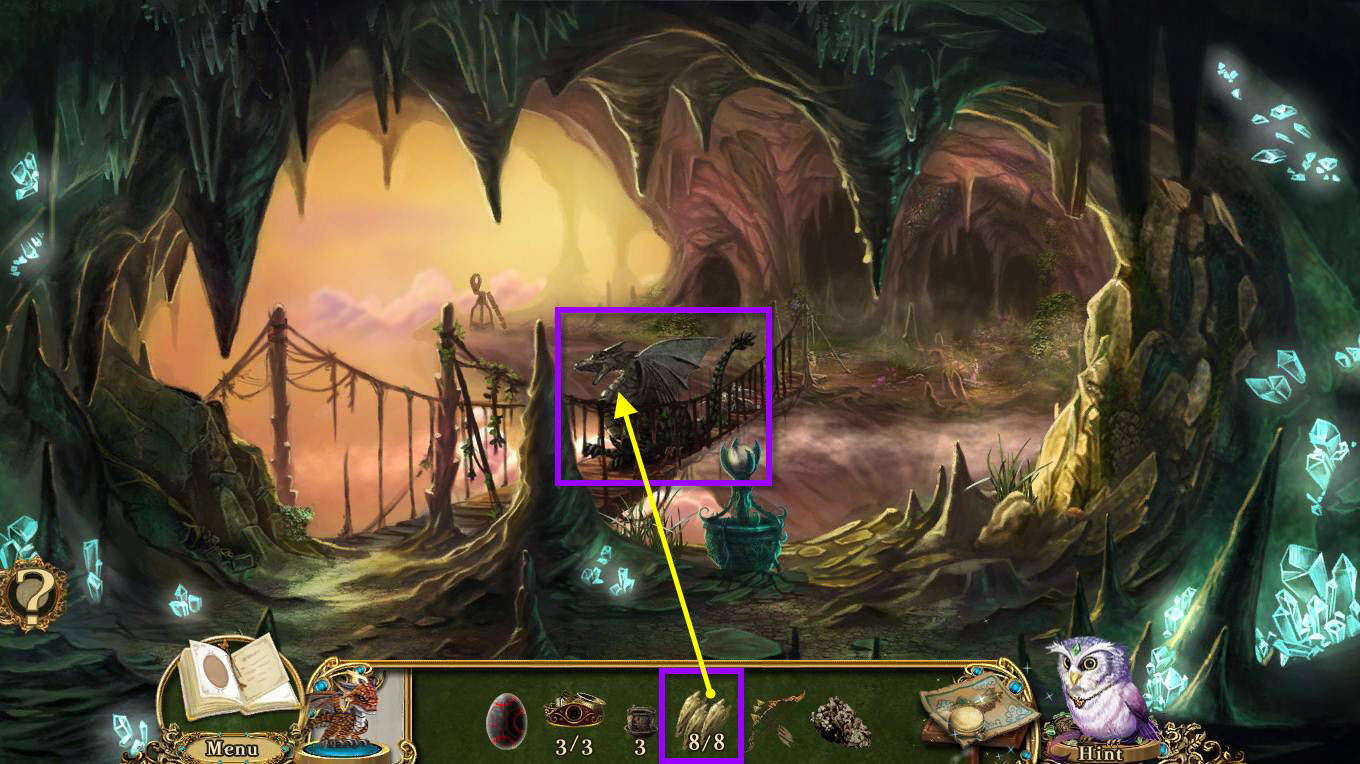
- Click on the petrified pocket dragon on the bridge to zoom in.
- Use the 8 DRAGON'S TEETH on his mouth.
- This will start a mini-game.
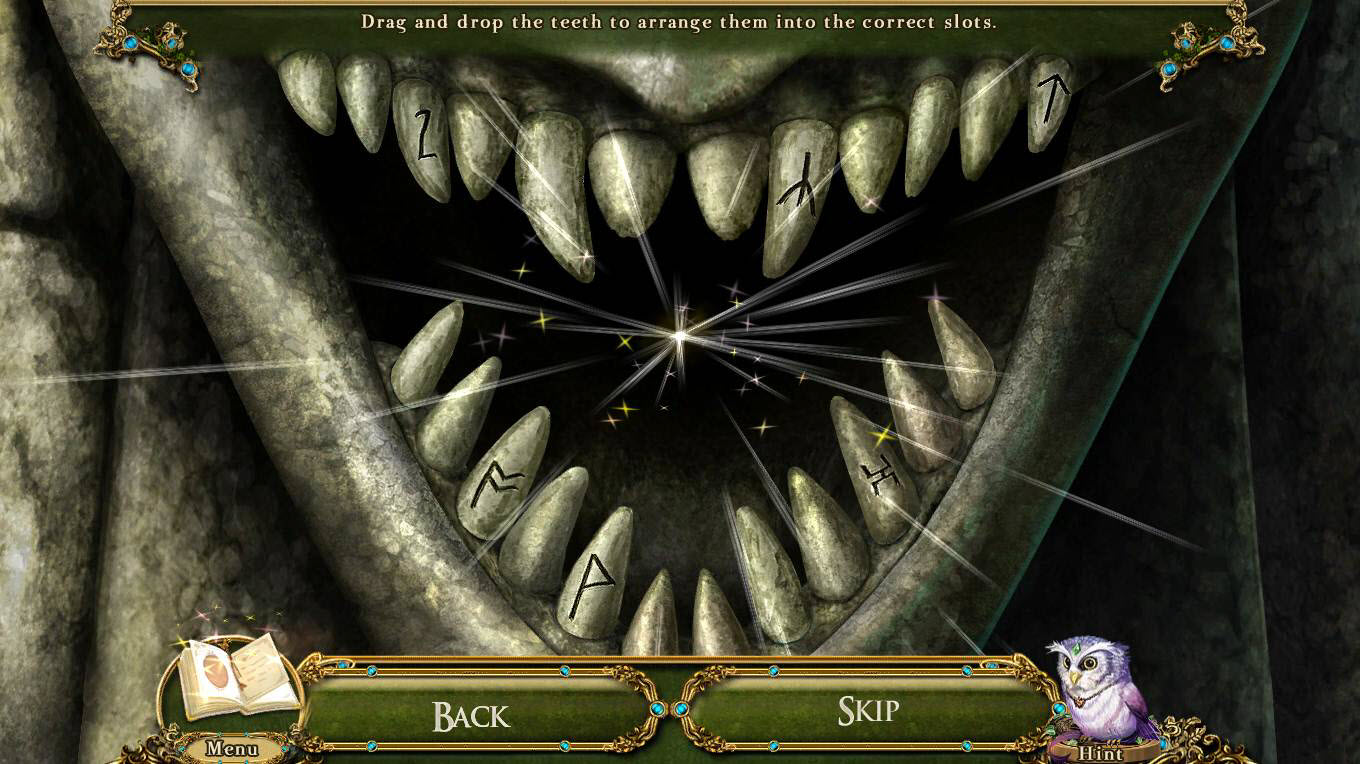
- The goal of the game is to restore the dragon's smile.
- You need to put the teeth back in the right positions.
- See the screenshot for the solution.
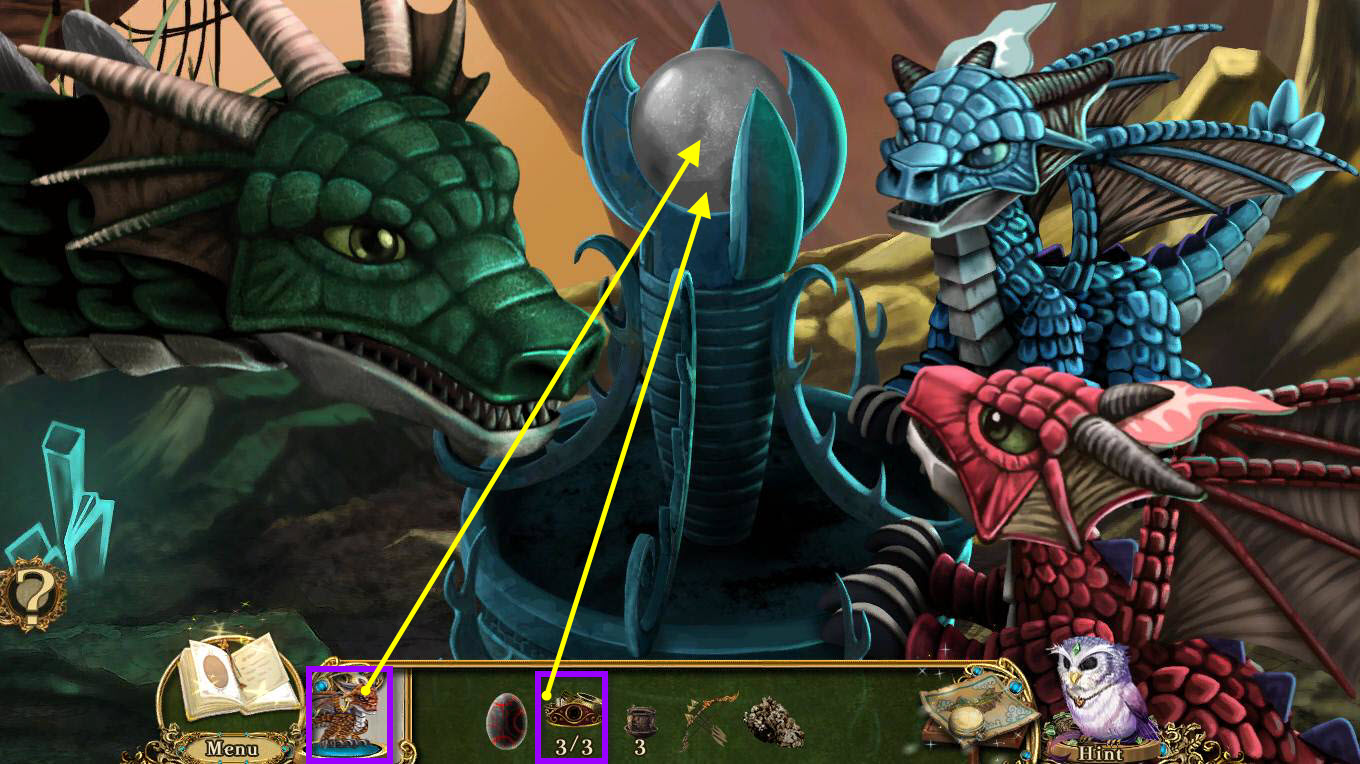
- Click on the stone brazier to zoom in.
- Use the pocket dragon on the essence of fire.
- Use the 3 INCUBATOR PARTS on the essence of fire.
- This will start a mini-game.
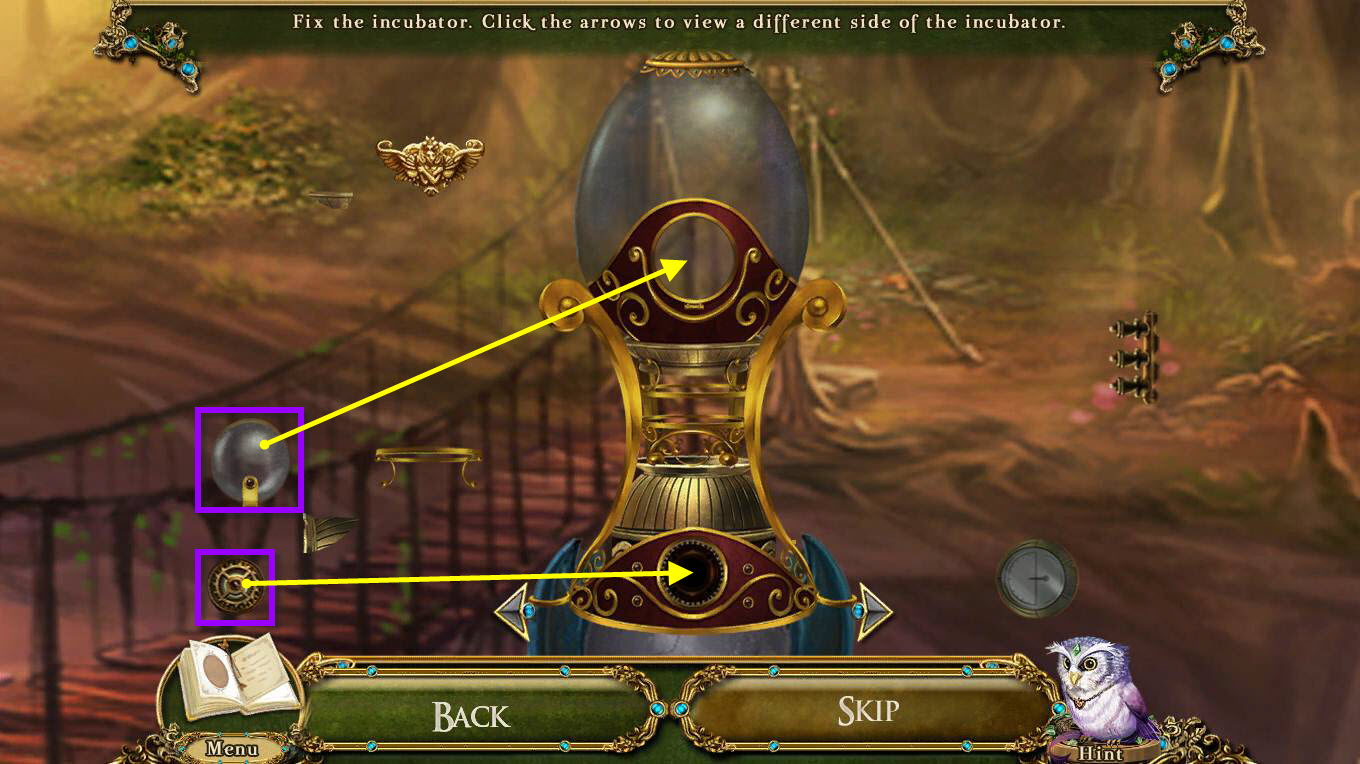
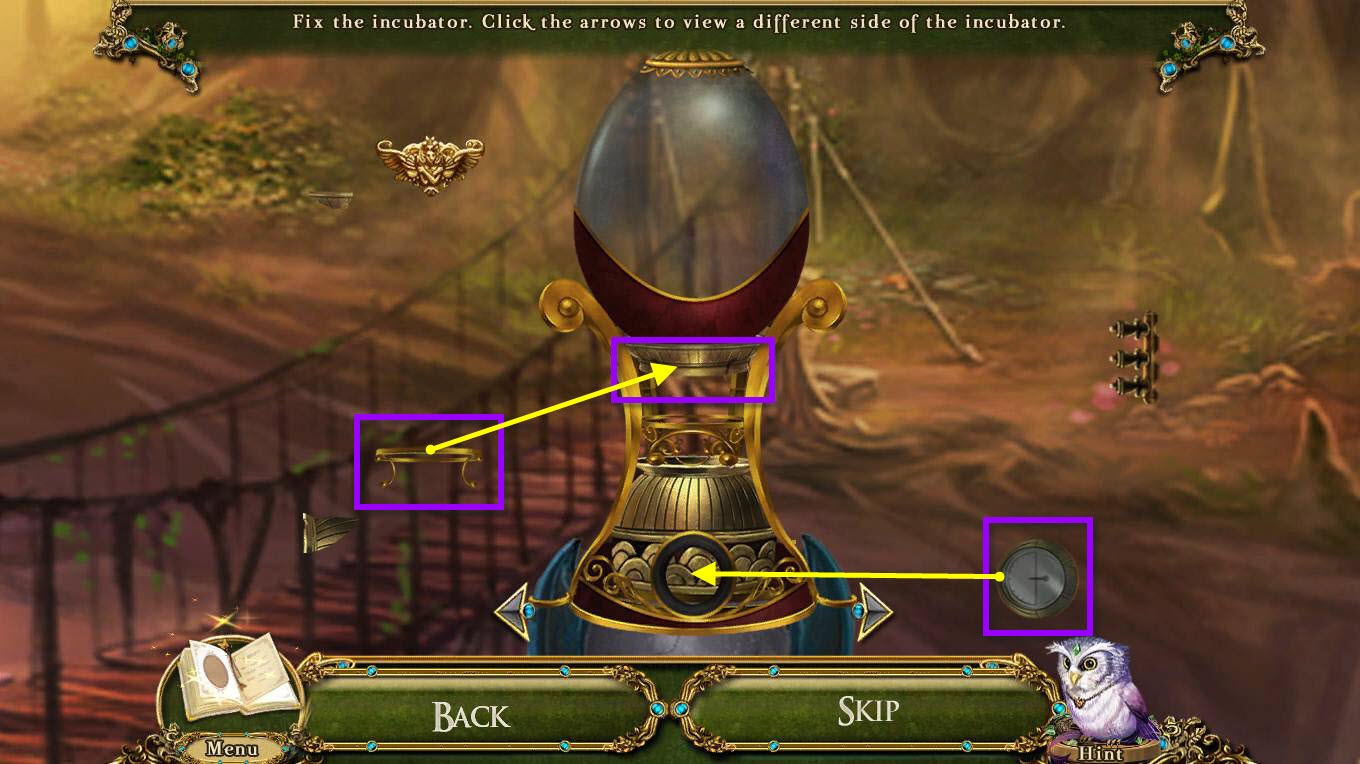
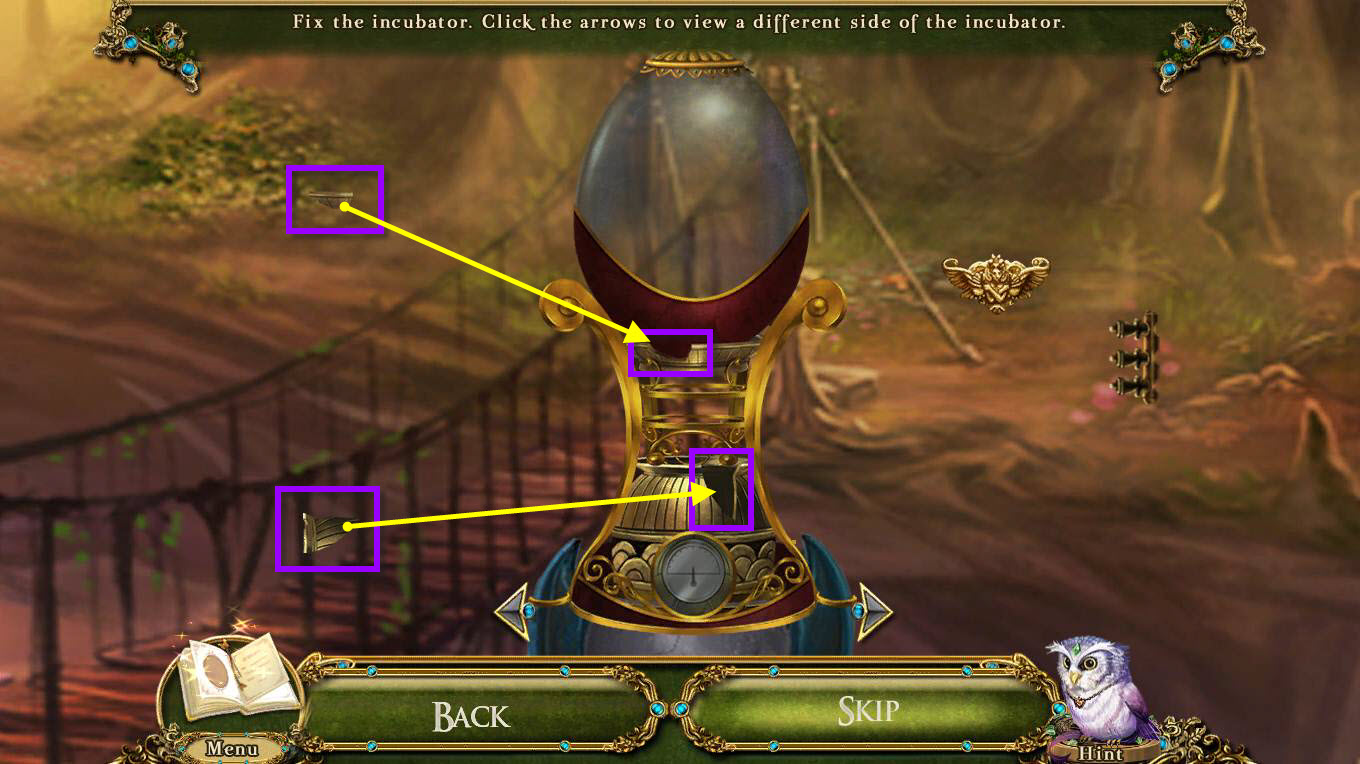
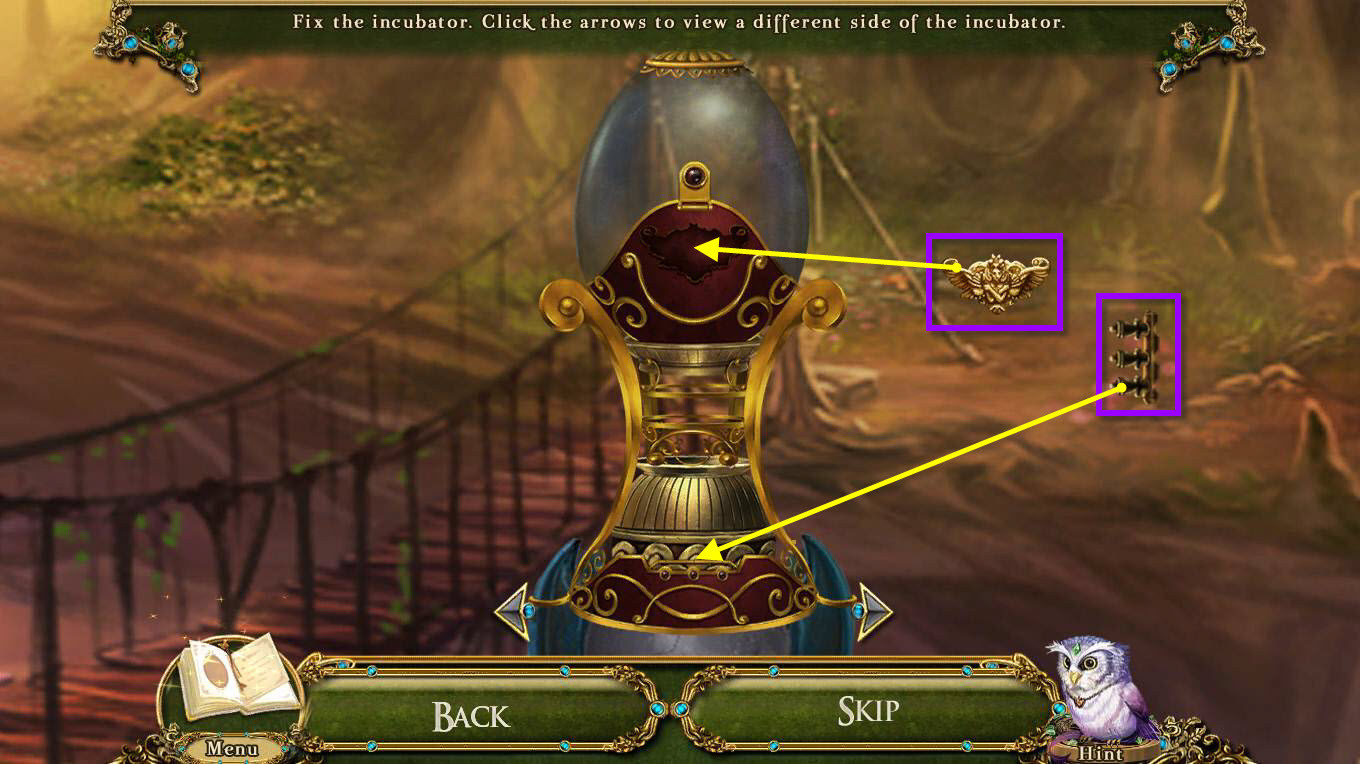
- The goal of the puzzle is to fix the incubator by putting the parts in the correct spot.
- You can rotate the incubator by clicking on the arrows to the left and right.
- See the screenshots above to see the solution.
- Once you are done, place the COCKATRICE EGG in the completed incubator.
- You will receive the ESSENCE OF FIRE and the COCKATRICE CHICK.
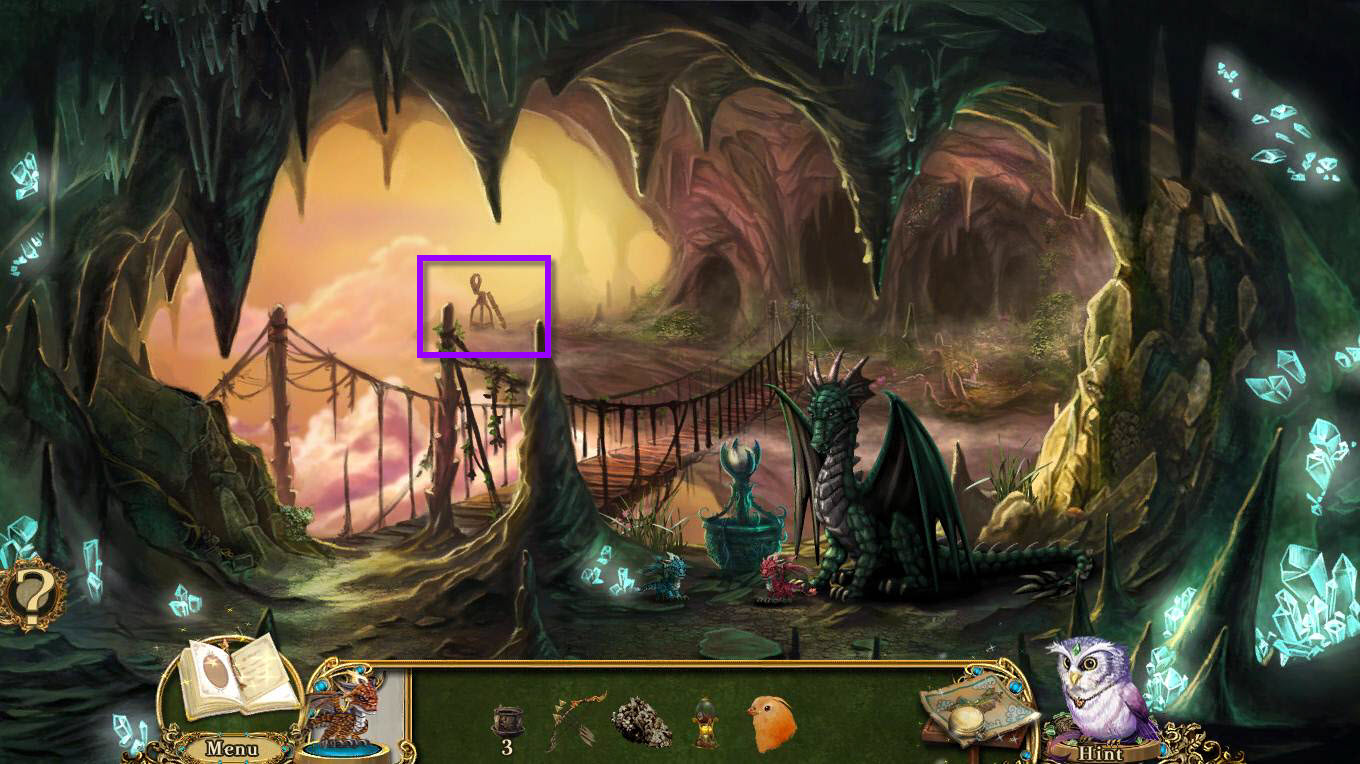
- Click on the Observation Point on the left to zoom in.
- Take the SPYGLASS.
- Now go back to the windmill observation deck.
- Click on the Alchemy workstation to zoom in.
- Then click on the Alchemy Charts on the wall for a hidden object scene.
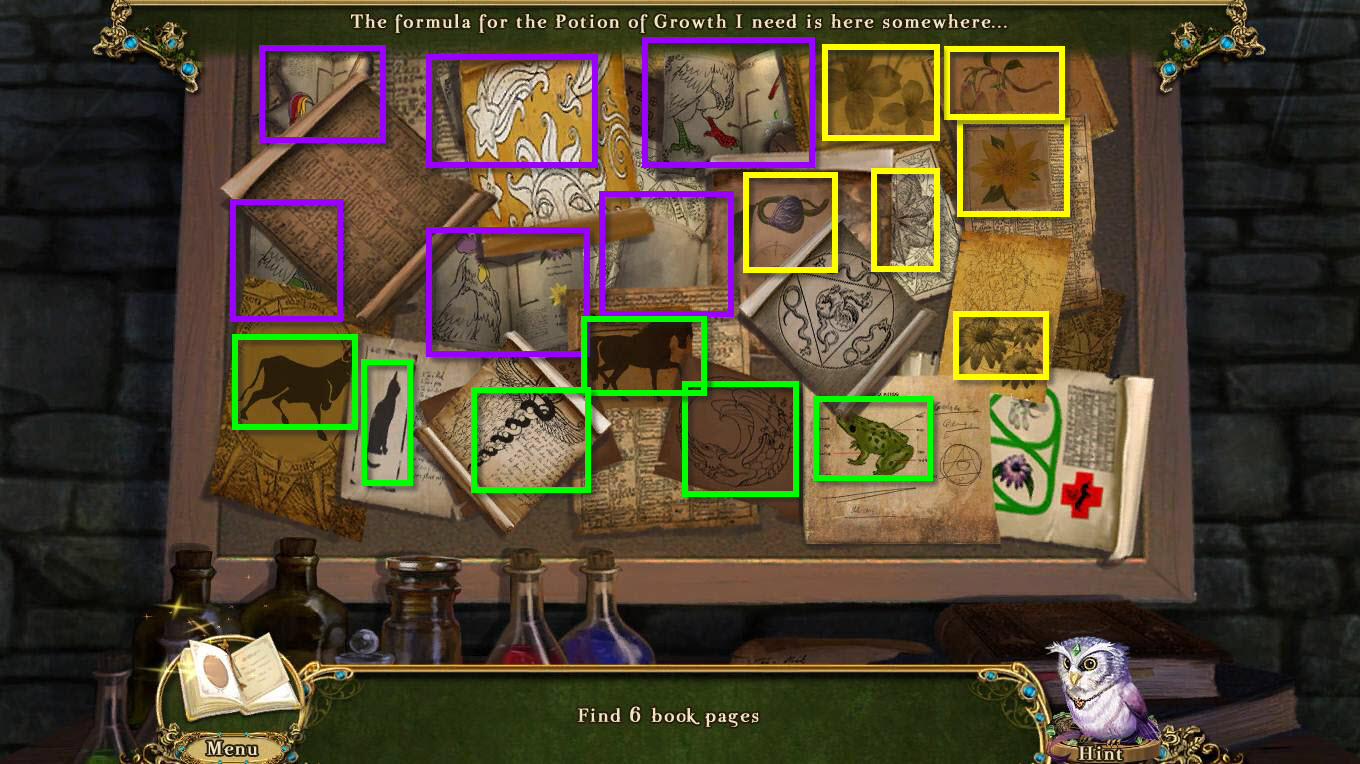
- Find all the items on the list.
- See the screenshot above for the solution.
- The book pages are in purple.
- The flowers are in yellow.
- The animals are in green.
- You have to move several of the pages aside in order to get to the right images.
- When you are done, click on the formula book to start another mini-game.
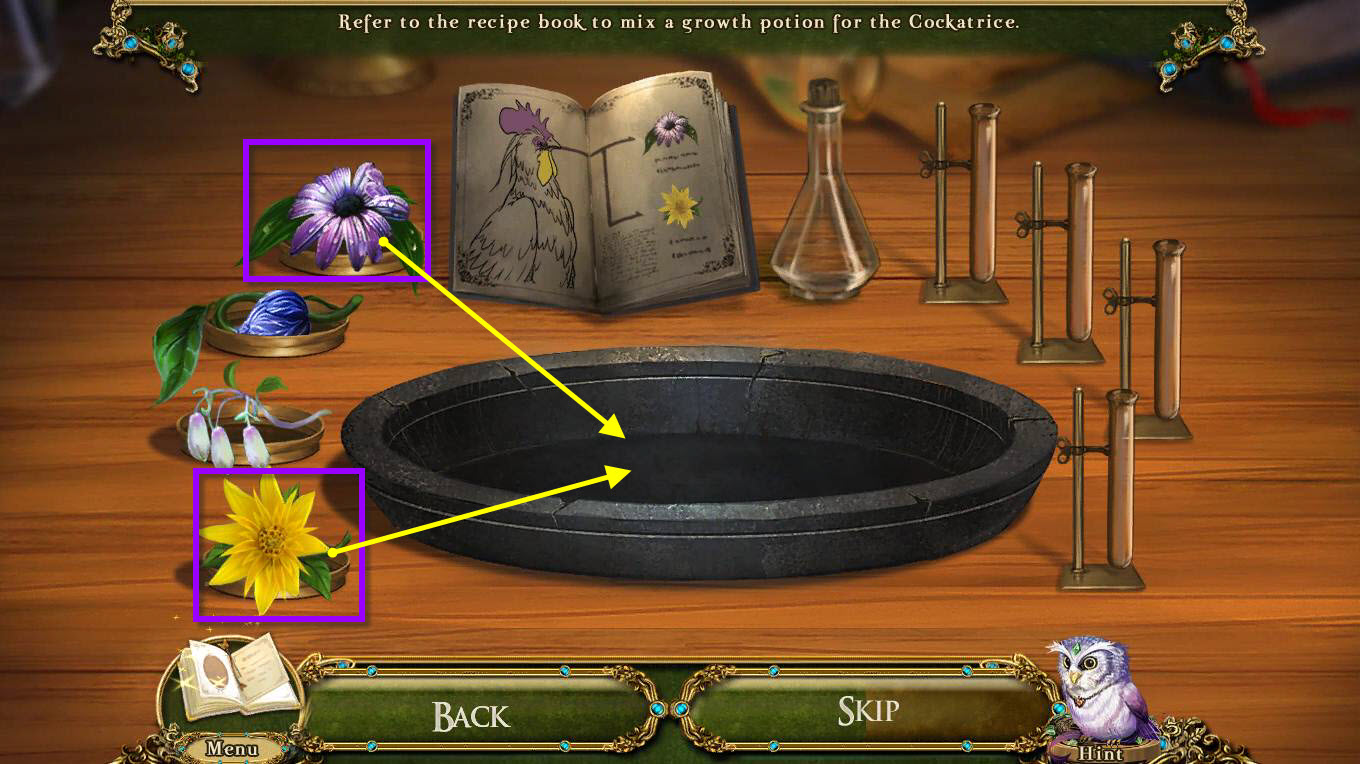
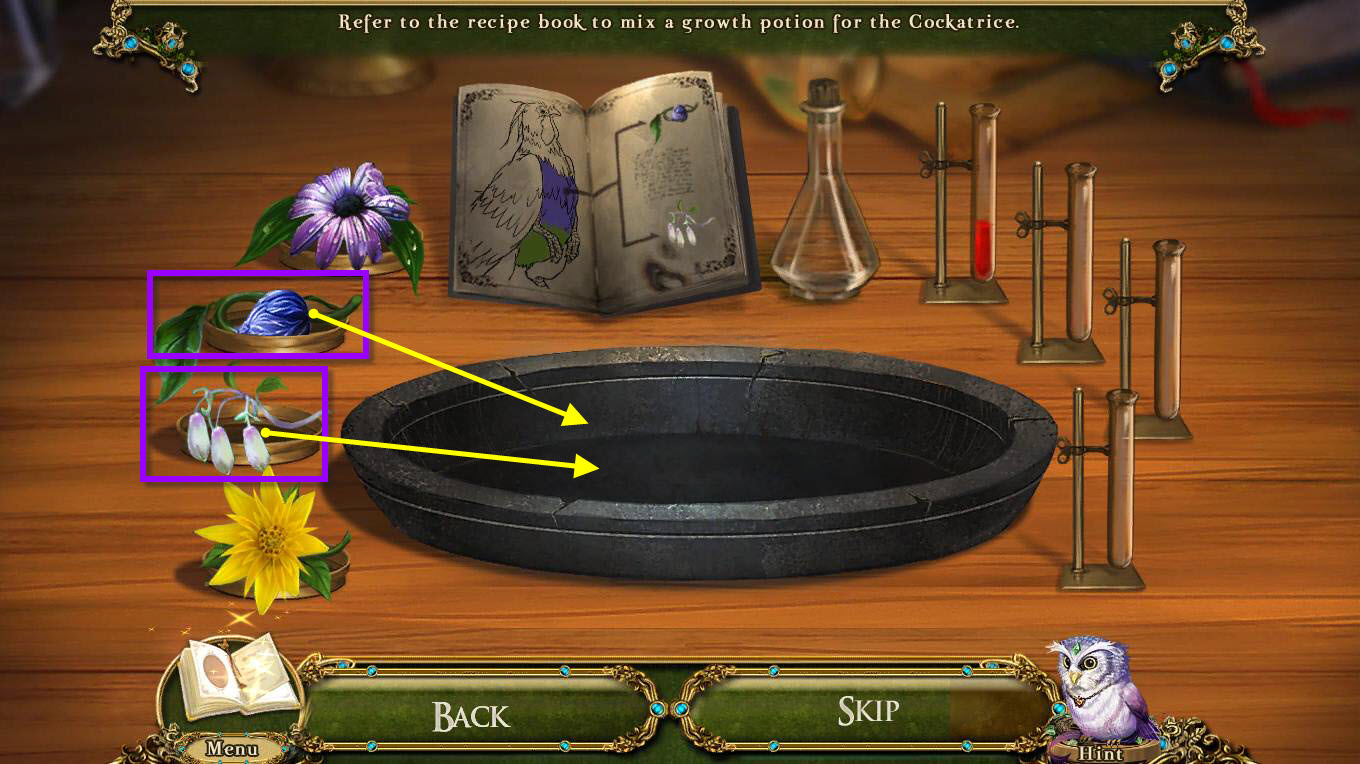
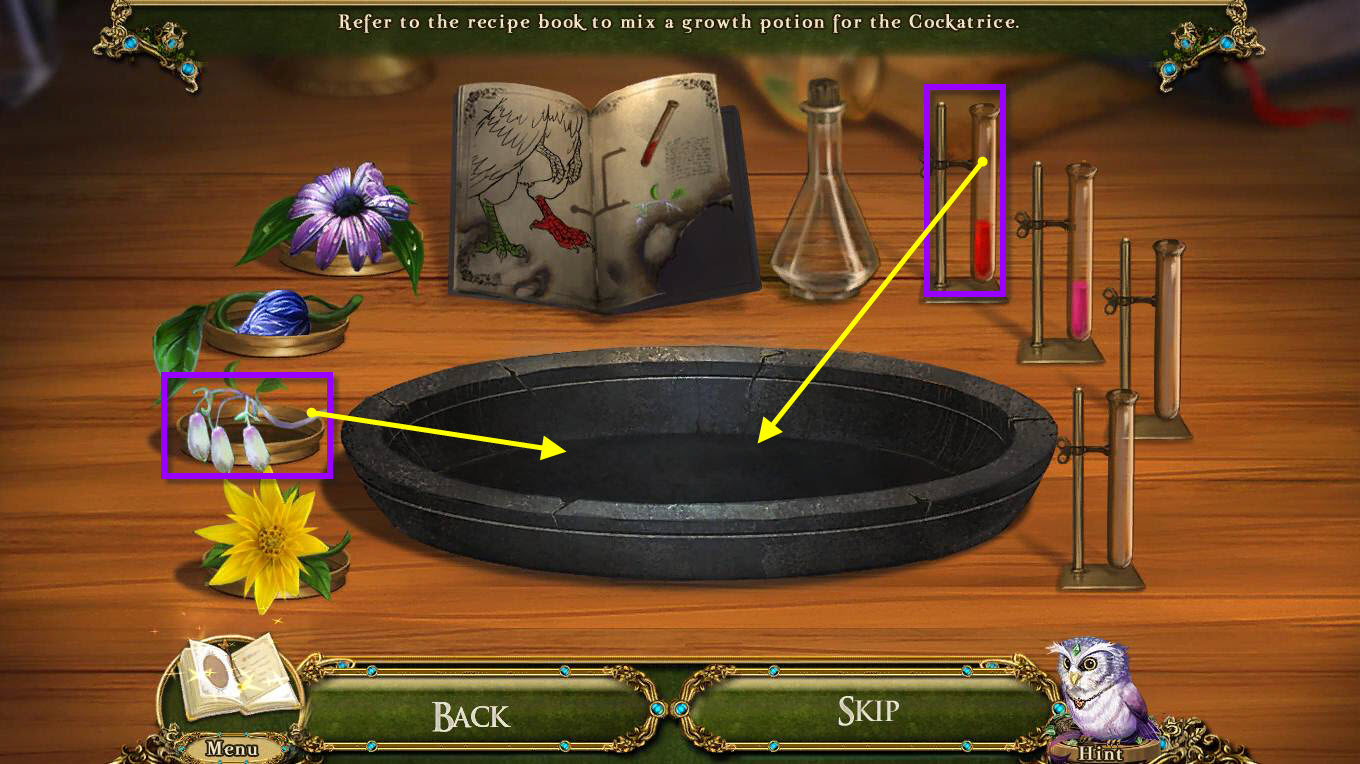
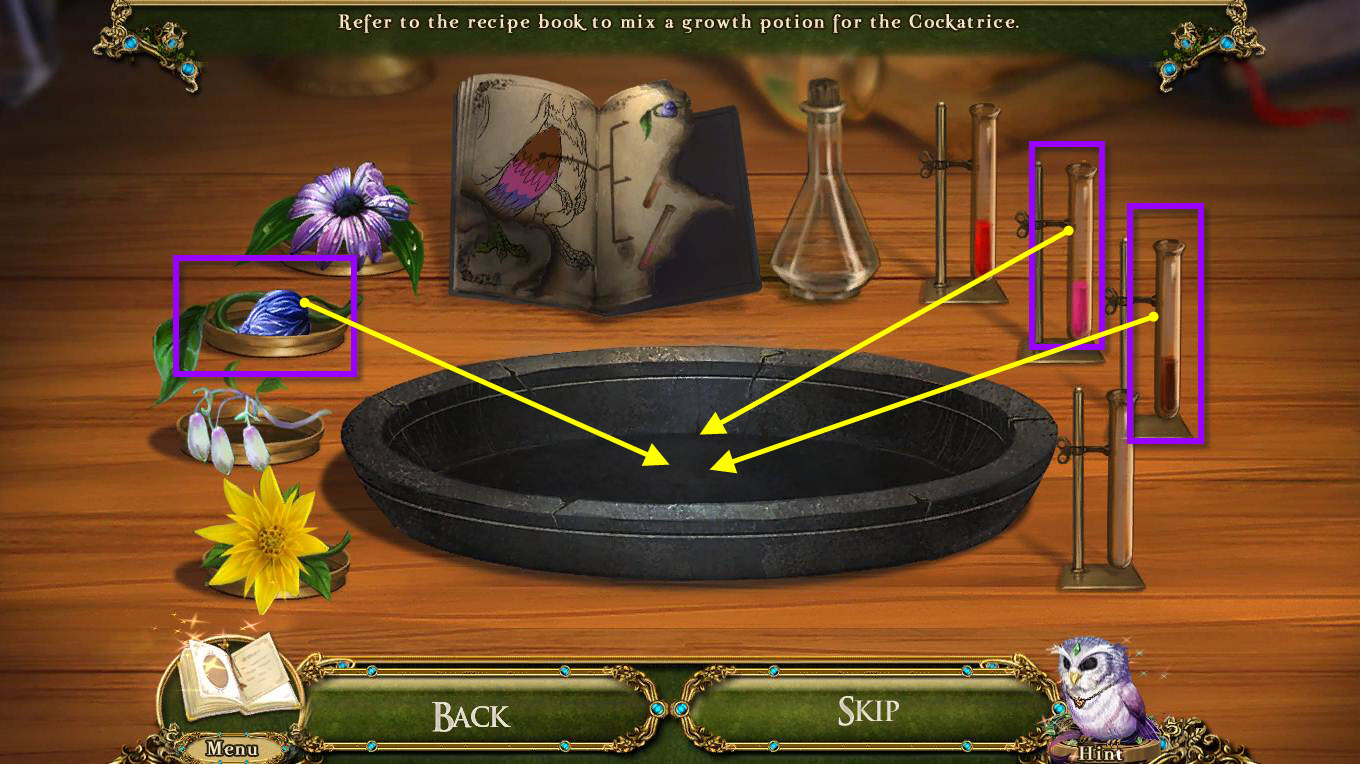
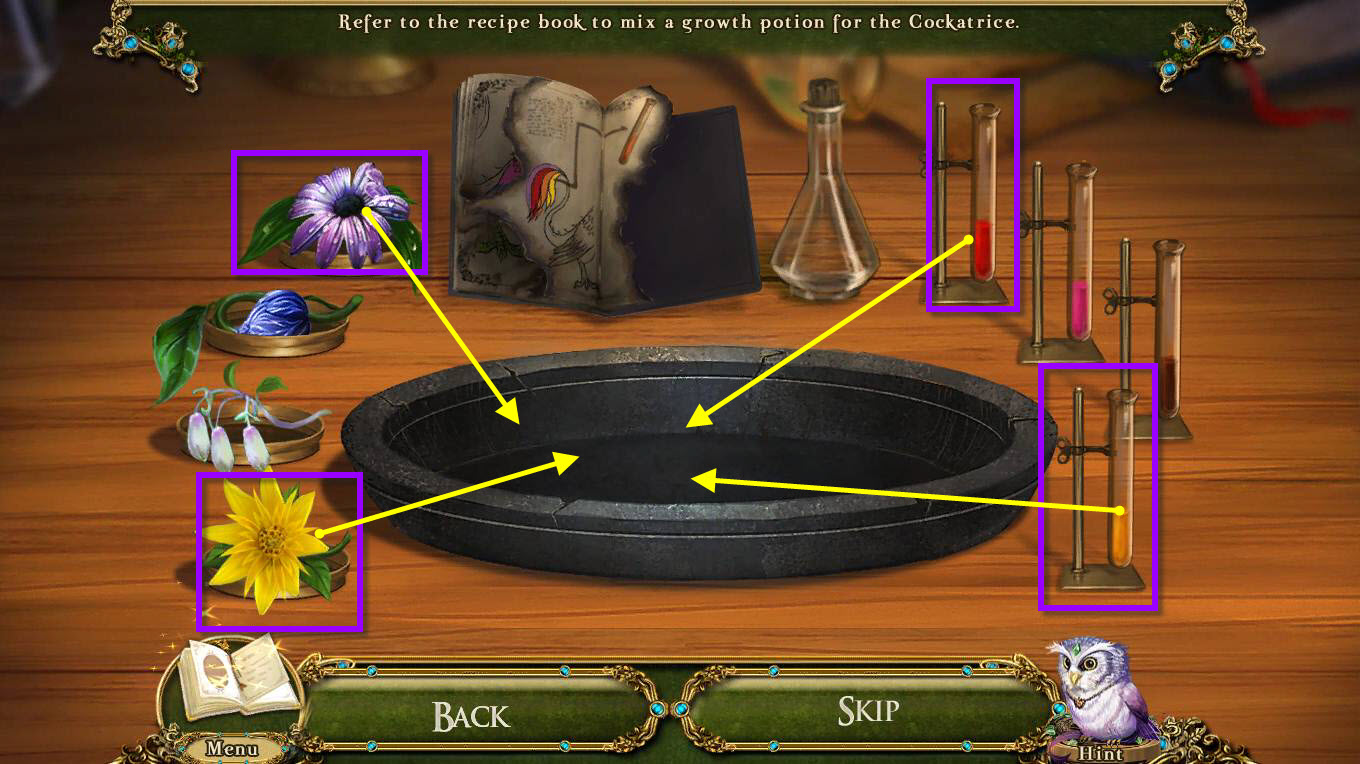
- You will need to use the formula book on the table as a reference in order to make the growth potion.
- Take note of the colors on the picture as they indicate which ingredient you have to use.
- See the screenshots above for the solution.
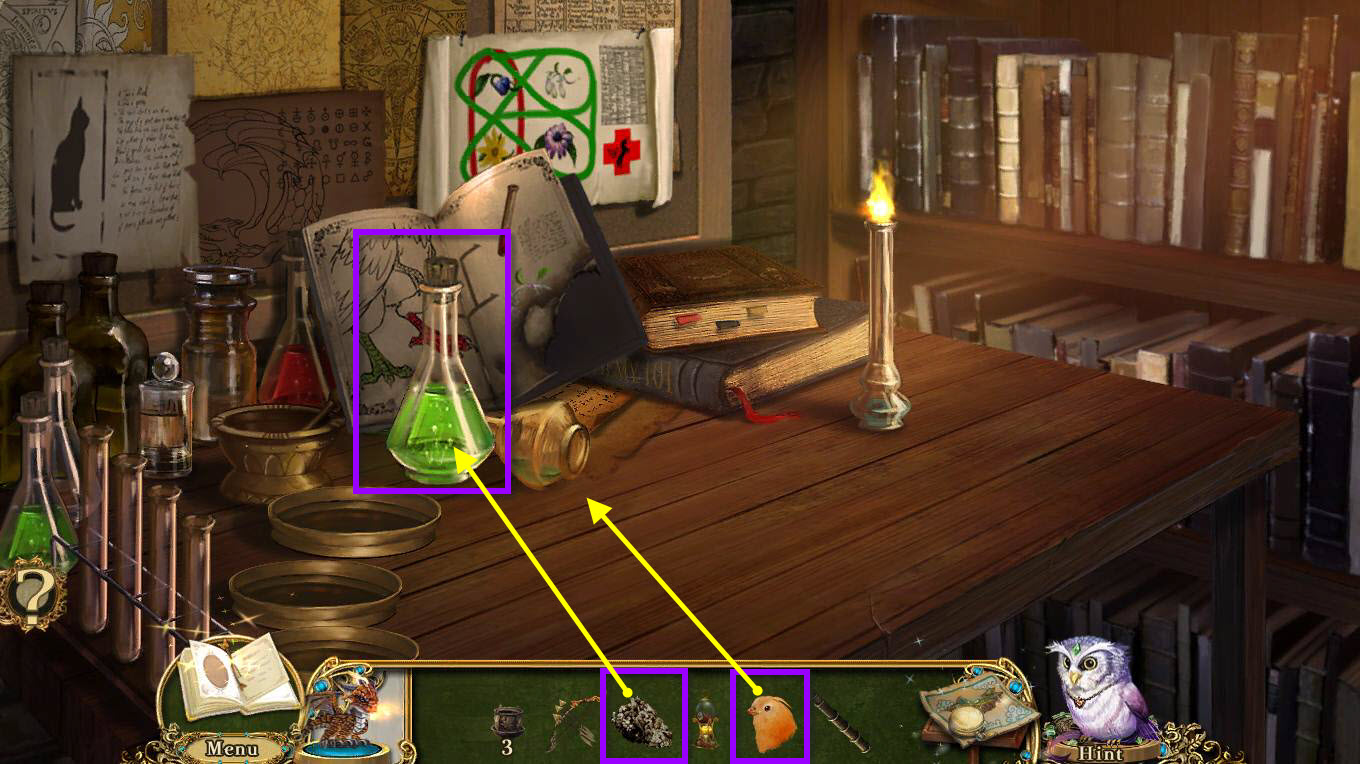
- Once you have made the potion, now you just need to get the Cockatrice Chick to drink it.
- Use the POPPED SABLECORN on the potion.
- Use the COCKATRICE CHICK on the bowl of POPPED SABLECORN.
- Go back once and discover the Cockatrice needs to be led to the basilisk with the bird feeders.
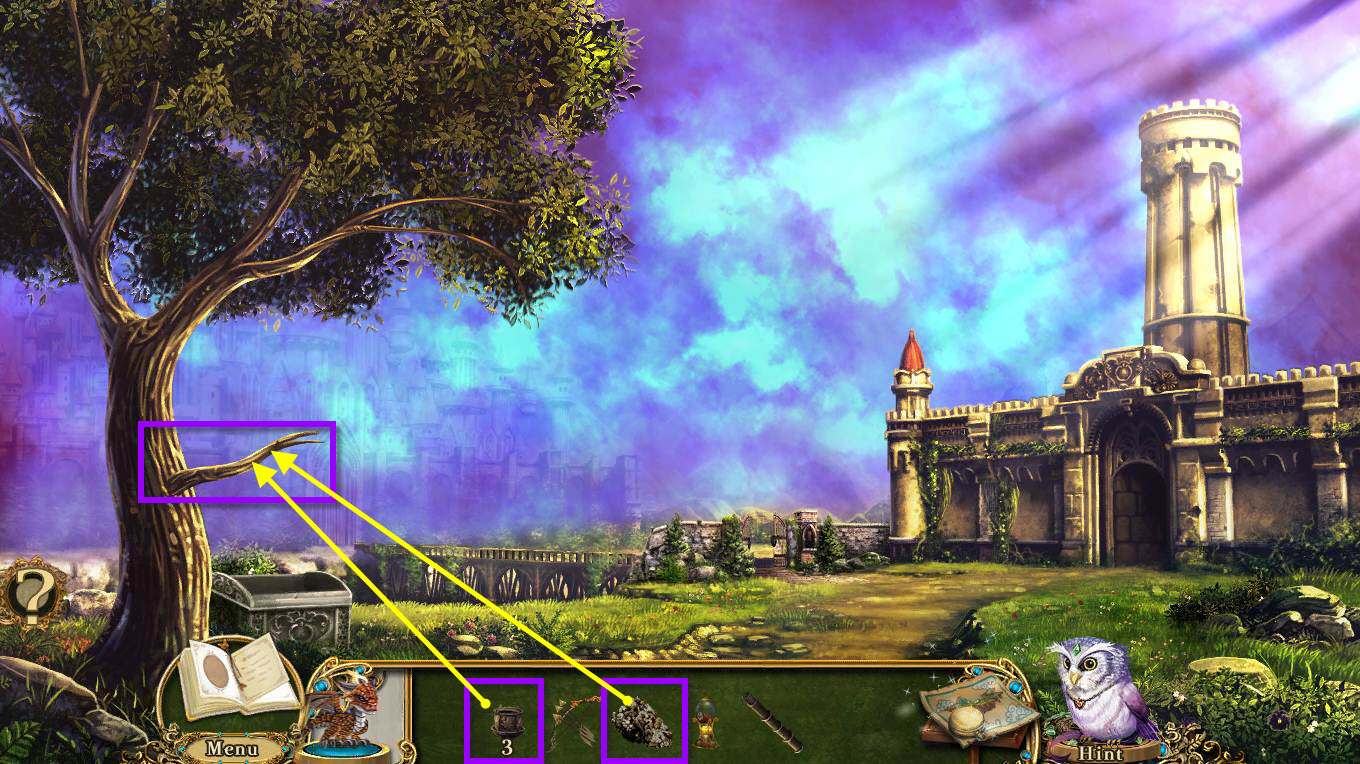
- Use the BIRD FEEDER on the hanging branch.
- Use the POPPED SABLECORN on the BIRD FEEDER.
- The Cockatrice will come running.
- Move forward to the castle bridge.
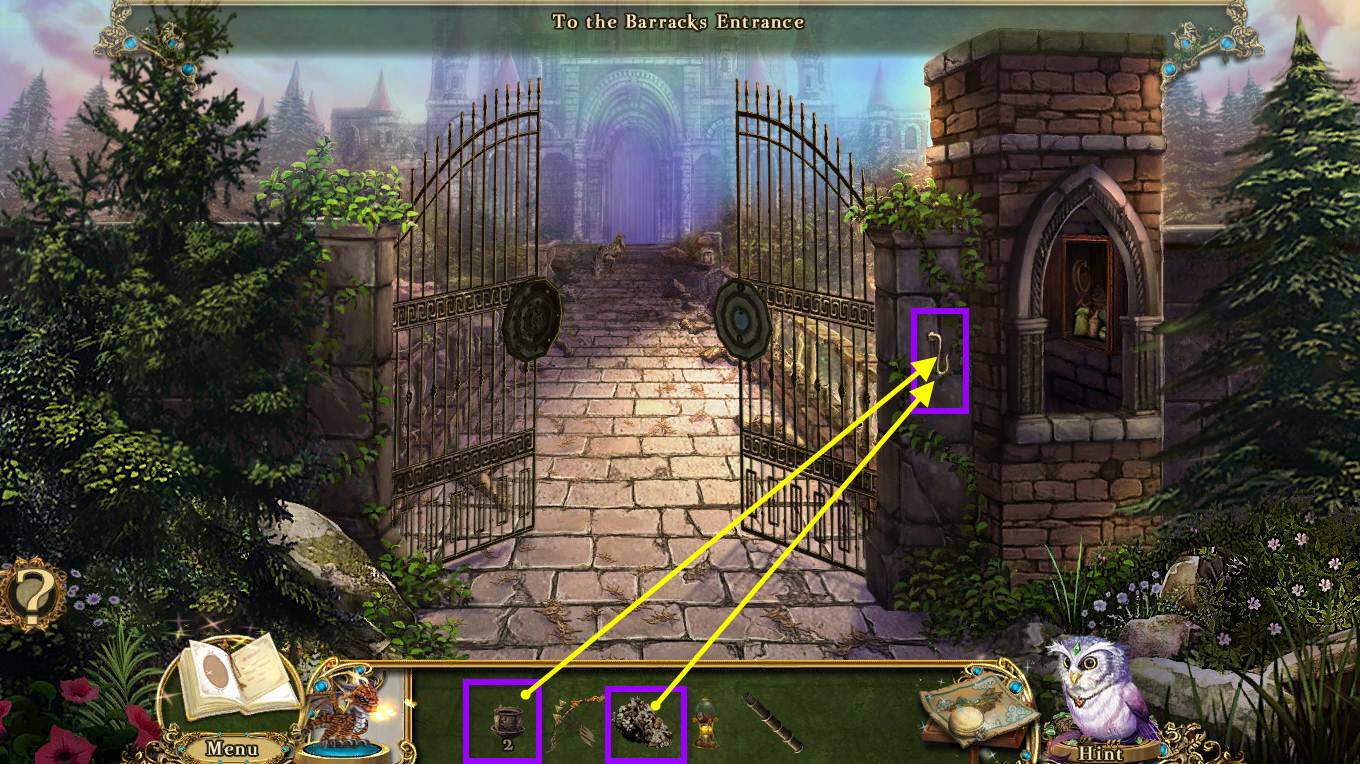
- Use the BIRD FEEDER on the hanging metal hook.
- Use the POPPED SABLECORN on the BIRD FEEDER.
- The Cockatrice will come running.
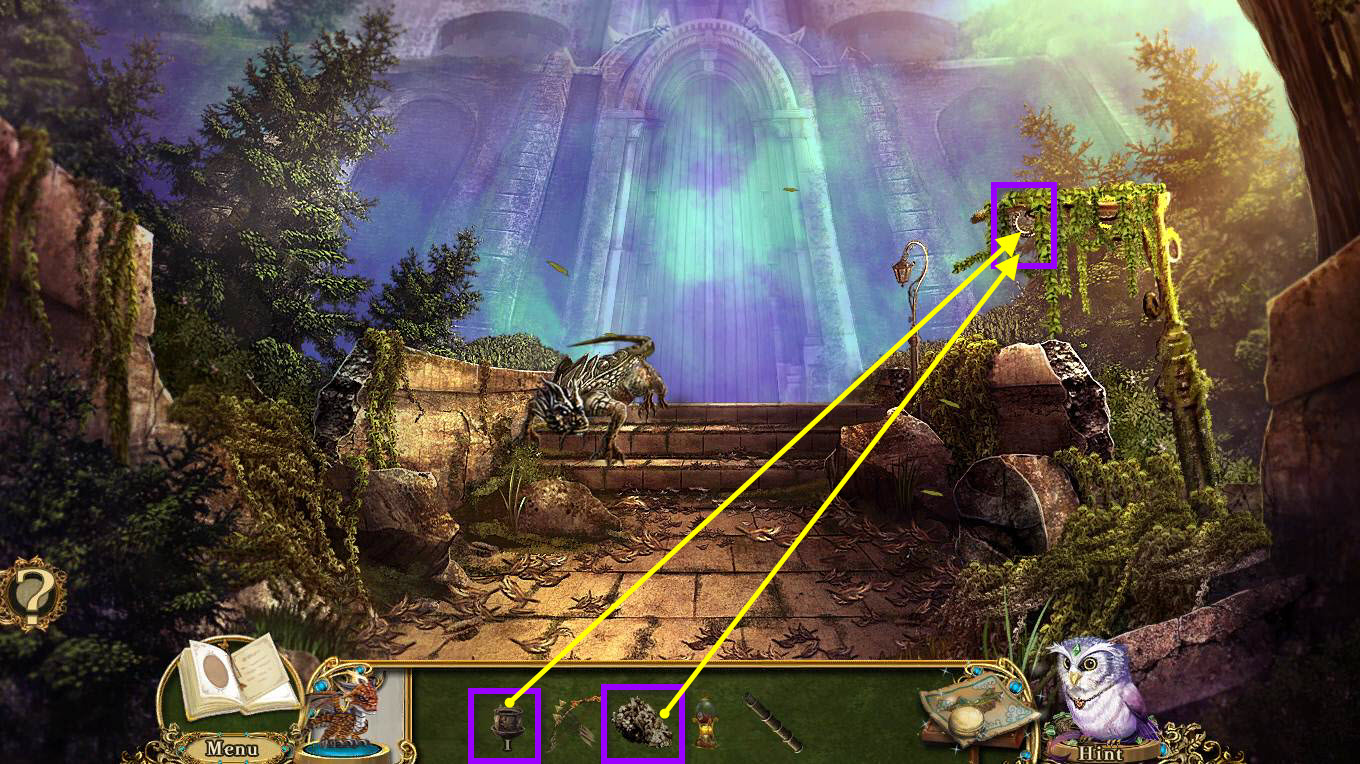
- Use the BIRD FEEDER on the overgrown lamp post hook.
- Use the POPPED SABLECORN on the BIRD FEEDER.
- The Cockatrice will come running and defeat the basilisk.
- Once the battle is over, click on your map and fast travel to the windmill crystal forge.
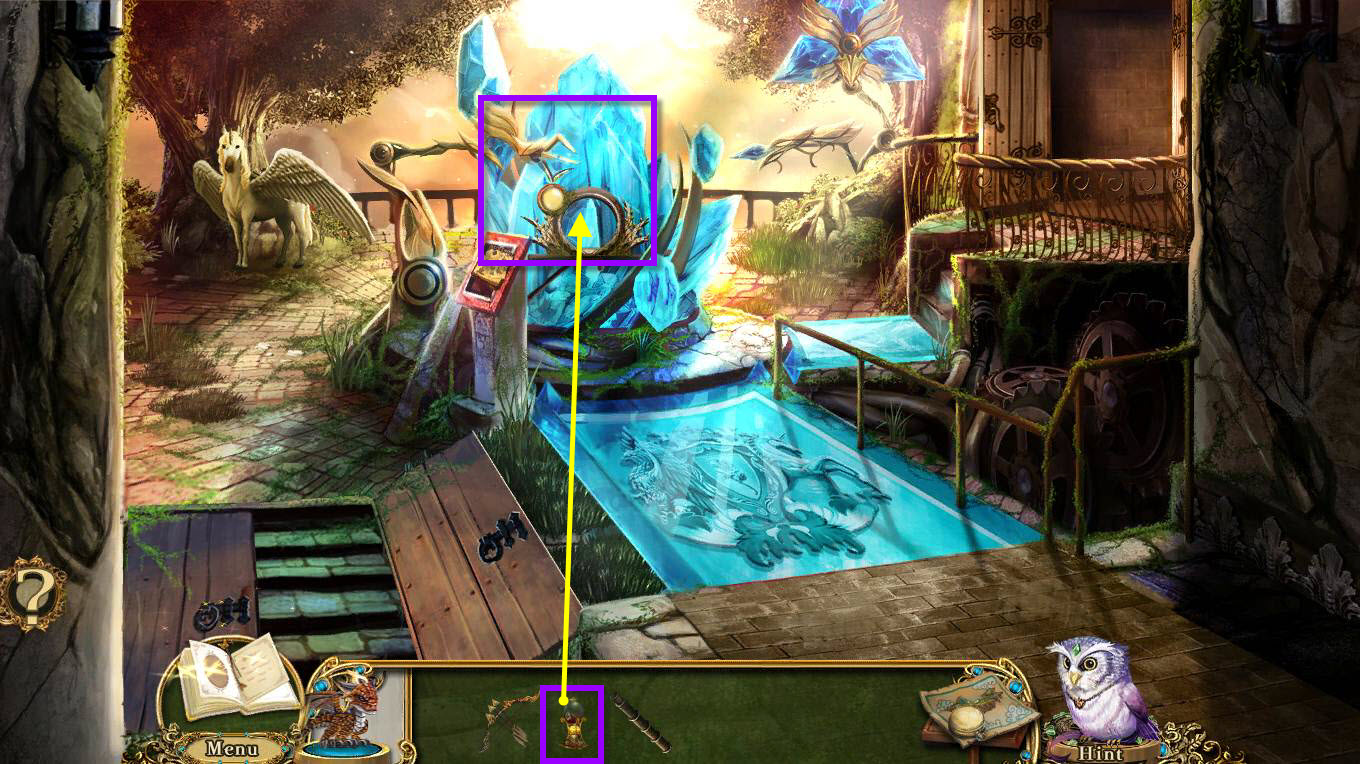
- Click on the crystal forge to zoom in.
- Use the ESSENCE OF FIRE on the forge.
- This will start a mini-game.
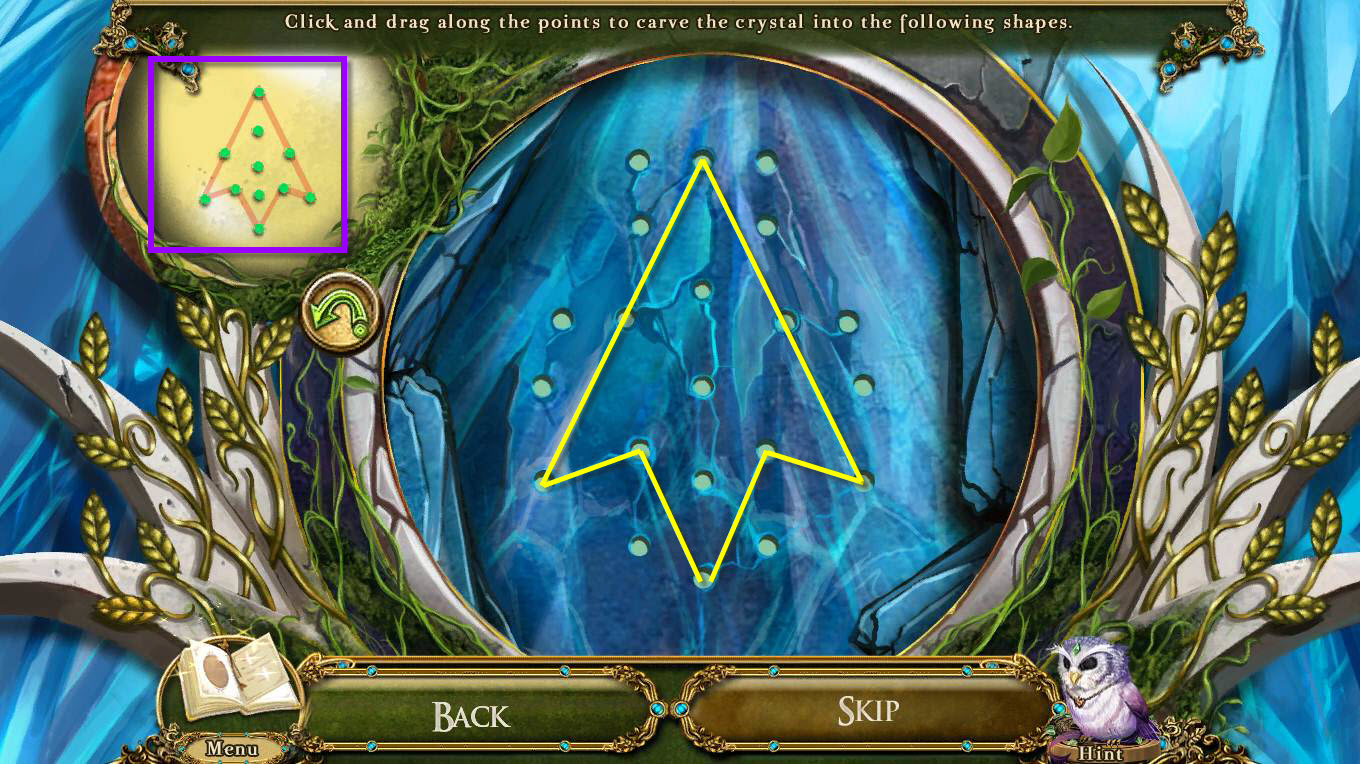
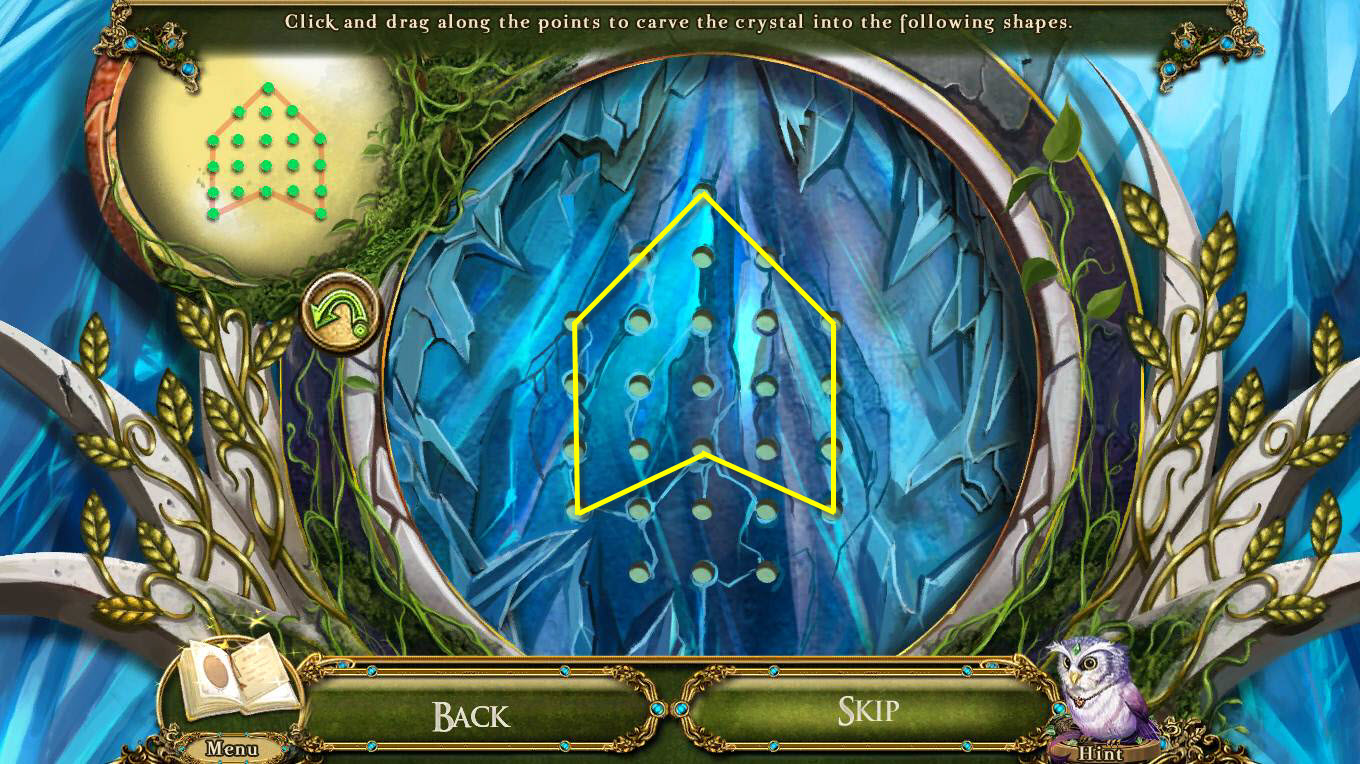
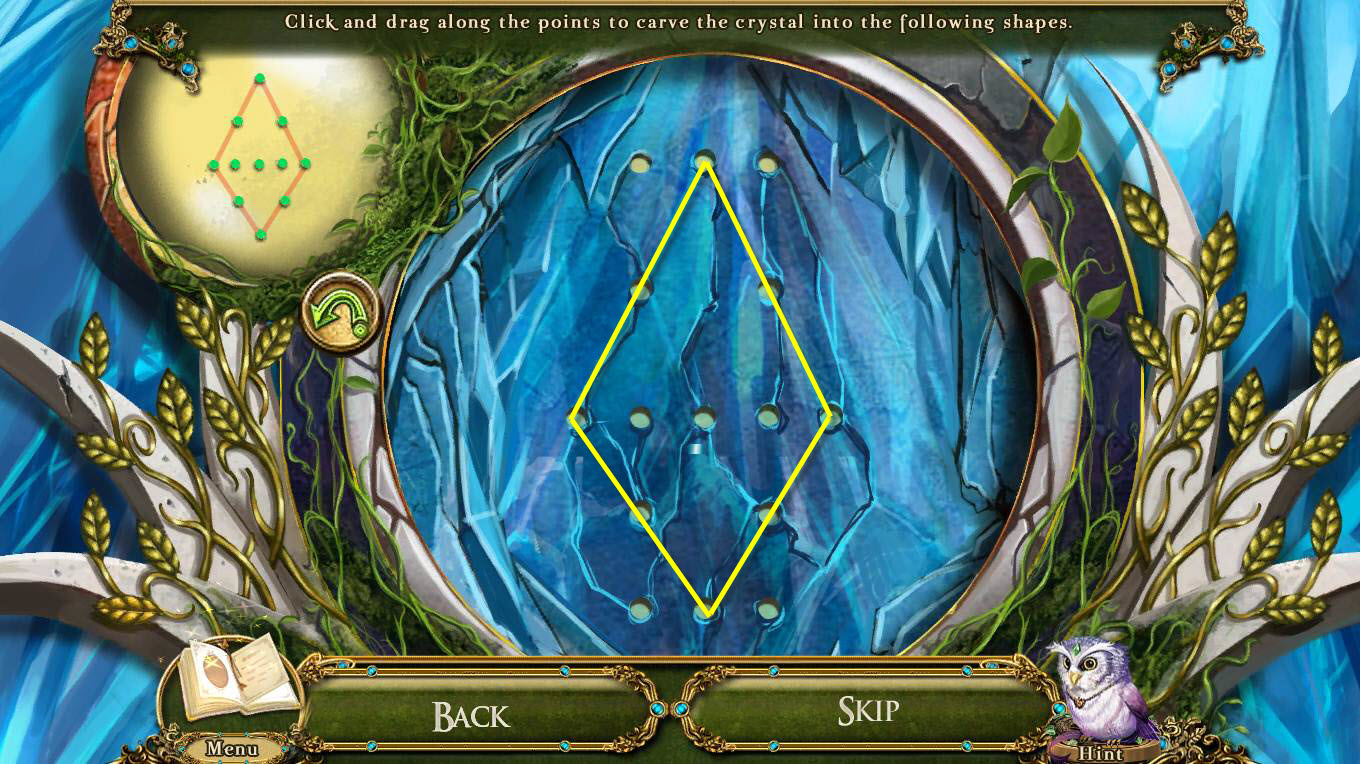
- The goal of the game is to drag your mouse through the points in order to recreate the picture on the left.
- You will have to go three rounds of this game.
- See the screenshots above for the solution.
- You will receive the BALLISTA BOLT HEAD.
- Return to the barracks courtyard.
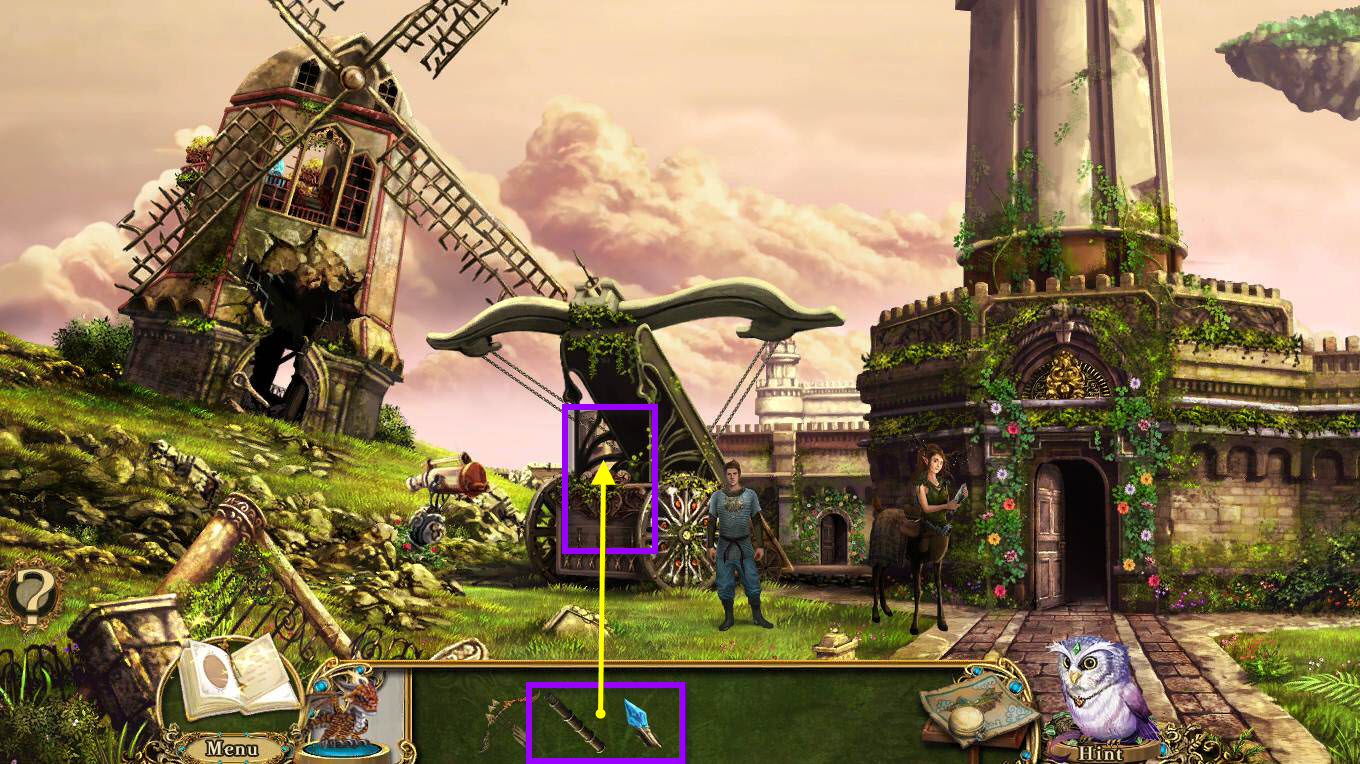
- Use the BALLISTA BOLT HEAD on the ballista,
- Use the SPYGLASS on the ballista.
- This will start a mini-game.
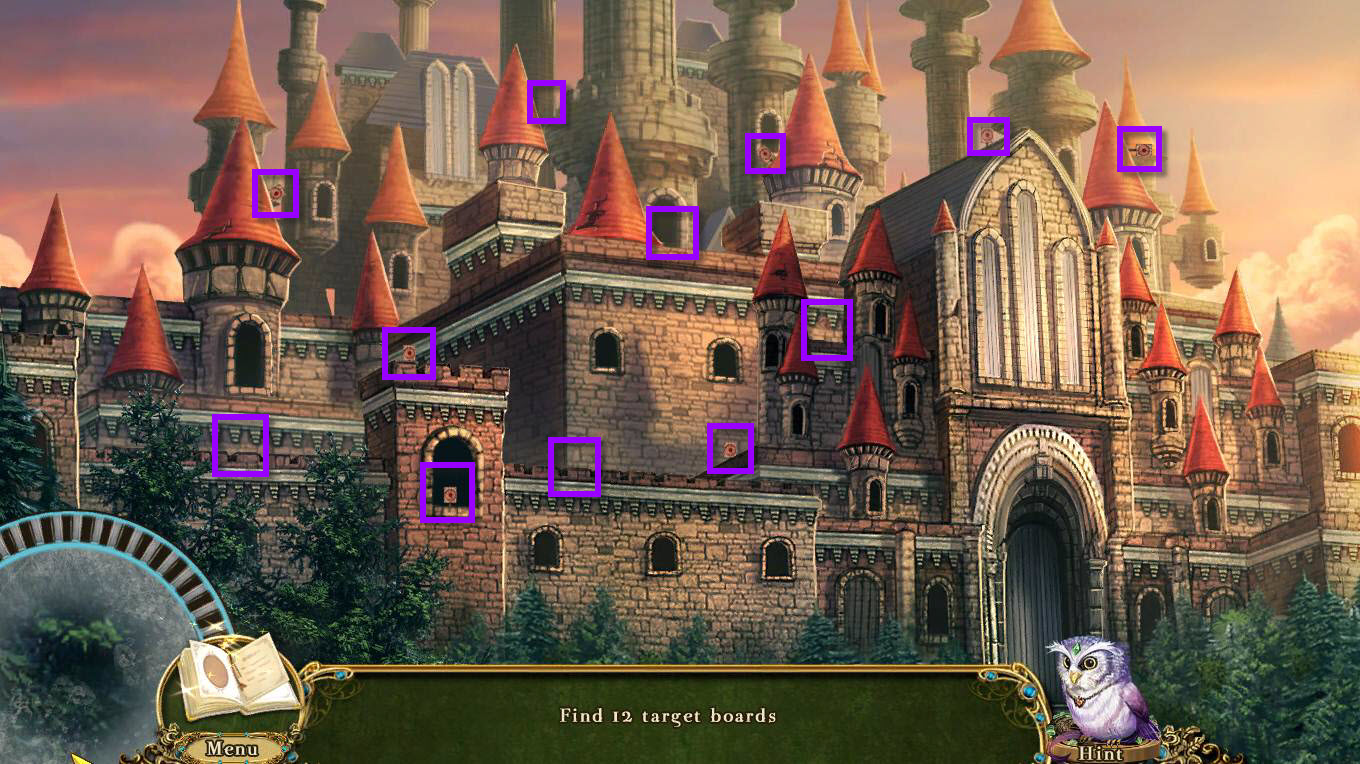
- The goal of the game is to find all the target boards with the view finder.
- The targets move so you need to keep a look out to find them all.
- Once you see them through the viewer, click on them.
- See the screenshot for the location of all 12.
Congratulations! You have completed Chapter 2 of Awakening: The Skyward Castle!
