Walkthrough Information
The Wizard and the Warrior is a classic RPG game. While it utilizes the standard RPG programming, what makes this game wonderful is the storyline and the optional sidequests. We've includes maps and screenshots of everything for you. One thing about this game is that there are a few sidequests that are time limited with the game. You may find that as you play through the game on your own the first time that you have missed some things. Take a look at the list of sidequests and see what you might have missed. I'll bet that you will want to play again so that you can have the pleasure of doing everything. I've put the world map and the Marnethia College Town map up here at the top because you will probably want to refer to them often just for convenience's sake. You may want to right click on them and choose to open them in another window.
Marnethia College Town Map
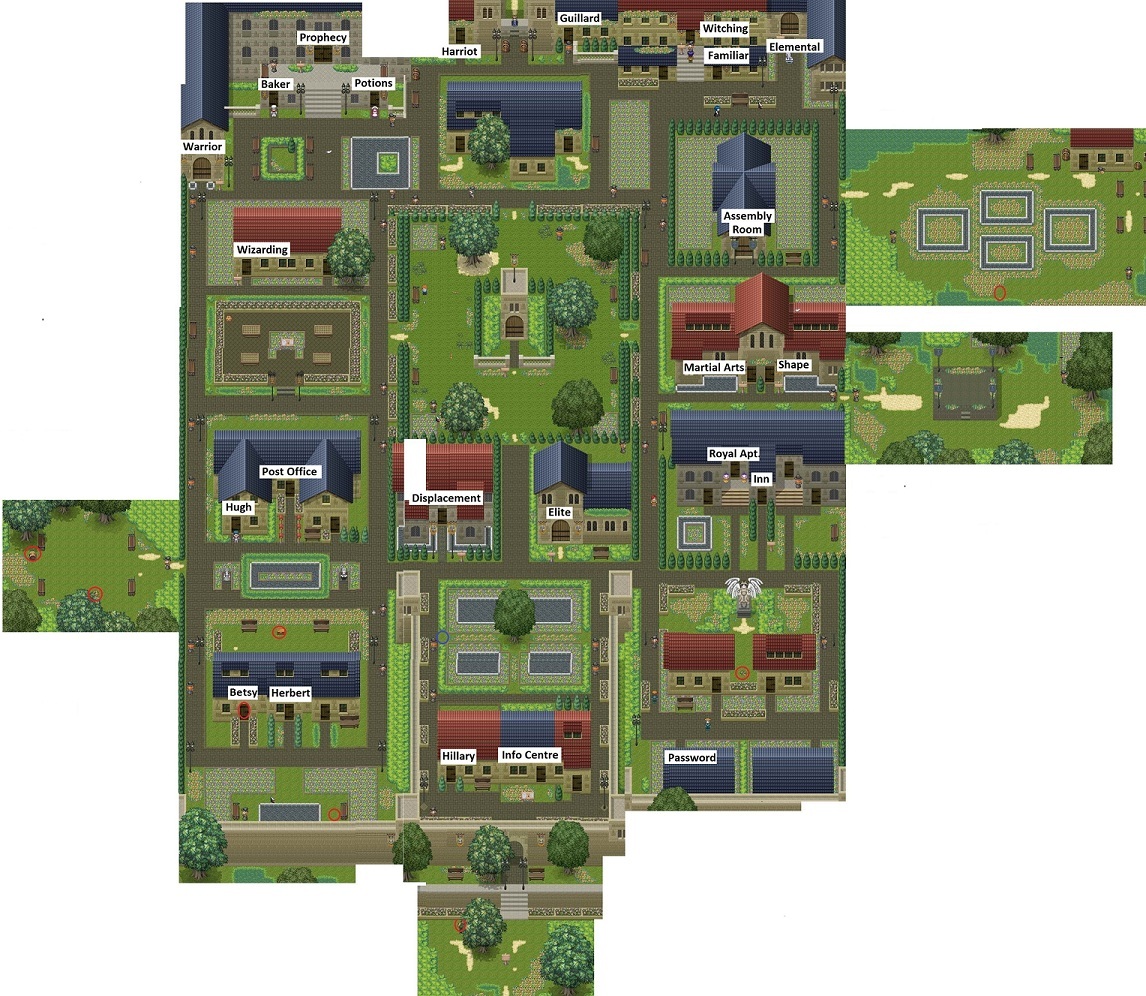
Map for when flying on your broomstick
General Information
Show/Hide
In this game you will play as Ember, or if you would rather to think of it in another way, Ember will always be part of your team. The walkthrough is written as if you are Ember though. Movement is made with either the keyboard arrows or mouse or a combination of the two (my fave). If your mouse or screen size is not working properly, be sure you have the most recent version where these have been fixed. The game author also frequents the forums at her website, www.eridani.com, so if you have any operating problems, you can ask a question there.
If you want to go into a windowed mode or back to full screen, you can use alt+enter or F12. If you wish to turn off the game sound, hitting F1 will bring up a screen that allows you to uncheck the two play sounds boxes.. The game interface uses a combination of the esc key, space bar, and enter key for the keyboard. On the mouse, the left button acts as the space bar and the right button acts as the escape button.
The game is not really scored at the end of the game. You will get a total number of pumpkins found, familiar items found, flying lesson score, and friendship points. The score just doesn't seem to really mean anything. Basically you just want to get everything done. Eridani has published a strategy guide with a list of all the sidequests but no hints on how to get them. Most people seem to want to get everything available done and not miss anything. Read the walkthrough and this will be you.
You need to talk to everyone if you want to find sidequests, and you need to talk to them more than once since sometimes thing needs to be done before a character will initiate a sidequest. Always choose to be helpful and nice as that will provide you with quest points and/or bonuses later on. But be willing to ask for rewards in a polite manner.
At the beginning of the game you are given the option of choosing your difficulty level. If you have not played this type of game before, you should really play it on the easy mode. If you don't like fighting, then choose the easy mode. However, the fighting is just challenging enough on easy mode to make the game enjoyable without getting too frustrating.
It is very important to note that you will not have an autosave feature on this game unless you choose the easy mode. You need to be sure to save often as in anytime you think you might be getting into a fight if you are not on easy mode.
In addition to progressing through the game, fighting is also important to get gold and experience. You will need gold to buy different potions and armament to assist in your fighting. You will need experience levels to become strong enough to fight effectively. .
Bonus items are usually found in chests of all sorts. Don't go around clicking on other furniture as there will not be anything there. You will also find small bags of gold lying on the ground.
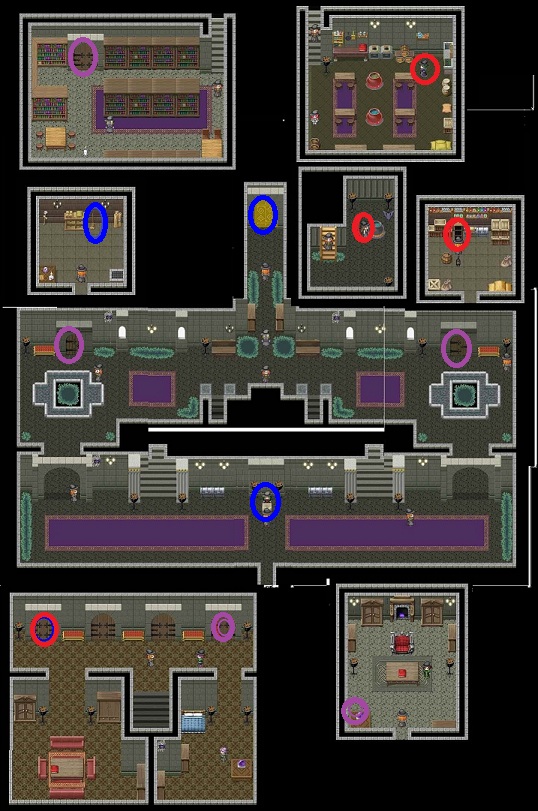
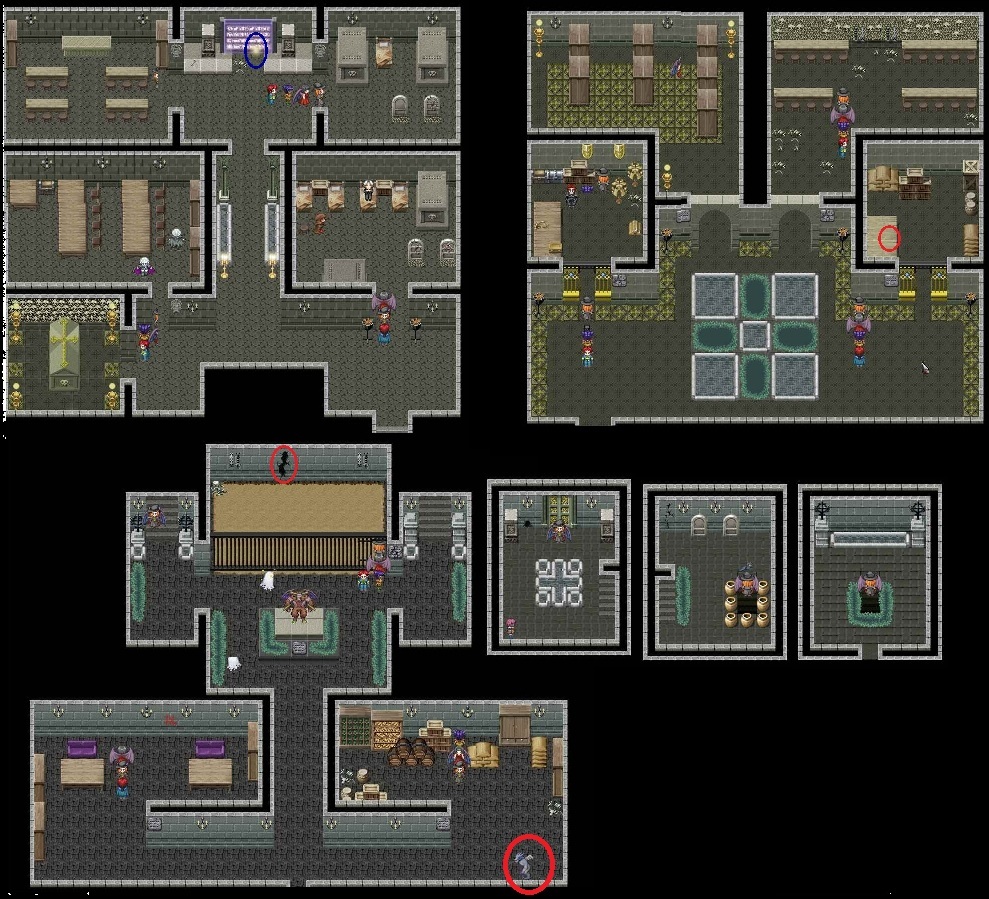
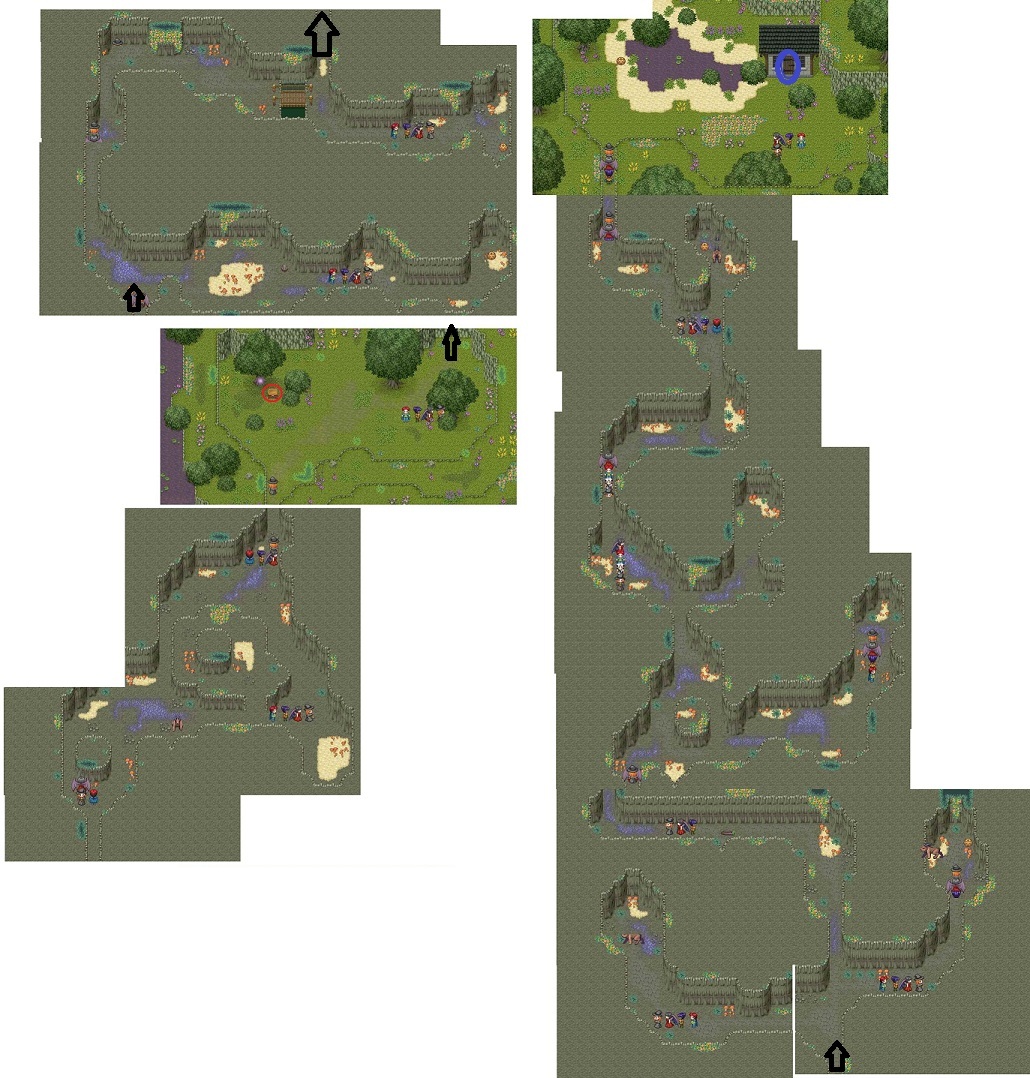
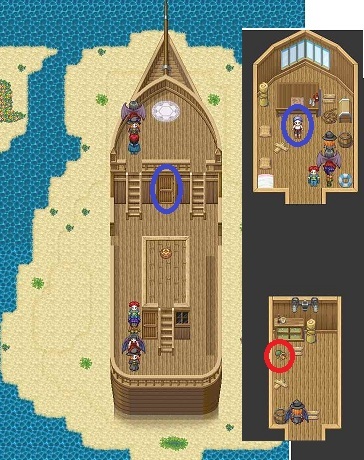
The Sidequests will be included in the walkthrough and also in list form at the end. Some sidequests are just too time-limited and I don't want you to miss out because they were split off. Screenshot maps are included in the Main Quest section. Items circled in blue are necessary for the main quest. Items circled in red are either sidequest items, or bonuses. Not all pumpkins are circled as they are pretty easy to see even on the maps. If an interior of a building is not shown, it means that there is nothing to do in there or that it is very obvious what to do inside. I have circled any doors that require entry though. I would still go in each building if possible and talk to everyone but at least you don't have to waste your time clicking on every single item. Items circled in purple will be available to explore at a later time upon your return back.
The Journal is extremely helpful. The first item is what you need to do next for the main quest. All the other items are what you need to complete for sidequests.
Familiars: You get to choose which one you want. Each one will find items in different spots, but for all they will have a bluish-white light where you need to look, so keep your eyes open.
Fighting Hints
Show/Hide
- You will choose between Attack, Skill, Defend, and Item. If you choose an attack or skill that only affects one enemy you will also need to select the enemy to hit. If you choose a skill or item that will affect only one team member you will need to choose the team member including that particular person.
- Enemies become stronger as the game progresses, but so do you as long as you gain experience.
- Fight everything you come across in the beginning to increase your experience level.
- SAVE frequently.
- If you lose a battle, you will get a Game Over screen, but you will be able to go back to an Auto Save point (on easy mode) or your own save point (on normal mode).
- Save before a big battle because sometimes the Auto Save point is a bit further back than you might want to replay.
- There is no published table (so far) that explains each enemy's attack method and weaknesses. The programmer published a strategy guide, but it did not give as many specifics as I would like regarding how to fight. I found it just did not help me that much.
- As you are fighting, pay attention to what happens to your enemies as each character metes out damage. Take note of which spells are most effective against each type of enemy and then use them.
- Try different approaches until you find something that works. I probably overused the spells, but it worked for me! I also like spells that hit all the characters at once, which was probably just lazy on my part.
- Sometimes direct attacks are more effective than using a spell.
- It is handy to stun, paralyze, put to sleep an enemy so that you can concentrate your firepower on just one enemy at a time. Also take that time to regenerate your party as necessary when your enemies are down.
- Also take note of the fact that sometimes your attack will actually give your enemy energy. White numbers are a decrease and green numbers are an increase.
- As the game progresses along, your characters will get more and more powerful spells. Always check out your new ones as they are frequently given to you just in time to be helpful.
- Some spells will "revive" a team member and some will "remove negative states." Revival is necessary when your team member has actually disappeared from the screen. You cannot use a revival potion unless your character is "exhausted."
- The spell that removes negative states is particularly helpful as you do not need to pick the right potion and it can remove more than one type of negative state at a time.
- You can also remove negative states by using the item choice and select the potion that will solve the problem. Note that you can use a weaker character to provide more health points (HP) or magic points (MP) to a character that is losing them but is a stronger fighter.
- One suggestion is to choose characters (once you get to do so) that that have the most MP available for use. I found the spells were just much more effective than raw power.
- Equipping your character with the right equipment can be very helpful. You should note that your weapon will frequently have an elemental attack. It is particularly important not to use an attack that will give your enemy an enemy boost.
- Most enemies will disappear after you battle them but a few will regenerate each time you re-enter their area. Good news is that at least you will get more gold and experience when you fight them again.
- A lot of battles can be avoided by running past your enemy but don't do that until your experience has been built up or if recommended in the walkthrough as some enemies are just too hard early on.
- Save whenever you can before you get to a fight while you are figuring out your party's effective moves.
- Return to an inn in town or House Island to rest each time you have a big fight. This is very, very important and will not be included each time in the walkthrough. Once you have access to House Island, all you need to do is walk through the front door to be restored.
WALKTHROUGH
Week 1
Show/Hide
Vester
Island
- Talk to Hilde, the teacher.
- Head south and then east to your house and talk to your mom. She wants you to find Giselle, your sister.
- As you explore Ember's house (and all other characters' houses), you will find trunks with personal belongings. You will be able to pick those up later if you'd like but they won't get you anything as far as I can tell.
- Pumpkins are circled on this map.
- At some point, talk to Lilly in town who wants to find her lost dog
- Head north through town and then out to find Giselle.
- Pick 3 blue flowers, Sky Blossoms.
- Don't fight too much for now as you can't go home to rejuvenate.
- Pick 1 blue flower in the north and 2 in the south (west on the beach and far southeast)
- Find Lilly's lost dog (after you get Giselle in your party). He's in south Vester at the northeast. Return it at some point.
- Return to your house to talk to you mom, Brigitte.
- Wake up in the morning and go talk to Marlon outside of school.
- After school head south to Evan's house and talk to him
- Go into town and find the school official.
- Rest at the Inn before you go to the door as you will end up at home later in the evening.
- You will end up back at your house.
- Go meet the official at the beach. He will take you to Nethina.
Vester Town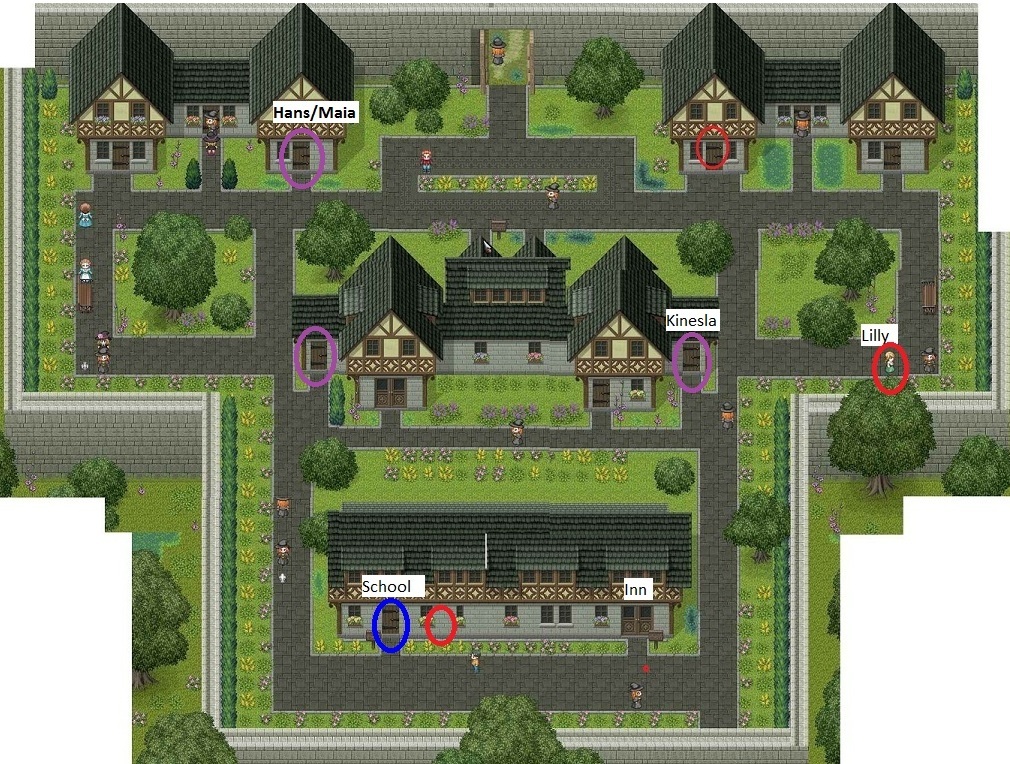
South Vester Island
North Vester Island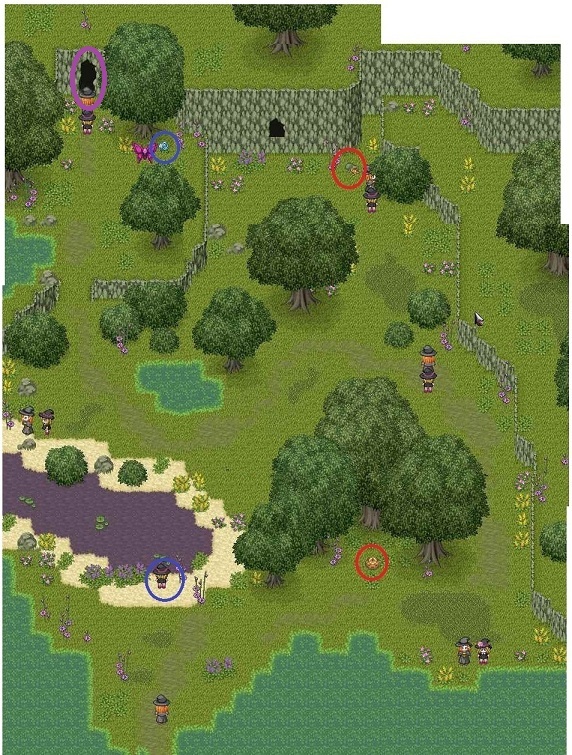 Marnethia Island
- You will land in Nethina, which is south of Marnethia College Town. You need to find someone to walk you to college.
- Find Anda on the docks in the southeast.
- Explore before leaving.
- Find the inn so you know where to come back to.
- Go to Johnny's house for the sidequest of finding him.
- Buy a few Disperse Drops for the monsters.
Nethina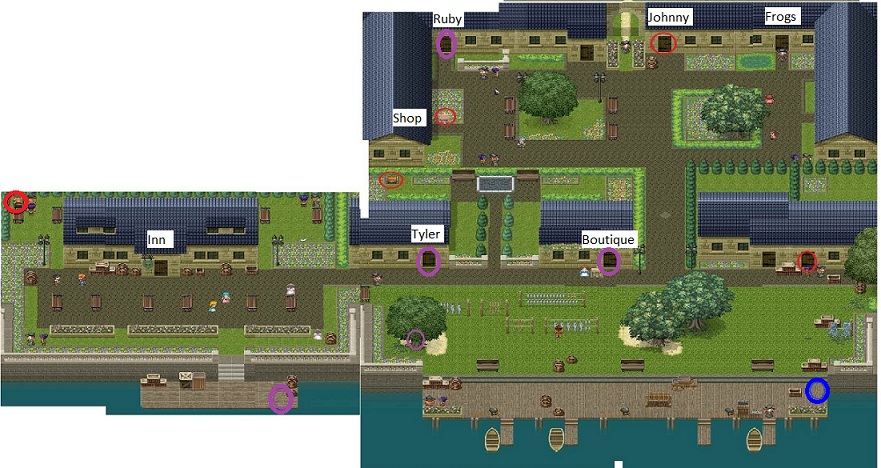
South Marnethia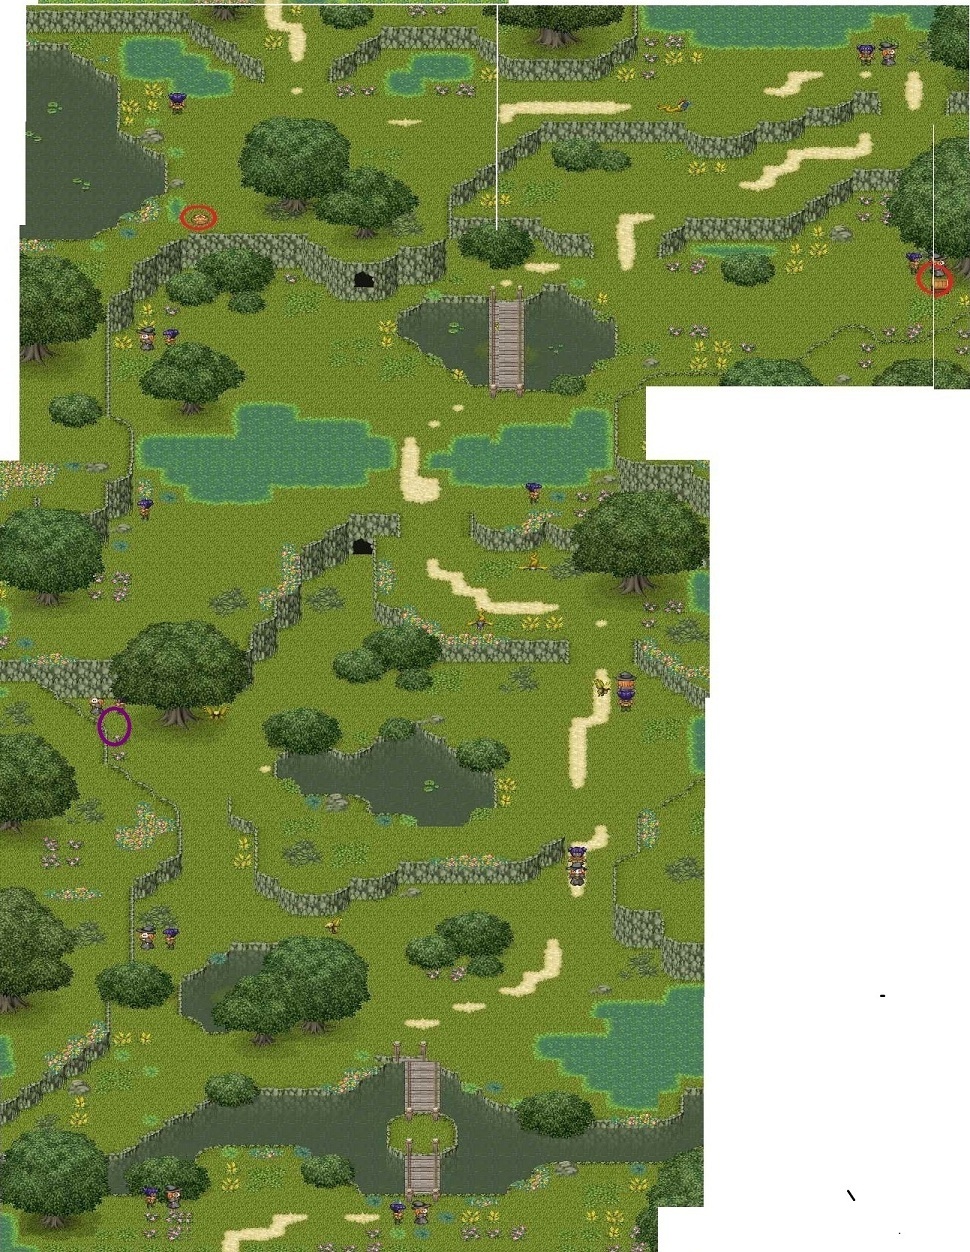 - Travel to the north with Anda.
- Try to avoid these monsters if at all possible as you are not very strong right now.
- The southern most sourfly will come back so there is no point in going back to the inn as you will just have to fight it again.
- Ember's frightening stare and Anda's attack are effective.
- When you get to the college town, Anda will depart.
- Go the Information Centre to get a pass to the Witching College. You will need need to come back later for a sidequest.
- Go to the Witching College.
- Talk to Helga outside; she needs to find her Witch's Hat.
- Talk to receptionist.
- Find your room and go to sleep.
Marnethia
Witching College
Week 1--Monday
- Talk to receptionist and get the key.
- Pick up your daily potion.
- Go to your Familiar Exam.
- Save before starting.
- Find 5 gems (circled in blue on the map); you will use the cat to get two gems.
- Talk to the witch to the south twice; once to turn her down and next to get a task to find her serpent familiar.
Familiar Exam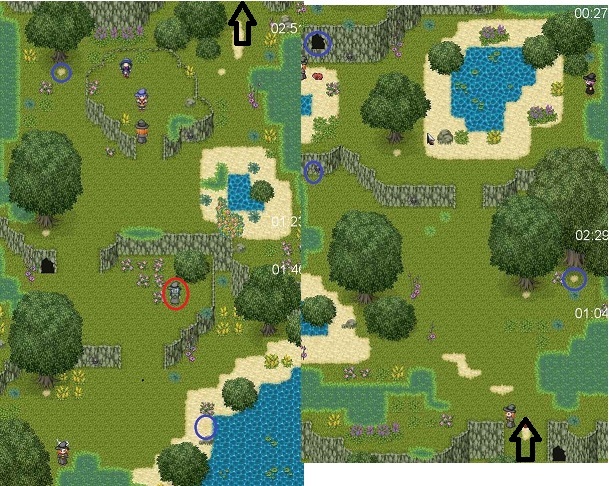 - Return to school.
- Get your familiar from the Familiar Store, which is just to the right of the Witching College.
- Pick whichever one you want; each has special powers but you probably won't be fighting with it too much. I had particularly good luck with the bat who eventually got a wicked upgrade and had a super powerful attack.
- Pick a good name and spell it correctly as you will be seeing it throughout the game.
- Explore
Marnethia College Town
- Go the Post Office and start delivering letters while you are
exploring (to Hillary, Harriot, and Henry)
- Find Adna (in the market)
- Talk to Hugh with Adna in your party; get task to take a letter to Sasha in the Warrior School.
Warrior School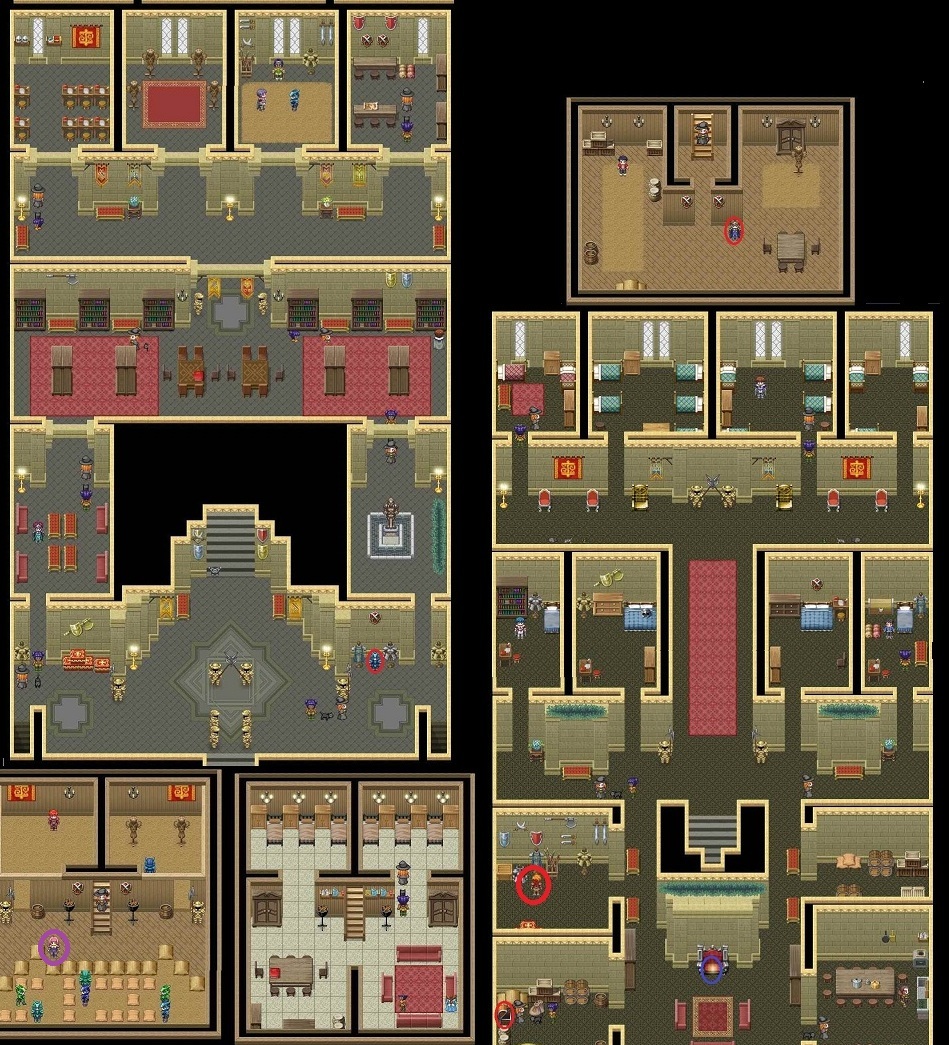 - Go to Warrior School with Adna.
- Talk to Boris; he needs to get unstuck.
- Give the letter to Harry
- Give the letter to Sasha; she wants a new outfit
- Find the student hideout (behind the chair in the hall upstairs) and get task to find the sword Godslayer.
- Return to Post Office and get a letter for Zoraida in the Witching College (the receptionist)
- Go through Betsy's house to the box in the backyard to pick up an Earth Pendant; you will need it for Day 2.
- Go to bed after delivering the letter.
Week 1 --Tuesday
- You can do the following at any time.
- Go to the headmistress' office and pick up the key on the floor, only if you talked to the witch in the familiar exam.
- Go to the library and open the locked door.
- Get the serpent and return it to the witch in the right most dormitory.
- She'll give you a bird to get rid of.
- Pick up daily potion from the kitchen
Start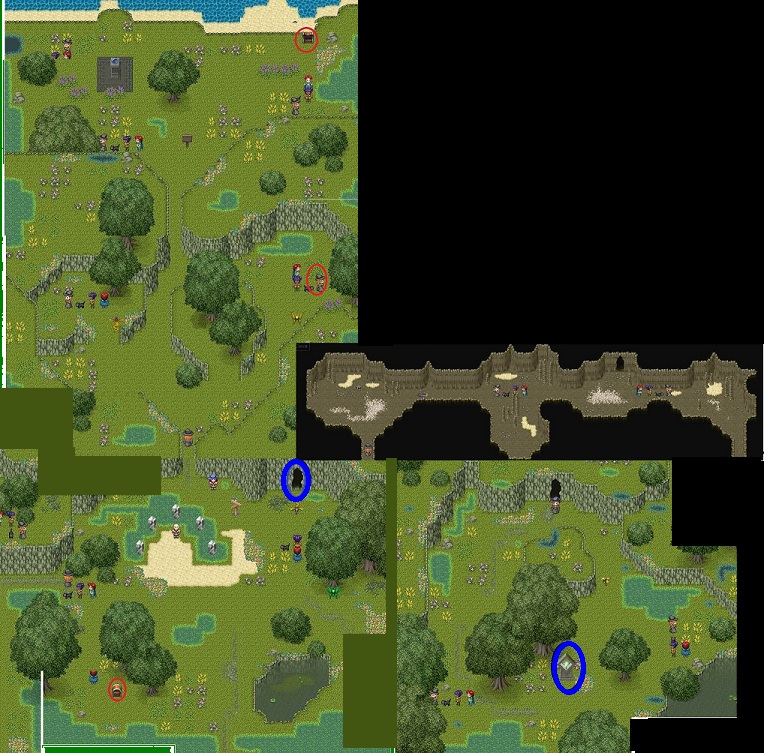
South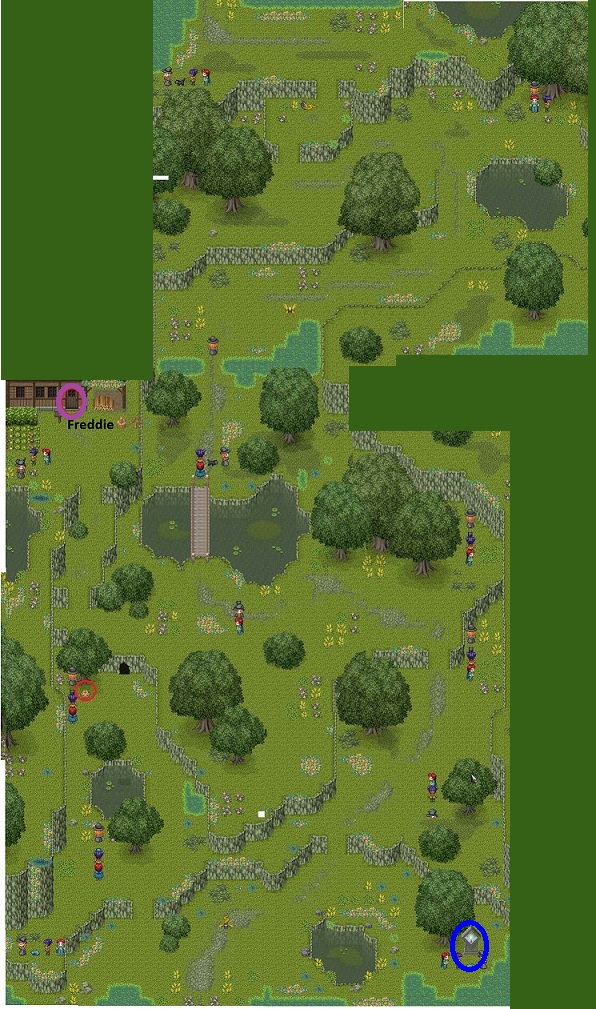
West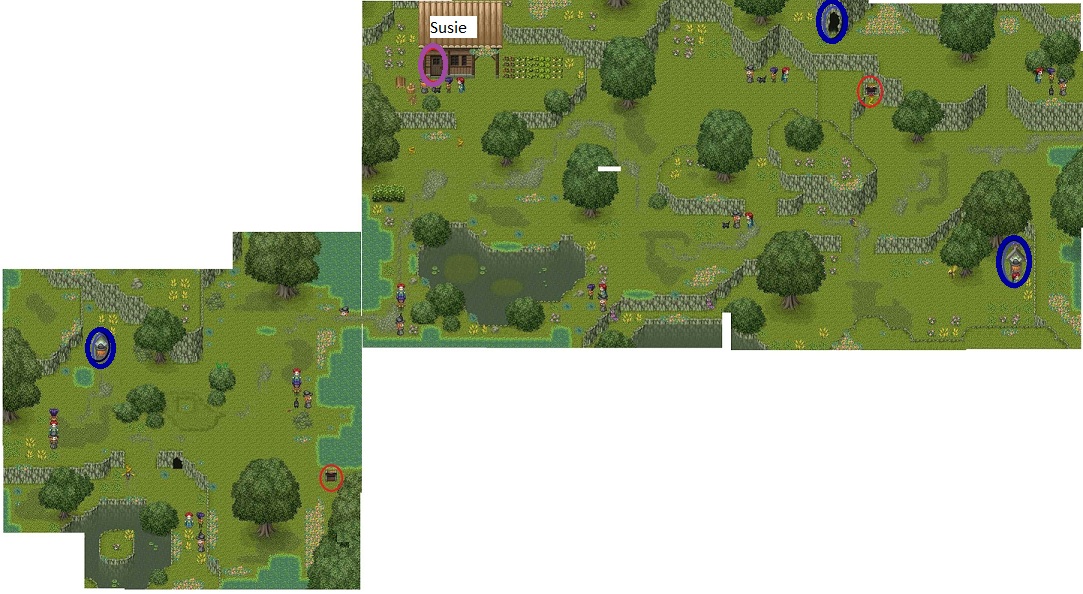
Cave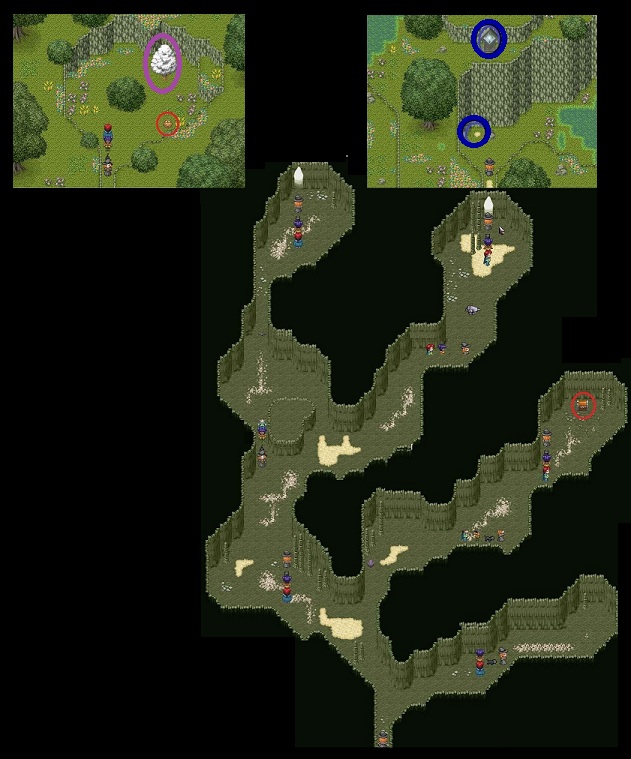 - Go out for second lesson
- Your team of 3 needs to find all 5 lights.
- Use your familiar to get Prophecy School pass. You can tell where to use it because you will get a little ball of light.
- Try to avoid the ugasquabs (snakey things)
- The sourflies just north of the bridge will return so don't expend any effort to kill them.
- You can buy potions near your starting point. You can also return to town and rest at the inn.
- Go back and get the Earth Pendant if you haven't done so yet
- Visit in the houses to get hints for later side quests.
- It may not be worth fighting the ugasquab to get to the chest near the big cave; it contains basic mail.
- Before going into the cave be sure to be fully charged up. Even better, fight enough to level up Ember so that she has Forest Curse
- Save the light that is through the big cave until last.
- Go just below the light, Quinn will go up and Brynn will come down.
- You have to fight a forest goblin on your way out. Interestingly Ember does not receive much damage, so just attack with her until you win.
- You will get a Displacement School pass when you get the 5th light.
- Talk to the official
- Return to town by walking and receive a Martial Arts School pass.
- Go to Post Office and pick up letter for Ruby in Nenthia (near the entrance)
- Find Johnny, the lost boy, outside of the post office by the statues
- Talk to the guy in the Info Center
- Go to Nenthia after resting in the inn if needed.
- Deliver the letter to Ruby
- Go to Johnny's house
- Buy Sasha's dress from Tyler
- Find Captain Charlie on the docks; he wants his 3 chests
- Don't forget to rest at the inn before returning
- Return to Marenthia
- Pick up a letter for Kinsie in the Displacement School
- Give Sasha her dress in the Warrior School
- Go to the Displacement School; you can't get in until you have Quinn in your party, but you can deliver the letter.
- Get another letter for Hyniak at the Night School but you can't go there yet.
- Write a nice letter to Mom. You need this to get a sidequest.
- Go to Prophecy School and find the Hidden Room to get the task to find 3 crystal balls
Prophecy School - Return to bed
Day 3--Wednesday
- Get your daily potion
- Get storeroom key from Vivianna to get a broom
- Find Witching College hideout and get mission to find Enchanted Mushroom Powder
- Find the broom in the other storeroom
- Do your flying lesson
- It is very important to save your game because you need to find the missing witch's hat.
- Ribbons are worth different point scores. Pink are worth one point, blue are two, yellow are three, green are five and purple are ten
- You need to use Forest Curse for all fights,
- The blue circles are ribbons. The yellow circles are fights for ribbons.
- If you have earned enough points AND when you are near the salesman; you will encounter the emerald dragonfly.
- Pick up the gold and buy some potions before you fight the dragonfly, for MP and Energy (cure sleepy)
- Be sure you have some potions that will give you back some MP as you need it for the Forest Curse.
- Fight the dragonfly and then go all the way to the end to get the witch's hat
- Before battling the dragonfly to go back be sure you have at least 15 MP.
Flying Lesson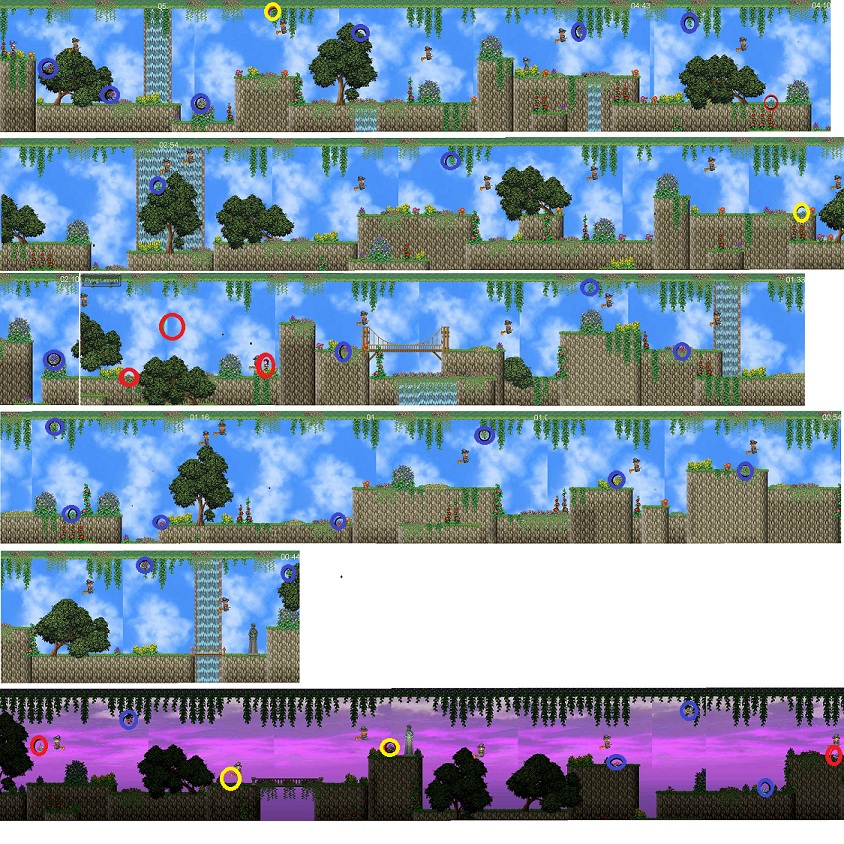 - When you pass you will end up at the Headmistress office.
- If you didn't write a letter to your mum you will be sent to bed.
- If you did, you can go out and explore more.
- You can go to the market and get one of the crystal balls
- Go to the clearing in the west and talk to the clown.
- When he tells you jokes, you have to find him absolutely funny. Don't respond neutral or negative at any time. You will receive a pass to Shape School.
- Go to Hugh to get your reward from Sasha.
- Go to the Shape School and find the hideout.
- In the hideout, get the mission to find Dave, a white bird, who is actually a student.
Shape School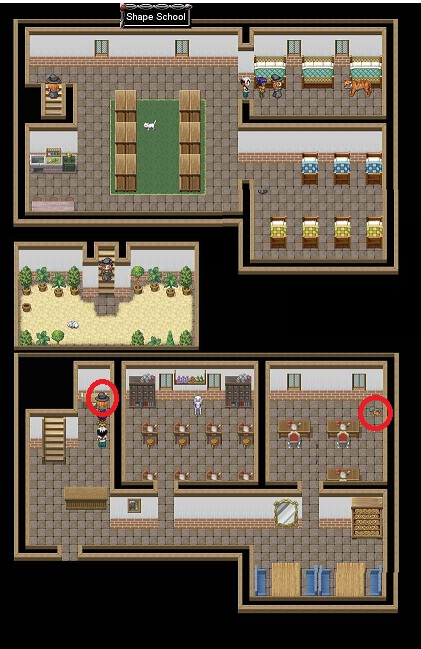 - On the way back, return the missing hat to Helga; she'll give you a
Witch's Ring.
- On the way back, return the missing hat to Helga; she'll give you a
Witch's Ring.
- Return to bed.
Day 4--Thursday
- Get your potion and head to class
- You will do another joint lesson at the Night School
 - Don't forget to equip your fighters
- Give letter to Nyniak
- There is a Darkness ring in the crack but it might not be worth the fight to get it.
- Find Marli in the library
- Find the student hideout; you will have to rescue the students before you get a task
- Head through the door in the hideout into the tunnels.
- There is a room with four switches.
- Use the rest area frequently as you fight
- Find the gate switches.
- Flip fourth switch and go into second gate from the right and read the sign on the wall to discover you need to learn a fire spell.
Tunnels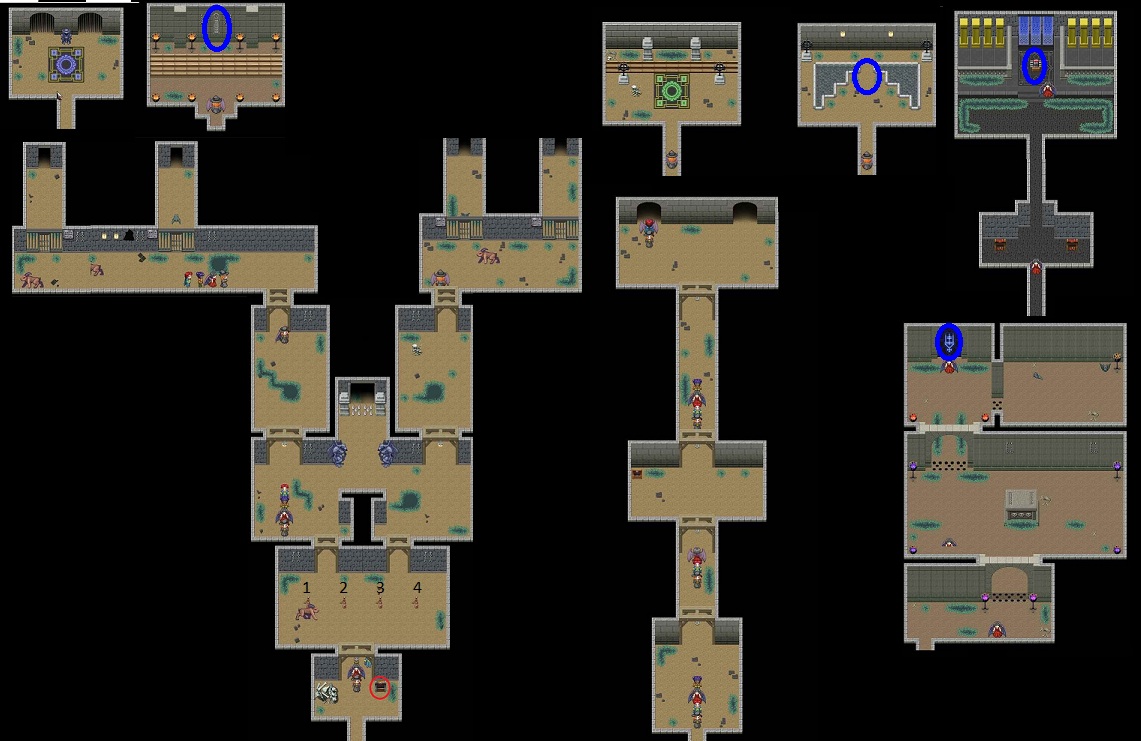 - Head out and into the clearing in the northeast.
- Rescue Heidi and she will give you an Elemental School pass and tell you that you can learn fire there.
- Pick up another letter for Herbert in SW MCT.
- Pick up and deliver a letter to Hayden in Martial Arts School; find their hideout.
Martial Arts School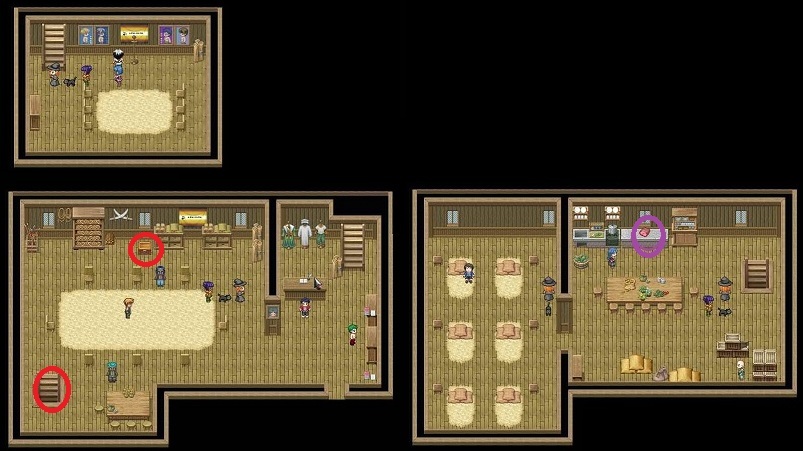 - Pick up the last letter for Ember; receive a Sparkle Staff
- Go to the Elemental School
- The hideout is at the plant in the first room at the top right, where you will get the request to find a mermaid student
- Talk to Leylitha on the first floor; she wants a 4-leaf clover
- Obtain the fire rod from the fire room; Marli has to equip it to use it
Elemental School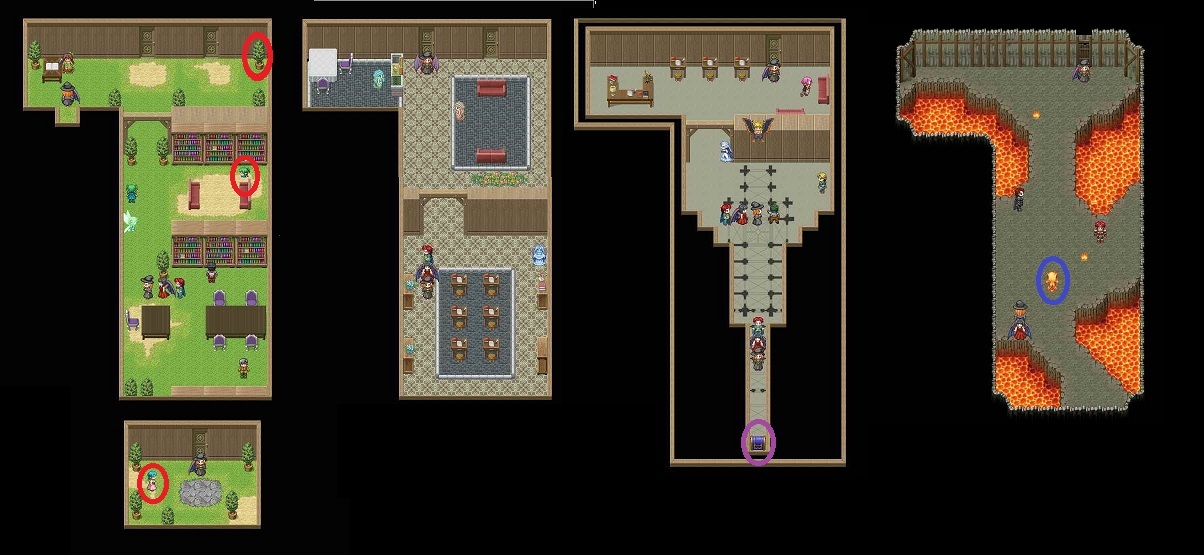 - Return to Night School and the second room (using the fourth switch)
- Light all 8 lamps by walking up and pressing the spacebar.
- Flip third switch, go to third gate, and then the right hand room to pick up blue orb
- Flip second switch, go to first gate.
- You will have a big fight when you place the blue orb on the blue design.
- Pick up the now green orb
- Rest if need be
- Flip the third switch and go to the third room and then the left room to place the green orb
- Pick up a key
- Flip the first switch and go to the fourth gate
- Light both lamps and spikes will drop.
- Light all the lamps in all the rooms
- Pick up Gloom Shield
- Rest if need be before and/or after battling the bats
- Go into the next room and battle the teacher.
- Flip the switch after battling the teacher
- Enter the center section
- Light all lamps; rescue the students
- Go back into the Night School hideout to get the task of finding the student's skull.
- Go to bed
Week 1--Friday
- You can go to the headmistress, Magnaria's office; she's looking for a student who turned into a cat.
- Pick up your potion and go to your lesson
- You will find yourself all alone on Barb Island
- I advise working your way to the right
- There is a cavern where you can sleep to get your HP and MP back for free.
- At the chest at the top right under the tree, you will have a fight; receive waking dust
- Rest after each fight
- Wake up and fight the 3 white mushrooms in your path
- You will receive Enchanted Mushroom Powder
- When you come upon the 3 caves go in the right one and meet Lilithia and then the left one.
- Find Lilithia in the woods; she will be in the area with the columns and the door with missing key.
- Then go back and find her in the middle cave; be sure to rest before you do so because you will have a fight on your hands.
- Return with the key to the area with the columns
- Enter the locked area and leave
- You will talk to your teachers and be sent to the infirmary at the Warrior School
Barb Island
Week 1--Saturday
- Wake up in the infirmary
- Anda invites you to her place
- Go to Betsy and discover the cat might be the missing student.
- Pick up Brynn and Quinn just south of Betsty's
- Return the missing cat/student to the headmistress.
- Take the Enchanted Mushroom Powder to the hideout at the Witching College; come back later for the potion
- If you haven't already, go the market and receive 1 crystal ball and find out that the other 2 are sold
- Pick up Marli outside the Royal Apartment
- You will find a dog with the skull on the way to Nethina.
- Return to the Martial Arts school and pick up the hunk of meat upstairs
- Give it to the dog, pick up the skull, and return it to the Night School hideout (later if you want)
- Head to Nethina and find Lionel right as you enter town; but go to the inn before you leave.
- Find Dave, the white bird, on the docks
Anda's Island
- Talk to Thrabin who needs to find his wife; she's writing in the north
- Talk to Olivia; don't sell her your familiar
- Find Anda's house.
- Go north to find the writer
- In the first cave, also go off to the right to get the heavy boots (needed for a sidequest).
- Enter the building in the clearing after the cave.
- Drop down the hole into the Bandit's Cave
- Kill all 4 bandits to drop the spikes to rescue the writer
- Rest after each fight
- Collect Godslayer for D-Squall
- Return to collect reward from writer; receive a steamy novel
- Go to Anda's house to sleep
- Talk to her father
- Head south to start home
- Before returning go in the cave at the beach to find a mermaid for the Elemental School, a heat shield, and a pumpkin
South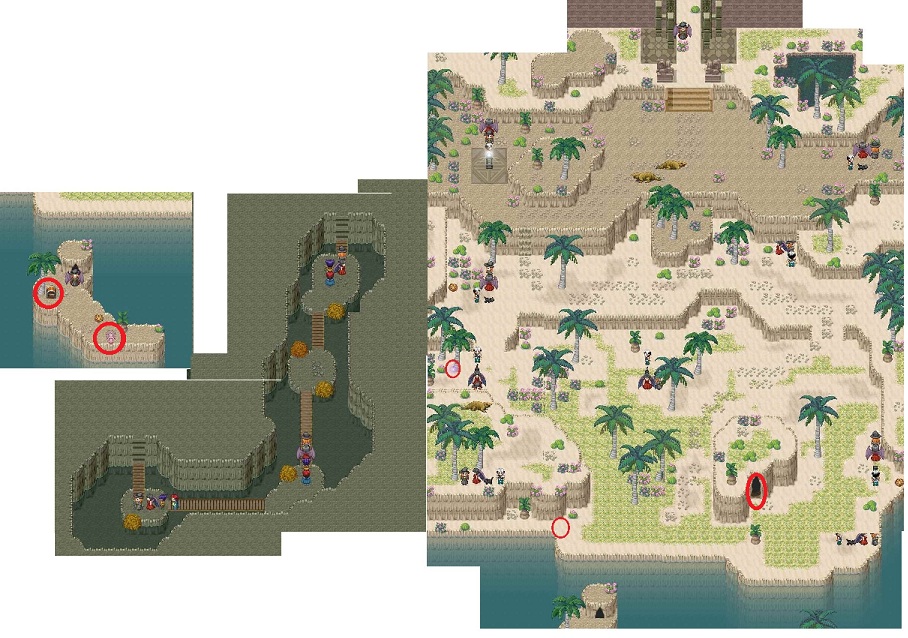
Town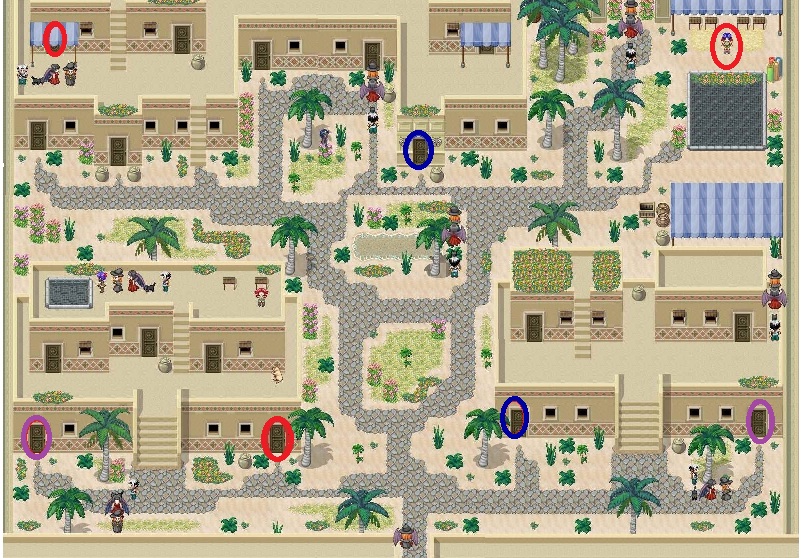
North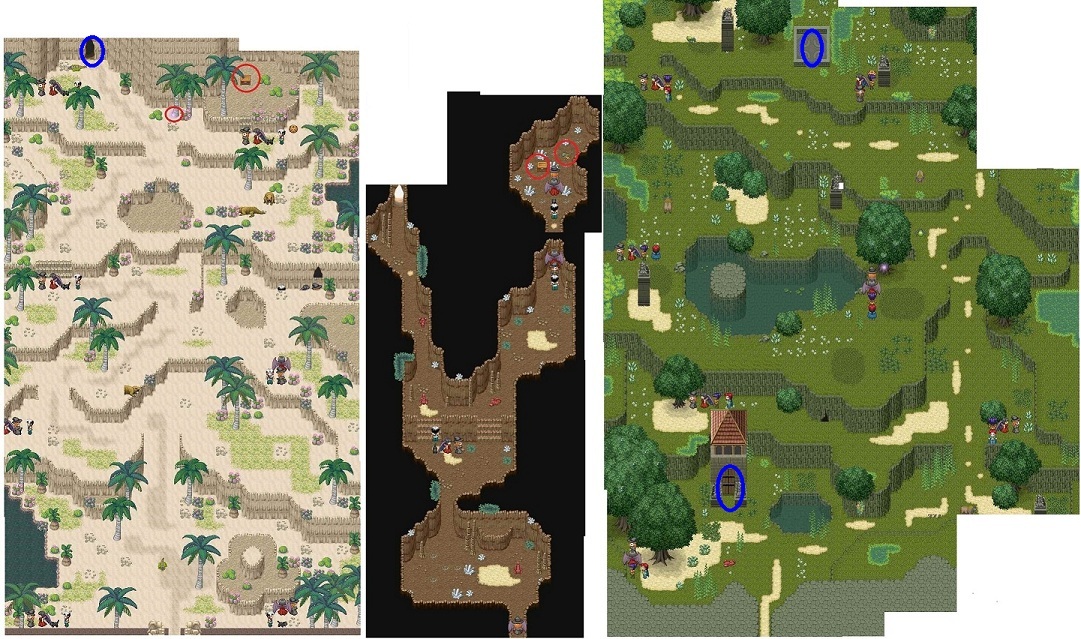
- Return to Nethina.
- Go to the inn to recharge if needed.
- Return to Marnethia College Town
- Go to School of Displacement
- Find the hideout and get the task of finding some carrot cake
Displacement School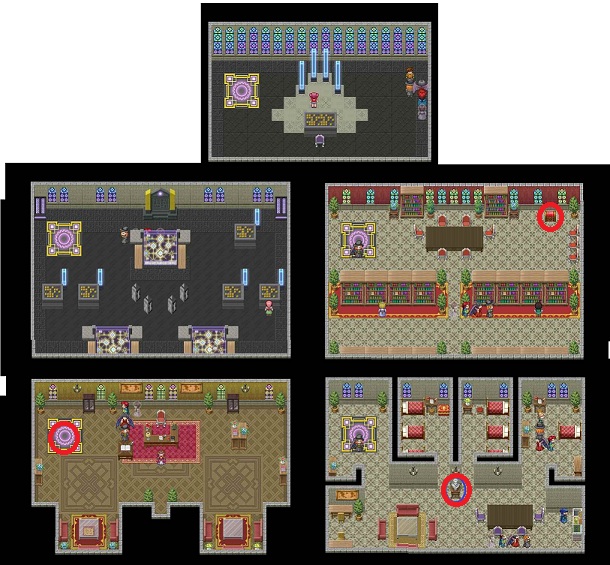 - Go to the
post office and pick up the key to the Angel Statue
- Go to the
post office and pick up the key to the Angel Statue
- Return Godslayer to Raymond in the Warrior School hideout
- Talk to student in hideout of Elemental School about finding a new student
- Put on the heavy boots and head down the wind tunnel in the Elemental School to open the chest.
- Give the skull to the student in the Night School hideout
- Go to Angel Statue in front of the Royal Apartment.
- Check out the new house
- Drop off pumpkins in the basement if you want
- Go to sleep
House Island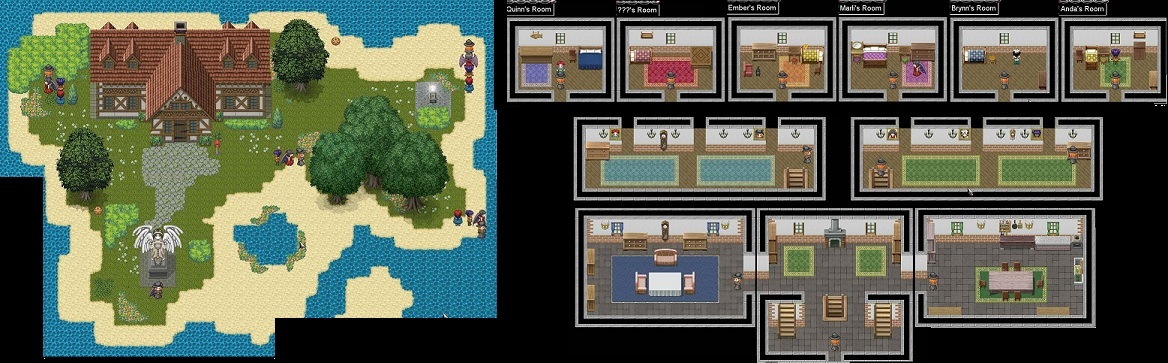
- Talk to Hilde, the teacher.
- Head south and then east to your house and talk to your mom. She wants you to find Giselle, your sister.
- As you explore Ember's house (and all other characters' houses), you will find trunks with personal belongings. You will be able to pick those up later if you'd like but they won't get you anything as far as I can tell.
- Pumpkins are circled on this map.
- At some point, talk to Lilly in town who wants to find her lost dog
- Head north through town and then out to find Giselle.
- Pick 3 blue flowers, Sky Blossoms.
- Don't fight too much for now as you can't go home to rejuvenate.
- Pick 1 blue flower in the north and 2 in the south (west on the beach and far southeast)
- Find Lilly's lost dog (after you get Giselle in your party). He's in south Vester at the northeast. Return it at some point.
- Return to your house to talk to you mom, Brigitte.
- Wake up in the morning and go talk to Marlon outside of school.
- After school head south to Evan's house and talk to him
- Go into town and find the school official.
- Rest at the Inn before you go to the door as you will end up at home later in the evening.
- You will end up back at your house.
- Go meet the official at the beach. He will take you to Nethina.
Vester Town
South Vester Island
North Vester Island
Marnethia Island- You will land in Nethina, which is south of Marnethia College Town. You need to find someone to walk you to college.
- Find Anda on the docks in the southeast.
- Explore before leaving.
- Find the inn so you know where to come back to.
- Go to Johnny's house for the sidequest of finding him.
- Buy a few Disperse Drops for the monsters.
Nethina
South Marnethia
- Travel to the north with Anda.- Try to avoid these monsters if at all possible as you are not very strong right now.
- The southern most sourfly will come back so there is no point in going back to the inn as you will just have to fight it again.
- Ember's frightening stare and Anda's attack are effective.
- When you get to the college town, Anda will depart.
- Go the Information Centre to get a pass to the Witching College. You will need need to come back later for a sidequest.
- Go to the Witching College.
- Talk to Helga outside; she needs to find her Witch's Hat.
- Talk to receptionist.
- Find your room and go to sleep.
Marnethia
Witching College
Week 1--Monday
- Talk to receptionist and get the key.
- Pick up your daily potion.
- Go to your Familiar Exam.
- Save before starting.
- Find 5 gems (circled in blue on the map); you will use the cat to get two gems.
- Talk to the witch to the south twice; once to turn her down and next to get a task to find her serpent familiar.
Familiar Exam
- Return to school. - Get your familiar from the Familiar Store, which is just to the right of the Witching College.
- Pick whichever one you want; each has special powers but you probably won't be fighting with it too much. I had particularly good luck with the bat who eventually got a wicked upgrade and had a super powerful attack.
- Pick a good name and spell it correctly as you will be seeing it throughout the game.
- Explore
Marnethia College Town
- Go the Post Office and start delivering letters while you are
exploring (to Hillary, Harriot, and Henry) - Find Adna (in the market)
- Talk to Hugh with Adna in your party; get task to take a letter to Sasha in the Warrior School.
Warrior School
- Go to Warrior School with Adna. - Talk to Boris; he needs to get unstuck.
- Give the letter to Harry
- Give the letter to Sasha; she wants a new outfit
- Find the student hideout (behind the chair in the hall upstairs) and get task to find the sword Godslayer.
- Return to Post Office and get a letter for Zoraida in the Witching College (the receptionist)
- Go through Betsy's house to the box in the backyard to pick up an Earth Pendant; you will need it for Day 2.
- Go to bed after delivering the letter.
Week 1 --Tuesday
- You can do the following at any time.
- Go to the headmistress' office and pick up the key on the floor, only if you talked to the witch in the familiar exam.
- Go to the library and open the locked door.
- Get the serpent and return it to the witch in the right most dormitory.
- She'll give you a bird to get rid of.
- Pick up daily potion from the kitchen
Start
South
West
Cave
- Go out for second lesson - Your team of 3 needs to find all 5 lights.
- Use your familiar to get Prophecy School pass. You can tell where to use it because you will get a little ball of light.
- Try to avoid the ugasquabs (snakey things)
- The sourflies just north of the bridge will return so don't expend any effort to kill them.
- You can buy potions near your starting point. You can also return to town and rest at the inn.
- Go back and get the Earth Pendant if you haven't done so yet
- Visit in the houses to get hints for later side quests.
- It may not be worth fighting the ugasquab to get to the chest near the big cave; it contains basic mail.
- Before going into the cave be sure to be fully charged up. Even better, fight enough to level up Ember so that she has Forest Curse
- Save the light that is through the big cave until last.
- Go just below the light, Quinn will go up and Brynn will come down.
- You have to fight a forest goblin on your way out. Interestingly Ember does not receive much damage, so just attack with her until you win.
- You will get a Displacement School pass when you get the 5th light.
- Talk to the official
- Return to town by walking and receive a Martial Arts School pass.
- Go to Post Office and pick up letter for Ruby in Nenthia (near the entrance)
- Find Johnny, the lost boy, outside of the post office by the statues
- Talk to the guy in the Info Center
- Go to Nenthia after resting in the inn if needed.
- Deliver the letter to Ruby - Go to Johnny's house
- Buy Sasha's dress from Tyler
- Find Captain Charlie on the docks; he wants his 3 chests
- Don't forget to rest at the inn before returning
- Return to Marenthia
- Pick up a letter for Kinsie in the Displacement School
- Give Sasha her dress in the Warrior School
- Go to the Displacement School; you can't get in until you have Quinn in your party, but you can deliver the letter.
- Get another letter for Hyniak at the Night School but you can't go there yet.
- Write a nice letter to Mom. You need this to get a sidequest.
- Go to Prophecy School and find the Hidden Room to get the task to find 3 crystal balls
Prophecy School
- Return to bed Day 3--Wednesday
- Get your daily potion
- Get storeroom key from Vivianna to get a broom
- Find Witching College hideout and get mission to find Enchanted Mushroom Powder
- Find the broom in the other storeroom
- Do your flying lesson
- It is very important to save your game because you need to find the missing witch's hat.
- Ribbons are worth different point scores. Pink are worth one point, blue are two, yellow are three, green are five and purple are ten
- You need to use Forest Curse for all fights,
- The blue circles are ribbons. The yellow circles are fights for ribbons.
- If you have earned enough points AND when you are near the salesman; you will encounter the emerald dragonfly.
- Pick up the gold and buy some potions before you fight the dragonfly, for MP and Energy (cure sleepy)
- Be sure you have some potions that will give you back some MP as you need it for the Forest Curse.
- Fight the dragonfly and then go all the way to the end to get the witch's hat
- Before battling the dragonfly to go back be sure you have at least 15 MP.
Flying Lesson
- When you pass you will end up at the Headmistress office. - If you didn't write a letter to your mum you will be sent to bed.
- If you did, you can go out and explore more.
- You can go to the market and get one of the crystal balls
- Go to the clearing in the west and talk to the clown.
- When he tells you jokes, you have to find him absolutely funny. Don't respond neutral or negative at any time. You will receive a pass to Shape School.
- Go to Hugh to get your reward from Sasha.
- Go to the Shape School and find the hideout.
- In the hideout, get the mission to find Dave, a white bird, who is actually a student.
Shape School
- On the way back, return the missing hat to Helga; she'll give you a
Witch's Ring. - Return to bed.
Day 4--Thursday
- Get your potion and head to class
- You will do another joint lesson at the Night School
- Don't forget to equip your fighters - Give letter to Nyniak
- There is a Darkness ring in the crack but it might not be worth the fight to get it.
- Find Marli in the library
- Find the student hideout; you will have to rescue the students before you get a task
- Head through the door in the hideout into the tunnels.
- There is a room with four switches.
- Use the rest area frequently as you fight
- Find the gate switches.
- Flip fourth switch and go into second gate from the right and read the sign on the wall to discover you need to learn a fire spell.
Tunnels
- Head out and into the clearing in the northeast.- Rescue Heidi and she will give you an Elemental School pass and tell you that you can learn fire there.
- Pick up another letter for Herbert in SW MCT.
- Pick up and deliver a letter to Hayden in Martial Arts School; find their hideout.
Martial Arts School
- Pick up the last letter for Ember; receive a Sparkle Staff - Go to the Elemental School
- The hideout is at the plant in the first room at the top right, where you will get the request to find a mermaid student
- Talk to Leylitha on the first floor; she wants a 4-leaf clover
- Obtain the fire rod from the fire room; Marli has to equip it to use it
Elemental School
- Return to Night School and the second room (using the fourth switch) - Light all 8 lamps by walking up and pressing the spacebar.
- Flip third switch, go to third gate, and then the right hand room to pick up blue orb
- Flip second switch, go to first gate.
- You will have a big fight when you place the blue orb on the blue design.
- Pick up the now green orb
- Rest if need be
- Flip the third switch and go to the third room and then the left room to place the green orb
- Pick up a key
- Flip the first switch and go to the fourth gate
- Light both lamps and spikes will drop.
- Light all the lamps in all the rooms
- Pick up Gloom Shield
- Rest if need be before and/or after battling the bats
- Go into the next room and battle the teacher.
- Flip the switch after battling the teacher
- Enter the center section
- Light all lamps; rescue the students
- Go back into the Night School hideout to get the task of finding the student's skull.
- Go to bed
Week 1--Friday
- You can go to the headmistress, Magnaria's office; she's looking for a student who turned into a cat.
- Pick up your potion and go to your lesson
- You will find yourself all alone on Barb Island
- I advise working your way to the right
- There is a cavern where you can sleep to get your HP and MP back for free.
- At the chest at the top right under the tree, you will have a fight; receive waking dust
- Rest after each fight
- Wake up and fight the 3 white mushrooms in your path
- You will receive Enchanted Mushroom Powder
- When you come upon the 3 caves go in the right one and meet Lilithia and then the left one.
- Find Lilithia in the woods; she will be in the area with the columns and the door with missing key.
- Then go back and find her in the middle cave; be sure to rest before you do so because you will have a fight on your hands.
- Return with the key to the area with the columns
- Enter the locked area and leave
- You will talk to your teachers and be sent to the infirmary at the Warrior School
Barb Island
Week 1--Saturday
- Wake up in the infirmary
- Anda invites you to her place
- Go to Betsy and discover the cat might be the missing student.
- Pick up Brynn and Quinn just south of Betsty's
- Return the missing cat/student to the headmistress.
- Take the Enchanted Mushroom Powder to the hideout at the Witching College; come back later for the potion
- If you haven't already, go the market and receive 1 crystal ball and find out that the other 2 are sold
- Pick up Marli outside the Royal Apartment
- You will find a dog with the skull on the way to Nethina.
- Return to the Martial Arts school and pick up the hunk of meat upstairs
- Give it to the dog, pick up the skull, and return it to the Night School hideout (later if you want)
- Head to Nethina and find Lionel right as you enter town; but go to the inn before you leave.
- Find Dave, the white bird, on the docks
Anda's Island
- Talk to Thrabin who needs to find his wife; she's writing in the north
- Talk to Olivia; don't sell her your familiar
- Find Anda's house.
- Go north to find the writer
- In the first cave, also go off to the right to get the heavy boots (needed for a sidequest).
- Enter the building in the clearing after the cave.
- Drop down the hole into the Bandit's Cave
- Kill all 4 bandits to drop the spikes to rescue the writer
- Rest after each fight
- Collect Godslayer for D-Squall
- Return to collect reward from writer; receive a steamy novel
- Go to Anda's house to sleep
- Talk to her father
- Head south to start home
- Before returning go in the cave at the beach to find a mermaid for the Elemental School, a heat shield, and a pumpkin
South
Town
North
- Return to Nethina.
- Go to the inn to recharge if needed.
- Return to Marnethia College Town
- Go to School of Displacement
- Find the hideout and get the task of finding some carrot cake
Displacement School
- Go to the
post office and pick up the key to the Angel Statue - Return Godslayer to Raymond in the Warrior School hideout
- Talk to student in hideout of Elemental School about finding a new student
- Put on the heavy boots and head down the wind tunnel in the Elemental School to open the chest.
- Give the skull to the student in the Night School hideout
- Go to Angel Statue in front of the Royal Apartment.
- Check out the new house
- Drop off pumpkins in the basement if you want
- Go to sleep
House Island
Show/Hide
Week 2--Monday
- Read mail waiting at the front door
- Go to Marnethia and to the Assembly Room
- Head into the North Forest
- Go to Susie's house in the North Forest to the west to get a crystal ball
- Go to the Memory Stone at the far north
- Travel to Brynn and Quinn's island
- Check everything out.
- Find the inn first to the southeast so you know where to rest
- Pick up the carrots outside the inn
- Pick up a package for Andrew on Amak Island.
- Take a rest at the Inn after fighting
- Find out you need to find a cure for the green-beaked chickens
- Find Brynn and Quinn's mother's house; she needs more sparkle
- Pick up the rock from his room
- Go to the west to the dad's house.
Brynn and Quinn's Island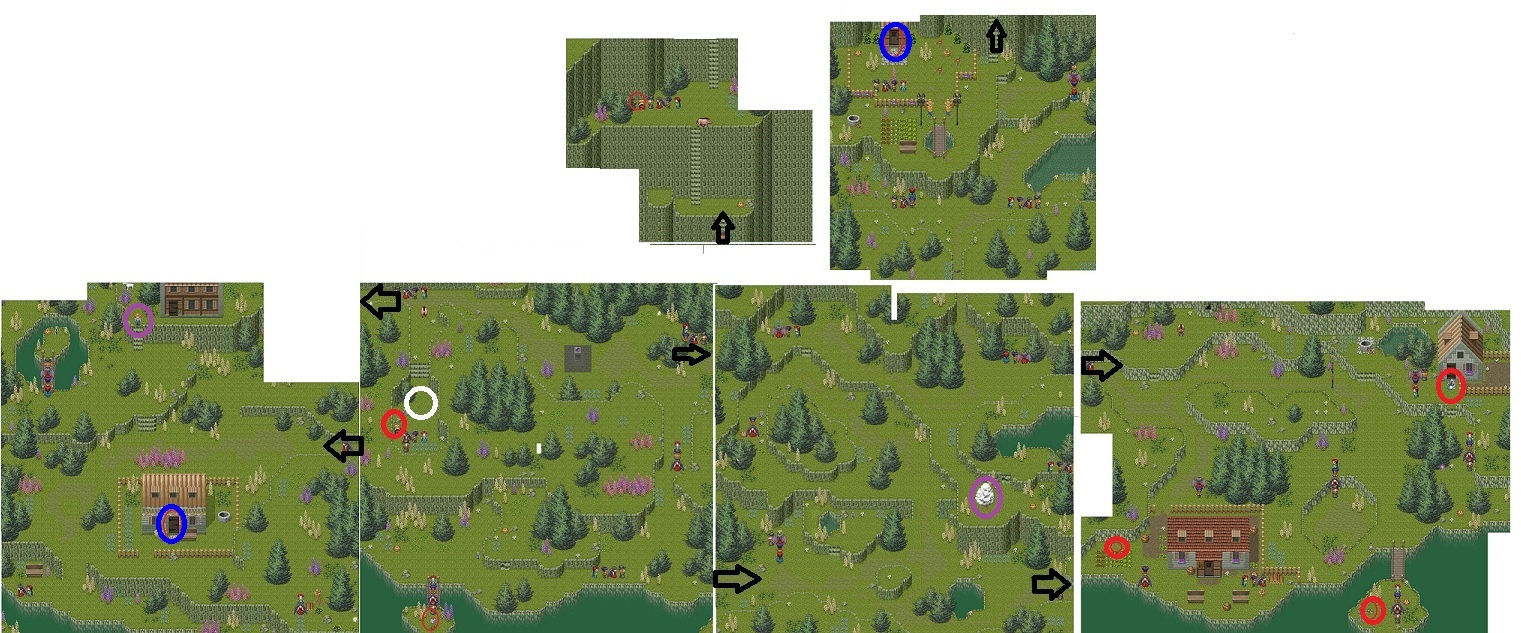 - Return to Marnethia via the Memory Stone.
- Return to House Island via the Angel Statue and go through front door to regenerate.
- Pick up the Wizarding College pass in park below the School of Displacement
- Go there and find their hideout (under the sink); they want a sculpture
- Head home to sleep
Week 2--Tuesday
- Head downstairs
- Talk to Anda's father
- Head to Marnethia
- Go to Assembly Room
- Head to the clearing to the east of the Shape School
- You will fight three times.
- There is a pole to the right that will heal everyone in your party. So use it between fights. This is not obvious; so go touch the pole and check your MP and HP. You won't be told anything until it is too late and you've used up your turns.
- There is also someone who will sell you items to the right of the pole.
- Apparently it does not really matter if you win or lose, but winning will get you lots of experience points.
- When you are finished, you will leave and talk to the Post Witch.
- Go to House Island to regenerate by walking through the front door.
- Head to the lesson door at the Witching College; you will teleport out of the city
- Head north to the Memory Stone
- There's a guard there, who you can either fight or avoid
- Then use the Memory Stone to get to Vester (Ember's island)
- You will have a battle when you enter Ember's house
- When done, you can go upstairs to rest
- Head to the cave in the north; return home to rest after any fights.
- Sell the annoying talking bird to the lady just south of Vester town.
- Find Brigitte and Giselle in the house
 - Return with Giselle to the Memory Stone
- Return to the house and read the mail
- Go to Anda's Island to read the book her father mentions
- Pick up the book in her house and head all the way to the north
- Step into the square to enter Ghost Cave
- You need to go into the rooms with the colored orbs in the order shown from left to right. If you make a mistake, you will start back at the beginning.
- Each time you pick up an orb you will release some ghosts
- Once all 4 orbs are placed, a chest will appear near the entrance on the square tile.
- If you walk into any of the ghosts, you will get burned or poisoned or "¦ so be sure to heal at least one party member or switch out party members to a normal one.
Ghost Cave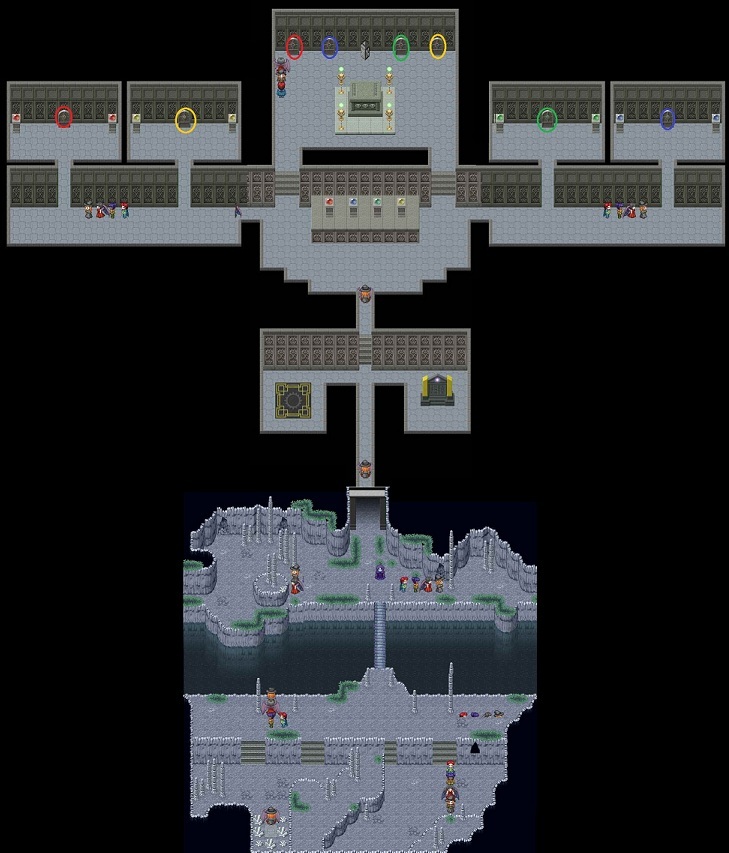 - Once you have the key return to the Memory Stone
- Return to House Island to regenerate and then go to Aunt Mitsy's Island.
Aunt Mitsy's Island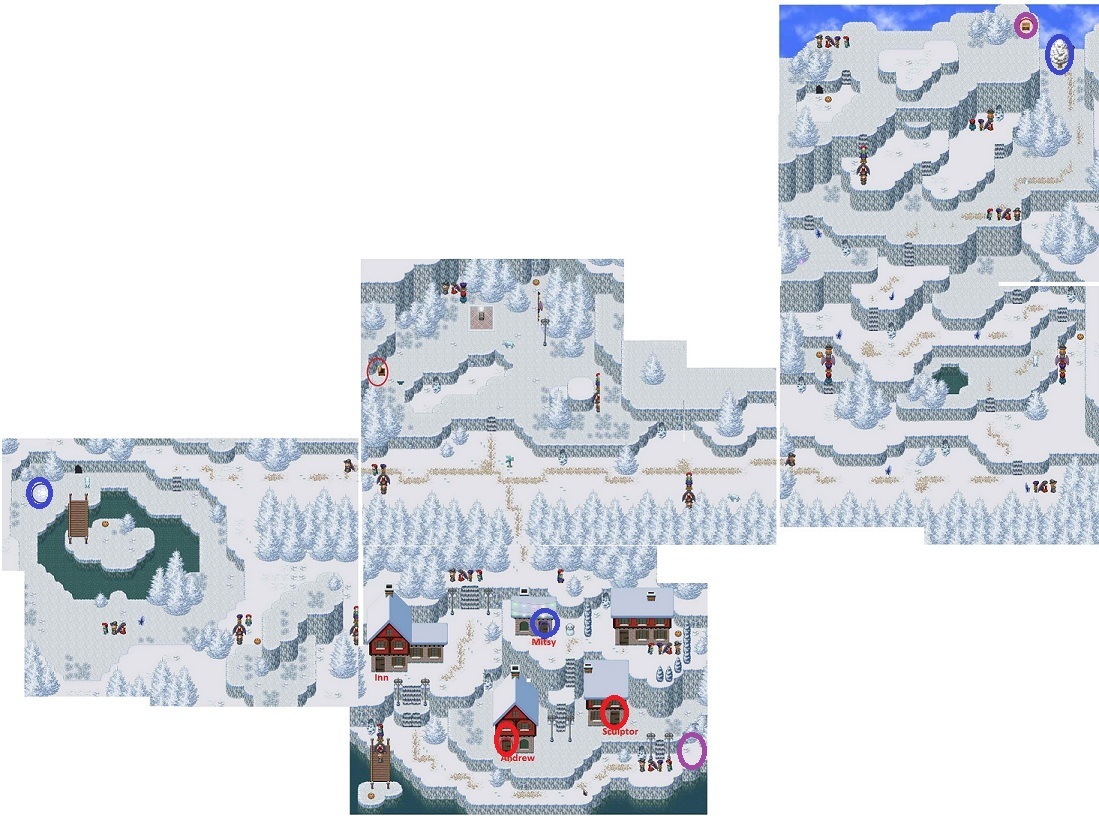 - In the Village you will find an inn, a sculptor for the Wizarding
College whom you have to pay the first time as you won't get a second
chance, Andrew who is waiting for his package, and Aunt Mitsy who wants
3 branches of Silver Tree.
- In the Village you will find an inn, a sculptor for the Wizarding
College whom you have to pay the first time as you won't get a second
chance, Andrew who is waiting for his package, and Aunt Mitsy who wants
3 branches of Silver Tree.
- The Silver Trees are here to the east and then north, in the North Forest of Marnethia through the big cave, and on Brynn and Quinn's Island.
- Find the Silver Tree here and then return to House Island to rejuvenate. You can do this after fights to rest for free.
- Head to the North Forest via the Memory Stone. The Silver Tree is south and then east into the caves on the left path.
- On Brynn and Quinn's island, the Silver Tree is to the right, but first head to the left to get the save the goat task if you wish.
- You will comment on a bird taking the goat away.
- Go further west and talk to the owner who wants the goat back.
- The goat is at the top of the mountain by Brynn and Quinn's mom's house.
- You can savegetting the goat until you are stronger if you'd like.
- Return to Aunt Mitsy and get the broom
- The launch spot is to the west. You can go around lake to avoid the bear if desired.
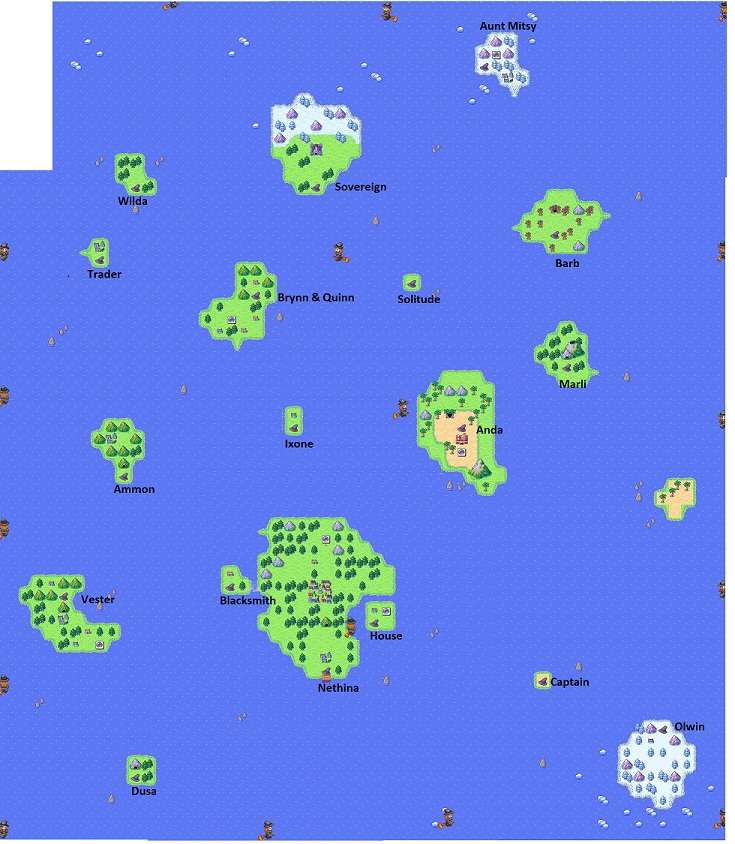
- Fly around and explore.
Map
- Completely optional islands are Trader and Blacksmith;
however, you can
find a few extras on these islands, so they are worth a quick visit.
Trader Island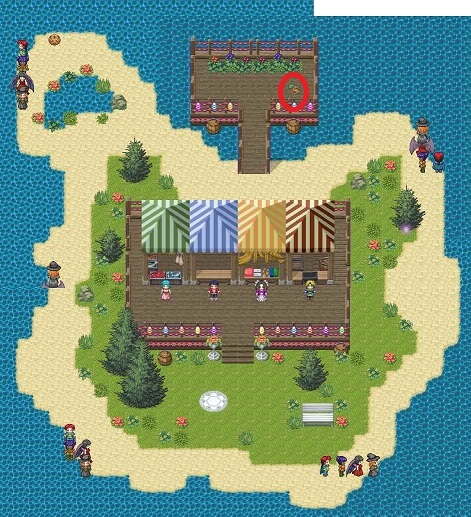
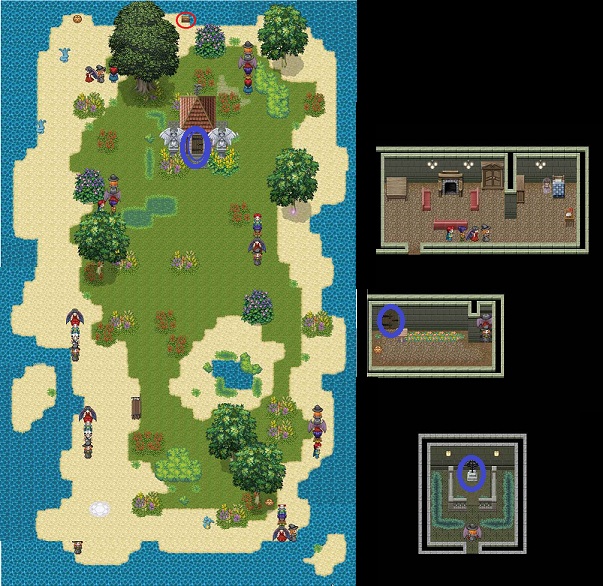
Blacksmith Island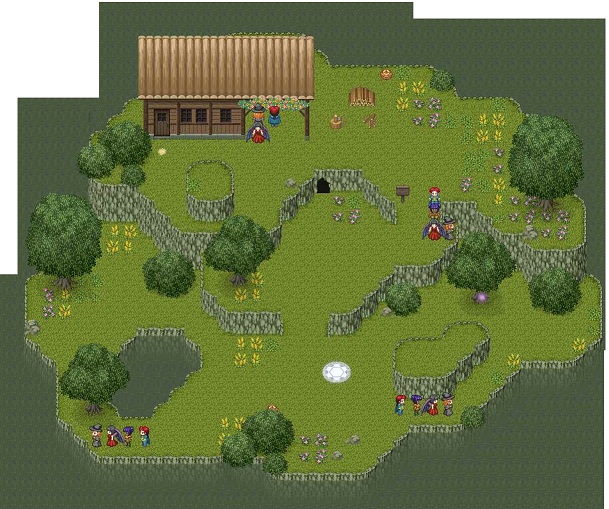 - Head to
Ixone Island and into the crypt to find that you can't wake the Ghost;
you need to find some way to wake her up.
- Head to
Ixone Island and into the crypt to find that you can't wake the Ghost;
you need to find some way to wake her up.
- Ixone also has one of the captain's chest.
 - Go to Captain's Isle; he has a bell that would wake a ghost but wants
to trade it for a companion
- Go to Captain's Isle; he has a bell that would wake a ghost but wants
to trade it for a companion
 - Return to North Forest via House Island and the Memory Stone.
- Go to Freddie's house, which is in the south near town.
- He'll come live with the Captain; return and get the Ghost Bell
- Return to Ixone and ring the bell.
- Aline says that we need to go to Ammon next
Ammon Caves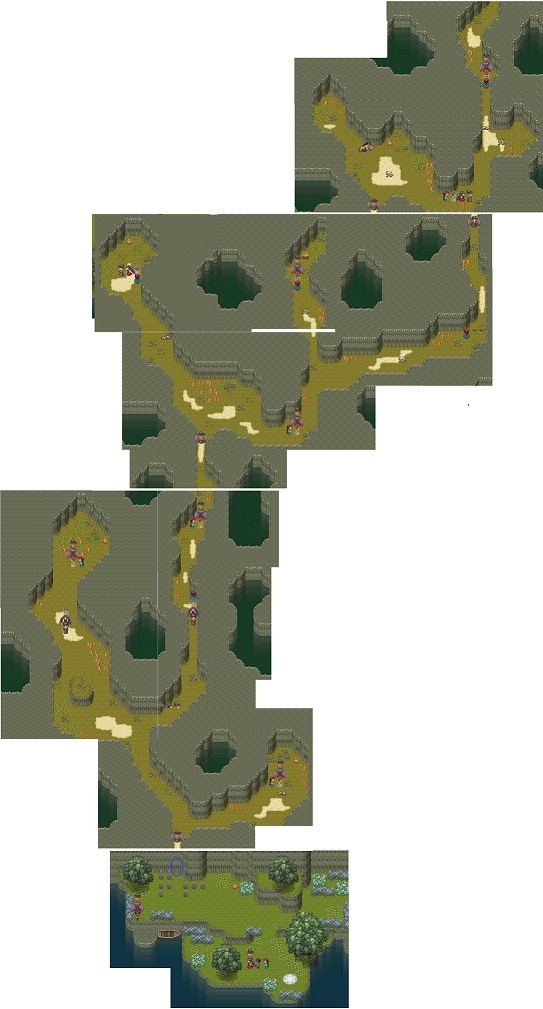
Ammon Clearing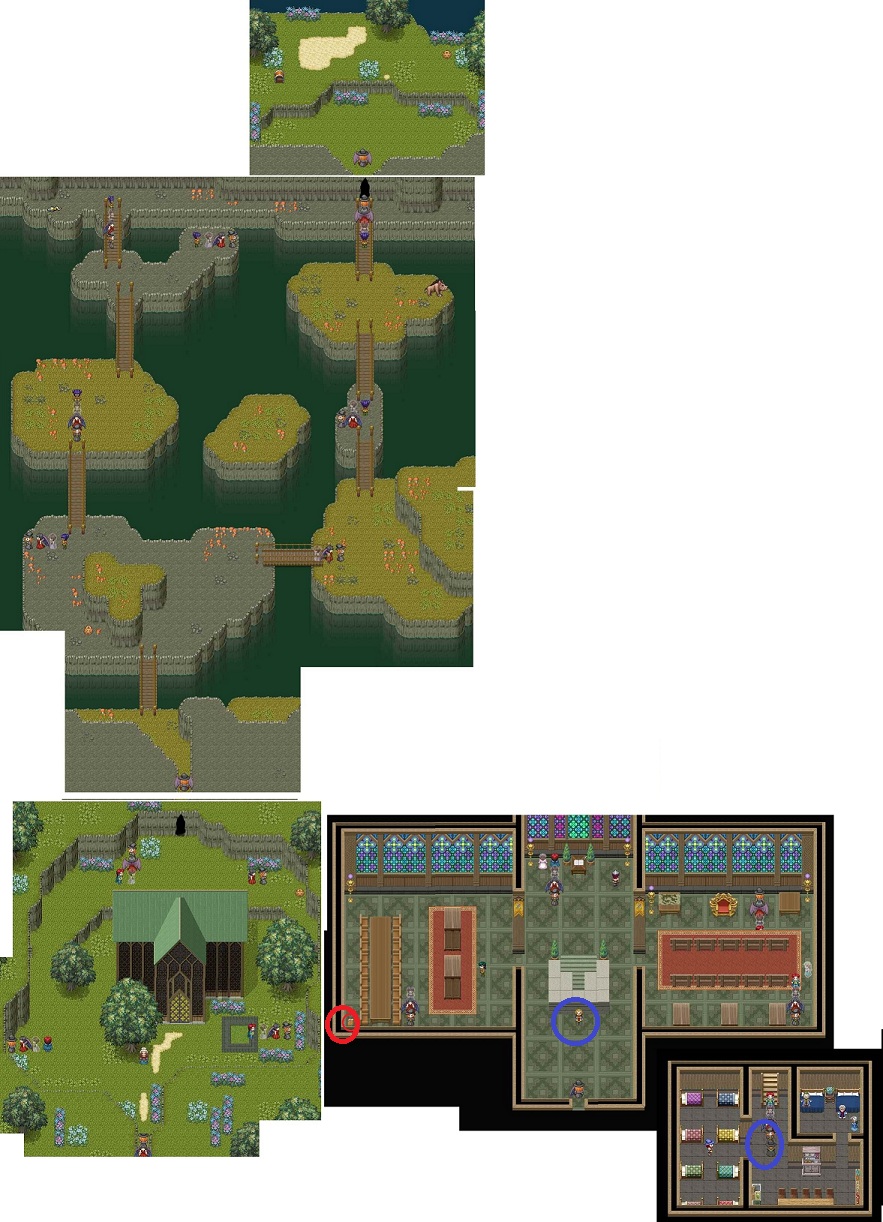 - Note on Ammon, there is a cave system to the north that is optional
- Inside the building, first room on the left, you will find the History book.
- First room on the right, find a ghost who wants the steamy novel; she will reward you with a new spell
- Go downstairs and find out you need a unicorn's horn to cure Anda's father.
- Talk to Anda's mother and get the Elder Sword
- Talk to Klaus in the center hall about finding missing Ghost Agents, Moriah, Wynne, Du'An
- You are going to have to fight two of these ghosts so go to your house to rejuvenate after fighting.
- Go to Moriah on Barb Island first.
- When you return to Barb Island you can also go through the locked gate to the north of the columned area and you will find the Golden Harp; you will have a fight when you come out so be prepared.
- Return to the cave area for the ghost
- The caves are different this time and have a market where you can trade pumpkins for items.
- Also the ghost is by a grave to the right of the caves (see blue circle on Barb Island map).
- No fight here and you'll get Moriah's Knife (good for Quinn)
- Du'An is the ghost on Anda's Island in the Ghost Cave.
- Wynne is on Dusa; inside you can get an "agility cure"Â for Aline.
Dusa Island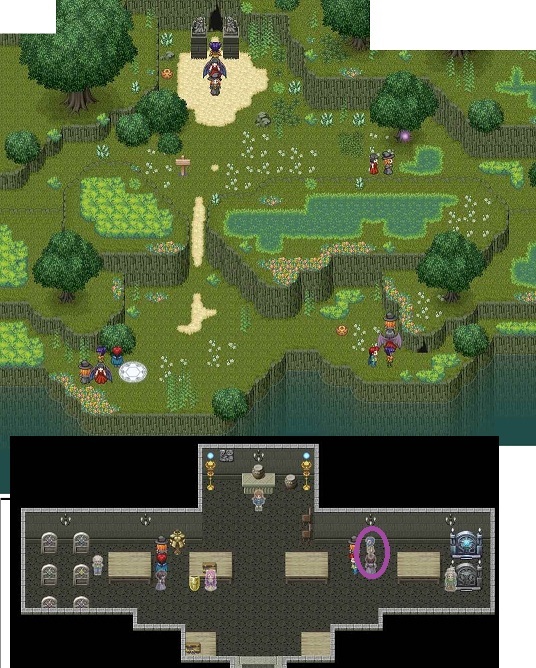 - Return to Ammon and let Klaus know what happened.
- He will give Brynn some breaker gloves, which will allow him to break through rocks.
- Olwin Island has rocks that are blocking the path so go there next.
- Be sure to arm Brynn with better accessories after using the breaker gloves.
- Go into the house to find out that you can get a unicorn horn on the ground but you also need to spend the night in the unicorn sanctuary and find the 4 feeding stations to feed the unicorns (circled in blue)
- First head to the fairy village in the northeast to find out where you can rest.
- There is a spot where you can't see a path but you can push through the trees. It is to the right of one of the angel statues.
- You will find the unicorn with a missing horn near the village.
- After finding it, go back and talk to the fairies; one will tell you it is in the fairy village (in a snow man)
- Another fairy wants you to admire all the statues for a wonderful reward. There are a total of 8 Snow Angel statues (circled in white)
- Return to the fairy after finding them all and she says you will get a reward "later"Â; the rewards turns out to be a landing spot
- Return to keeper's house.
Olwin Island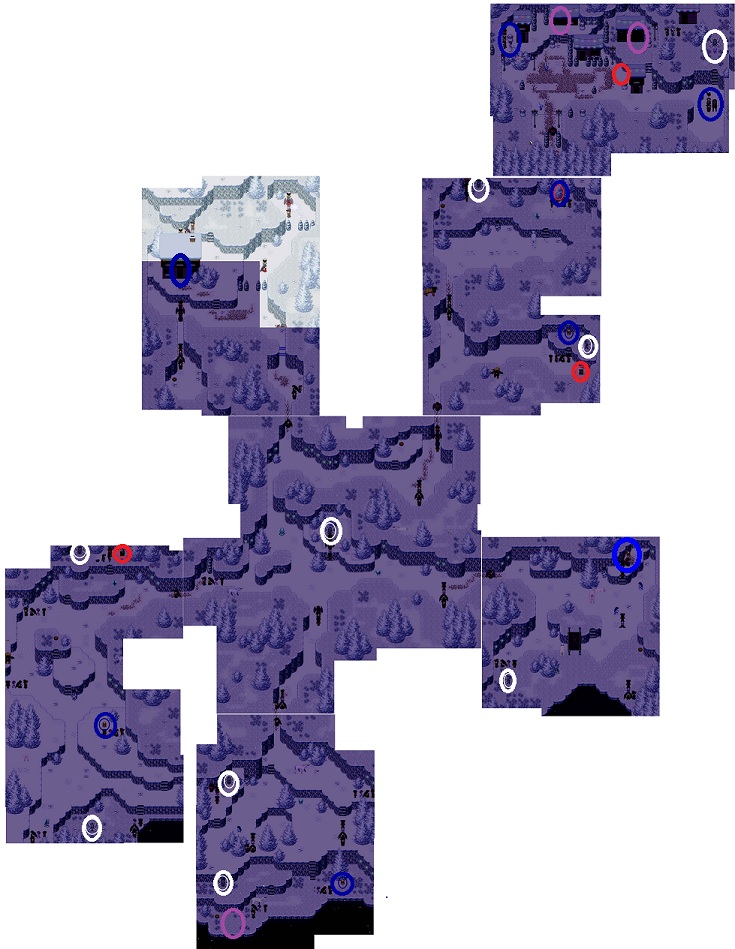 - Return to Ammon
- Give the unicorn horn to Brigitte
- Get some rest
- Talk to Hilde who will give you half a golden disc and now to find the other half
- Head to Wilda Island next
- Wilda is a tough island; so return to your house each time you fight.
- Avoid the animals, Porcubears.
- Befuddle Blow with Quinn is a great spell
- On Wilda off to the northwest you will find a "life coach"Â who will help Marli's dad come out of the cupboard, so return here after going to Marli's island.
Wilda Island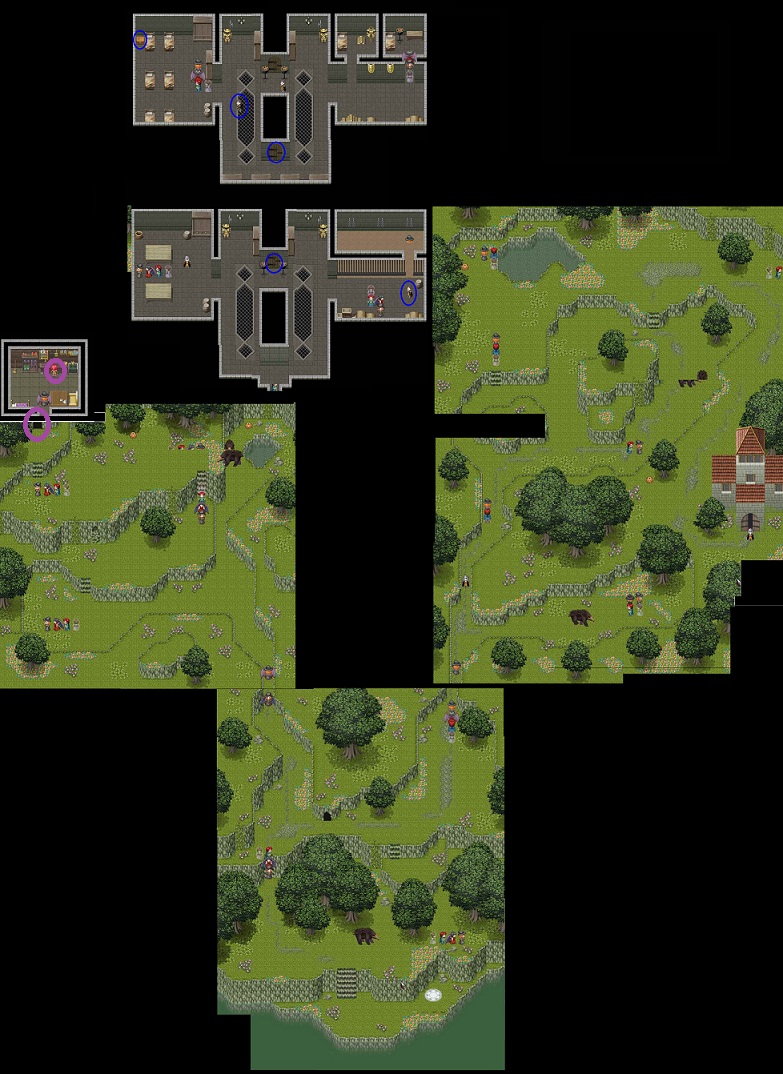 - Have you been to Marli's Island; maybe take a break and do
that.
- Have you been to Marli's Island; maybe take a break and do
that.
- After talking to Marli's dad you can go talk to the life coach again.
- You can go into the caves on Marli's island too and head left to find sparkle for Quinn's mom.
- Once you do this, you will be able to find a firefly which will need a new home for a task.
Marli's Island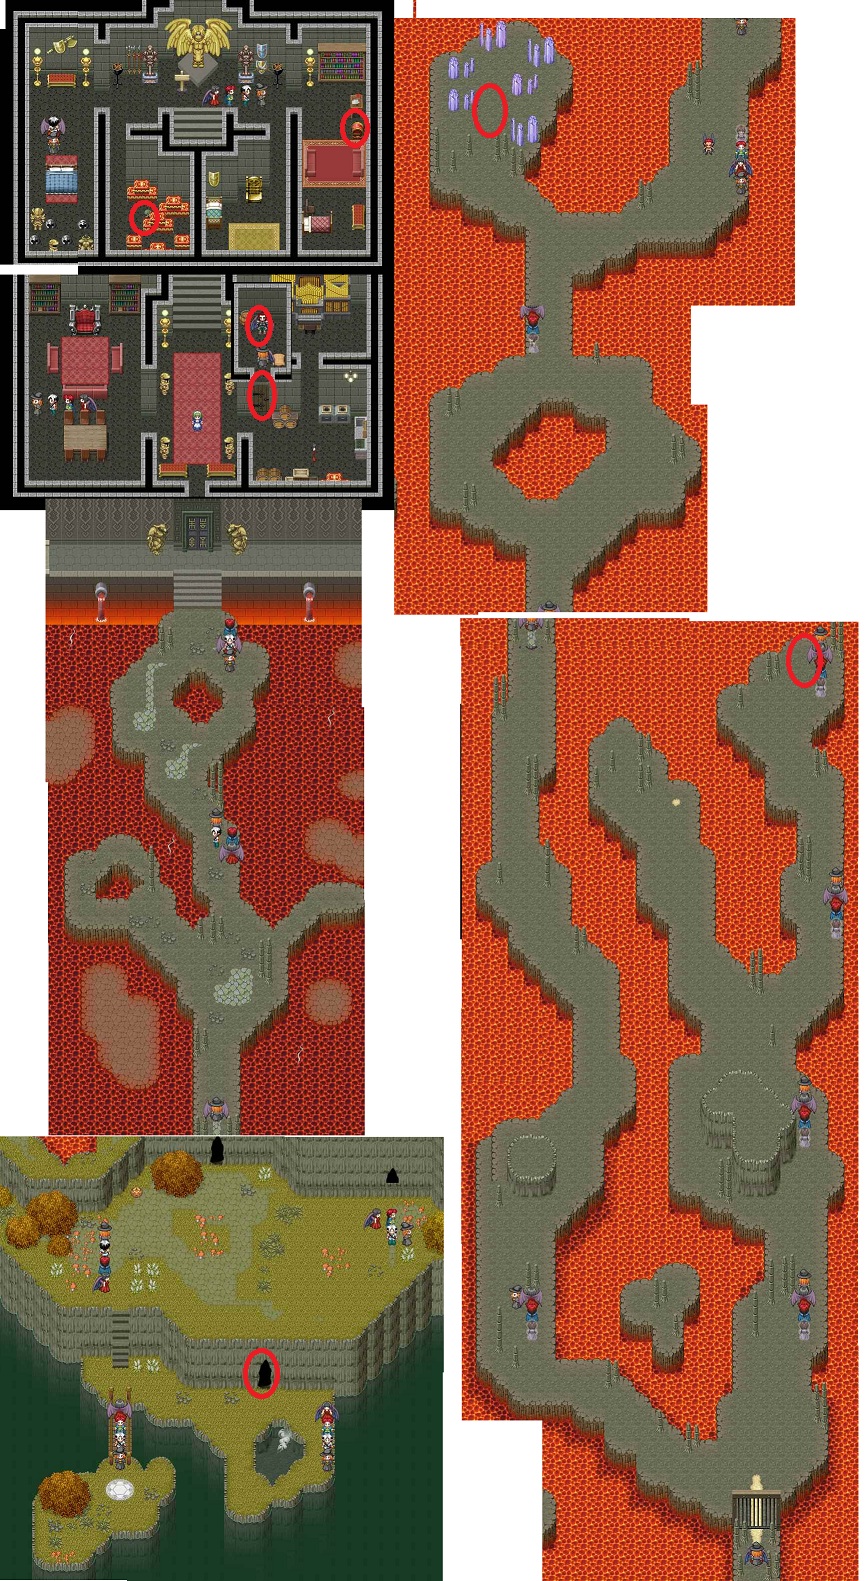 - Back to Wilda
- Inside the house, on the right you will fight three guards and then get a key to the next floor
- Fight the guard there and go to the chest to get the next key for the next door
- Open the chest and get the other half of the disc
- Go to Solitude Islandand put the disc in the statue
- Solitude has a chest (for Charlie)
Solitude Island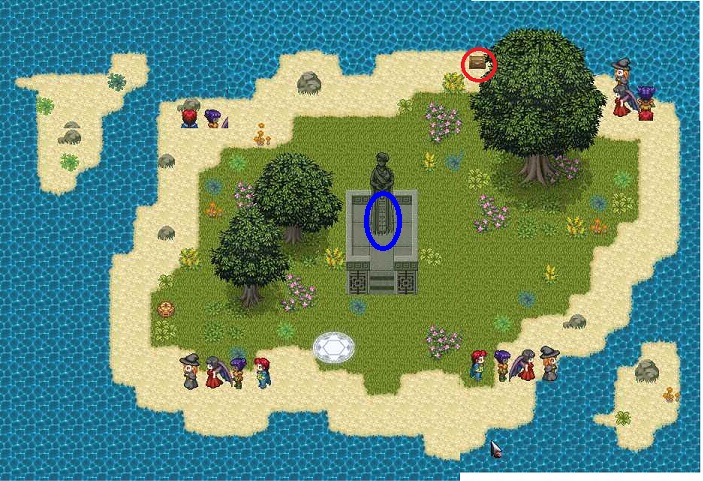 - You will be transported to Eione Island
- Find the lighthouse in the northwest
- Sandra on the top floor of the lighthouse says to just kick the teleport stone to make it work
- You can rest for free in the lighthouse
- Go kick the teleporter and fight your way to the Queen.
- You will release her and then return automatically to Ammon
- Finish up your side quests
- Return to Vester Island
- Get a side quest to give Hans his gold and hat somewhere cold (his wife is in the first house to the left of the northern gate)
- Next row left most door has a chest
- Marli can learn Wicked Lullaby from the right most door on the same row from Kinesla
- One of Capt. Charlie's chests is on the western beach where you left the first time
- Return to Nethina
- Give Captain Charlie his chests; choose the third one to get 1000 gold and discover that you will need a locksmith to fix it.
- Go to Dusa and talk to the thief to open it.
- Get orb from Ellie, second from right door from Nethina.
- Go into the fashion boutique and the owner will fall in love with Giselle.
- When Giselle is offered a position, have her say "I guess so."Â Your new task is to find a new customer for her.
- Return to Marnethia
- You can return the harp to Guilliard and Marli will learn a new spell
- Bring the history book to the Info Center and find about the secret of some sort in the storage room beside the Marnethia Inn
- Go to Hugh's house to tell his mother about the boutique
- Go to the storage room and find a hole with the Marnethia Sword
- Go into the Royal Apt, pay for entry, and find Oil for Warrior School Boris; unstick him
- Return the crystal balls to the Prophecy School
- Take the sculpture to the Wizarding School
- Go to the baker and get him to make a carrot cake with the carrots you found; take the carrot cake to the Displacement School
- Pick up a potion from the hideout at Witching College
- Buy a chicken beak rib at the familiar shop
- Get an Elite School pass from Evan who is to the right of the Night School.
- Go to the Elite School and find the hideout.
- After finding an unusual teleport machine, leave the Elite School and you will go back to the house.Elite School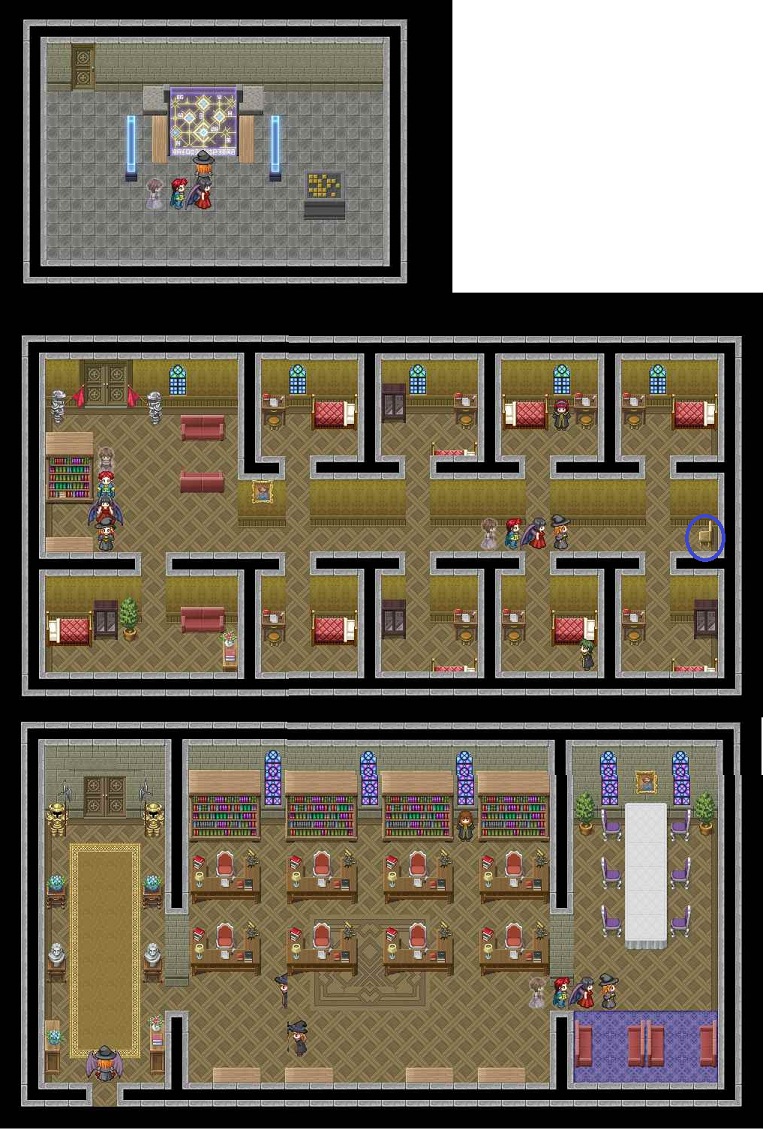 - Upon awakening, you have a letter from the queen and a key
to the castle.
- Upon awakening, you have a letter from the queen and a key
to the castle.
- If you found all of the hideouts and did their tasks, there will be a letter at the mailbox.
- Return to Marnethia and go to the password door. Enter the password, all lower case. There will be rewards!
- Return to House Island and travel to Sovereign Island by broom..
- You can break through the rock with Brynn's gloves and get the 4 leaf clover
- Rest in the bedrooms upstairs
- When you go to rescue the queen, remove Aline from your party.
Sovereign Island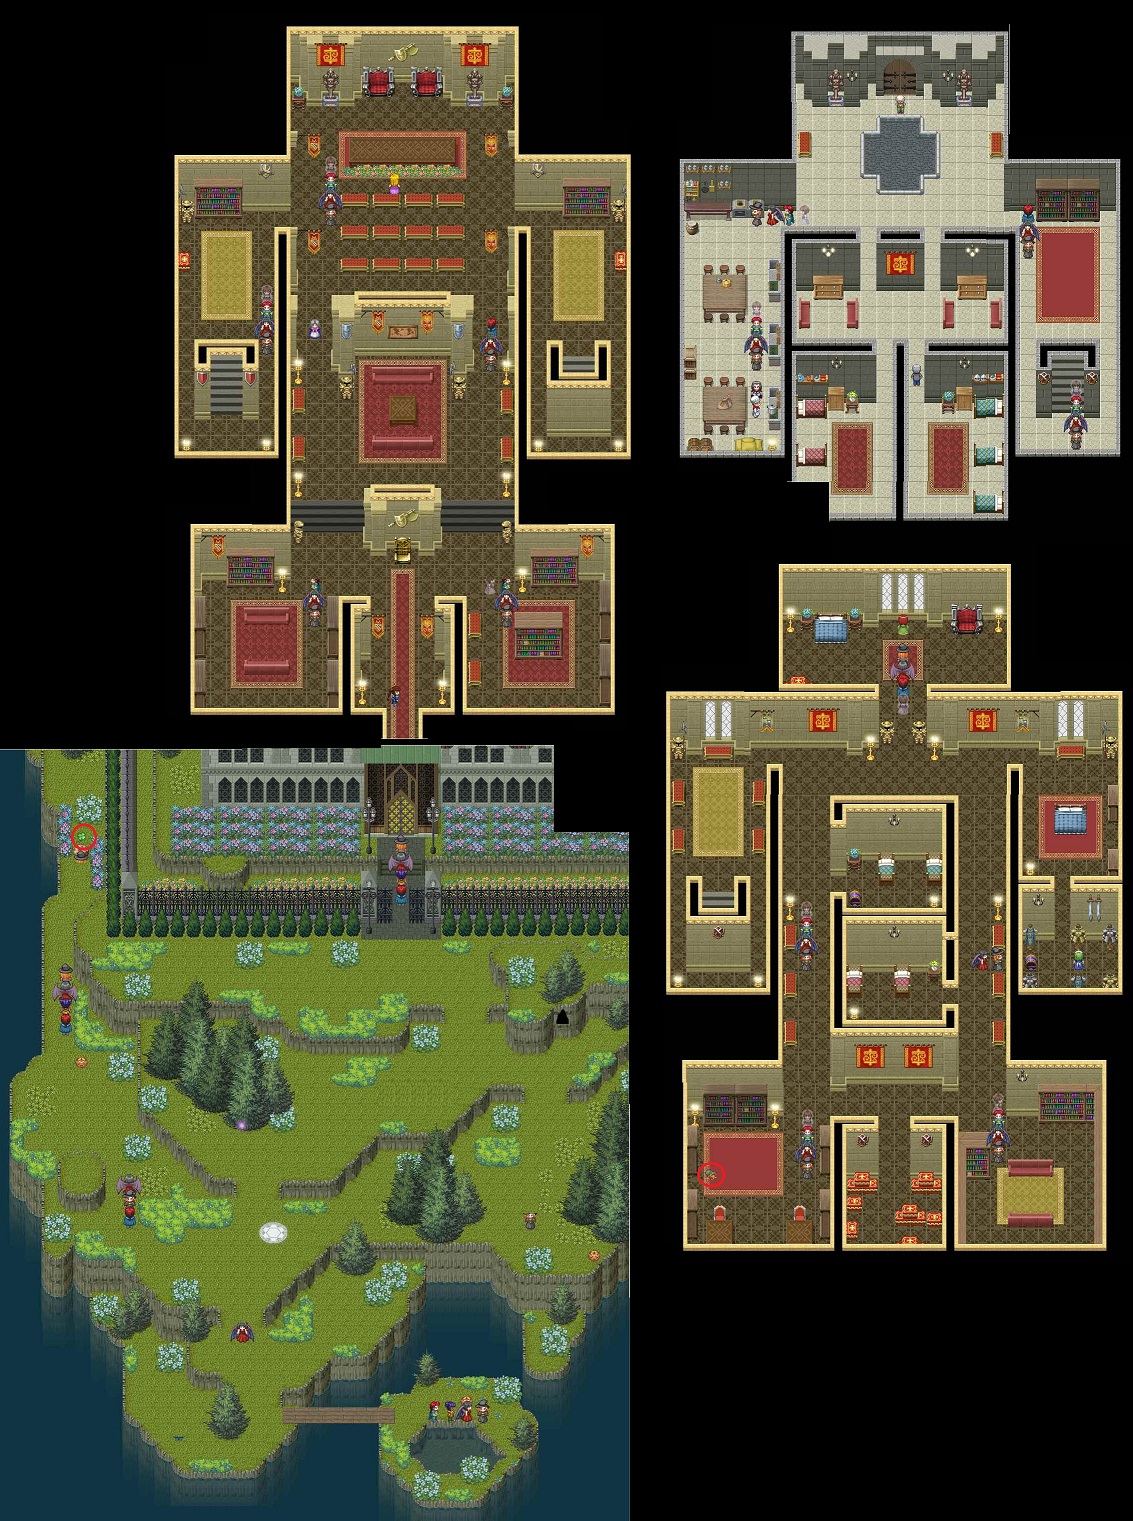 - Return
to Ammon to tell them that the ghosts have gone bad
- Return
to Ammon to tell them that the ghosts have gone bad
- Find out that they have all been captured but Ember's mom was not captured as she left before it happened.
- Return to Aunt Mitsy's Island
- Hans is near her house
- Go to Ember's mother in Mitsy's house and release Aline with the potion
- There is a chest at the top of the mountain, above the Silver Tree. Arm Marli with the Fire Rod and you can open it.
- Return to Olwin (there is a portal at the fairy village now)
- Receive a packet of Fairy Dust from fairy who couldn't see in the dark.
- Need to find the little fairy Angelina She is in the further south trapped by a robber
- Return to the mom and receive a sparkle ring
- Return Anda's Island
- Put Aline in your party and you can scare the hiccups out of the little boy
- You can give the firefly to Olivia to watch after.
- Return to Brynn and Quinn's island
- Give the beak rub to the chicken lady; you will get your reward when you return to House Island. Lots of eggs with gold in them.
- Give the sparkle to the boys' mom.
- Rescue the goat if you have not done it already
- On the way stop off at Trader Island; you should have plenty of money now and you need to arm yourself well for the final battle.
- Save at this point too; that way if you can't win, you can come back and buy something different if needed.
- Consider going to Blacksmith Island
- Return to Nethina to get reward from the boutique owner
- Return to Elemental School to give 4-leaf clover
- Return to Elite School and the ghost portal, which you will now go through
- You have 4 fights at each of the grave lights.
- You should return to Marnethia and the inn or House Island to restore after each fight.
- Don't go in until you finish all your sidequests. You can still do most of them after finishing but you won't get "credit" for them.
- Rest before going in as you will have one final big battle.
Ghost King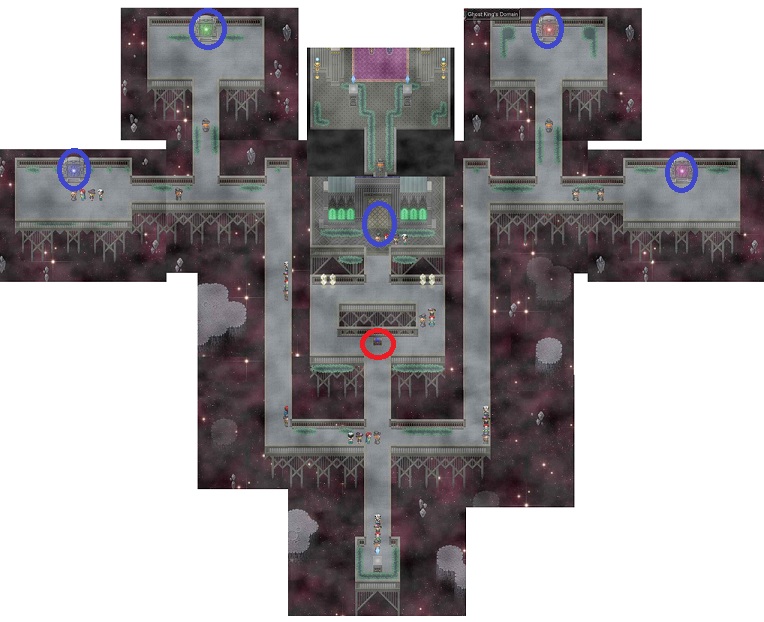
- Read mail waiting at the front door
- Go to Marnethia and to the Assembly Room
- Head into the North Forest
- Go to Susie's house in the North Forest to the west to get a crystal ball
- Go to the Memory Stone at the far north
- Travel to Brynn and Quinn's island
- Check everything out.
- Find the inn first to the southeast so you know where to rest
- Pick up the carrots outside the inn
- Pick up a package for Andrew on Amak Island.
- Take a rest at the Inn after fighting
- Find out you need to find a cure for the green-beaked chickens
- Find Brynn and Quinn's mother's house; she needs more sparkle
- Pick up the rock from his room
- Go to the west to the dad's house.
Brynn and Quinn's Island
- Return to Marnethia via the Memory Stone.- Return to House Island via the Angel Statue and go through front door to regenerate.
- Pick up the Wizarding College pass in park below the School of Displacement
- Go there and find their hideout (under the sink); they want a sculpture
- Head home to sleep
Week 2--Tuesday
- Head downstairs
- Talk to Anda's father
- Head to Marnethia
- Go to Assembly Room
- Head to the clearing to the east of the Shape School
- You will fight three times.
- There is a pole to the right that will heal everyone in your party. So use it between fights. This is not obvious; so go touch the pole and check your MP and HP. You won't be told anything until it is too late and you've used up your turns.
- There is also someone who will sell you items to the right of the pole.
- Apparently it does not really matter if you win or lose, but winning will get you lots of experience points.
- When you are finished, you will leave and talk to the Post Witch.
- Go to House Island to regenerate by walking through the front door.
- Head to the lesson door at the Witching College; you will teleport out of the city
- Head north to the Memory Stone
- There's a guard there, who you can either fight or avoid
- Then use the Memory Stone to get to Vester (Ember's island)
- You will have a battle when you enter Ember's house
- When done, you can go upstairs to rest
- Head to the cave in the north; return home to rest after any fights.
- Sell the annoying talking bird to the lady just south of Vester town.
- Find Brigitte and Giselle in the house
- Return with Giselle to the Memory Stone - Return to the house and read the mail
- Go to Anda's Island to read the book her father mentions
- Pick up the book in her house and head all the way to the north
- Step into the square to enter Ghost Cave
- You need to go into the rooms with the colored orbs in the order shown from left to right. If you make a mistake, you will start back at the beginning.
- Each time you pick up an orb you will release some ghosts
- Once all 4 orbs are placed, a chest will appear near the entrance on the square tile.
- If you walk into any of the ghosts, you will get burned or poisoned or "¦ so be sure to heal at least one party member or switch out party members to a normal one.
Ghost Cave
- Once you have the key return to the Memory Stone- Return to House Island to regenerate and then go to Aunt Mitsy's Island.
Aunt Mitsy's Island
- In the Village you will find an inn, a sculptor for the Wizarding
College whom you have to pay the first time as you won't get a second
chance, Andrew who is waiting for his package, and Aunt Mitsy who wants
3 branches of Silver Tree. - The Silver Trees are here to the east and then north, in the North Forest of Marnethia through the big cave, and on Brynn and Quinn's Island.
- Find the Silver Tree here and then return to House Island to rejuvenate. You can do this after fights to rest for free.
- Head to the North Forest via the Memory Stone. The Silver Tree is south and then east into the caves on the left path.
- On Brynn and Quinn's island, the Silver Tree is to the right, but first head to the left to get the save the goat task if you wish.
- You will comment on a bird taking the goat away.
- Go further west and talk to the owner who wants the goat back.
- The goat is at the top of the mountain by Brynn and Quinn's mom's house.
- You can savegetting the goat until you are stronger if you'd like.
- Return to Aunt Mitsy and get the broom
- The launch spot is to the west. You can go around lake to avoid the bear if desired.
- Fly around and explore.
Map
- Completely optional islands are Trader and Blacksmith;
however, you can
find a few extras on these islands, so they are worth a quick visit. Trader Island
Blacksmith Island
- Head to
Ixone Island and into the crypt to find that you can't wake the Ghost;
you need to find some way to wake her up.- Ixone also has one of the captain's chest.
- Go to Captain's Isle; he has a bell that would wake a ghost but wants
to trade it for a companion
- Return to North Forest via House Island and the Memory Stone. - Go to Freddie's house, which is in the south near town.
- He'll come live with the Captain; return and get the Ghost Bell
- Return to Ixone and ring the bell.
- Aline says that we need to go to Ammon next
Ammon Caves
Ammon Clearing
- Note on Ammon, there is a cave system to the north that is optional- Inside the building, first room on the left, you will find the History book.
- First room on the right, find a ghost who wants the steamy novel; she will reward you with a new spell
- Go downstairs and find out you need a unicorn's horn to cure Anda's father.
- Talk to Anda's mother and get the Elder Sword
- Talk to Klaus in the center hall about finding missing Ghost Agents, Moriah, Wynne, Du'An
- You are going to have to fight two of these ghosts so go to your house to rejuvenate after fighting.
- Go to Moriah on Barb Island first.
- When you return to Barb Island you can also go through the locked gate to the north of the columned area and you will find the Golden Harp; you will have a fight when you come out so be prepared.
- Return to the cave area for the ghost
- The caves are different this time and have a market where you can trade pumpkins for items.
- Also the ghost is by a grave to the right of the caves (see blue circle on Barb Island map).
- No fight here and you'll get Moriah's Knife (good for Quinn)
- Du'An is the ghost on Anda's Island in the Ghost Cave.
- Wynne is on Dusa; inside you can get an "agility cure"Â for Aline.
Dusa Island
- Return to Ammon and let Klaus know what happened. - He will give Brynn some breaker gloves, which will allow him to break through rocks.
- Olwin Island has rocks that are blocking the path so go there next.
- Be sure to arm Brynn with better accessories after using the breaker gloves.
- Go into the house to find out that you can get a unicorn horn on the ground but you also need to spend the night in the unicorn sanctuary and find the 4 feeding stations to feed the unicorns (circled in blue)
- First head to the fairy village in the northeast to find out where you can rest.
- There is a spot where you can't see a path but you can push through the trees. It is to the right of one of the angel statues.
- You will find the unicorn with a missing horn near the village.
- After finding it, go back and talk to the fairies; one will tell you it is in the fairy village (in a snow man)
- Another fairy wants you to admire all the statues for a wonderful reward. There are a total of 8 Snow Angel statues (circled in white)
- Return to the fairy after finding them all and she says you will get a reward "later"Â; the rewards turns out to be a landing spot
- Return to keeper's house.
Olwin Island
- Return to Ammon- Give the unicorn horn to Brigitte
- Get some rest
- Talk to Hilde who will give you half a golden disc and now to find the other half
- Head to Wilda Island next
- Wilda is a tough island; so return to your house each time you fight.
- Avoid the animals, Porcubears.
- Befuddle Blow with Quinn is a great spell
- On Wilda off to the northwest you will find a "life coach"Â who will help Marli's dad come out of the cupboard, so return here after going to Marli's island.
Wilda Island
- Have you been to Marli's Island; maybe take a break and do
that.- After talking to Marli's dad you can go talk to the life coach again.
- You can go into the caves on Marli's island too and head left to find sparkle for Quinn's mom.
- Once you do this, you will be able to find a firefly which will need a new home for a task.
Marli's Island
- Back to Wilda- Inside the house, on the right you will fight three guards and then get a key to the next floor
- Fight the guard there and go to the chest to get the next key for the next door
- Open the chest and get the other half of the disc
- Go to Solitude Islandand put the disc in the statue
- Solitude has a chest (for Charlie)
Solitude Island
- You will be transported to Eione Island- Find the lighthouse in the northwest
- Sandra on the top floor of the lighthouse says to just kick the teleport stone to make it work
- You can rest for free in the lighthouse
- Go kick the teleporter and fight your way to the Queen.
- You will release her and then return automatically to Ammon
- Finish up your side quests
- Return to Vester Island
- Get a side quest to give Hans his gold and hat somewhere cold (his wife is in the first house to the left of the northern gate)
- Next row left most door has a chest
- Marli can learn Wicked Lullaby from the right most door on the same row from Kinesla
- One of Capt. Charlie's chests is on the western beach where you left the first time
- Return to Nethina
- Give Captain Charlie his chests; choose the third one to get 1000 gold and discover that you will need a locksmith to fix it.
- Go to Dusa and talk to the thief to open it.
- Get orb from Ellie, second from right door from Nethina.
- Go into the fashion boutique and the owner will fall in love with Giselle.
- When Giselle is offered a position, have her say "I guess so."Â Your new task is to find a new customer for her.
- Return to Marnethia
- You can return the harp to Guilliard and Marli will learn a new spell
- Bring the history book to the Info Center and find about the secret of some sort in the storage room beside the Marnethia Inn
- Go to Hugh's house to tell his mother about the boutique
- Go to the storage room and find a hole with the Marnethia Sword
- Go into the Royal Apt, pay for entry, and find Oil for Warrior School Boris; unstick him
- Return the crystal balls to the Prophecy School
- Take the sculpture to the Wizarding School
- Go to the baker and get him to make a carrot cake with the carrots you found; take the carrot cake to the Displacement School
- Pick up a potion from the hideout at Witching College
- Buy a chicken beak rib at the familiar shop
- Get an Elite School pass from Evan who is to the right of the Night School.
- Go to the Elite School and find the hideout.
- After finding an unusual teleport machine, leave the Elite School and you will go back to the house.Elite School
- Upon awakening, you have a letter from the queen and a key
to the castle.- If you found all of the hideouts and did their tasks, there will be a letter at the mailbox.
- Return to Marnethia and go to the password door. Enter the password, all lower case. There will be rewards!
- Return to House Island and travel to Sovereign Island by broom..
- You can break through the rock with Brynn's gloves and get the 4 leaf clover
- Rest in the bedrooms upstairs
- When you go to rescue the queen, remove Aline from your party.
Sovereign Island
- Return
to Ammon to tell them that the ghosts have gone bad- Find out that they have all been captured but Ember's mom was not captured as she left before it happened.
- Return to Aunt Mitsy's Island
- Hans is near her house
- Go to Ember's mother in Mitsy's house and release Aline with the potion
- There is a chest at the top of the mountain, above the Silver Tree. Arm Marli with the Fire Rod and you can open it.
- Return to Olwin (there is a portal at the fairy village now)
- Receive a packet of Fairy Dust from fairy who couldn't see in the dark.
- Need to find the little fairy Angelina She is in the further south trapped by a robber
- Return to the mom and receive a sparkle ring
- Return Anda's Island
- Put Aline in your party and you can scare the hiccups out of the little boy
- You can give the firefly to Olivia to watch after.
- Return to Brynn and Quinn's island
- Give the beak rub to the chicken lady; you will get your reward when you return to House Island. Lots of eggs with gold in them.
- Give the sparkle to the boys' mom.
- Rescue the goat if you have not done it already
- On the way stop off at Trader Island; you should have plenty of money now and you need to arm yourself well for the final battle.
- Save at this point too; that way if you can't win, you can come back and buy something different if needed.
- Consider going to Blacksmith Island
- Return to Nethina to get reward from the boutique owner
- Return to Elemental School to give 4-leaf clover
- Return to Elite School and the ghost portal, which you will now go through
- You have 4 fights at each of the grave lights.
- You should return to Marnethia and the inn or House Island to restore after each fight.
- Don't go in until you finish all your sidequests. You can still do most of them after finishing but you won't get "credit" for them.
- Rest before going in as you will have one final big battle.
Ghost King
SIDEQUESTS
Show/Hide
In order listed in the Strategy Guide.
Find Godslayer Sword
- Talk to the person outside of the Witching College before 2nd day
- Time sensitive--Find the hat during the Flying Lesson.
- You need to fight the green dragonfly and transport to the other location.
- The hat is all the way to the right.
Find Godslayer Sword
- Warrior School, student hideout
- Find the sword on Anda's Island when rescuing the writer.
- Return to the hideout
Find 3 Crystal Balls for Prophecy School- Find the sword on Anda's Island when rescuing the writer.
- Return to the hideout
- Prophecy School, student hideout
- Get the pass in the North Forest; your familiar will find it.
- First one is in the market on Marnethia
- Second one is at Suzie's house in the North Forest of Marnethia
- Third one is at Ellie's house in Nethina.
- Return to the hideout
Get a sculpture- Get the pass in the North Forest; your familiar will find it.
- First one is in the market on Marnethia
- Second one is at Suzie's house in the North Forest of Marnethia
- Third one is at Ellie's house in Nethina.
- Return to the hideout
- Wizarding College, student hideout
- Get the pass off of the ground in the park just south of the School of Displacement
- The sculptor is on Aunt Mitsy's island in the village
- You need to pay him the first time you come across him; you won't get a second chance.
- Return to the hideout
Find the missing skull- Get the pass off of the ground in the park just south of the School of Displacement
- The sculptor is on Aunt Mitsy's island in the village
- You need to pay him the first time you come across him; you won't get a second chance.
- Return to the hideout
- Night School, student hideout
- The skull is being chewed on by a dog between Marnethia College Town and Nethina
- Once you "talk" to it, return to the Martial Art School and get the piece of meat from the kitchen upstairs.
- Go back to the dog and you can trade the meat for the skull.
- Return to the hideout
Need Carrot Cake- The skull is being chewed on by a dog between Marnethia College Town and Nethina
- Once you "talk" to it, return to the Martial Art School and get the piece of meat from the kitchen upstairs.
- Go back to the dog and you can trade the meat for the skull.
- Return to the hideout
- Displacement School, student hideout
- You will find the carrots on Brynn and Quinn's island outside the inn
- You can get the Baker in MCT to bake a carrot cake
- Return to the hideout
Need Enchanted Mushroom Powder- You will find the carrots on Brynn and Quinn's island outside the inn
- You can get the Baker in MCT to bake a carrot cake
- Return to the hideout
- Witching College, student hideout.
- Fight all 3 of the sleeping white mushrooms on Barb Island to get it
- Return to the hideout
Find a new student - Fight all 3 of the sleeping white mushrooms on Barb Island to get it
- Return to the hideout
- Elemental School, student hideout
- Find out they need to find a water student
- On Anda's island, go through the cave just south of where you arrive the first time.
- Return to hideout
Find Dave the bird- Find out they need to find a water student
- On Anda's island, go through the cave just south of where you arrive the first time.
- Return to hideout
- Shape School, student hideout
- Time-limited and activity-limited to get the pass
- First you need to write a letter to your mom at the Post Office before the end of Day 2.
- If you wrote a letter, you will be let out of the headmistress' office at Day 3.
- On Day 3 only, you can find a clown in the clearing on the west side of town.
- You need to then respond to the clown's jokes with complete enthusiasm to get the pass.
- After talking to the student in the hideout, you can find Dave on the docks down in Nethina.
- Return to the hideout.
Find Lilly's lost dog - Time-limited and activity-limited to get the pass
- First you need to write a letter to your mom at the Post Office before the end of Day 2.
- If you wrote a letter, you will be let out of the headmistress' office at Day 3.
- On Day 3 only, you can find a clown in the clearing on the west side of town.
- You need to then respond to the clown's jokes with complete enthusiasm to get the pass.
- After talking to the student in the hideout, you can find Dave on the docks down in Nethina.
- Return to the hideout.
- Talk to Lilly on the east side of the town on Vester
- With Giselle in your party, you can find the dog in the southern section northeast of Ember's house
- Return to Lilly
Find the stolen harp Guillard - With Giselle in your party, you can find the dog in the southern section northeast of Ember's house
- Return to Lilly
- Visit Guillard a little way into the game. He won't lose
his harp until a day or two into the game.
- Find the Harp on Barb Island.
- You will get a key the first time through and open an area that is barred off.
- Once you have Aline (the ghost) you can return to get through the barred off area and find the harp.
- Return to Guillard
Deliver letter to Sasha - Find the Harp on Barb Island.
- You will get a key the first time through and open an area that is barred off.
- Once you have Aline (the ghost) you can return to get through the barred off area and find the harp.
- Return to Guillard
- Talk to Hugh outside of his house
- Deliver the letter to Sasha in the fighting room in the Warrior School
Sasha needs a new dress to wear - Deliver the letter to Sasha in the fighting room in the Warrior School
- Deliver the letter to Sasha
- Buy the dress from Tyler in Nethina.
- Return to Sasha
Find a special book - Buy the dress from Tyler in Nethina.
- Return to Sasha
- Talk to the person in the Information Center after the first day
- Pick up the book in Marli's house.
- Return to the Information Center
Find a secret in the storage room - Pick up the book in Marli's house.
- Return to the Information Center
- Return the above book to the Info Center
- He will tell you about the secret
- Go to the door to the right of the Inn and find a hole in the floor
Find a cure for the chickens - He will tell you about the secret
- Go to the door to the right of the Inn and find a hole in the floor
- Talk to the chicken keeper on Brynn and Quinn's island (far east)
- Buy the potion from the Familiar Store (outside Witching College)
- Bring the potion back to the chicken keeper
- Your reward will be "golden" eggs on House Island
Find the rare serpent- Buy the potion from the Familiar Store (outside Witching College)
- Bring the potion back to the chicken keeper
- Your reward will be "golden" eggs on House Island
- Time-limited, triggered during the Familiar Exam (day 1) only.
- Speak to the witch who wants you to cheat and after finding all the gems, talk to her again.
- She lost her serpent
- Go to the Headmistress' Office and pick up a key on the floor.
- Go to the locked door in the library and find the serpent.
- Return the serpent to witch who is now in her dorm room..
Find someone to take this bird- Speak to the witch who wants you to cheat and after finding all the gems, talk to her again.
- She lost her serpent
- Go to the Headmistress' Office and pick up a key on the floor.
- Go to the locked door in the library and find the serpent.
- Return the serpent to witch who is now in her dorm room..
- You need to finish the "Find the rare serpent" sidequest first.
- You will receive an annoying bird
- Give it to the lady who is just south of the town on Vester Island
Find the author - You will receive an annoying bird
- Give it to the lady who is just south of the town on Vester Island
- Talk to the author's husband in the town on Anda's island.
- He will give you a key
- Find the little house in the far north
- Fight 4 thieves in the caves beneath the little house to rescue her.
- Return to her house to receive a reward (steamy novel, which can go to a ghost on Ammon Island)
Find Johnny for his mother in Nethina - He will give you a key
- Find the little house in the far north
- Fight 4 thieves in the caves beneath the little house to rescue her.
- Return to her house to receive a reward (steamy novel, which can go to a ghost on Ammon Island)
- Find the mother in Nethina
- Find Johnny just south of the Post Office after the first day.
- Return to Nethina for your reward
Deliver the letters - Find Johnny just south of the Post Office after the first day.
- Return to Nethina for your reward
- Go to the Post Office and deliver all the letters
- The last one will be fore Ember
Get the goat back - The last one will be fore Ember
- On your second visit to Brynn and Quinn's island, head to the west.
- You will comment about the goat being carried away by a giant bird
- Talk to the owner of the goat
- Fight to rescue the bird on the mountain above the mom's house
- Talk to the goat owner
Get 3 branches - You will comment about the goat being carried away by a giant bird
- Talk to the owner of the goat
- Fight to rescue the bird on the mountain above the mom's house
- Talk to the goat owner
- This is not a sidequest
- Talk to Aunt Mitsy.
- The Silver Tree are on Aunt Mitsy's island, Brynn and Quinn's island, and the North Forest of Marnethia.
- Return to Aunt Mitsy
Admire all the snow angels - Talk to Aunt Mitsy.
- The Silver Tree are on Aunt Mitsy's island, Brynn and Quinn's island, and the North Forest of Marnethia.
- Return to Aunt Mitsy
- Talk to the fairy near the snow angel in the Fairy Village on Olwin
- Find all 8 snow angels (see map above)
- Return to the fairy; your reward will be a new landing spot in the fairy village
Locksmith needed - Find all 8 snow angels (see map above)
- Return to the fairy; your reward will be a new landing spot in the fairy village
- You need to solve the "lost chest" sidequest first
- Return the chests to Captain Charlie.
- Choose to accept a chest as a reward to discover you can't open it.
- Talk to the ghost thief on Dusa Island and he will unlock it.
Give back the hat and gold - Return the chests to Captain Charlie.
- Choose to accept a chest as a reward to discover you can't open it.
- Talk to the ghost thief on Dusa Island and he will unlock it.
- Talk to Hans' wife in Vester Town (but not right away)
- Hans will be on Aunt Mitsy's island just east of the village.
Find the cat - Hans will be on Aunt Mitsy's island just east of the village.
- Talk to the Headmistress of the Witching College a bit into the game
- Find the cat who is acting crazy at Betsy's house
- Return to the Headmistress
Find a Four Leaf Clover - Find the cat who is acting crazy at Betsy's house
- Return to the Headmistress
- Talk to Leylitha in the Elemental School
- Find the four leaf clover on Sovereign Island to the west.
- Use the Breaker Gloves to break through the rock to get to it
- Return to Leylitha
Find a cure for hiccups - Find the four leaf clover on Sovereign Island to the west.
- Use the Breaker Gloves to break through the rock to get to it
- Return to Leylitha
- On Anda's island, there is a house (to the right of the writer's
house) where there is a little boy with hiccups
- Place Aline into your party and talk to the little boy again
Deliver a parcel- Place Aline into your party and talk to the little boy again
- Find the parcel on Brynn and Quinn's island on a small island to the
south.
- Deliver the parcel to Andrew in the village of Aunt Mitsy's island
Find a new customer - Deliver the parcel to Andrew in the village of Aunt Mitsy's island
- When you have Giselle with you, visit the boutique in Nethina
- She will find Giselle to be wonderful.
- Respond "I guess so."
- She will ask Giselle to find her a customer.
- Go talk to Hugh's mother
- Return to the boutique for the reward
Find some sparkle!- She will find Giselle to be wonderful.
- Respond "I guess so."
- She will ask Giselle to find her a customer.
- Go talk to Hugh's mother
- Return to the boutique for the reward
- Talk to Brynn and Quinn's mom.
- Go to the caves of Marli's island.
- Find the crystals off to the left
- Return to the mom.
Find someone to care for the Firefly - Go to the caves of Marli's island.
- Find the crystals off to the left
- Return to the mom.
- Battle the pixies in the cave on Marli's island after you have
discovered the sparkle
- You will release the Firefly who needs someplace warm to live.
- Go to Olive in the town on Anda's island. She wants a pet.
Find the fairy child - You will release the Firefly who needs someplace warm to live.
- Go to Olive in the town on Anda's island. She wants a pet.
- Return to the fairy village on Olwin
- Talk to the fairy outside her house
- Rescue her daughter in the far sout
- Return to the fairy mother
Unstick the warrior - Talk to the fairy outside her house
- Rescue her daughter in the far sout
- Return to the fairy mother
- Try to talk to Boris in the Warrior School
- Pay to enter the Royal Apt. (when it is not being guarded)
- Pick up a bottle on the floor to discover the oil.
- Return to Boris
Help Marli's father - Pay to enter the Royal Apt. (when it is not being guarded)
- Pick up a bottle on the floor to discover the oil.
- Return to Boris
- Try to talk to Marli's father on their island
- Find the "life coach" on Wilda Island in the northwest
- She will come to help her dad.
- Return to Marli's island.
Find the lost chests - Find the "life coach" on Wilda Island in the northwest
- She will come to help her dad.
- Return to Marli's island.
- Talk to Capt Charlie on the docks in Nethina (after the first day)
- One chest is on Solitude Island
- One chest is on Ixone Island (where Aline is)
- One chest is on Vester Island on the western beach
- Return to Capt Charlie
Find the lost hat
- One chest is on Solitude Island
- One chest is on Ixone Island (where Aline is)
- One chest is on Vester Island on the western beach
- Return to Capt Charlie
- Talk to the person outside of the Witching College before 2nd day
- Time sensitive--Find the hat during the Flying Lesson.
- You need to fight the green dragonfly and transport to the other location.
- The hat is all the way to the right.
Comments will load when you reach this part of the walkthrough.