
Walkthrough Information
Sixty years ago, a cruise ship goes down in a tidal wave and now a small island is being bothered by ghosts. Your editor wants you to write a story about the situation, which is great because you have a friend living there who is a paranormal specialist. Upon your arrival, your friend is nowhere to be found, and the only being to meet you is a ghost. Discover how the shaman's "ghost ship" and the ghosts on this island have something to do with an upcoming eclipse.
The specific goal of the game is to pick up the pieces of many fragmented hidden objects and then figure out how to use them.
Gameplay
Show/Hide
The cursor does not change when you hover it over the fragmented objects to pick up. It will change into a hand when you are over either a Beyond Item or an item you need that is not fragmented. The cursor turns into an eyeball when there is something you can look at. The cursor will have a gear when there is an area that needs an inventory item to be used on it.
The game operates very simply. You have only the one menu bar at the bottom. From left to right you have:
The Menu button where you can resume playing, change your options, or save and exit.
The Ghost Ship shows you a little information about the ghosts you have found and those you still need to find. This is not really necessary to the gameplay.
The center section alternates between Find and Use. The Find section is for the fragmented objects you need to find. Hovering over the item will give you the name of the item and show you the pieces you need to find. Pieces that are unavailable to find at the current time are red. This means you have to do something else before you can get it. The Use section is all of your completed items and other items you may have picked up.
The Hint button recharges after either one minute for casual play or two minutes for expert. It will not be wasted if there is nothing available to do in the scene you are in.
The Book has two sections. One is important information you have gathered during the game and it will occassionaly automatically record important information for puzzle solutions.
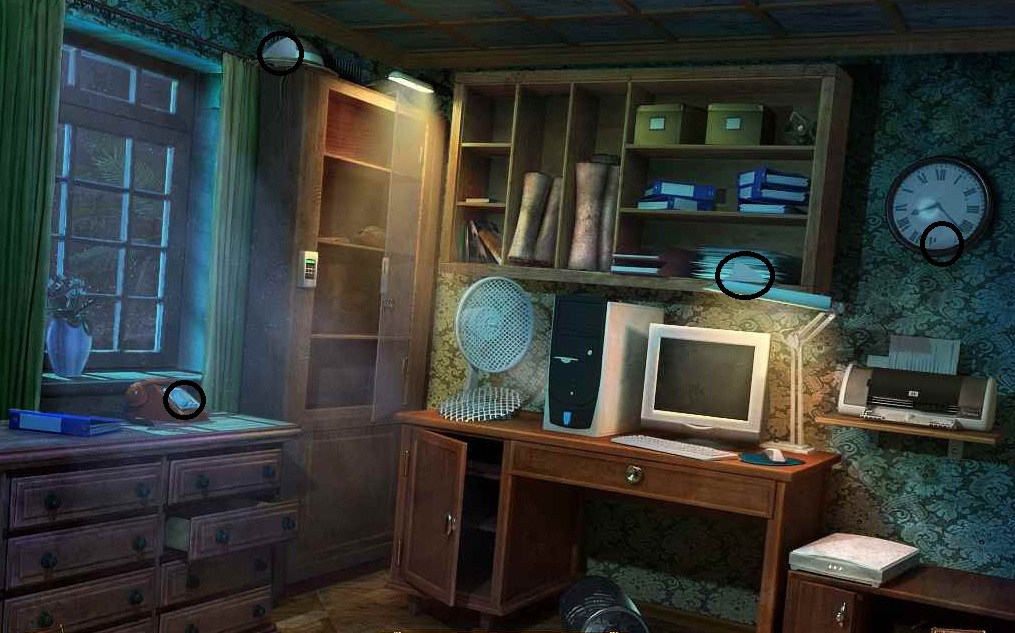
The other section is the Map. The game has 4 major section and each section is tabbed. Green circles are areas you can access currently. The circle with the footsteps on it is the location you are currently at. An exclamation point is an area where you can currently do something. The handy thing about this is that the exclamation point will only appear when there is something that can actually be done with what you have available. The exclamation point won't appear until you have the items you need in your inventory.
There are great hints that pop up as commentary as you click on different areas.
I discovered when I played the game a second time that you actually do not need to pick up any of the papers to progress through the game. These usually only add details to the story but do not trigger any actual game play, which is great in case you miss one.
The game operates very simply. You have only the one menu bar at the bottom. From left to right you have:
The Menu button where you can resume playing, change your options, or save and exit.
The Ghost Ship shows you a little information about the ghosts you have found and those you still need to find. This is not really necessary to the gameplay.
The center section alternates between Find and Use. The Find section is for the fragmented objects you need to find. Hovering over the item will give you the name of the item and show you the pieces you need to find. Pieces that are unavailable to find at the current time are red. This means you have to do something else before you can get it. The Use section is all of your completed items and other items you may have picked up.
The Hint button recharges after either one minute for casual play or two minutes for expert. It will not be wasted if there is nothing available to do in the scene you are in.
The Book has two sections. One is important information you have gathered during the game and it will occassionaly automatically record important information for puzzle solutions.
The other section is the Map. The game has 4 major section and each section is tabbed. Green circles are areas you can access currently. The circle with the footsteps on it is the location you are currently at. An exclamation point is an area where you can currently do something. The handy thing about this is that the exclamation point will only appear when there is something that can actually be done with what you have available. The exclamation point won't appear until you have the items you need in your inventory.
There are great hints that pop up as commentary as you click on different areas.
I discovered when I played the game a second time that you actually do not need to pick up any of the papers to progress through the game. These usually only add details to the story but do not trigger any actual game play, which is great in case you miss one.
The walkthrough:
- Only the destinations that you need to get to are listed and not the different scenes you need to move through.
- If you are not sure which direction to go, you can use the map to help you go in the right direction. The destination names match the names on the map.
- For each fragmented object, one color is used to circle the pieces and the walkthrough will tell you what color to look for.
- Beyond Items: There are 56 Beyond Items, which have been circled with light purple. Disappointingly, getting all of them gets you nothing be your own self satisfaction.
- The following are the four different map sections:
Show/Hide
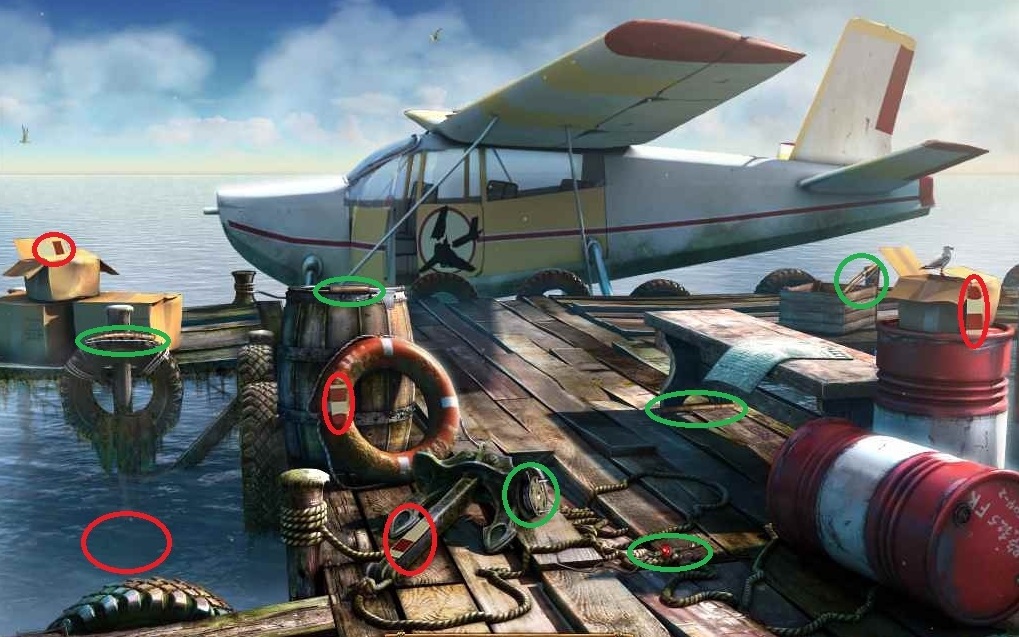
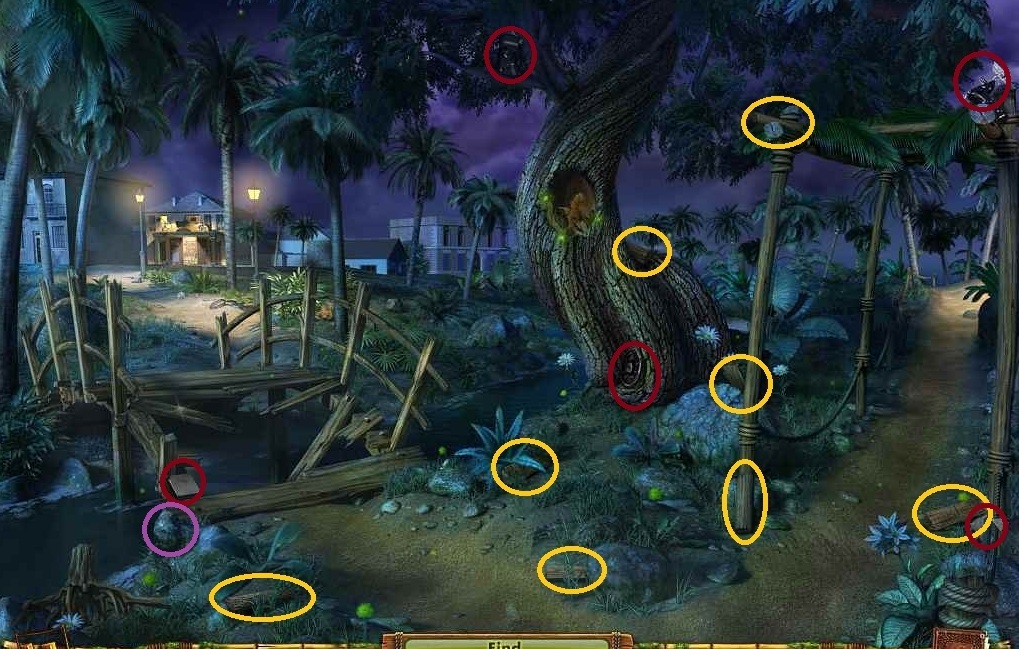
START
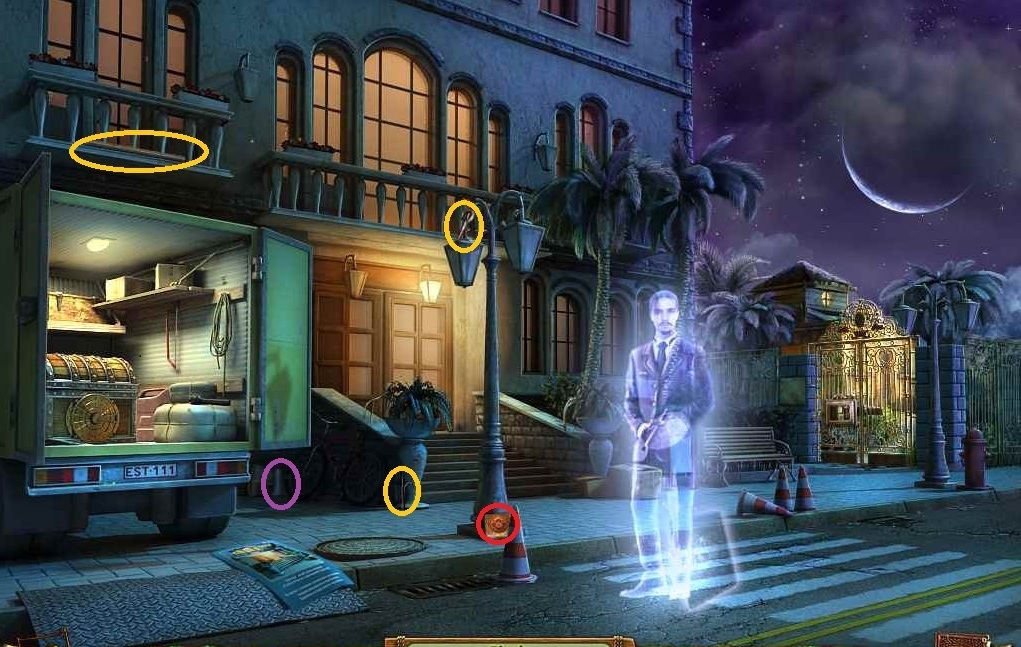
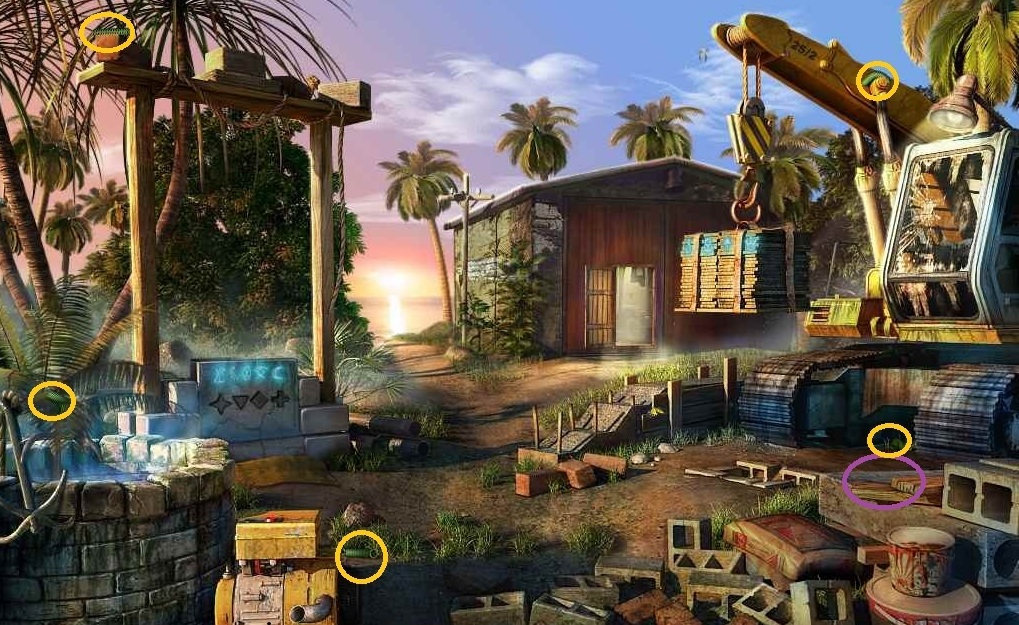
- Go into the airplane and leave
- Find pieces for FISHING ROD (green)
- Find pieces for PROPELLER (red)
- Use FISHING ROD to get last piece of PROPELLER out of the water.
- Put the PROPELLER on the plane.
- Enter the plane and press the start button.
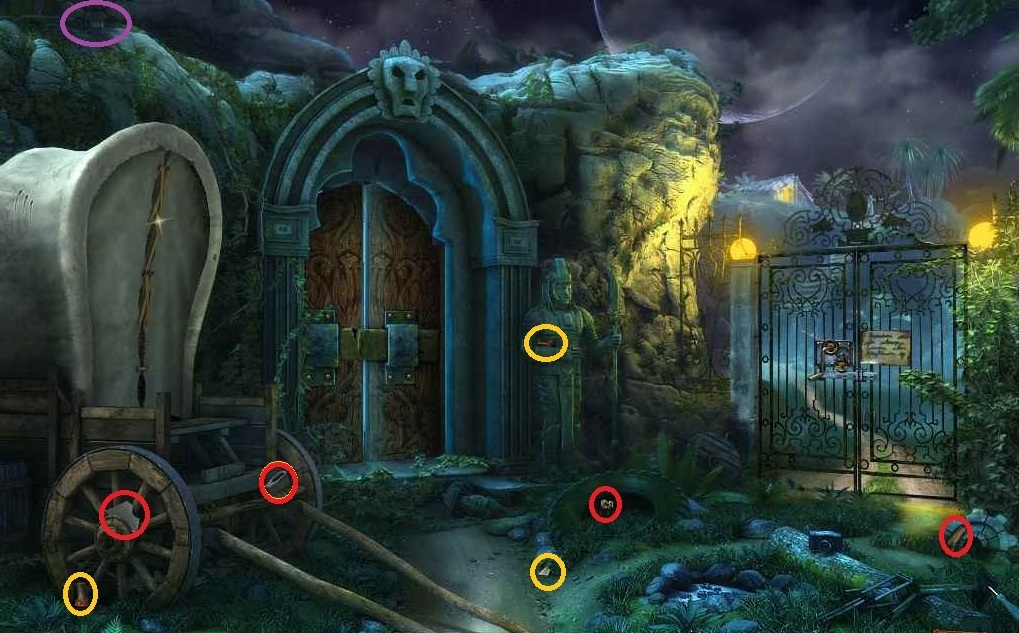
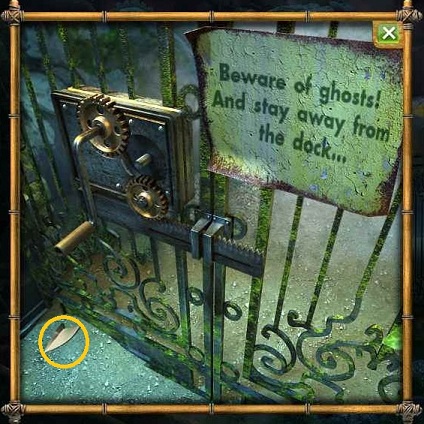
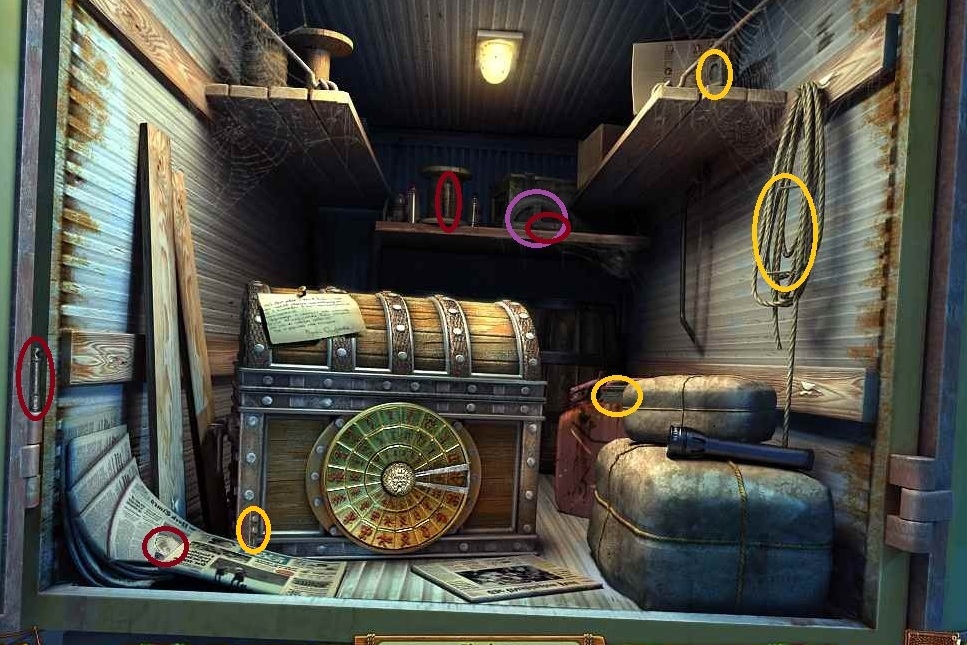
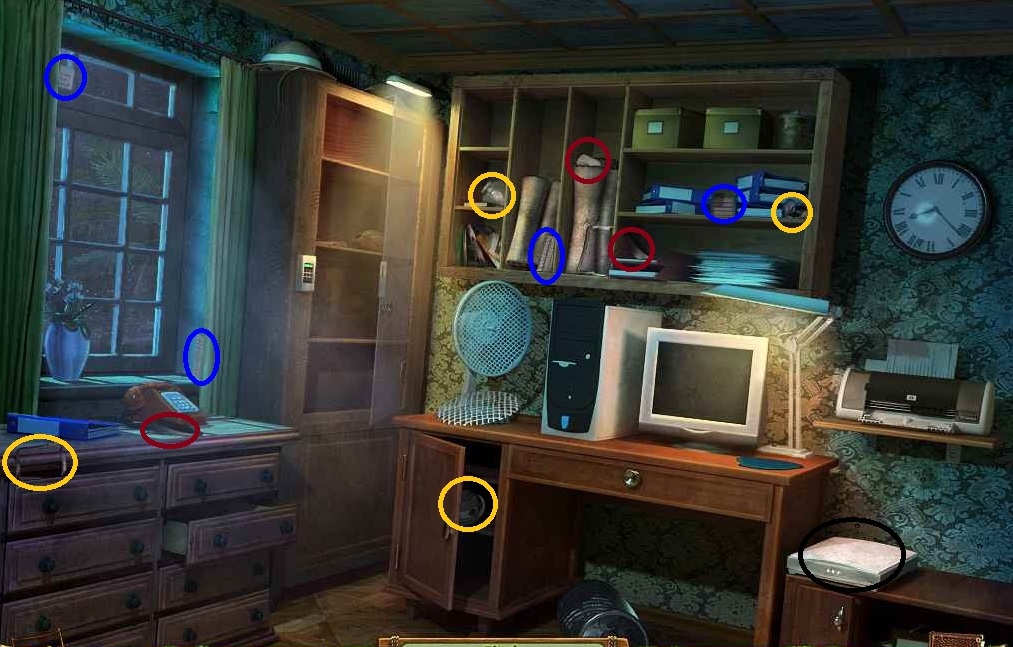
- Pick up KNIFE pieces (yellow)
- Click on gate to find last piece of KNIFE
- Use KNIFE to open wagon lacings
- Pick up the last piece of the AXE
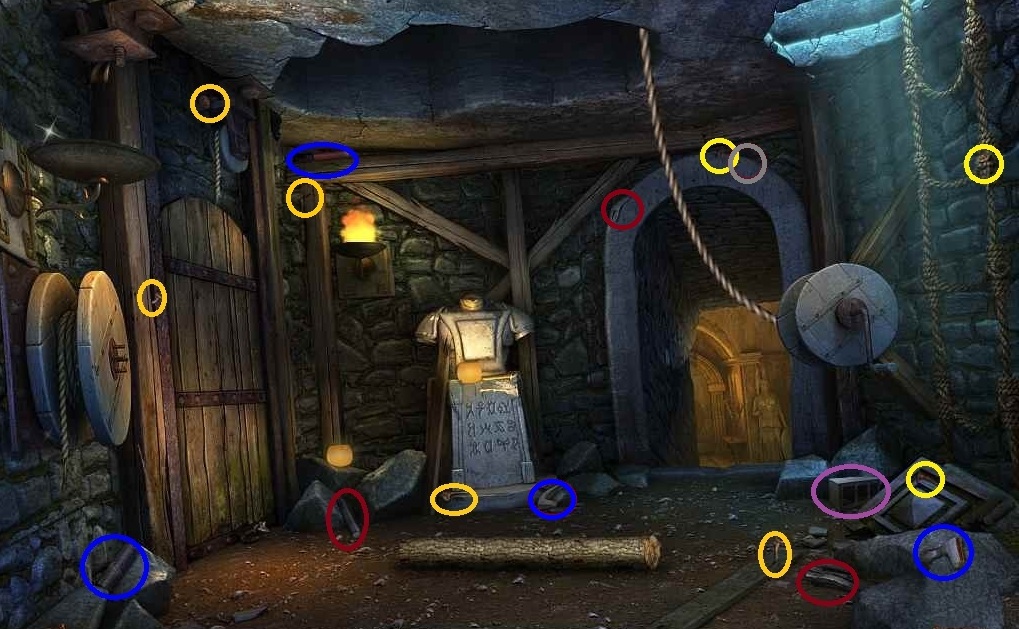
- Use AXE to open door to CAVE
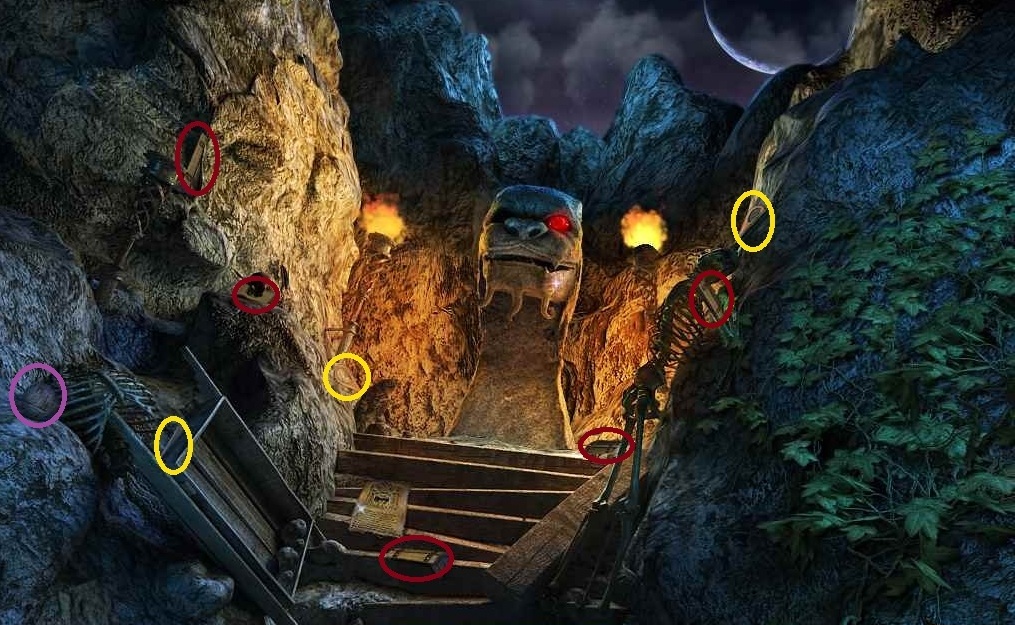
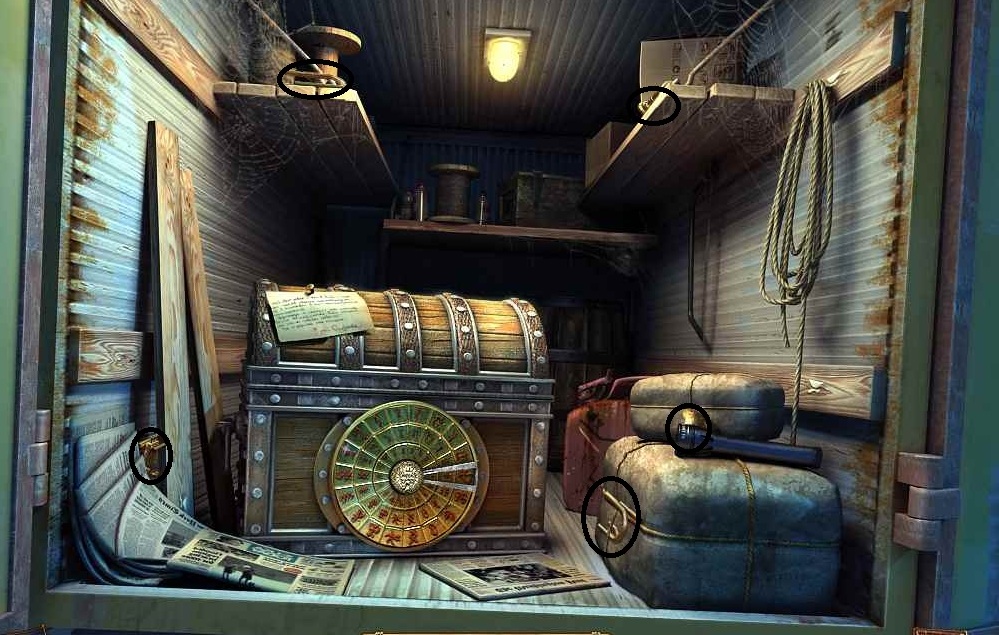
- Pick up RAKE pieces (green)
- Pick up X-SHAPED HANDLE pieces (red)
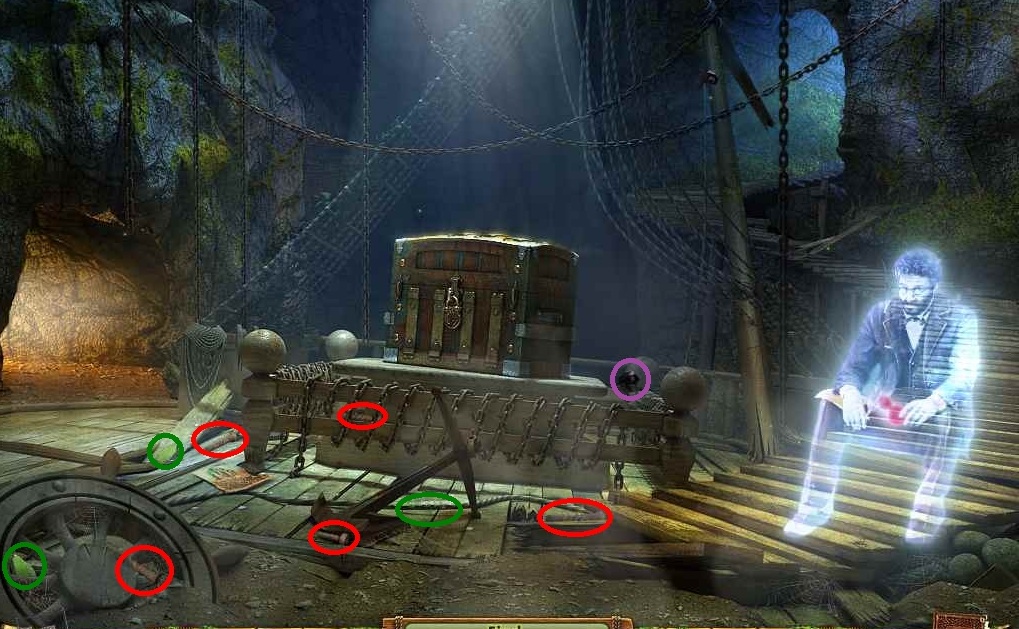
- Pick up SLEDGEHAMMER pieces (red)
- Pick up OAR pieces (blue)
- Pick up INK POT and FISH piece from chest
- Pick up FISH pieces (blue)
- Place X-SHAPED HANDLE
- Give INK POT to Ghost Writer and get a WOODEN WRITER
- Click on paper left behind by WRITER
- Pick up GEAR
- Place GEAR in gate and turn crank
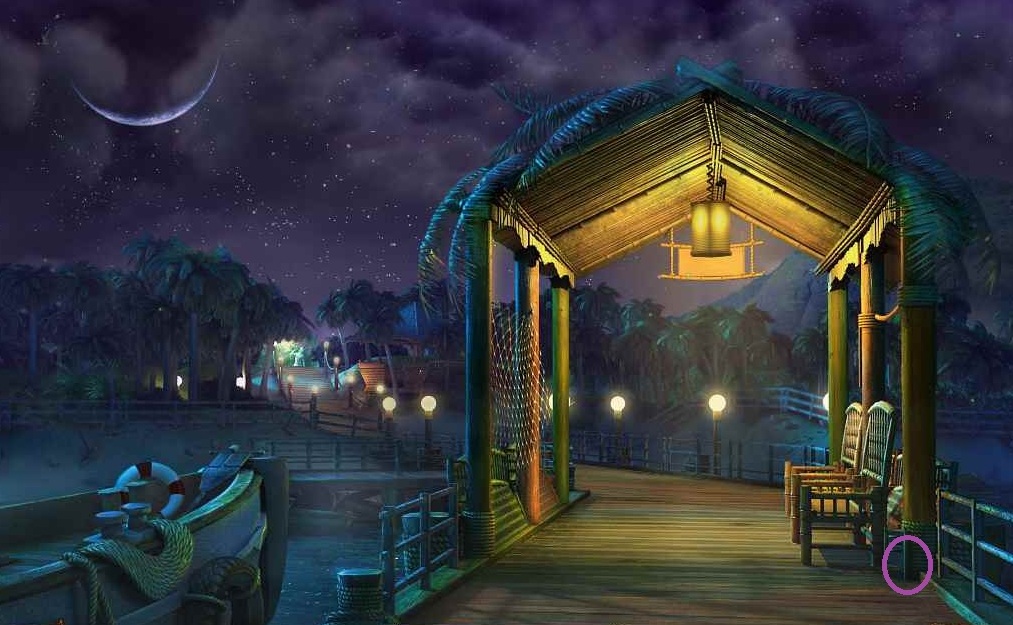
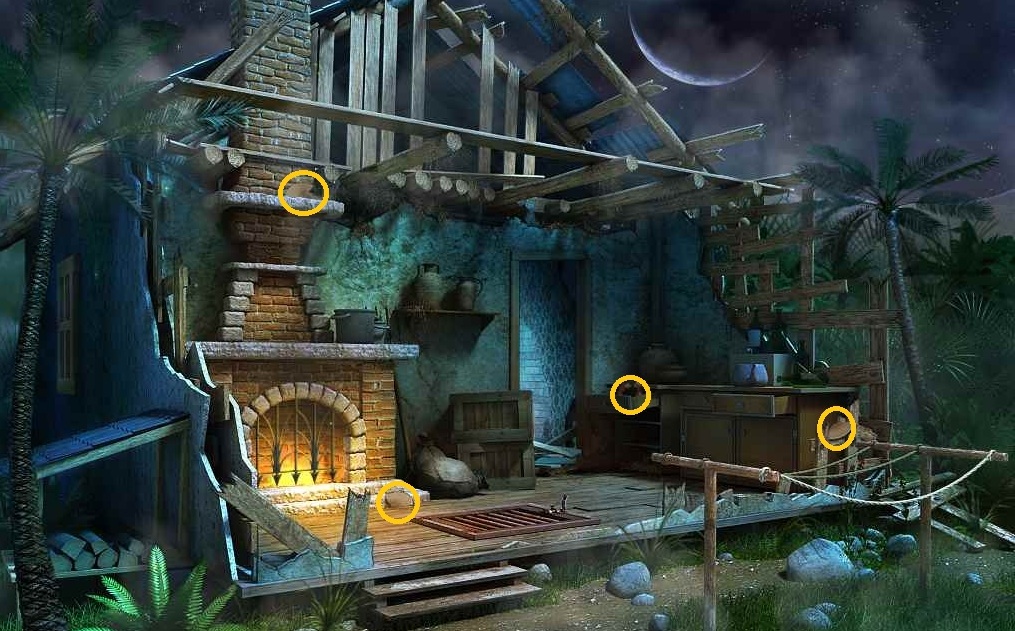
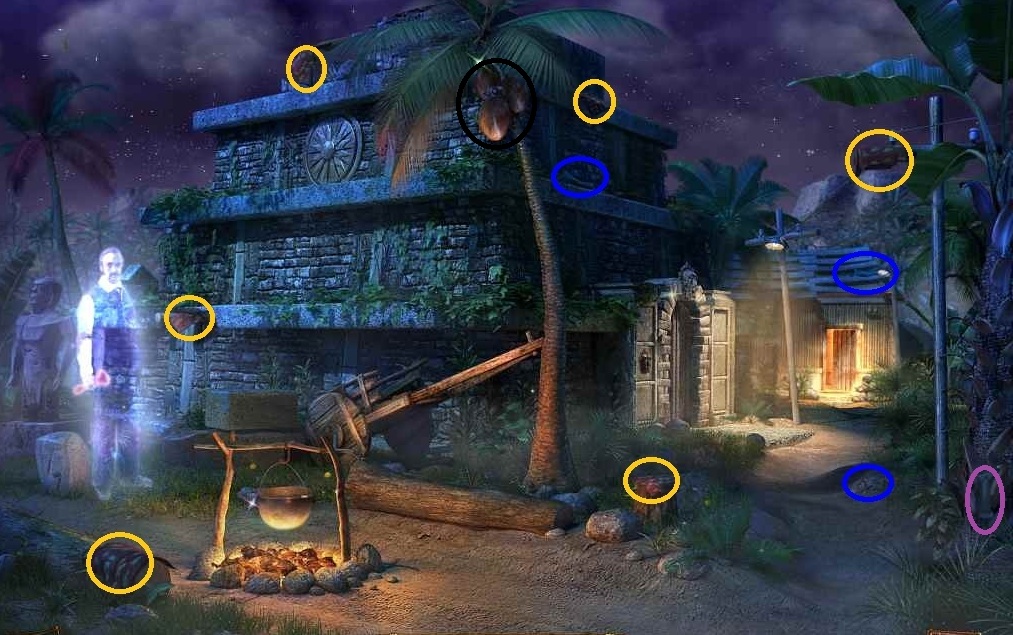
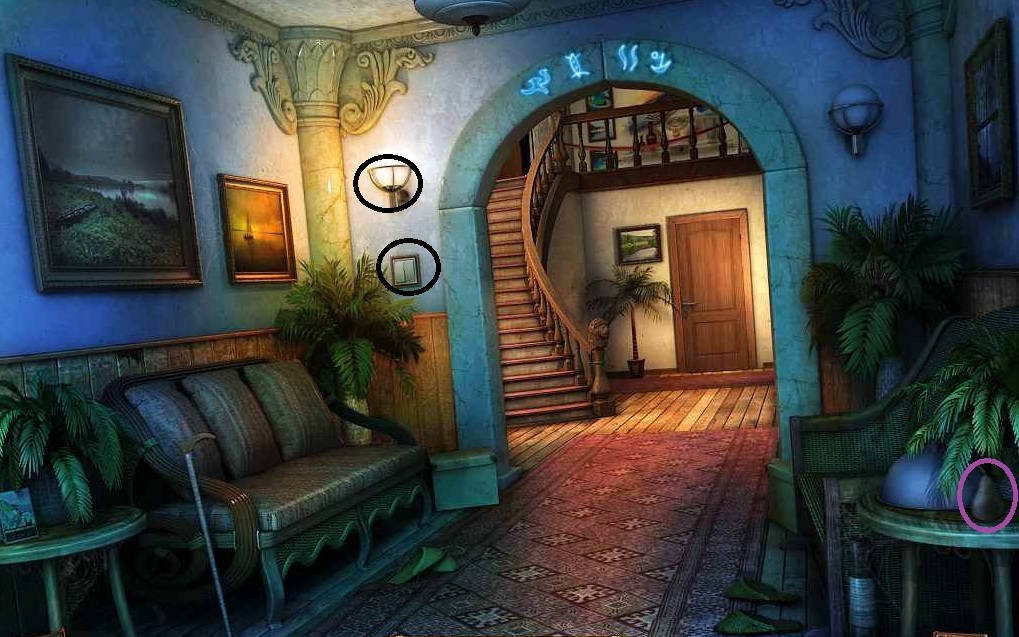
- Go to DOCK first
- Pick up LADDER pieces (yellow)
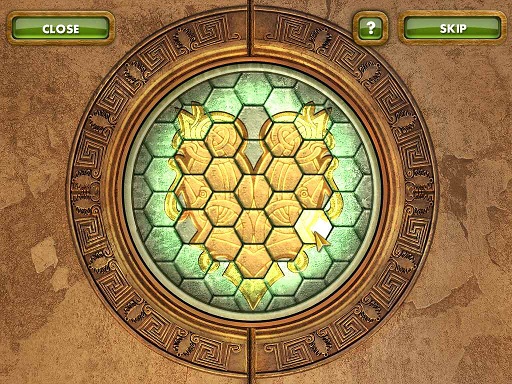
- Pick up GLASS CLEANER pieces (blue)
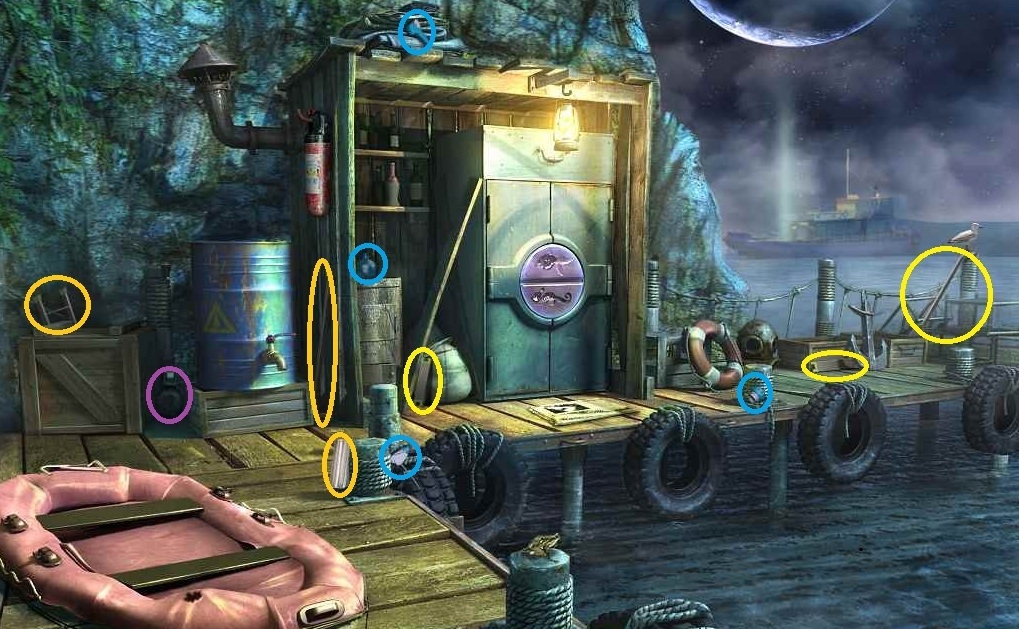
- Place LADDER at bottom of steps
- Try to pick up SEAHORSE (black); it will drop in the fire
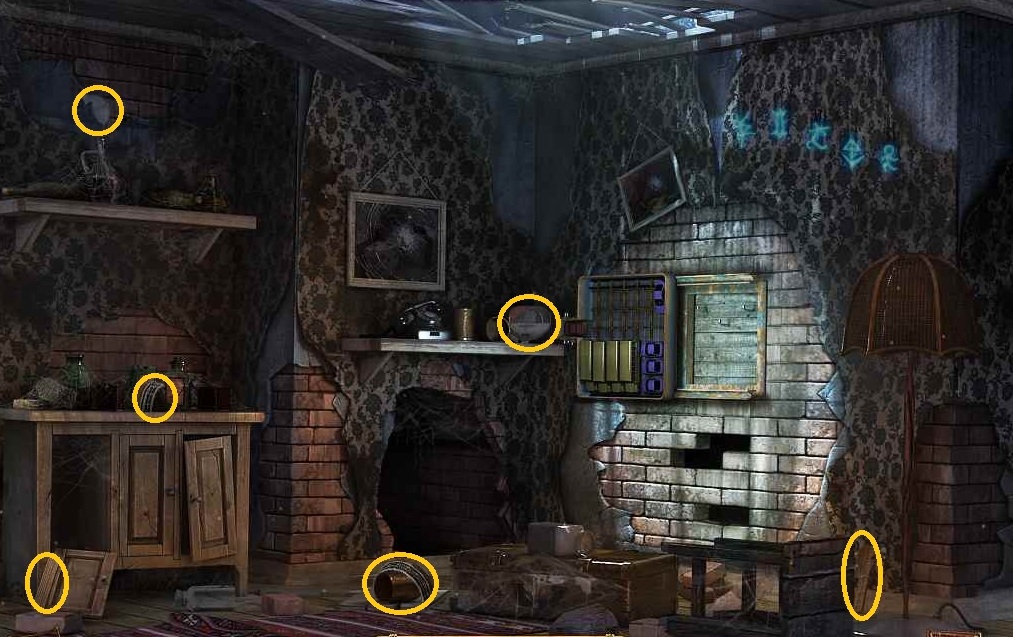
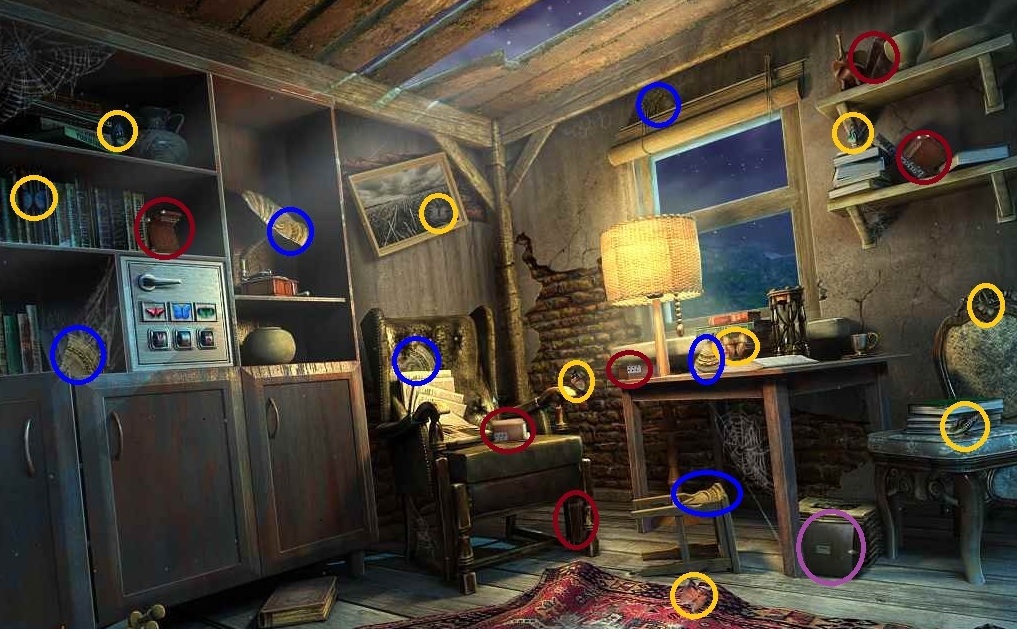
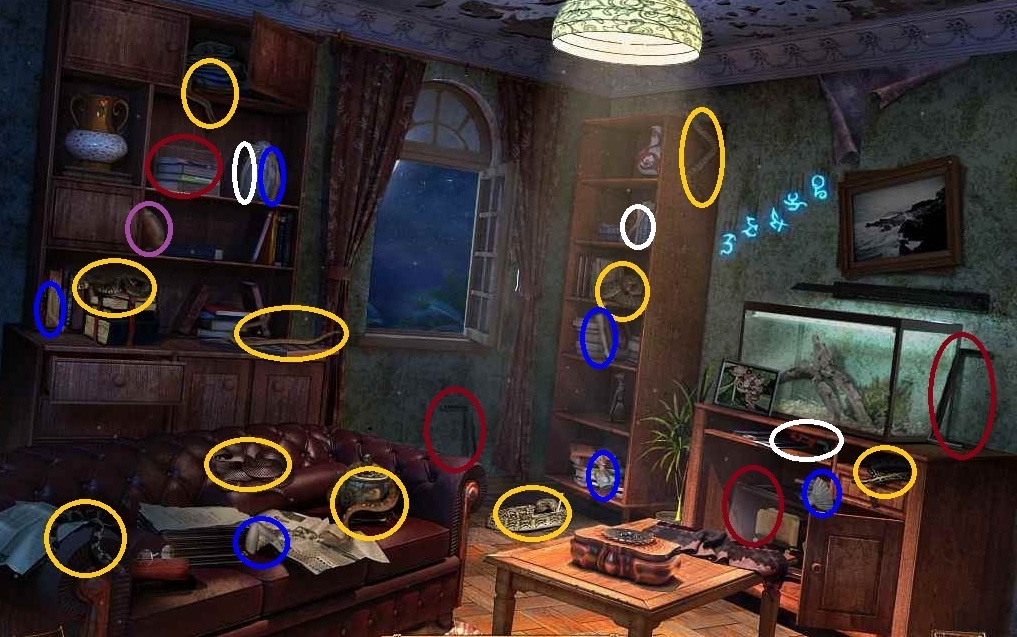
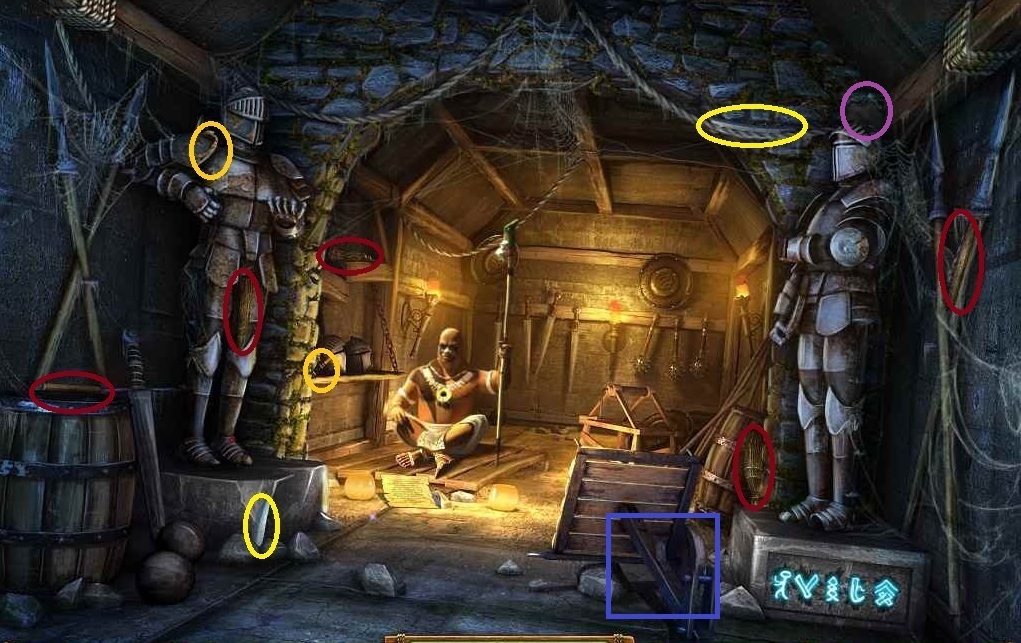
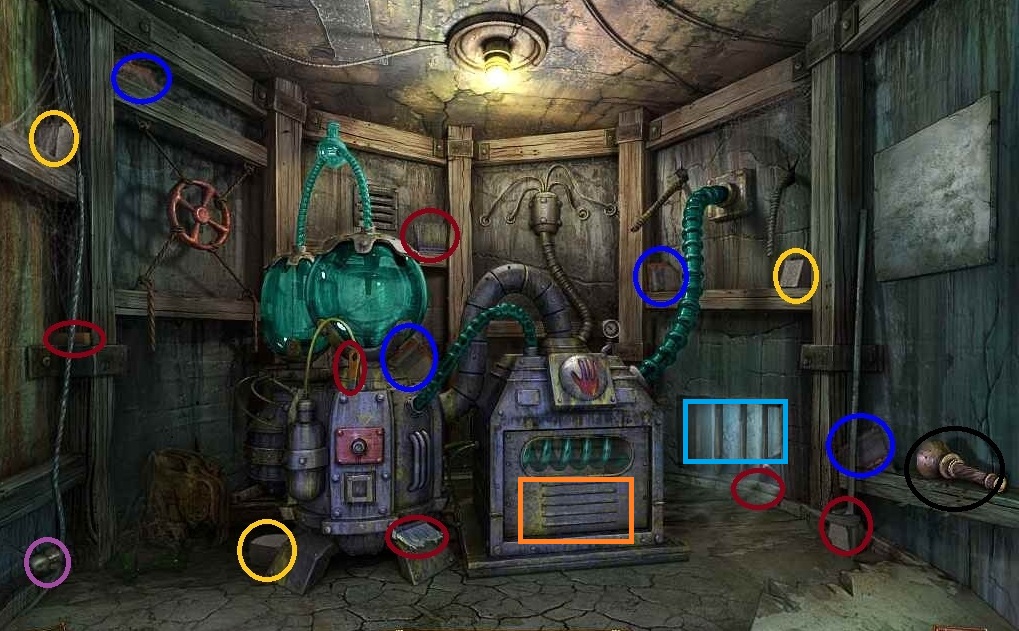
- Pick up PICKAXE pieces (red)
- Pick up AIR PUMP pieces (yellow)
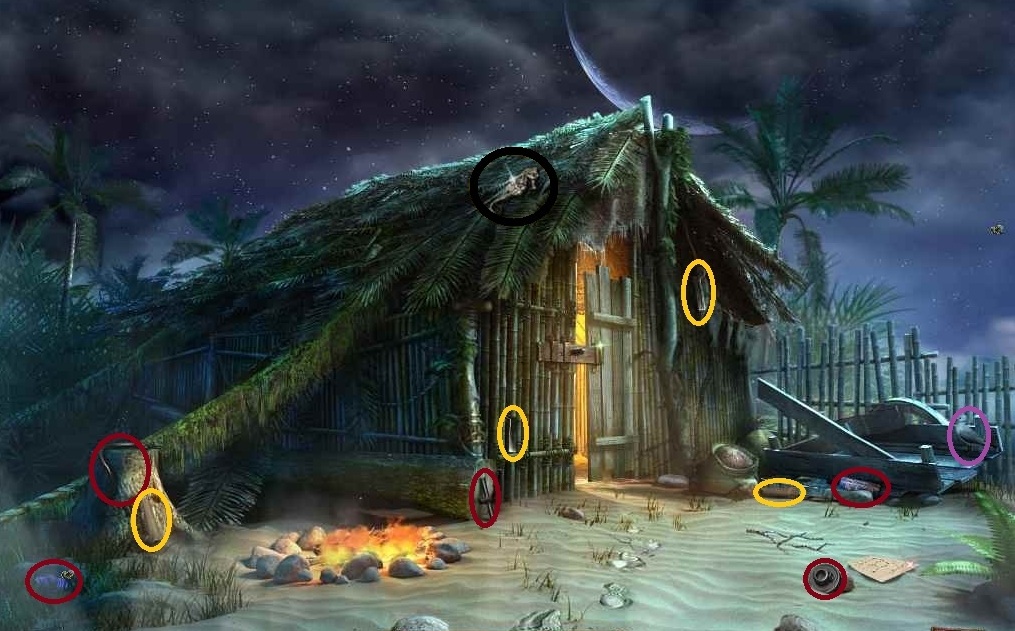
- Pick up MUG pieces (red)
- Pick up SCISSOR pieces (yellow)
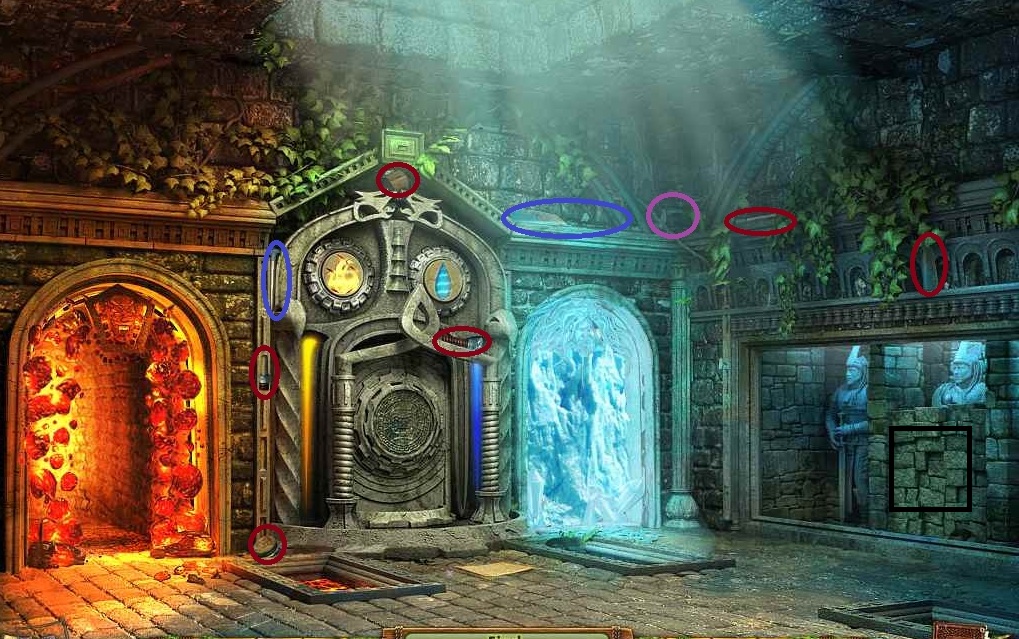
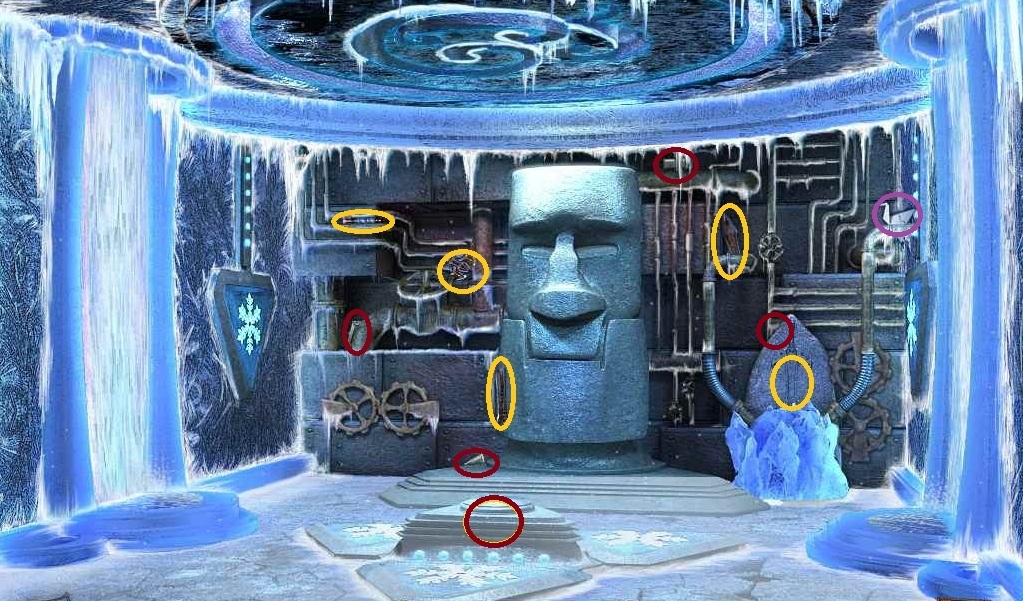
- Use PICKAXE on the frozen blue door.
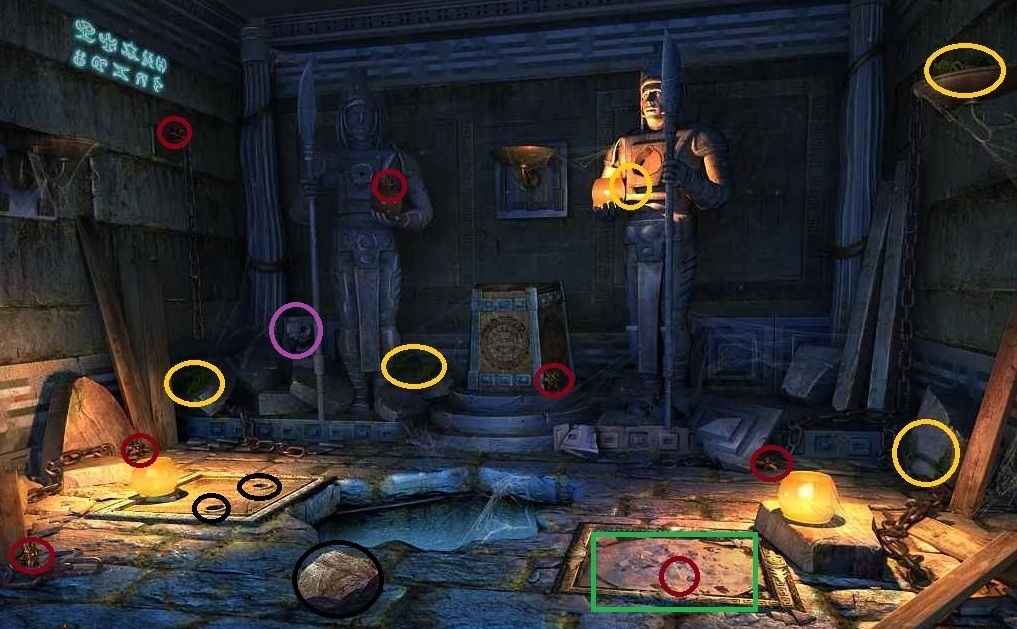
- Pick up last piece of SLEDGEHAMMER
- Use SLEDGEHAMMER on the stone blocking the middle Ancestral Warrior (to the right)
- Click on the stone 4-FINGERED HAND a few times to obtain it
- Click on center pedestal. Pick up silver brick.
- Pick up SWORD pieces (yellow)
- Place completed SWORD on the stone that has the sword shape.
- Pick up SILVER BRICK behind that stone.
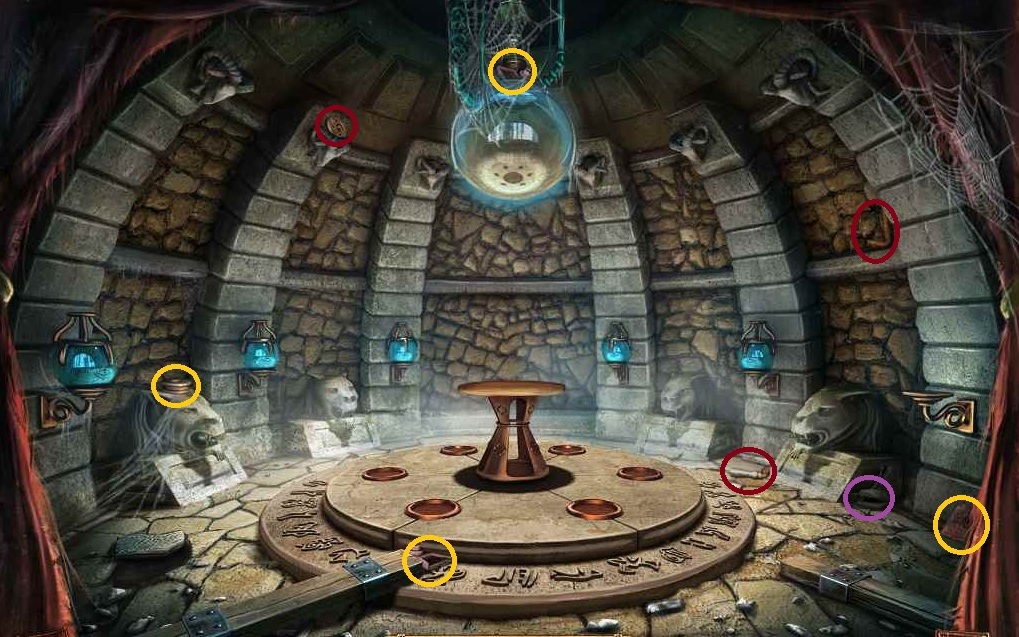
- Place MUG under the waterfall on the left to get a MUG WITH WATER.
- Click on center pedestal again and pour the water in the raindrop shaped hole.
- Click on the sword to release the freezing air.
- Pick up the frozen WATER SYMBOL from the center pedestal.
- Pick up SILVER BRICKS (red)
- Drop the SILVER BRICKS in the pot.
- Click the two X-SHAPED HANDLES to turn the pot.
- Use 4-FINGERED HAND on the handprint.
- Pick up the FIRE SYMBOL
- Place the FIRE and WATER SYMBOLS
- Pick up the GHOST SHIP model.
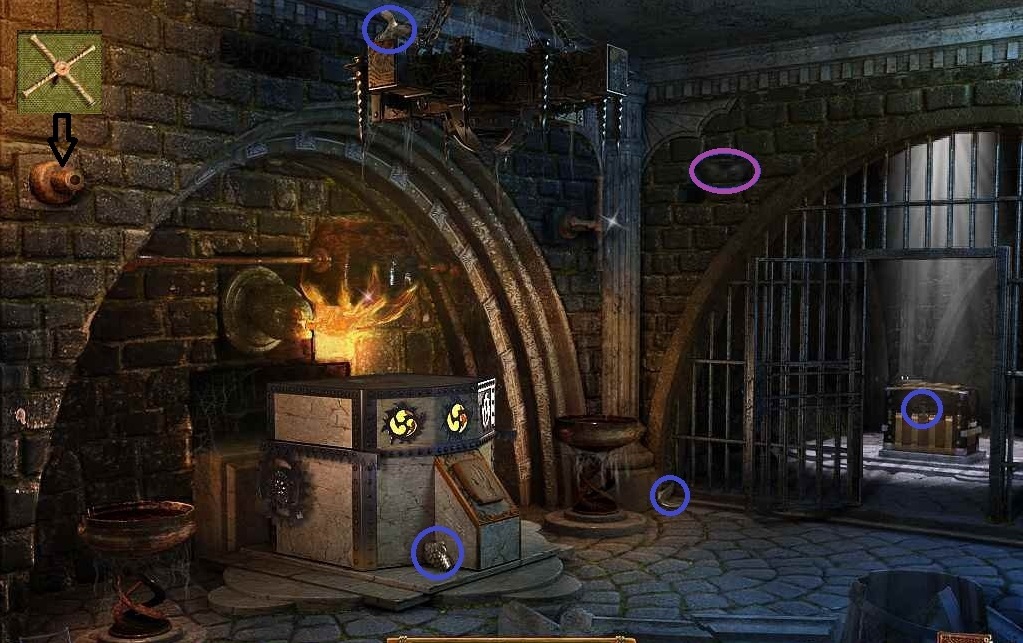
- Place the WOODEN WRITER in his room and receive OILER
- Place OILER under the blue oil barrel.
- Click on the red handle to receive a FILLED OILER
- Pick up FIRE EXTINGUISHER
- Click on the door and use the OILER on the metal bar
- Use FIRE EXTINGUISHER on the fire.
- Pick up the GLUE pieces (yellow)
- Pick up SHIP'S WHEEL pieces (black)
- Pick up BROOM pieces (brown)
- Pick up SPONGE pieces (blue)
- Pick up RUBY (red)
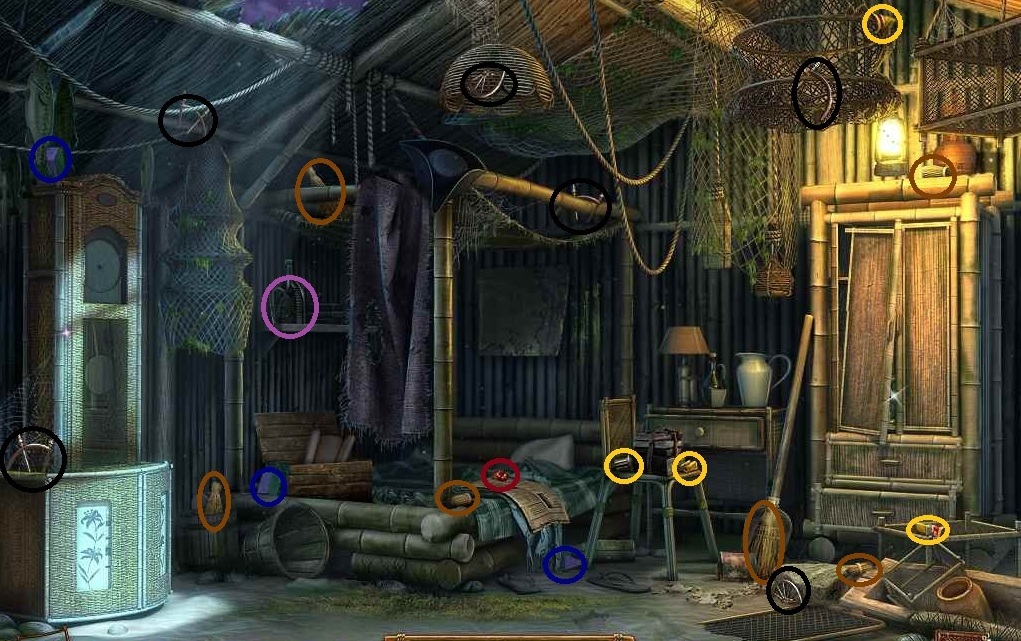
- Place RUBY in the statue.
- Pick up last SCISSORS piece and KEY
- Use KEY on the chest.
- Pick up last RAKE piece
- Use the RAKE on the fire ash to dig out the SEAHORSE
- Click on the doors to the wardrobe on right.
- Use the BROOM to clear off the cobwebs.
- Use SCISSORS on the boots to get RUBBER PATCH
- Place AIR PUMP on deflated raft
- Click on the hole in the raft. Use the GLUE and then the RUBBER PATCH on the hole.
- Click on AIR PUMP to inflate the raft.
- Click on the raft to drop it in the water.
- Pick up the HOUR HAND that was underneath the raft
- Place the FISH and SEAHORSE to open the closet
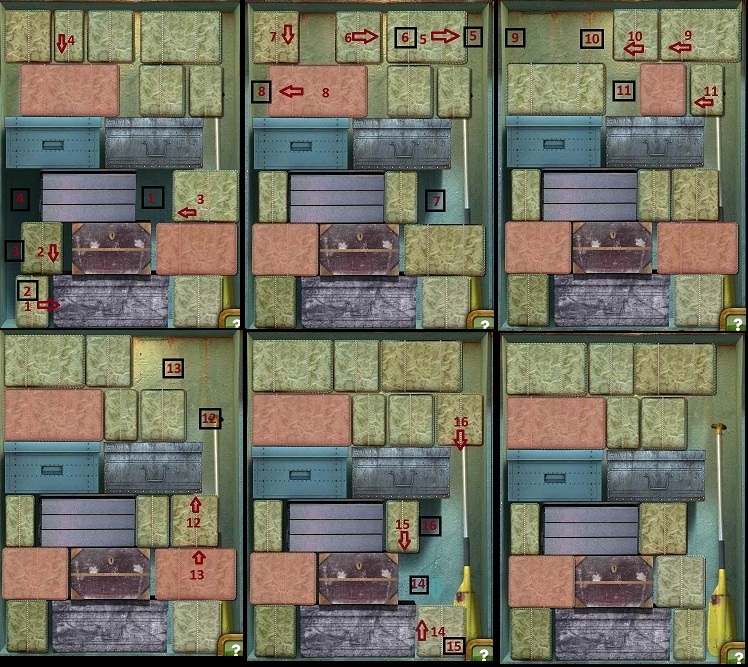
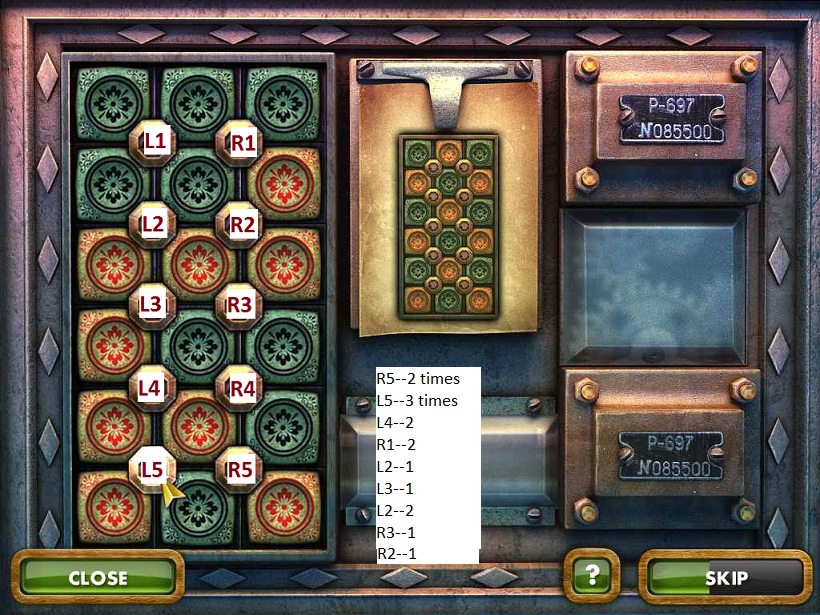
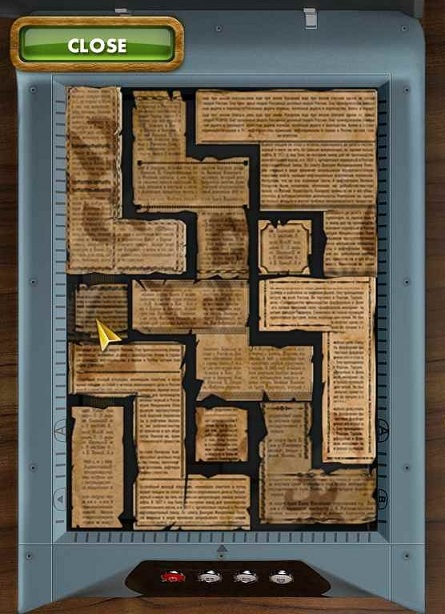
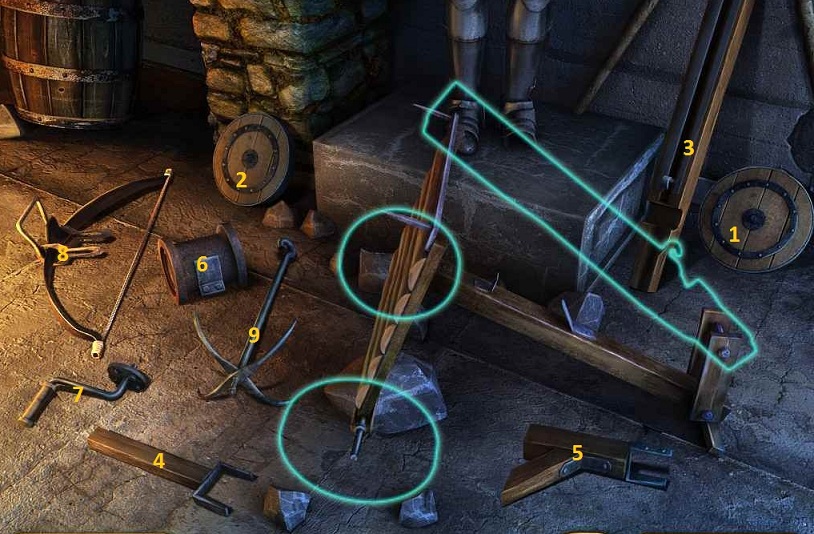
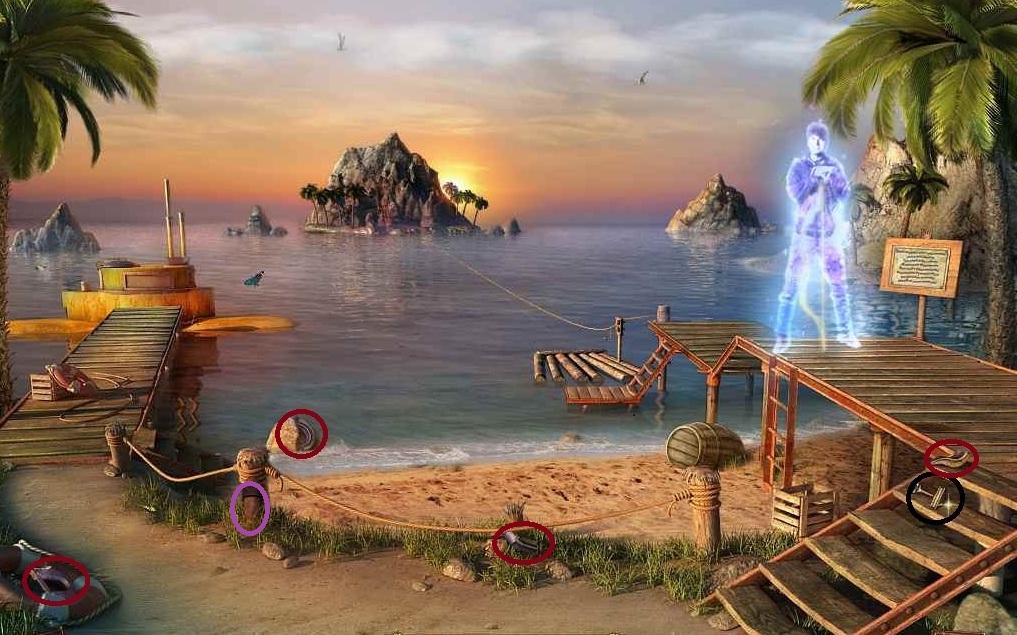
- Retrieve the OAR by rearranging the boxes
- See image for solution.
- Move boxes in number order in the direction of the arrow the location indicated by the same number surrounded by a black box.
- Put the 2 OARS in the boat
- Click on boat.
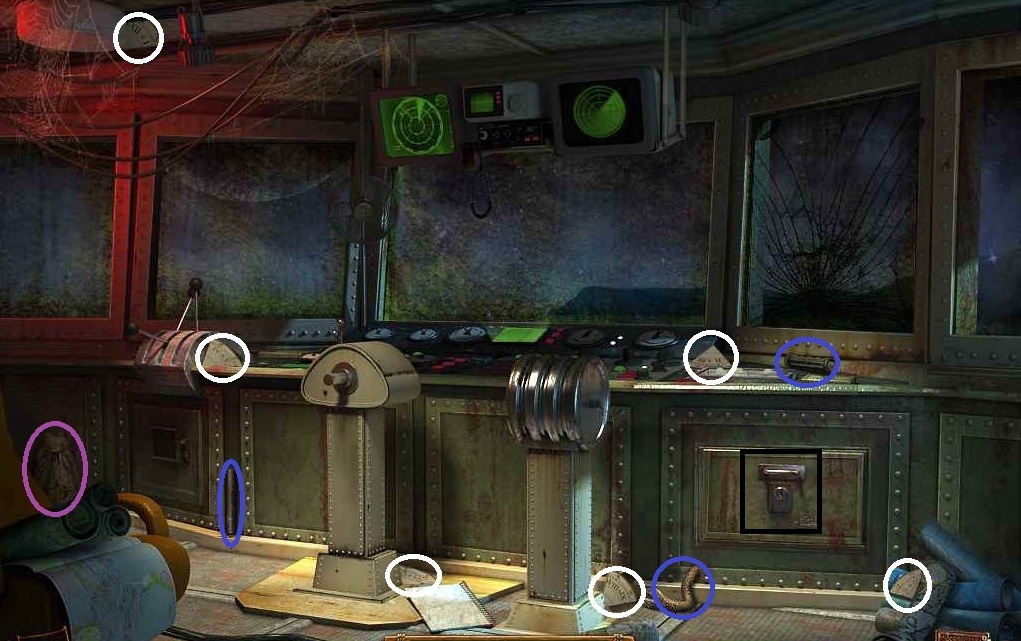
- Pick up CLOCK FACE (white)
- Pick up CROWBAR (blue)
- Place SHIP'S WHEEL
- Note time on the locked storage door
- Open crate with CROWBAR
- Retrieve MINUTE HAND
- Place 3 clock parts onto the clock and set to 4:30.
- Pick up the KEY and the last SPONGE piece from under the clock
- Use GLASS CLEANER on the window and then the SPONGE
- Use the KEY to open the storage
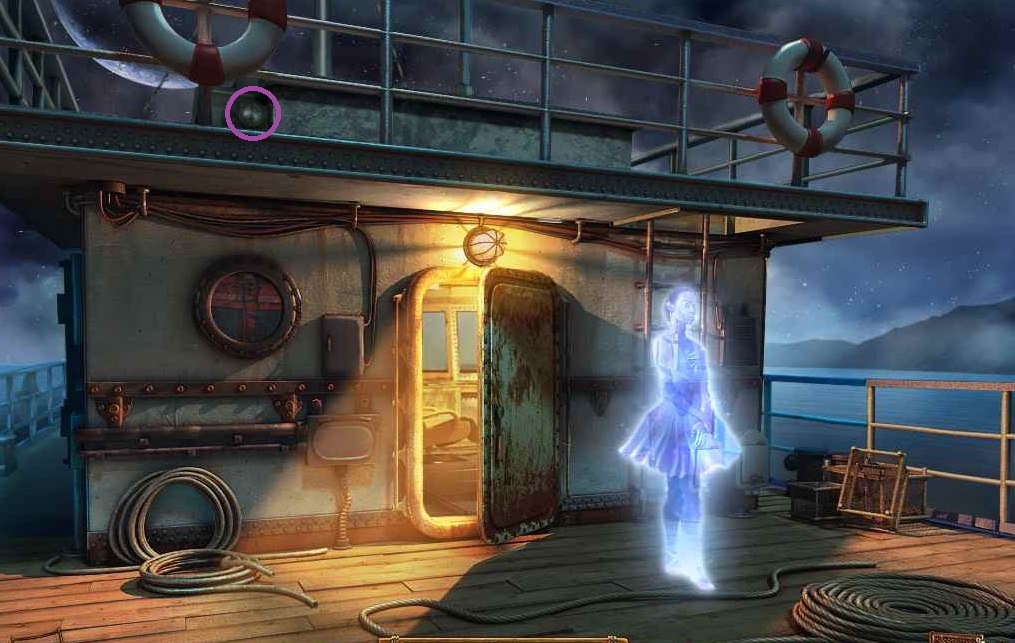
- Pick up the BALLET SHOES
- Give BALLET SHOES to the BALLET DANCER on the deck.
- Place the BALLET DANCER in her room on the ship.
- Pick up the LEVER.
- Place the LEVER on the column to the right of the WHEEL.
- Click on it and you will be taken to the next area.
Southern Coast of the Island
Show/Hide
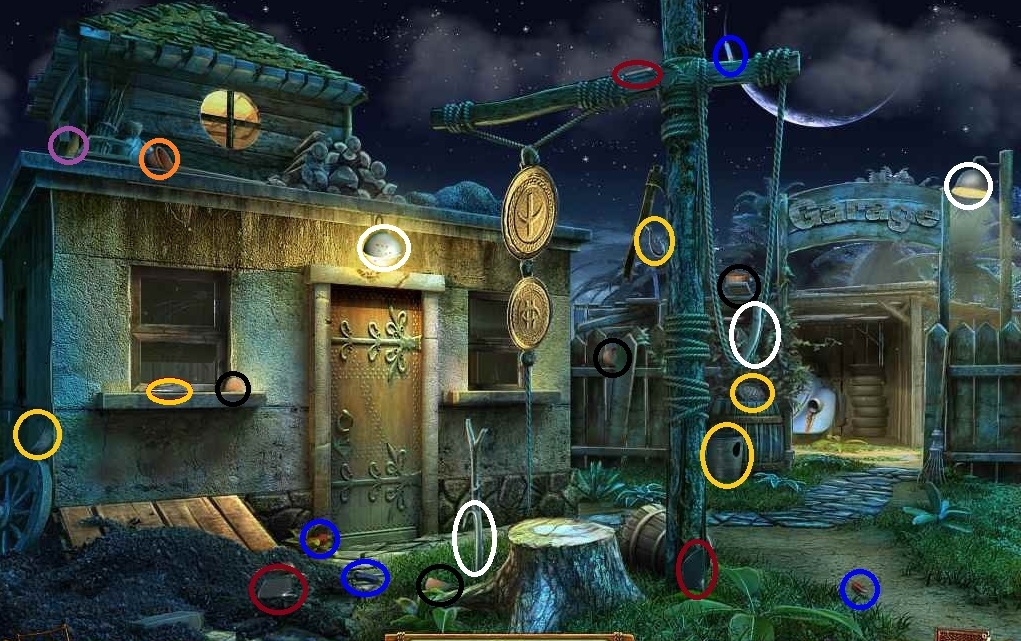
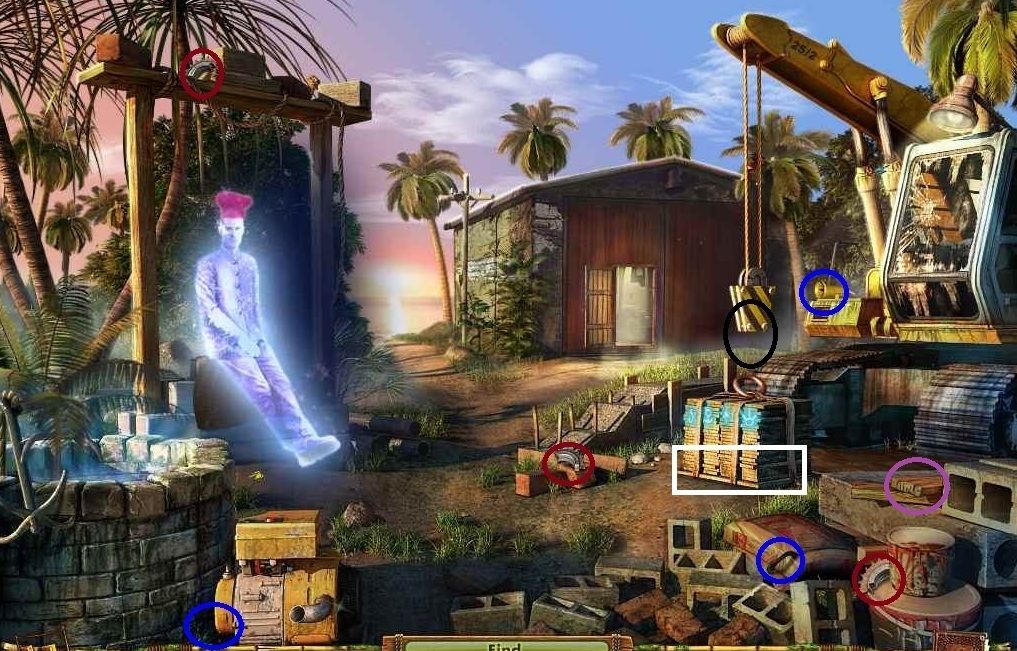
SOUTHERN COAST
- Pick up the PROP to the left of the VIOLINIST (black)
- Pick up the RUNE (red)
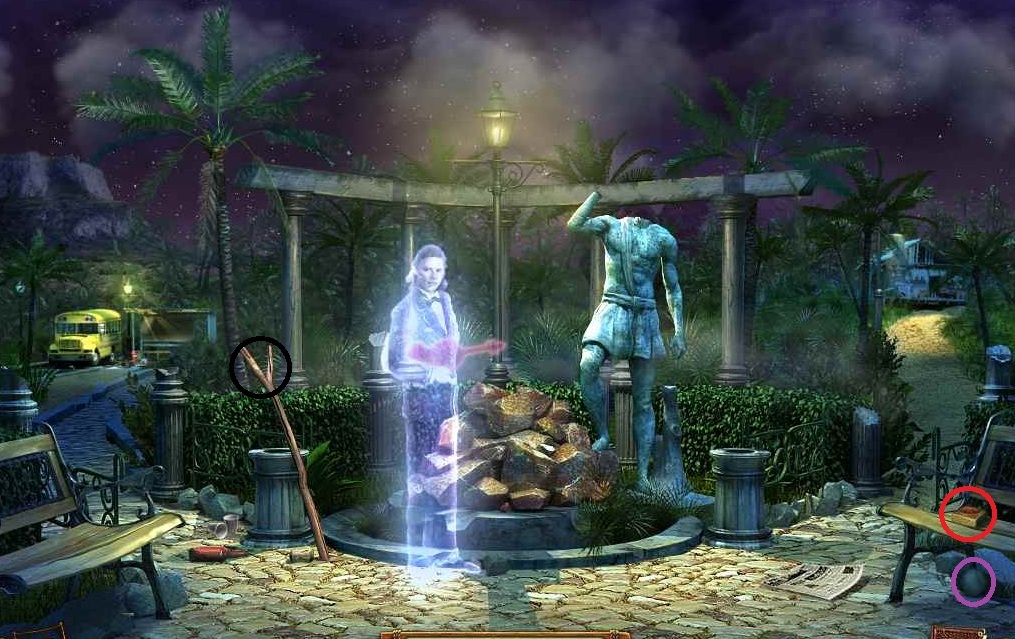
- Use the PROP to hold open the hood of the bus.
- Pick up RED CAR pieces (red)
- Pick up LADDER pieces (yellow)
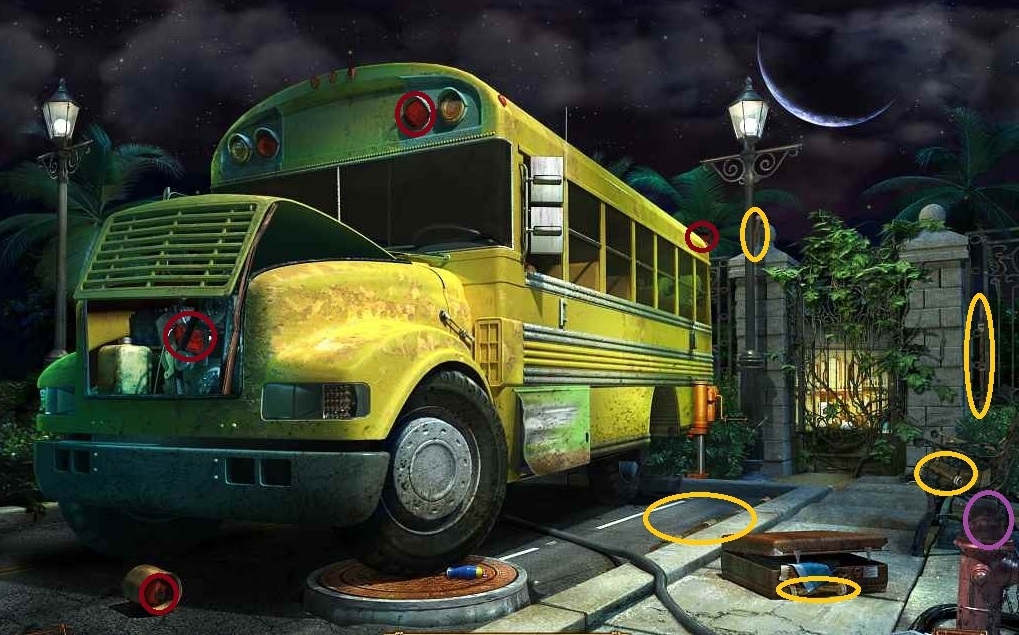
- Pick up NUTS (yellow)
- Pick up RUNE (red)
- Pick up STATUE FRAGMENTS (white, blue)
- Pick up PRUNING SHEARS (red)
- Pick up ELECTRIC SCREWDRIVER (yellow)
- Solve and pick up the KEY
 Put the RED CAR onto the puzzle on the wall
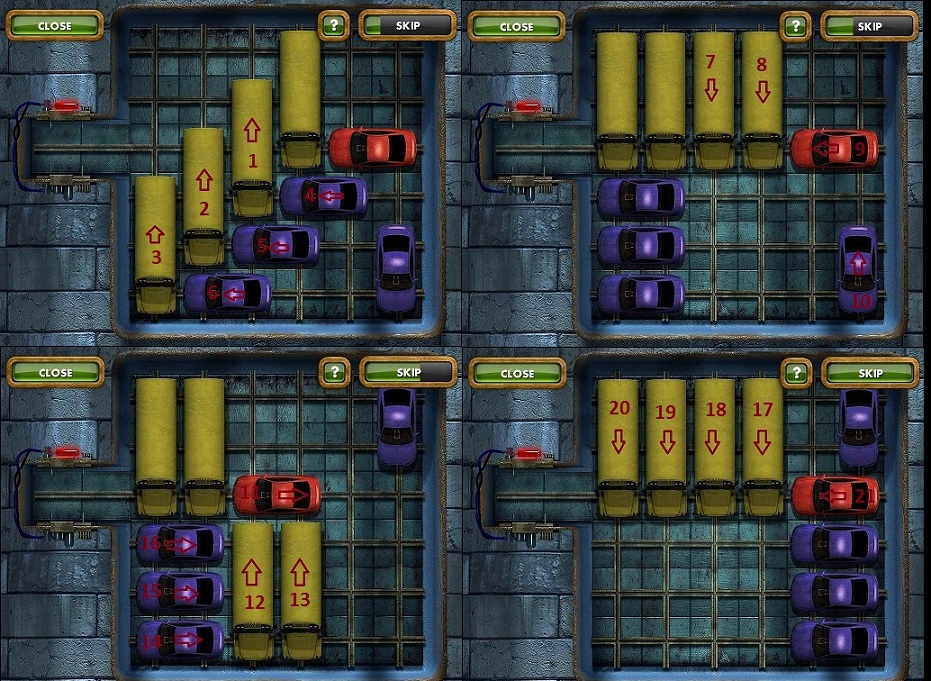
- Use the PRUNING SHEARS on the vines covering the gate
- Pick up HOOK pieces (yellow)
- Pick up RUNE (red)
- Pick up STORAGE KEY pieces (red)
- Pick up TAPE RECORDER pieces (yellow)
- Pick up PRINTER CARTRIDGES (yellow)
- Pick up MAGNIFYING GLASS pieces (blue)
- Pick up RUNE (red)
- Talk to BELL HOP. He needs 5 musical instruments.
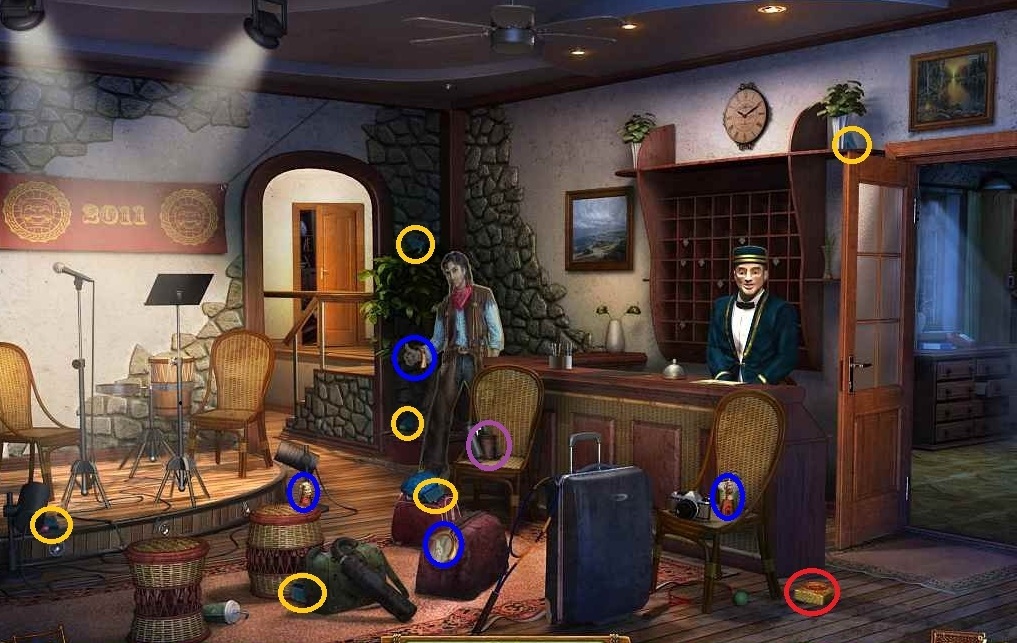
- Pick up the TRUMPET pieces.
- Use STORAGE KEY on side of the BUS
- Pick up TIRE and RUNE
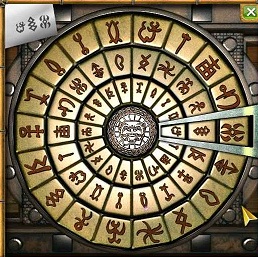
- Click on the GATE
- Place 5 RUNES on the puzzle
- Solve PUZZLE.
- Press buttons as labelled in the order and the number of times listed on the image.
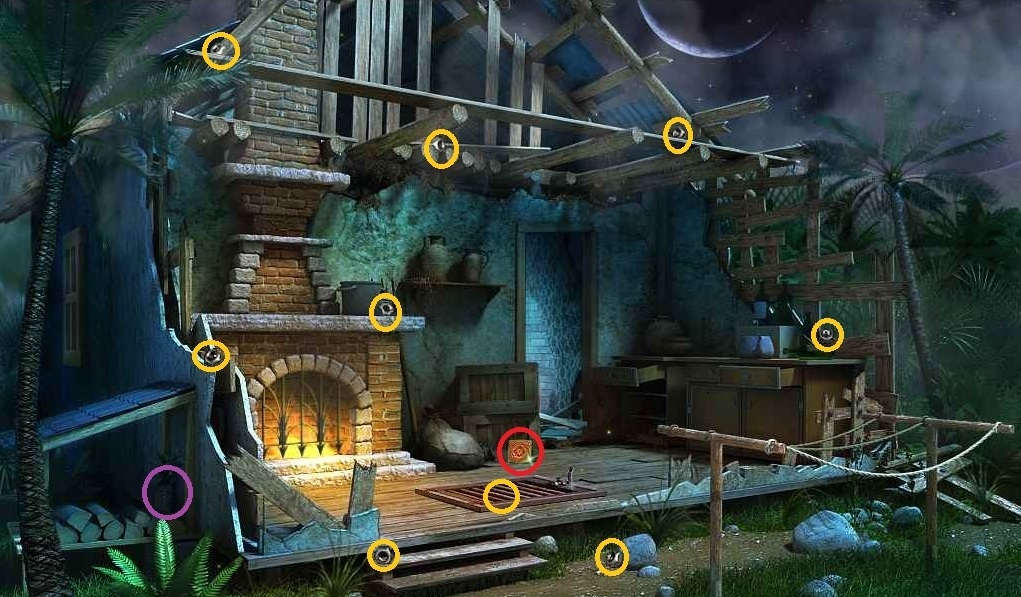
- Pick up WATERING CAN pieces (yellow)
- Pick up SHOVEL pieces (red)
- Pick up DRUM pieces (black)
- Pick up LADLE pieces (white)
- Pick up TIRE IRON pieces (yellow)
- Pick up STATUE FRAGMENT pieces (red)
- Pick up VALVE HANDLE pieces (blue)
- Touch MAGNET to clothesline and use it on the grate to pick up last NUT
- Pick up TAMBOURINE pieces
- Pick up BANJO pieces
- Put on the TIRE, NUTS, and use TIRE IRON
- Remove the JACK
- Click on front window of the BUS.
- Place the KEY in the ignition and click on it to start the bus.
- Pick up the SCREWDRIVER
- Use HOOK on manhole cover
- Pick up last LADDER piece
- Place ladder on the side of the house to the left of the door
- Pick up last DRUM piece
- Use SCREWDRIVER on mailbox
- Pick up last piece of VALVE HANDLE
- Place 3 STATUE FRAGMENTS
- Click on manhole
- Place VALVE HANDLE and turn it
- Fill WATERING CAN
- Place JACK on fire grate and click on the handle
- Use FULL WATERING CAN on fire
- Pick up the VIOLIN
- Give the VIOLIN to the VIOLINIST
- Place VIOLINIST in the WOODEN SHIP and pick up a HAMMER
- Use HAMMER on the upper window to pick up a KEY and last SHOVEL piece
- Use SHOVEL on the dirt outside the house to uncover a door closed with WIRE
- Use KEY to enter the house
- Turn on LIGHT by pulling on the cord
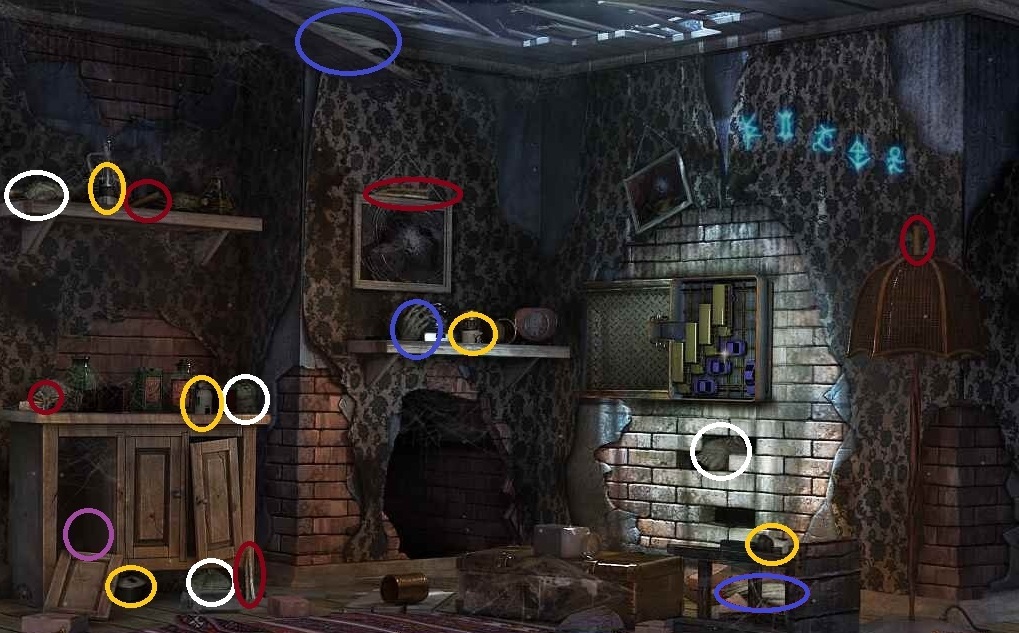
- Pick up ACCORDION pieces (red)
- Pick up BUTTERFLIES (yellow)
- Pick up PLATE pieces (blue)
- Put the 5 instruments on the stage
- Get the ACCESS CARD from the manager
- Pick up SNAKES (yellow)
- Pick up pieces to TERRARIUM COVER (red)
- Place SNAKES in the TERRARIUM and place the COVER on top
- Pick up CORKSCREW pieces (white)
- Pick up BALLET DANCER pieces (blue)
- Place Ballet DANCER on music box and pick up SCISSORS
- Use ACCESS CARD on the locked case
- Use the SCISSORS on the package
- Use CORKSCREW on bottle
- Pick up SCRAPS OF PAPER
- Pick up OIL LAMP pieces (yellow)
- Pick up KEYBOARD pieces(blue)
- Pick up MOUSE pieces (red)
- Open on SCANNER (black)
- Place SCRAPS OF PAPER on the SCANNER; do SCANNER PUZZLE
- Place MOUSE on mouse pad beside the COMPUTER
- Place KEYBOARD just below the COMPUTER
- Start the COMPUTER by pressing the BLUE button; it will overheat
- Click on COMPUTER
- Use ELECTRIC SCREWDRIVER to take side panel off and click on the side panel.
- Click on the red hot innards and you will get a now need to find the FAN blades
- Place the FAN blade on the white fan.
- Press the RED BUTTON on the fan and then the BLUE BUTTON on the Computer.
- Click on the COMPUTER screen and then press the SCANNER button on the right.
- Place the PRINTER CARTRIDGES in the printer. Just put the cartridges in the right places. This is not a puzzle.
- Now you need to find paper.
- Place OIL LAMP in the dark hole. Pick up PLIERS.
- Use the PLIERS on the wire on the door.
- Pick up PAPER pieces (red)
- Pick up POLYNESIAN DICTIONARY (black circle) and then piece of PAPER behind it.
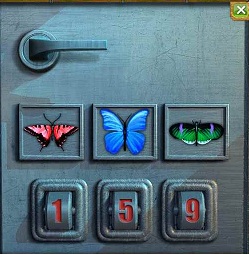
- Place BUTTERFLIES on the board (green box) When finished this will copy into your book.
- Click on safe to get last piece of PLATE
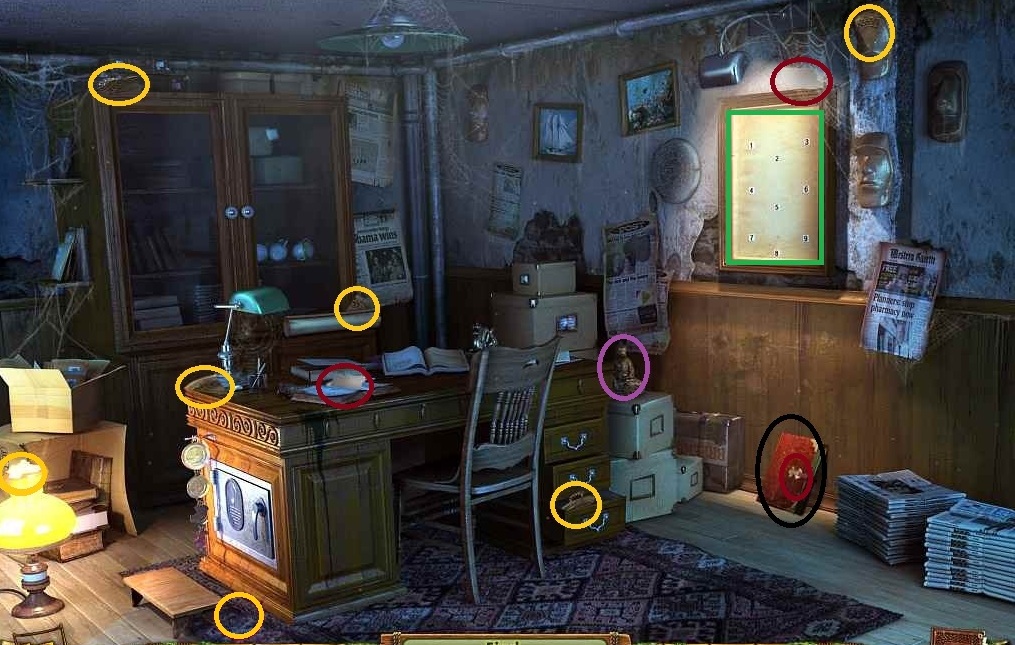
- Match the butterfly shapes on the SAFE to the ones in the book and enter those nnumbers
-
Open safe to pick up SPYGLASS
- Give the SPYGLASS to the ghost outside. Put him in the SHIP and receive an AUDIO TAPE.
- A piece of paper will be dropped on the ground. Use the MAGNIFYING GLASS on it to copy some symbols into your book. These codes are the same symbols as the plates.
- Hang the two PLATES under the others.
- Put the PAPER in the PRINTER.
- Click on the COMPUTER screen and the print button to the right.
- Click on the printout to see symbols that are copied into your book.
- Use the code just received to open the chest.
-
Pick up the PAINTING and the last piece of the TAPE RECORDER
- Give the PAINTING to the ARTIST
- Return him in the ship and you will get a KEY.
- Place the TAPE RECORDER on the stump underneath the plates
- Press the open button on the right.
- Place the TAPE in the TAPE RECORDER
- Click on the top to close it.
- Press the red record button.
- Now you need a MICROPHONE so return to the HOTEL LOBBY and get it from the stage.
- Place the MICROPHONE on THE TAPE RECORDER
- Click on the TAPE RECORDER and click on the red record button again.
- Take the LADLE to hit the PLATES in the order written down in your book. From the top, it is 2, 1, 3, 4.
- Pick up the TAPE RECORDER
- Place the TAPE RECORDER on the stool by the safe.
- Press the green play button.
- Open the safe and pick up the NOTE. You now need to find a car to get to the shaman's house, fast.
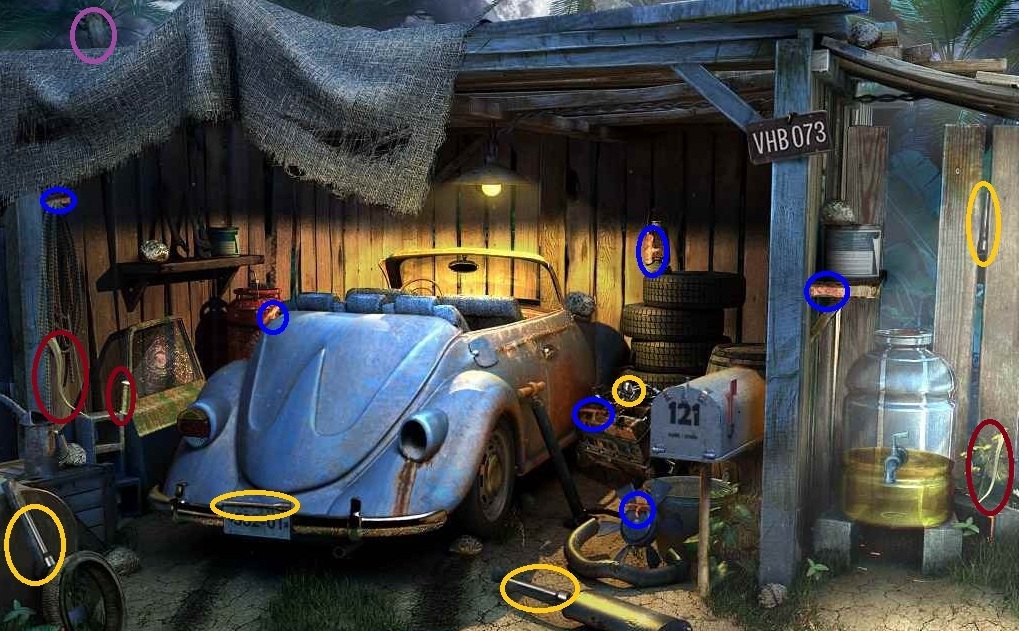
- Click on front window to discover the key is broken/gone.
-
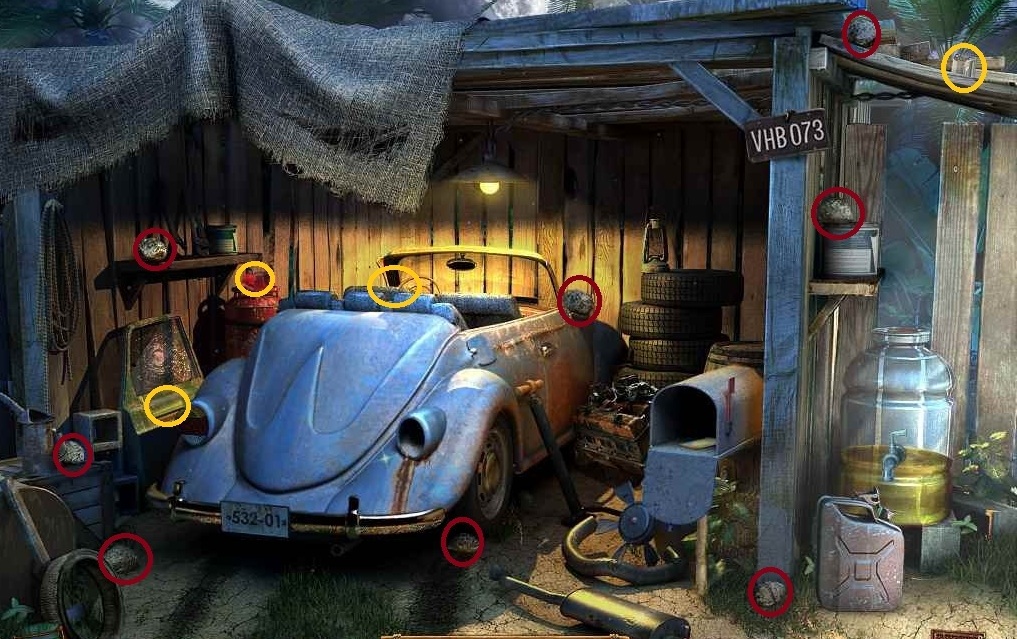
Pick up the GAS CAN pieces.

-
Pick up FUNNEL pieces

- Place GAS CAN underneath the gasoline. Click on the spigot and you will need to find STONES.
- Find STONES (red)
- Find TAILLIGHT pieces (yellow)
- Click on the front seat area of the car and then click on the glove box to get the last TAILLIGHT piece.
- Drop the STONES in the gas.
- Click on the spigot.
- Fill the GAS CAN
- Click on the fuel door of the car.
- Place the FUNNEL in the fill tube.
-
Pour the GAS into the tank.
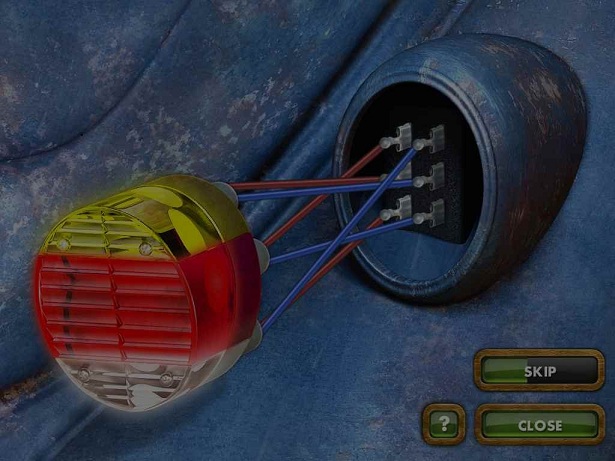
- Put the TAIL LIGHT in its spot.
- Do the PUZZLE to reconnect the light.
- Place the KEY in ignition and go to next location
Central Part of the Island
Show/Hide
BRIDGE
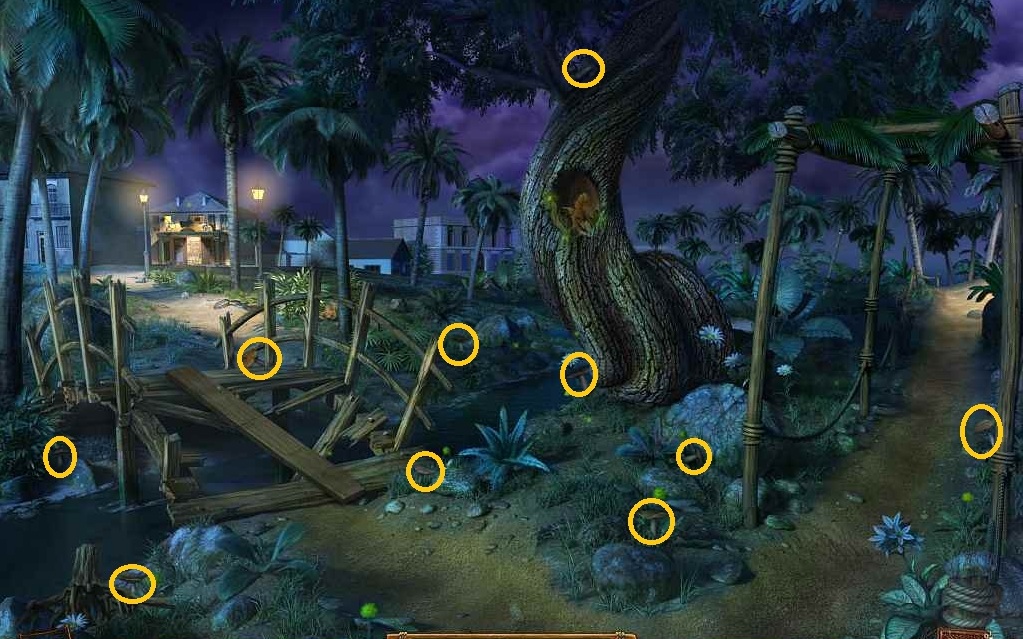
- Pick up LOGS (yellow)
- Pick up SEWING MACHINE pieces (red)
- Pick up CURTAIN pieces (yellow)
- Pick up WIRE CUTTER pieces (blue)
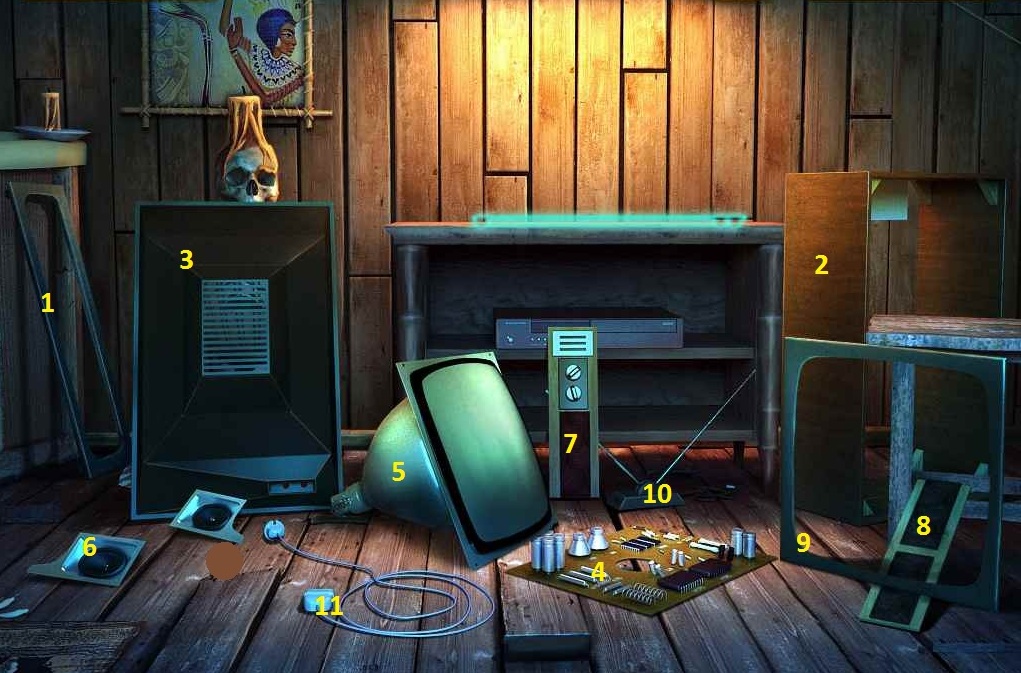
- Pick up TV pieces (yellow)
- Pick up BOOMERANG pieces (red)
- Pick up RAZOR pieces (blue)
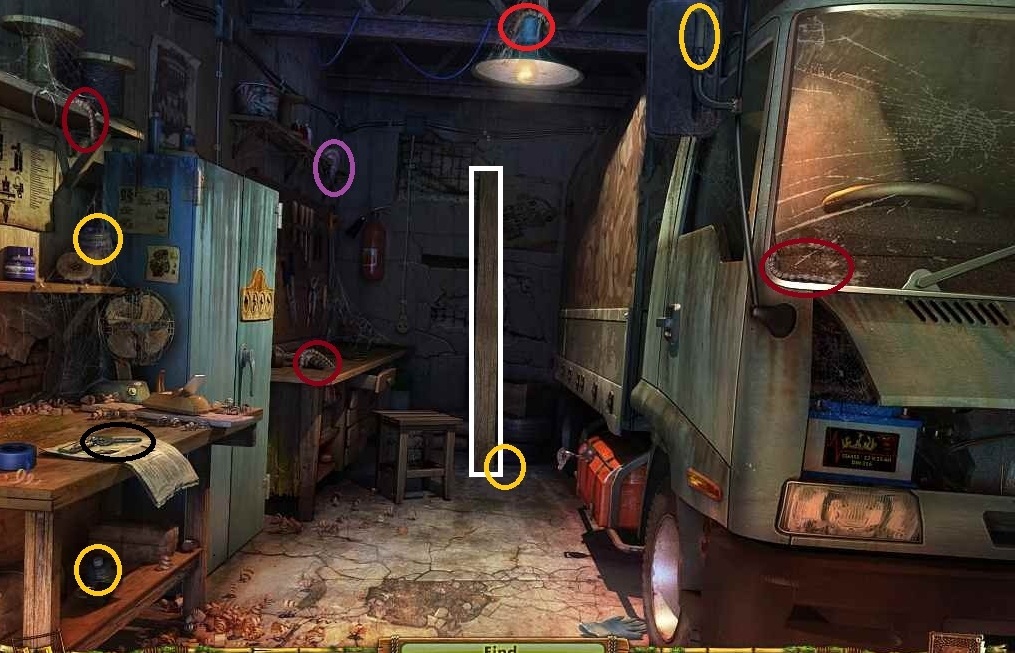
- Assemble the TV
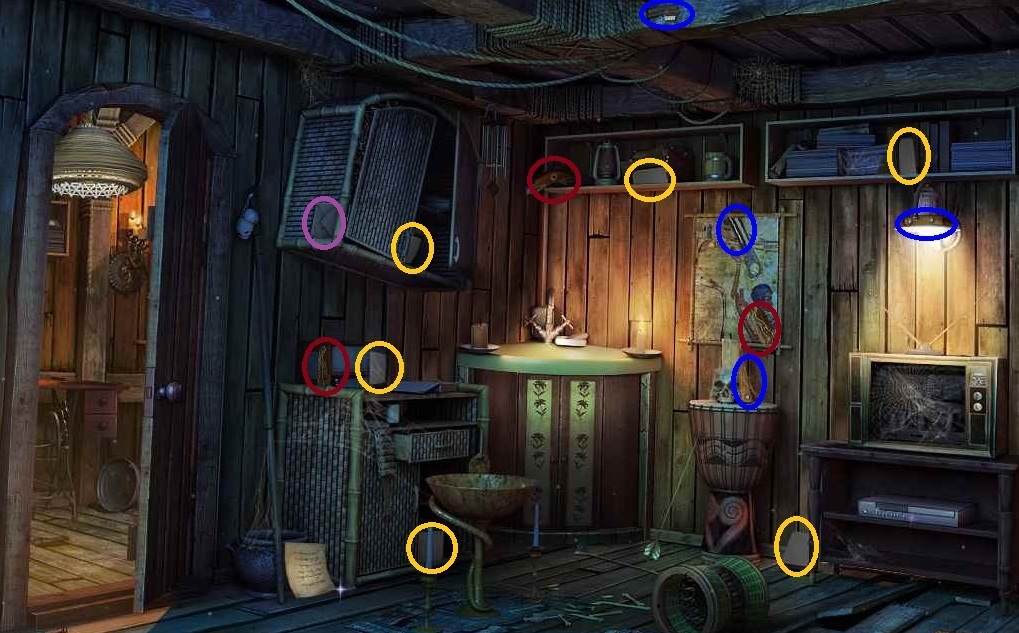
- Place SEWING MACHINE on table. Pick up THREAD and put it on the SEWING MACHINE. (black circles)
- Put LOGS in fireplace
- Pick up SAW pieces (yellow)
- Pick up VIDEOTAPE pieces (blue)
- Pick up GLASS CUTTER pieces (red)
- Use the BOOMERANG on the COCONUTS.
- Pick up last piece of WIRE CUTTER and MATCHES
- Use MATCHES on the LOGS
- Pick up last piece of SAW in the upper part of the fireplace (green)
- Use the SAW on the cart to get a PLANK
- Place the PLANK on the BRIDGE.
- Pick up HAMMER pieces (yellow)
- Pick up MASK pieces (red)
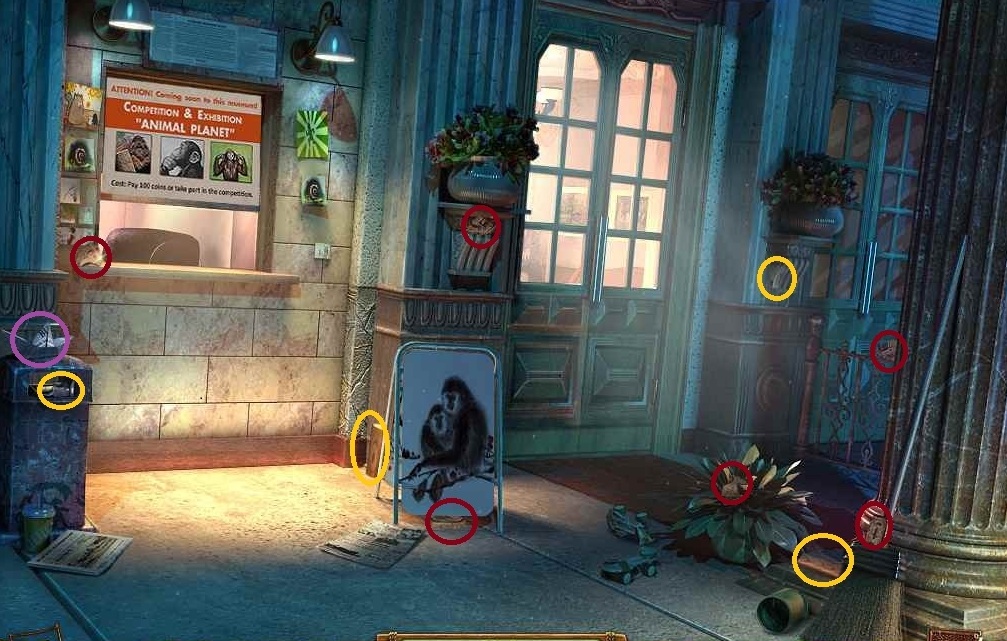
- Pick up SHOVEL pieces (yellow)
- Pick up WEIGHTS (red)
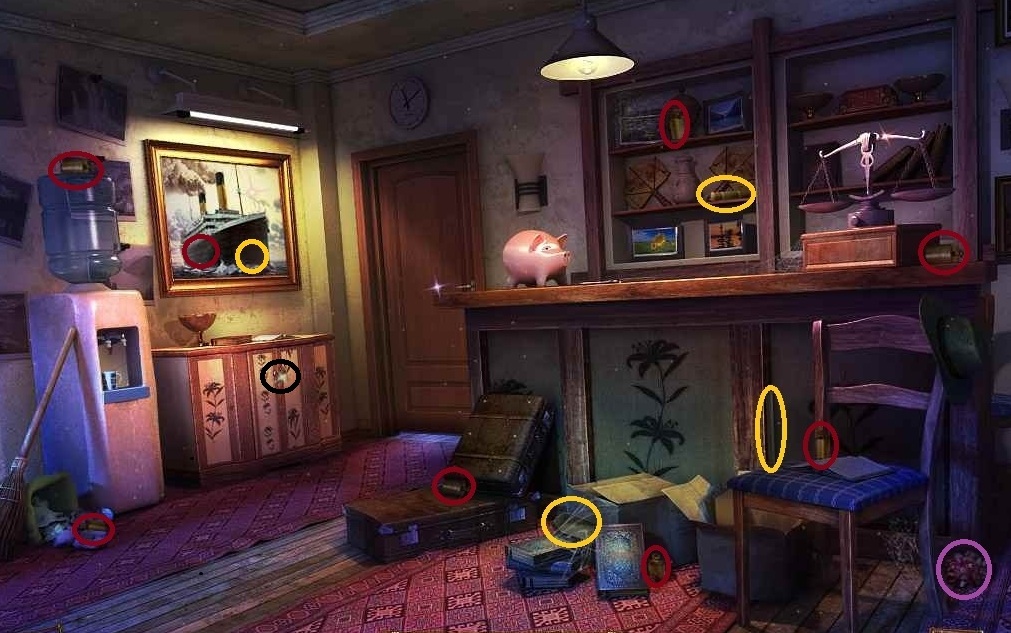
- Use HAMMER to break PIGGY BANK and pick up KEYS
- Use KEYS to open cabinet to the left of the door (black)
- Pick up PAPERCLIP and PAINT
- Use PAPERCLIP to pick the lock on the door
- Pick up INSTANT CAMERA pieces (red)
- Pick up white HAT (black)
- Pick up black HAT (yellow)
- Pick up FLASH DRIVE (green)
- Click on the camera. Click on the cover of the camera. Place the FLASH DRIVE in the camera.
- Put 2 HATS on the monkeys.
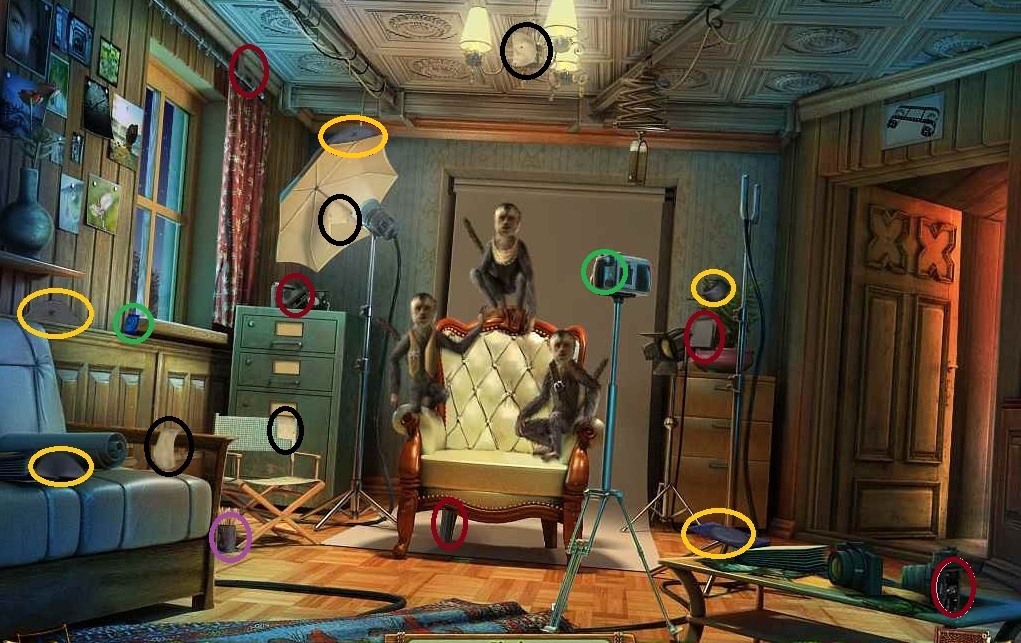
- Pick up HAT pieces
- Pick up LIGHT pieces (yellow)
- Pick up SAFETY PIN (green)
- Place it on the SEWING MACHINE.
- Pick up fixed HAT
- Put the HATS on the monkeys.
- Hang the LIGHT.
- Put up CURTAIN on the window
- Use PIN to close the curtains
- Click on the camera and take 3 pictures when all 3 monkeys are looking at you.
- Take MONKEY PHOTO to the box office.
- Click on light switch in Foyer, left side.
- Click on light twice.
- Pick up LIGHT BULB.
- Pick lock on door with PAPERCLIP
- Pick up BIRDCAGE pieces (yellow)
- Pick up CAN OPENER pieces (red)
- Pick up STETHOSCOPE pieces (yellow)
- Pick up GLUE (red)
- Pick up TWEEZERS (blue)
- Place BIRDCAGE
- Pick up some GRAIN from the hole in the tree.
- Place the GRAIN in the CAGE
- Pick up the KEY the bird drops next to the CAGE
- Unlock the cabinet
- Pick up the last STETHOSCOPE piece
- Pick up the FLASK
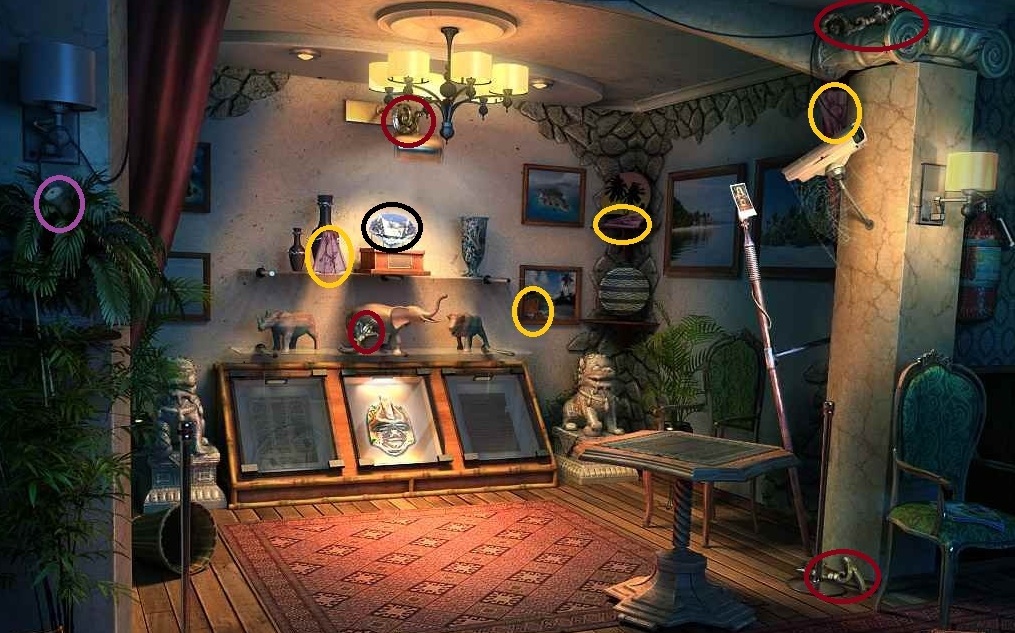
- Take PHOTO of exhibit by placing CAMERA on DIAMOND
- Place GLUE on spear in front of security camera
- Place PHOTO on spear
- Pick up DIAMOND (black)
- Pick up FAN pieces (yellow)
- Pick up CANDLESTICK pieces (red)
- Give DIAMOND to GIRL.
- Place GIRL in ship and receive LAMP
- Use CAN OPENER to cut open the mail box.
- Pick up the recipe and use the DICTIONARY to translate it and place it into the book.
- Pick up MASK pieces
-
Collect MUSHROOMS
- Place CANDLESTICK on the wall in the second room and click on it.
- Pick up last pieces of the VIDEOTAPE and GLASS CUTTER
- Use GLASS CUTTER to get the MASK
- Use a RAZOR on the painting of the Queen Margaret
- Click on safe
- Place STETHOSCOPE on safe
- Turn dials until you hear a loud click and see the stethoscope flash white (random solution).
- Pick up last WEIGHT and last piece of SHOVEL
- Pick up CHISEL.
- Click on water cooler.
- Click on tap to fill cup with water.
- Put PAINT in the water.
- Put LIGHT BULB in the paint and get a RED LIGHT BULB
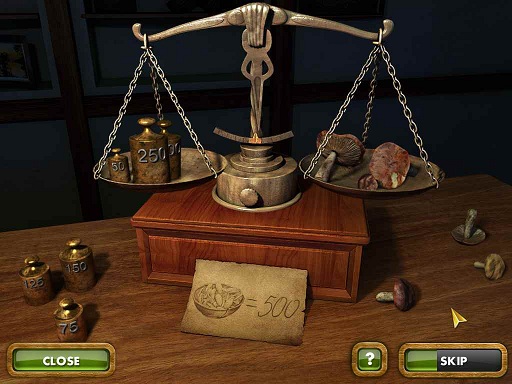
- Place WEIGHTS and MUSHROOMS on SCALE
- Click on SCALE to start PUZZLE
- Find the MUSHROOMS that weigh 200, 250, and 50 grams.
- Receive 500 g MUSHROOMS
- Use SHOVEL to pick up coals from fireplace
- Drop COALS onto the chains locking the grate
- Use WIRE CUTTER to cut the chains.
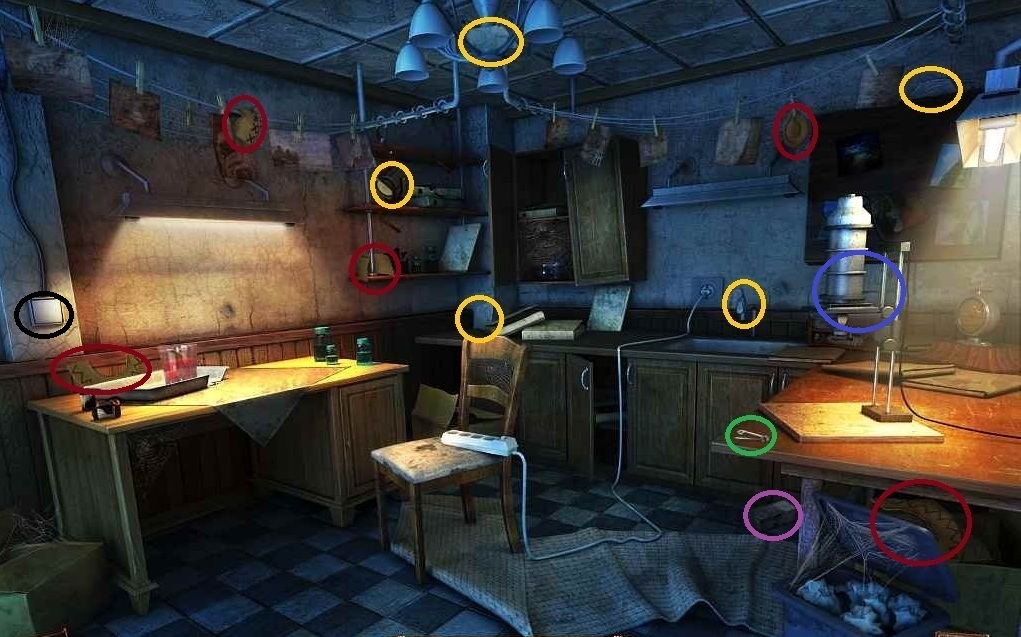
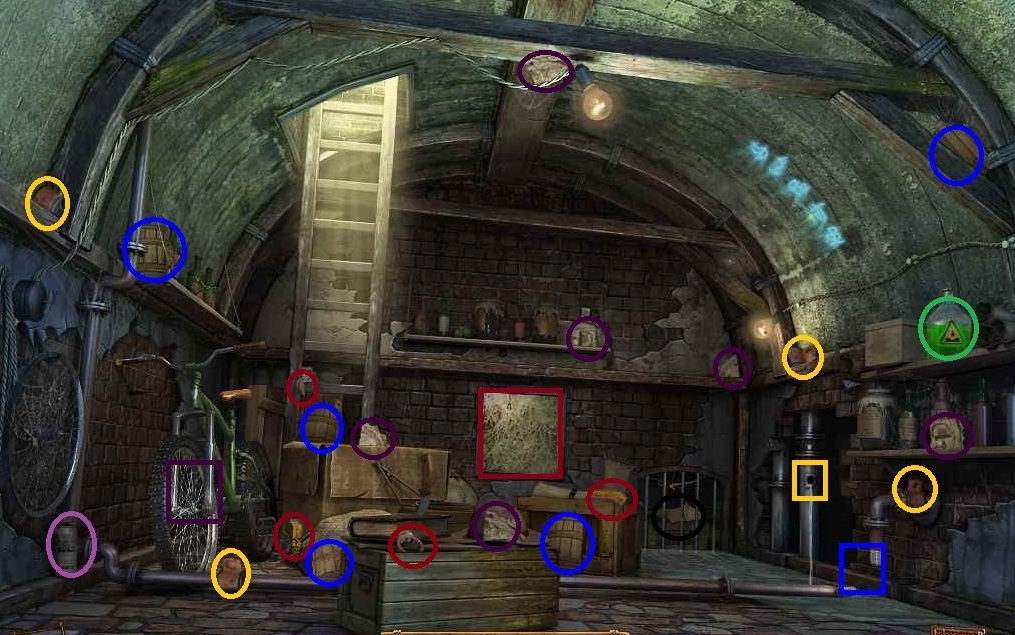
- Pick up PIPE JOINT pieces (yellow)
- Pick up MASK pieces (purple)
- Pick up WRENCH pieces (red)
- Pick up BUCKET pieces (blue)
- Use TWEEZER (forceps) to pick up FADED PAPER (black circle)
- Place the FLASK onto the bottle of green acid (green circle)
- Click on the hole in the pipe and place PIPE JOINT (yellow square)
- Click on bicycle wheel and use WRENCH to remove it. (purple square)
- Place BICYCLE TIRE on the pipes (blue square)
- Click on sinkl
- Click on faucet
- Place BUCKET under the water
- Pick up BUCKET with water.
- Give SCULPTOR ghost the CHISEL, place sculptor in ship, and receive a MASK
- Pick up COCONUT
- Use FAN under the kettle to start the fire.
- Drop WATER, COCONUT, MUSHROOMS, and ACID into the kettle.
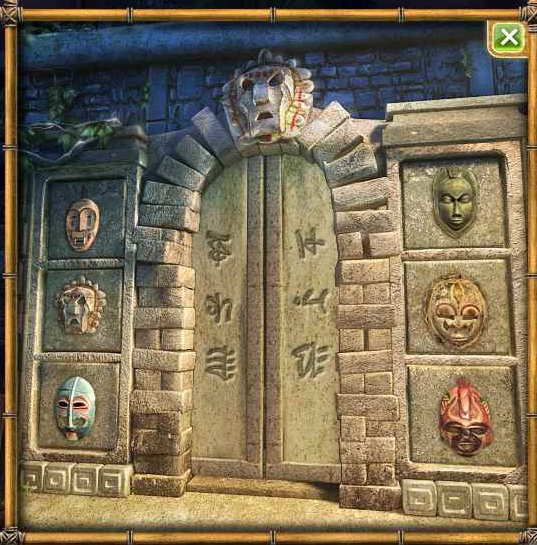
- Hold FADED PIECE OF PAPER over the steam to get the solution for the masks at the temple door.
- Click on PYRAMID DOOR.
- Place the 5 MASKS in the proper place on the door.
- Pick up PLUNGER pieces (yellow)
- Pick up TRAY pieces (red)
-
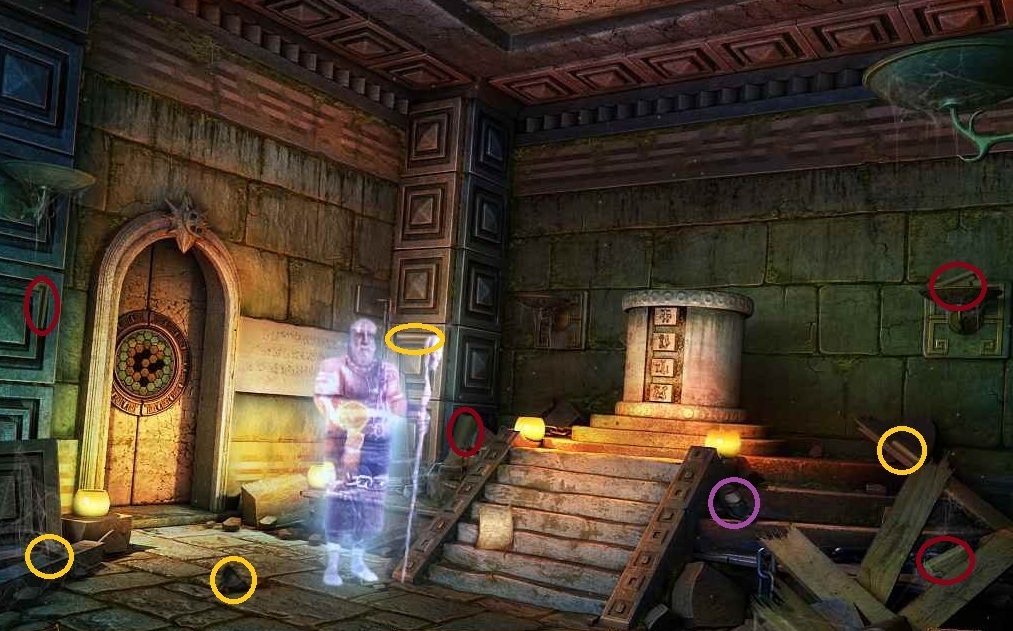
- Place PLUNGER on the dirty mirror (red square)
- Pick up PHOTO NEGATIVE
- Place LAMP on chair
- Place RED LIGHT on LAMP
- Turn light on with switch on wall (black circle)
- Place negative in photo developer (blue circle)
- Use TWEEZER to pick up undeveloped photo
- Place TRAY on table and click on it
- Place PHOTO in tray
- Click on RED FLUID to develop photo
- Code for pyramid pedestal will copy into your book
- Click on pedestal and press the buttons in the proper order (from the top 3, 1, 4, 2)
- Pick up SKULL and give it to the SHAMAN.
- Put the SHAMAN in the ship and receive RUNES
- Pick up 2 STAKES
- Place RUNES on door and solve puzzle
Northern Coast of the Island
Show/Hide
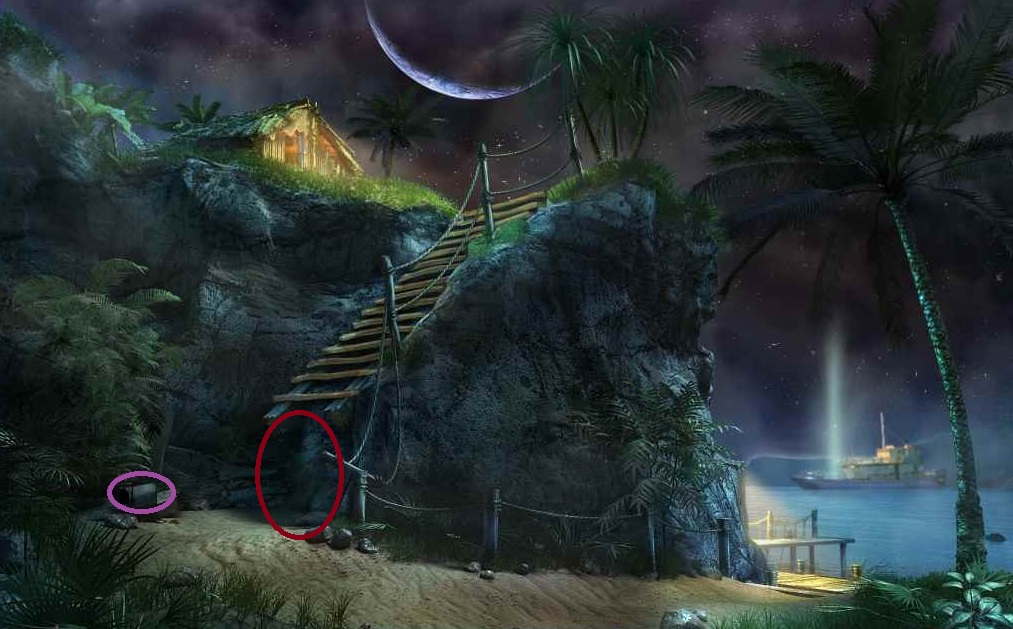
DESCENT
- Pick up LADDER pieces (yellow)
- Pick up STARS (red)
- Drop LADDER in hole
- Place STAKES in ropes
- Pick up ROCK on floor (black circle)
- Use ROCK on STAKES
- Pick up HAMMER pieces (blue)
- Pick up CROWBAR pieces (red)
- Pick up NAILS (yellow)
- Pick up LOG
- Pick up ROPE pieces (red)
- Pick up STATUE'S HEAD pieces (yellow)
- Click on the rocks on top of the big rock until they all fall off.
- Use the LOG to lever the big rock out of the way.
- Pick up last ROPE that was underneath the rock

- Pick up BROOM pieces (red)
- Pick up SWORD pieces (yellow)
- Use BROOM on sand (green box)
- Pick up last STAR
- Note constellation pattern
- Click on door with STARS
- Place STARS
- Match the constellation pattern on the door

- Pick up PULLEY pieces (yellow)
- Pick up HANDLE pieces (red)
- Place HANDLE on wood spool
- Place PULLEY on the ceiling to the left of the other pulley
- Place ROPE on the spool
- Click on HANDLE to pull up wooden door
- Pick up last piece of CROWBAR
- Use CROWBAR on locked chest.
- Pick up last STATUE HEAD piece
- Place STATUE HEAD on statue
- Click on handle of winch attached to battering ram
- Use SWORD to release battering ram to open the door.
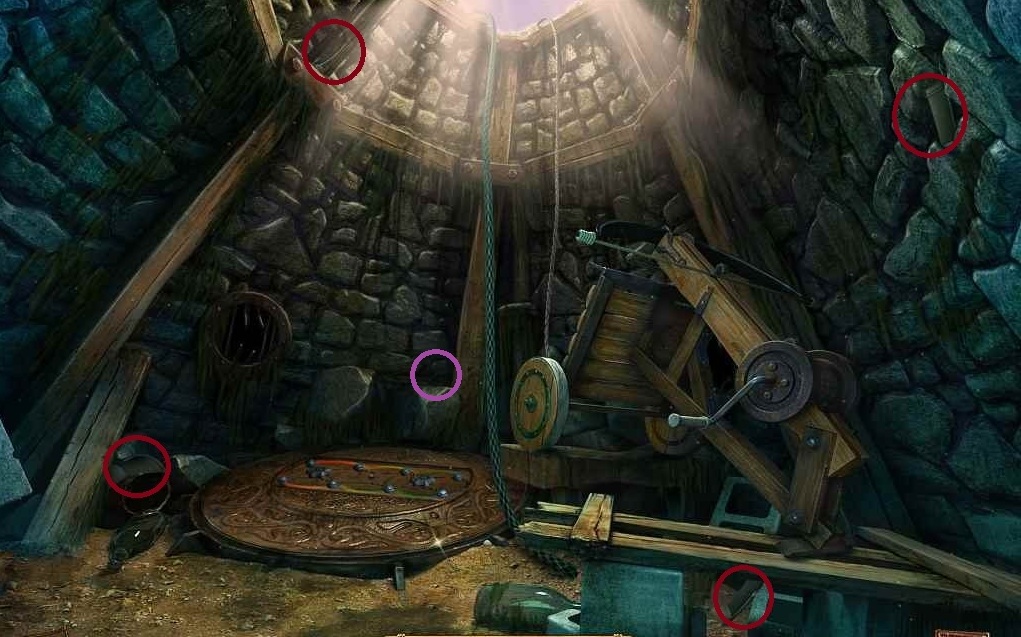
- Pick up WHEEL in the water
-
Fix the catapult (blue square)
- Use CATAPULT to shoot rope up the well
- Climb out.
- Pick up FLASHLIGHT pieces (blue)
- Pick up GEAR pieces (red)
- Pick up HANDLE pieces (yellow)
- Pick up CHAIN pieces (red)
- Pick up PLANK (white box)
- Pick up KEY (black circle)
- Pick up TRIANGULAR KEY (black circle)
- Pick up HOOK pieces (red)
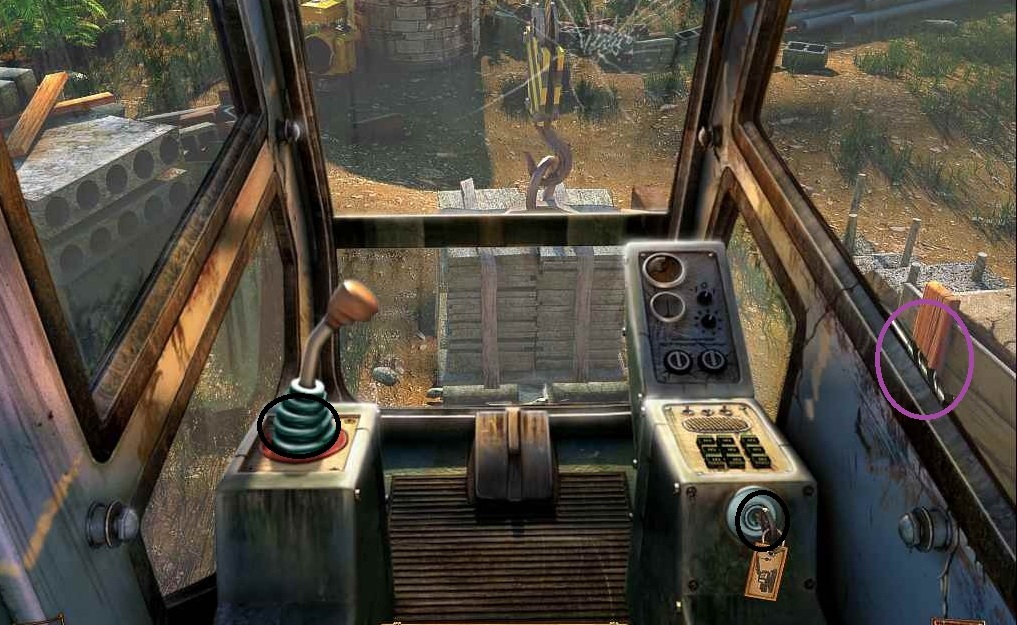
- Place HOOK on crane
- Put the HANDLE on the hole
- Put the KEY in the ignition
- Click on the KEY
- Click on the GEAR SHIFT
- Pick up the CROSS-SHAPED KEY
- Pick up CHEF'S HAT from under the palette (white box)
- Give HAT to COOK, place COOK in ship, and receive a SCREWDRIVER
- Note the symbols from behind the cook; they will go in your book.
- Put PLANK on RAFT.
- Place the NAILS and use the HAMMER
- Place the GEAR on the crank and then the CHAIN
- Pick up MANOMETER pieces (red)
- Pick up SHOVEL pieces (yellow)
- Pick up HACKSAW pieces (blue)
- Click on AIR TANK, place MANOMETER, pick up AIR TANK
- Place FLASHLIGHT on board
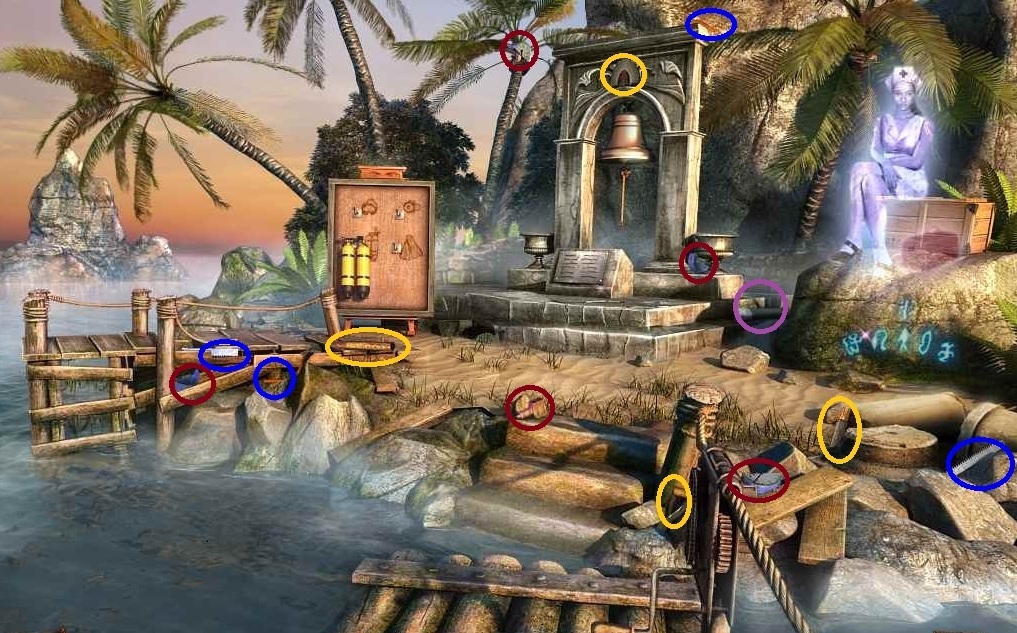
- Use HACKSAW on submarine hatch.
- Pick up FLIPPER pieces (yellow)
- Pick up MASK pieces (red)
- Pick up PICKAXE pieces (blue)
- Place OXYGEN TANK
- Use SCREWDRIVER to remove cover from COMPRESSOR box; it needs a BATTERY
- Click on PUZZLE; it needs 2 BUTTONS
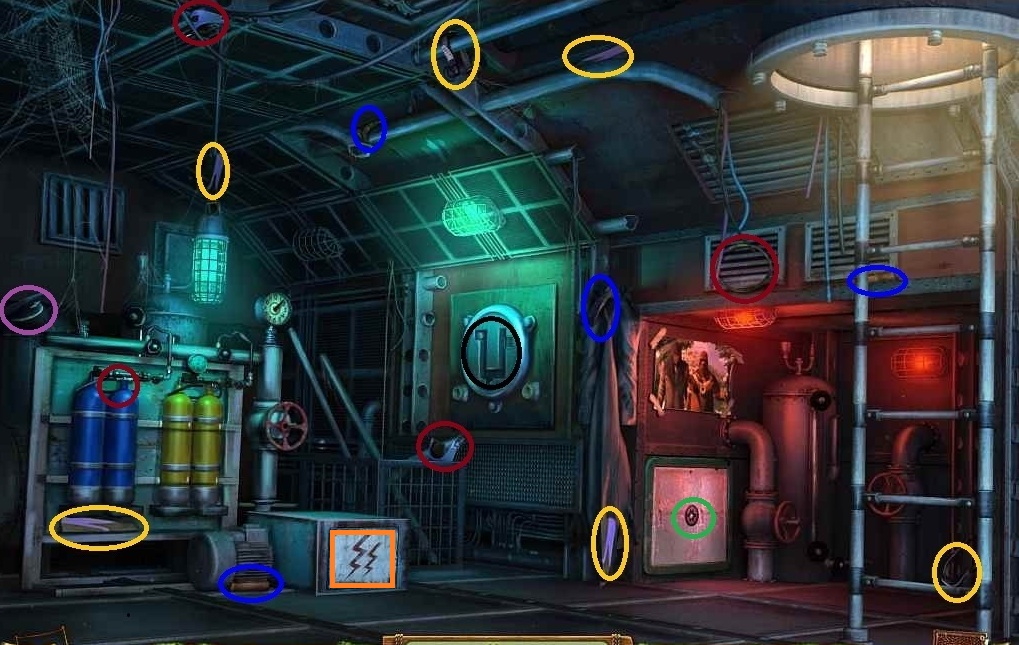
- Use PICKAXE on the stone below the NURSE
- Pick up the FIRST-AID KIT and give to NURSE; receive DIAMOND-SHAPED KEY
- Hang up MASKS and FINS
- Click on box NURSE was sitting on; click again to remove the cover
- Pick up BUTTON
- Take BATTERY from the truck
- Place BATTERY in the box
- Turn handle on COMPRESSOR
- Pick up FULL OXYGEN TANK
- Place OXYGEN TANK
- Click on the ladder on the dock
- Pick up POLE AXE pieces (yellow)
- Pick up CROSSBOW pieces (red)
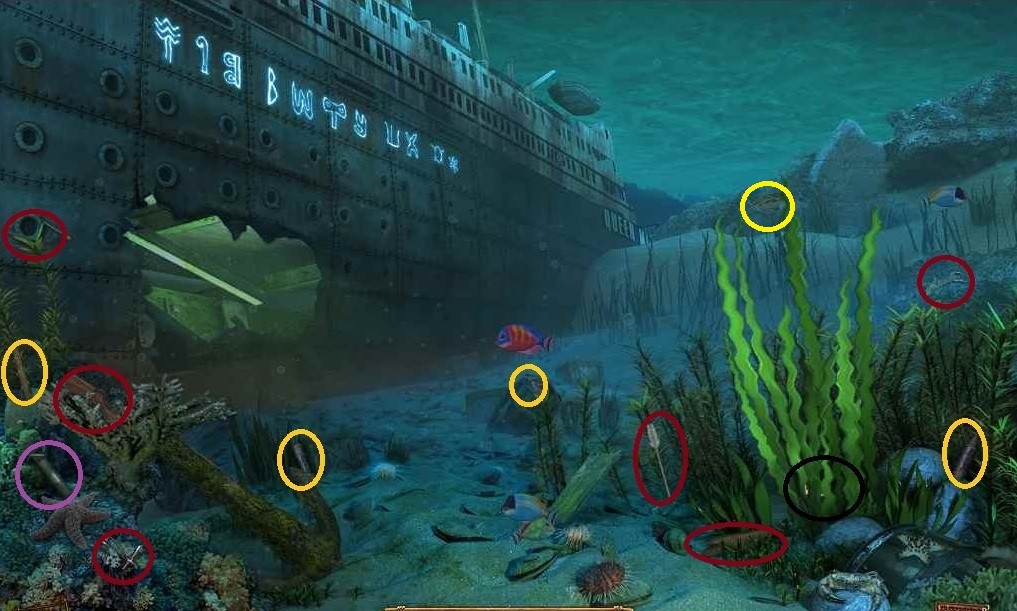
-
Pick up SICKLE and AMULET
- Use SICKLE on the grass at the black circle to get KEY (black)
- Place the 4 KEYS, turn them in the pattern from outside, 3, 4, 1, 2
- Pick up BUTTON
- Place BUTTONS
- Puzzle--Press buttons in this order
- R, L, L, R, R, R, L, R, L
- Receive SPHERE SHAPED KEY
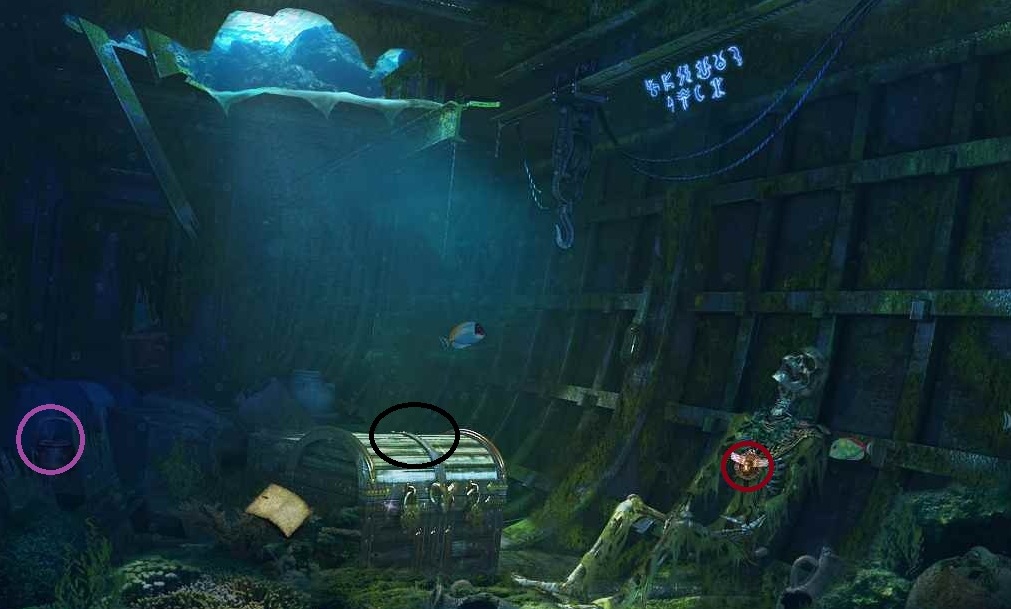
- Use KEY in Submarine (green circle)
- Pick up TILES and BOW
- Give BOW to ARCHER, place in ship, and get an OILER
- Click on ghostly ARROW in the sand, use SHOVEL
- Pick up KEY
- Place the TILES on the door
- Pick up SHIELD pieces (blue)
- Pick up GRINDSTONE pieces (yellow)
- Pick up BRUSH pieces (red)
- Pick up TORCH (black)
- Use BRUSH on white placard to the right
- Place GRINDSTONE on sharpener.
- Sharpen the POLE AXE
- Place CROSSBOW on left statue
- Use POLE AXE on red STEAM HANDLE
- Place STEAM HANDLE on machine with the red rectangle; click on it.
- Place AMULET on the chest of the right statue
- Retrieve 4-FINGERED HAND
- Light the TORCH
- Place HAND in the handprint
- Pick up GREEN HOSE pieces (yellow)
- Attach GREEN HOSE to pump and press green button
- Use OILER and then KEY on chest
- Pick up 6 MAORI and GEAR
- Pick up BUCKET pieces (red)
- Place GEAR on colored circle puzzle
- Line up colors
- Click on the left, center, and right circles as indicated below
- L 1, C 2, L 1, R 1, C 1, R 3, C3, R 1
- Pick up GEMS and last BUCKET piece
- Place BUCKET under fuel tank
- Click on HOSE
- Pick up BUCKET WITH GAS
- Pour GAS on "tinder", light it with the TORCH
- Grab last SHIELD piece from grated area that is now open
- Give right statue the SHIELD
- Click on CROSSBOW
- Pick up OIL LAMP from the open right statue base
- Place OIL LAMP on empty holder on the right
- Place GEMS in oil lamps
- Place MAORI statues around in a circle
- Place the SHIP on the center table
Comments will load when you reach this part of the walkthrough.