
Walkthrough Information
Images ©Big Fish Games and Mumbo Jumbo
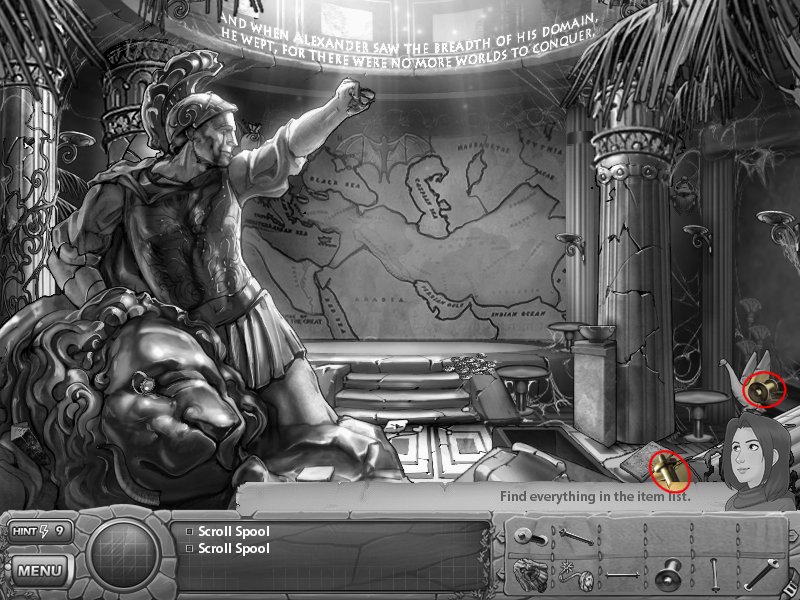
Overview: Samantha Swift is hot on the trail of another rare and exclusive object! This time she is after Alexander the Greats, Scroll of Wealth. However, she's also being pursued by evil, can she make her escape in time?
How To Play:
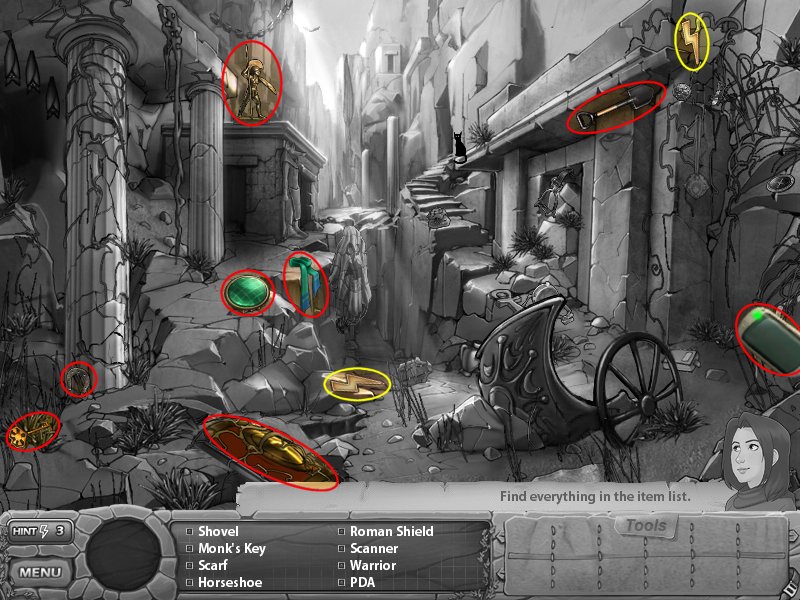
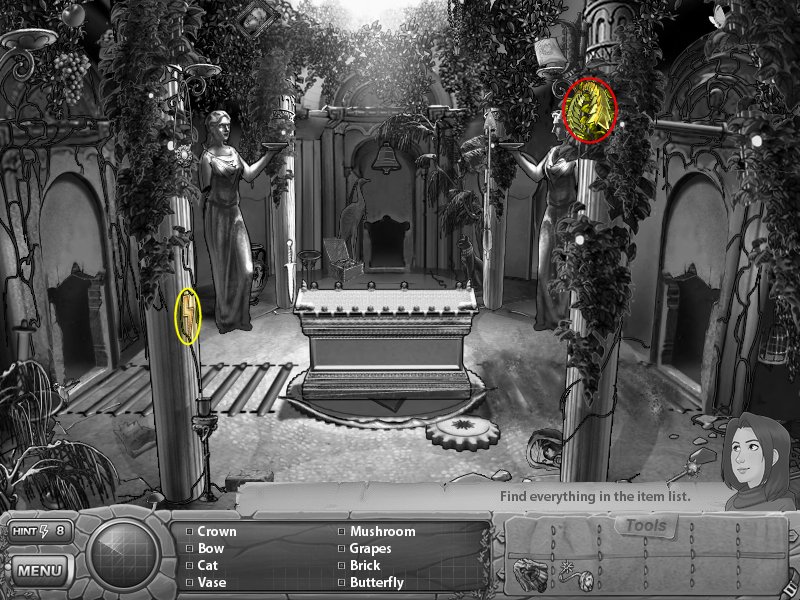
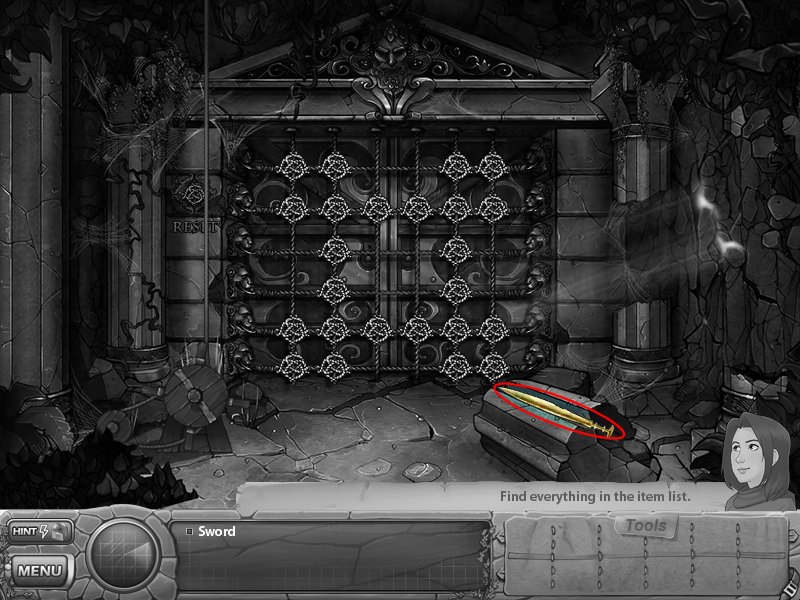
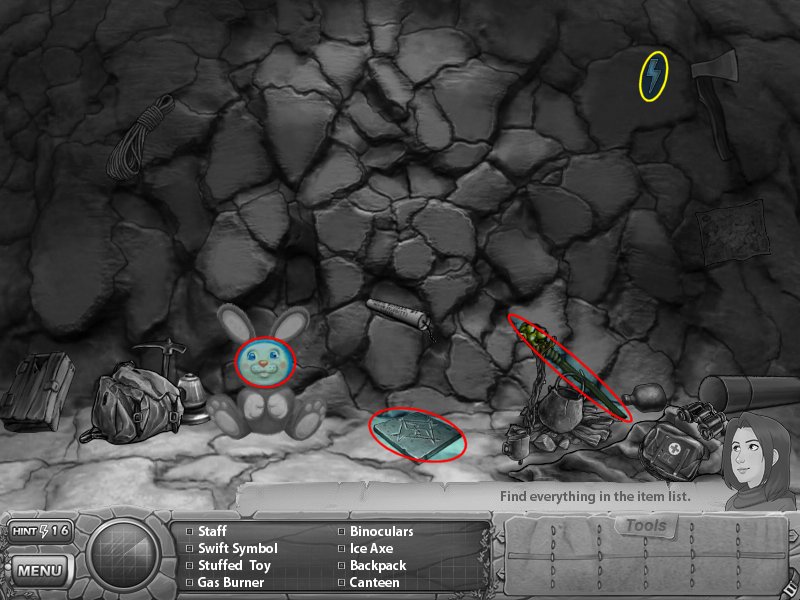
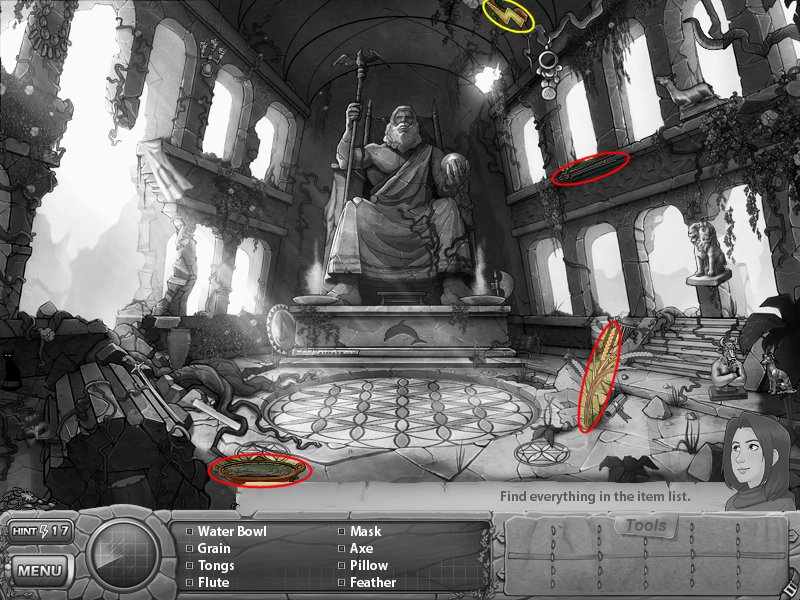
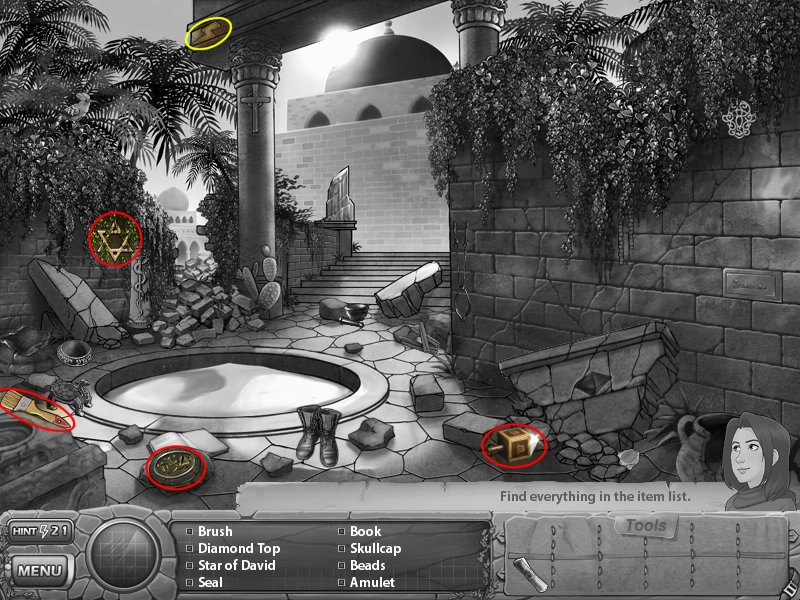
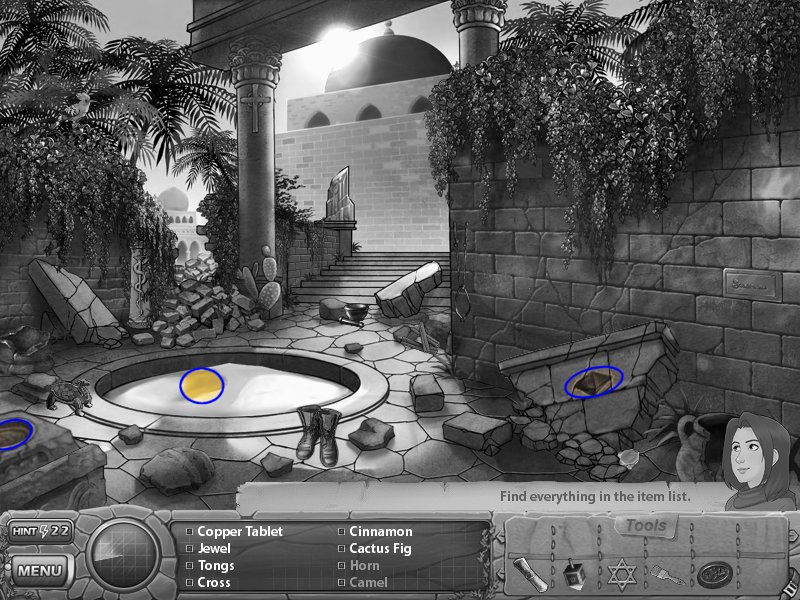
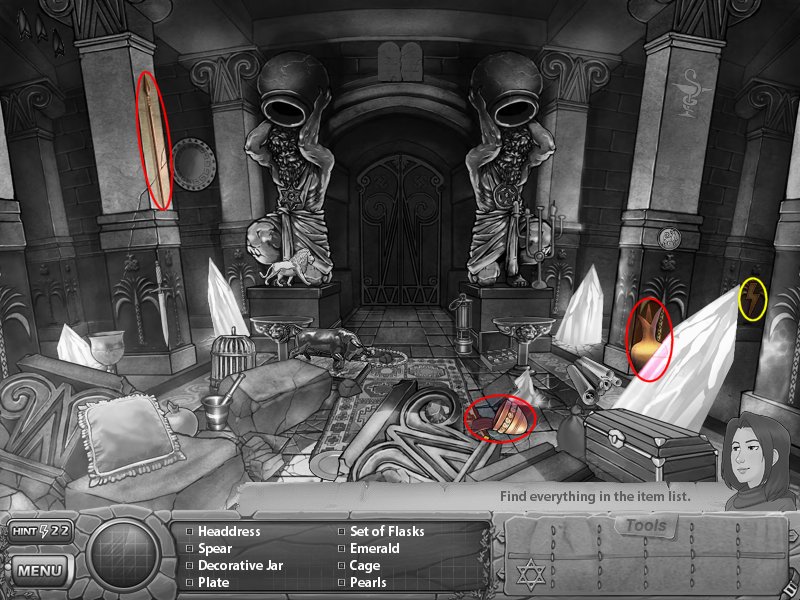
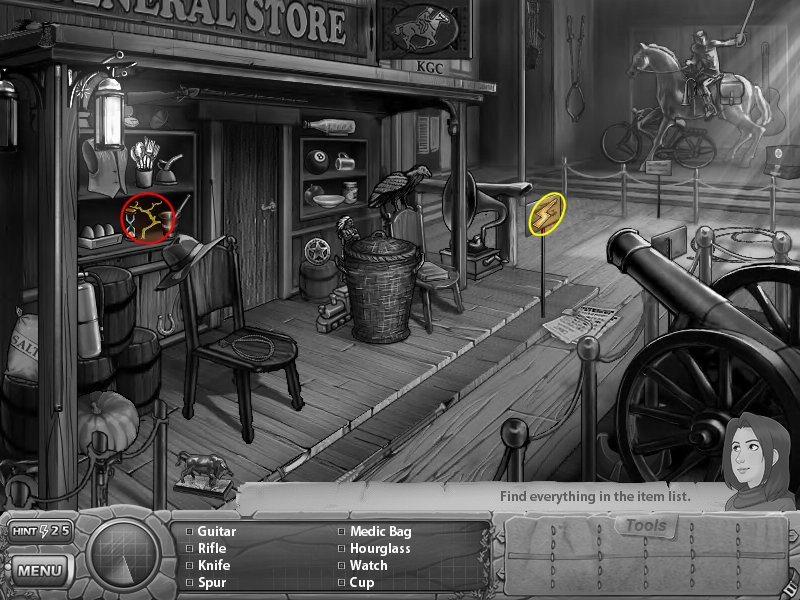
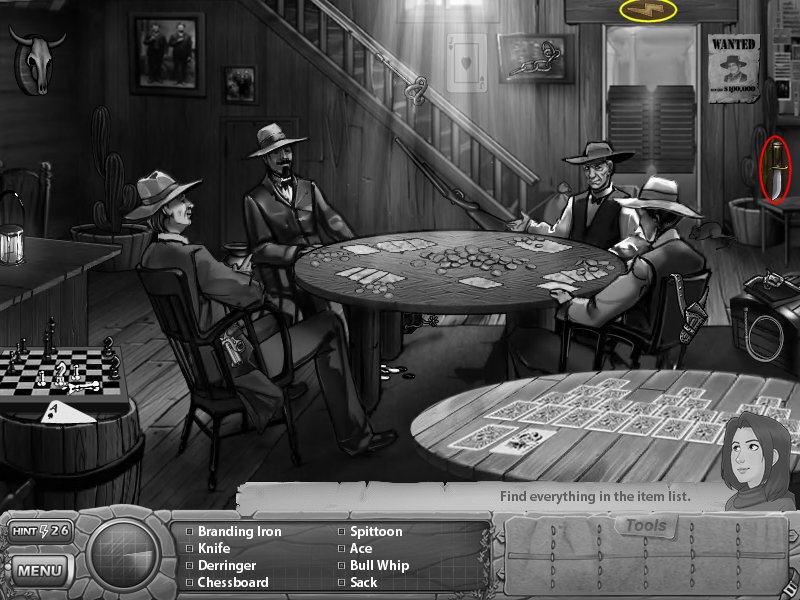
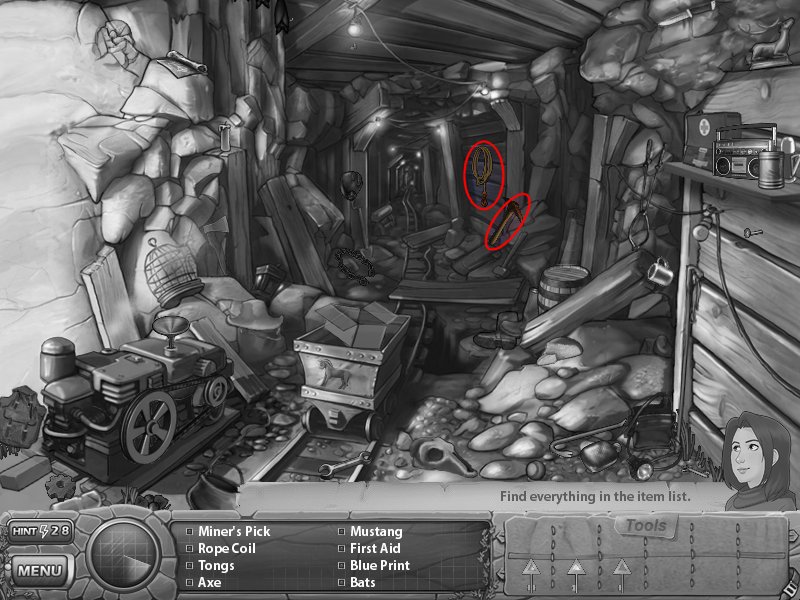
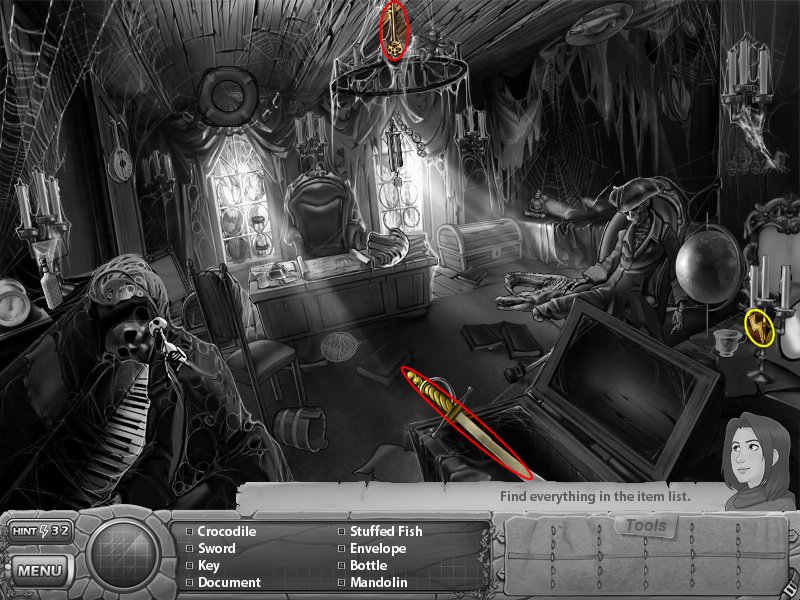
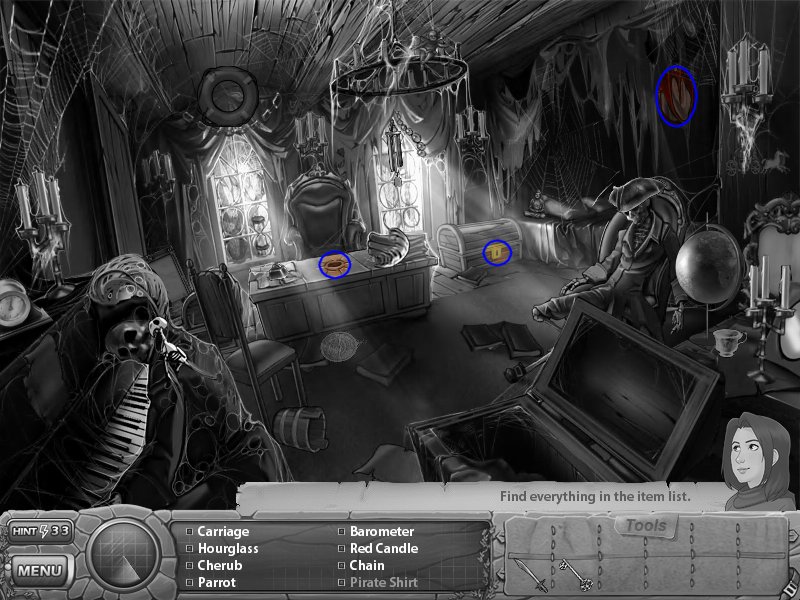
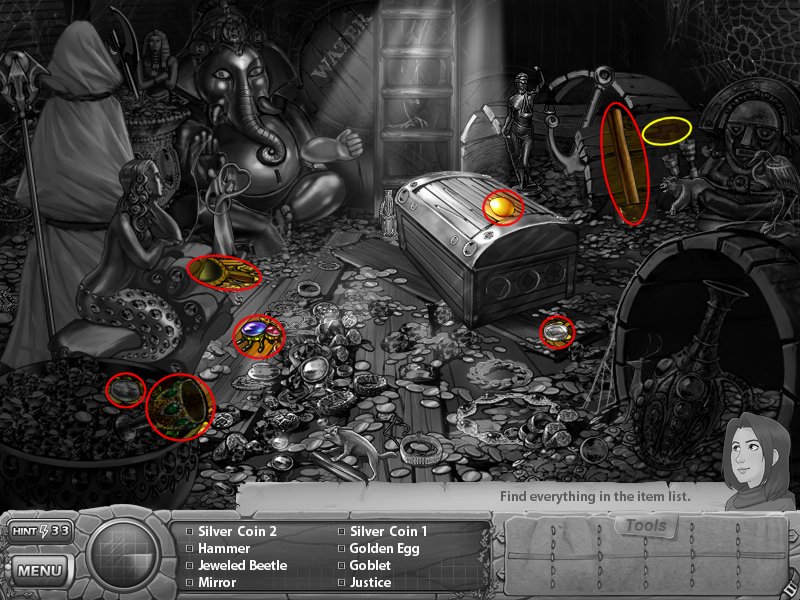
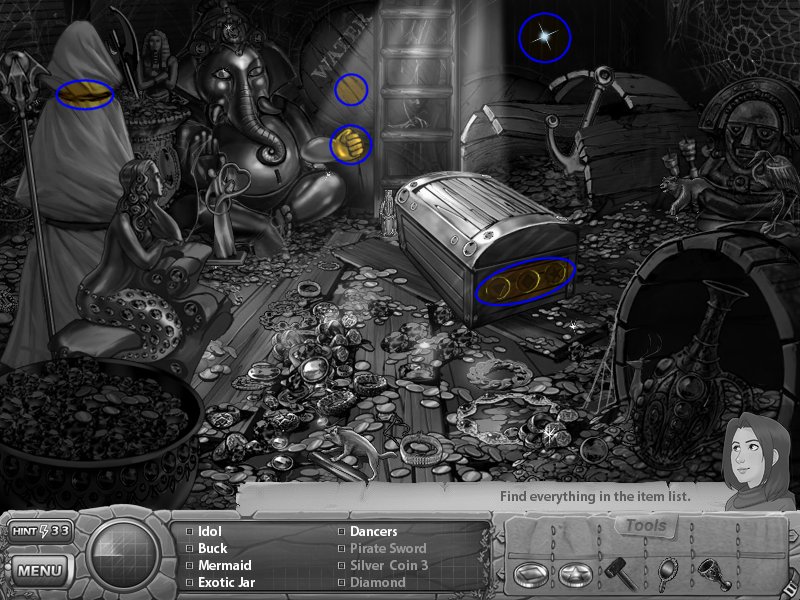
1. Finding Items - Like any HOG, you need to find the items listed. However, each time you play the game, objects will move to new locations. Therefore, I will only circle inventory items! You're on your own for the rest.
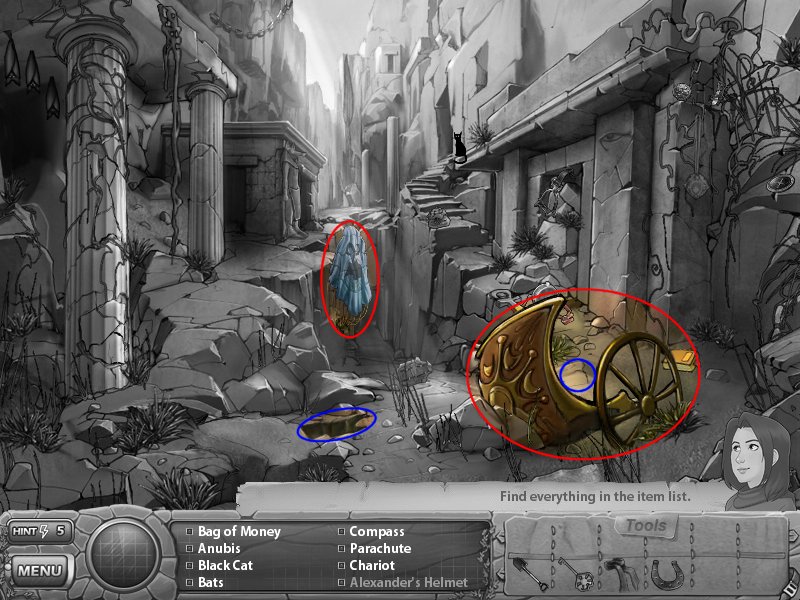
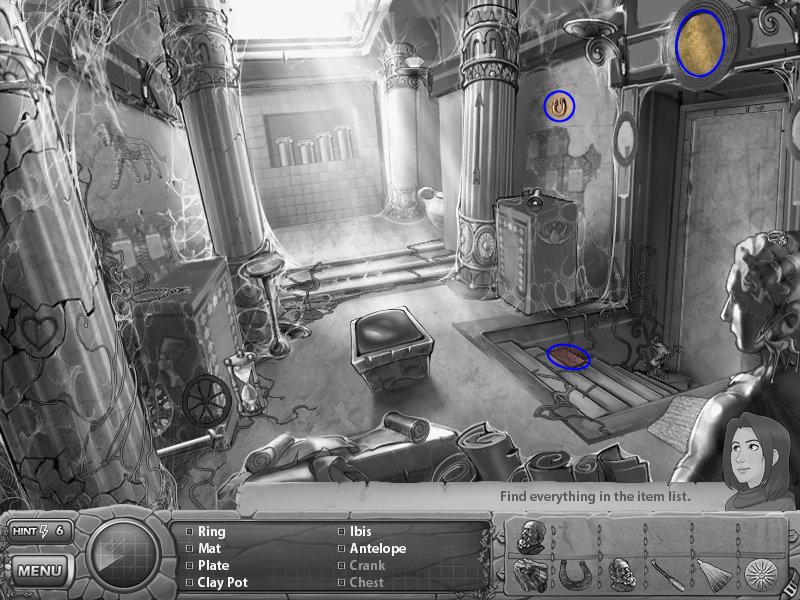
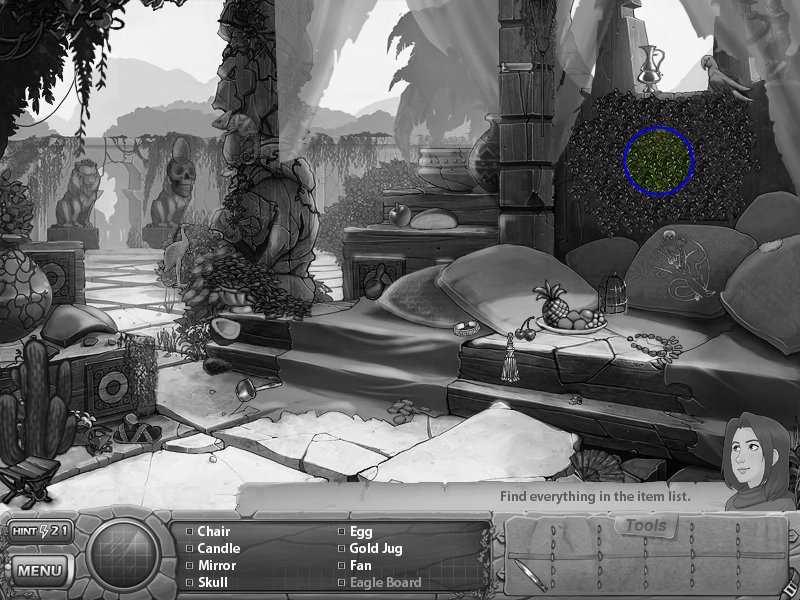
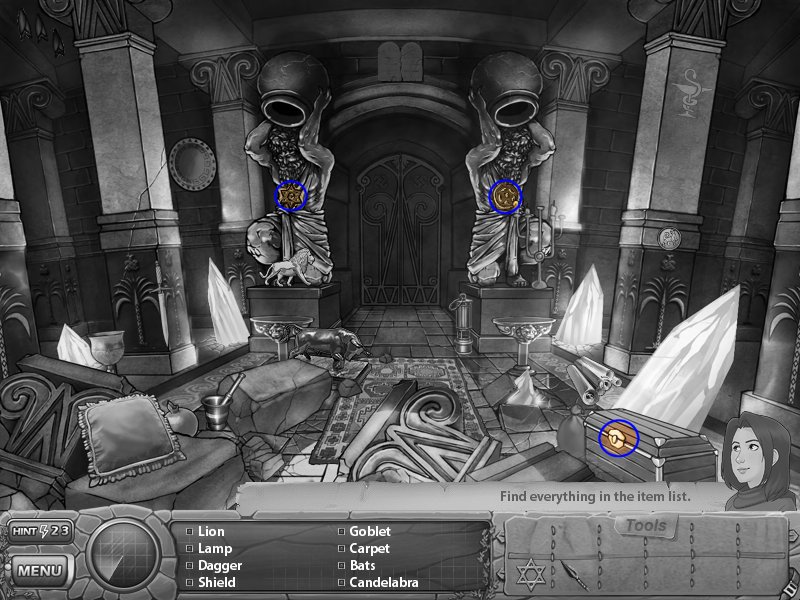
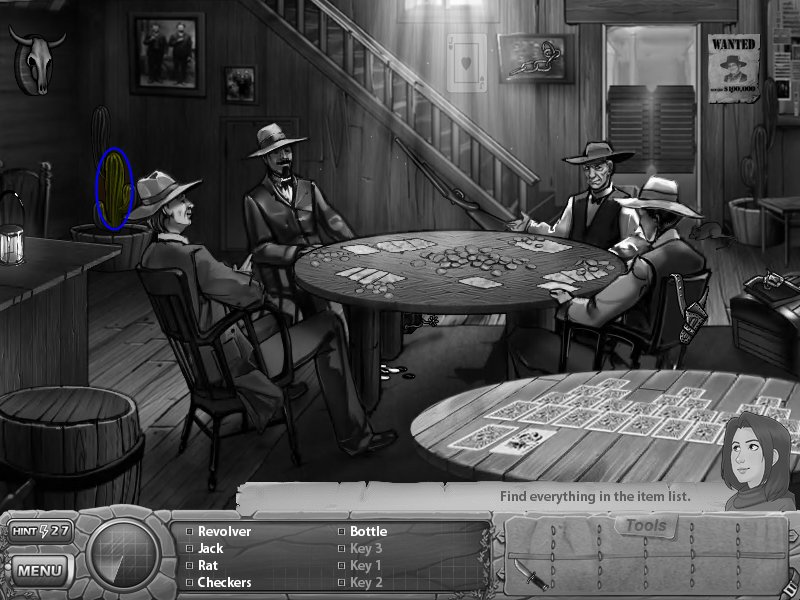
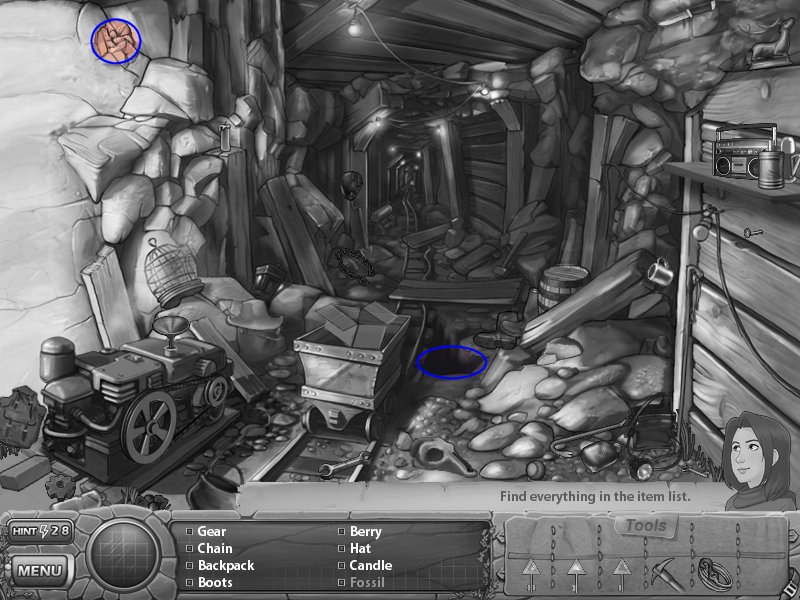
2. Blue Items - Items listed in blue need a tool (or another object) it order to uncover them. (I will circle these areas in blue)
3. Cursor with Blue Gears - This means you need to use a tool from your inventory.
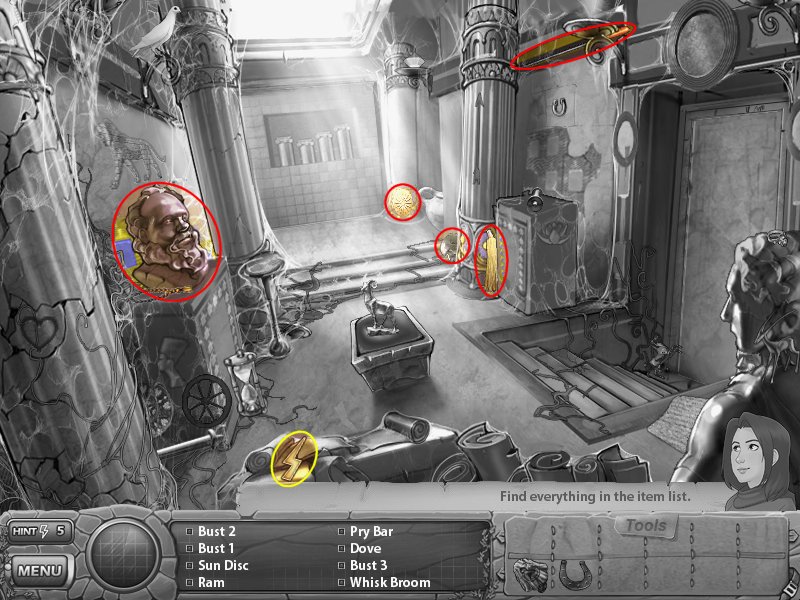
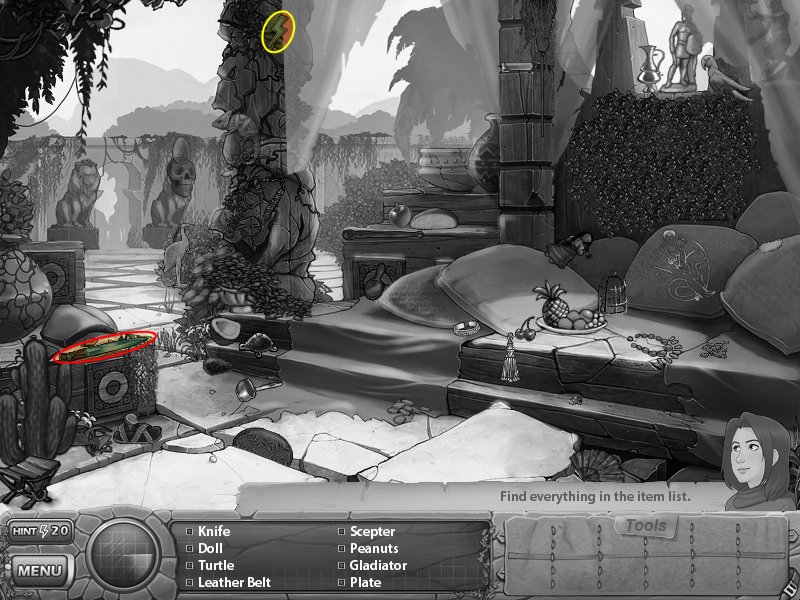
Hints: Find lightning bolts in each scene for extra hints. (I will circle these in yellow)
Fun Facts: You can customize your PDA! Click "Customize" and change the "Skin" or even "Color"!
PDA:
1. See "Fun Facts" for the Customize feature.
2. Log tells you your current objective.
3. Contacts gives you character bios.
4. Museum takes you back to the museum to see what you've found so far.
Scanner - You can click on any item in your list and it will give you the shape. A new feature is that the scanner image will change colors when you get near the object.
Levels:
Stage 1
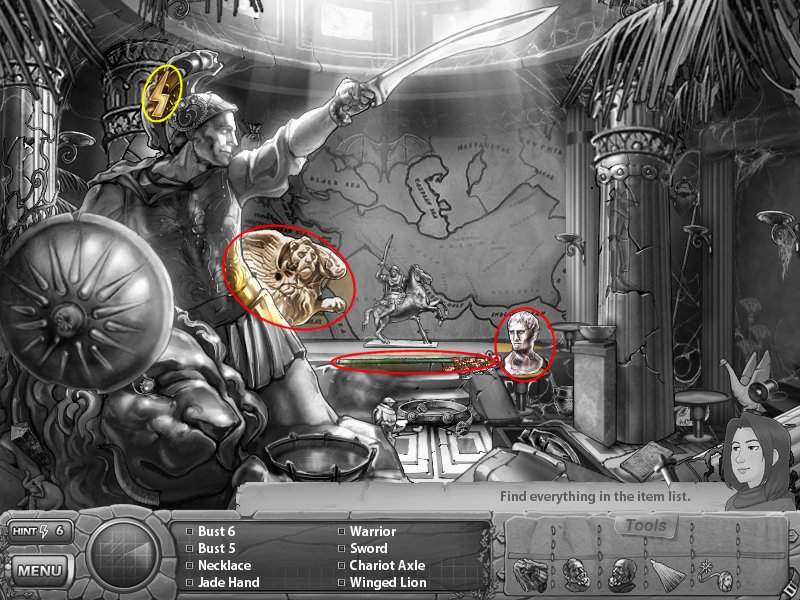
Level 1
- Warrior's Helmet - use the scarf in the hole (see screenshot)
- Chest Armor - use the shovel in the area the chariot vacated to uncover a chest and then use the monk's key on the chest
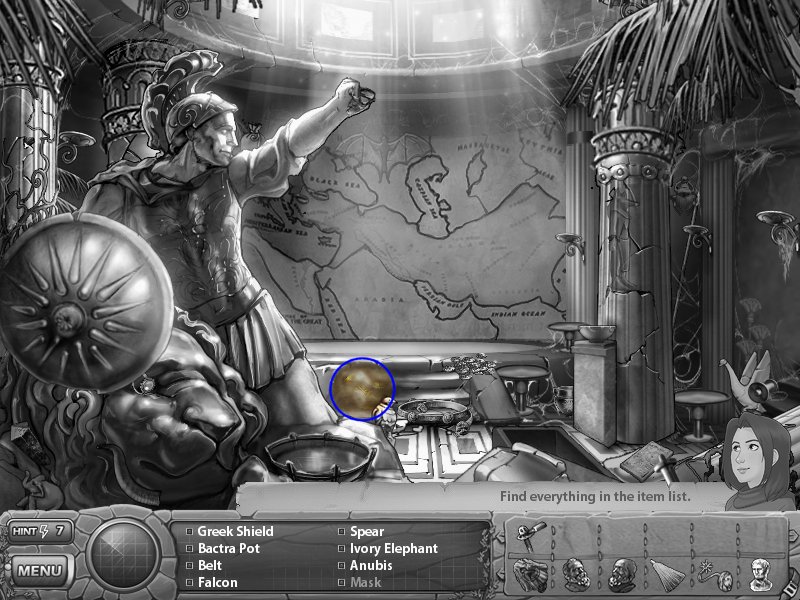
Level 2
- Crank - use the crowbar on the broken step
- Chest - use the horseshoe on the one on the wall
- Exit - use the sun disc above the door
Level 3
- Mask - use the whisk broom on the dirt
- Olympia Head - if you wait and watch the lights display, the item you need will appear at the bottom of the screen
- Exit to the left and go back to Level 2.
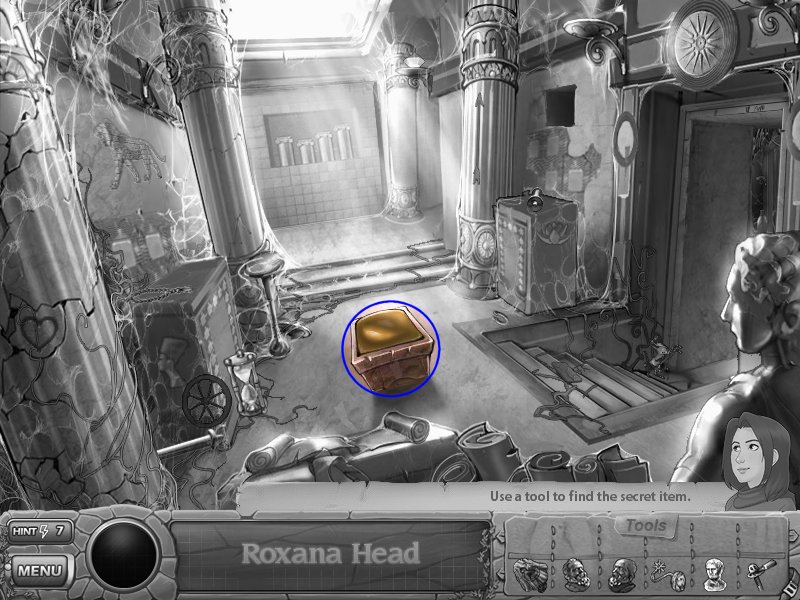
Level 2 - 2
- Roxana Head - use the chariot axle on the container in the middle of the room
Bust Puzzle: place the busts in the correct order on the pedestals, you want the pedestal to turn gold.
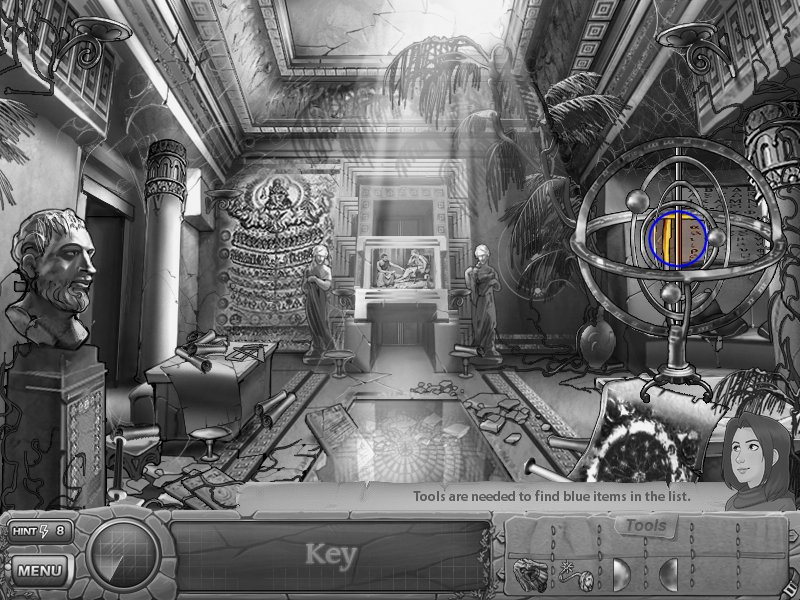
Level 4
- Key - place the balls in the middle of the solar contraption and take the key from where the water was
- Exit - use the key on the door that's revealed

Level 5
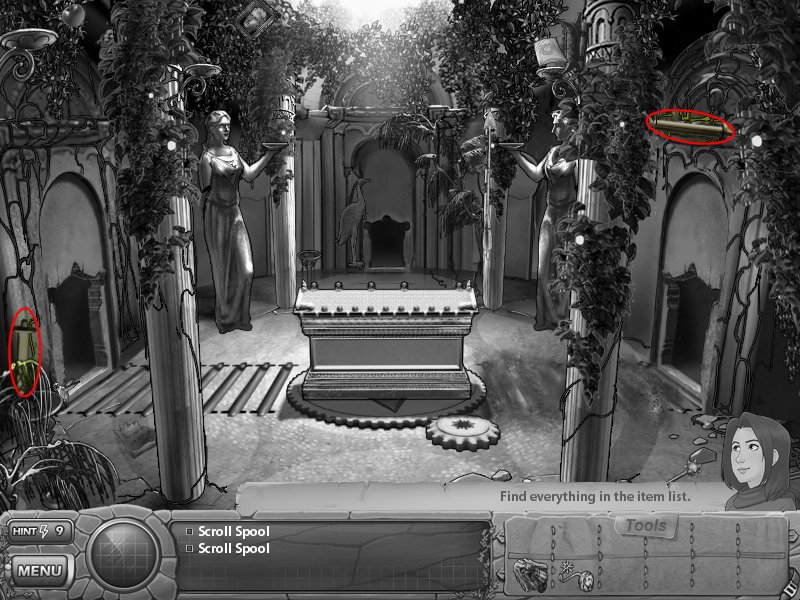
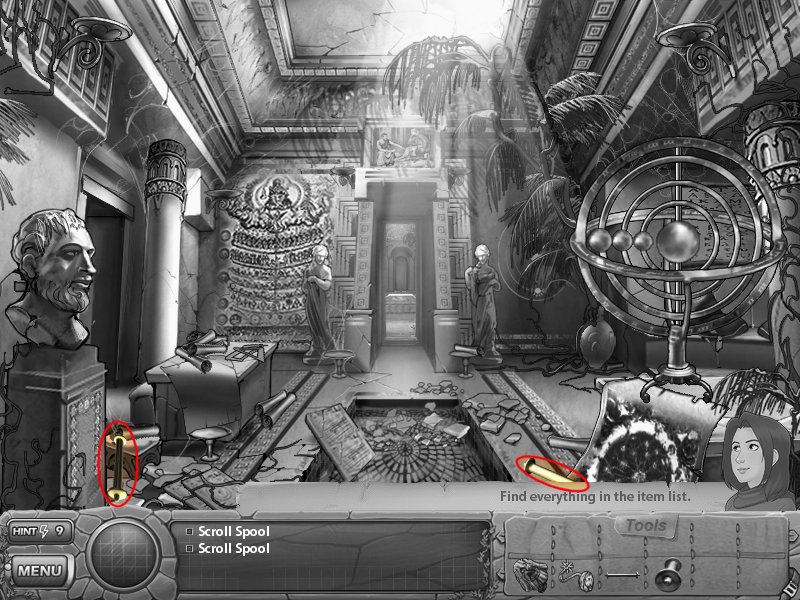
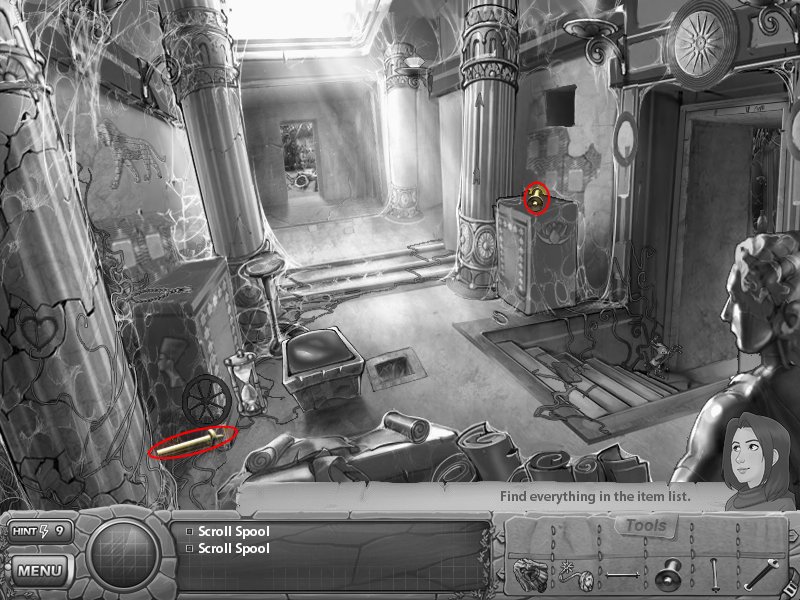
- Exit to past levels and collect Scroll Spools
Level 4-2
Level 2-3
Level 3-2
Level 5-2
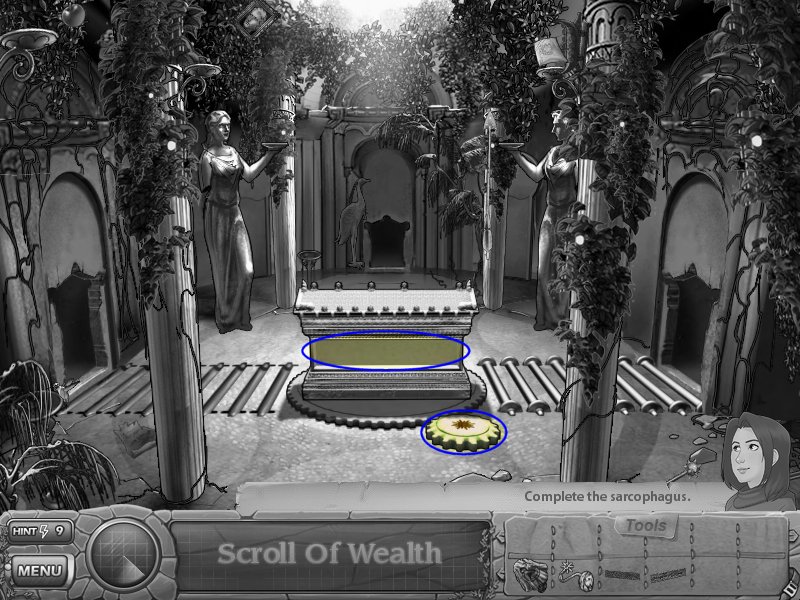
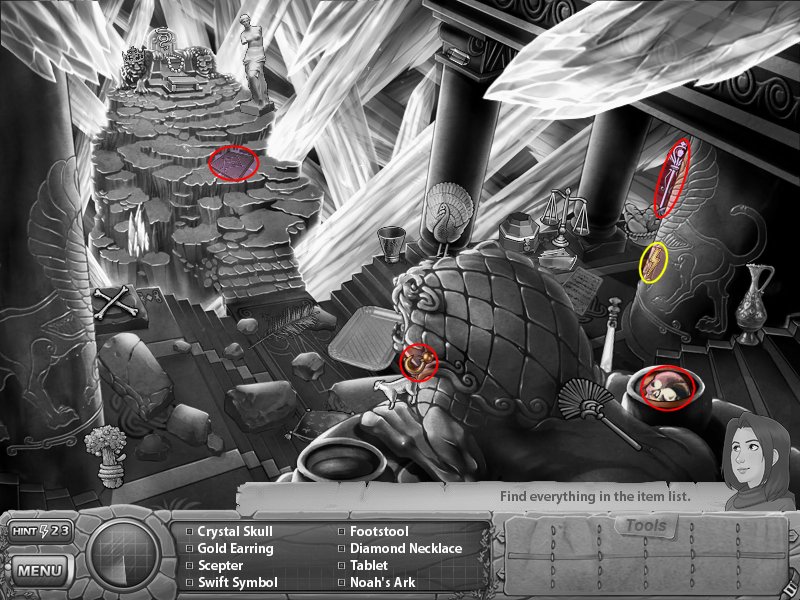
- Swift Symbol - place the scrolls in the ground next to the coffin
- Side Carving - this will appear to the right when you move the coffin
- Scroll Spools - pick them up and put them on the other side
- Side Carving - the second side carving will appear on the left side once the coffin is moved again
- Scroll of Wreath - use the crank on the gear on the to rotate the coffin and place the side carvings on each side
Level 6
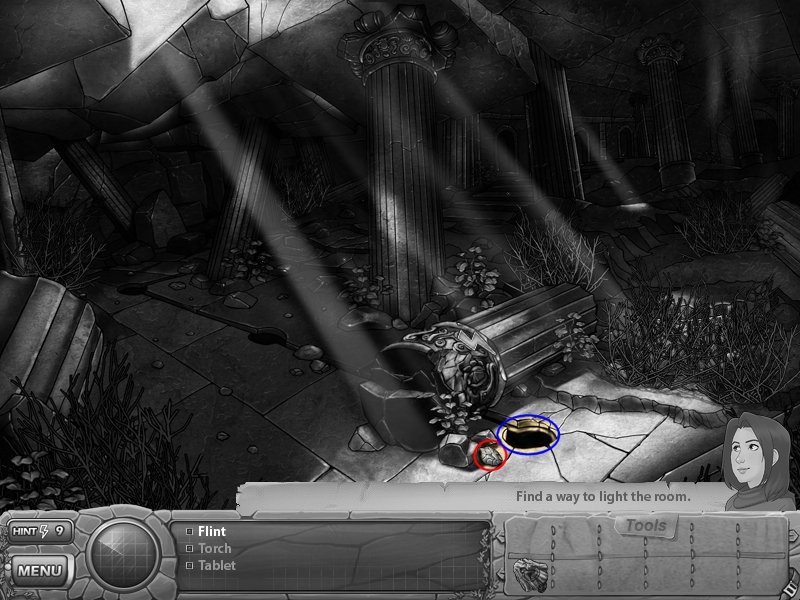
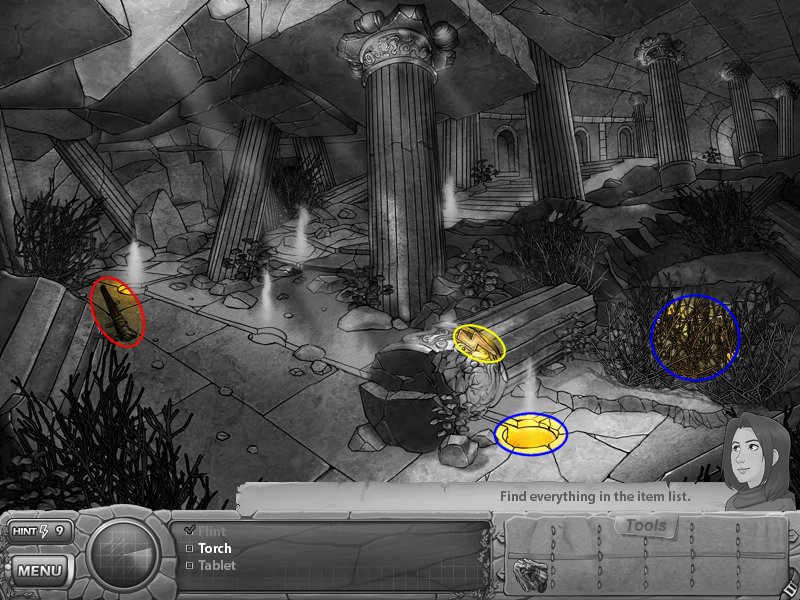
- Light - use the flint on the hole near the bottom of the screen
- Tablet - use the torch on the fire (same hole) and set the brush to the right on fire
Level 7
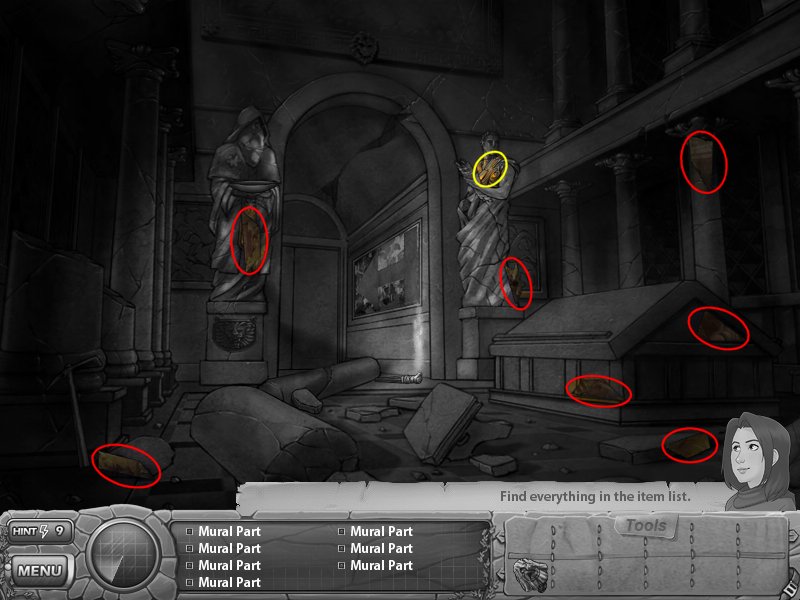
- Light - just toss that lit torch anywhere
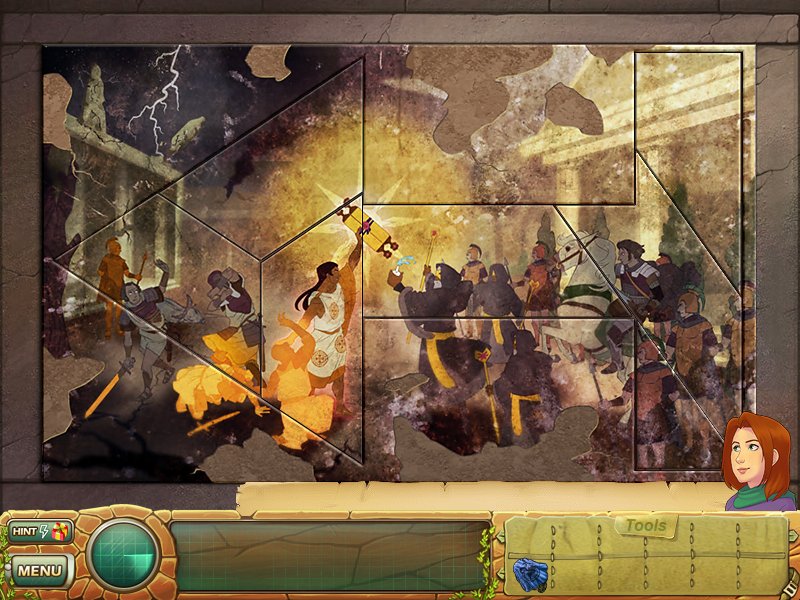
- Mural - click on the mural in the back and use the missing pieces you found to restore the picture
Level 8
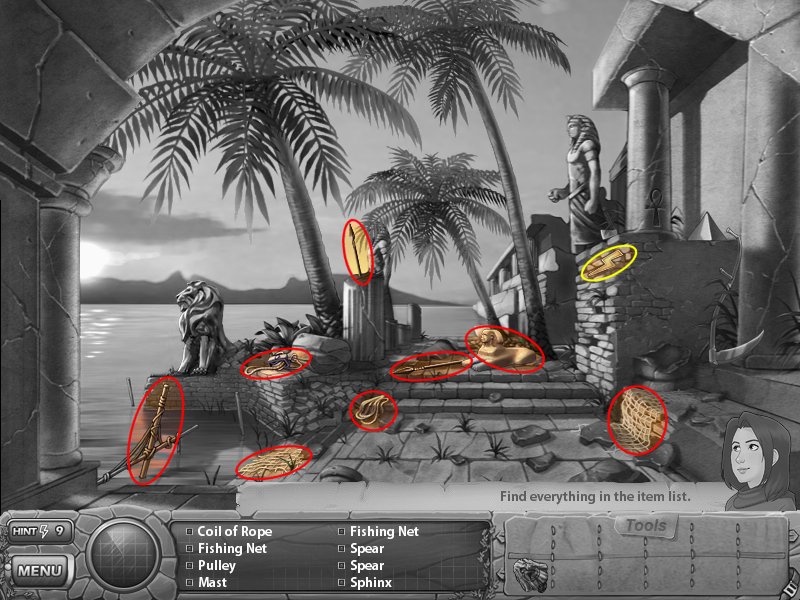
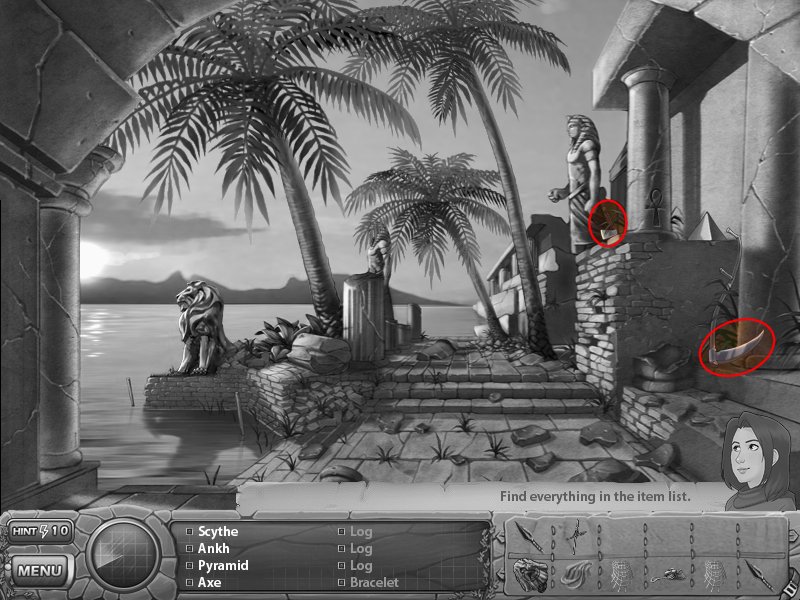
- Log(s) - use the axe on the palm trees
- Click on water to build boat
- Assembly - logs, spears, fishing nets, mast, scythe, rope, pulley, parachute
Level 7-2
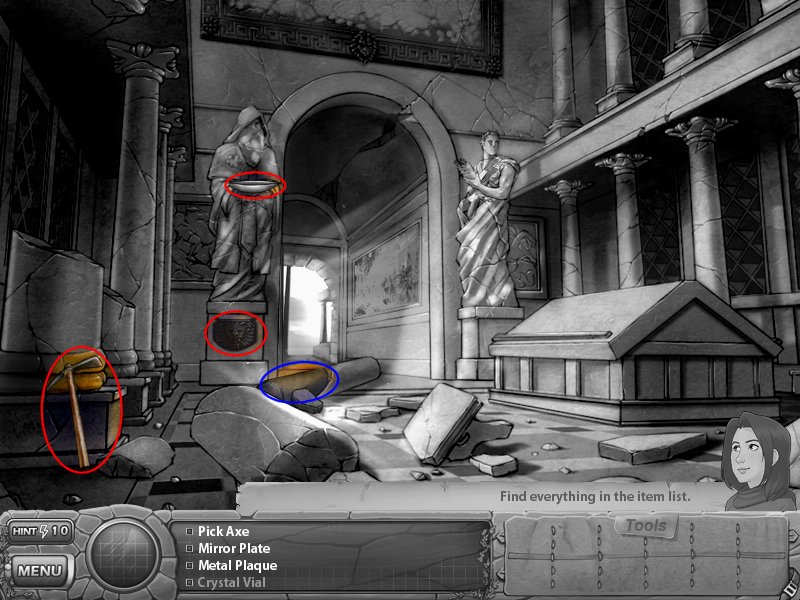
- Crystal Vial - use pick axe on back column
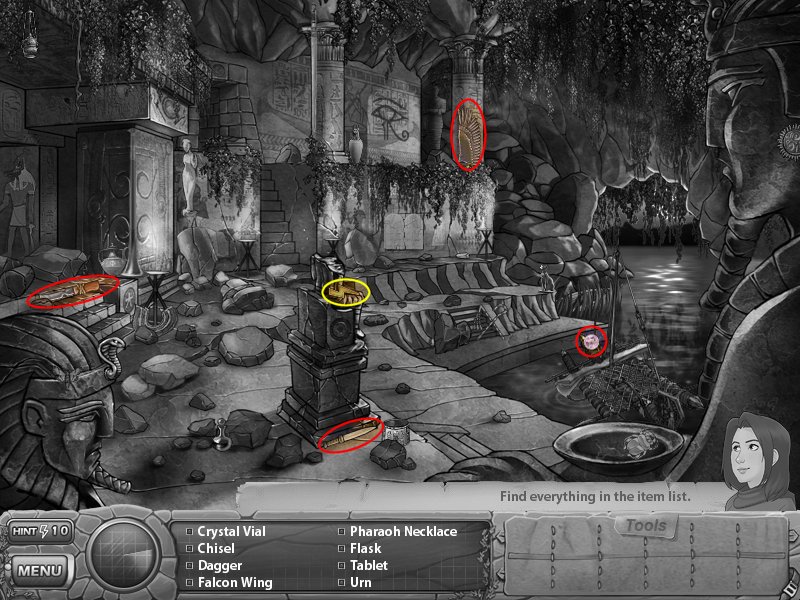
Level 8-2
- Assembly - metal plaque, mirror plate, crystal vial
Level 9
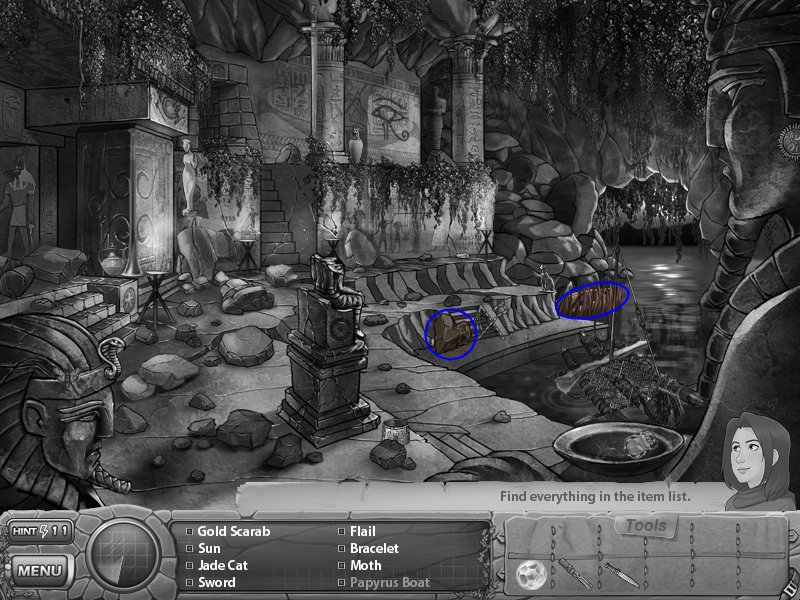
- Papyrus Boat - use dagger on reeds
- Heart Peice - use chisel on heart shaped stone
Level 10
- Zoom in on the pedestal to assemble the heart

Stage 2
Level 11
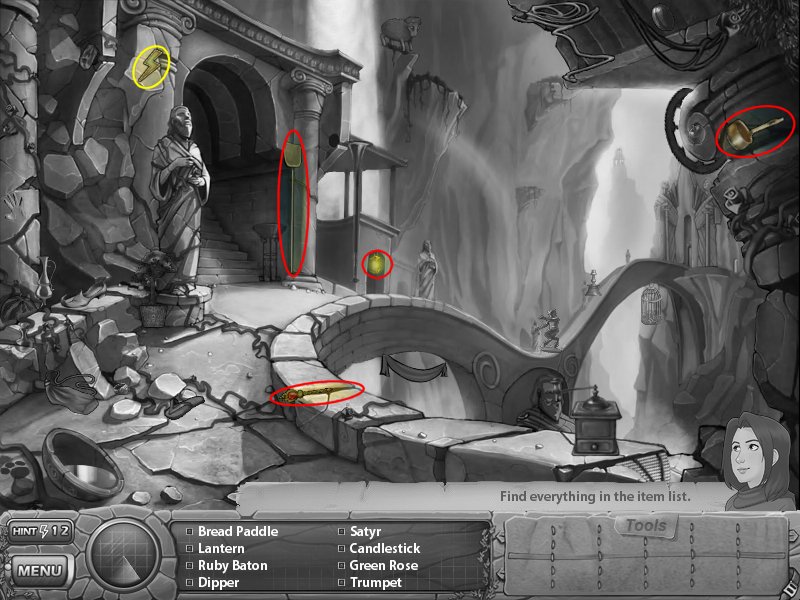
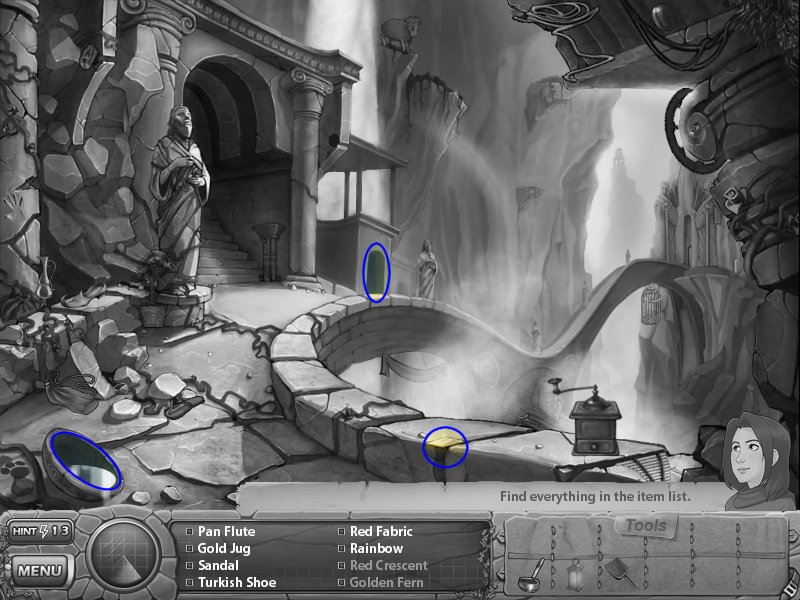
- Golden Fern - use dipper in bowl with water and pour the water into a crack in the wall
- Red Crescent - use the lantern in the stairwell
- Golden Bread - use the bread paddle in the oven
Level 12
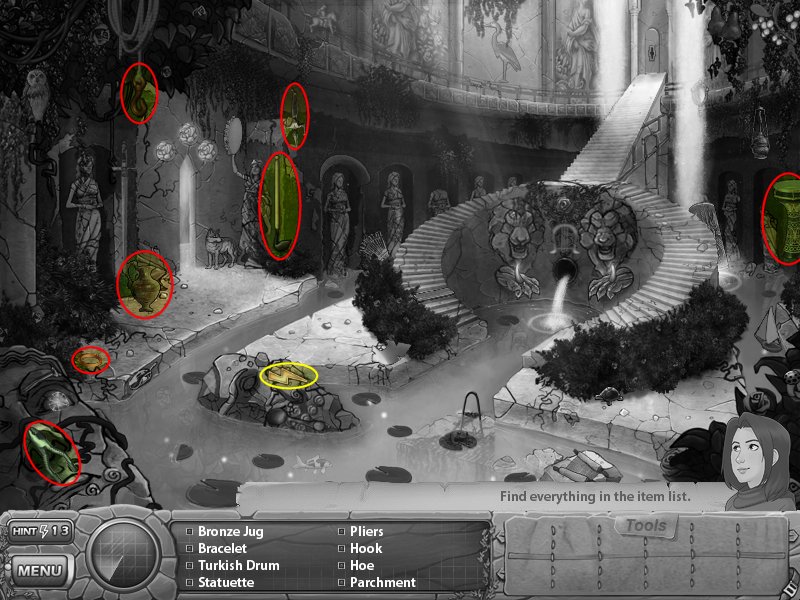
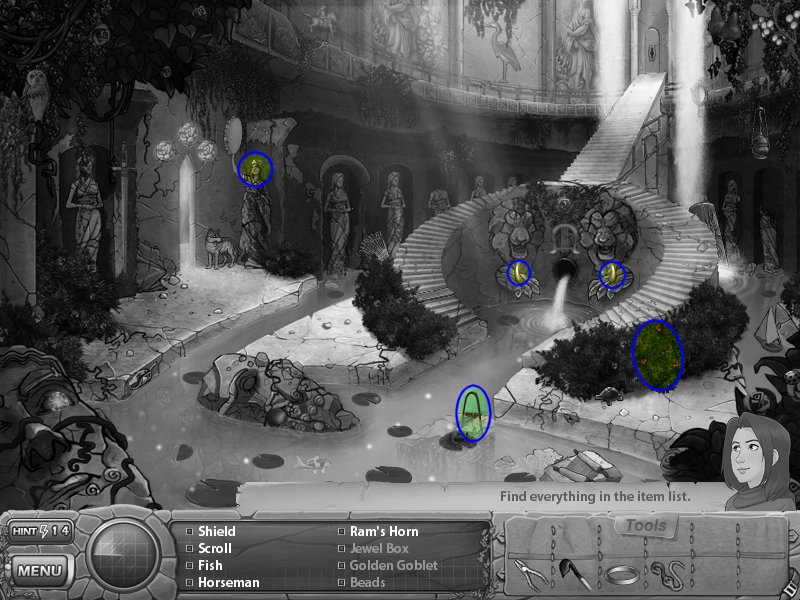
- Beads - use hook on the bracket sticking out of the water by the frog
- Jewel Box - use hoe on bushes by fountain (right side)
- Golden Goblet - put the bracelet on the statue that is holding the round item
- Key - use the pliers on the gold "horns" at the fountain
Level 13
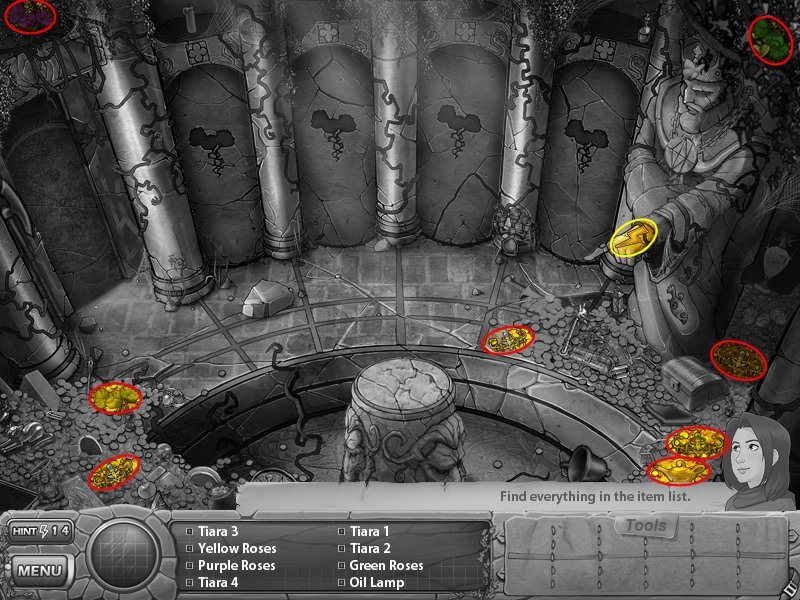
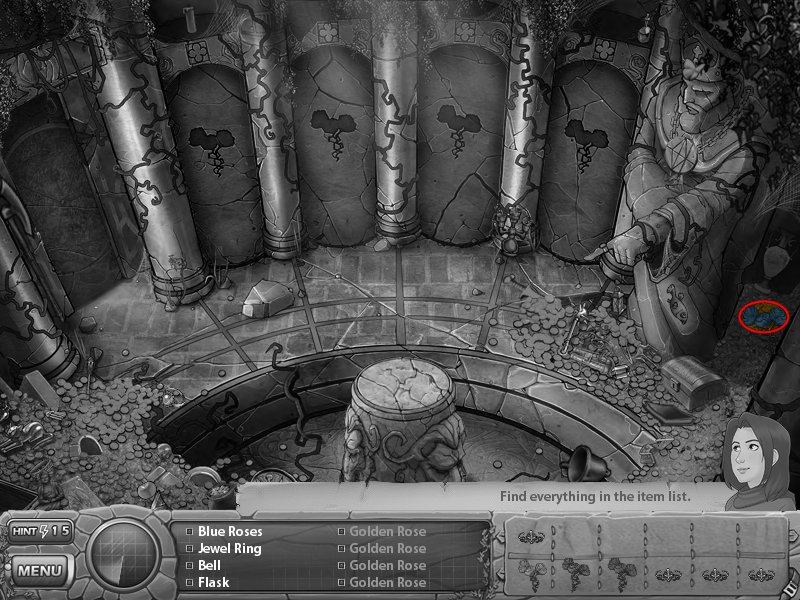
- Golden Rose(s) - place the colored roses into the wall under the matching symbol
- Exit - place the tiara's on each statues head
Level 14
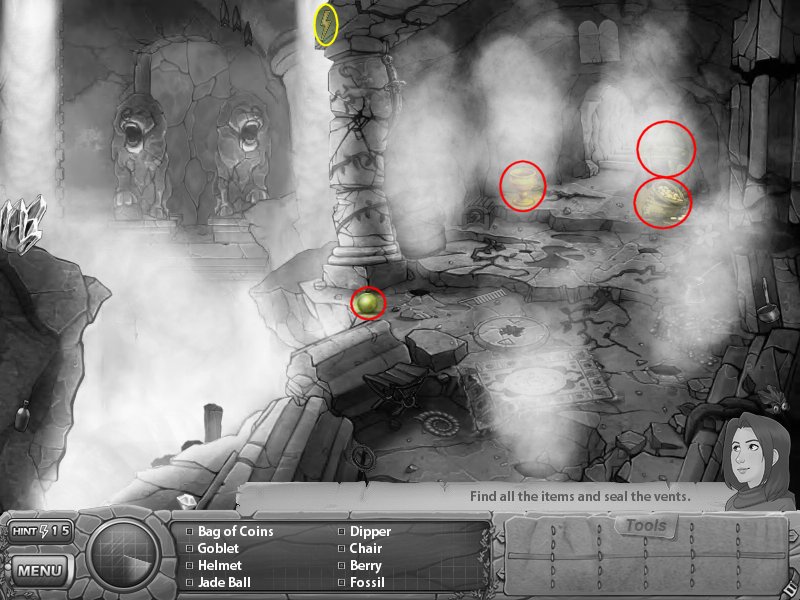
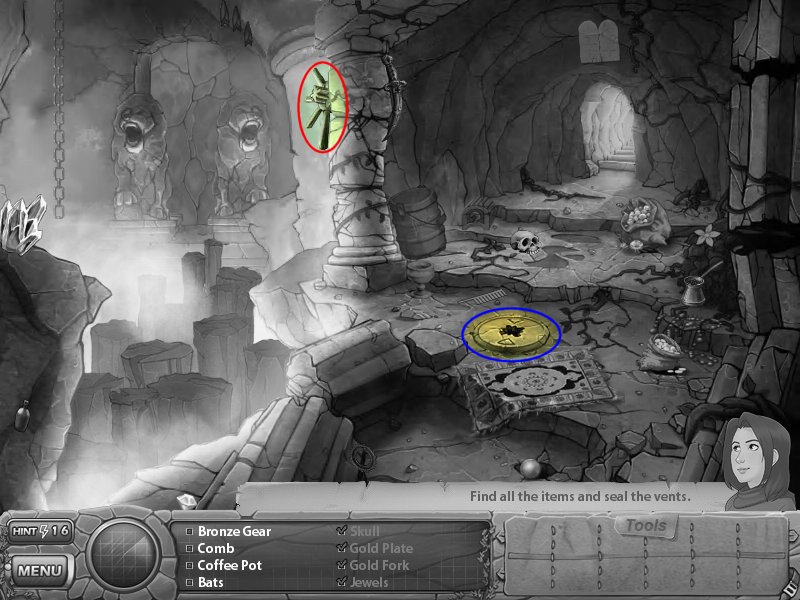
- Vents - place the various items that go into your inventory over the steam
- Exit - use wheel crank on round gear in center
Level 15
Knot Puzzle - when you click a not, the others beside it will either go away or move, you need to find the right combination to remove all of them (see screenshots for solutions)
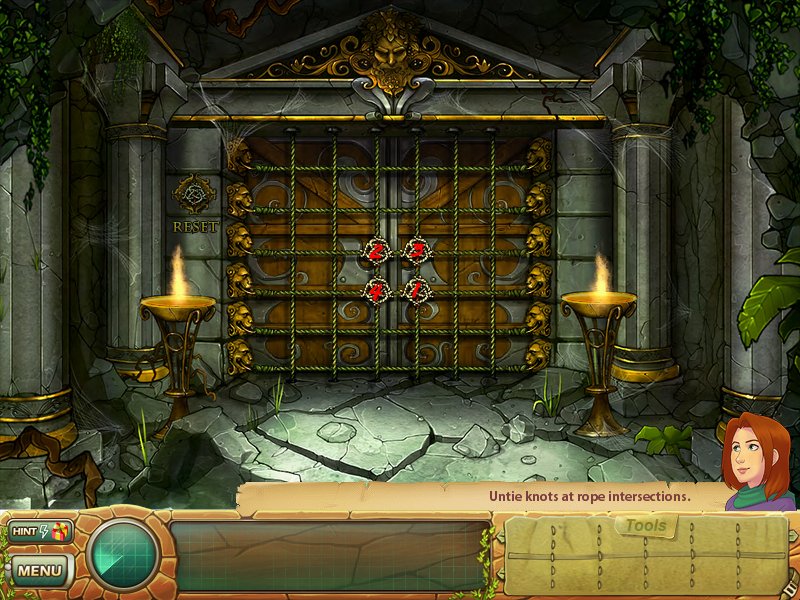
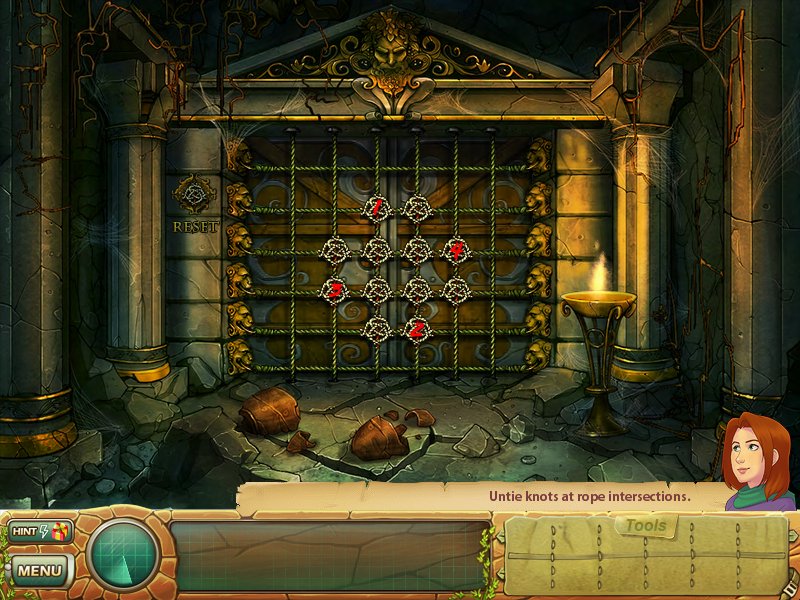
Hint: for the last puzzle, pick up the golden sword and use it on the knots (you can also solve it if you wish but...)
Level 16
Level 17
- Exit - use staff on turning wheel
Level 18
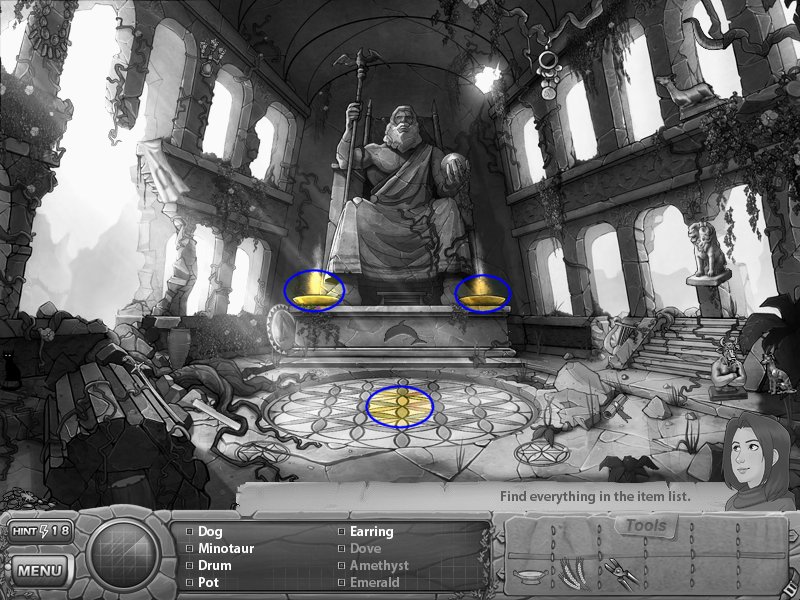
- Dove - put the grain in the middle of the room to draw the dove
- Emerald - use the water bowl on the right fire
- Amethyst - use tongs on left fire
- Vial of Beauty - click the middle of the floor for a puzzle
Floor Puzzle - click the middle of the flowers to turn them, they need to match the ones in the four corners, work on each corner separately, once its lit it will STAY lit so you can re-use those same petals for another puzzle
Stage 3
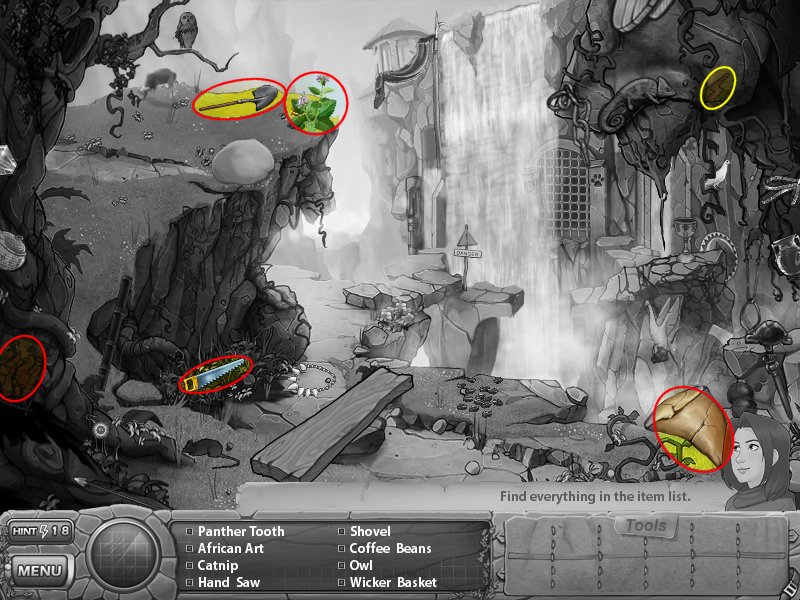
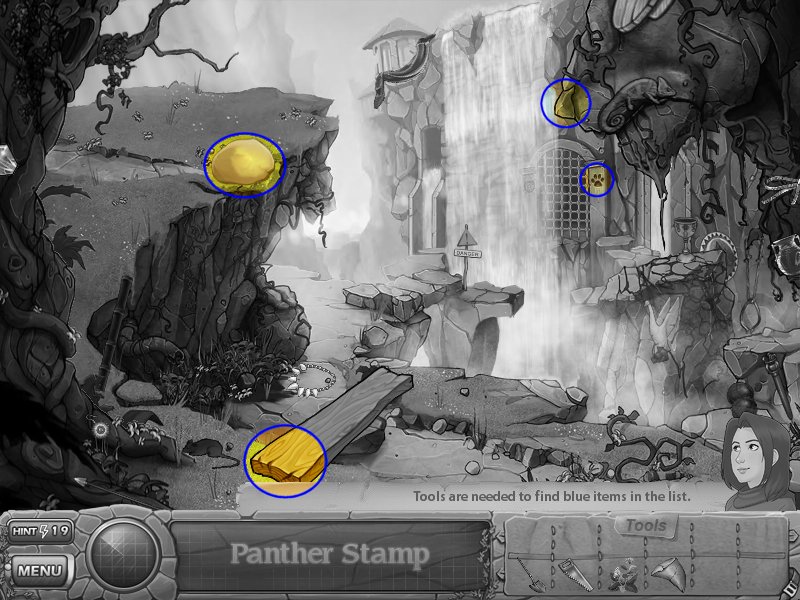
Level 19
- Panther Stamp - use the catnip on the panthers nose (large rock shaped one above Samantha's head)
- Exit - place the panther's tooth on the end of board and then use the shovel unearth the boulder and then use the panther stamp on the paw print to open the gate
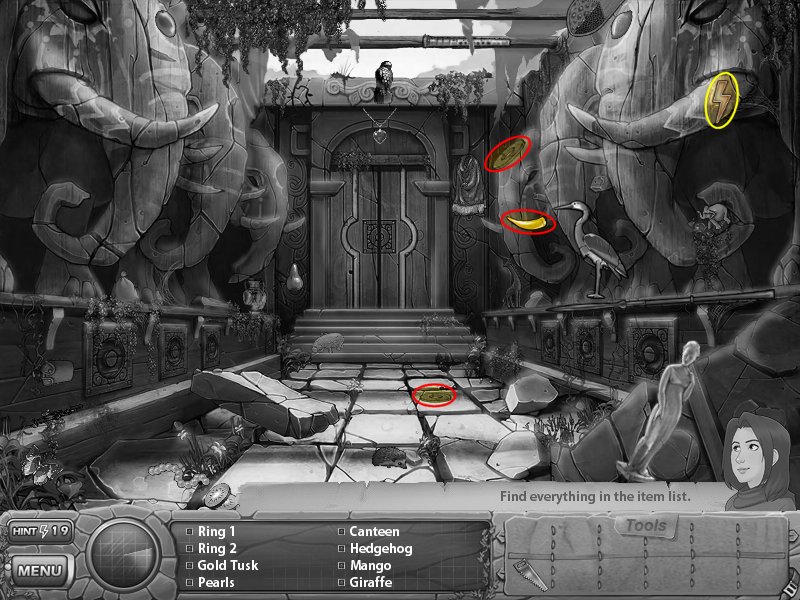
Level 20
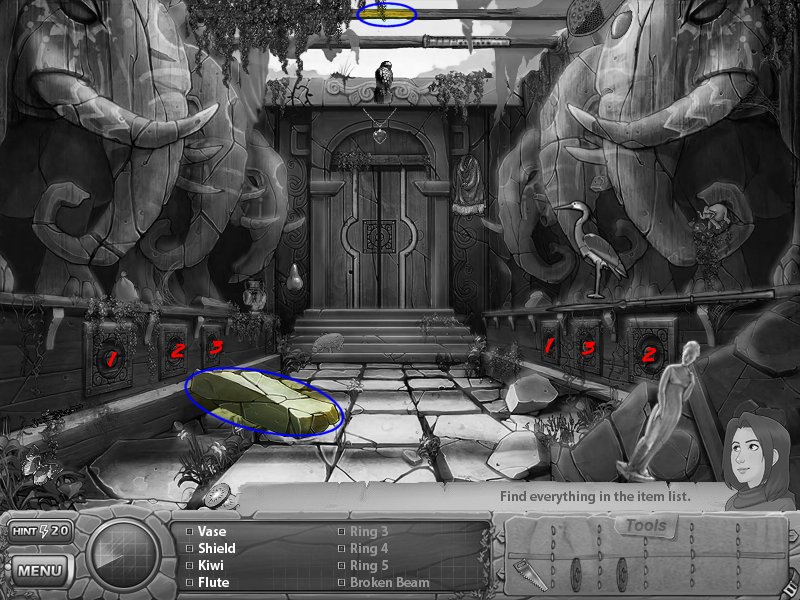
- Rings and Beam - use the saw on the beam above
- Last Ring - use the broken beam on the boulder
- Exit - place the rings under the elephant head and push them down, you will see their eyes light up, you need to push the two disc that create the same color eyes
Level 21
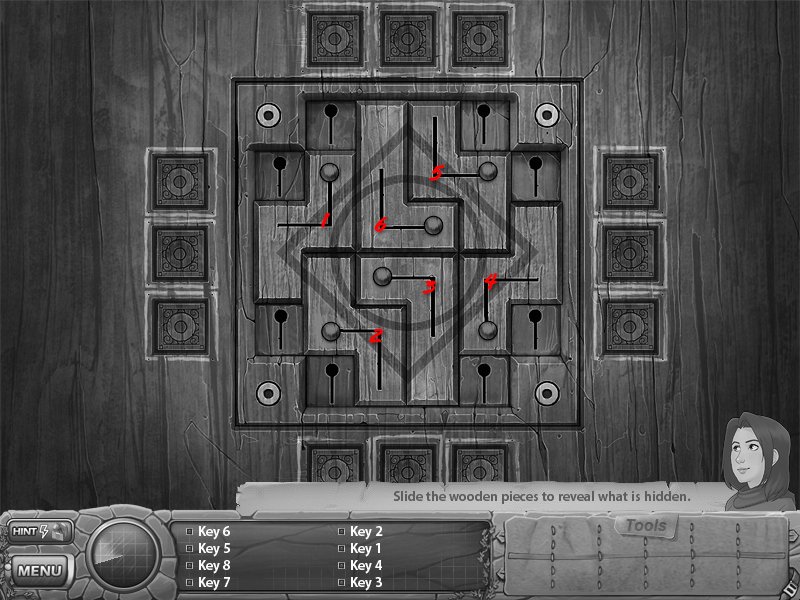
- Eagle Board - use knife on vines
- Sheba's Scroll - click the puzzle revealed by the eagle board
Wood Puzzle - slide the wooden pieces around to reveal the keys then slide them back and put the keys in the keyholes
Level 22
- Camel - use brush on sand in middle
- Horn - use diamond top to drill into stone slab
- Menorah - place seal on top of left column
- Exit - use scroll on scene and click on the holes
Level 23
- Solomon's Star - use the spear on the chest lock
- Exit - put Solomon's Star and the Star of David on the statues
Level 24
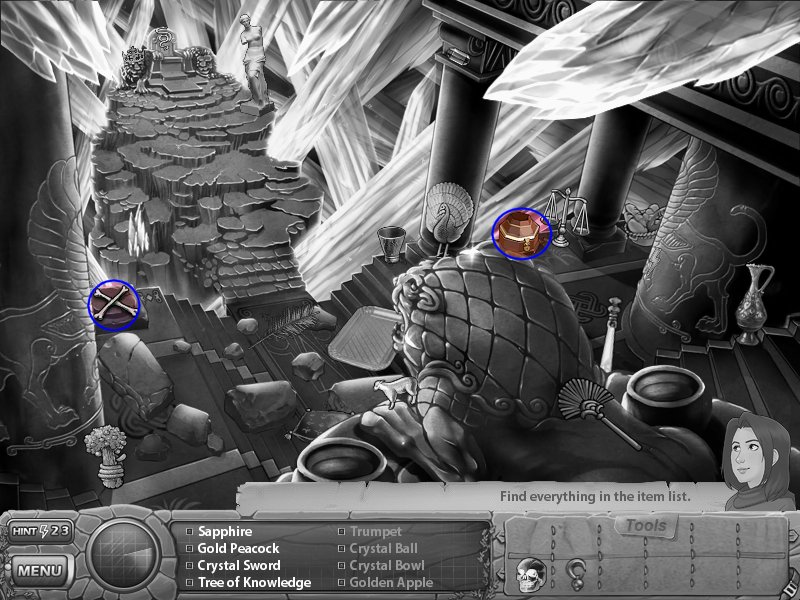
- Crystal Bowl and Trumpet - place the crystal skull on the crossbones
- Crystal Ball - use golden earring on locked chest
- Golden Apple - use the trumpet on the pink crystal above her head
- Vial of Sustenance - zoom in on chair to get a puzzle
Chair Puzzle - swap the gold with the silver without the touching them, this is very simple, just keep them on separate paths
Level 25
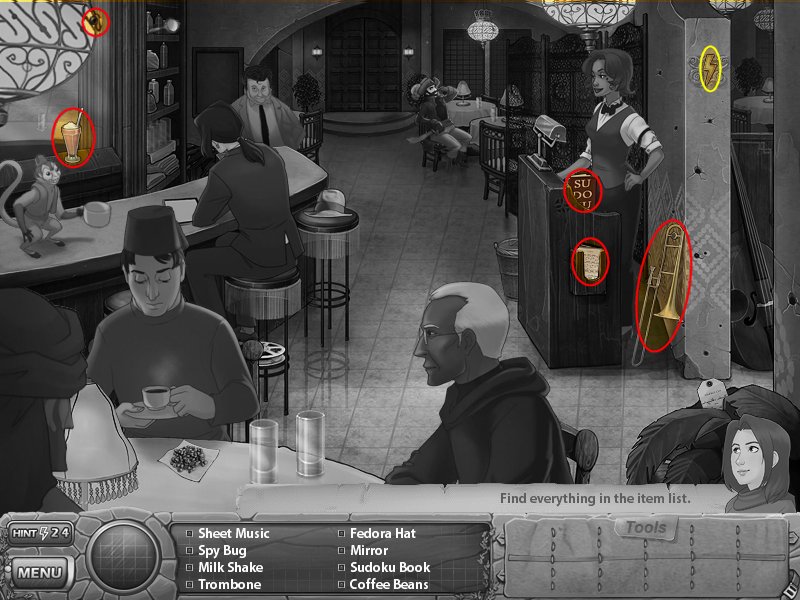
- Briefcase - give the guy on the barstool the milk shake
- Go the second room (right)
- Gold Coin - give the man in the turban the glass of water
- Stack of Cash - give the key to man at the end of the bar
- Bracelet - give the dates to the monkey
- Old Document - give the bartender (Sam's friend) the stack of cash
- Go to second room
- Exit - give the plane ticket to the waitress and the passport to the pilot
Level 26 (Second Room)
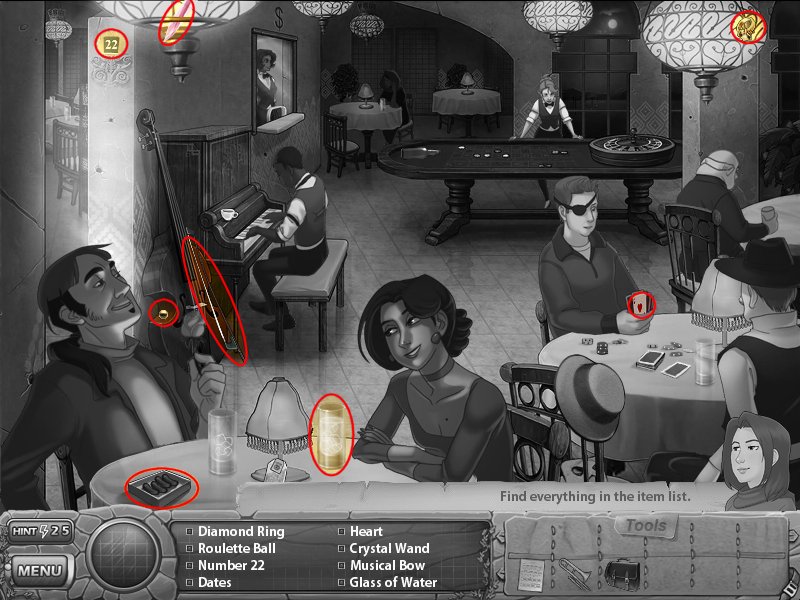
- Gold Wasps - give briefcase to man alone at far table
- Swift Symbol - give the piano play the sheet music
- Key - use the bow on the cello
- Go back to first room
- Chip Stack - give the gold coin to the banker/teller
- Passport - use the roulette ball, number 22, and chips at the roulette table
- Pendant - use the trombone behind the piano
- Plane Ticket - give the diamond ring to the guy with the rose
- Go back to the first room
Stage 4
Level 27
Level 28
- Zoom in on large table to get information
- Zoom in on solitaire table to... play solitaire!
- Golden Branch - use the knife on the cactusSolitaire
Solitaire - this is very simple, take the card and match either higher or lower making chains
Level 29
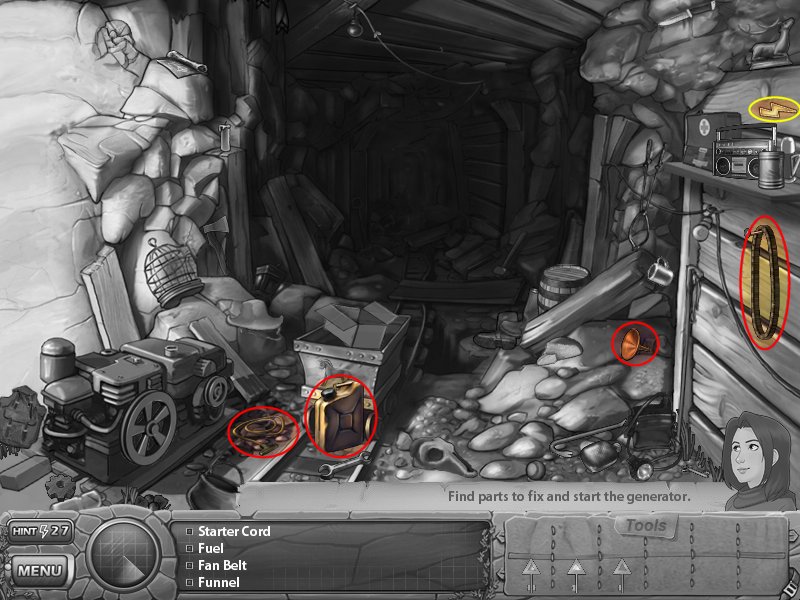
- Generator - use funnel, gas, fan belt, and starter
- Fossil - use pickaxe in upper, left corner on rocks
- Golden Branch - use rope coil in hole in ground
Level 30
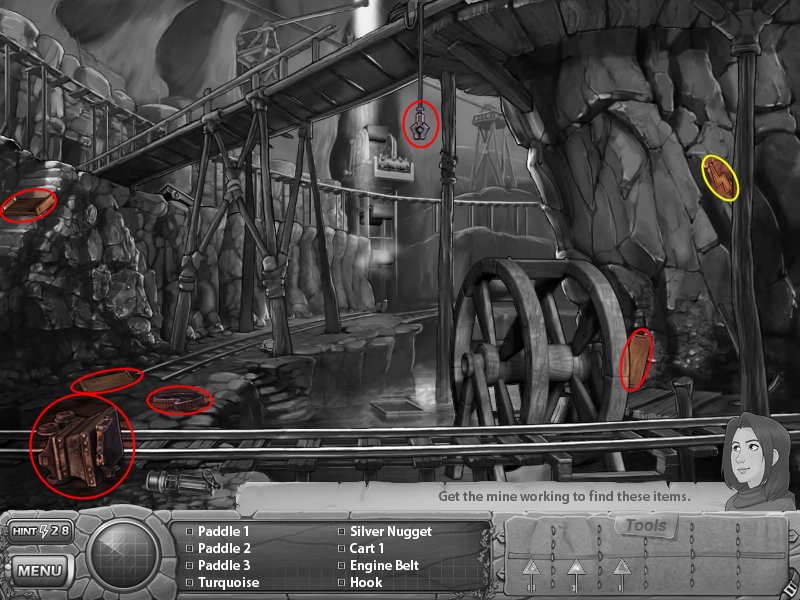
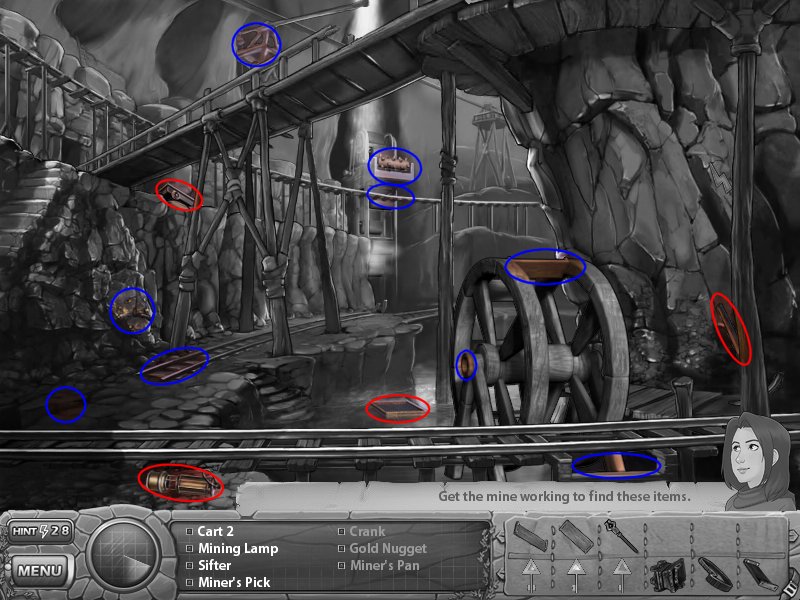
- Use trays on the water wheel
- Use engine belt on the machine in the back
- Use the hook on the crane above
- Put cart 2 on the upper tracks by machine
- Place sifter underneath the water wheel
- Crank - use the miners lamp near the left edge of the screen
- Put the other cart on the lower level tracks near where they end
- Put the crank on the water wheel
- Gold Nugget - use the pickaxe on the stone with gold in it and then click the cart, once it arrives over the sifter, use the crank
- Repeat the process
- Golden Branch and Gold Dust - zoom in the steps and use the miners pan in the water, drag it sideways with your cursor to move it
Level 31
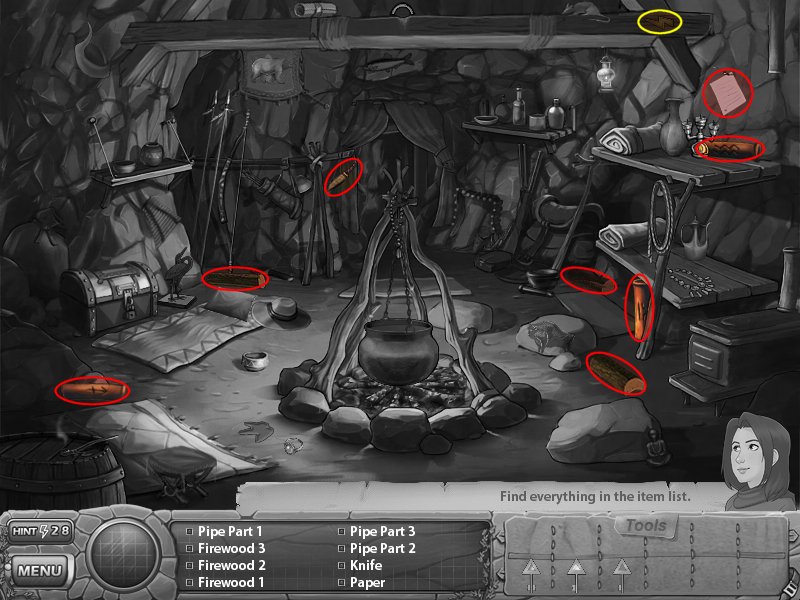
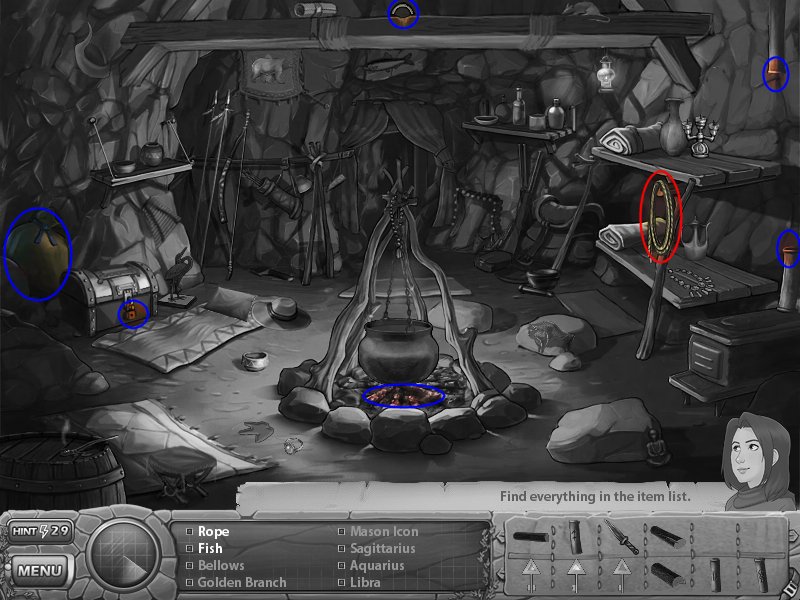
- Bellows - use the knife on the sack behind the chest
- Golden Branch and Mason Icon - use the hot pink key on the chest
- Astrological Signs - place the wood underneath the pot and use the bellows
- Treasure - use the pipes on the stove to the right (start with 3, 2, 1)
- Exit - use the rope on the hook above the pot and then pull the end
Level 32
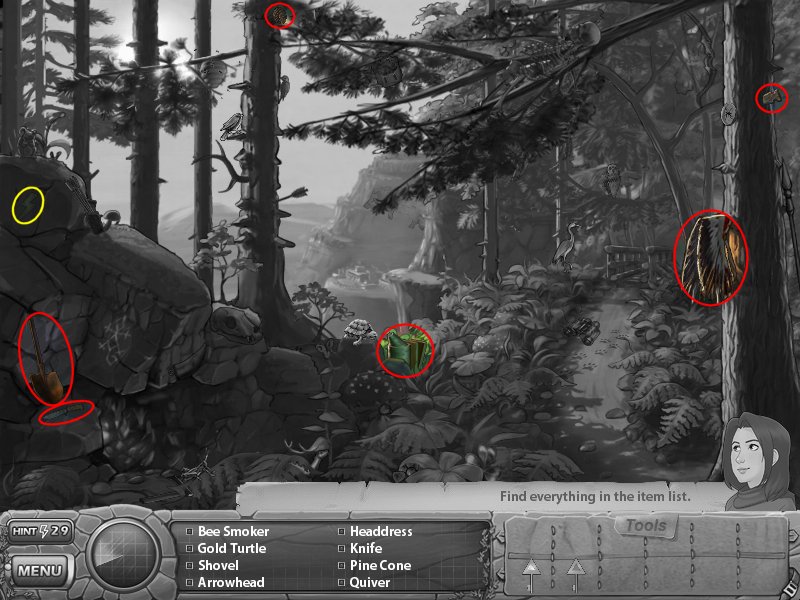
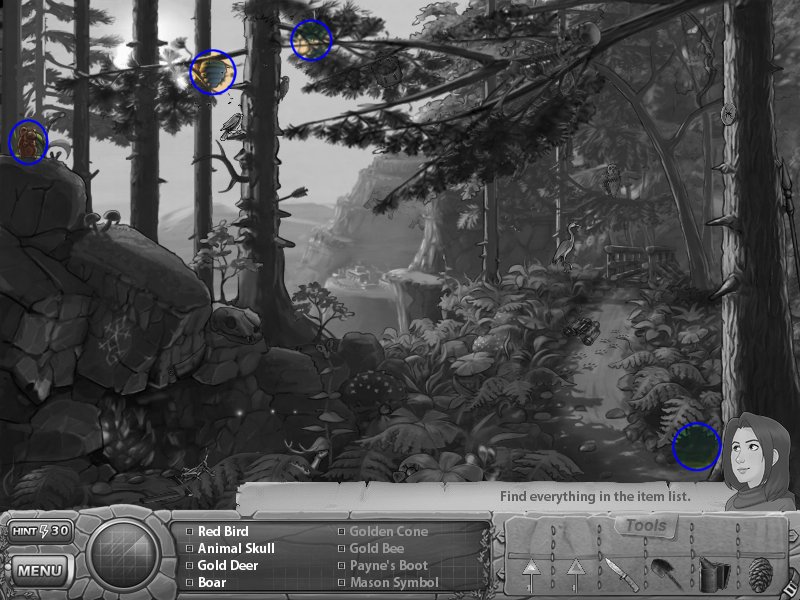
- Gold Bee - use the bee smoker on the beehive
- Mason Symbol and Payne's Boot - use the knife on the tree branch, near where you found the pinecone
- Golden Cone - give the pinecone to the (very adorable) squirrel
- Golden Branch - use the shovel at the base of the tree to reveal a chest, use the light pink key on the chest
Level 33
- Use the key card from Mr. Payne on the security gate
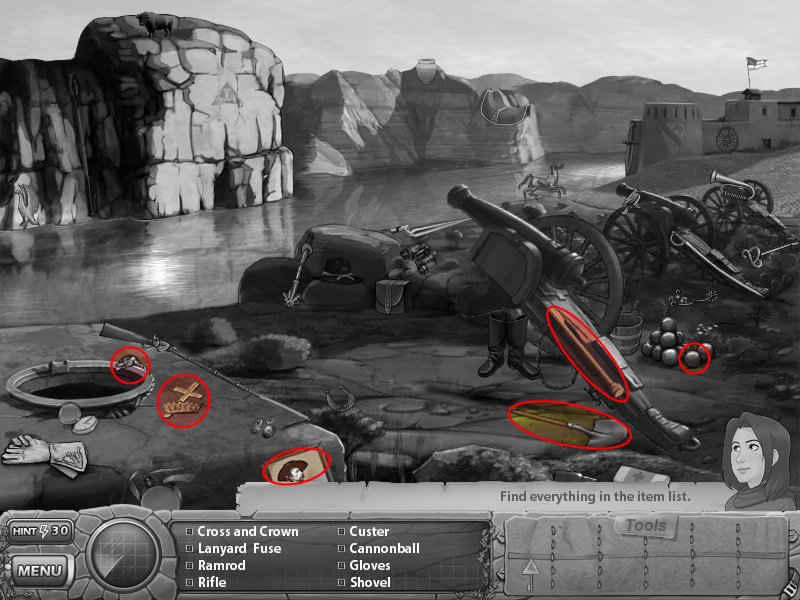
- Assemble the cannon: cannon ball, ramrod, fuse and wheel
- Click the cannon to aim it (middle option) and click the end of the fuse to fire
- Tree Trunk - use the cross and crown on the rock that falls from the cannon blast and then use the shovel on the spot where it was to reveal a chest, use the blue key on the chest
Level 34
- Vial of Stability- put the tree back to together
Stage 5
Level 35
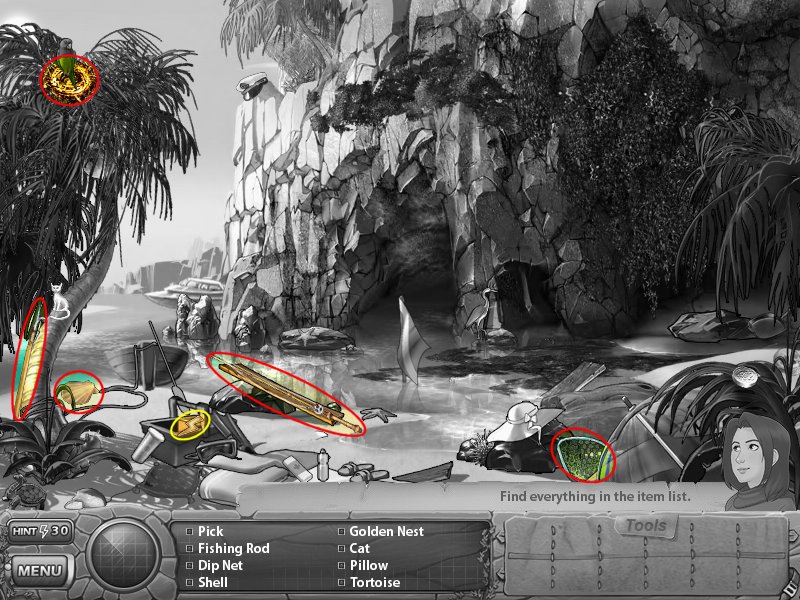
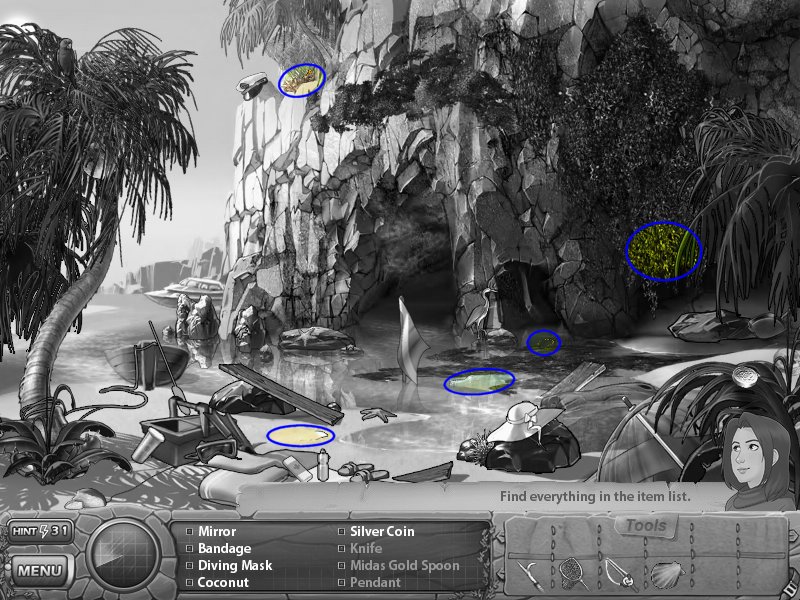
- Pendent - use the pick in the swampy area
- Midas Gold Spoon - use the fishing rod to grab the sparkling item from the bird nest on the cliff
- Knife - use the seashell to dust away sand near the edge of the plank
- Message in a Bottle - use the net to retrieve a bottle in the water
- Exit - use the knife on the vines
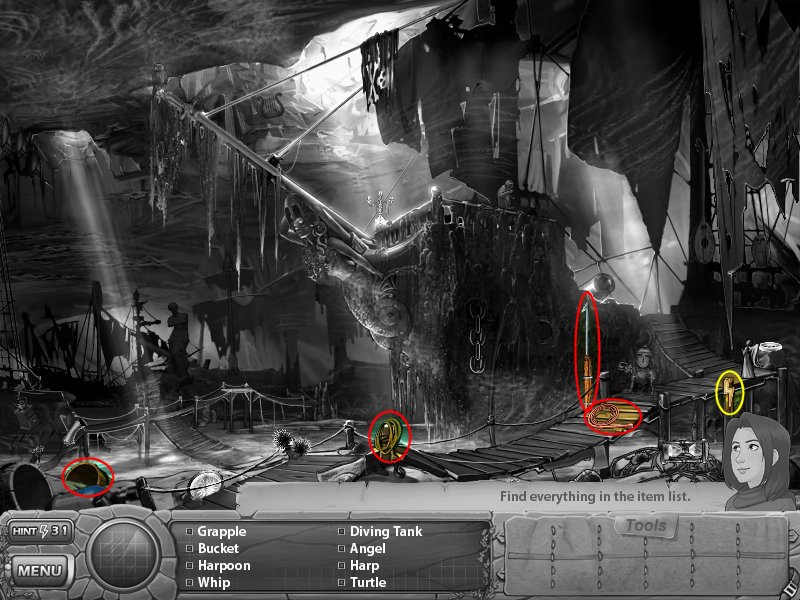
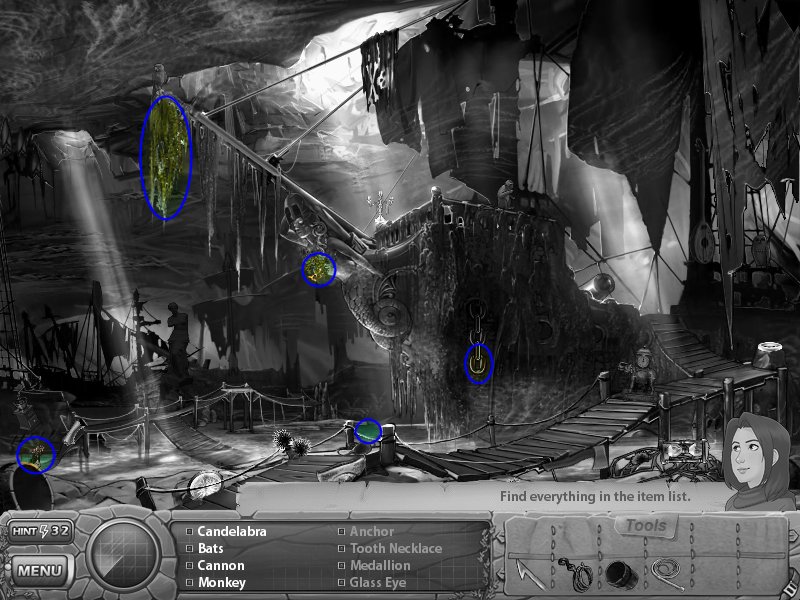
Level 36
- Glass Eye - use the bucket in the water
- Medallion - use the whip on the ships lady
- Tooth Necklace - use the spear on the seaweed hanging from the mast, near the bird
- Anchor - use the grapple near the left side of the screen
- Golden Links - use the anchor on the chain
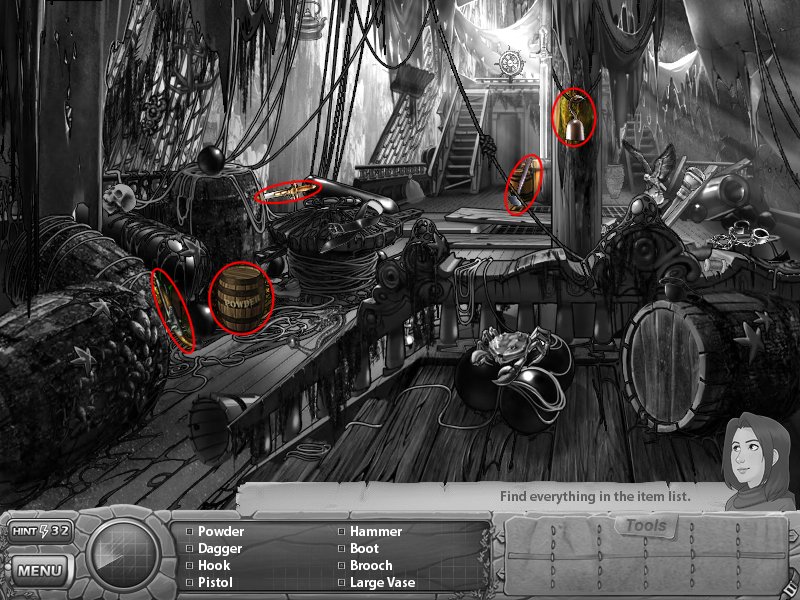
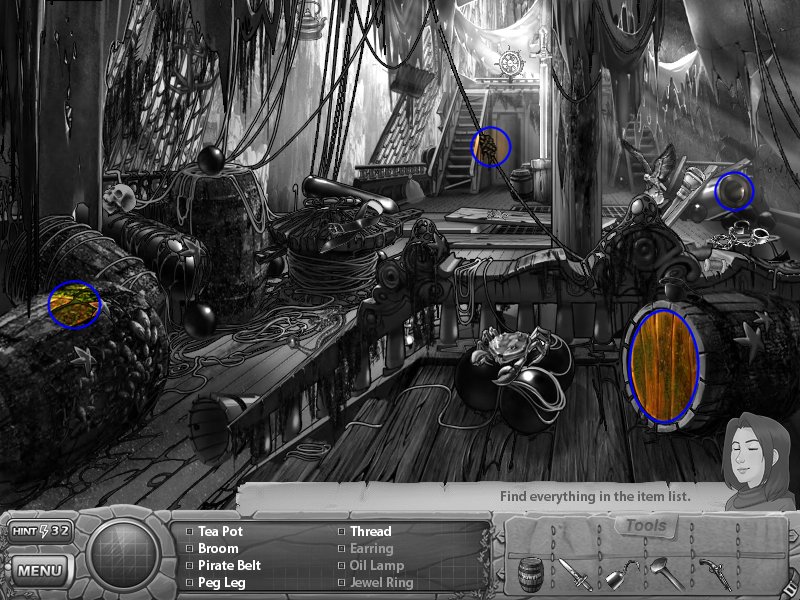
Level 37
- Jeweled Ring - use the hammer on the barrel to the right
- Eearing - use the hook on the cannon
- Oil Lamp - use the knife on the rope knot
- Pirate Chest - place the powder on top of the barrel to the left and us the gun to shoot it
Level 38
- Pirate Shirt - use sword on bed curtains
- Telescope - use the key on the chest
- Exit - put the telescope in the middle of the desk
Level 39
- Pirate Sword - use the mirror on the sparkle on the wall
- Silver Coin - put the goblet in the elephants hand and then use the hammer on the water to fill it up
- Diamond - place the three silver coins into the side of the chest
- Vial of Beauty - use the pirate sword on the wrapped statue
Stage 6
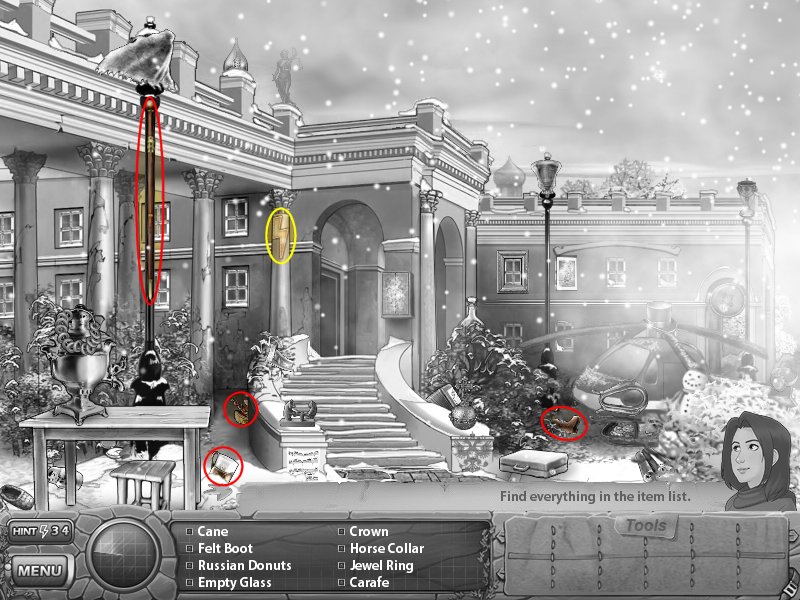
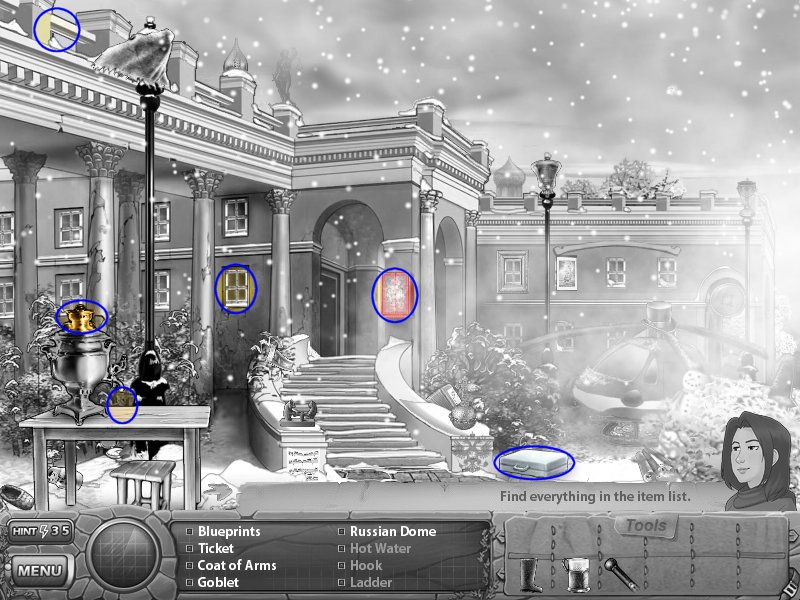
Level 40
- Hot Water - place the empty glass under the gold beverage crock and use the boot on top it
- Hook - use the hot water to melt the ice on the fire case
- Ladder - use the hook on the upper, left of the screen
- Painting - use the cane on the brief case
- Exit - use the ladder under the lit window
Level 41
- Place the exhibits in their correct places
Level 42
- Faberge Egg 2 - use the acid on the red box lock
- Faberge Egg 3 - place the medal in the medal shape on the edge of the couch
- Gold Canary Eggs - zoom in on the safe to get a puzzle
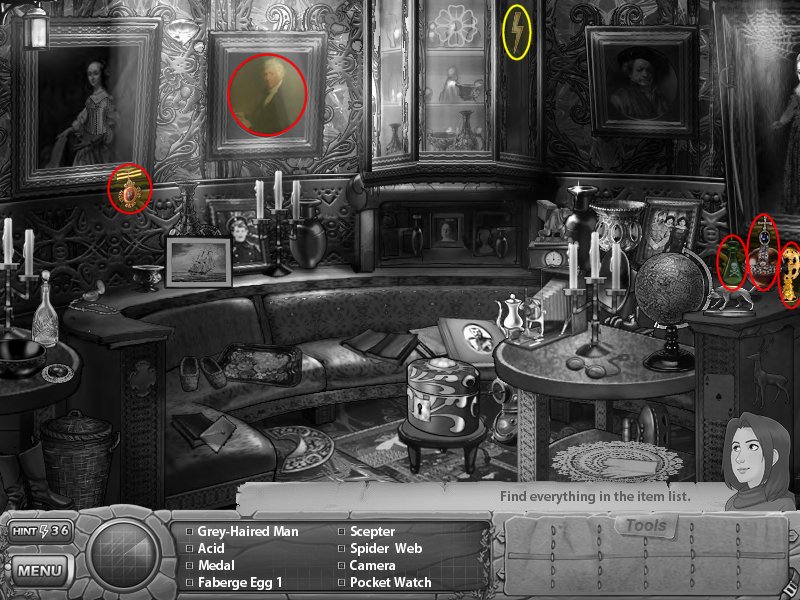
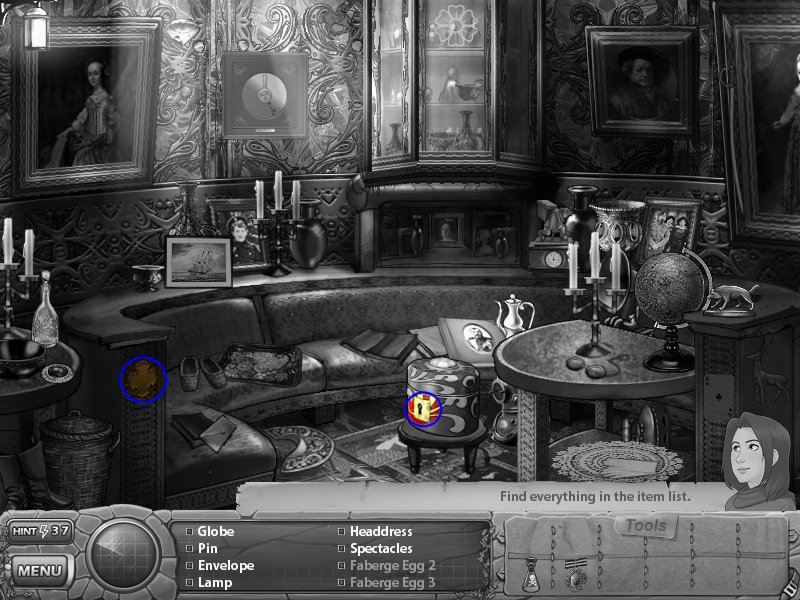
Safe Puzzle - swap the different colors to create a key that matches the lock
- Solution (from top to bottom): PINK, BLUE, ORANGE, GREEN, RED
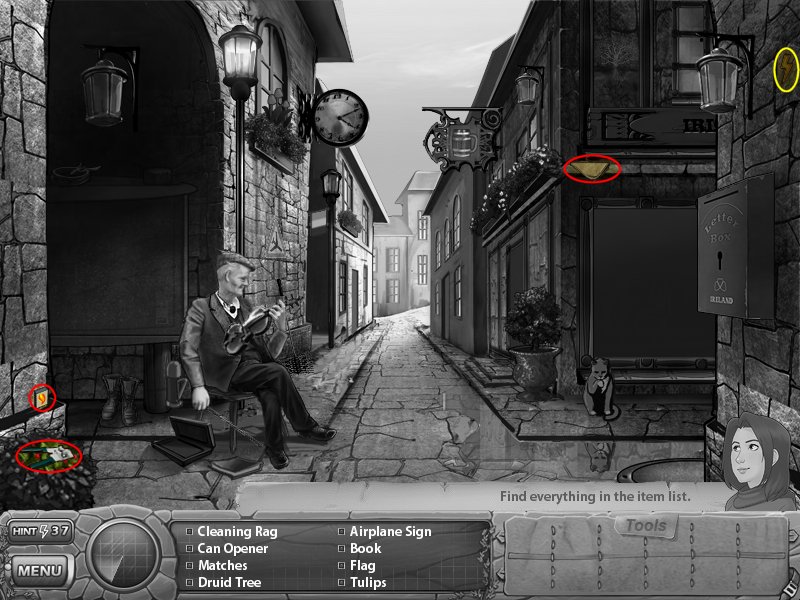
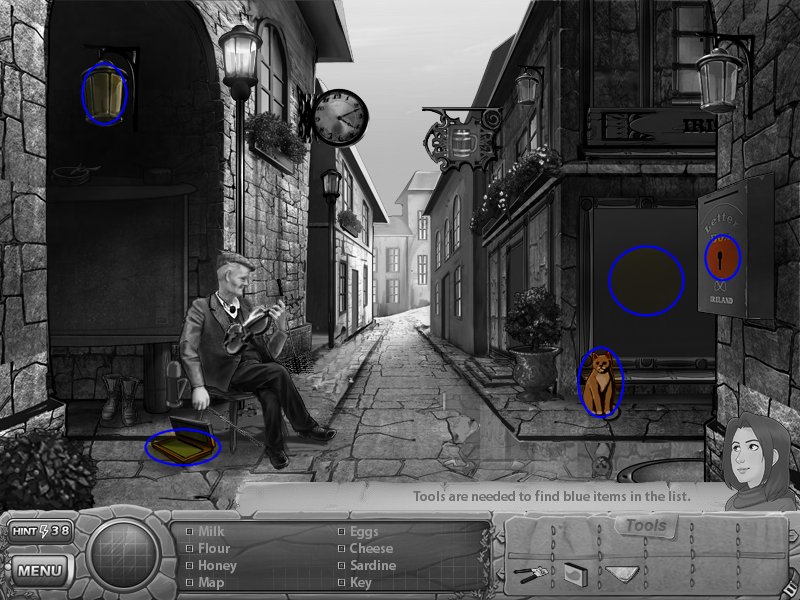
Level 43
- Map - use matches on lantern
- Milk, Flour, Honey, Eggs and Cheese - use the cleaning rag on the dirty window
- Sardine - use the can opener on the can
- Key - give the sardine to the cat
- Money - use the key on the mailbox
- Exit - give the money to the fiddler
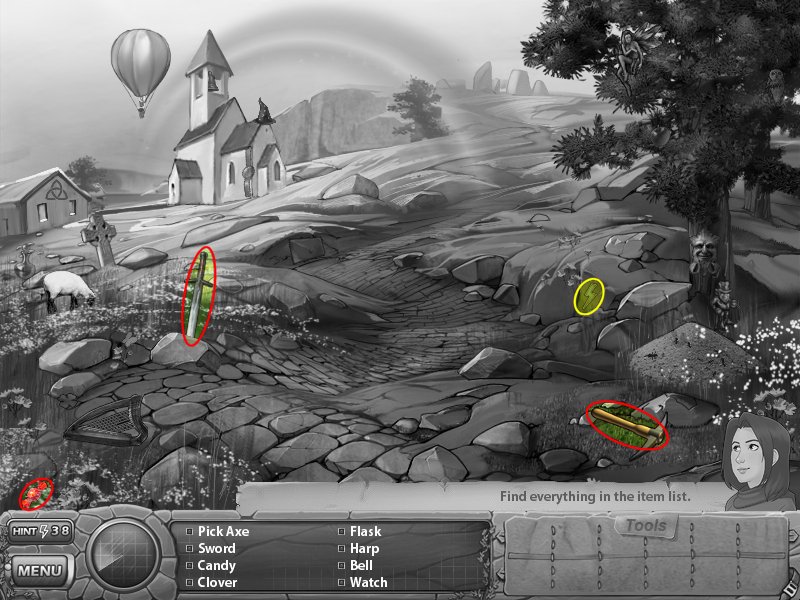
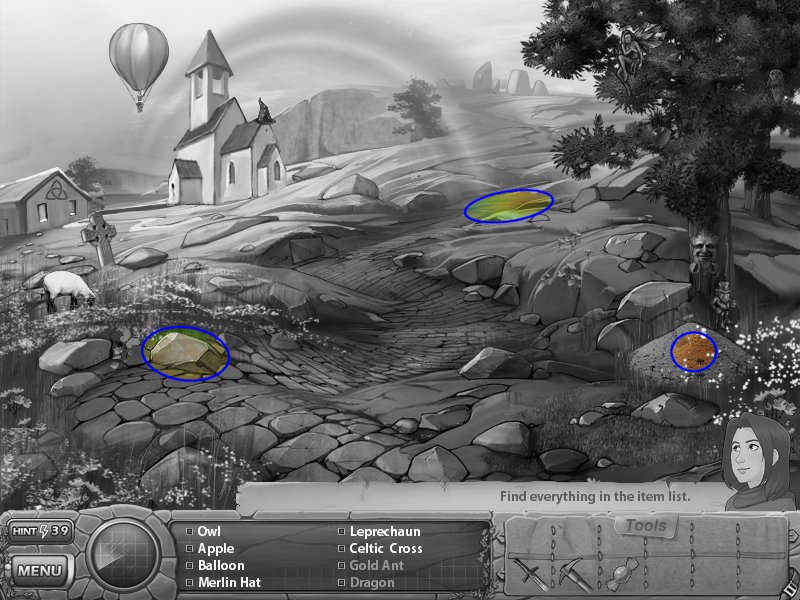
Level 44
- Golden Ant - place the candy on the ant hill
- Dragon - use the sword on the rock with fire coming from underneath it
- Pot of Gold - use the pickaxe at the bottom of the rainbow
Level 45
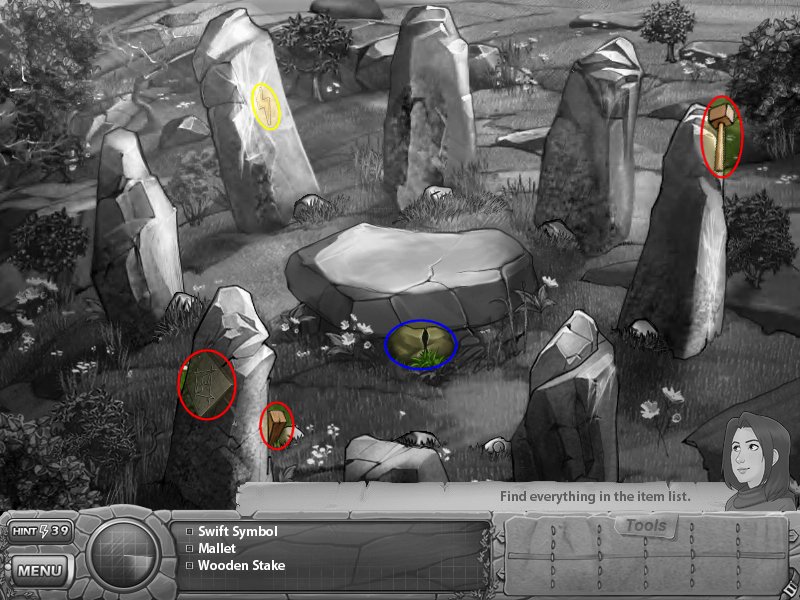
- Exit - use the wooden stake and the mallet on the crack in the center rock
Board Puzzle - simply clear the boards away one at a time
Matching Tiles Puzzle - this is a simple match game, remove the matching tiles, but use some strategy as some can't be matched until you uncover them first
Stone Puzzle - using the sequence you just took a picture of, click the rocks in order according to the symbols
Level 46
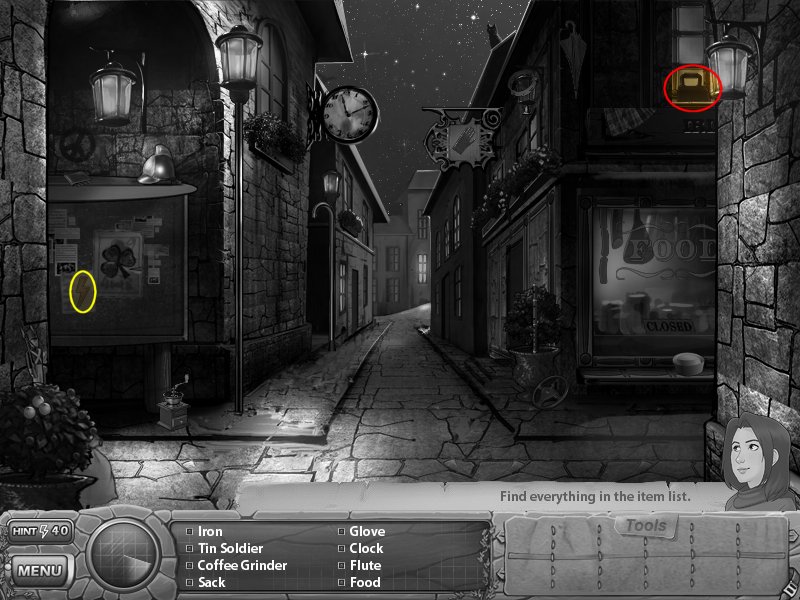
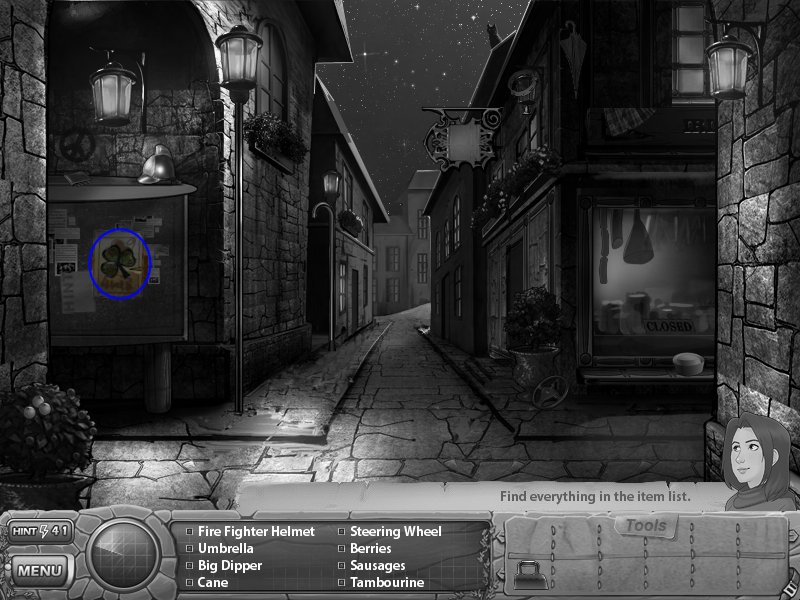
- Letter - use the iron on shamrock paper on the bulletin board
Stage 7
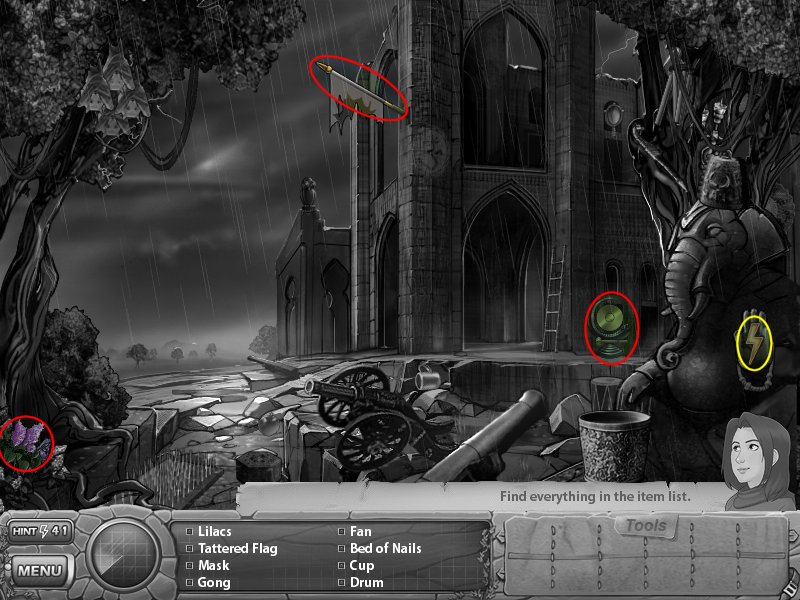
Level 47
- Mallet - use the flag on the cannon
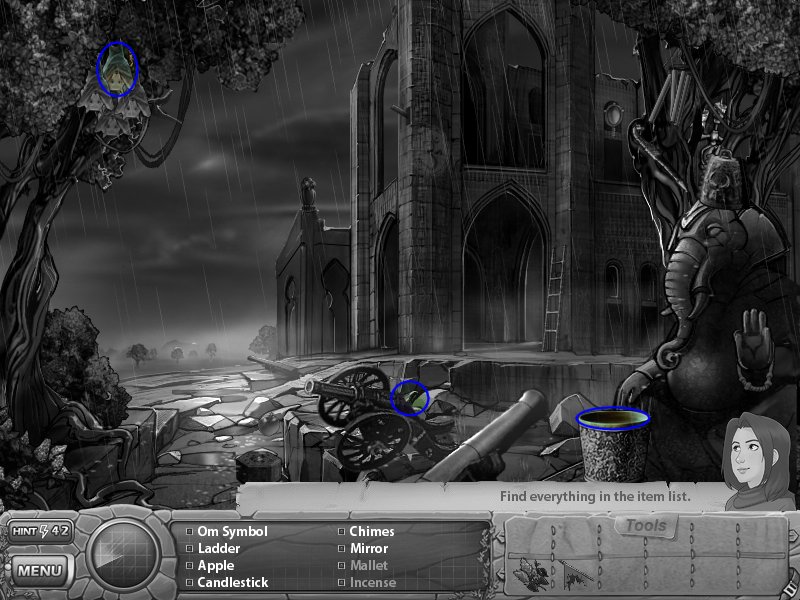
- Incense - place the lilacs in the bucket at the front of the screen, right side, then use the mallet on it
- Goddess - use the incense on the flames and wave it under the bats in the upper, left corner
Level 48
- Zoom in on the large chess board

Chess Puzzle - thankfully we don't actually have to place chess, just match three or more objects by swapping pieces
- Once you clear the background, the Queen Key will appear, keep playing until you can get it to fall off the end of the board
- You cannot use the Queen Key to swap pie ices
- Exit - use the Queen Key in the middle of the board
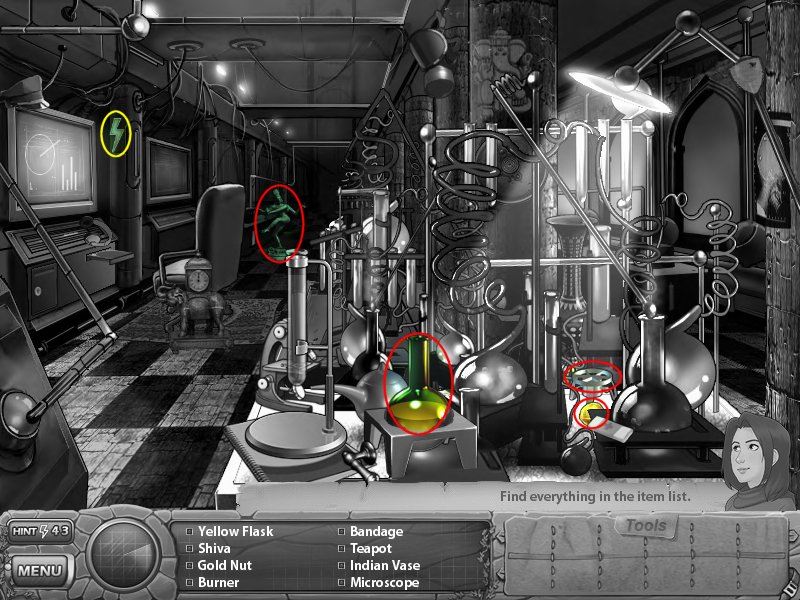
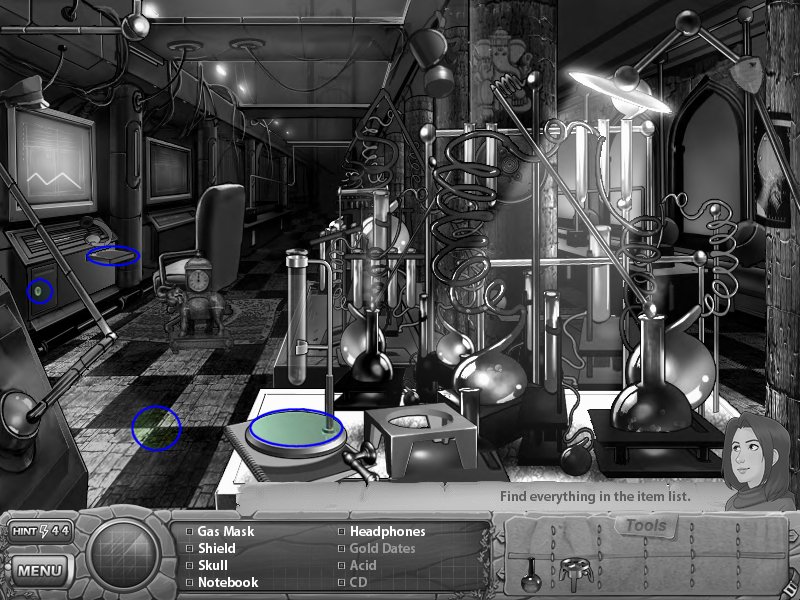
Level 49
- Acid - use burner on left side of table
- Gold Dates - break the yellow flask over the floor
- CD - pour the acid on the cabinet lock on the console
- Golden Horse - put the CD into the CD player
Level 50
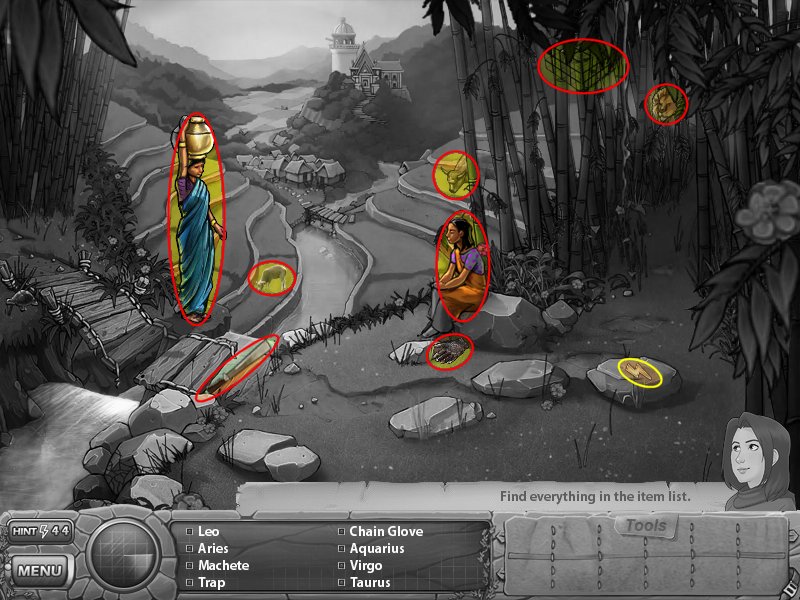
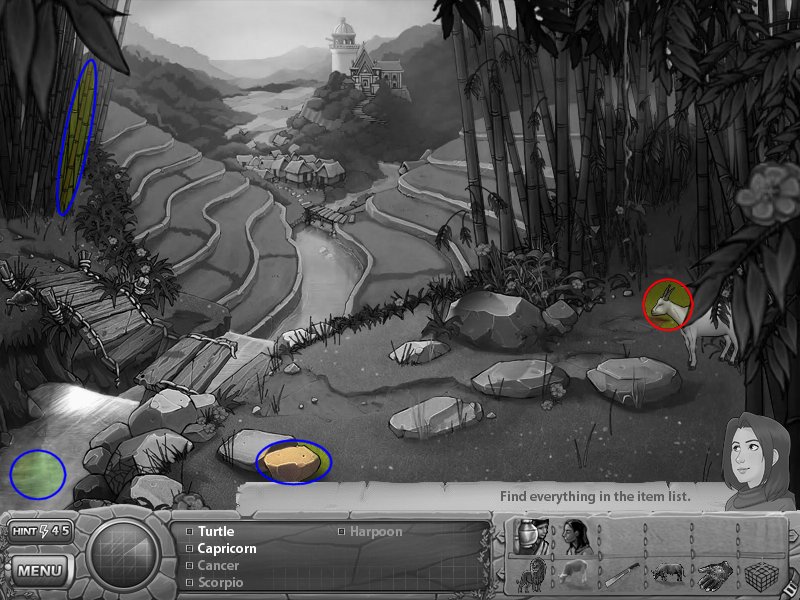
- Harpoon - use the machete on the bamboo on the left side
- Scorpio - use the chain glove on the rock near the front, left side
- Cancer - use the trap in the water
- Pisces - use harpoon in the water
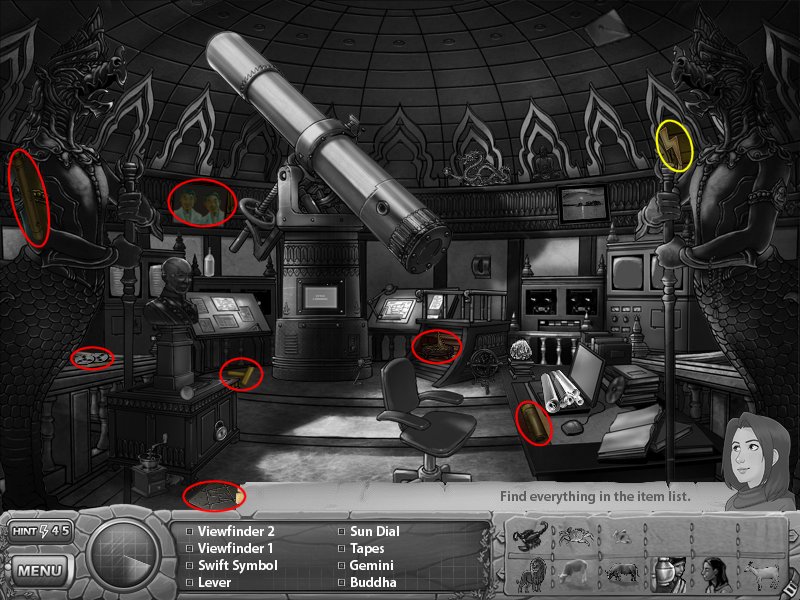
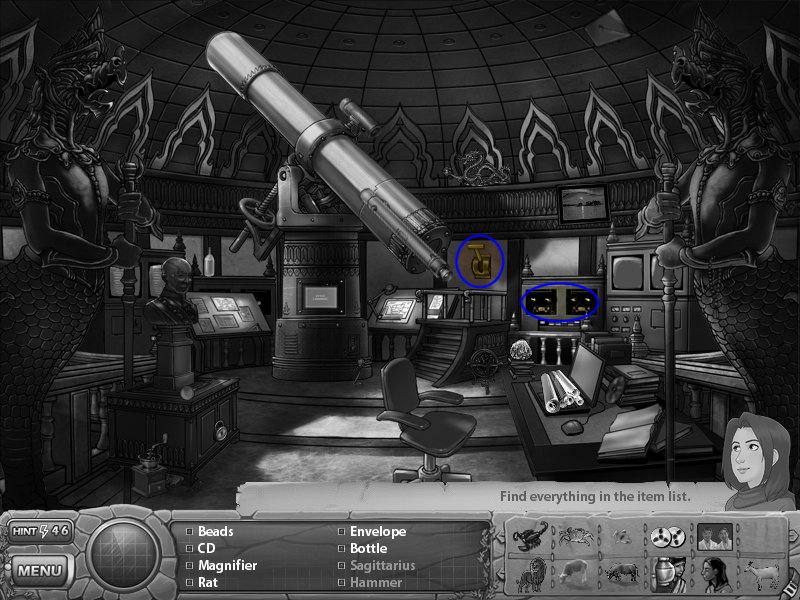
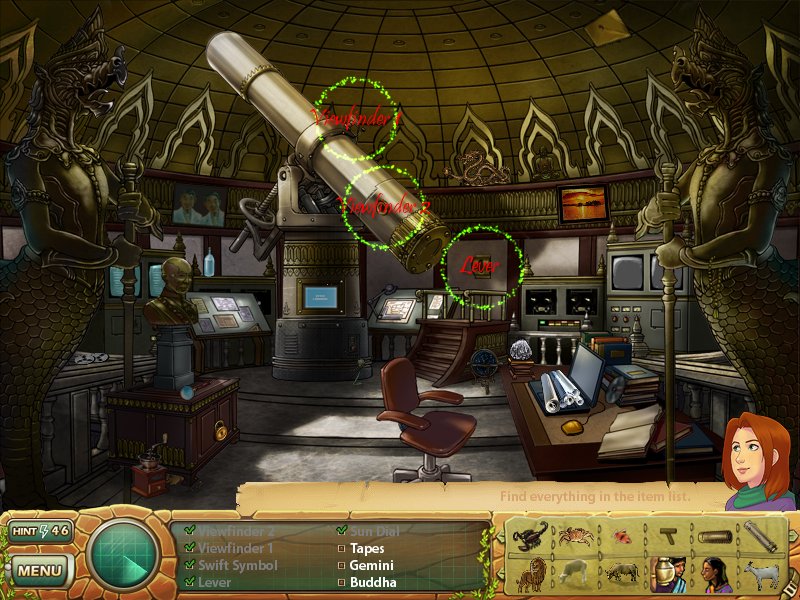
Level 51
- If you click items when your inventory is full, green circles will appear in the spots you need to put items (it may be triggered other ways but I'm not sure how)
- See screenshot for placement of items
- Hammer - once the telescope is assembled, pull the lever and the hammer will be to the right side of the now open roofSagittarius
- - put the tapes in the machine at the back
- Libra - use the hammer on the locked cabinet
- Once you have all the constellations, click the telescope
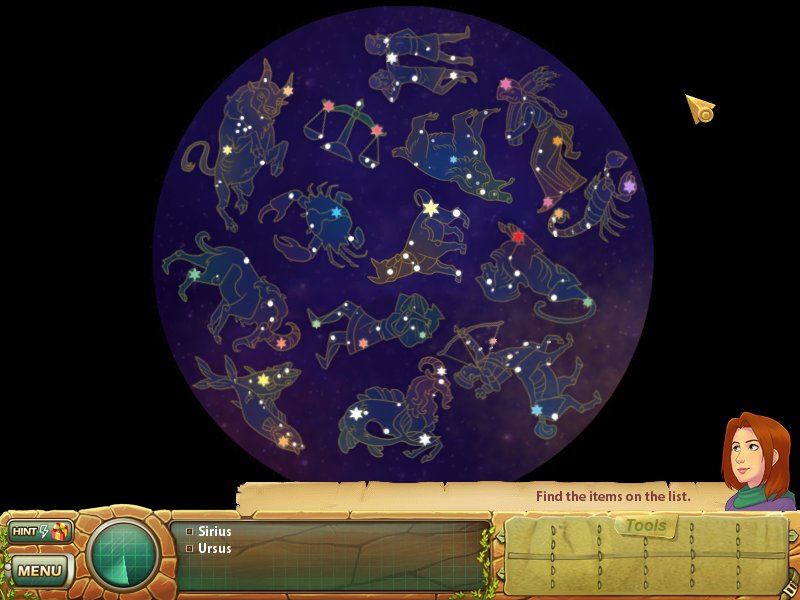
- Vial of Loyalty - zoom in on the computer and drag the constellation Sirius onto the keyboard, it will then show a few keys, you need to click them until they turn green (I just clicked them randomly until they all lit up)
- Exit - zoom in on the machine with the two screens and do the same thing with the last constellation
Constellation Puzzle - you need to find the constellations by matching the stars on the constellation pictures to the ones in the sky and dragging them onto the right stars
Hint: I found it helpful to rotate them on the black background
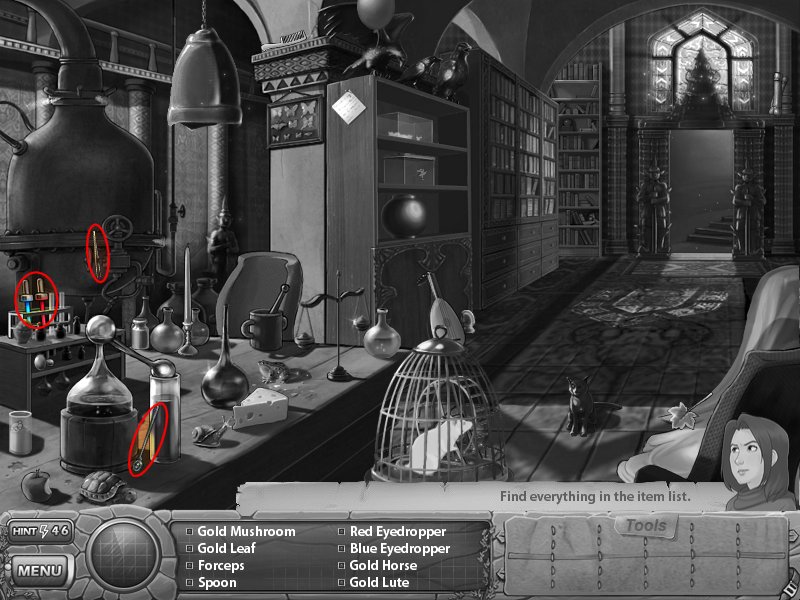
Level 52
- Red Powder - use the spoon on the red powder on the left side
- Gold Apple - use the red eyedropper on the apple
- Gold Cheese - use the red eyedropper on the cheese
- Gold Bug - use the forceps to grab the gold bug that must have fell into the powder
- Feather - use the blue eyedropper on the birds on the top shelf
- Gold Fish - use the blue eyedropper on the round fishbowl (tricky, eh, you thought you should use the red eyedropper on the fish didn't you?)
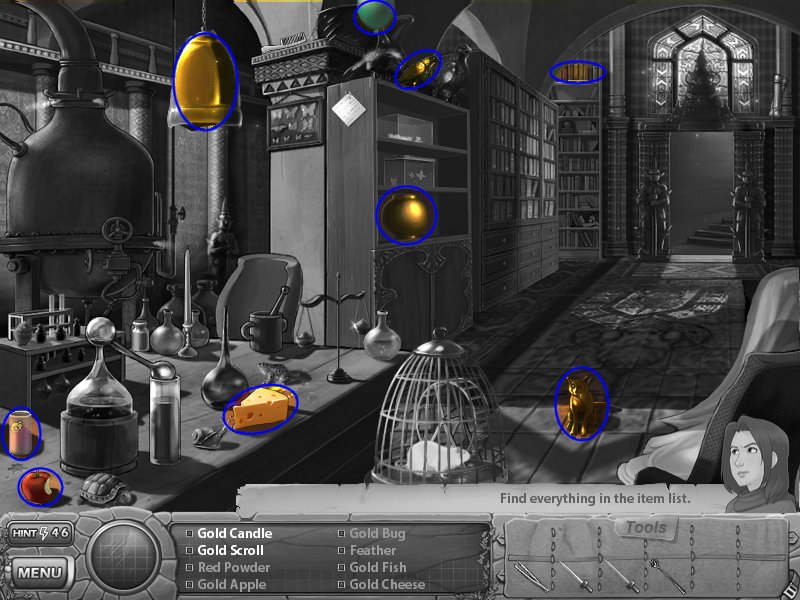
Defeating Chess
- use the red eyedropper on the books on the top of the bookshelf
- use the blue eyedropper on the gold case hanging from the ceiling
- use the red eyedropper on the balloon where the birds are
- use the blue eye dropper on the cat
THE END...?
Comments will load when you reach this part of the walkthrough.