
Walkthrough Information
Images
©ERS Game Studio
Overview: After your
awake from a terrible car crash, you find yourself trapped in a
cemetery. You must help the ghosts as they are your only chance of escape.
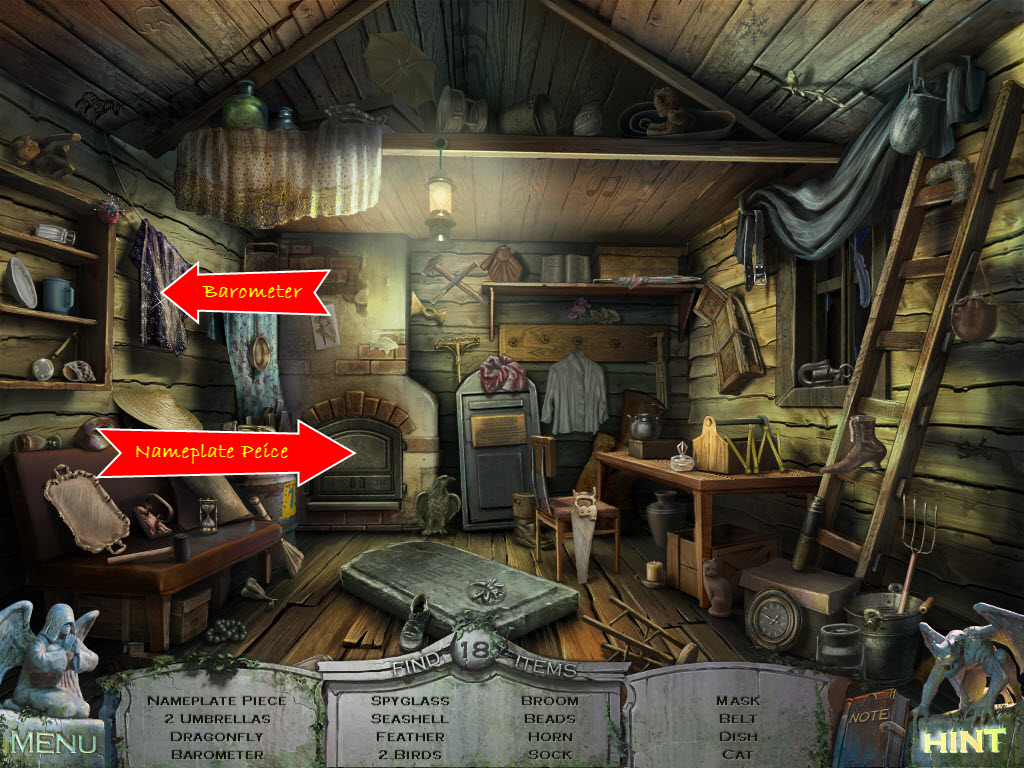
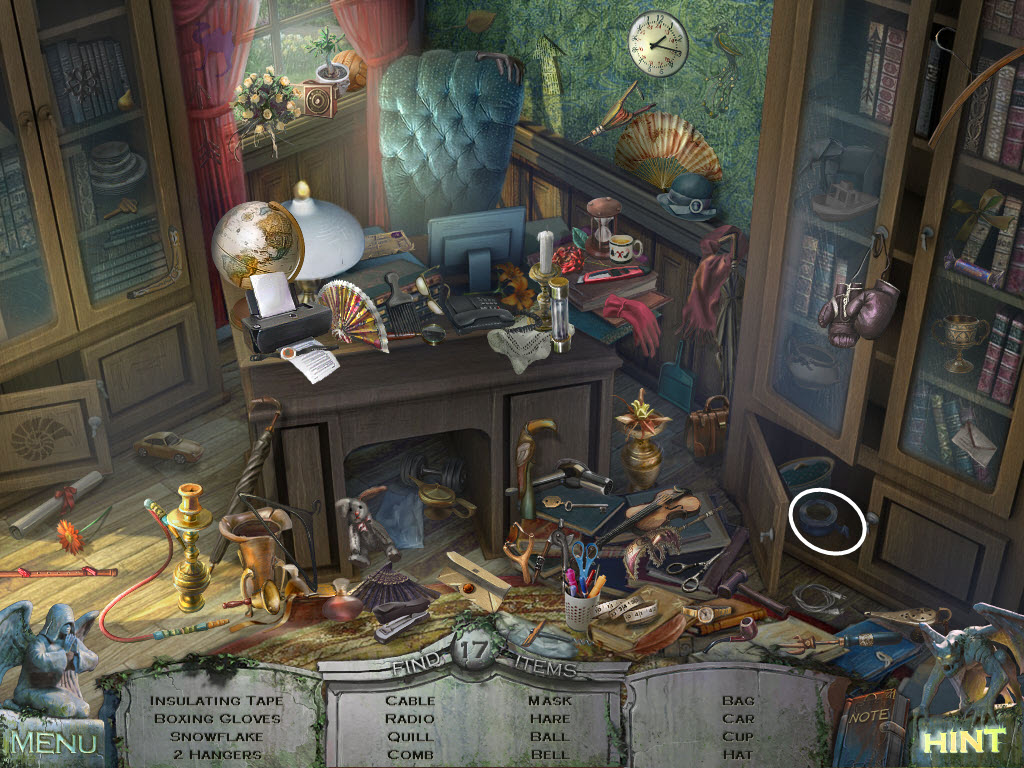
Hidden Object Areas: The objects in each area will vary per game/per player. Only inventory items will be indicated. You will sometimes need to move/open things to find items. These items are also marked as they are the same for every player.
Hints: These are unlimited, but must refill after use.
Journal: These keeps a running commentary of your progress and important notes.
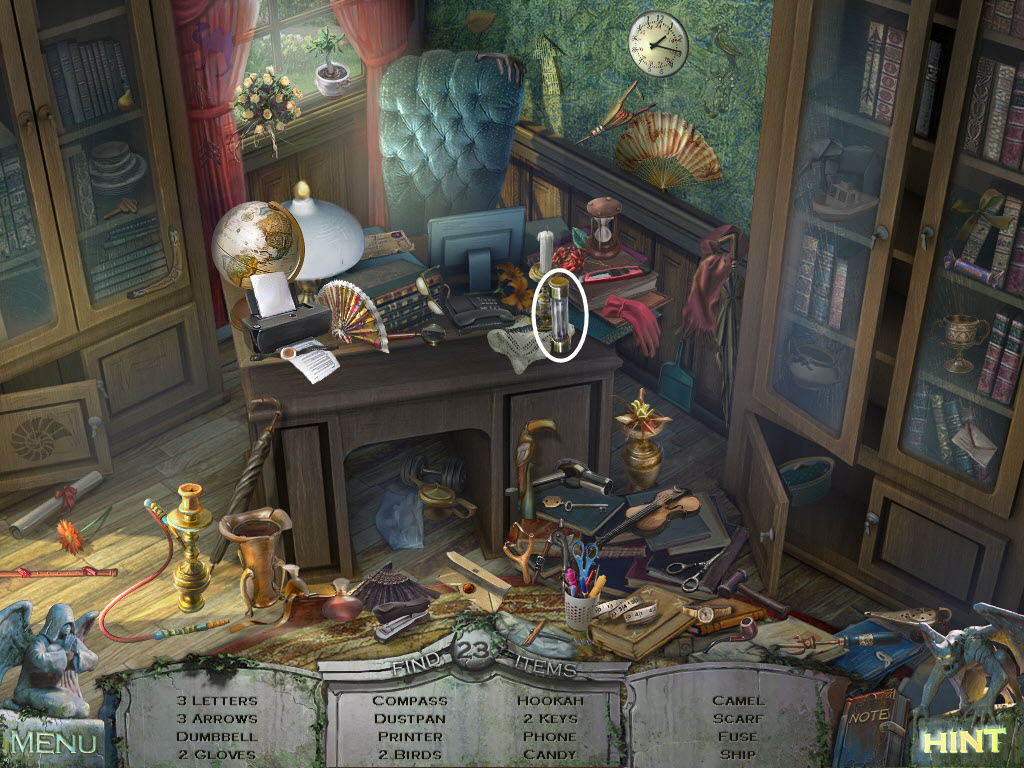
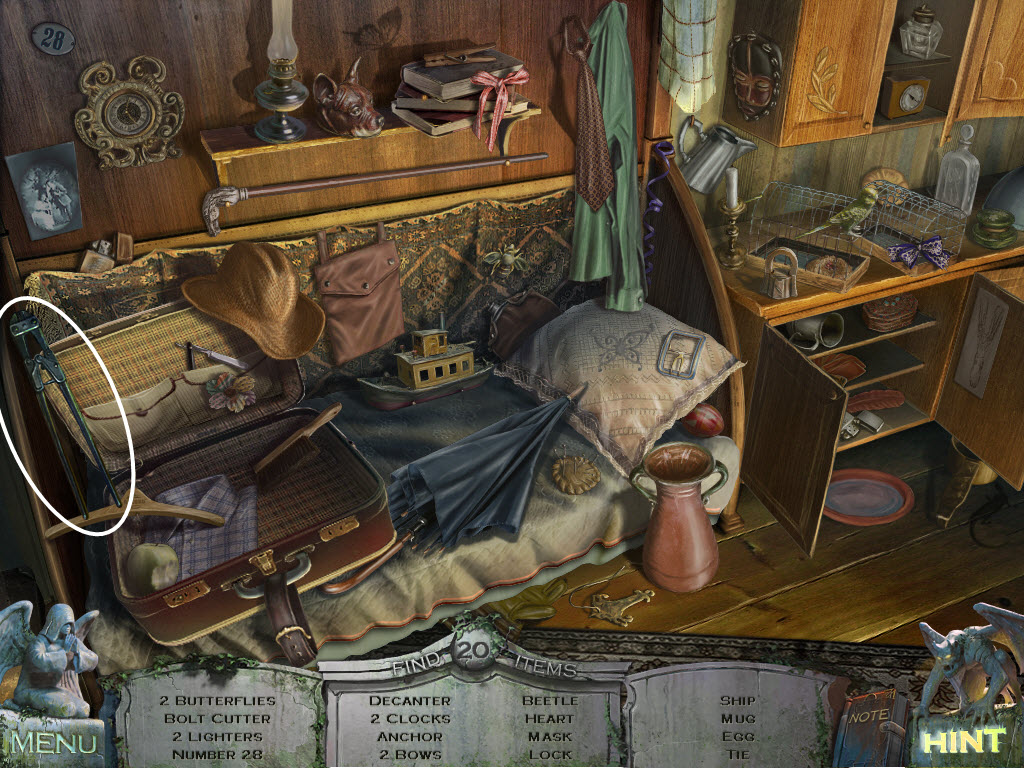
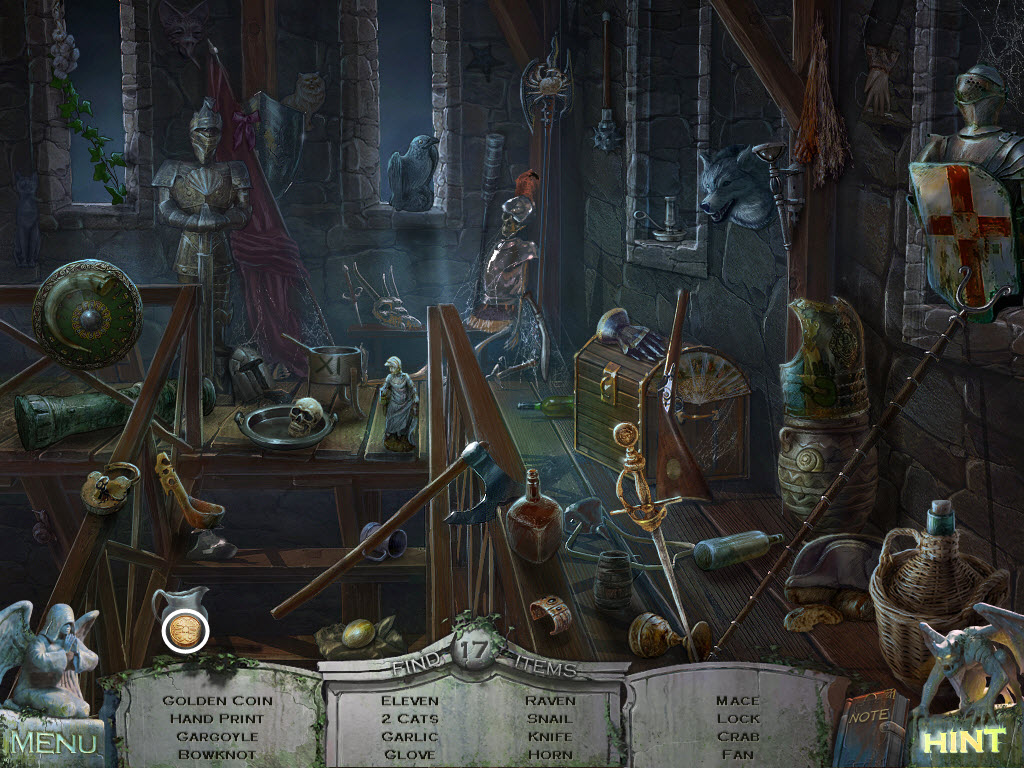
Graveyard
Outside House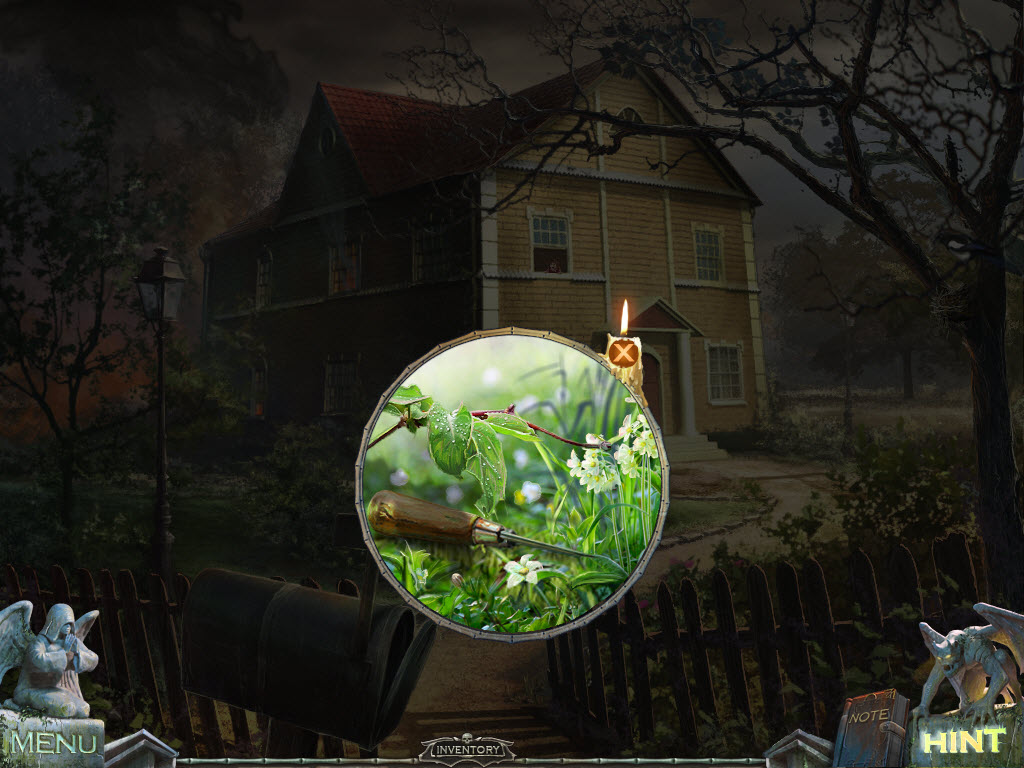

Outside House
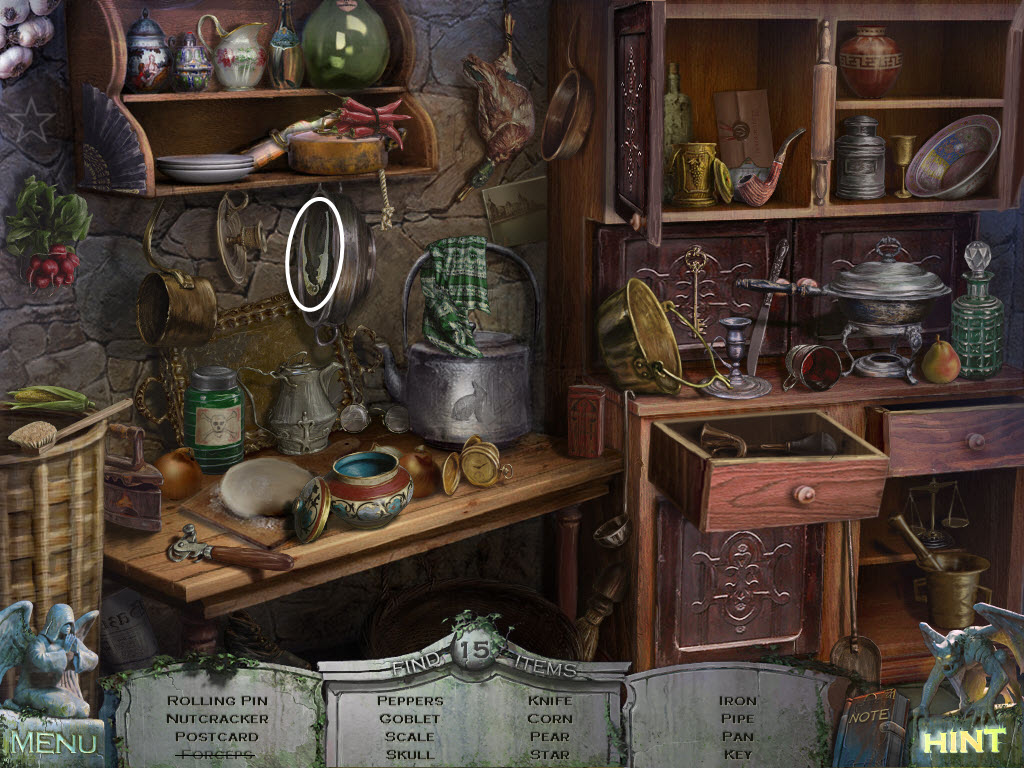
Kitchen
Hallway
Stagecoach
Prison
Bridge
Tower
Hidden Object Areas: The objects in each area will vary per game/per player. Only inventory items will be indicated. You will sometimes need to move/open things to find items. These items are also marked as they are the same for every player.
Hints: These are unlimited, but must refill after use.
Journal: These keeps a running commentary of your progress and important notes.
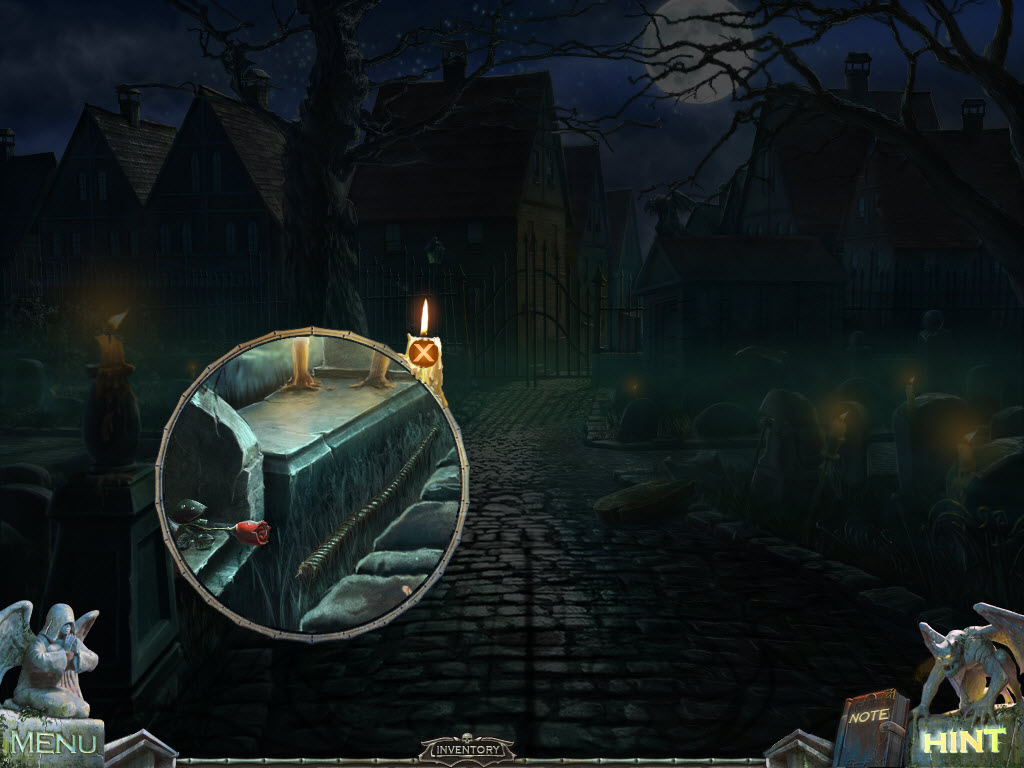
Graveyard
- look on the ground on the left side
- pick up the Metal Rod
- examine the fallen tombstone
- use the Metal Rod to move the tombstone
- take the Nameplate Piece
- go right
- look at the picture of the little girl
- read the newspaper
- go right
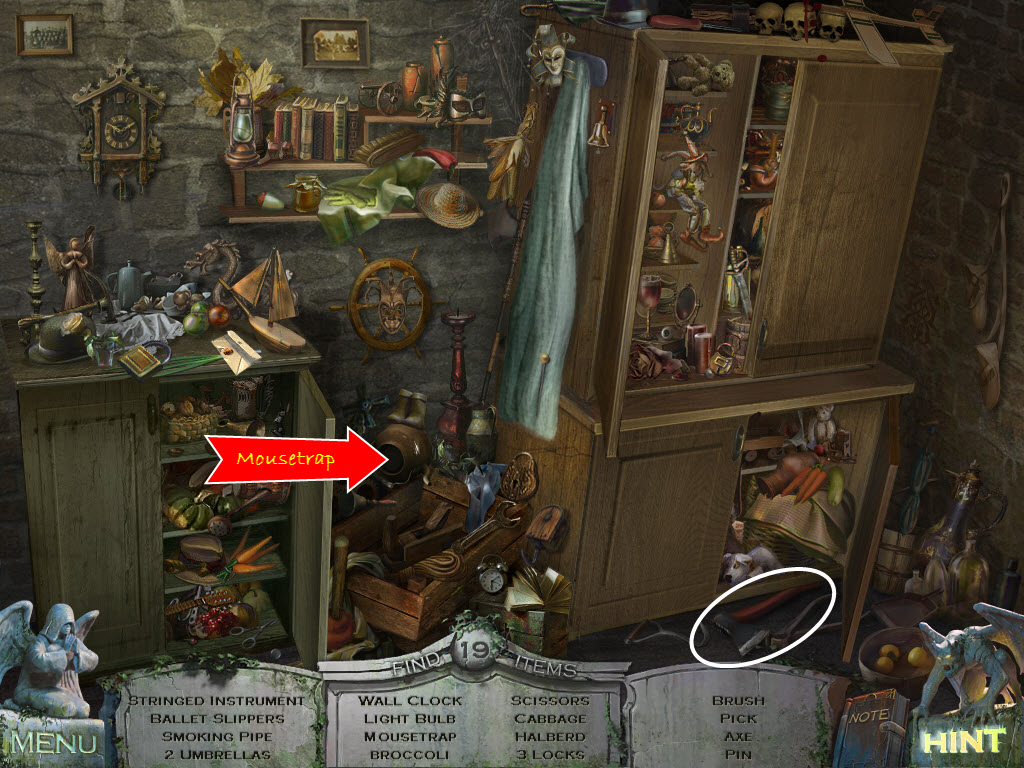
- examine the door - hidden object area
- take the Nameplate Piece
- go down
- examine the man's tombstone - there is no nameplate
- place the Nameplate Pieces in the recessed area
- listen to the ghost
- enter the vision
Outside House
- look at the window with the little girl - listen to her
- look in the mailbox
- take the Newspaper
- examine the area between the bushes where the butterflies are flying
- pick up the Awl
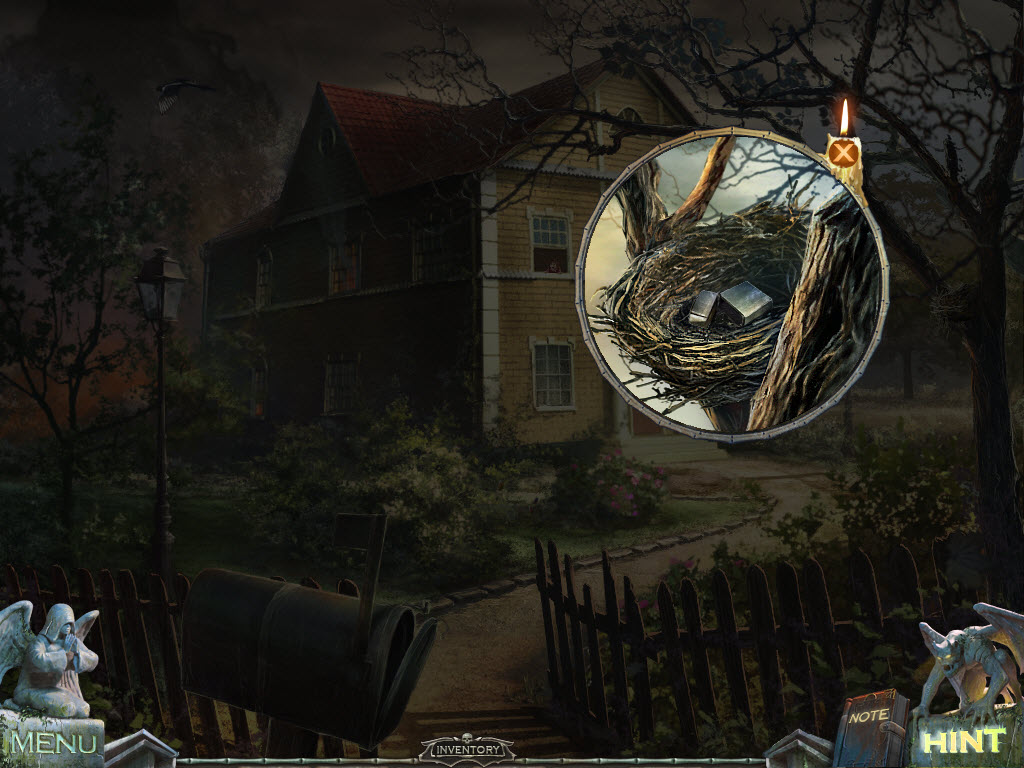
- click the bird sitting in the nest - it dropped something
- examine the next and take the Lighter's Hull
- go up
- examine the front door
- pick up the Cleaner
- place the Newspaper in front of the door and push it under
- use the Awl on the lock
- pull the Newspaper back out and take the Key
- use the Key on the lock
- enter the house
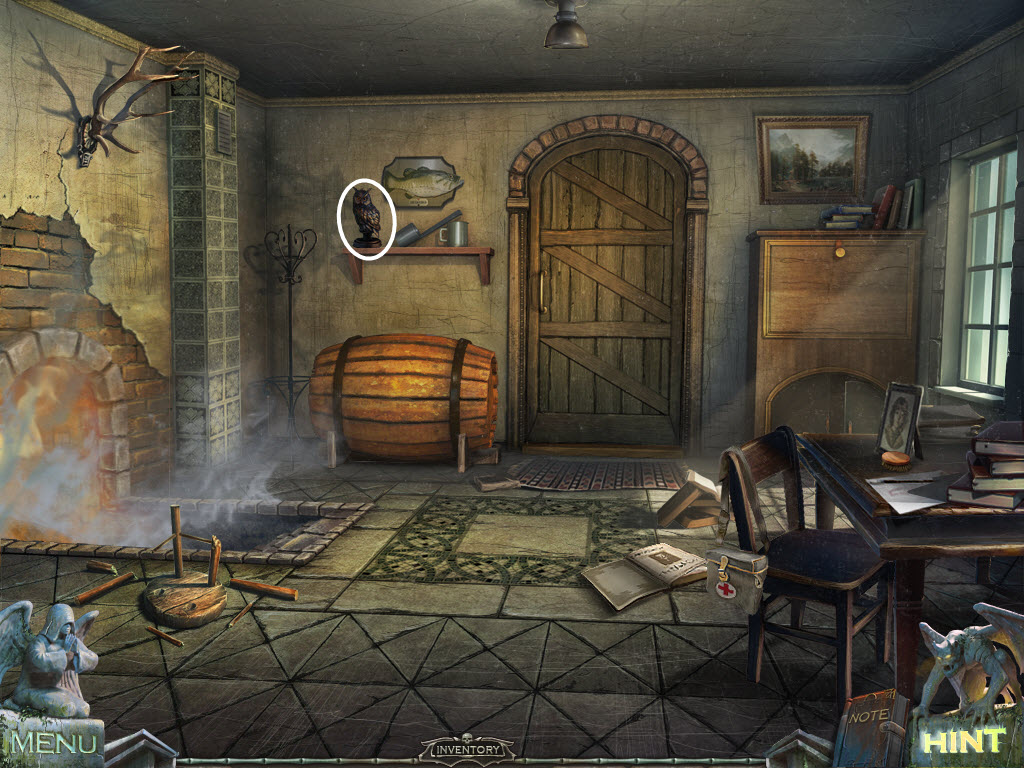
- pick up the owl Statuette
- throw the Statuette through the window
- open the cupboard door and look inside
- take the Flashlight
- look at the picture of the little girl
- take the Brush
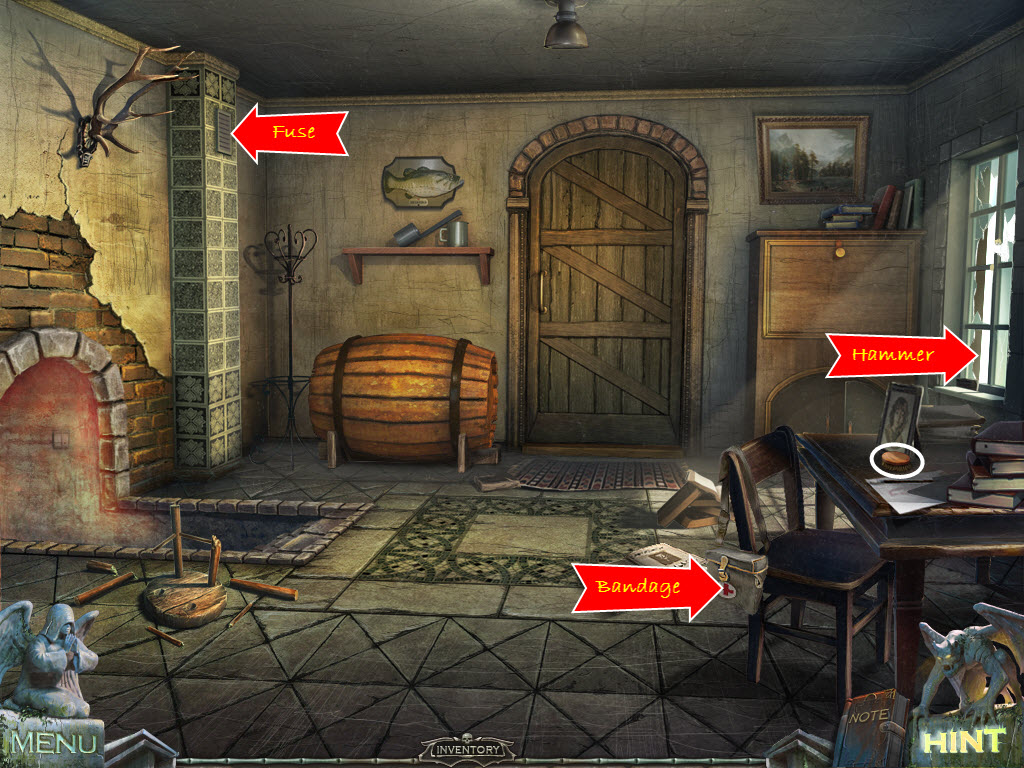
- open the first aid kit and take the Bandage
- examine the grate on the chimney
- remove the grate and use the Flashlight
- take the Fuse from inside
- look out the window and take the Hammer
- examine the book lying open on the floor
- make a note of the numbers - they will also be added to your journal
- examine the keg by the door
- use the Hammer on the keg twice
- go left
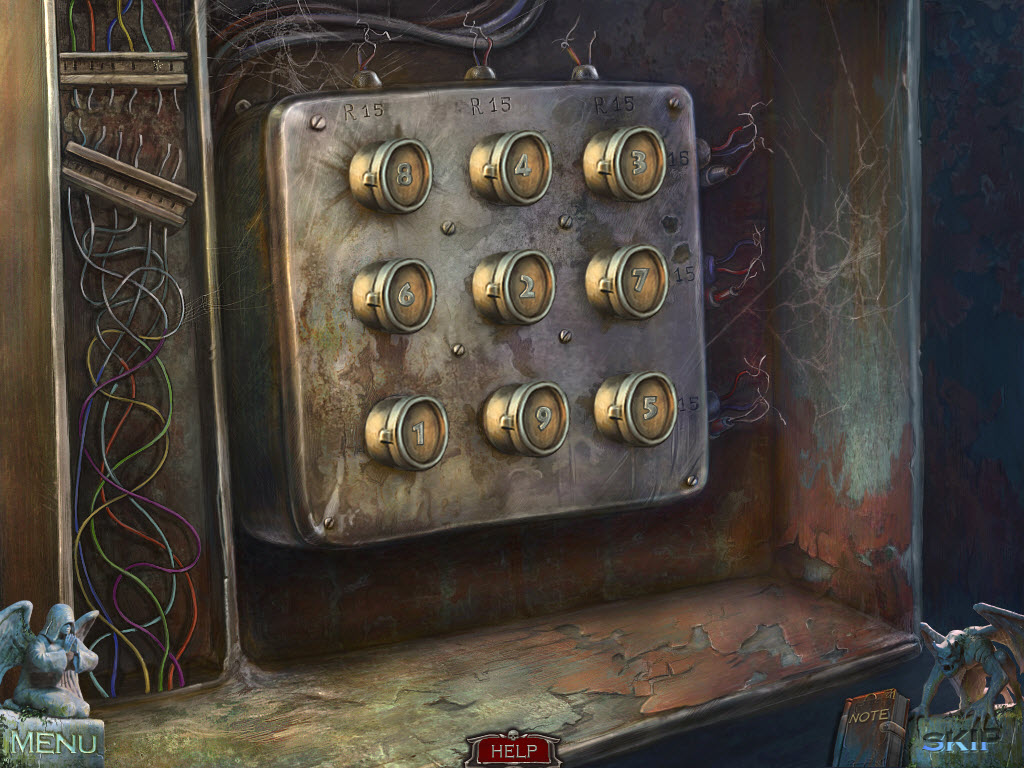
- examine the fuse box on the right and open it
- Fuse Box Puzzle
- place the Fuse in with the rest of them
- place the numbered fuses so that each row/column equal fifteen
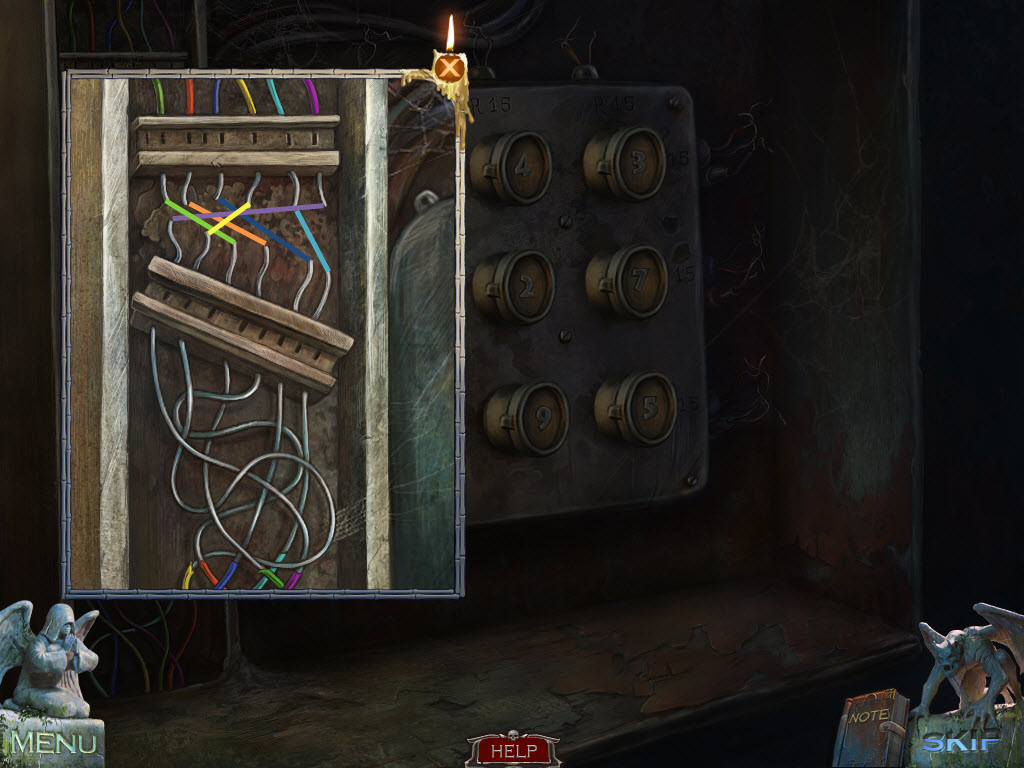
- click the end of a bottom wire (trace the route with your mouse) and then click its matching top wire
- see screenshots for solutions
- pull the lever to cut the power
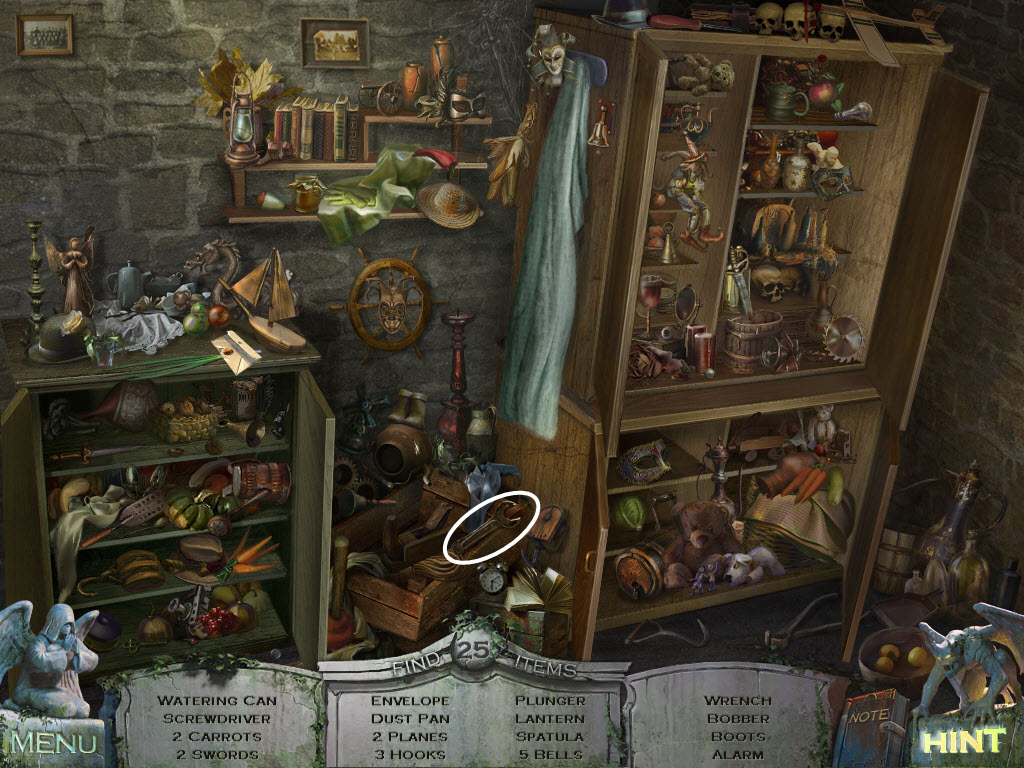
- examine the wardrobe on the other side - hidden object area (you will need to open all the cupboard doors)
- take the Axe
- examine the locked box under the table to the left
- use the Cleaner and Brush on the glass
- use the arrows to bring up the numbers you saw in the book upstairs
- look inside and take the Gloves
- go down
- use the Gloves on the hot door handle
- enter the hallway
- attempt to move (in any direction)
- look in the father's hand and take the Key
- go left
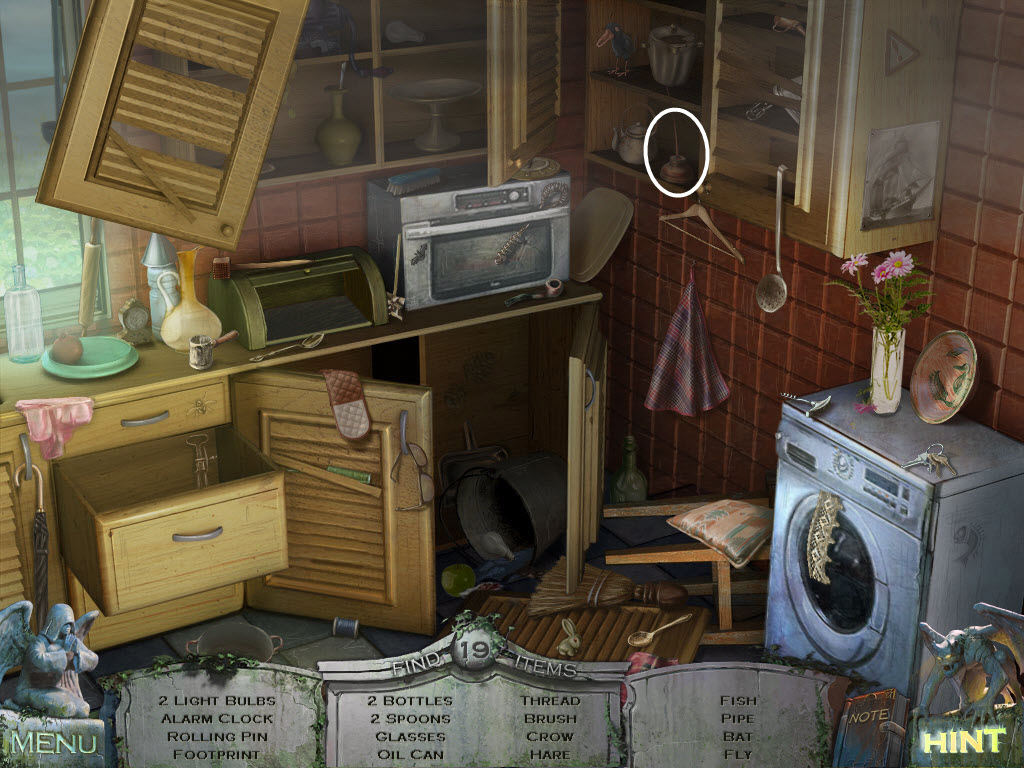
- examine the microwave - hidden object area
- take the Knife
- go down and right
- open up the cupboard and take the Vise Handle
- open the drawer and take the Glue
- use the Axe on the left wall twice
- go left
- examine the fireplace and take the Tongs
- return to the basement
- examine the vice on the table
- use the Vice Handle on the vice
- turn the handle and take the Screwdriver
- pick up the Scissors
- go down
- examine the broken stool
- Broken Stool Puzzle
- place the Glue, Scissors, and Bandage on the ground
- use the Scissors to cut open the Glue
- use the Glue on all the wood pieces
- replace all the wooden pieces
- use the Scissors to cut the Bandage
- receive Stool
- go up and right
- use the Stool to reach the bookshelf
- take the Ballerina
- go left
- use the Knife to cut up the carpet
- take the Carpet
- return to the basement
- use the Carpet to soak up all that water
- receive Wet Carpet
- go down and up
- use the Wet Carpet on the fire
- go up
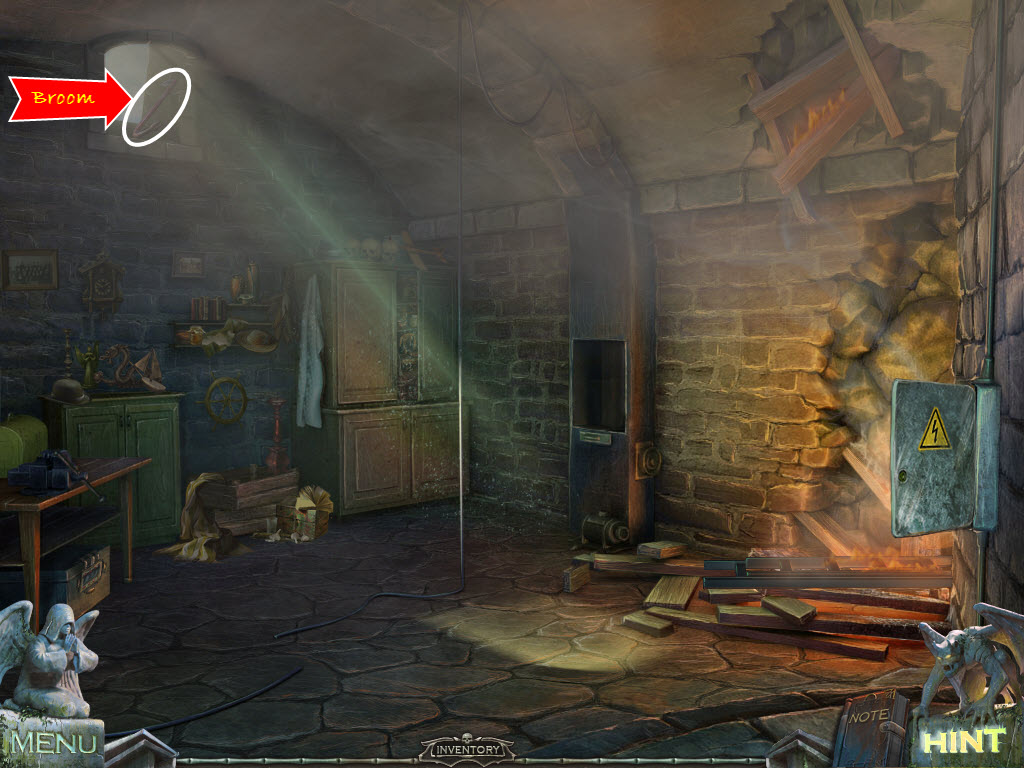
- pick up the Broom
- examine the shelf and notice the clock has stopped - a note will be made in your journal
- go right
- examine the bathroom cupboard
- open the cupboard door and take the Pliers
- look in the bathtub and notice the valve is missing
- pick up the Weight from the side of the bathtub
- lift up the rug and take the Screw
- go down
- attempt to go forward
- go through the second left door
- look at the bottom of the bed
- push back the bed covers and take the Winch Handle
- open the bedside table drawer and take the Ruler
- return to the basement
- examine the wardrobe again - hidden object area
- take the Wrench
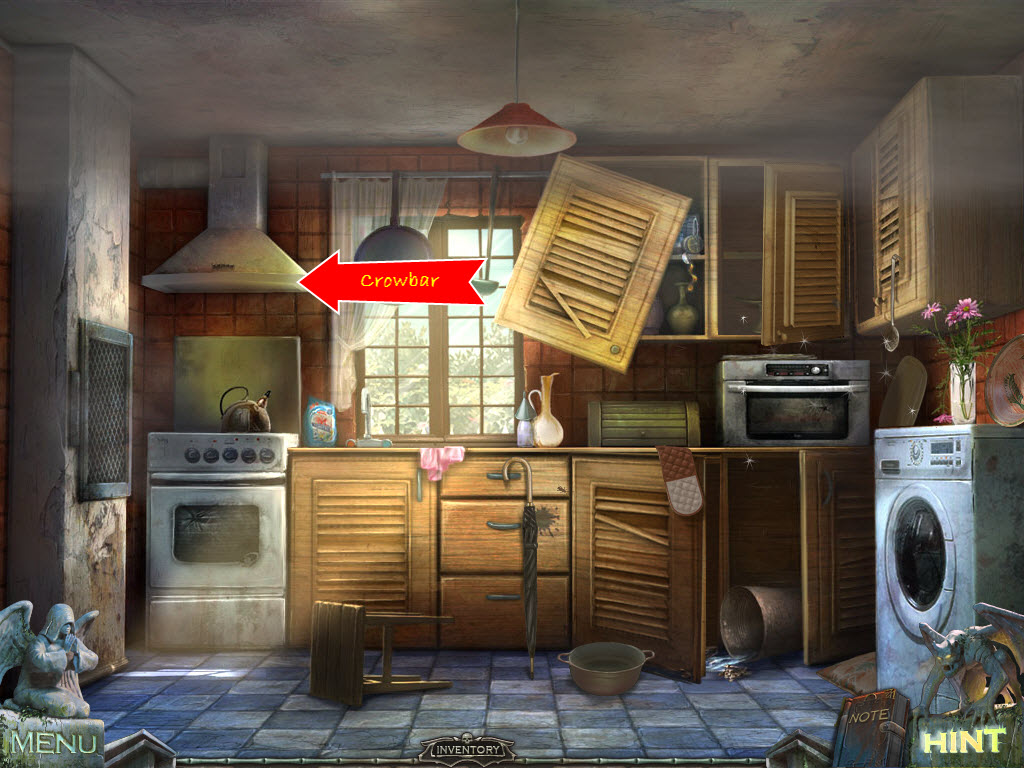
- use the Broom to reach the Crowbar in the window
- return to the kitchen
- use the Crowbar on the oven vent
- look inside the vent cover
- use the Knife to cut the tape and take the Lighter's Core
- examine the microwave again - hidden object area
- take the Oil Can
- return to the living room
- examine the windowsill
- place the Lighter's Hull and Core on the windowsill
- Lighter Puzzle
- use the Lighter Fluid on the Lighter's Core
- place the Lighter's Core into the Lighter's Hull
- return to the bedroom
- look at the ballerina on the dresser
- use the Lighter to melt the wax on the ballerina
- receive the Ballerina
- return to the living room
- examine the music box on the table on the right
- place both Ballerinas on the back of the music box
- remove the music box lid
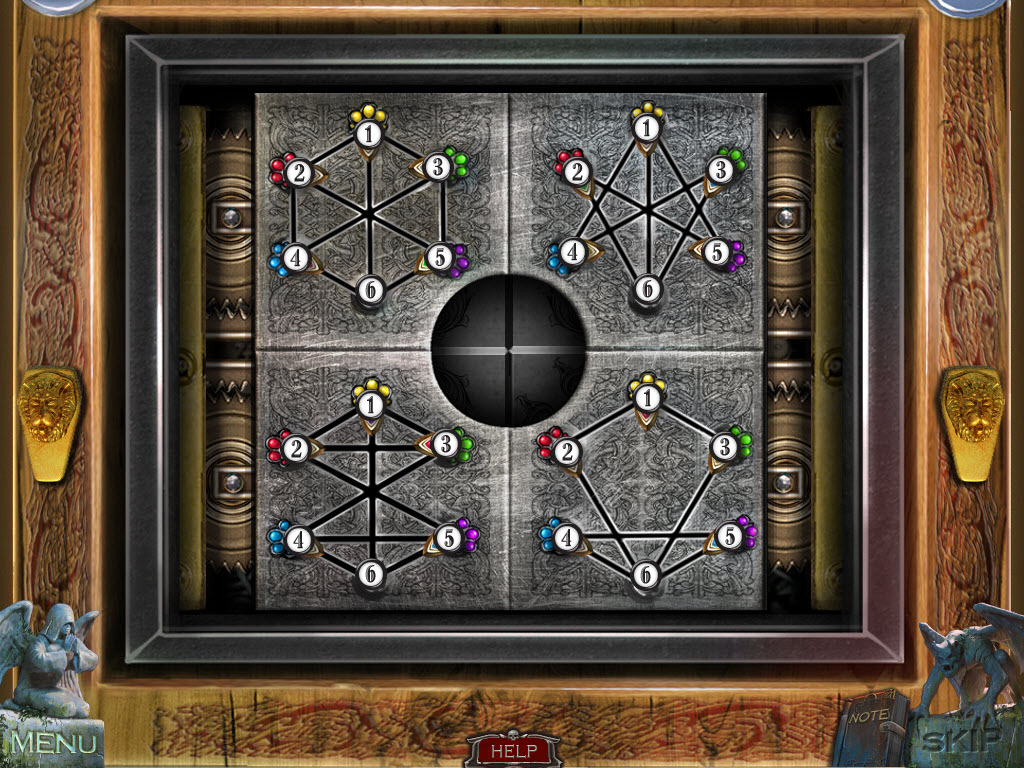
- Music Box Puzzle
- slide the gems into the correct places according to color
- the way the gem is pointing is the direction it will move
- you must complete all four puzzles
- see screenshot for solutions
- use the Key on the center of the music box
- replace the lid
- use the Screwdriver on the screws in the middle of each gear
- take the Gears
- return to the hallway
- examine the silver circle on the wall
- use the Wrench to remove the bolt
- place the Gears inside
- place the Winch Handle in the center
- use the Oil Can on the mechanism
- turn the handle to lower the stairs
- go up the stairs
- examine the area to the right - hidden object area
- take the Pulley
- examine the bag
- use the Knife to cut open the bag
- take the Relief Piece
- examine the clock in the back
- place the Weight inside the clock
- turn the hands to read 10:05
- take the Relief Piece
- return to the bedroom
- look at the chest under the window
- place the two Relief Pieces in it
- Bedroom Chest Puzzle
- swap the pieces to complete a picture
- then turn the rings to everything is aligned
- see screenshot for solution
- look inside and take the Office Key
- go down
- use the Office Key on the first left door
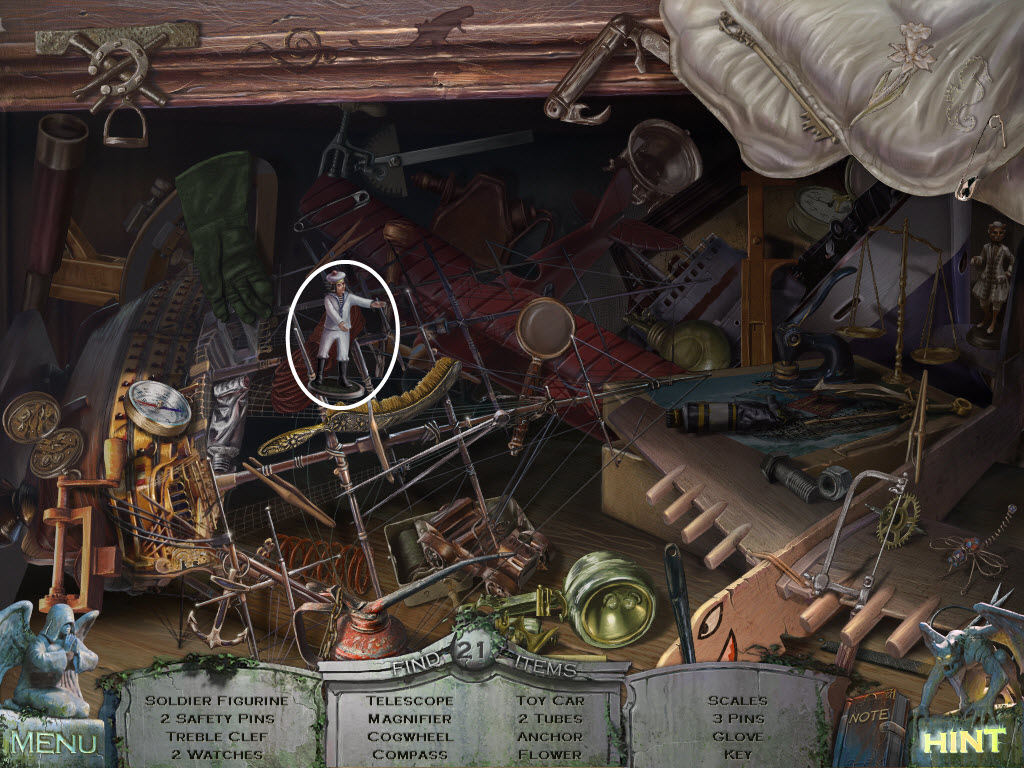
- examine the bookshelves - hidden object area
- take the Insulating Tape
- examine the left window
- use the Pliers to cut the cord off the electric razor
- examine the shelf on the left
- use the Screwdriver to unscrew the screws on the right side of both the top and bottom hinges
- receive Door Panel
- return to the basement
- use the Insulating Tape on the wires
- look in the fuse box and flip the lever
- return to the kitchen
- examine the sink
- use the Screwdriver to remove the Valve
- return to the bathroom
- look in the bathtub again
- replace the Valve on the bathtub
- return to the bedroom
- examine the window
- use the Screw on the latch and tighten it with the Screwdriver
- open the latch and lift up the window
- look outside the window
- scare of the raven - it drops a key
- place the Door Panel over the gap
- pick up the Key
- look at the window with the closed shutters
- use the Ruler to open the window
- enter the little girls bedroom
- try to reach Anne-Marie
- look in the rubble and use the Tongs to pick up the Hook
- return to the office
- use the Key on the back bookshelf
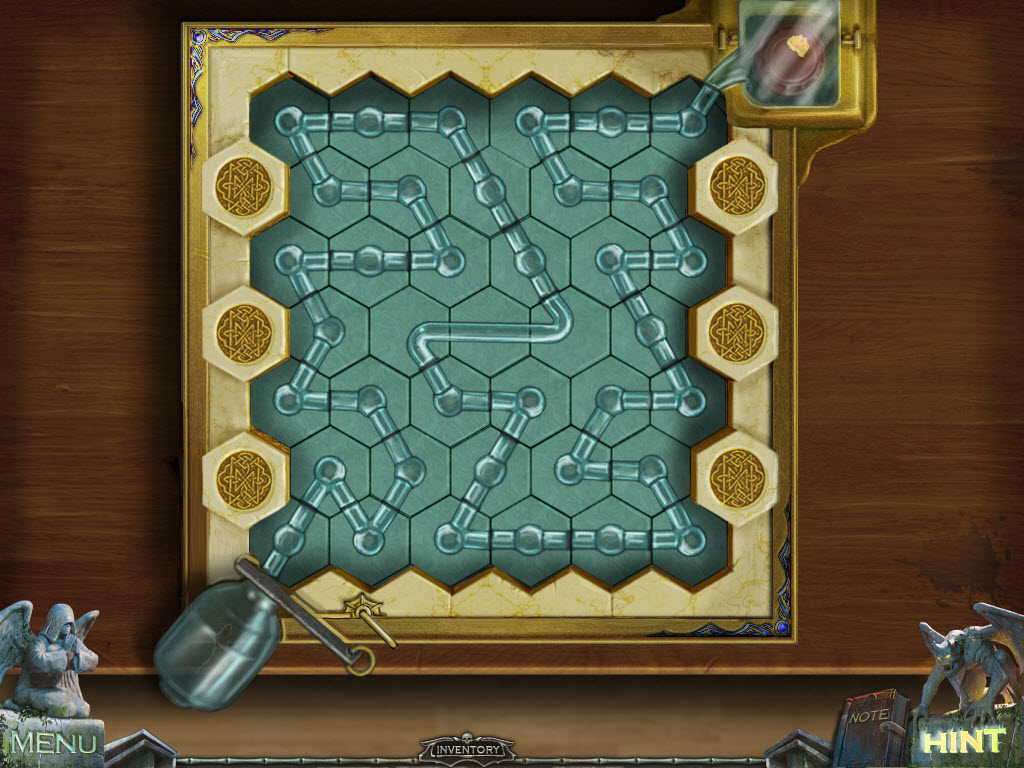
- Bookshelf Puzzle
- take the books off the right shelf and arrange them on the left shelf until they all fit
- left click to rotate the books
- see screenshot for solution
- the instructions to the machine in the attic will be added to your journal
- examine the bookshelf - hidden object area
- take the Fuse
- return to the attic
- examine the area to the right - hidden object area
- take the Belt
- look at the ceiling beam where the rope is
- place the Pulley on the beam and attach the rope
- place the Hook on the Pulley
- examine the machine in the right corner
- follow the instructions in your journal to put it back together
- use the Wire on the machine once it's assembled
- use the Insulting Tape on the wire
- back out and look at the switch on the beam
- replace the Fuse below the buttons
- click the top button
- take the Hook from under the pallet
- remove the Belt from the machine before you leave the attic
- return to the basement
- use the Belt on the dumb waiter
- return to the kitchen
- examine the dumbwaiter
- push the down button
- return to the basement
- take the Empty Bucket
- return to the bathroom
- use the Empty Bucket on the running water in the bathtub
- take the Full Bucket
- return to the basement
- use the Full Bucket on the small fire in the corner
- use the Hook to pull out the Ladder
- leave the house
- place the Ladder under the Anne-Marie's window
- listen to the father
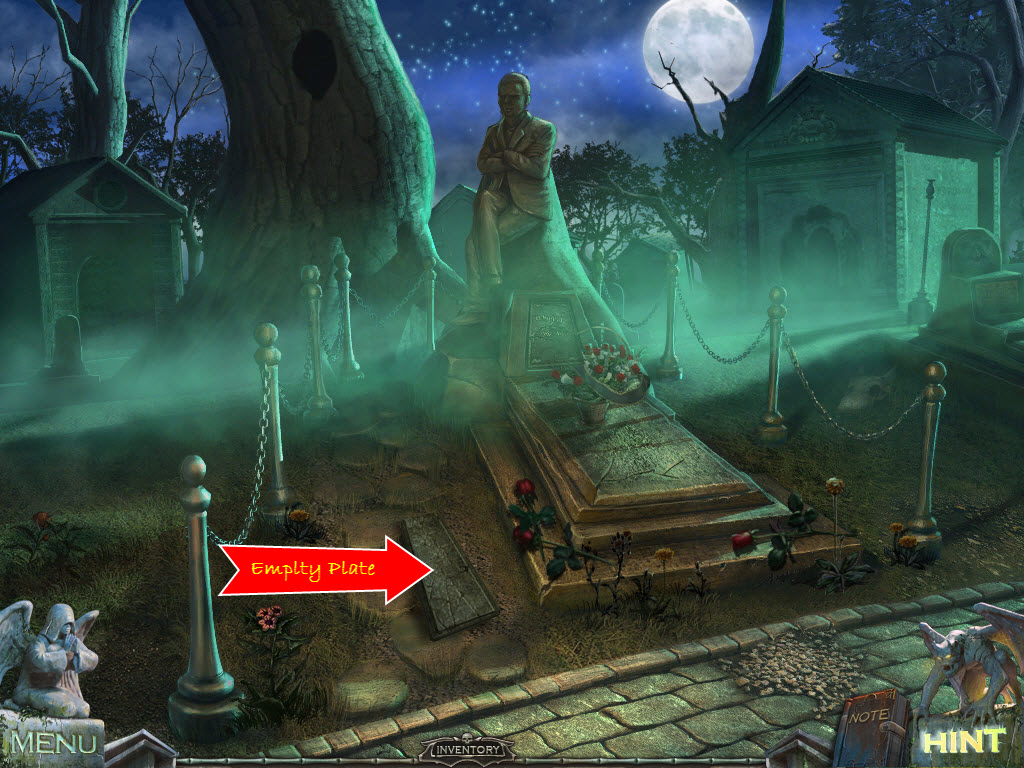
- pick up the Empty Plate to the left of the tombstone
- go right
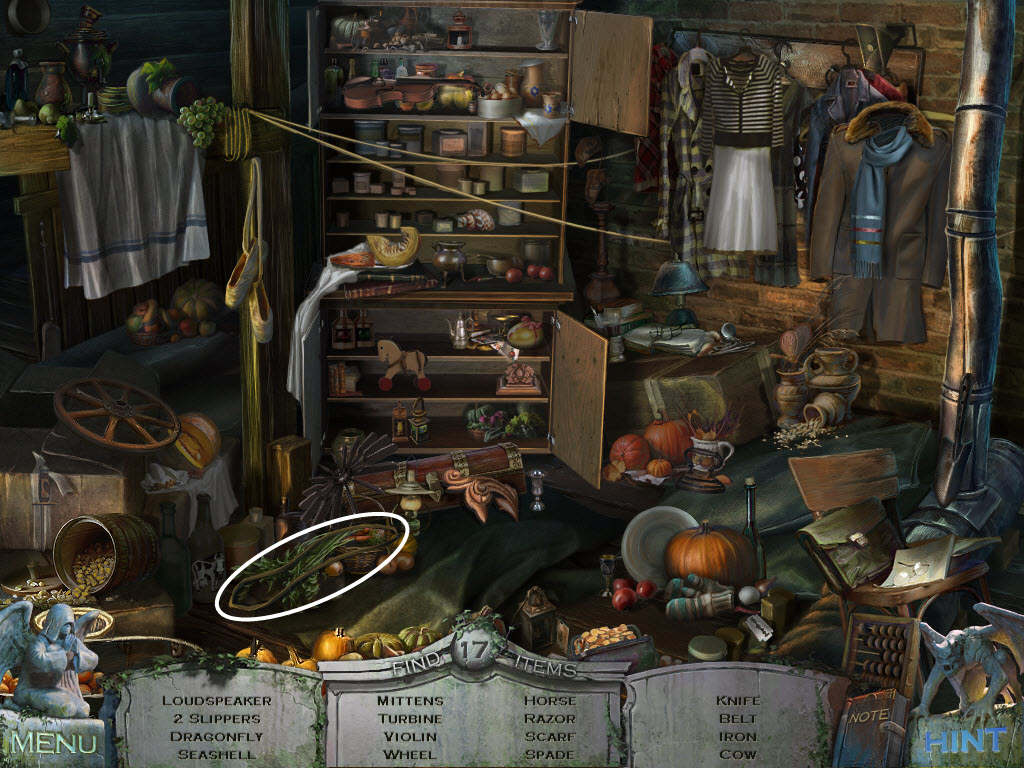
- examine the door - hidden object area
- take the Hammer and Chisel
- go down twice and left
- examine the tombstone
- place the Empty Plate on the tomb
- use the Hammer and Chisel on the Empty Plate
- enter the vision
Outside House
- go up
- pick up the Ladder
- use the Ladder on the side of the house (to the left of the door)
- examine the roof and take the Wire
- look in the wheelbarrow and take the Hand Rake
- go down
- use the Ladder to reach the lamp
- examine the lamp and take the Valve
- examine the grate by the fountain
- use the Hand Rake to remove the leaves
- use the Valve on the pipe and turn it
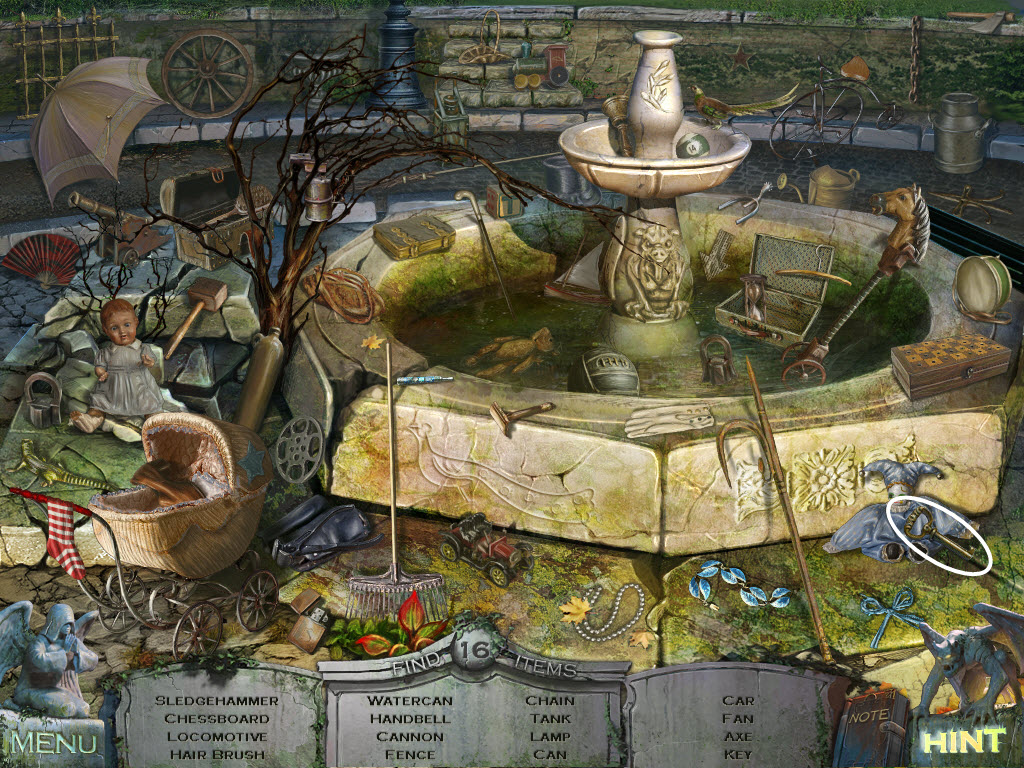
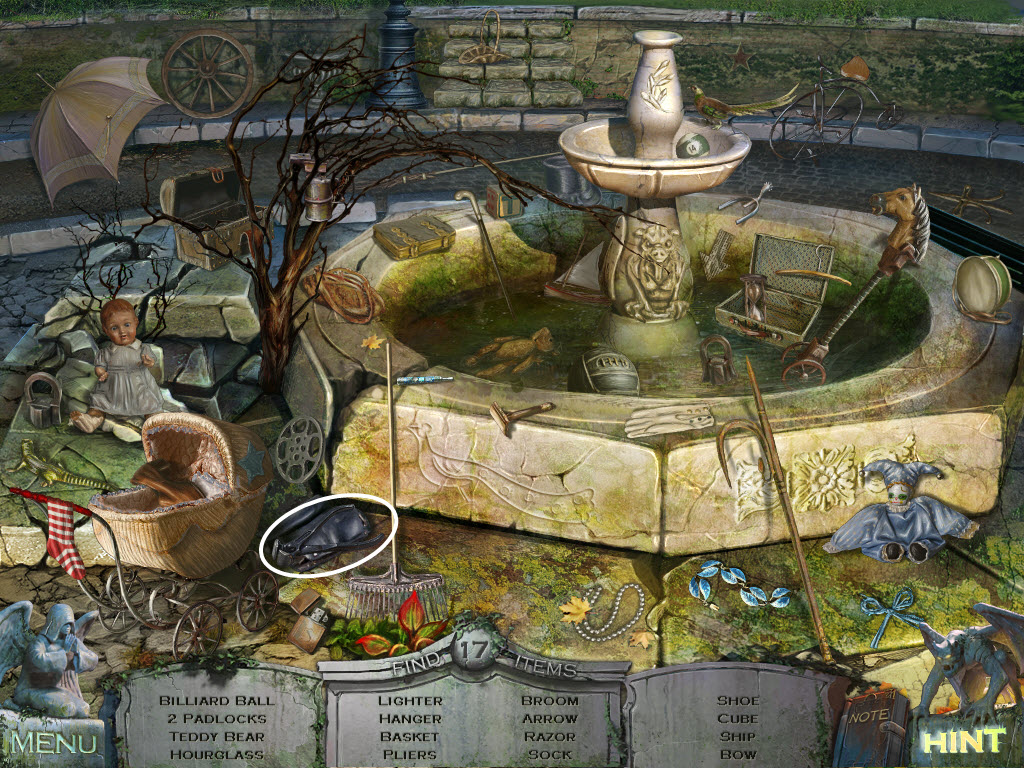
- examine the fountain - hidden object area
- take the House Key
- examine the front door
- use the House Key on the lock
- enter the house
- examine the statue on the left and pick up the Ring
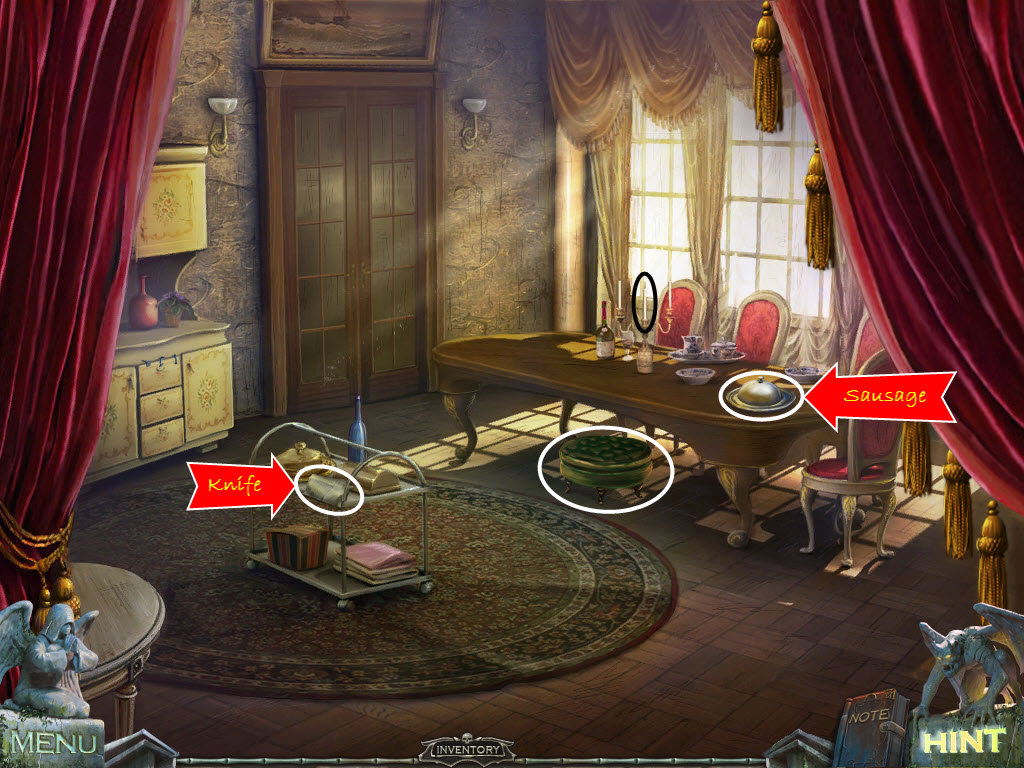
- go left
- examine the tea tray
- life the cloth napkin and take the Knife
- take the Stool
- examine the covered dish
- take the cover off the dish and take the Sausage
- examine the candelabra and take the Candle
- go left
Kitchen
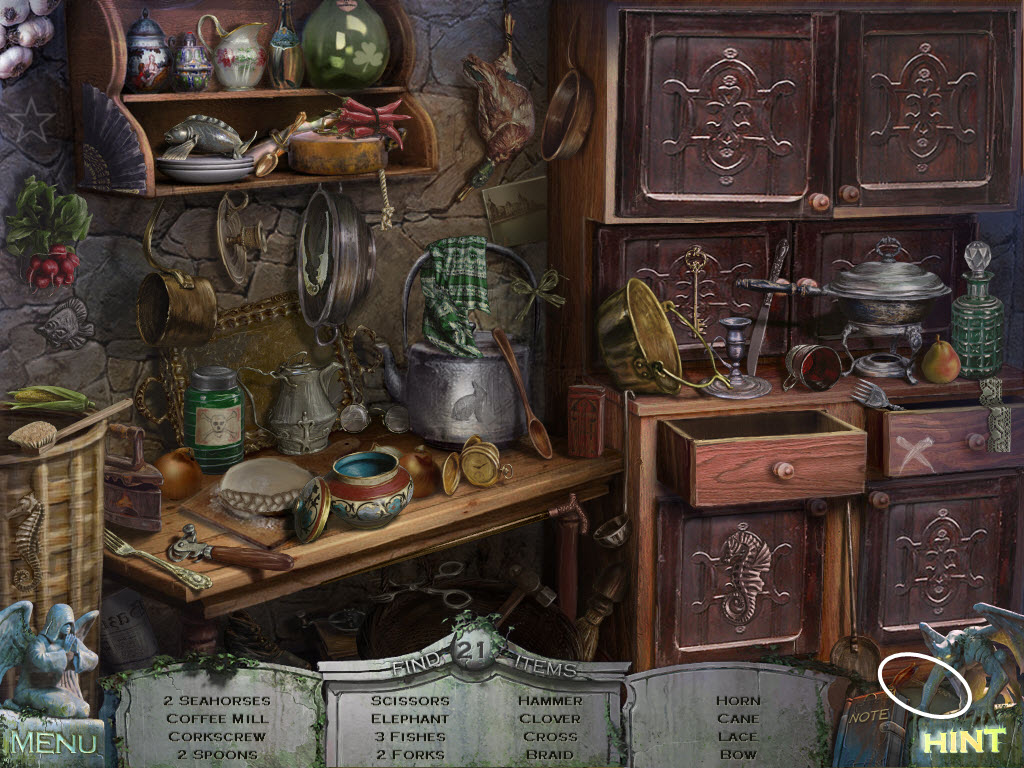
- examine the cupboard on the right - hidden object area
- take the Corkscrew
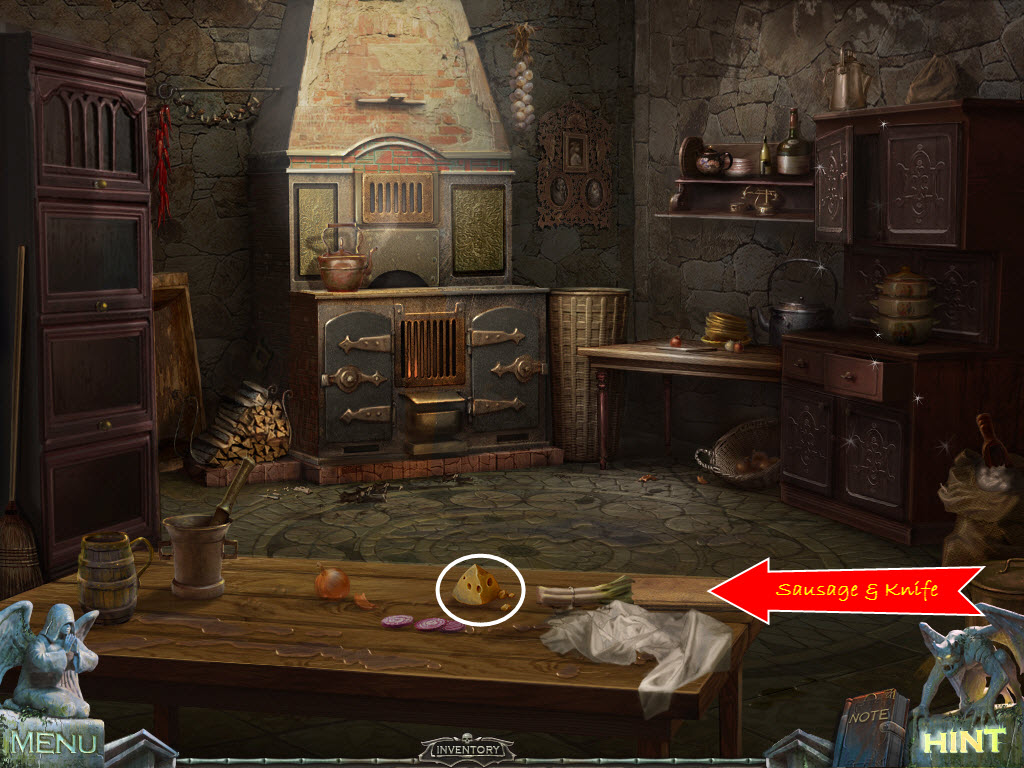
- pick the Cheese up off the table
- place the Sausage on the cutting board
- use the Knife to cut up the Sausage
- take the Sausage Slice
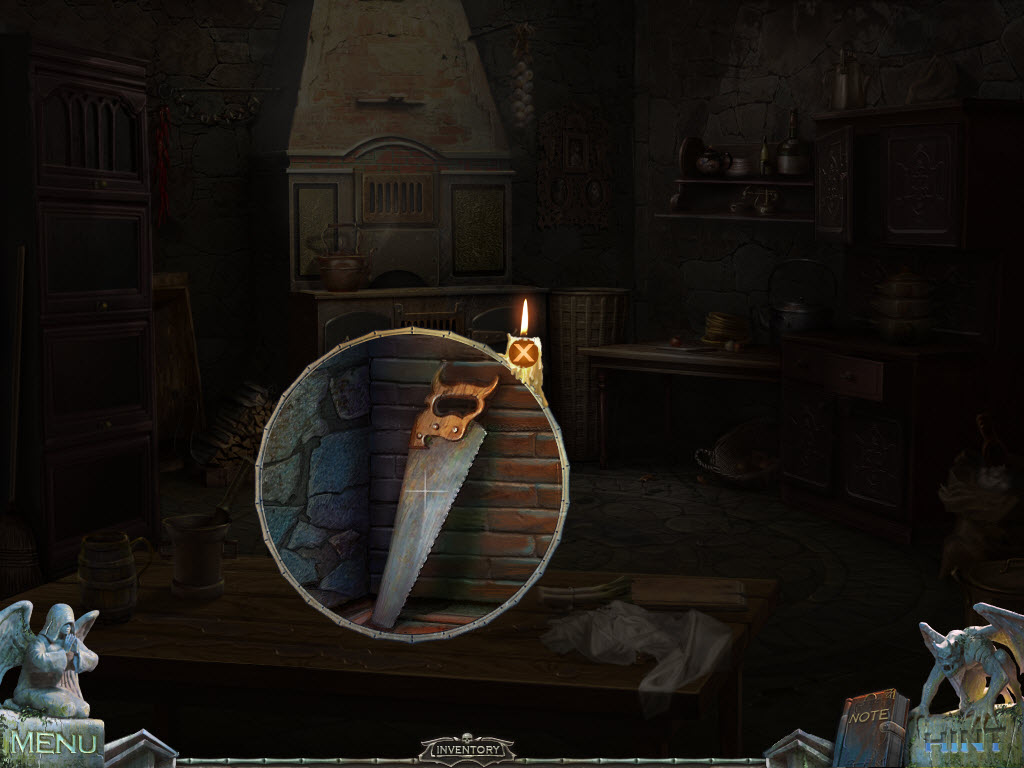
- examine the pile of wood and take the Saw
- return to the foyer and go up the stairs to the middle
Hallway
- use the Stool to see on top of the wardrobe
- take the Tassel
- go through the first right door
- use the Tassel to tie back the curtains
- look on the beside table and take the Feather
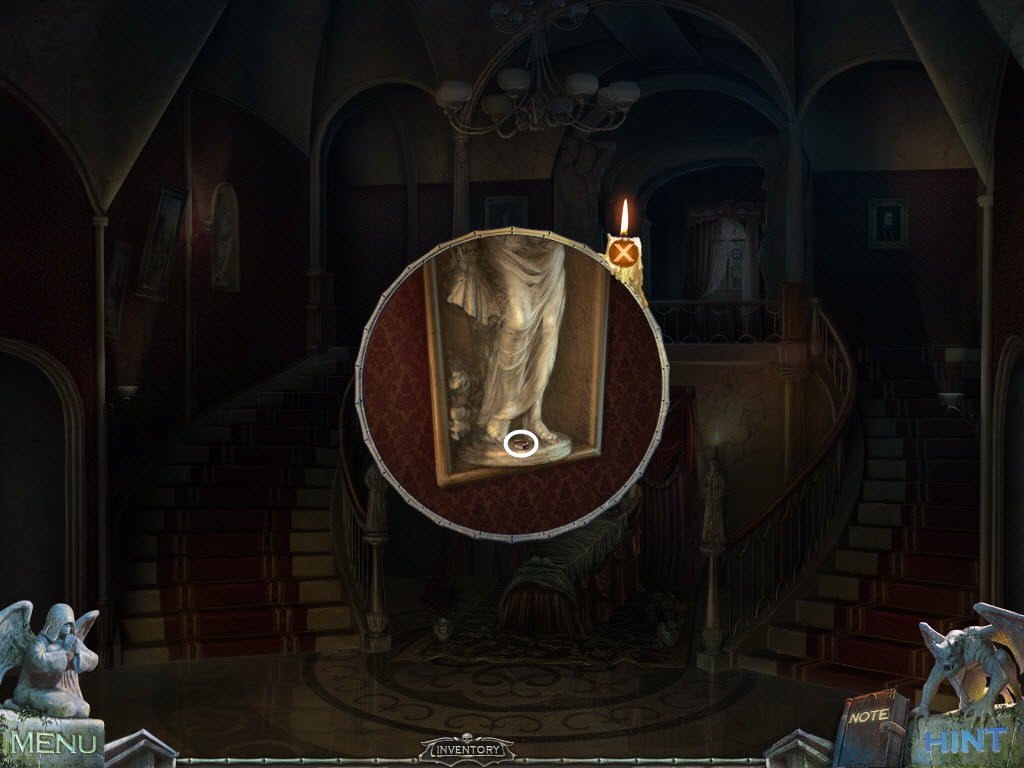
- remove the painting on the wall
- look at the photo on the dresser
- pick up the Envelope
- examine the small box on the vanity table
- use the Ring to open up the box
- take the Tweezers
- go back outside
- look at the window on the right
- use the Saw to remove the shovel head
- place the Candle on the tip of the handle
- use the Wire to hold it all together
- take the Candle on a Stick
- examine the fountain - hidden object area
- take the Pliers
- return to the dining room
- examine the cupboard drawers on the left
- use the Pliers to remove the nails
- open the drawer and take the Gas Switch and Potholder
- go into the kitchen
- use the Potholder to open the hot oven door
- light the Candle on a Stick in the fire
- go up the stairs and to the left
- examine the switch on the left
- use the Gas Switch on it and turn it
- use the Candle on the Stick to light the chandelier
- examine the portrait - a note of the drawing will be made in your journal
- examine the fish tank
- throw the Sausage in the tank and grab the Sailor Figurine
- look at the bottom of the ladder
- use the Tweezers to pick up the Hairpin
- click the ladder to move it to the right
- examine the ship in the bottle
- use the Corkscrew to remove the cork
- place the Sailor Figurine inside the bottle
- use the Tweezers to place the Sailor Figurine on the back part of the ship - see drawing in your journal
- take the Ball
- return to the hallway
- examine the door on the left
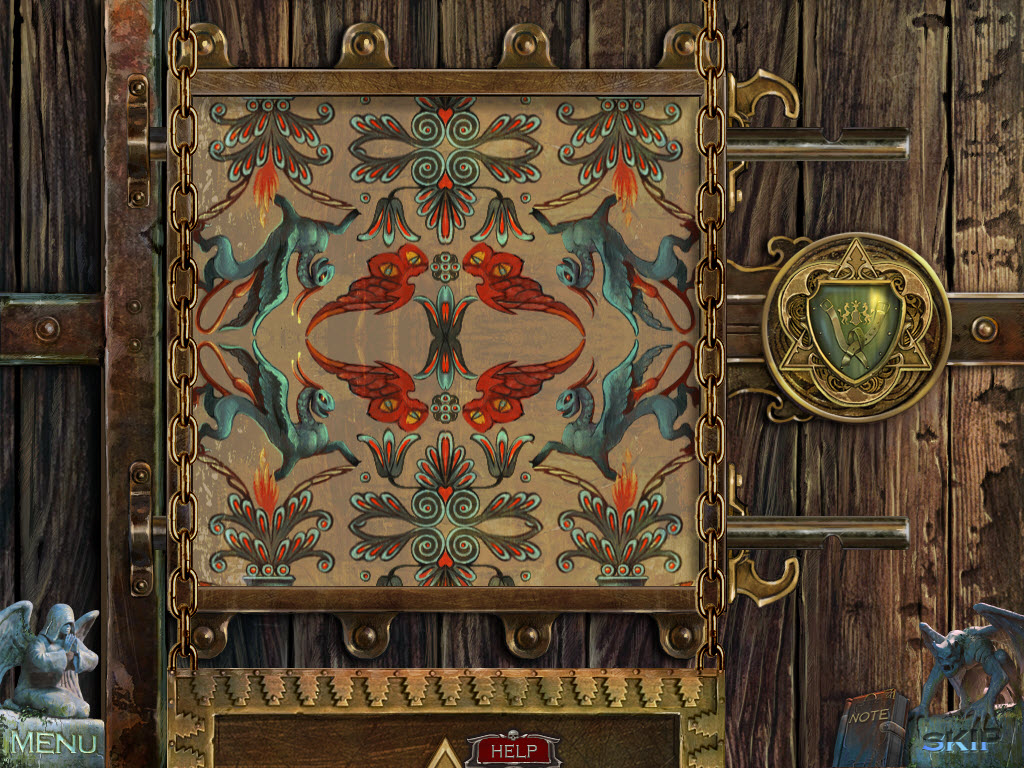
- Hallway Door Puzzle
- replace the green Ball
- click the middle of the circles to rotate the colors
- the object is to match the diagram on the right
- the placement of balls in the puzzle is random
- enter the room
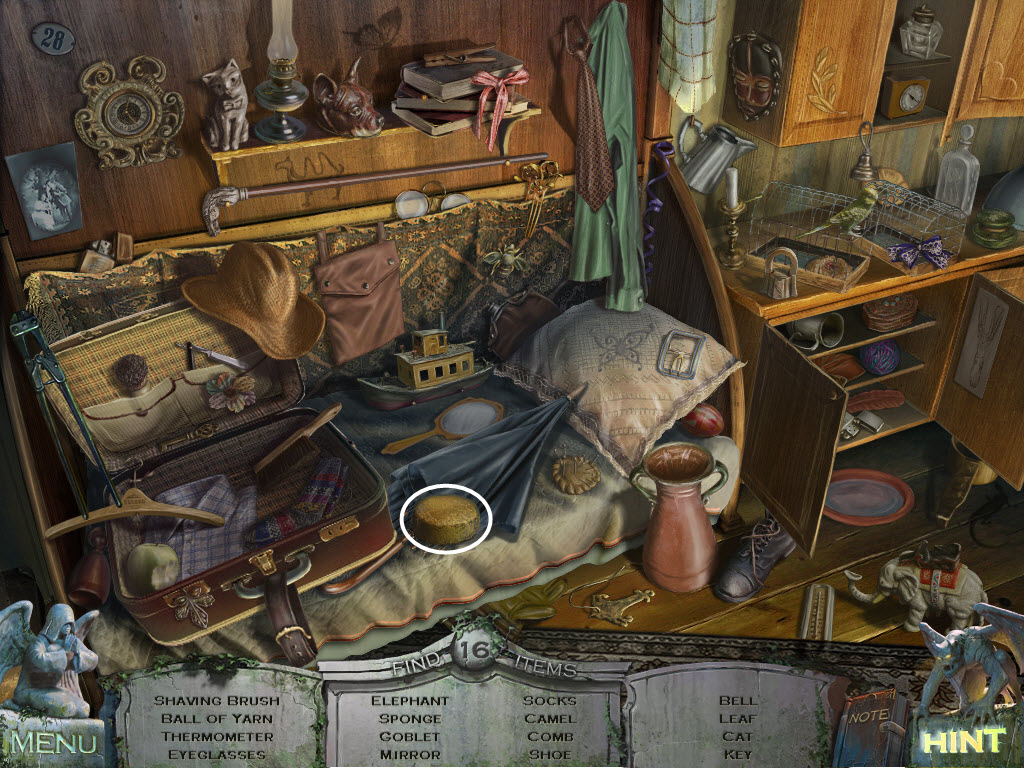
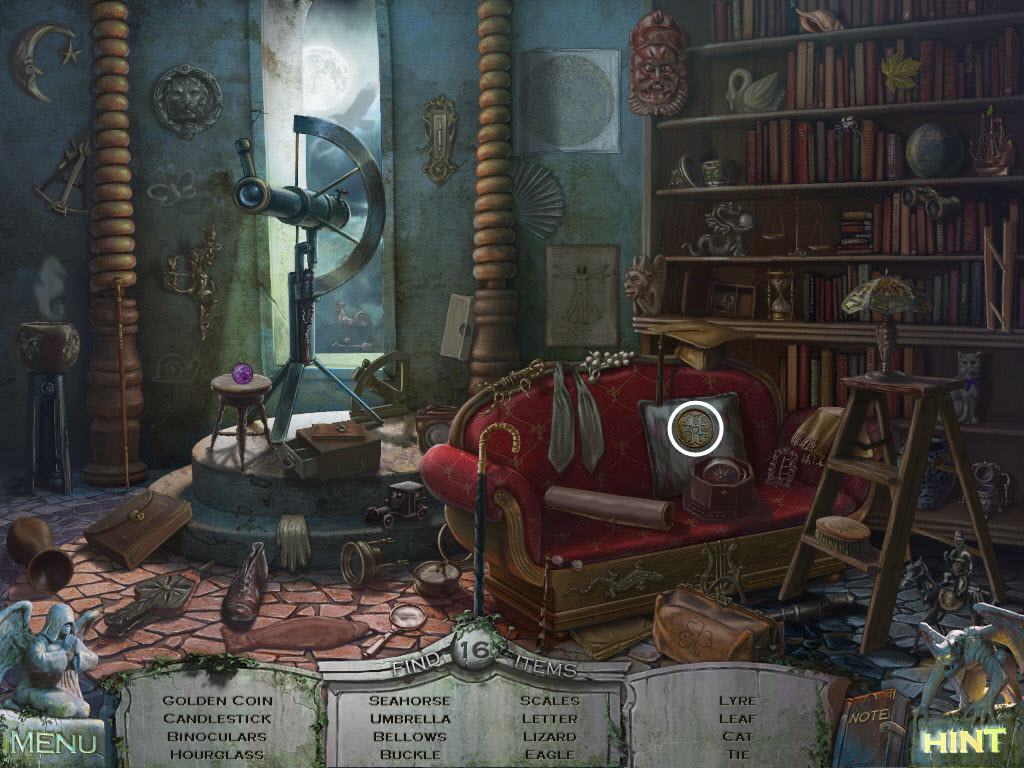
- examine the bed - hidden object area
- take The Cage
- pick up the Empty Jar from the bedside table
- look in the bedside table drawer and examine the photo
- read the diagram on the floor - it will be added to your journal
- look in the little drawer
- take the Label and the Spool of Thread
- return to the other bedroom
- look at the bedside table again
- place the Label on the blue bottle
- take the Sleeping Pills
- return to the kitchen
- examine the cupboard on the right - hidden object area
- take the Nutcracker
- use the Knife to cut another Sausage Slice
- use the Sleeping Pills on the Sausage Slice
- receive Sleepy Sausage
- examine the mouse hole
- place The Cage on the ground
- use the Hairpin and Spool of Thread on The Cage
- place the Cheese inside The Cage
- when the mouse gets in the cage pull the spool of thread
- receive Trapped Mouse
- return to the son's bedroom
- examine the mouse maze on the desk
- Mouse Maze Puzzle
- place the Trapped Mouse in the maze
- rotate the pieces so the make a continuous line from beginning to end
- pull the lever to release the mouse
- see screenshot for solution
- take the Gardener's House Key
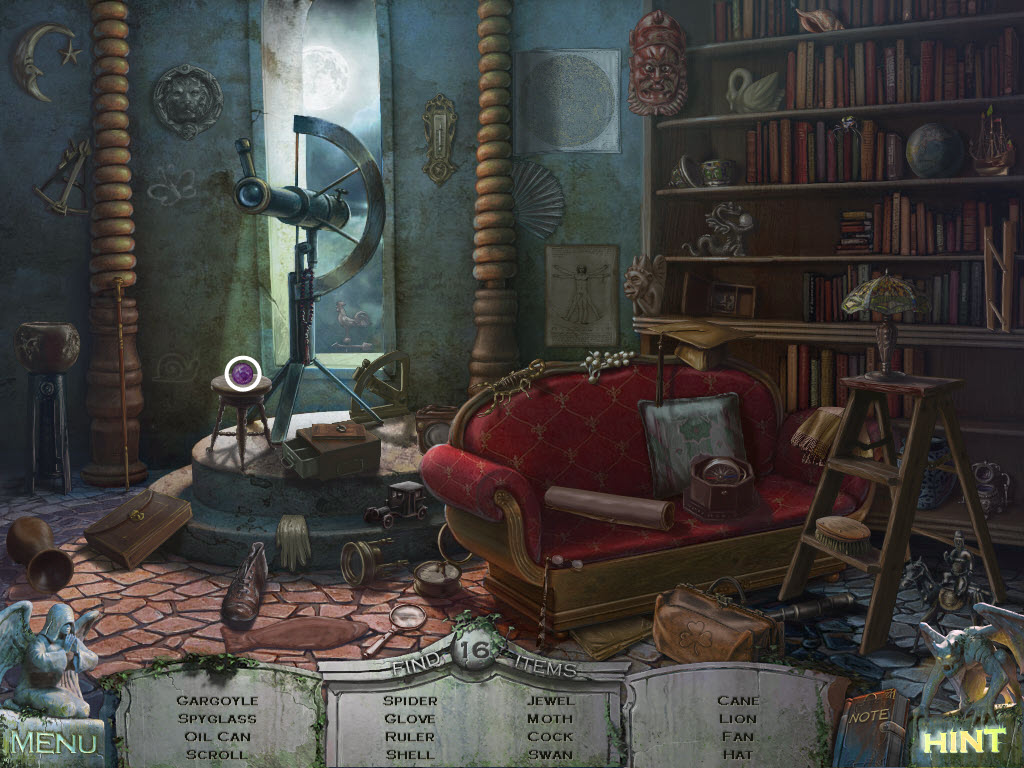
- examine the bed - hidden object area
- take the Soldier Figurine
- return to the library
- use the Soldier Figurine on the ship in a bottle
- make a note of the numbers that appear - a note will also be made in your journal
- return to the gardeners
- use the Key on the lock to enter the gardeners house
- examine the bed - hidden object area
- take the Sponge
- examine the trunk and take the Name Tags
- pick up the Rake
- return to the foyer
- examine Katherine's body
- use the Sponge on the back of her left hand (her left, your right!)
- return to the gardeners house
- examine the bed - hidden object area
- take the Bolt Cutter
- exit and examine the fence
- use the Bolt Cutter to cut the wire
- enter the back yard
- give the Sleeping Sausage to the dog
- use the Rake on the pile of leaves
- take the Book on Snakes and the Dreamcatcher
- examine the dogs collar and take the Husband's Room Key
- return to the gardeners house
- examine the counter
- use the Book of Snakes on the snakes
- Snake Puzzle
- place the Name Tags on the table
- flip through the book
- match the name tags to the correct snake until only one is left
- place the last one on the empty cage
- use the Empty Bottle on the green snake
- return to the hallway
- use the Key on the second right door
- enter the room
- examine the photograph on the table
- take the Hourglass
- examine the desk and take the Inkwell
- examine the wall safe
- Wall Safe Puzzle
- first turn the knob to match the numbers you found in the library
- solution: left 4, right 1, left 7, right 2
- examine the inside of the safe
- rotate the three rings with the arrows so the balls fall into the holes
- hint: work on getting the inner ball in first, then the middle, then the outer
- pull the lever back to reveal Katherine's bedroom
- place the Trapped Snake in the safe
- close the safe
- return to the Katherine's bedroom
- place the Dreamcatcher on the nail and tug on it
- examine the pillow and move it aside
- take the Key
- use the Key on the locked vanity door
- take the Sheet of Paper
- return to the library
- examine the table
- place all your inventory items on the table
- Will Puzzle
- use the Nutcracker to break the Hourglass
- use the sand from the hourglass on the paper
- use the Quill to rub the paper
- uncork the Inkwell and dip the Quill into it
- use the Quill to rewrite the will
- place the paper into the Envelope
- received Sealed Envelope
- go outside
- mail the Sealed Envelope
- scare off the raven
- examine the scarecrow - once the raven has attacked it
- take the Shed Key
- go down and right twice
- use the Shed Key on the side door
- look inside and take the Shovel
- go down twice and left twice
- examine the area where the mushrooms are
- use the Shovel to dig in the loose dirt
- take the Plate
- use the Plate on the tombstone
- enter the vision
Stagecoach
- examine the driver - he is still alive
- examine Mary and notice the claw marks on the stagecoach door
- scare away the raven - he flies toward the castle
- look inside the stagecoach and take the Flint
- go towards the castle
- take the Shovel
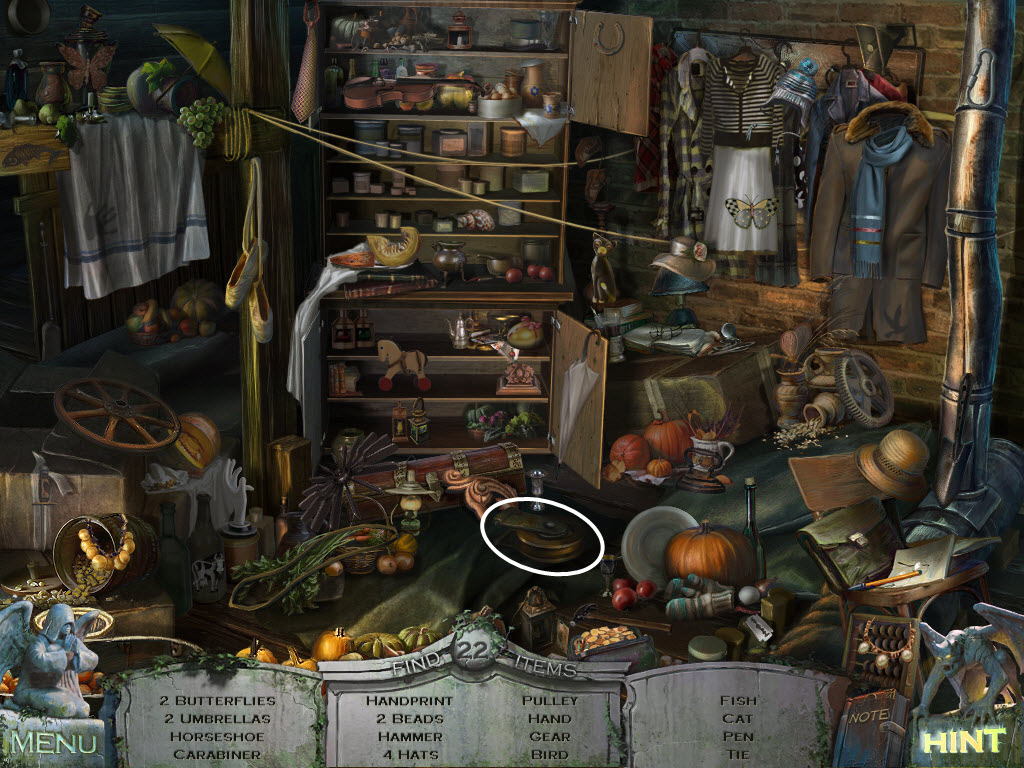
- examine the pile - hidden object area
- take the Axe
- go down
- use the Axe to cut the branch of the tree
- use the Axe to cute all the little branches off
- take the Stick
- use the Stick on the stagecoach wheel
- take the Whip
- use the Shovel to unearth the gold Disk
- go towards the castle
- examine the pile - hidden object area
- take the Chain
- try to climb the rope ladder
- use the Whip to pull the ladder back down
- climb the rope ladder
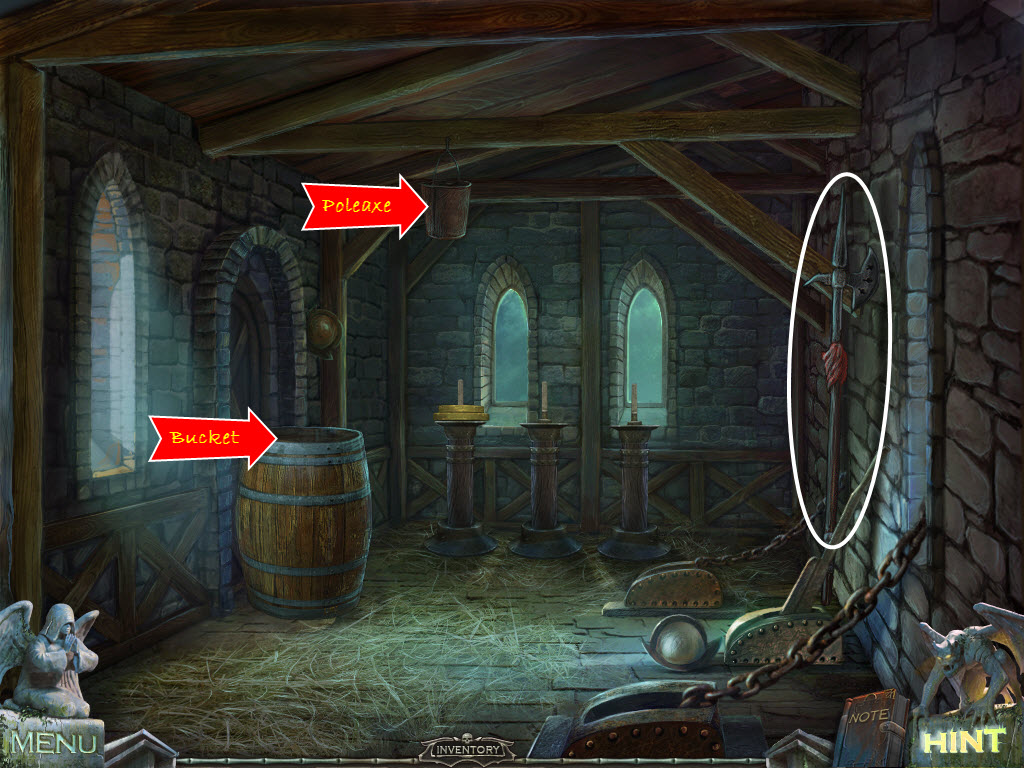
- take the Poleaxe
- use the Poleaxe to get the bucket down
- pick up the Bucket
- examine the barrel
- use the Bucket to take out the water
- take the Disk
- examine the pedestals
- Disk Puzzle
- place the two Disks on top of the others
- the object is to move all the disks from the left to the far right pedestal
- you cannot place a larger disk on top of a smaller disk
- pull the lever to lower the bridge
- exit out and go across the bridge
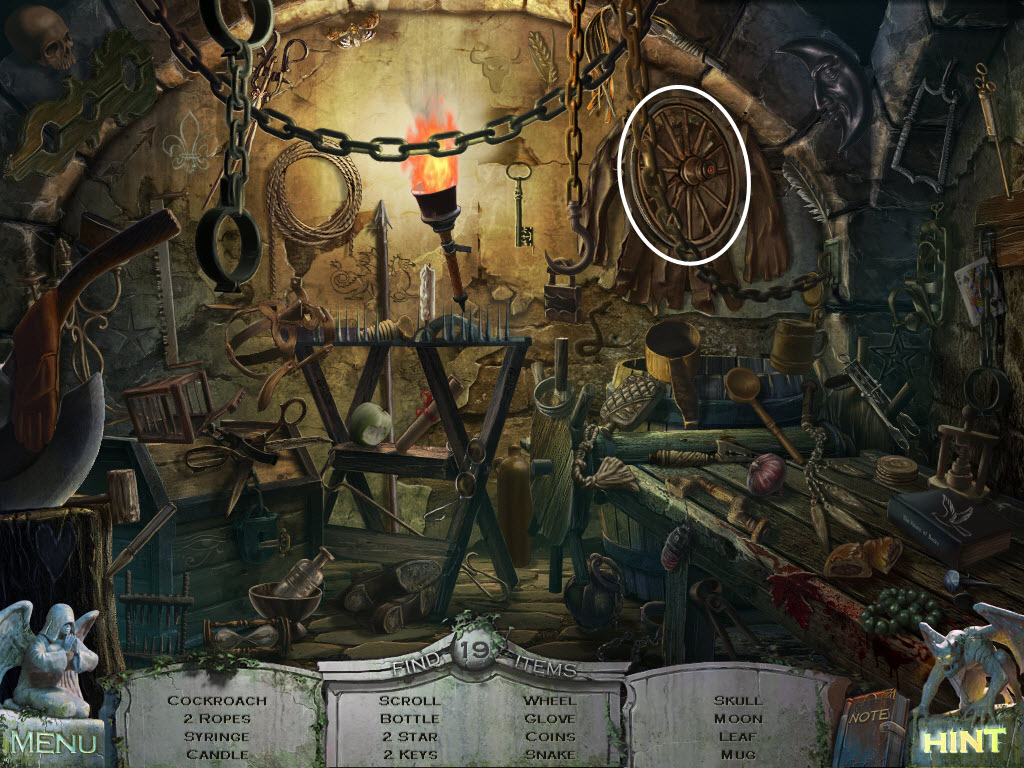
- examine the well
- use the Chain and Bucket on the well
- turn the wheels
- look inside the bucket and take the Prison Cell Key
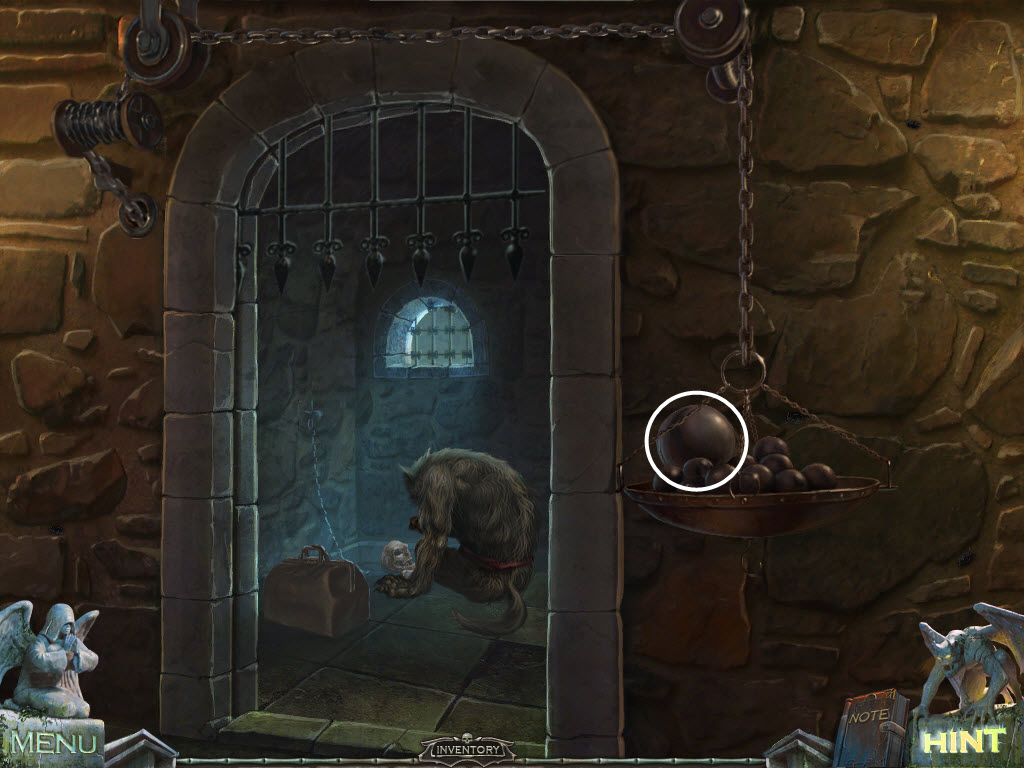
- go through the small door on the right
- examine the casket
- take a closer look at skeleton and remove the Jewel from his eye
- look at the area to the right - hidden object area
- take the Cannon Wheel
- use the Prison Cell Key on the cell door
- take the Gunpowder
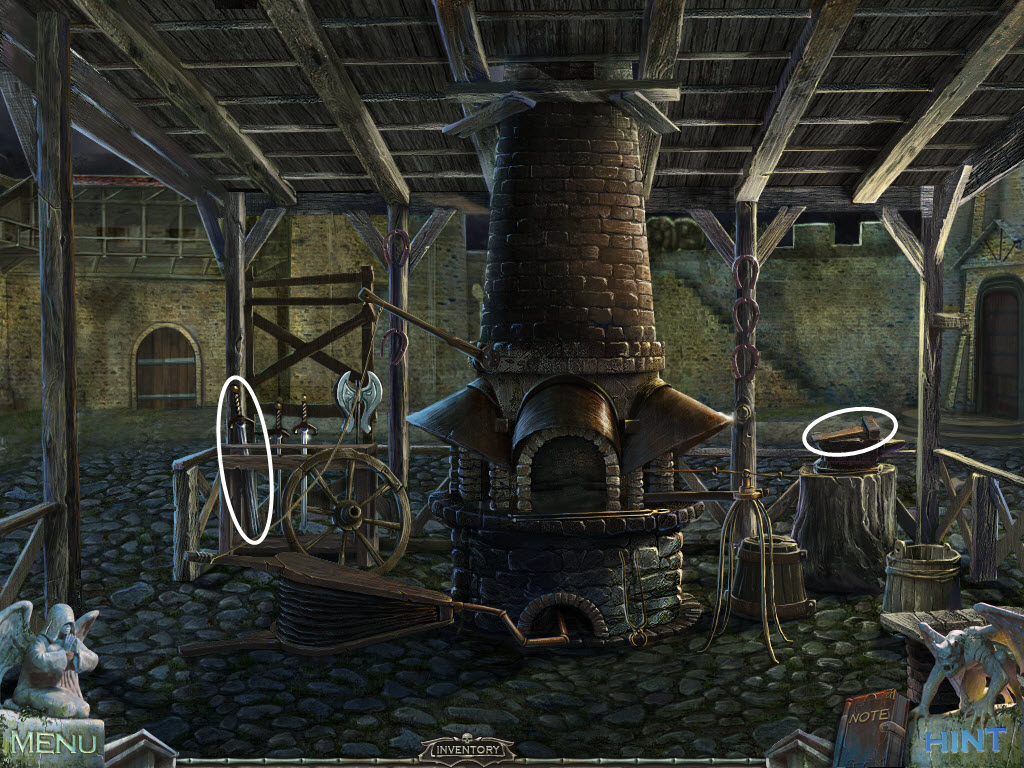
- exit and go right
- examine the swords on the left
- take a Sword
- take the Hammer from on top of the anvil
- return to the prison
Prison
- look inside the prison cell and examine the pillow
- use the Sword to cut open the pillow
- take the Hacksaw
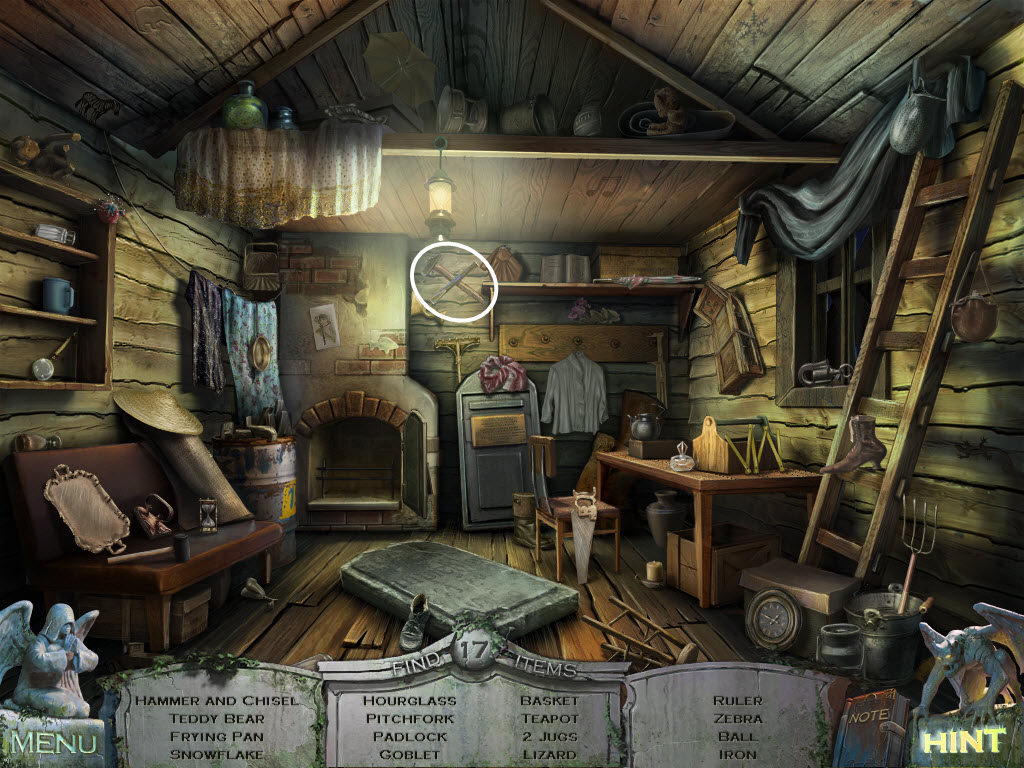
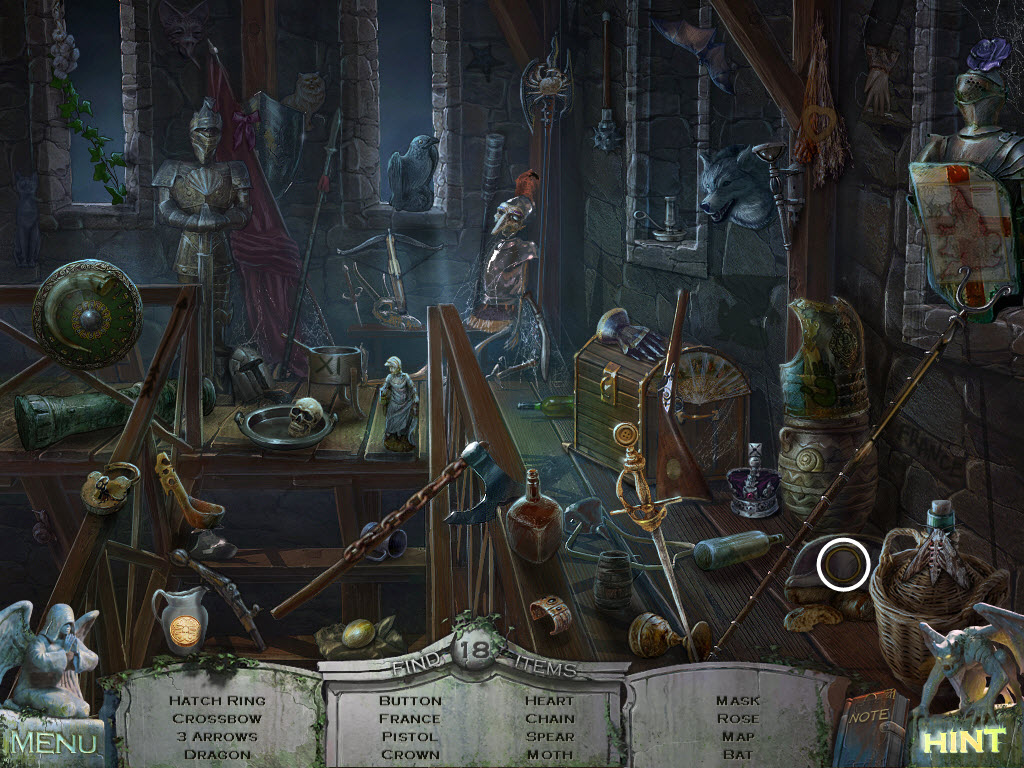
- examine the area to the right - hidden object area
- take the Pliers
- exit
- examine the door on the left
- use the Axe on the door
- use the Hacksaw on the bolt
- enter
- take the Cannon Ball
- return to bride
Bridge
- climb the rope ladder
- examine the left window
- use the Pliers to remove the Nail
- return to the courtyard
- climb the wall on the left
- examine the cannon
- replace the Cannon Wheel
- click the cannon so it faces the door
- examine the cannon again
- place the Gunpowder and Cannon Ball into it
- exit out
- use the Flint on the back of the cannon
- enter the tower
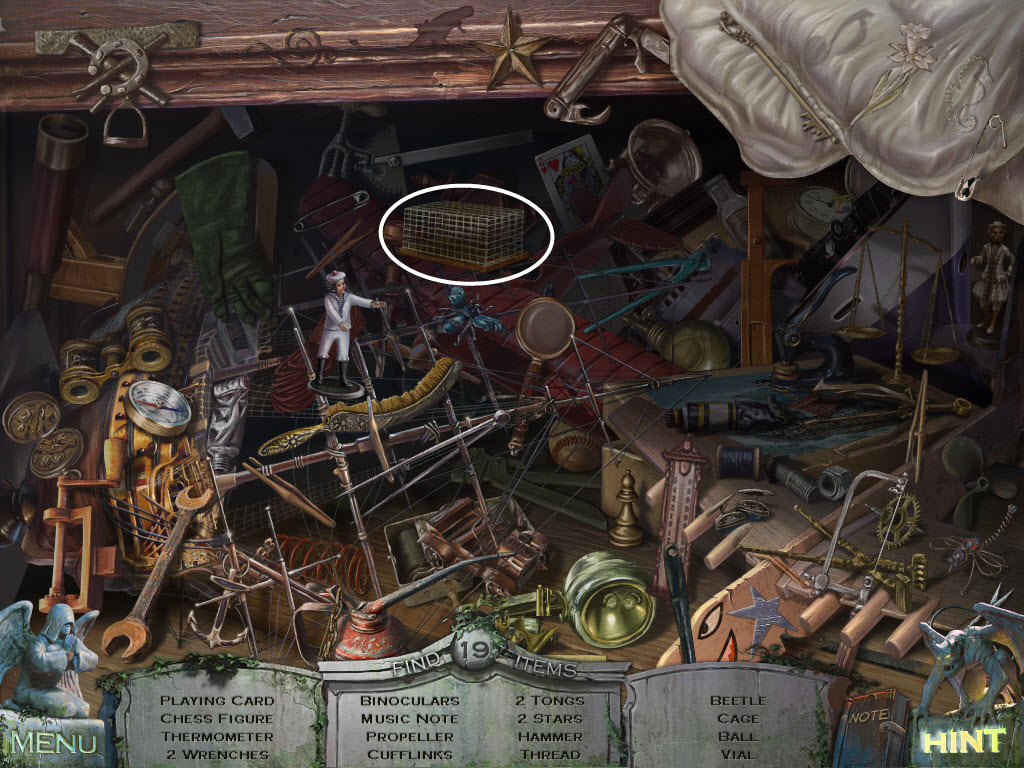
- examine the staircase - hidden object area
- take the Hatch Ring
- examine the hatch in the right corner
- replace the Hatch Ring
- go down
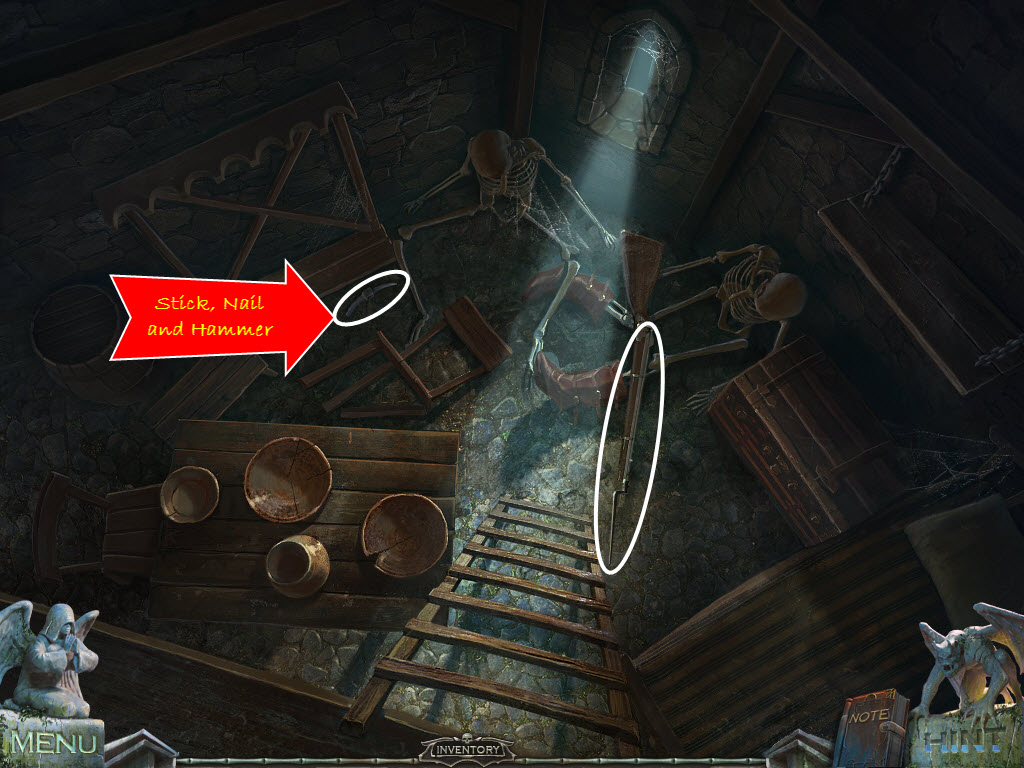
- open the chest and take the Mold
- look at the pickaxe head
- place the Stick through the pickaxe head
- use the Nail and Hammer on the pickaxe head
- receive a Pickaxe
- pick up the Bayonette
- exit
Tower
- use the Pickaxe on the Cannon Ball
- examine the staircase - hidden object area
- take the Golden Coin
- return to the courtyard
- examine the grate
- use the Pickaxe on the grate and take the Coat of Arms
- examine the door
- place the Coat of Arms in the door
- Tower Door Puzzle
- move the columns up and down to create a picture
- there is more than one image you can make
- see screenshot for my solution
- enter
- pick up the werewolf Book off the table
- take the Wood out of the fireplace
- give the Sword to the second right knight
- take the Puzzle Piece
- go upstairs
- examine the couch - hidden object area
- take the Golden Coin
- examine the left bookshelf
- place the Book in the spot that is empty
- take the Puzzle Piece
- go down
- look at the machine on the left
- replace the Puzzle Pieces
- Tower Dining Room Puzzle
- flip over the pairs and match the symbols
- the puzzle will keep moving the pieces around
- take the Golden Coin
- go upstairs
- examine the round table
- place the three Golden Coins in the holes
- examine the couch - hidden object area
- take the Jewel
- examine the eagle statue in the corner
- place the Jewels in its eyes
- click on the scroll in its mouth
- read the scroll - it will be added to your journal
- return to the stagecoach
- examine the chest on the back of the coach
- use the Bayonette and Hammer on the chest
- take the Needle and Thread and the Purse of Silver Coins
- return to the blacksmith
- place the Wood in the oven
- use the Flint on the Wood
- examine the bellows
- use the Thread and Needle to repair the hole
- look closer at the oven
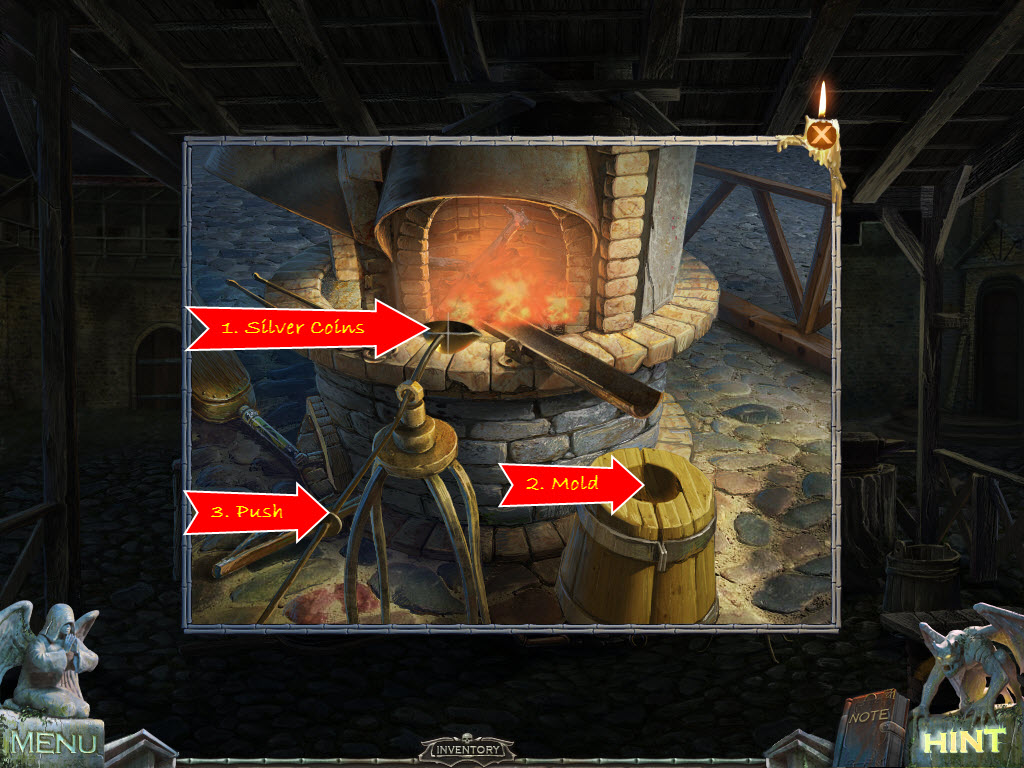
- place the Purse of Silver Coins in the scoop
- place the Mold in the wood holder
- push the handle forward
- open the Mold and take the Silver Bullet
- return to the library
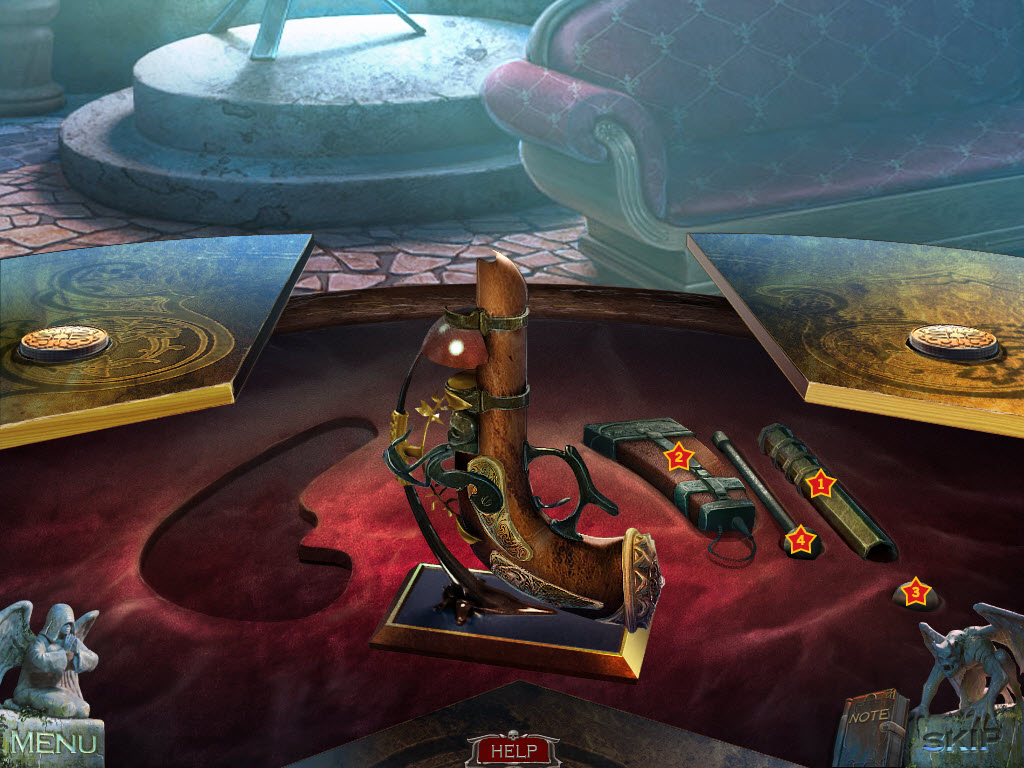
- examine the table
- place the Silver Bullet in the hole
- place the gun into the holder
- place the gold cylinder on top of the gun
- place the gunpowder and Silver Bullet into the cylinder
- place the silver cylinder into the gun
- receive Pistol
- return to the werewolf
- use the Pistol and shoot the werewolf
- replace the Cannon Ball to open the gate
- examine the medicine bag and open it
- take the Vaccine and Smelling Salts
- return to the stagecoach
- place the Vaccine in the drivers hand
- use the Smelling Salts on the driver
- examine the case at the edge of the statue
- break it open and take the Raven Plate
- go down twice and up
- examine the door to the mausoleum
- place the Raven Plate in the door
- open the coffin and take the Key
- use the Key to open the gate
To Be Continued...
Comments will load when you reach this part of the walkthrough.