
Walkthrough Information
MAGIC ENCYCLOPEDIA: MOON LIGHT WALKTHROUGH
Solve the mystery of Professor Fobros' recent unexplained disappearance and enjoy the exquisite artwork in all the scenes. You play Katrina, a student of Professor Fobros. Roger, Katrina's brother, has requested her assistance in locating Professor Fobros in this hidden object adventure game with no time limits.
General Tips and Vocabulary:
- Repair Artifacts – There are 5 items along the bottom of the screen that are broken into several pieces and placed throughout the scene. Collect all the pieces of the repair artifact and it becomes a wolf artifact (inventory item). The repair artifact pieces can be challenging to find. Look along the edges of the scene along with looking at items in the same with same color and/or shape and/or texture. The locations for the repair artifact pieces are always in the same location in every game.
- Wolf Artifacts – Are the completed repair artifacts and are placed on the right of the screen into inventory. Use the wolf artifacts in areas where you receive a hammer icon. Wolf artifacts can be used in any of the scenes located in the chapter/level in which it is introduced. The wolf artifacts will no longer be in inventory when there is no use for them.
- Hand icon – Select the area and an action will take place.
- Eye icon – Take a closer look by selecting these glowing blue areas. A pop-up window will appear allowing you to view the magnified area.
- Hammer icon – Place one or more wolf artifacts (inventory items) in the icon area for an action to take place and/or for another repair artifact piece to become available.
- Question Mark icon – Select the icon to play a mini-game.
- Walking Icon – Entrance or exit into another scene.
- Sparkling Areas – Place your curser over these areas to see what type of icon or repair artifact piece is there.
- Gems – One or two colored diamond-shaped gems are located in all the scenes except Fobros' Office and the Basement Vault. All the gems need to be collected for the Professor's Amulet to finish the game.
- General map - Flags on the statue locations indicate that location has been completed. Dark Blue Gems above the statue locations indicate there are gems to collect. No flag and no gem on the statue locations indicate the location has not been completed. You can transfer to the main map at anytime in the game by the selecting the revolving globe in the upper right of the screen.
- Main Menu – is accessible from the General Map scene. You can replay any unlocked game, change the player profile, change the game options and play or exit the game from the Main Menu.
- Hints - There are an unlimited number of hints throughout the game by selecting the chargeable hint button. It doesn't take very long for the button to charge.
- Unlimited Clicking - There are no penalties for excessive clicking.
- Locations: There is more than one scene at each location. Later in the game, 2 locations will appear at the same time, these locations will be tied together and you'll probably need to visit each location more than once.
- Coins: There will be 2 coins in the upper right of the screen after a few scenes have been completed. They are explained well in the game, but in case you didn't catch the information. The larger coin automatically keeps you in the same location just transfers you to a different scene. The smaller coin transfers you to a different location within the same chapter/level of the game.
- Action Line: Place your curser on the repair and wolf artifacts to get a description of the artifact in the pop-up action bar at the top of the screen. Place your curser on some items in the scenes and the sparkle areas and a pop-up box will appear at the top of the screen giving you hints for actions for the selected item. Example of a hint: Guests must leave their shoes outside...place the boot at the side of the door.
- Progress Bars: There is a progress bar along the bottom of the main map indicating how much of the game has been completed. The progress bar above the wolf artifacts/inventory indicates how much of the level/chapter has been completed.
- Scroll Pages: Collect the scroll page, which is a page in Roger's diary at the end of each chapter/level to proceed to the next chapter/level. You can revisit each completed chapter/level and select the scroll page again to read again if desired.
- Chapters/Levels: There are 11 chapters/levels in the game. Each chapter has a minimum of 2 scenes and as many as 5 scenes.
Mini-games:
- All 18 Mini-games can be skipped after the skip button has charged.
- The skip button is on the lower right of the screen and needs to be charged before you have the option to skip the puzzle. So why not try to solve the puzzle until the button fills.
- Mini-games can be replayed after they have been unlocked by selecting the mini-games button on the lower left of the Main Menu Screen.
- The mini-games can be rest by selecting the arrow at the top left of the game board or by exiting the game by selecting the arrow w/the door on the top right of the game board.
- Most of the mini-games can have several solutions OR have random solutions.
About the walkthrough:
- The pieces of the items you need to collect have a colored circle around them on the screenshots and are also highlighted in the same color in the walkthrough. The circles on the screenshots indicate where the pieces of the items are located by the color coded items circled at the bottom and the color coded highlighted list of Repair Artifacts in the walkthrough.
- The color coded rectangles or squares are hot spots (eye icon) OR indicate where a piece of an item is found after using an artifact item (hammer icon). Hot spots are areas to be selected for a pop-up close up view.
- The color coded arrows on the screenshots indicate where you need to place a completed artifact (inventory item).
- Most screenshots have a text box w/color coded steps for each scene.
- Some of the actions can be completed in a slightly different order than indicated in the walkthrough.
- Gems are circled in purple and white on screenshots (sorry, but some screenshots may read they are circled in purple).
- I tried to place as much information in each screenshot as possible, as I find this the easiest method to follow a game. I also tried to make the written steps in the walkthrough descriptive. I didn't describe where each item was located.
- Descriptions of gem locations and hot spots are included in the written portion of the walkthrough.
- Mini-game solutions or examples were given in most cases.
****SPOILER ALERT****
CHAPTER 1: MAGIC ACADEMY:
Fobros'
Office: 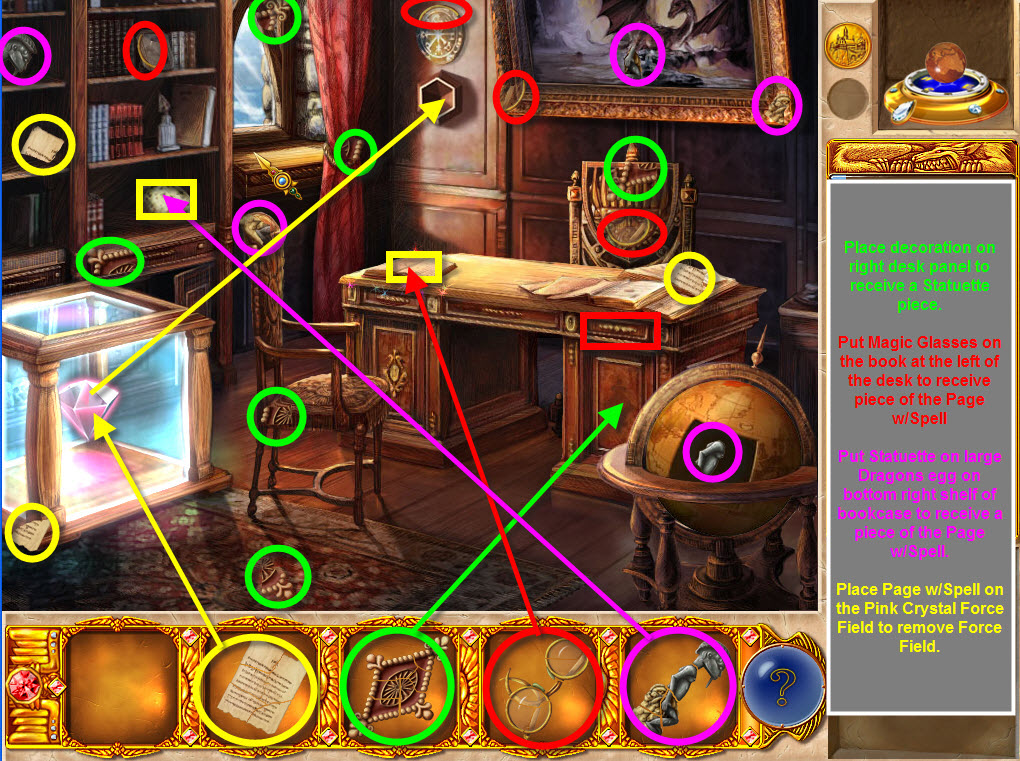
Repair Artifacts: Page w/Spell, Decoration, Magic Glasses, Statuette
- Follow the tutorial to locate the 4 pieces of the oil can, use the oil can on the rusty portion of the globe. Select the globe to open a secret compartment containing one piece of the statuette. Collect the piece of the Statuette.
- Collect all visible repair artifact pieces.
- Place the Decoration on the bottom right panel of the desk to open the drawer above the panel. Collect a piece of the Magic Glasses.
- Read the book on the left side of the desk w/the magic glasses to collect a piece of the Page w/Spell.
- Break the large dragon's egg on the bottom right shelf of the bookcase w/the Statuette to collect a piece of the Page w/Spell.
- Turn off the pink crystal force field by placing the Page w/Magic Spell on the crystal. The pink crystal will move into the hexagon on the back left wall panel; thus revealing a portal.
- Enter the portal into the Professor's Basement Vault.
Professor
Fobros' Vault 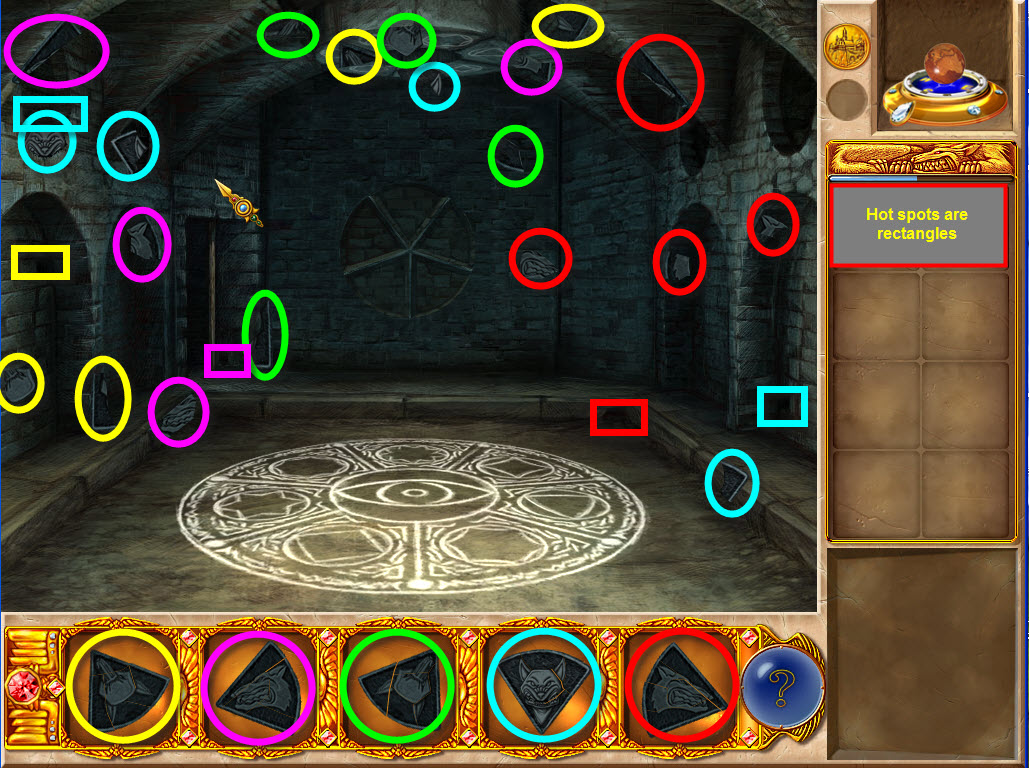
Repair Artifacts: Triangle Stone #1, Triangle Stone #2, Triangle Stone #3, Triangle Stone #4, Triangle Stone #5
- Collect all the pieces for the 5 triangle stones.
- See screenshot for hot spots.
- Place
completed triangle stones in the correct positions on the circle on the
back wall of the room. Then select the back wall to reveal the first
mini-game
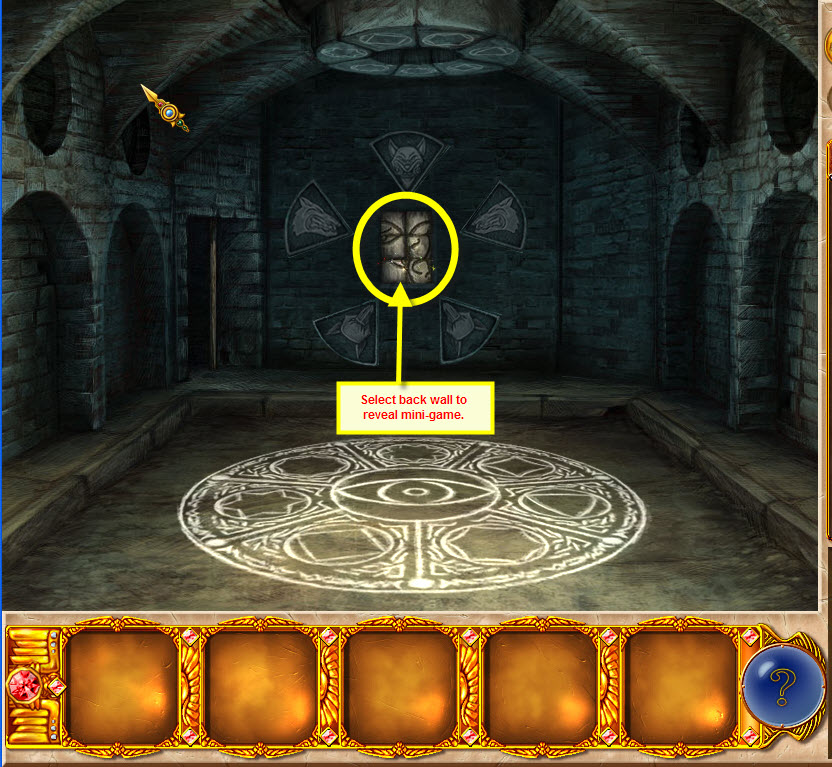
Tile Swap Mini-game:
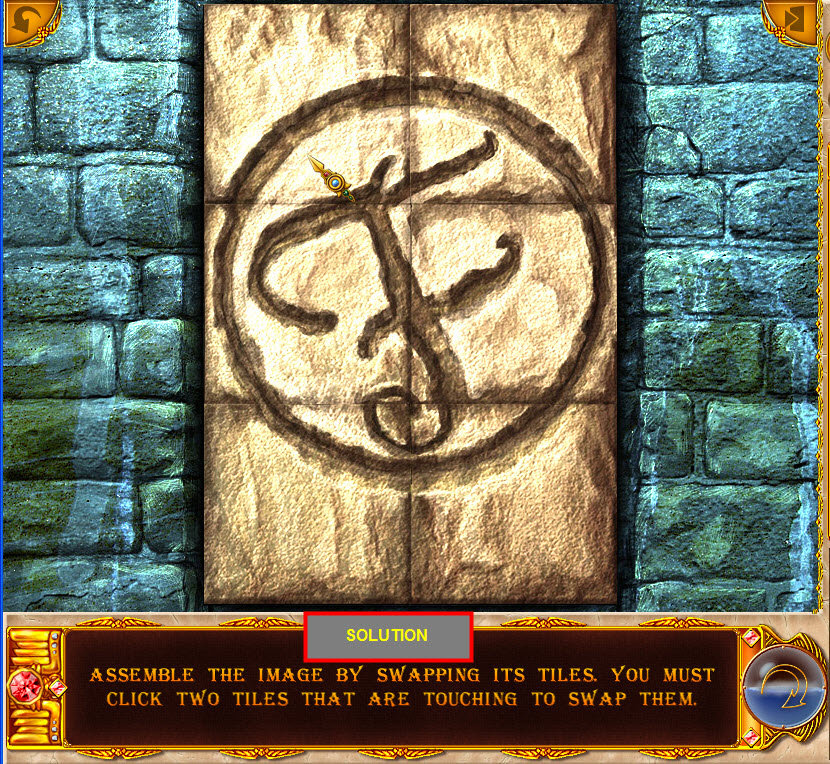
· Assemble the image by swapping its tiles. Select 2 adjacent tiles to have the selected tiles swap places. The completed game should resemble an "F" with a circle around it.
Select the scroll for a page from Roger's diary. The game will transfer to the main map. Select the next location then select play.
CHAPTER 2: TIBETAN MONASTERY:
- FROM NOW ON EACH SCENE WILL HAVE 1 – 2 GEMS TO COLLECT FOR THE PROFESSOR'S AMULET (the game will show you the first one). The gems will be circled in purple and white on the Screenshots.
- I've stated the color of the gems in the walkthrough, however, the colors may look slightly different in your game depending on your display resolution settings. The pink and purple gems may look almost the same.
Tibetan
Monastery Outside: 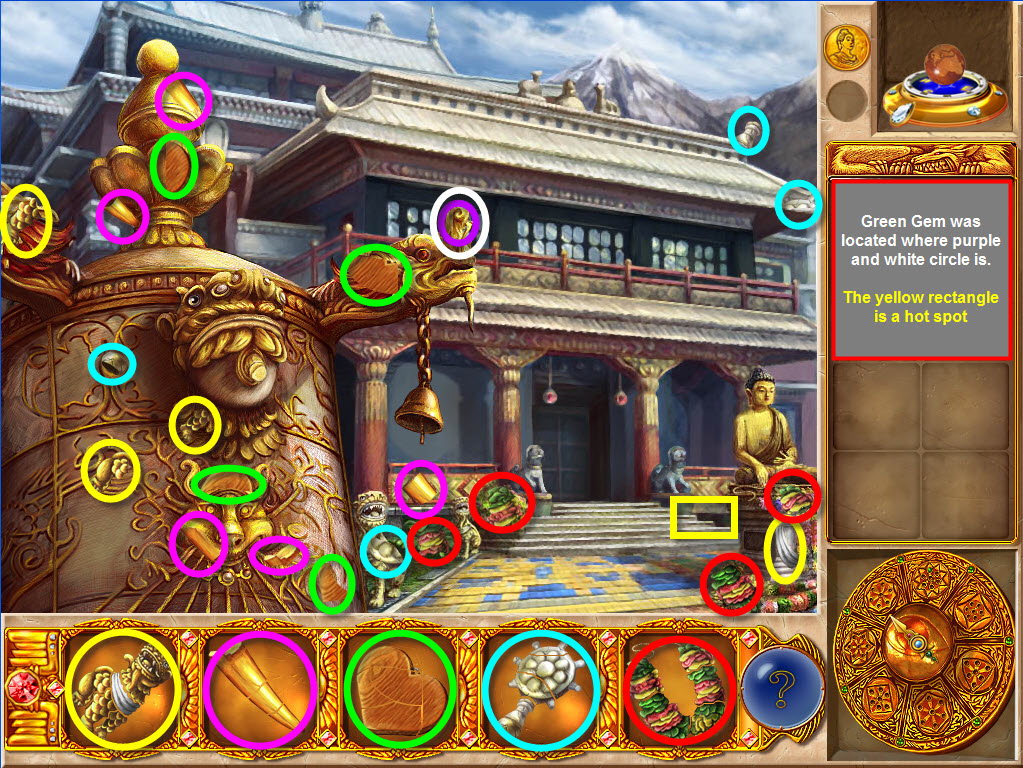
Repair Artifacts: Statue, Horn, Clapper, Tibetan Sign, Flower Garland
Gem: 1 Green. The tutorial will show you the first gem in the game.
- Collect the green gem (on the dragon on the right on the bronze and gold statue in the bottom left of the scene)
- Collect all visible repair artifact pieces.
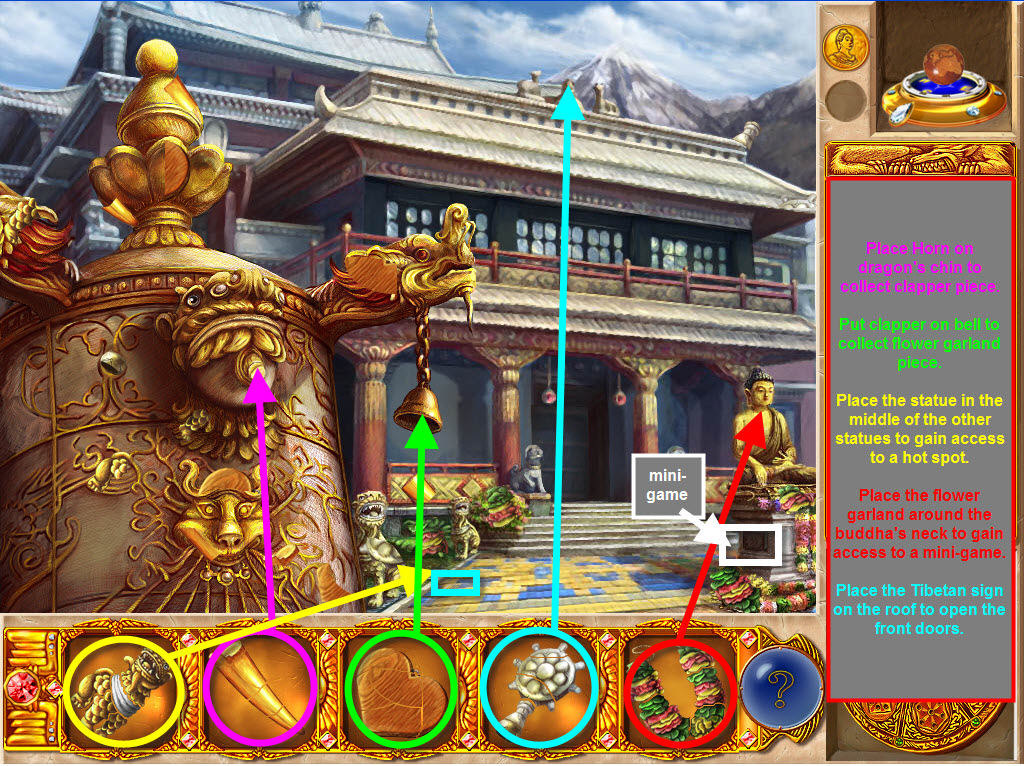
- Place the horn on the dragon's chin on the front of the bronze and gold statue in the bottom left of the scene to collect a clapper piece from the dragon's mouth.
- Place the clapper on the bell when you have collected all the pieces; part of the flower garland will fall to the ground. Select the flower garland piece to collect.
- Place the statue between the two other statues on the left of the walkway to activate a hot spot. Select the hot spot below the statue and collect a piece of the Tibetan Sign.
- Place the Flower Garland around the Buddha's neck to reveal a mini-game.
- Place the Tibetan Sign on the top middle of the roof to open the Monastery doors.
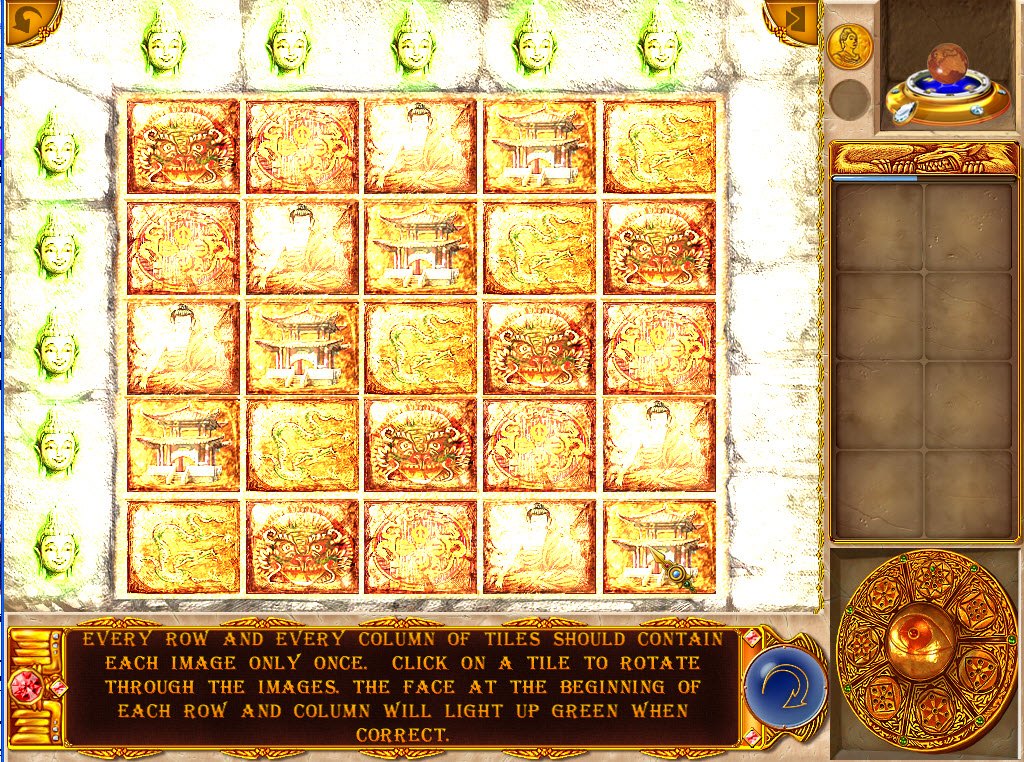
Buddha Mini-game:
· Select the darkened rectangle on the left side of the Buddha pedestal.
· Each row and each column should contain each image one time.
· Select each square to cycle through the images.
· When each column or row has only one of each image the Buddha heads on the top and on the left of the puzzle will turn green.
· There are several solutions for this game. One of the solutions is below:
Row 1: Dragon Head, Symbol, Man, Pagoda, Snake.
Row 2: Symbol, Man, Pagoda, Snake, Dragon Head.
Row 3: Man, Pagoda, Snake, Dragon Head, Symbol.
Row 4: Pagoda, Snake, Dragon Head, Symbol, Man.
Row 5: Snake, Dragon Head, Symbol, Man, Pagoda.
Collect the blue gem after completing the game. This gem is to be placed in a column inside the monastery; it's NOT for the Professor's Amulet.
- Enter the Monastery.
Tibetan
Monastery Inside: 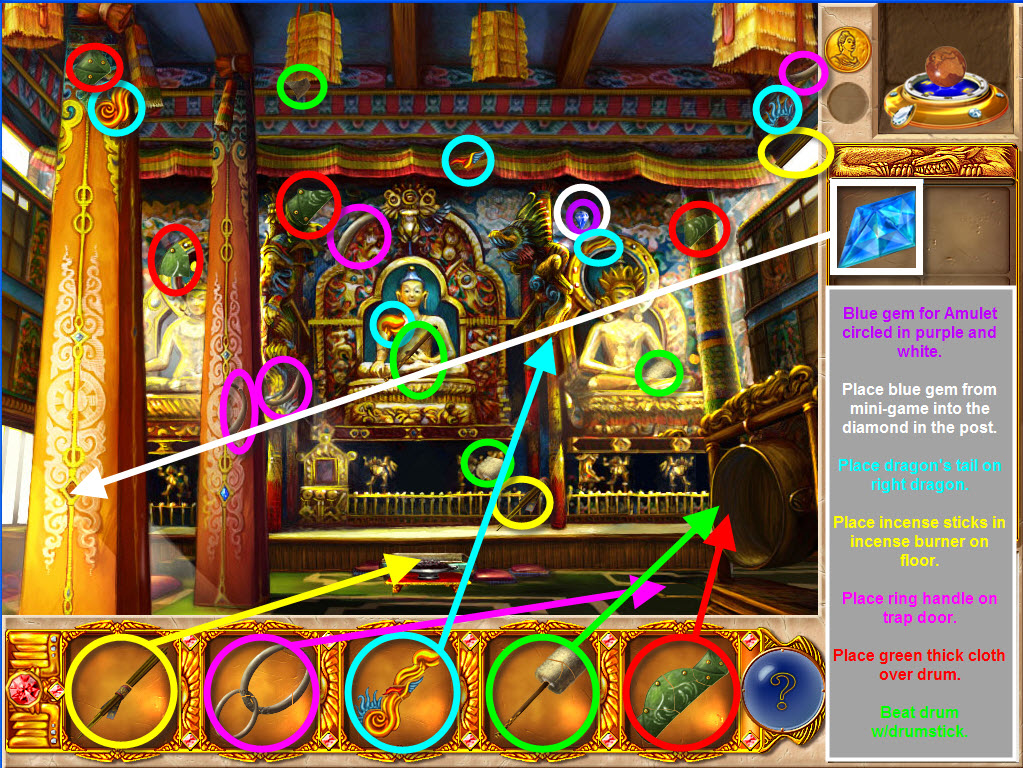
Repair Artifacts: Incense sticks, Ring Handle, Dragon Tail, Large Drumstick, Thick (green) cloth
- Select the Blue Gem slightly left and above the right statue's head for the Professor's Amulet.
- Collect visible pieces of the repair artifacts.
- Place the blue gem collected from the mini-game outside the Monastery inside the diamond on the column on the bottom left of the scene to reveal a piece of the Large Drumstick. Select the piece of the Large Drumstick.
- Place the Incense Sticks on the incense burner in the middle of the floor.
- Place the Tail on the Dragon on the middle column on the right side. The incense burner on the floor will ignite.
- Place the Incense Sticks on the incense burner in the middle of the floor. The Dragon on the right column will drop a ring handle piece (may take a little while). Select the Ring Handle piece.
- Place Ring Handle on the hidden compartment on the floor on right side of the scene between the statue and the drum and collect a piece of the green thick cloth.
- Place the Thick Green Cloth on the drum on the bottom right of the scene.
- Beat drum w/ the drumstick. A Buddha will rise above the incense burner holding a scroll. The scroll will reveal another message from Roger.
- Return to the main map and select the Fortuneteller's Cottage.
CHAPTER 3: FORTUNETELLER'S COTTAGE:
- From now on the pieces of the repair artifacts can be located in different scenes.
- Wolf (inventory) artifacts can be used in any of the scenes in a chapter/level.
- You'll have to travel to most scenes more than once in order to collect all the pieces of the repair artifacts as they build upon each other.
Outside
the Fortuneteller's Cottage: 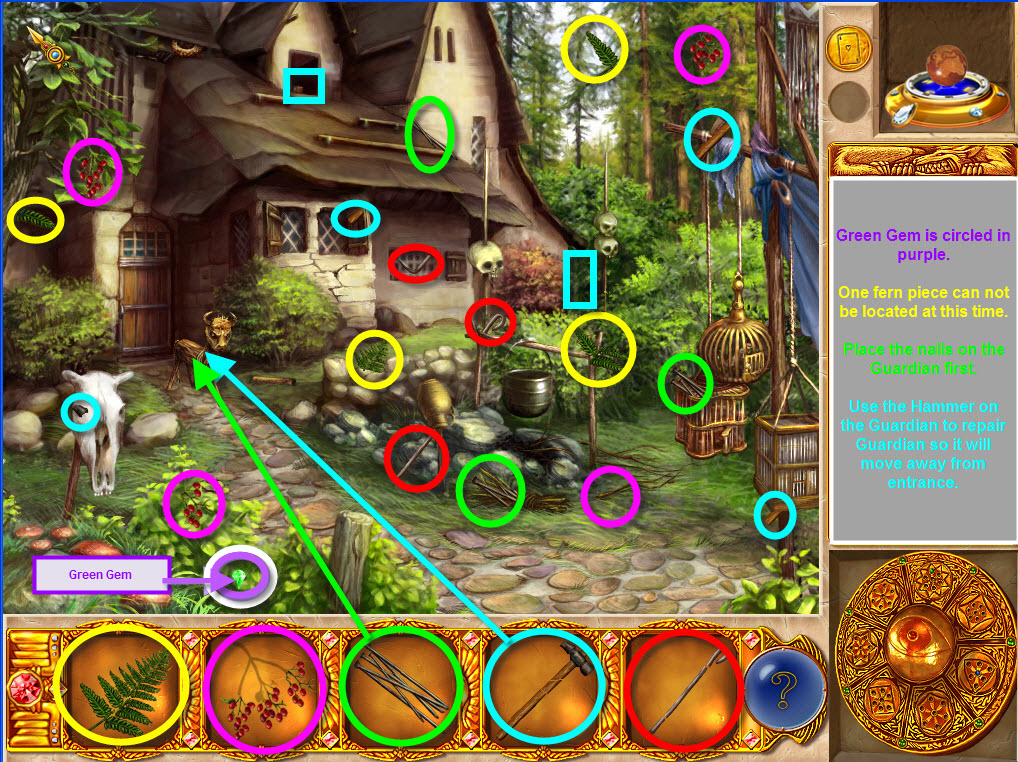
Repair Artifacts: Fern Leaf, Spurge Flax, Nails, Hammer, Fire Poker
Gem: Green Gem
- Select the Green Gem on the bottom left of the scene and left of the wood post in the bushes for the Professor's Amulet.
- Collect all visible repair artifact pieces.
- Collect a nail piece in a hot spot located in the top window of the house (indicated by a rectangle in screenshot).
- Collect a hammer piece in a hot spot to the right bottom of the house (indicated by a rectangle in the screenshot).
- The fern artifact will be incomplete at this time.
- Place the nails on the Guardian (wooden animal) in front of the door of the Cottage.
- Place the hammer on the Guardian after you've placed the nails on the Guardian to repair the Guardian. The Guardian will move out of the way.
- Enter the Cottage (you'll return to the outside of the Cottage again later).
Inside
the Fortuneteller's Cottage: 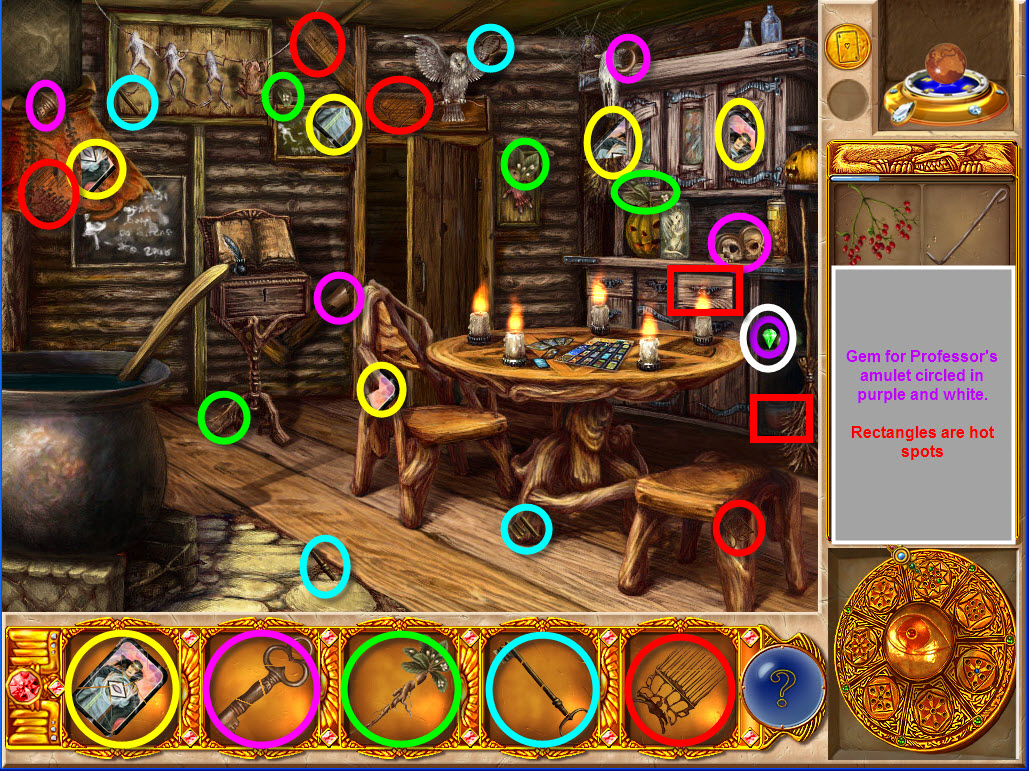
Repair Artifacts: Tarot Card, Key #1, Mandrake Root, Key #2, Fortune Tellers Comb.
Gem: Green Gem
- Select the green gem for the Professor's Amulet located on the right side of the scene on the top shelf on the right side of the china cabinet.
- Collect one piece of the Fortuneteller's Hair Comb by selecting the top right drawer of china cabinet (hot spot).
- Collect one piece of the Mandrake Root by selecting the small black pot on the bottom shelf on the right side of the china cabinet (hot spot).
- Collect all visible pieces of the repair artifacts (one piece of Key #1 is unattainable at this time all other pieces are visible or in hot spots).
- Collect the Tarot Card pieces and place the completed Tarot Card on top of the cards on the table to reveal a mini-game.
Tarot Card Mini Game:
· Arrange the cards according to the elements of which they're made and their basic nature.
· When a card is selected the description appears at the top of the puzzle.
· The cards lock into place when placed correctly. There is only one solution to this game.
· Top Row Categories (basic nature) from left to right: Man, Woman, Nature, Artificial (or Man Made).
· Left Column Categories (elements) top to bottom: Fire, Water, Air (wind), Earth.
·
Solution
(left to right) 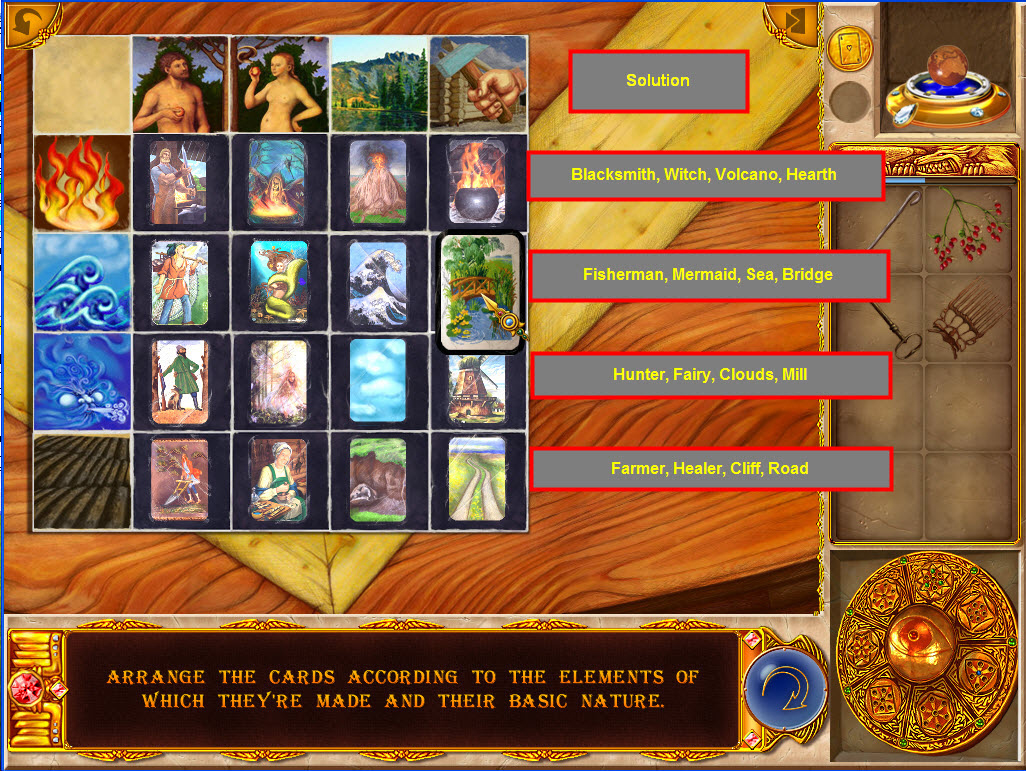
1. Top Row: Blacksmith, Witch, Volcano, Hearth (iron pot in fireplace).
2. Second Row: Fisherman, Mermaid, Sea, Bridge.
3. Third Row: Hunter, Fairy, Clouds, Mill (windmill).
4. Bottom Row: Farmer, Healer, Cliff, Road.
5. Select the cards after game has been completed to collect a page w/invisible ink.
- Place the page w/invisible ink above a candle on the dining table to change the paper into a spell recipe (the paper will float above the candle for a little while).
- Go to the outside of the Cottage by selecting the door OR select the small coin at the top right of the scene.
Outside
the Fortuneteller's Cottage – Key Use and Collecting last Fern Piece:
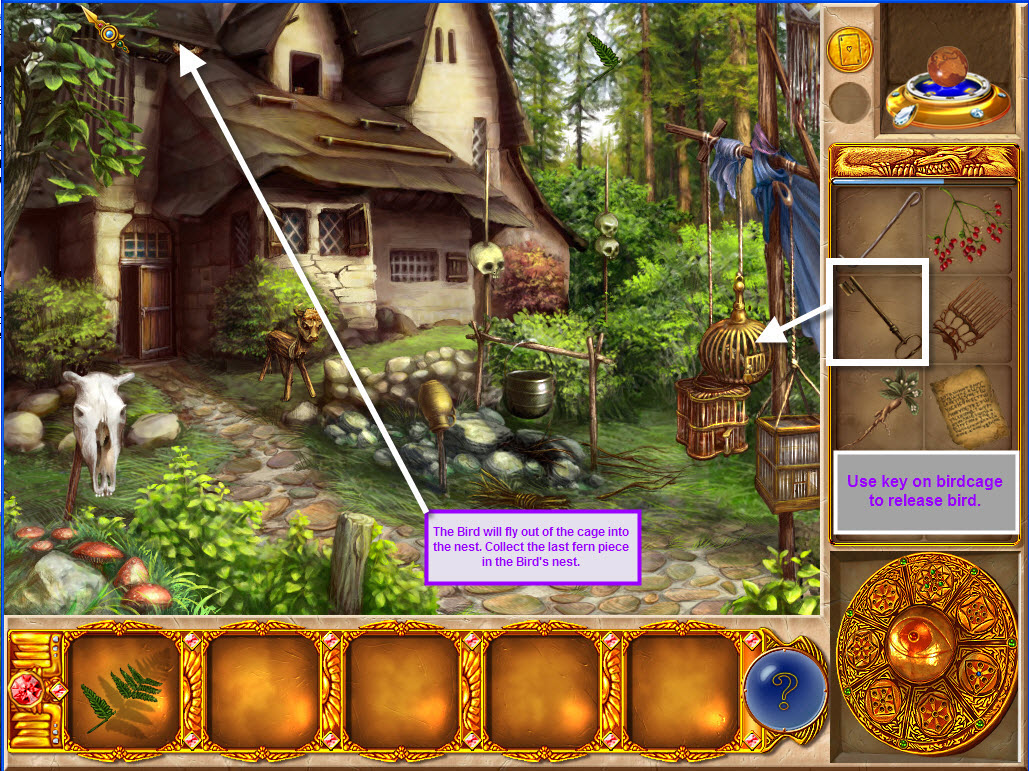
- Use the completed key (#2) on the birdcage on the right of the scene.
- The bird will fly out of the cage and into the Bird's nest near the top of the house roof (above the door).
- Collect the last fern piece in the bird's nest hot spot.
- Go back inside the Cottage.
Fortuneteller's
Cottage Inside – Fire Poker, Spell Recipe, Mandrake Root, Spurge Flax, Fern,
Fortune Teller's Comb and Key Use: 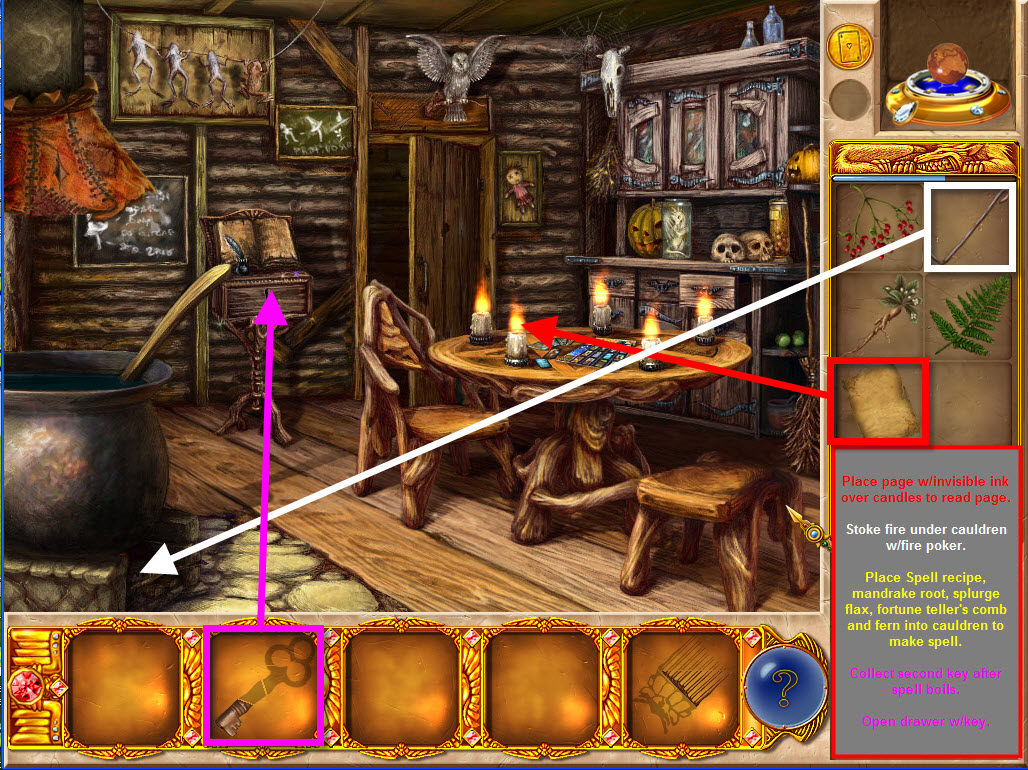
- Use the Fire Poker to stoke the fire under the large black cauldron.
- Place the Spell Recipe, Fern, Mandrake Root, Fortuneteller's comb and Spurge Flax into the cauldron. The recipe will boil and the last piece of Key #1 will appear below the cauldron.
- Use the completed key on the drawer on the small table by the door to receive another scroll/diary page.
- Select the scroll page and more of the story will be revealed.
CHAPTER 4: GERMAN CASTLE
Outside
the German Castle: 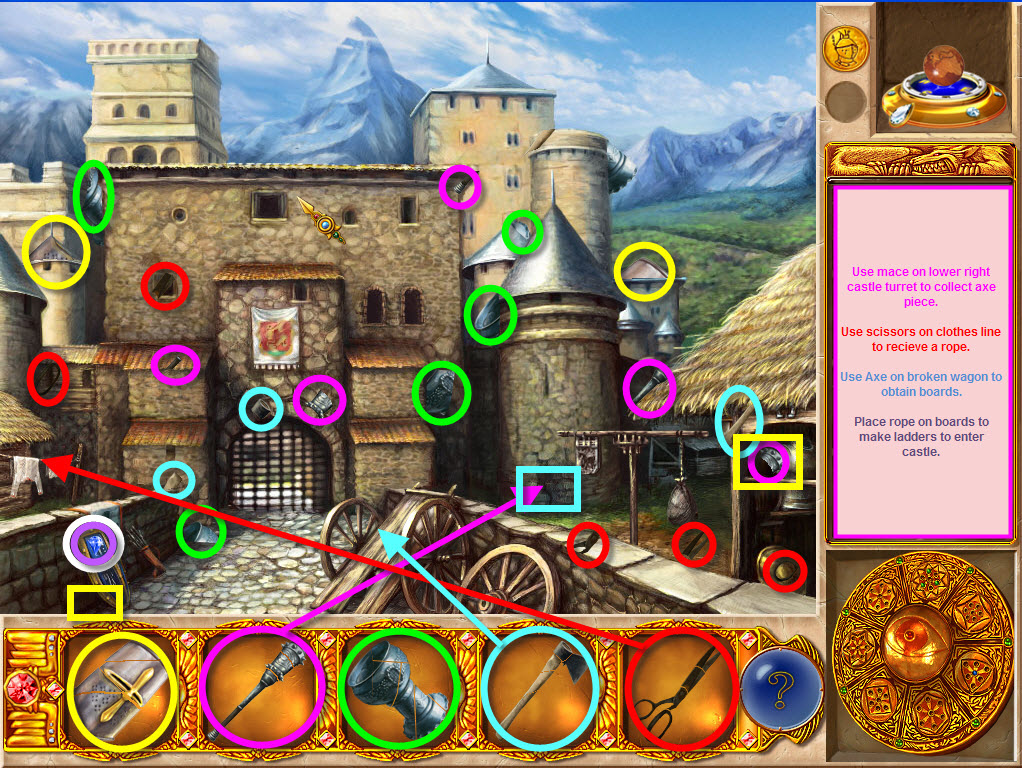
Repair Artifacts: Helmet, Mace, Goblet, Axe, Scissors
Gem: 1 Blue
- Collect the Blue Gem on the lower left of the scene on the top of the shield in the blue area for the Professor's Amulet.
- Collect all visible pieces of the repair artifacts.
- The Hot spots are under the shield on the lower left (helmet piece) of the scene and on the top shelf of the hut on the right of the scene (helmet piece). You need to collect the mace piece first.
- Place the mace on the bottom right castle turret to reveal an axe piece.
- Use the axe on the broken wagon to make boards.
- Cut the clothesline on the left of the scene w/scissors to receive a rope in inventory.
- Place the rope on the cut boards and with the magic of computer games...you have ladders leading to the castle windows.
- Enter
the castle through the windows.
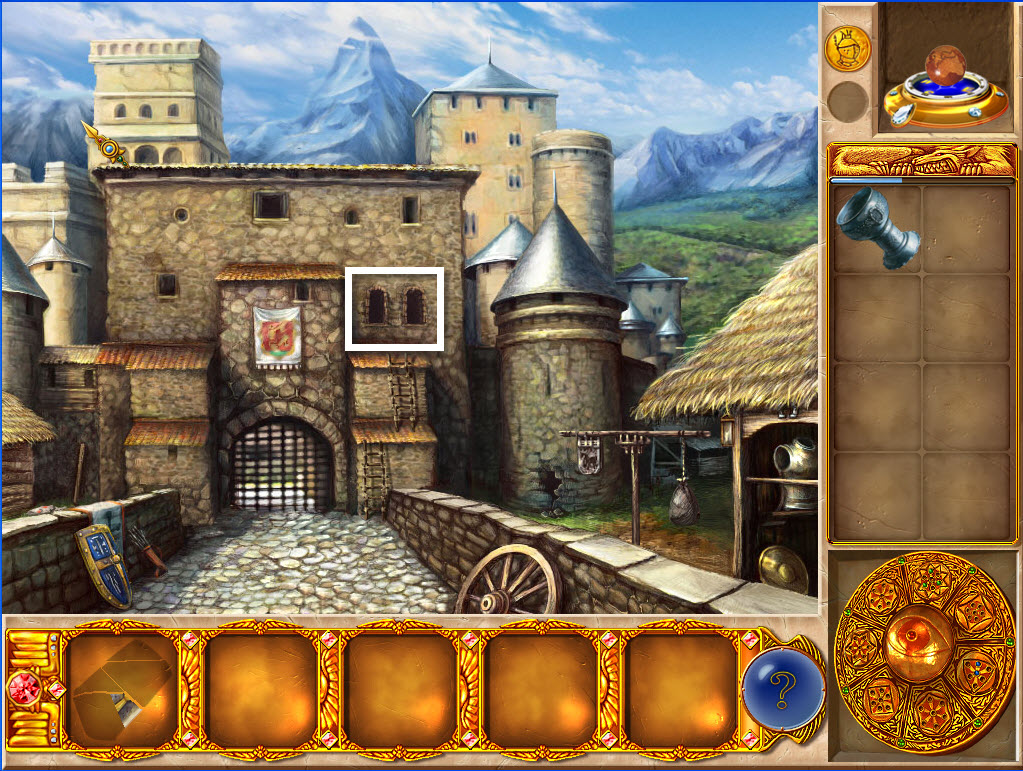
Inside
the German Castle: 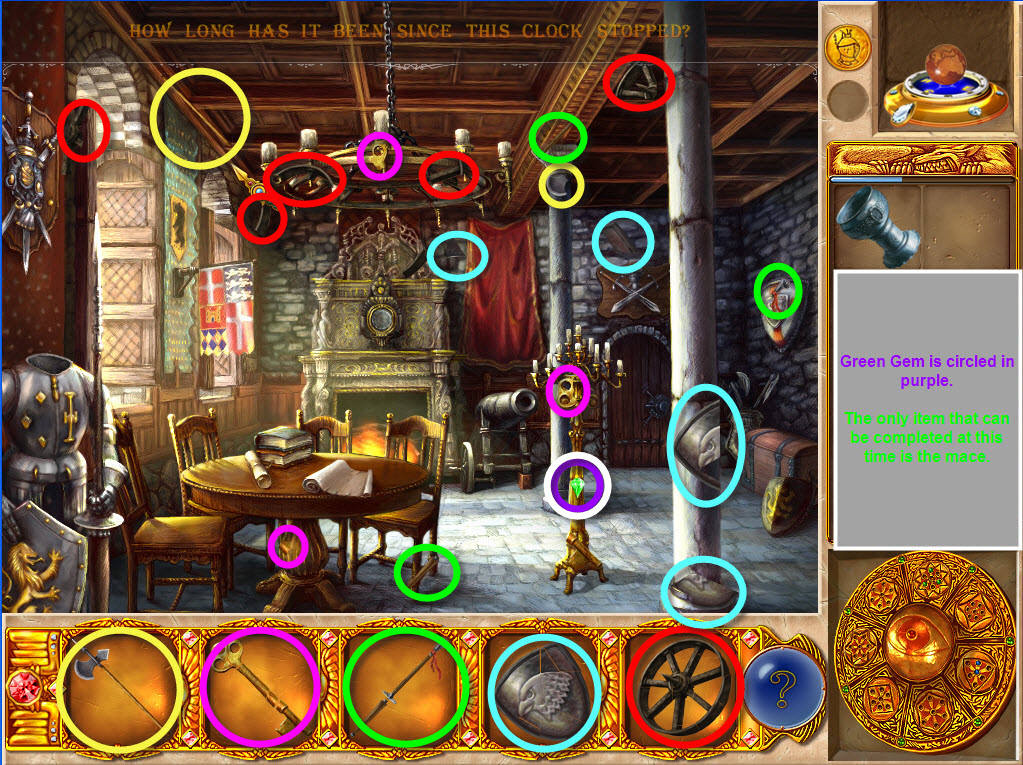
Repair Artifacts: Halberd, Key, Lance, Shield, Cannon Wheel
Gem: 1 Green
- Select the Green Gem on the candelabra in the middle of the scene for the Professor's Amulet.
- Collect all visible repair artifact pieces. You should have the Goblet and Lance completed.
- You can't do any more in here for now, so go out side via the window or selecting the coin in the upper right of the screen.
Outside the German Castle – Lance Use and obtaining the rest of the Helmet:
- Practice
your jousting skills (not really) by placing the Lance on the practice
equipment (pole w/the shield on one side and bag on the other on the right
side of the scene.)
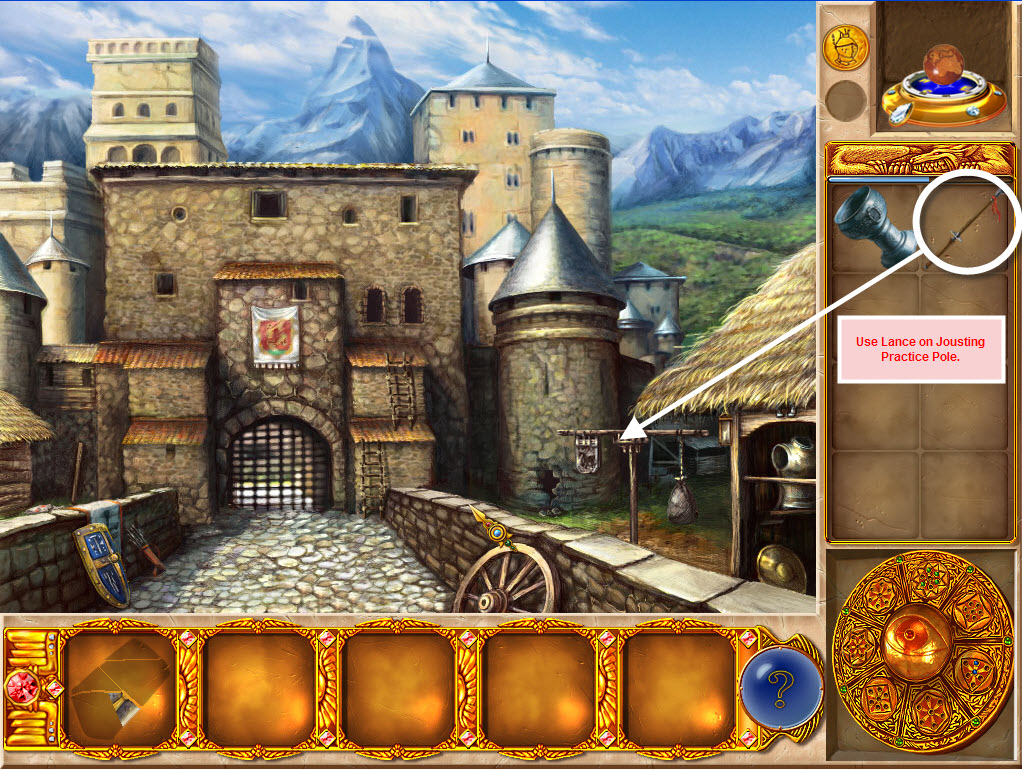
- Pick up the last piece of the helmet after jousting practice.
- Go back inside the Castle.
Inside
German Castle – Helmet, Halberd, Shield 
- Put the Helmet on the Suit of Armor at the bottom left of the scene to reveal a piece of the Halberd. Collect the Halberd piece.
- Use the Halberd to open the brown chest on the right of the scene. After the chest opens, select the chest for a close-up view and select a piece of the key.
- Place the key on the clock above the fireplace mantle; select the last piece of the shield when it appears.
- Put the shield on the Coat of Arms above the door in the back right of the room to reveal a mini-game.
Water Jar Mini-game:
· Pour water from one jar into another by clicking the jars. The first and second jars should contain four liters of water each.
· Each jar has a number on it indicating the number of liters of water it will contain when full.
·
There
are several solutions to this game. Here is one solution: 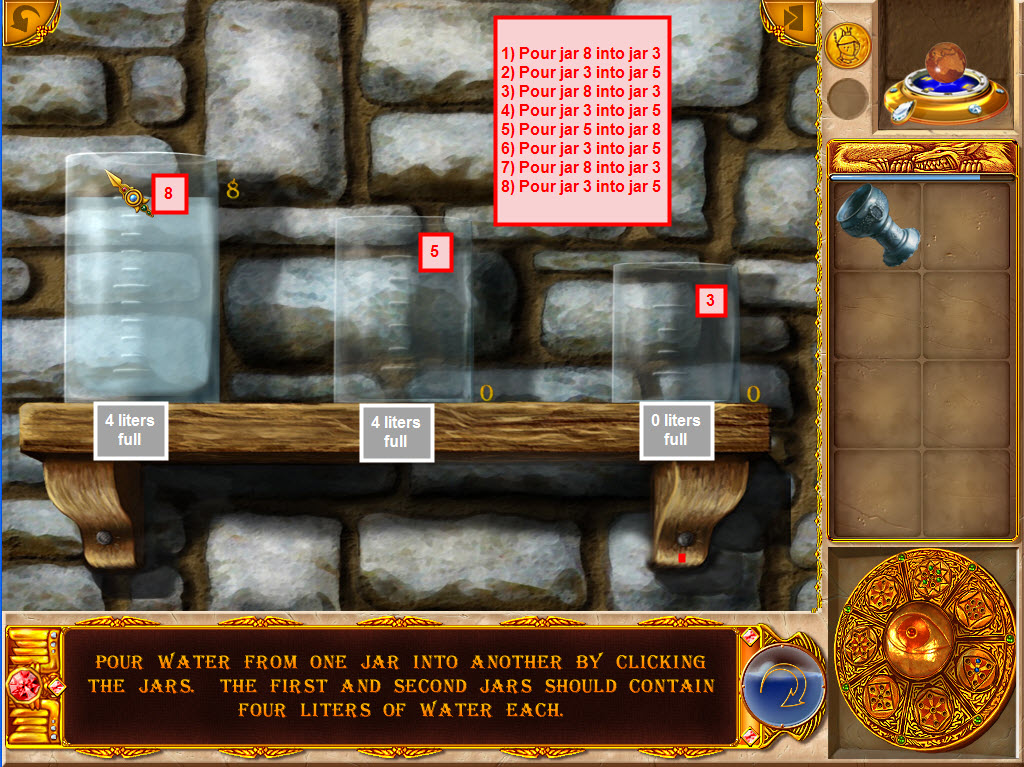
1. Pour the 8 liter jar into the 3 liter jar.
2. Pour the 3 liter jar into the 5 liter jar.
3. Pour the 8 liter jar into the 3 liter jar.
4. Pour the 3 liter jar into the 5 liter jar.
5. Pour the 5 liter jar into the 8 liter jar.
6. Pour the 3 liter jar into the 5 liter jar.
7. Pour the 8 liter jar into the 3 liter jar.
8. Pour the 3 liter jar into the 5 liter jar.
9.
Inside
German Castle – Goblet and Cannon Wheel Use: 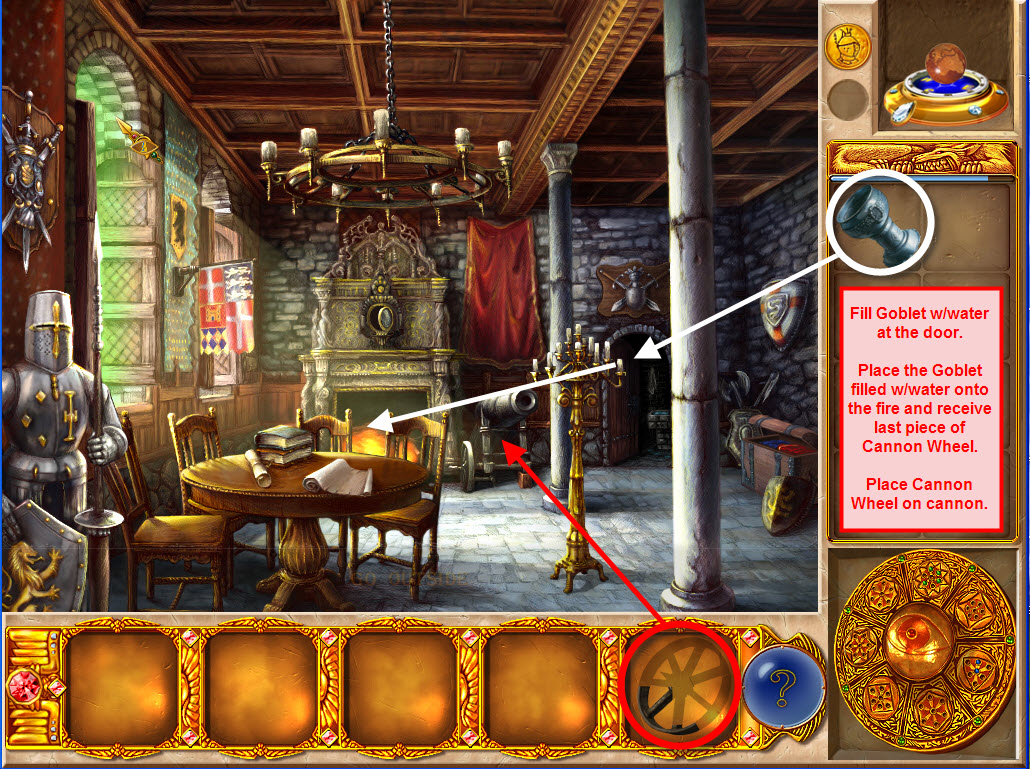
- Place the Goblet on the door where the Water Jar mini-game was and fill the Goblet with water.
- Extinguish the fire in the fireplace w/the goblet of water and receive the last piece of the Cannon Wheel.
- Yep, you guessed it...place the Cannon Wheel on the cannon and receive a scroll page; you'll then be transferred to the Main Map.
CHAPTER 5: ASIA AND GOLDEN DRAGON PALACE:
- From now on, there are 2 location sites w/ 2 or more scenes at each location site for each chapter/level.
- The top (largest) coin at the top right of the scene is your current location site.
- The bottom (smallest) coin at the top right of the scene is the other available site at this location.
- Inventory items can be used in any of the location sites or scenes available in each chapter/level.
- Inventory items do NOT carry over into the next chapter/level.
Asia Tent Site Outside:
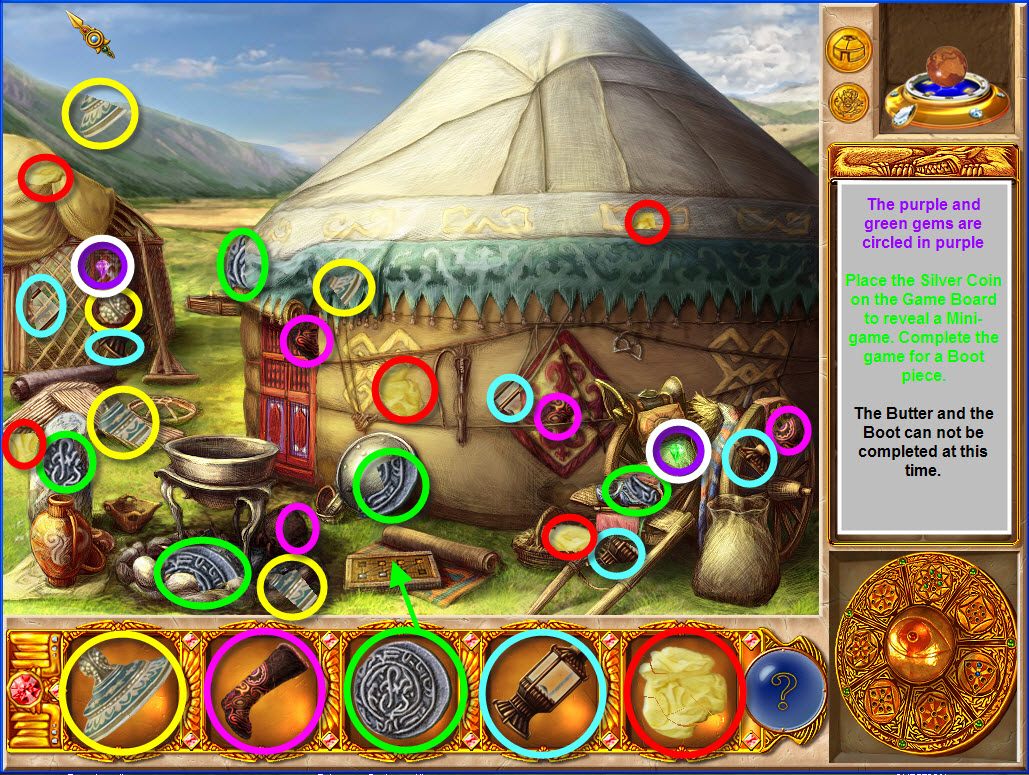
Repair Artifacts: Lid, Boot, Silver Coin, Lamp, Butter
Gems: 1 Purple and 1 Green
- Select the Pink Gem on the tent on the left of the scene for the Professor's Amulet.
- Select the Green Gem on the cart at the right of the scene for the Professor's Amulet.
- Select all visible Repair Artifacts; the boot and the butter can not be completed at this time.
- Place the Silver Coin on the game board on the bottom middle of the scene to reveal a mini-game.
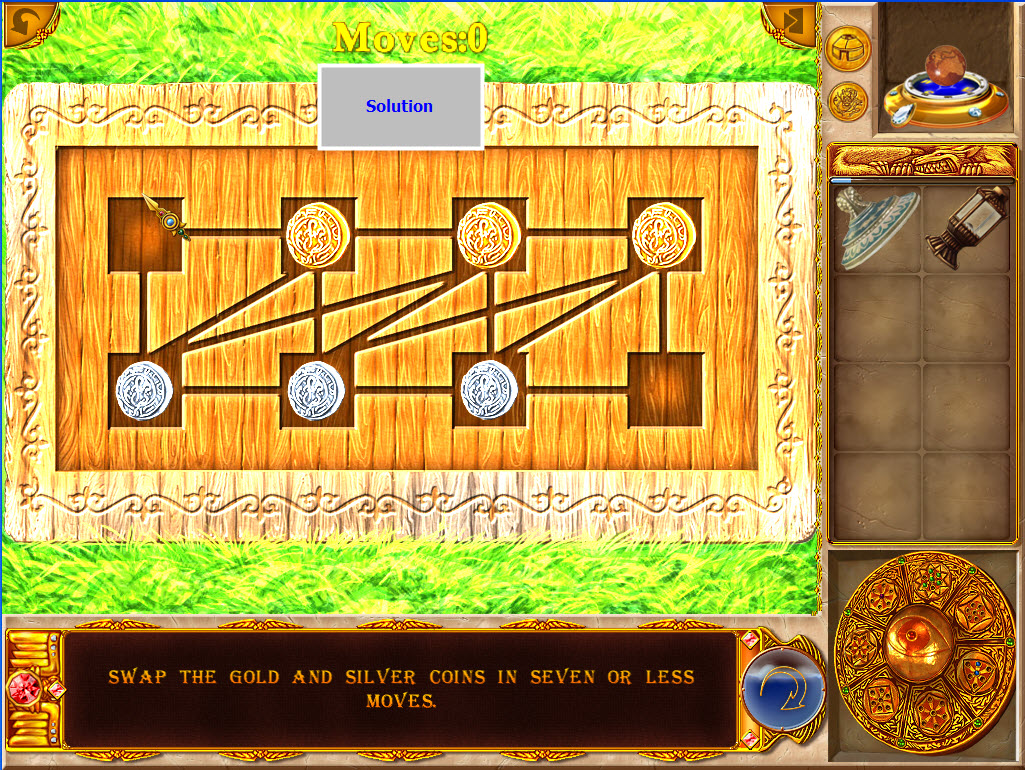
Coin Swap Mini-Game:
· Swap the Gold and Silver Coins in seven or less moves. When completed the Gold Coins will be on top of the game board and the Silver Coins will be on the bottom of the game board.
·
There
are several solutions to this puzzle. I've numbered the squares 1-8 from left
to right in screenshot. Here is one solution: 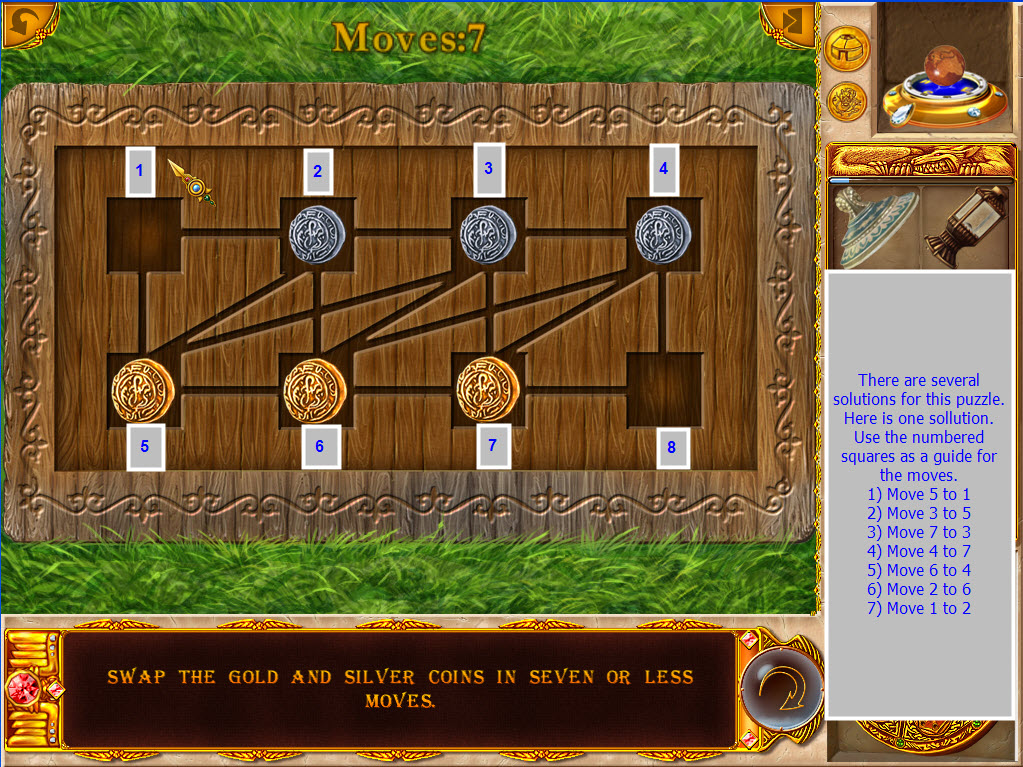
1. Move 5 to 1.
2. Move 3 to 5.
3. Move 7 to 3.
4. Move 4 to 7.
5. Move 6 to 4.
6. Move 2 to 6.
7. Move 1 to 2.
- Collect the piece of the boot after the Coin Swap Mini-Game is completed.
- Place
the boot on the right side of the door to gain entrance into the tent.
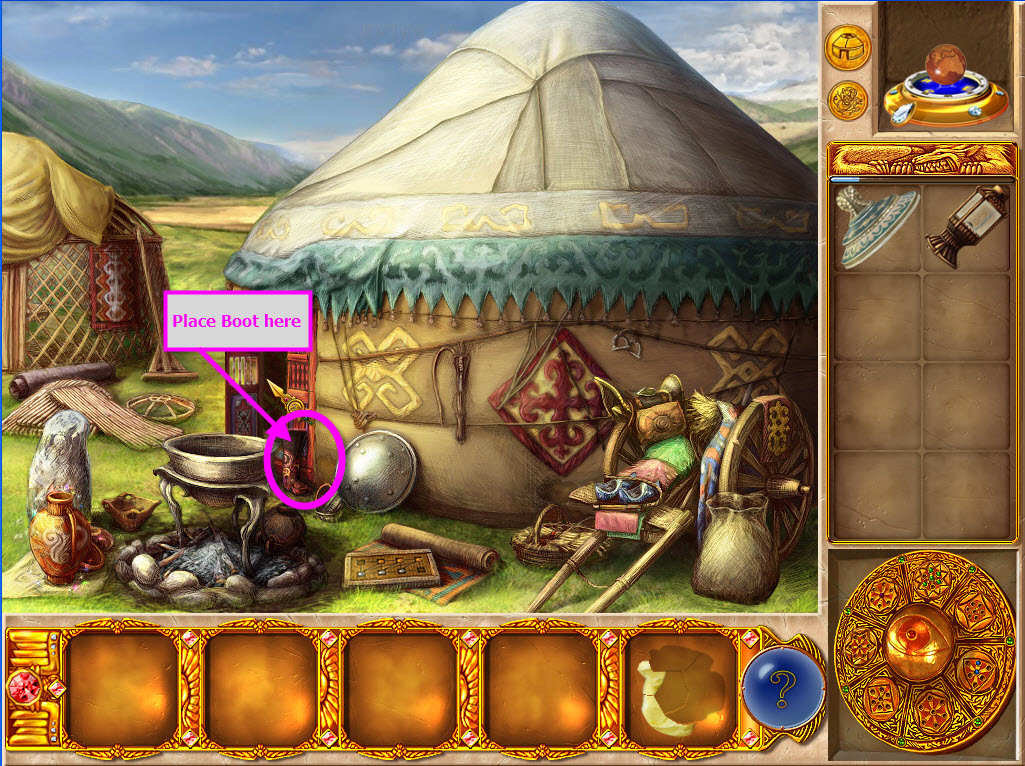
- Enter the tent.
Asia Tent Site Inside:
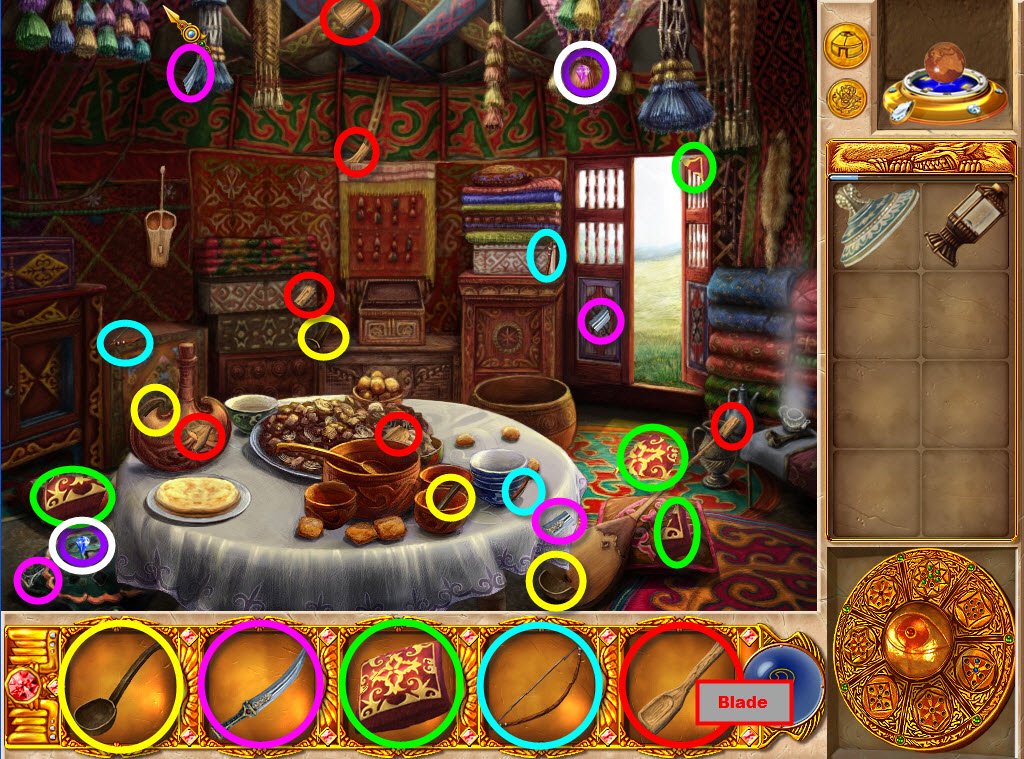
Repair Artifacts: Scoop, Dagger, Pillow, Bow, Blade (resembles wooden spoon)
Gems: 1 Blue and 1 Purple Gem
- Collect the Blue Gem on the floor on the bottom left of the scene for the Professor's Amulet.
- Collect the Purple Gem above the door amongst the tassels for the Professor's Amulet.
- Collect all visible repair artifact pieces; the blade is the only completed item at this time.
- Place
the lid on the teapot that is steaming on the right of the scene to reveal
a pillow piece. Collect the pillow piece.
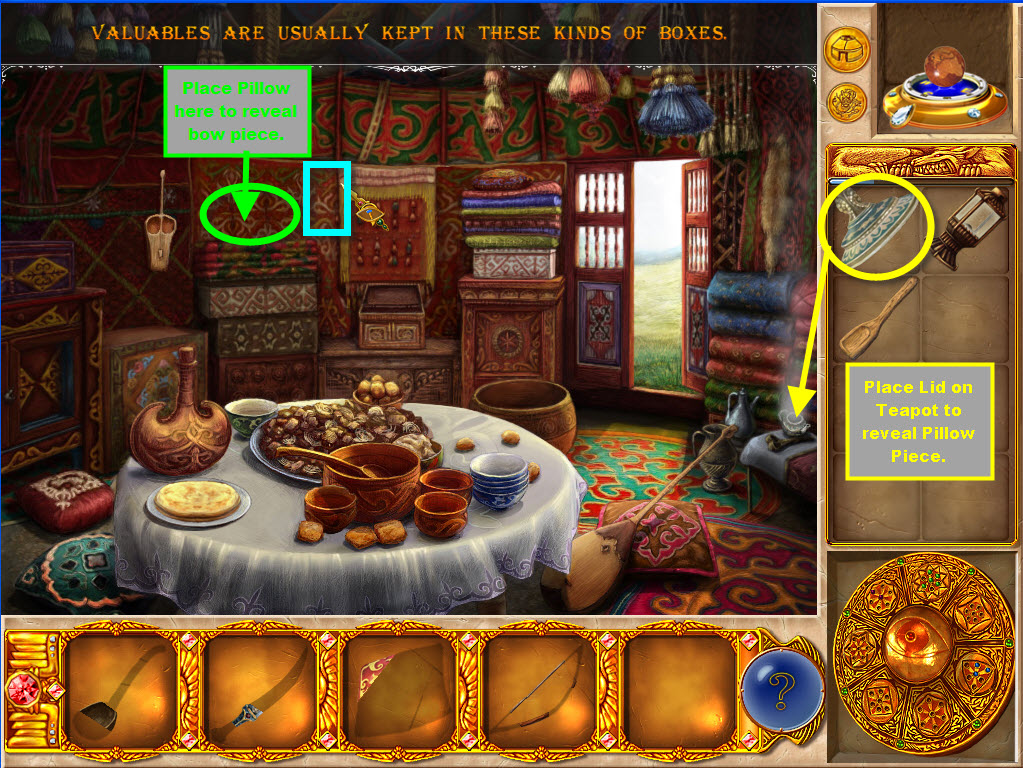
- Place the pillow on top of the stack of blankets in the central back of the scene (Not the stack of blankets by the door that already has a pillow on top).
- Select the bow piece that appears on the right side of the pillow.
- Make sure you have all the pieces of the lantern.
- Select the small coin in the upper right of the scene to travel to the Palace of the Golden Dragon. You'll return to this location later.
Golden Dragon Palace Outside:
- Some of the Repair Artifacts pieces are painfully difficult to locate and are along the edges of the scene.
Repair
Artifacts: Umbrella, Tablet, Chop
Sticks, Hairpin, Diadem 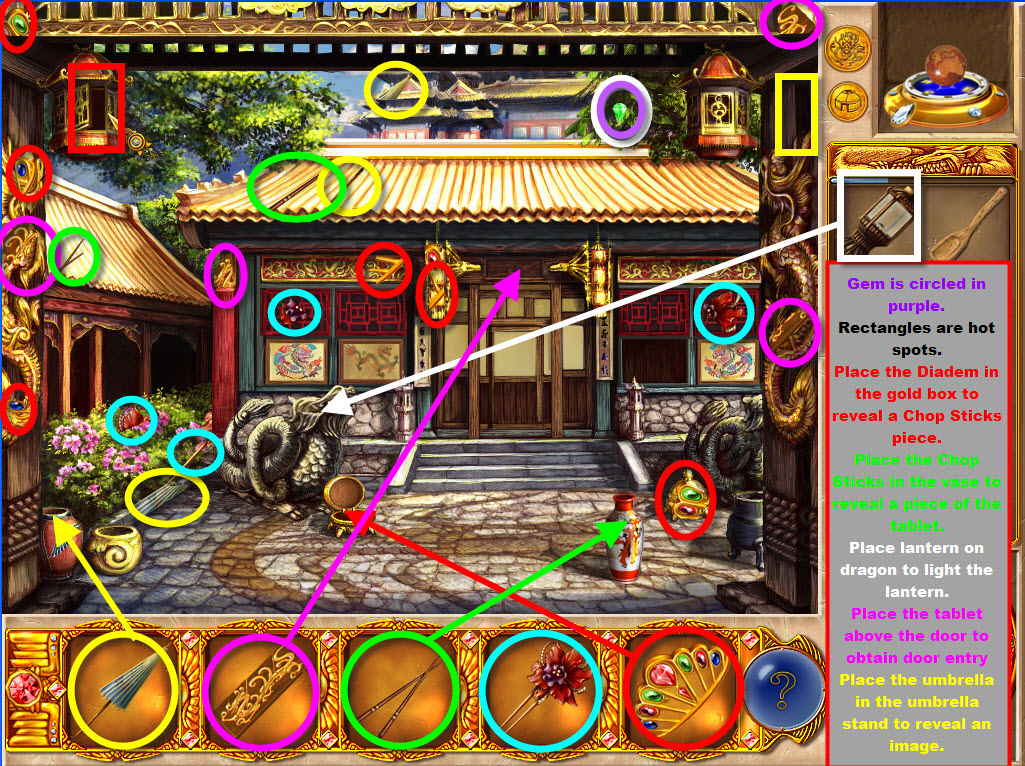
Gem: 1 Green Gem
- Select the Green Gem (circled in purple and white on screenshot) in the upper right of the scene amongst the tree leaves to the left of the lantern for the Professor's Amulet.
- Collect all visible repair artifact pieces.
- Collect a piece of the diadem in the left lantern at the top of the scene (hot spot). Collect an umbrella piece in the upper right of the scene to the right of the lantern (hot spot).
- Place the Diadem in the gold box in the front of the dragon and to the left of the stairs to reveal a Chop Sticks piece. The dragon will move and breathe fire (hint-hint). Collect the Chop Sticks piece.
- Place the Chop Sticks in the vase near the bottom right of the scene and pick up the tablet piece.
- Light the Lantern by placing it on the fire-breathing dragon. The dragon will blow fire into the lantern; which will then be put back into inventory.
- Place the Tablet above the front door to gain Palace access.
- Put the Umbrella in the umbrella stand to reveal an image that you'll need later.
- Enter the Palace.
Golden Dragon Palace
Inside: 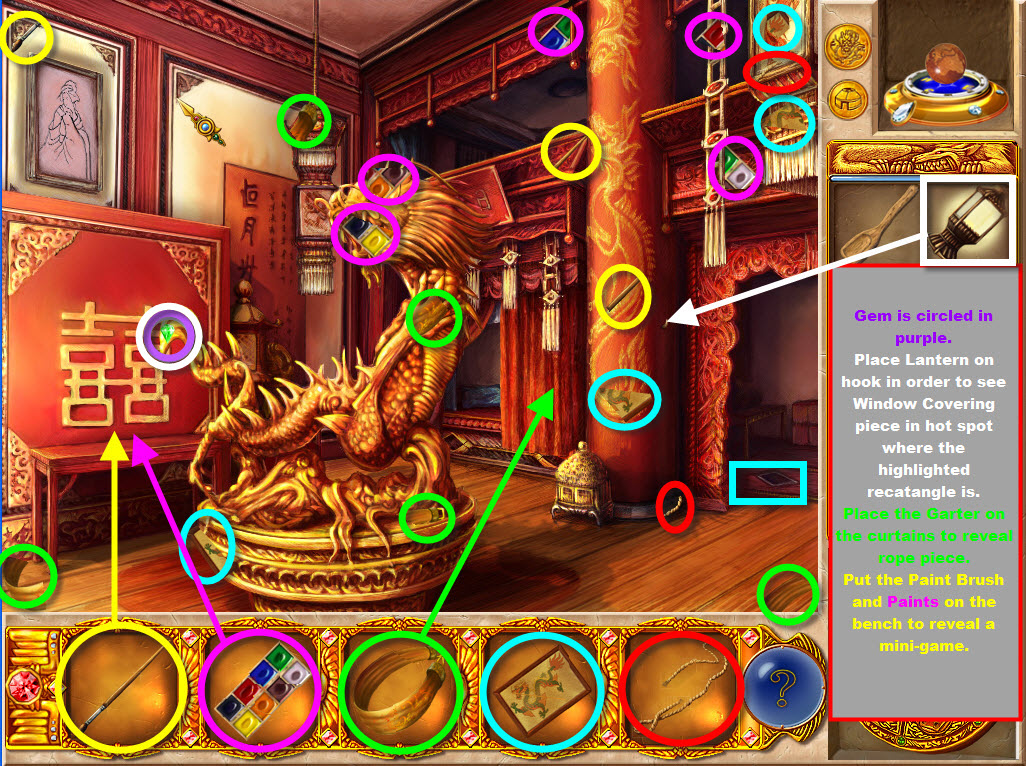
Repair Artifacts: Brush, Paints, Garter, Window Covering, Rope
Gem: 1 Green gem on Dragon's Tail
- Collect the Green Gem on the Dragon's Tail for the Professor's Amulet.
- Yep, you know the drill...collect all the visible repair artifact pieces.
- Place the lantern on the hook to the left of the bottom alcove in order to access a hot spot. Hot Spot is the diamond on the floor below the alcove. Collect a window covering piece.
- Place the Garter on the curtains behind the dragon to open a hot spot that reveals a rope piece.
- Put the Brush and Paints on the bench under the black and white Geisha picture on the left of the scene to trigger a mini-game.
- Select the black and white picture of the Geisha above the bench to open a mini-game.
Painting the Geisha Picture:
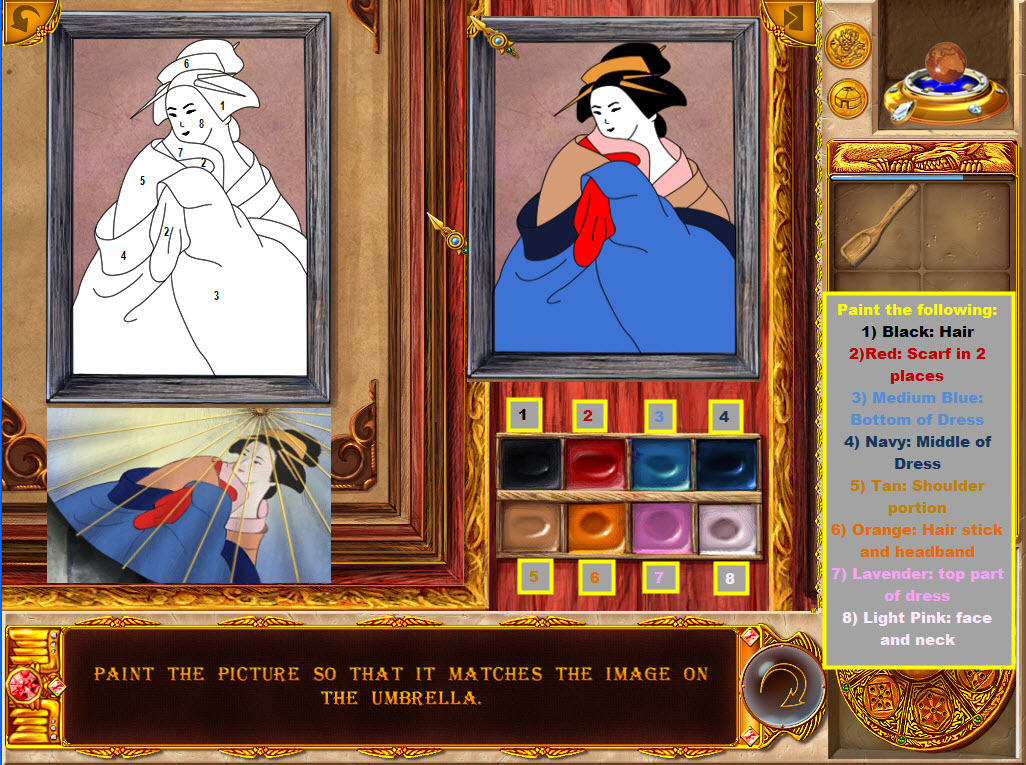
· Paint the picture so that it matches the image on the umbrella. If you looked at the opened umbrella, the image will be available in the game.
· Basically a paint by number without the numbers.
· Select the color of paint to be applied to the paintbrush or curser.
· Select the area that requires that color of paint.
· Should you make a mistake, paint over the previous color with the correct color.
Paint the following:
1) Black: Hair
2) Red: Scarf in 2 places
3) Medium Blue: Bottom of kimono
4) Navy: Middle of kimono
5) Tan: Shoulder portion
6) Orange: Hair stick and headband
7) Lavender: Top part of kimono
8) Light Pink: Face and neck
- When the painting is completed correctly a piece of the Window Covering will be revealed. Collect the Window Covering piece.
- Go outside the Palace.
Golden Dragon Palace Outside – Window Covering Use and Matching Mini-Game:
·
Place
the Window Covering over the window to the right of the door.
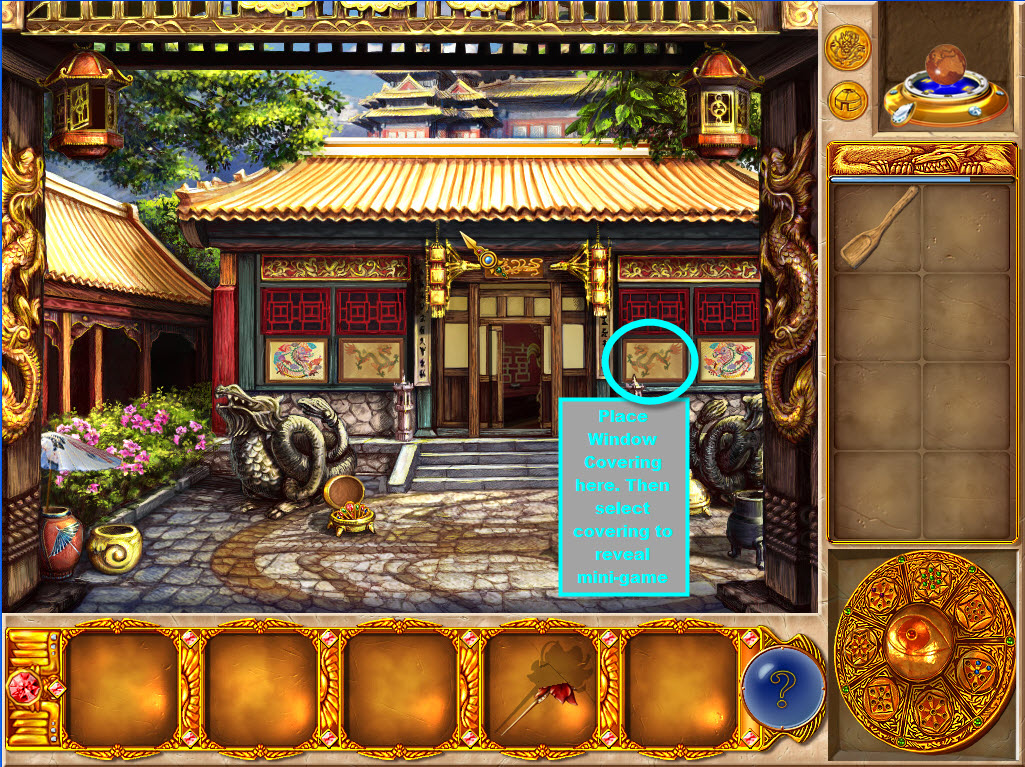
· Select the recently placed Window Covering to reveal a mini-game.
Matching Game:
· Find the matching pairs by clicking the cards to flip them over. If the cards do not match they will flip back over automatically.
· This one is simple...I simply can't imagine anyone not having played some type of matching game in their lifetime. The pairs light up when a match is made making a horrible screenshot. The solutions are random.
· A Hairpin piece will be revealed when game is completed.
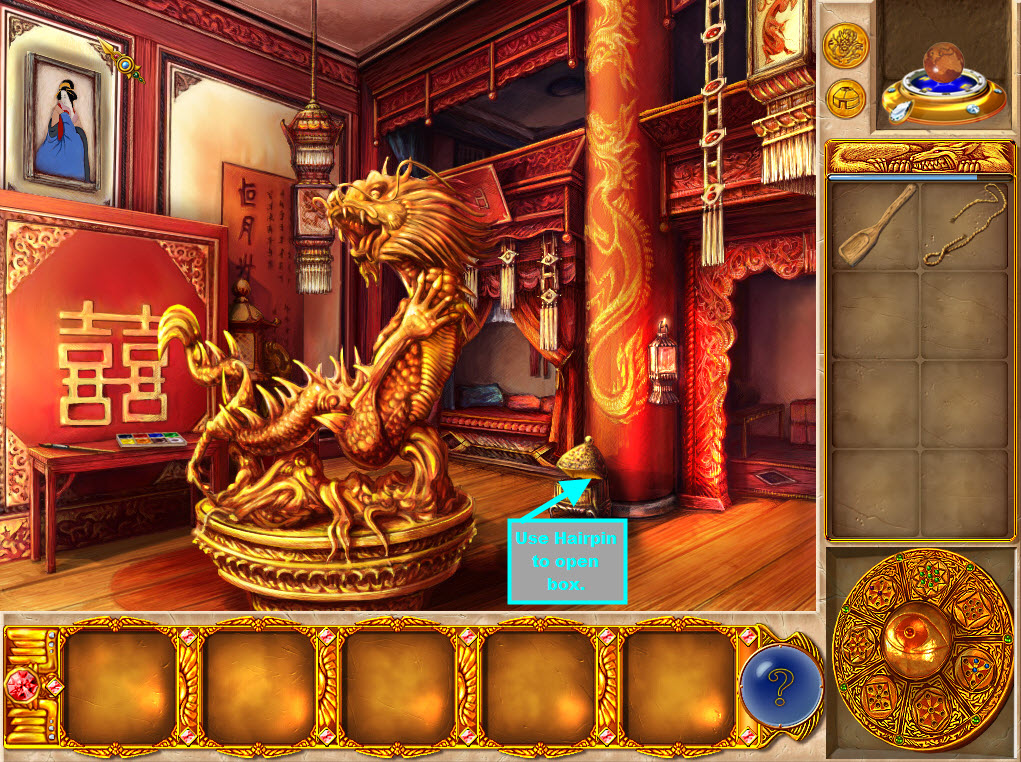
Golden Dragon Palace Inside – Hairpin Use and Rope collection:
- Open the gold decorative box at the bottom of the column to the right of the dragon w/the hairpin. A piece of the rope will be revealed. Select the rope to collect it.
- You
should have all the items from this scene.
- Return to the Tent location by selecting the small coin in the upper right of the scene.
Asia Tent Site Outside-
Blade and Rope Use: 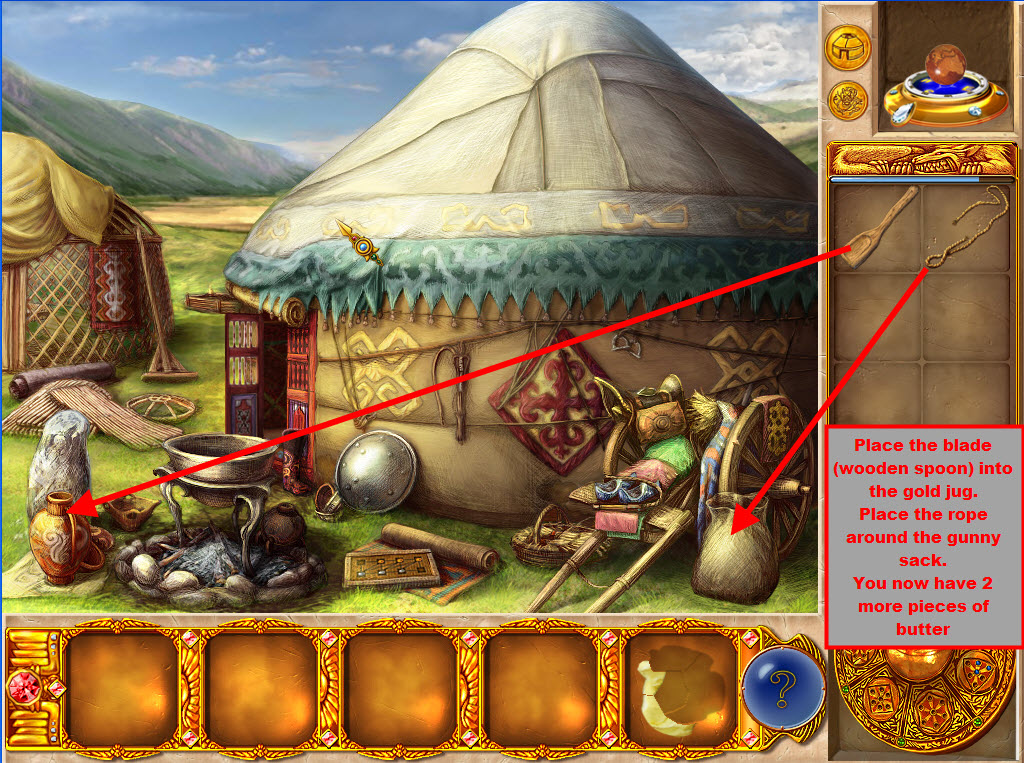
- Place the Blade (wooden spoon) into the gold jug at the bottom left of the scene and to the left of the campfire to acquire a butter piece.
- Tie the gunny sack at the bottom right of the scene w/the rope, the sack will move and reveal a butter piece. Select the butter to acquire another butter piece.
- Go inside the tent.
Asia
Tent Site Inside – Butter, Bow, Scoop and Dagger Use: 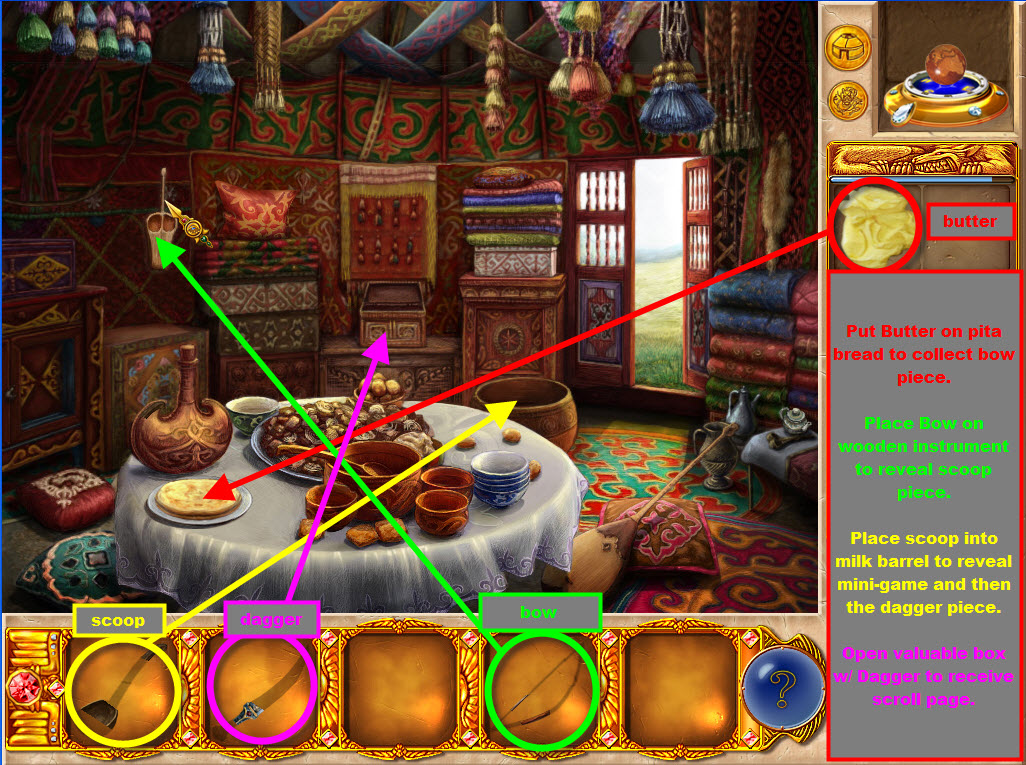
- Put the Butter on the pita (round) bread on the dining table...the plate will move...select the bow piece for collection.
- Place the bow on odd looking wooden instrument hanging on the wall near the left of the scene and to the left of the stack of blankets and pillow. You'll here beautiful music...when the music is completed a drawer will open to the right of the instrument revealing a scoop piece. Collect the scoop piece.
- Put the scoop into the milk barrel to the right of the table. Select the barrel to reveal a mini-game.
Milk Bottle Game:
· Does this game seem similar to a previous game? Pour the milk by clicking on the bottles so that three bottles contain eight liters. Obviously the 5 liter bottle can not contain 8 liters...so the 24, 11 and 13 liter bottles need to have 8 liters each.
· The number of liters in the bottle is notated to the right of the bottle.
·
There
is more than one solution to this game. Here is one solution.
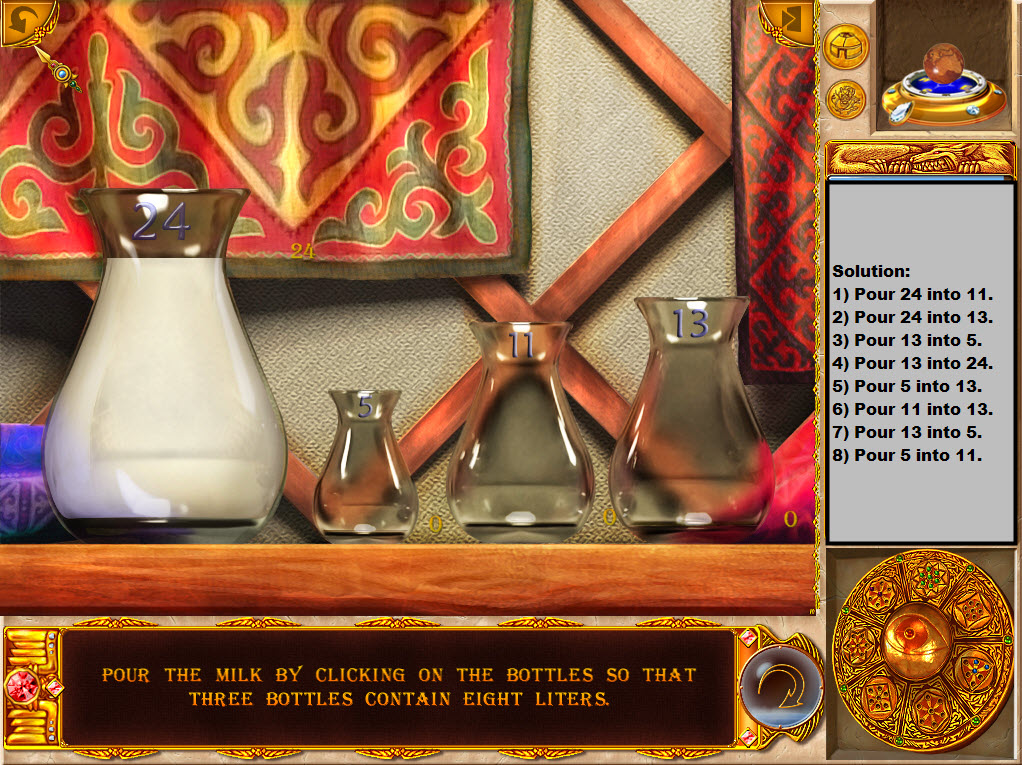
Solution:
1. Pour 24 liter into 11 liter.
2. Pour 24 liter into 13 liter.
3. Pour 13 liter into 5 liter.
4. Pour 13 liter into 24 liter. There is now 8 liters in the 24 liter bottle.
5. Pour 5 liter into 13 liter.
6. Pour 11 liter into13 liter.
7. Pour 13 liter into 5 liter.
8. Pour 5 liter into 11 liter.
- Collect the last Dagger piece when game is solved.
- Open the valuable box in the back middle of the scene between the two chests with the Dagger to receive a scroll page.
CHAPTER 6 - FIRE WORSHIPERS' TEMPLE AND UNDERGROUND:
- This chapter has only one location w/2 scenes.
Fire Worshiper's Temple Outside:
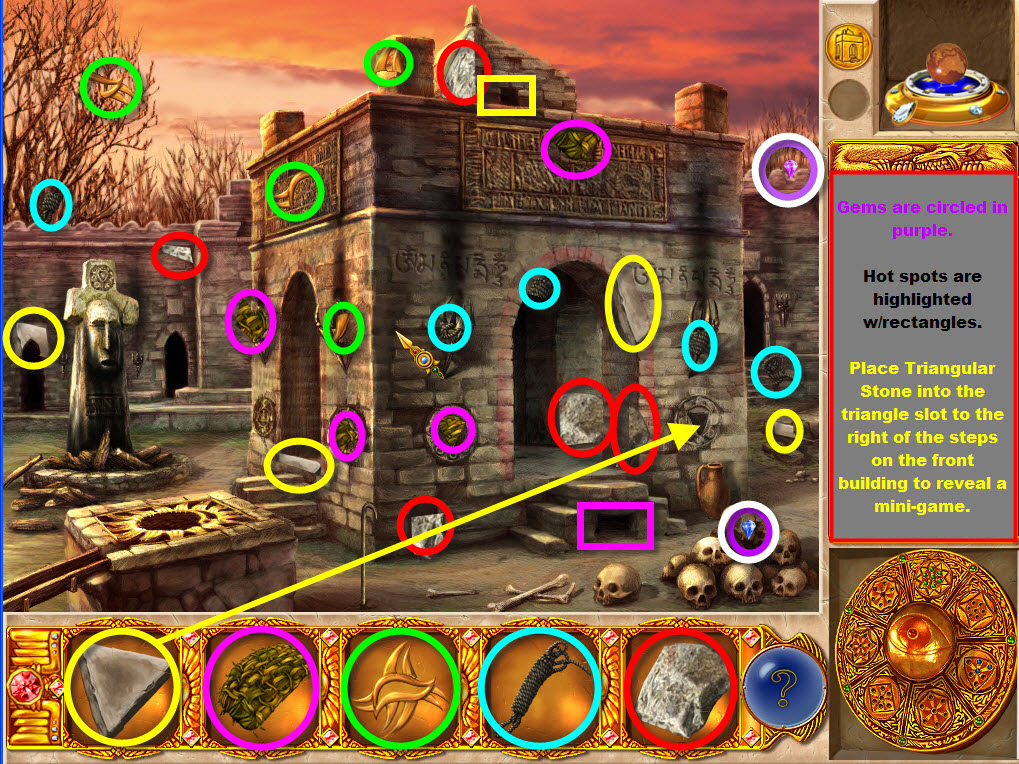
Repair Artifacts: Triangular Stone, Sponge, Golden Symbol, Rope, Heavy Stone
Gems: 1 Purple and 1 Blue circled in purple in the screenshot.
- Collect the purple gem on the top right of the scene for the Professor's Amulet.
- Collect the blue gem in the bottom right of the scene for the Professor's Amulet.
- Collect the visible repair artifact pieces.
- Collect a piece of triangular stone by selecting the hot spot in the top middle on the front building.
- Collect a piece of the Sponge by selecting the hot spot at the bottom middle of the steps.
- Place the Triangular Stone into the triangle on the building to the right of the steps to activate a mini-game.
- Select the rectangle to the right of where you placed the Triangular Stone to reveal a mini-game.
Shape
Stones Mini-Game: 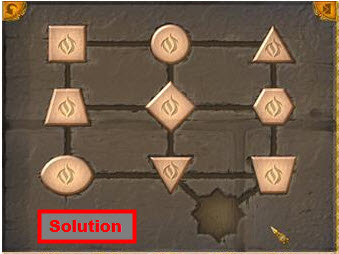
· Move the stones around the grid by clicking on them until each one is in its proper place.
· The stones need to be placed in the slots w/the same shape as the stones.
· The slot on the very bottom will be empty when the puzzle is solved correctly. One empty slot is needed to move the stones around.
· When the stone is in the correct slot it will light up; but will not lock into the slot.
· It's most effective to place the stones correctly in the top row first, then solve the second row then the third row...or if you get too discouraged...skip the puzzle by selecting the button on the bottom of the screen to the left of the Professor's Amulet.
· Place the stones in this order from left to right to solve the puzzle:
1. Top Row: Square, Circle, Point up Triangle.
2. Middle Row: Upright Trapezoid, Diamond, Hexagon
3. Bottom Row: Oval, Point down Triangle, Upside down Trapezoid.
- Water will flow into a bronze pitcher under the mini-game location after the game is solved.
- Place the Sponge into the pitcher the wet sponge will return to the inventory.
- Clean the large statue on the left of the scene with the wet Sponge to receive a Golden Symbol piece.
- Put the Golden Symbol on the top of the stone box on the left bottom of the scene.
- Put the Heavy Stone on the iron support in the shape of a cane at the bottom of the scene. The Heavy Stone will pound the cane into the ground giving it more support.
- Place the Rope on the iron support. The rope will go into the stone box which leads to the underground.
- Select the rope to enter the underground location.
Underground Location:
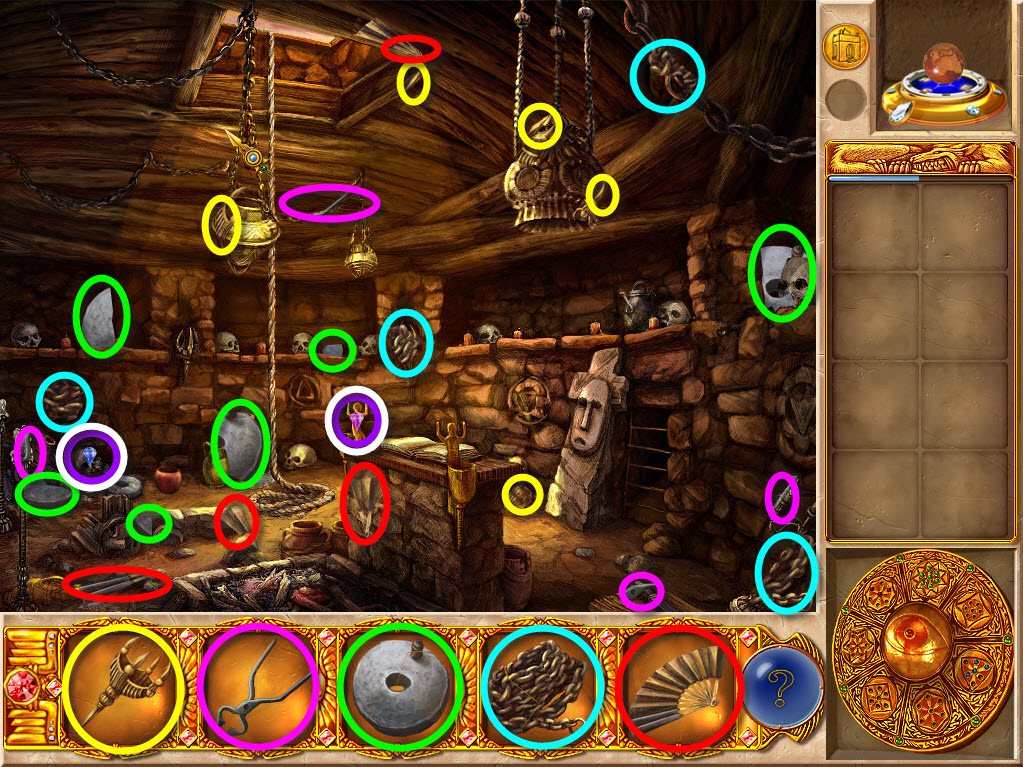
Repair Artifacts: Torch, Pinchers, Millstone, Chain, Fan.
Gems: 1 Blue Gem and 1 Purple Gem.
- Collect the Gems for the Professor's Amulet. The Blue Gem is on the left side in front of the rock wall. The purple gem is almost right in the middle of the scene on a figure that is on the Alter.
- Collect all the visible repair artifact pieces.
- Place the millstone on top of the other
millstone on the left side of the scene below the rock wall and receive
crushed firestone.
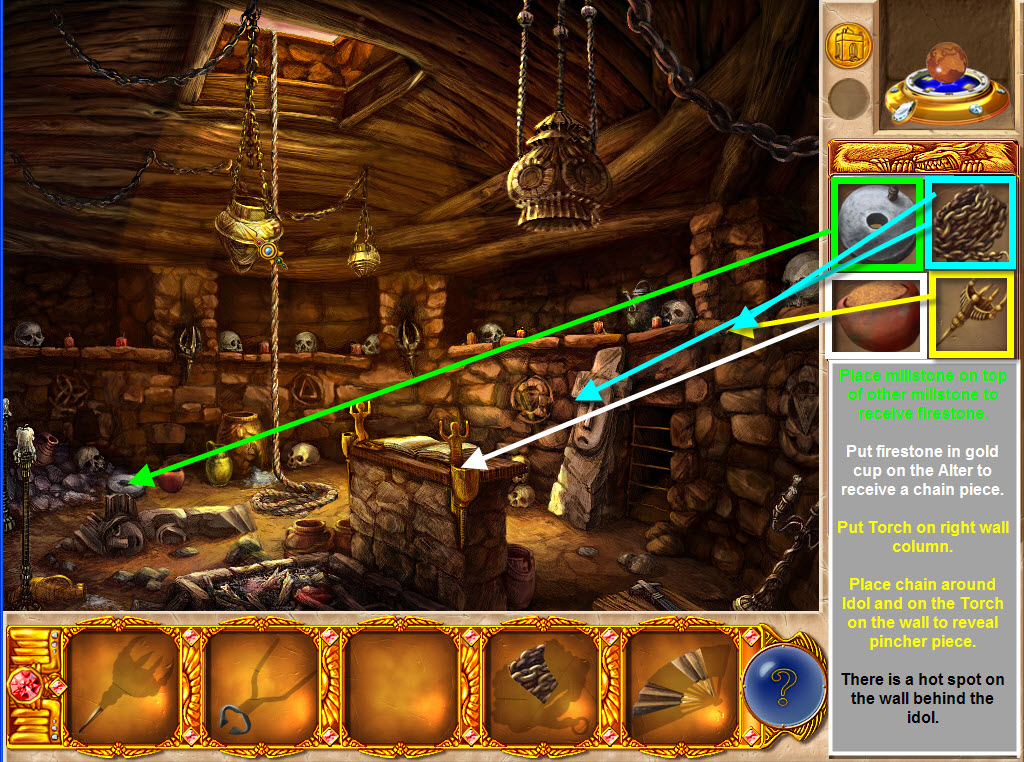
- Put the crushed firestone into the gold cup on the Alter that is closest to the bottom of the scene. A short fire will erupt in the cup and produce a piece of the chain for you to select.
- Put the Torch on right wall column to act as a lever.
- Place the Chain on the idol to the left of the bars in the wall AND select the Torch so chain will be levered on the torch. The Idol will move revealing a Pincher piece.
- There is a hot spot behind where the
Idol was located; slightly above where the pincher piece was located. Take
a peek inside the hot spot and collect a fan piece.
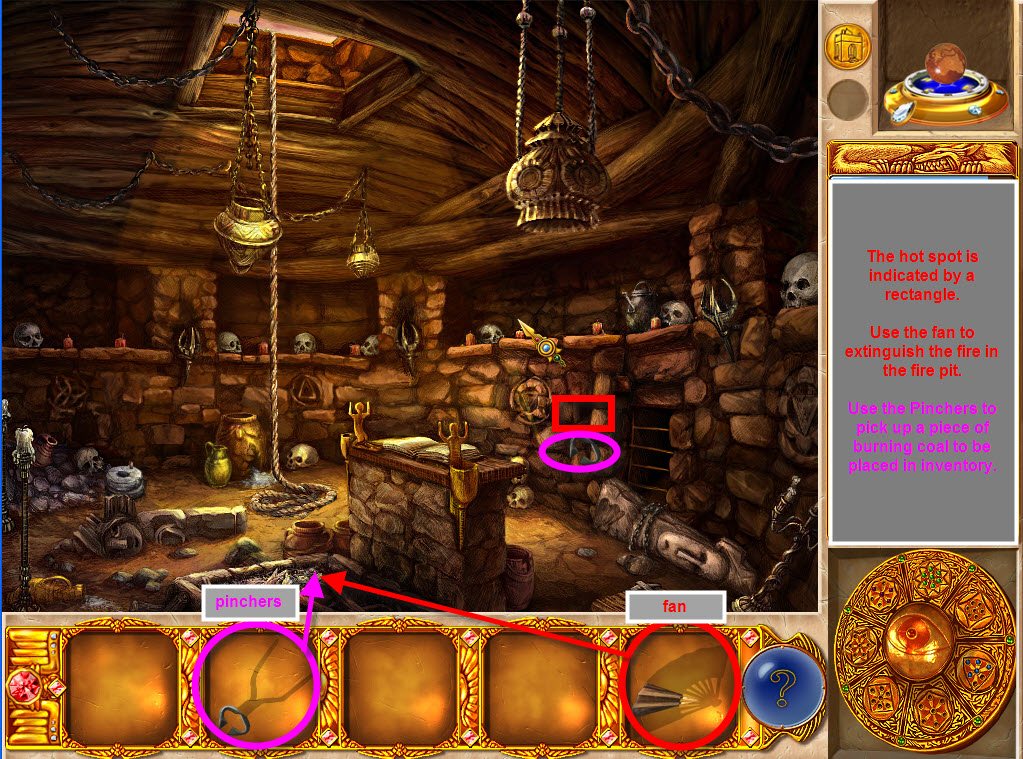
- Use the fan to extinguish the fire in the fire pit in front of the Alter.
- Use the Pinchers to pick up a piece of burning coal from the fire pit. The Pinchers will be holding a piece of burning coal and be placed into inventory.
- Exit the Underground and enter the Temple area.
Fire Worshipers' Temple – Fire:
- Hmmm, now what is a Fire Worshipers' Temple without a fire? You have a hot piece of coal in inventory...so start a fire in front of the Idol Statue where all the wood is stacked to receive a scroll page.
CHAPTER 7 – MASONIC TEMPLE AND PEARL DIVER'S HUT:
Masonic Temple Outside:
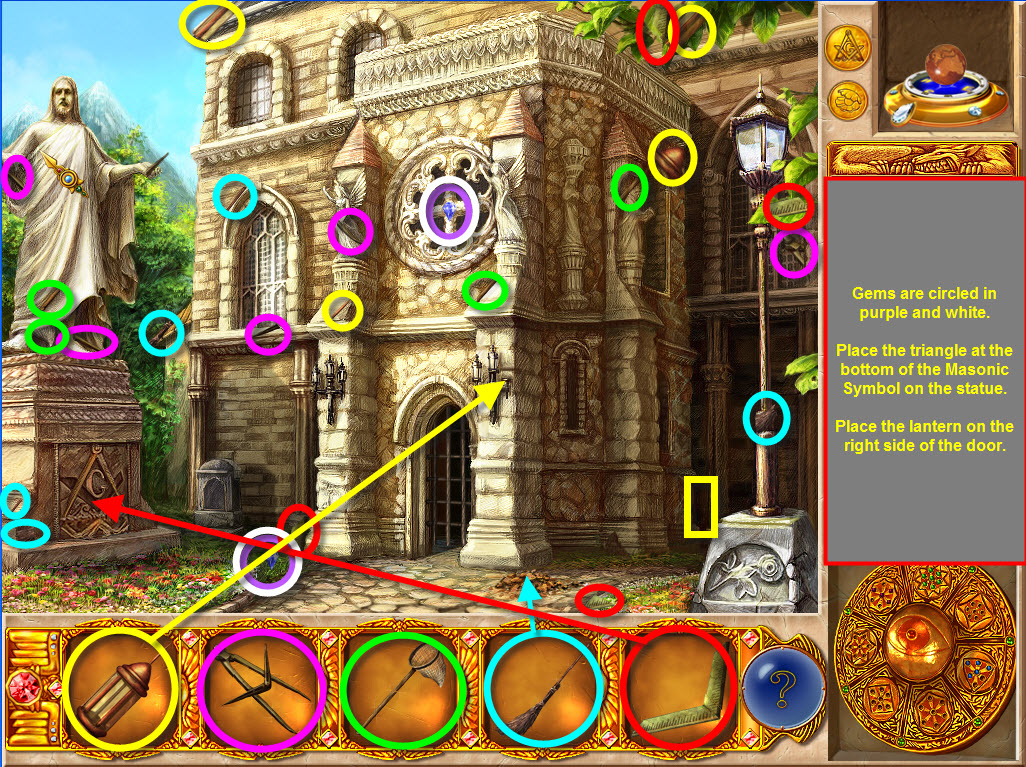
Repair Artifacts: Lantern, Compass w/ Sharp Edges, Net, Broom, Triangle
Gems: 2 Dark Blue Gems
- Collect the 2 Dark Blue Gems for the Professor's Amulet. One is above the door in the middle of decorative circle window and the other is to the left of the stone walkway which is to the right of the statue.
- Collect all visible repair artifact pieces along with a piece of the lantern in the hot spot. Hot spot is located on the right side of the building in the corner near the bottom.
- Sweep the leaves out of the way w/the broom to reveal a piece of the triangle. Collect the Triangle piece.
- Place the triangle at the bottom of the Masonic symbol at the bottom of the statue to activate a mini-game.
Symbol Flipping Game:
· Flip the tiles by clicking on them until every tile is displaying the same symbol.
· Each tile selected will affect every tile in the row and column in which it is located.
· Each tile when flipped can have a G, a symbol shaped similar to a small V or a symbol resembling a compass.
· The symbols flip in this cycle G, V, and Compass.
· The symbols are in a different order each time you enter the mini-game area thus having a random solution.
· There is a hint button (has two arrows) on the left of the game which can be used an unlimited amount of times after it is charged.
· The hint button allows you to flip the selected tile one time without affecting any of the other tiles.
·
The
game is won by having all "G's", or all "V's" or all "Compasses" on the board.
Example of solved game in screen shot. 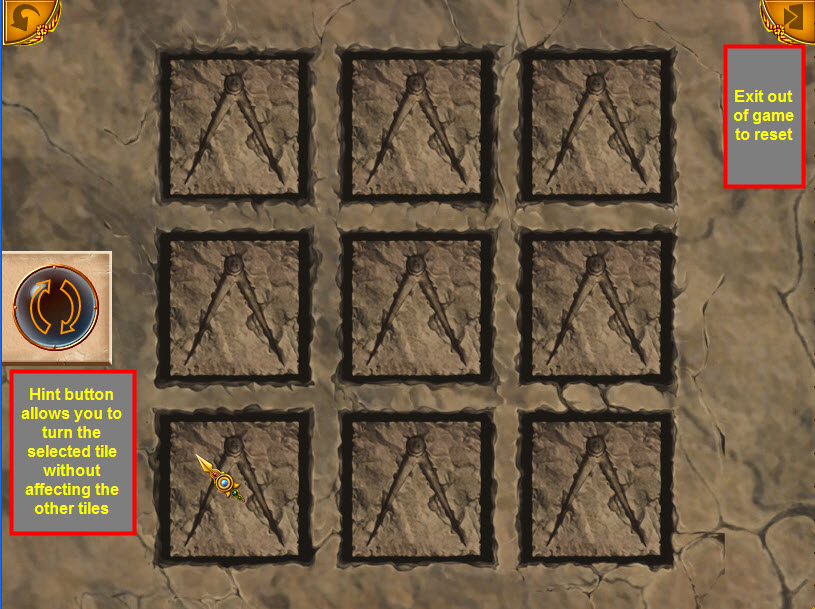 7
7
- Collect the Compass piece after the Tile Flipping game is completed. Another piece will drop into the flower bed. You'll be unable to collect it at this time.
- Put the lantern on the right side of the lanterns on the right side of the door to gain inside access to the Masonic Temple.
- At this point the Net and the Compass are incomplete. You'll return to this location later. Enter the Masonic Temple.
Masonic Temple Inside:
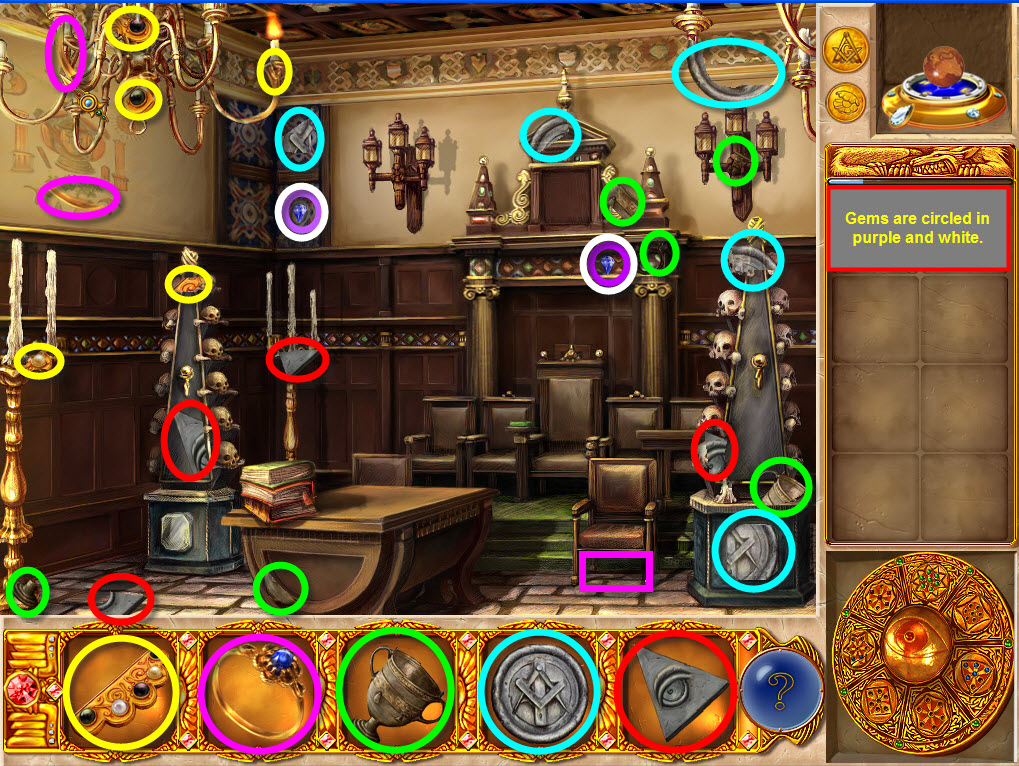
Repair Artifacts: Jewel w/Pearls, Diamond Ring (can cut glass), Goblet, Key (the key is round), Plate
Gems: 2 Dark Blue Gems
· Collect the 2 Blue Gems for the Professor's Amulet. One is located on the right side of the Throne mantel; the other is on the back wall near the top corner.
· Collect all visible repair artifact pieces.
· Select the area under the front chair on the right to magnify a hot spot and collect a diamond ring piece.
· The diamond ring should be completed before exiting the Temple.
· Exit the Temple and go outside.
Masonic Temple Outside – Diamond Ring Use:
- Cut the Glass Lantern on the large
lamppost on the right of the scene w/the diamond ring to open a hot spot.
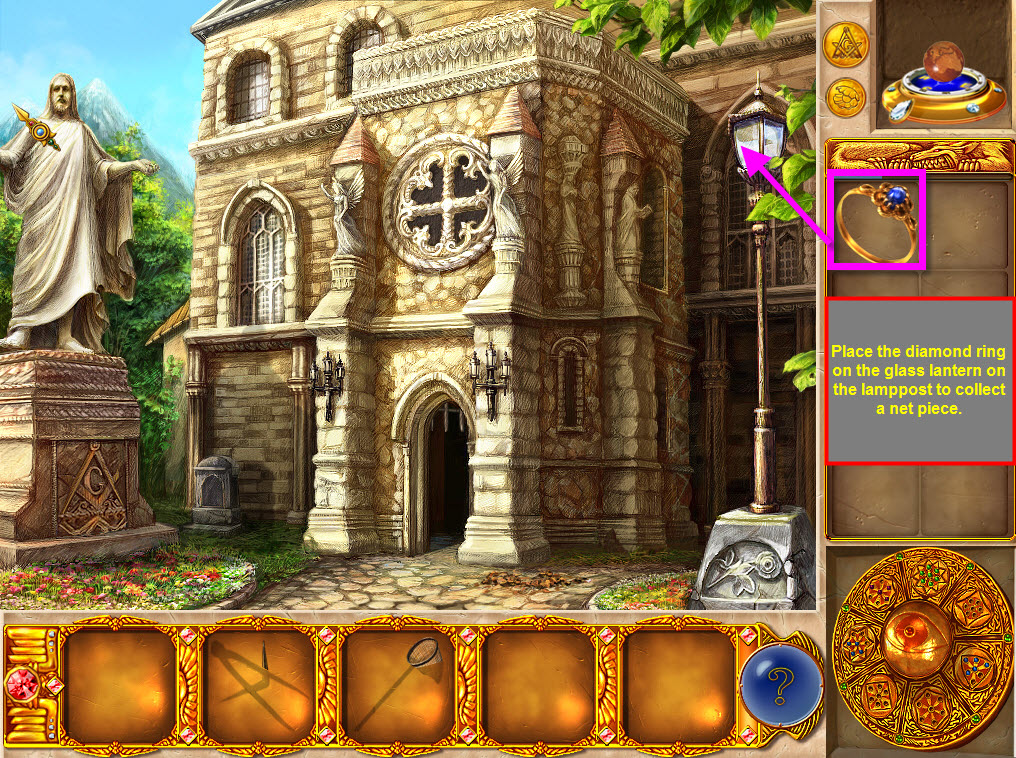
- Select the lantern to collect the net piece. The net should now be completed.
- Select the small coin in the upper right of the screen to travel to the Pear Diver's Hut.
Pearl Diver's Hut: 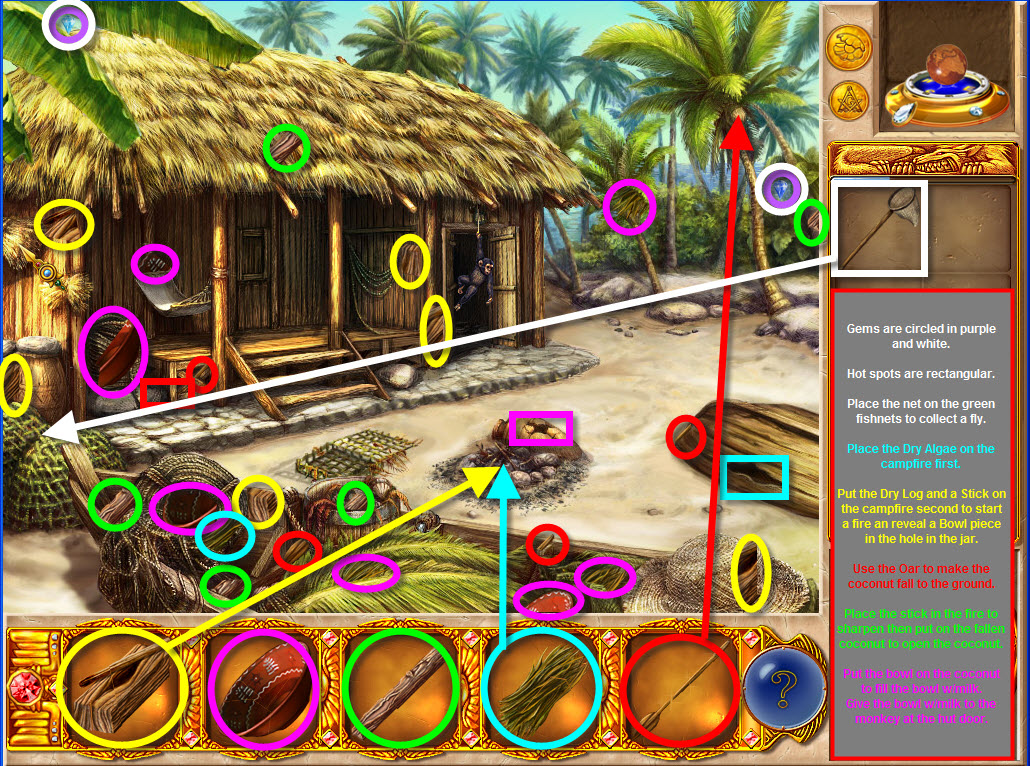
Repair Artifacts: Dry Log and a Stick, Bowl, Stick, Dry Algae, Oar
Gems: 1 Light Blue Gem and 1 Dark Blue Gem
- Collect the 2 blue gems for the Professor's Amulet. One is located in the upper left of the scene between the palm leaves; the other is on the right side of the scene between the palm trees and slightly above the bushes.
- Collect all visible repair artifact pieces.
- Collect a Dry Algae piece in the hot spot that is the hole in the boat on the right side of the scene.
- Collect a small oar piece in the hot spot located on the hut porch at the bottom of where the porch ends under the hammock near the left side of the scene.
- Start a fire by placing the Dry Algae first in the campfire ring. Then place the Dry Log and a Stick on the dry algae. The stick will rub itself on the log starting a fire and scare the crab away from the jar.
- Select the hole in the jar beside the campfire to reveal a bowl piece.
- Place the net on the green fishnets on the left side of the scene to collect a fly.
- Use the Oar to make the coconut in the coconut tree on the top right of the scene fall to the ground.
- Put the stick on the fire to sharpen the stick. Then place the stick on the coconut to open the coconut.
- Put the bowl on the coconut to fill the bowl w/ the milk.
- Give the bowl w/milk to the monkey at the hut door.
- **SPECIAL NOTE: SOME PLAYERS HAVE INDICATED A COMPUTER GLITCH AT THIS POINT W/THE MONKEY NOT MOVING OUT OF THE WAY OR RETURNING AFTER ENTERING THE HUT, THUS MAKING ENTRANCE OR RE-ENTRY INTO THE HUT IMPOSSIBLE. There are no solutions to this problem at this time except to delete the game and start a new game.** I personally had this happen under one of the profiles I was using for the walkthrough. I was successful using other profiles to complete this area.
- Enter the hut.
Pearl Diver's Hut Inside:
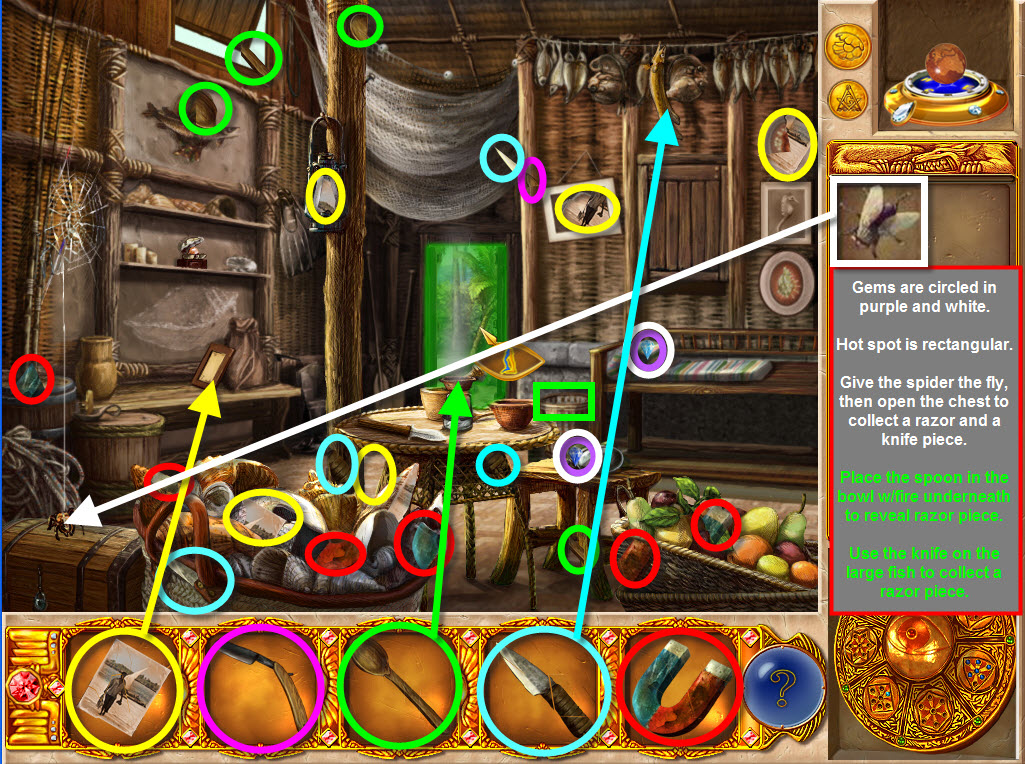
Repair Artifacts: Photo, Razor, Spoon, Knife, Magnet
Gems: 1 Light blue and 1 Dark Blue
- Collect the 2 blue gems for the Professor's Amulet. The dark blue gem is on the stool next to the table; the light blue gem is on the bench seat to the right of the door on the curled up portion of the mat.
- Collect a spoon piece in the hot spot located in the trash can to the right of the door.
- Place the spoon in the bowl w/the sterno fire underneath to reveal and collect a razor piece.
- Feed the spider the fly to open the trunk and collect a razor piece and a knife piece. The spider is located on the lower left side of the scene on the trunk.
- Cut the hanging fish at the top of the scene to the right of the door w/ the knife to collect a razor piece.
- Put the photo into the empty frame on the bottom shelf on the left side of the scene to activate a mini-game.
Photo
Mini-game: 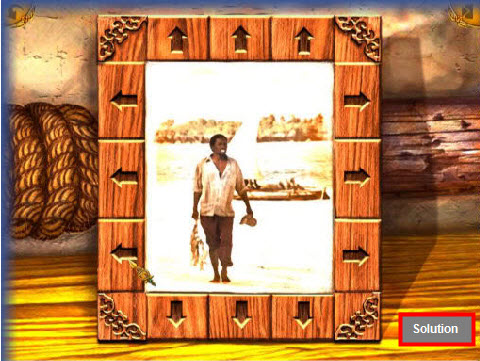
· Reconstruct the picture by clicking the arrows on the side of the frame to align its pieces.
· When you select an arrow on the side of the frame it moves each square in the row OR column in the direction of the selected arrow.
· See screenshot for completed picture.
- Collect the razor piece after game is completed.
- All the repair artifacts from this scene should be completed at this time. The magnet and razor need to be in the inventory.
- You'll need to return to the hut to put a jewel into the oyster box...but for now return to the Masonic Temple by selecting the small coin in the upper right of the screen.
Masonic Temple Outside – Magnet Use
- Place the magnet into the flowerbed on the lower left of the scene to collect the last piece of the sharp compass.
- Enter the Temple.
Masonic Temple Inside –
Razor, Compass, Plate, Goblet and Key Use 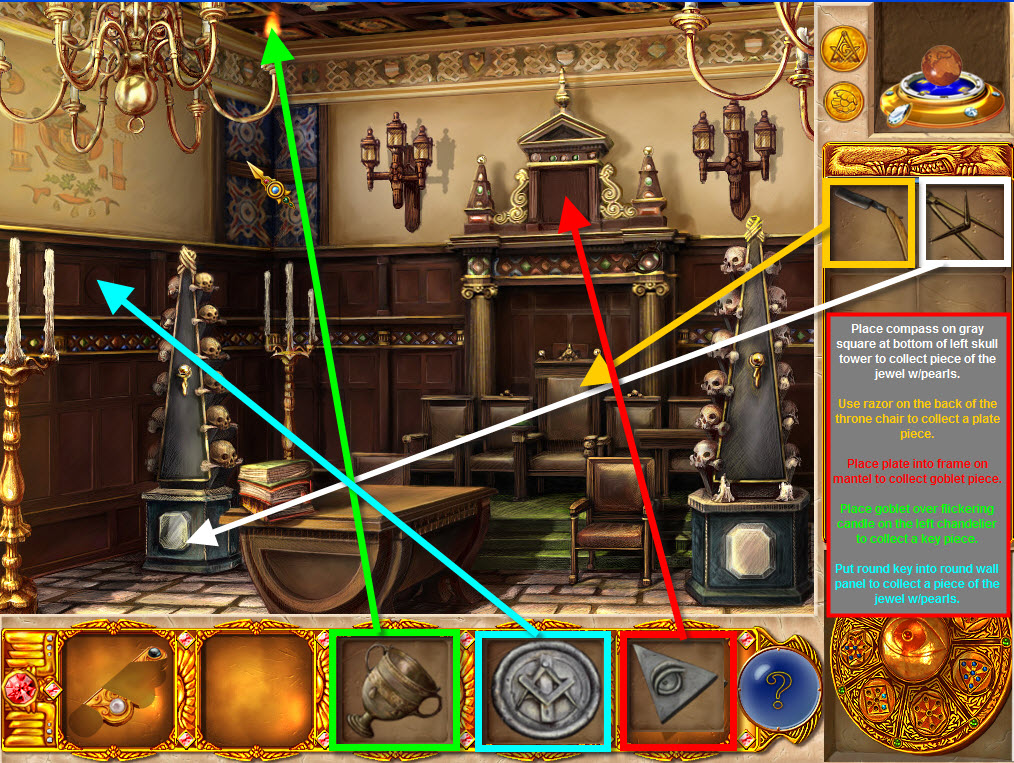
- Place the compass on the gray square at the bottom of the skull tower on the left of the scene and collect a piece of the jewel w/pearls.
- Use the razor on the back of the throne chair in the middle of the scene to collect a piece of the plate.
- Place the plate in the frame on the mantel and collect a goblet piece.
- Now let's get rid of the flickering candle by placing the goblet over the candle in the chandelier on the top left of the scene. The goblet will hold the candle and float onto the skull tower on the left. A wall panel will open revealing a key piece. Collect the key piece.
- Put the round key into the round wall panel left of the skull tower on the left side of the scene and collect the last piece of the jewel w/pearls.
- Return to the Pearl Diver's Hut by selecting the small coin in the upper right of the scene.
Pearl Diver's Hut-Jewel w/Pearls Use:
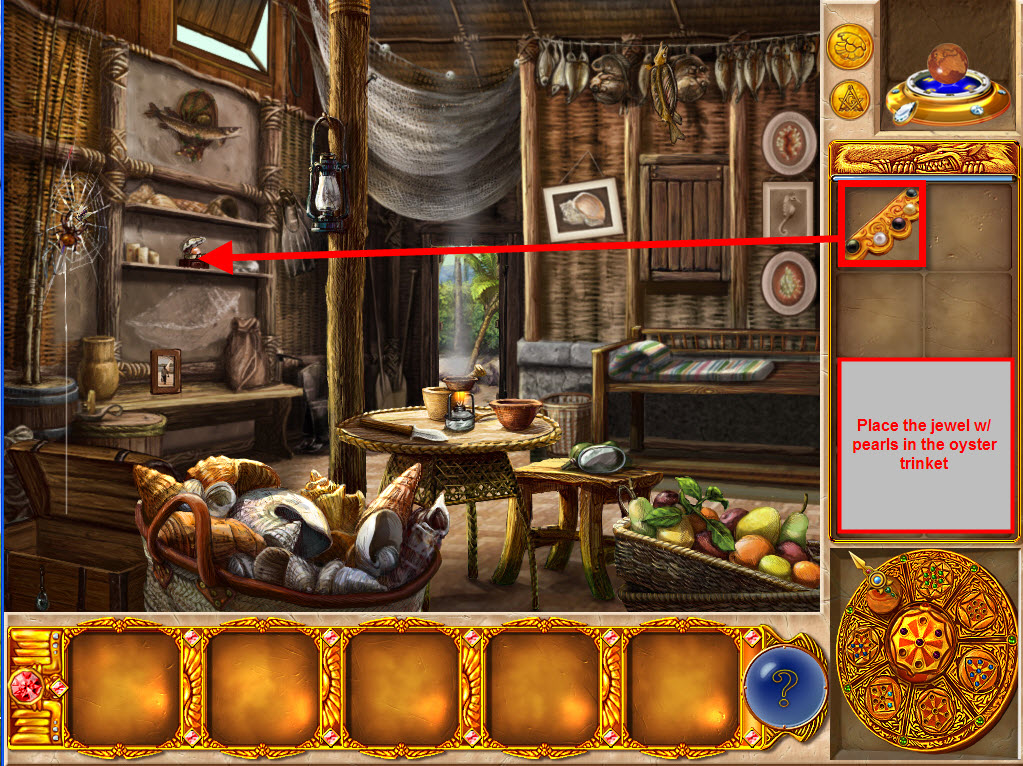
- Select the Oyster Pearl Box on the shelf above the picture frame, and then place the jewel w/pearls onto the box to receive a scroll page.
CHAPTER 8 – THE WIZARD'S HOUSE AND LABYRINTH:
The Wizard's House: 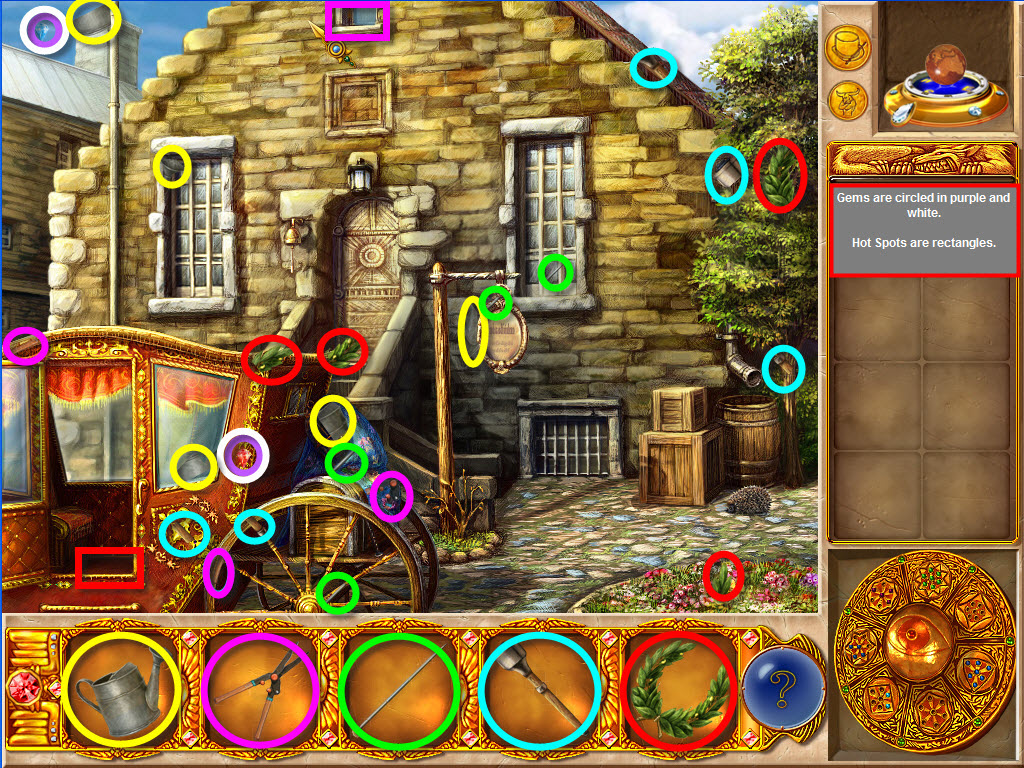
Repair Artifacts: Watering Can, Hedge Clippers, Knitting Needle, Torch, Laurel Wreath
Gems: 1 Blue and 1 Red
- Collect the gems for the Professor's Amulet. The Light Glue Gem is in the sky in the upper left of the scene. The red gem is on the red carriage to the right of the window above the carriage wheel.
- Collect all visible repair artifact pieces.
- Collect a hedge clipper piece in a hot spot in the top window of the house.
- Collect a laurel wreath piece in a hot spot in the floor of the carriage.
- The laurel wreath and torch should be completed.
- Travel to the Labyrinth by selecting the small coin.
Labyrinth Outside: 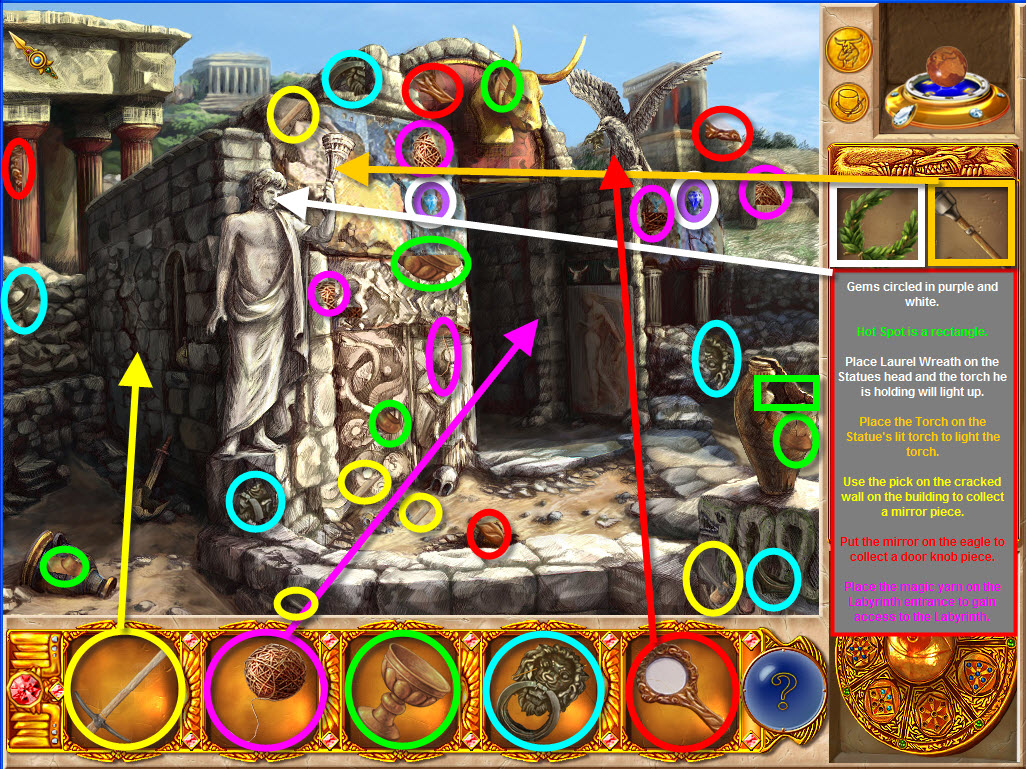
Repair Artifacts: Pick, Magic Yarn, Goblet, Door Handle, Mirror
Gems: 1 Dark Blue and 1 Light Blue
- Collect the gems for the Professor's Amulet: The light blue gem can be difficult to see. It's to the left of the door in the blue painted area. The dark blue gem is below the eagle and slightly to the right.
- Collect all visible repair artifact pieces. Collect a goblet piece in the hot spot. The hot spot is the broken vase on the lower right of the scene.
- Place the Laurel Wreath on the Statue's head and the torch he's holding will have a fire.
- Place the torch on the statue's lit torch. The torch will be lit and return to inventory.
- Use the pick on the cracked wall on the left side of the building to collect a mirror piece.
- Place the mirror on the eagle to collect a door handle piece.
- Put the magic yarn on the floor in front of the door to gain access to the Labyrinth.
- Enter the Labyrinth.
Labyrinth Inside: 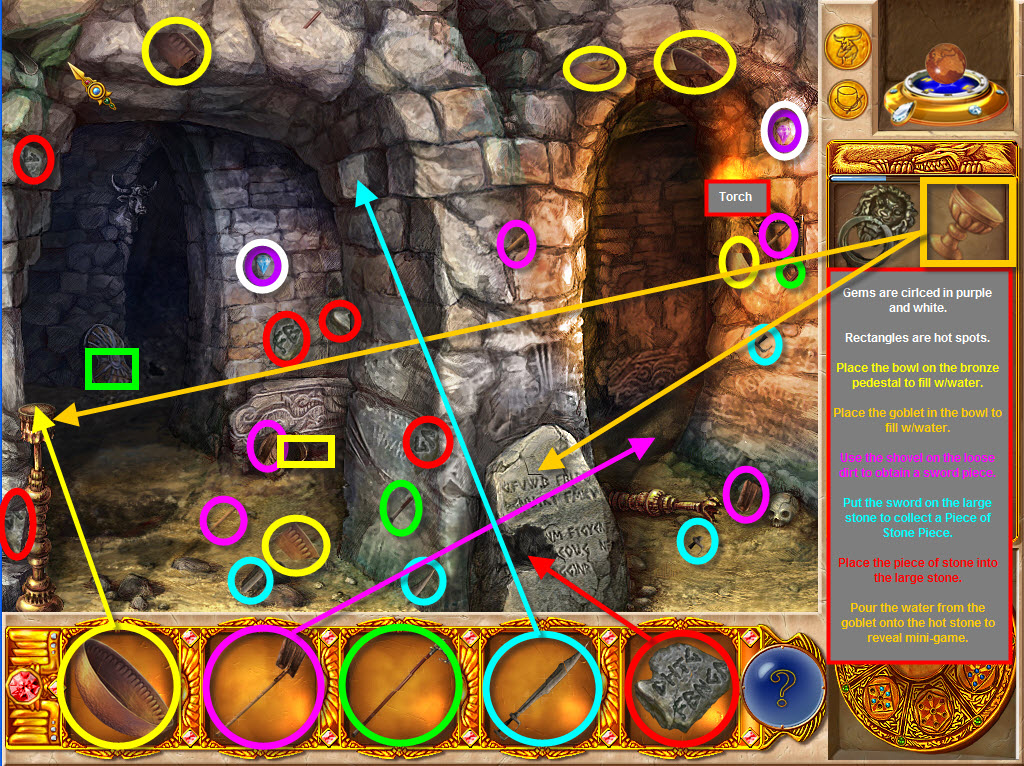
Repair Artifacts: Bowl, Spade, Walking Stick, Sword, Piece of Stone:
Gems: 1 Light Blue and 1 Purple
- When you first enter the Labyrinth it will be dark. Take the lit torch and place it on the wall on the right.
- Collect the gems for the Professor's Amulet. The purple gem is above the lit torch; the light blue gem is on the back wall near the middle of the scene.
- Collect all visible repair artifact pieces.
- Select the bronze jug near the back on the floor to collect a bowl piece.
- Select the shield on the very back wall to collect a walking stick piece.
- The bowl and shovel should be completed.
- Use the shovel on the loose dirt on the right side of the scene in between the two walls near the back of the scene.
- Place the bowl on the bronze pedestal on the bottom left of the scene. Then fill the goblet w/water. The goblet w/water will return to inventory.
- Use the sword to pry the large brick-shaped stone sticking out of the middle wall on the top left side to receive the last Piece of Stone.
- Place the Piece of Stone on the large stone w/writing in the middle of the scene. OOPS, the stone is now hot. Good thing you've got a goblet full of water.
- Pour the water over the hot stone to activate a mini-game.
Moving
Stones Mini-Game: 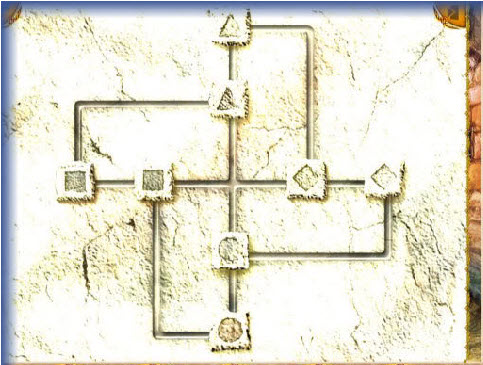
· Move the stone by clicking on them until there are two identical stones on each side.
· Ok, this one is nearly impossible to explain as the stones will only move to the corners making the number of available moves at one time very limited. The stone positions are random, thus making the solution random. Good Luck...you can always skip if you need to.
· Collect the last piece of the walking stick and return to the Wizard's House.
Wizards House Outside-Door Handle, Walking
Stick, Watering Can, Hedge Clippers, Knitting Needle Use: 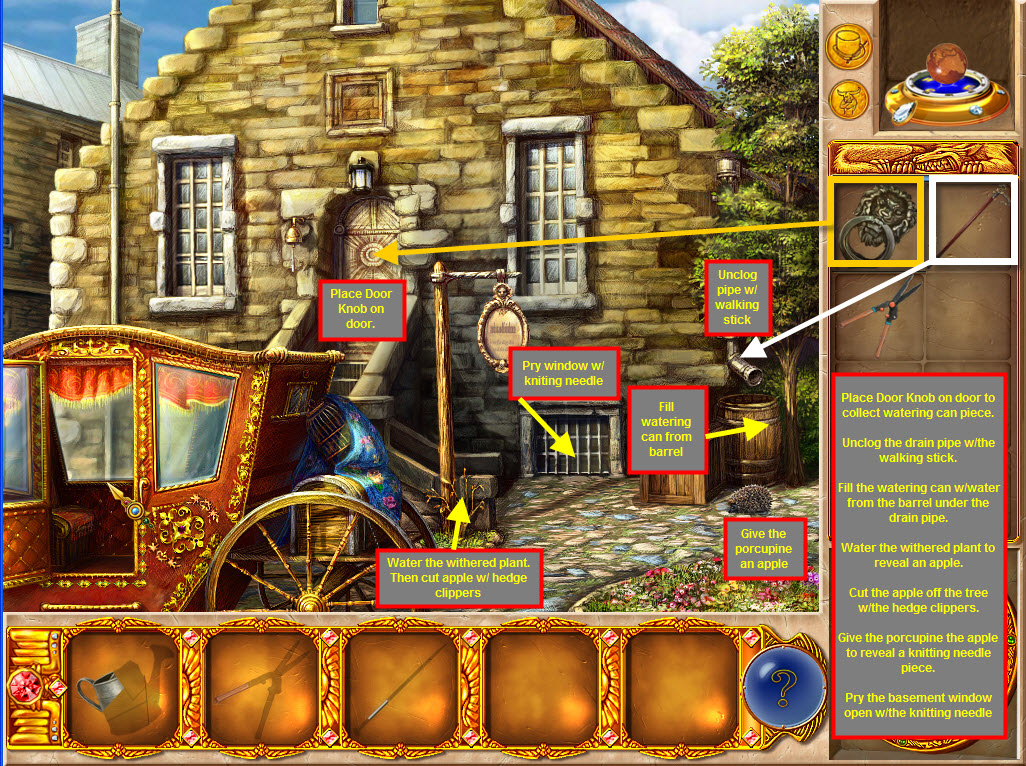
- You might think you could place the door handle on the door and enter the house...oh no...that would be too easy!
- Put the door handle on the door anyway to collect a watering can piece.
- Place the walking stick on the drain pipe on the right side of the house to unclog the pipe.
- Take the watering can to the barrel under the unclogged drain pipe and fill 'er up with water.
- Water the almost dead plant in the middle of the scene under the post to reveal an apple. You'll have to wait until the plant grows before you can get the apple.
- Cut the apple off w/the hedge cutters and give the apple to the poor porcupine. The porcupine doesn't like anybody watching while he eats...so he'll walk off with the apple uncovering the last piece of the knitting needle.
- Pry the basement window open with the knitting needle to gain entrance into the house.
- Enter the house.
Wizard's House Inside:
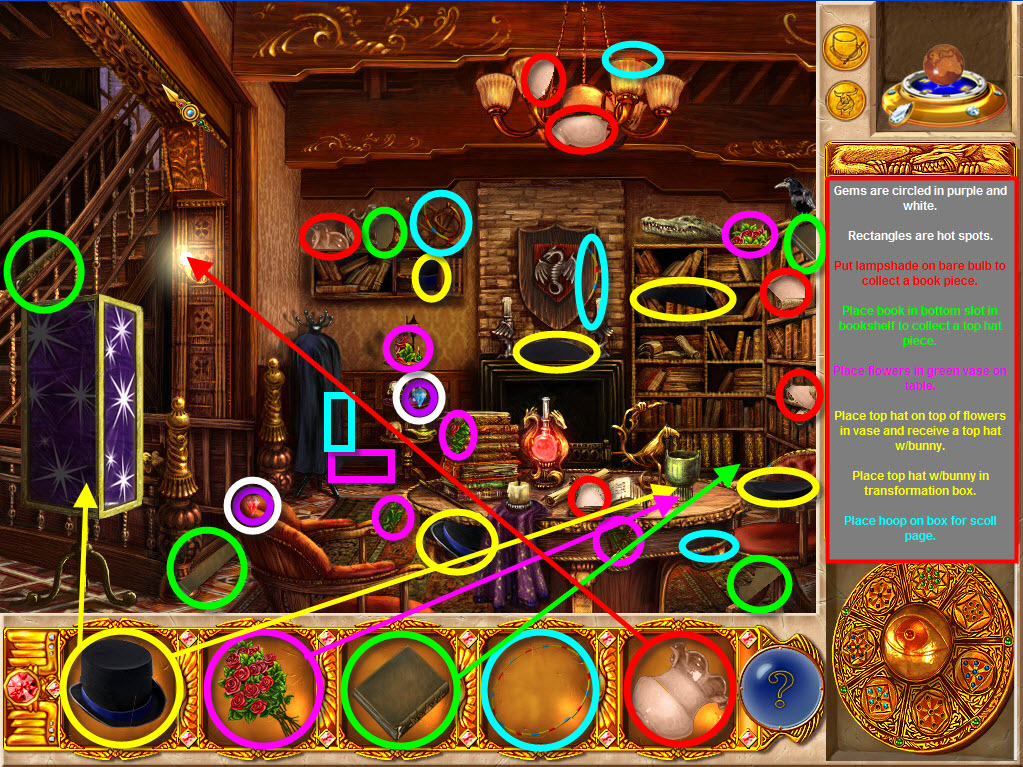
Repair Artifacts: Top Hat, Flowers, Book, Hoop, Lampshade
Gems: 1 Red and 1 Light Blue
- Collect the Gems for the Professor's Amulet. The red gem is difficult to see. It's on the red chair on the left of the scene at the top of the chair. The light blue gem is on the middle shelf of the 3-tier table to the left of the fireplace.
- Collect all the visible pieces of the repair artifacts.
- Collect a flower piece in the hot spot where the floor meets the wall to the left of the 3-tier table.
- Collect a hoop piece in the hot spot on the right side of the Wizard's cape in the left corner of the room.
- Place the flowers in the green vase on the right side of the table...thought you were going to collect something didn't you...not yet.
- Select the shield above the fireplace to reveal a mini-game. Select the area again to activate the game.
Item
Arranging Game: 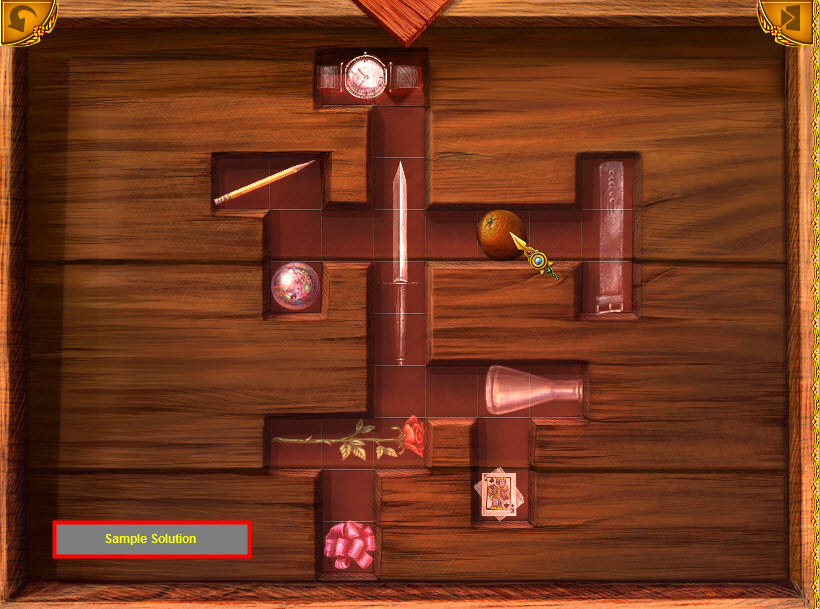
· Arrange the items so that they're all inside the shape but aren't touching anything else. Click the items to rotate them.
· The solution somewhat random; as you can place the smaller items in different spots to solve the game.
· You can move the items off the boar should you prefer to get them out of the way.
· It might be best to find the locations for the larger items first.
· The items will gray out and lock into place when they're in the correct position.
· Collect the lampshade piece when the game is completed.
- Place the lampshade on the bare bulb on the wall to the right of the stairs on the left of the scene and collect a piece of the book.
- Put the book into the empty slot on the bottom shelf of the bookcase on the right back wall and collect a top hat piece from the alligator's mouth on the top shelf.
- Place the top hat on top of the flowers in the flower vase on the table and collect a bunny in a top hat... the strange lamp on the table will empty.
- Select the purple transformation box on the left of the scene to open the box. Place the top hat w/the bunny inside the box. Close the door on the box by selecting the box.
- Place the hoop on the transformation box and abracadabra...ala-ca-zam...open the box for a spell page.
CHAPTER 9 – EGYPT AND ART MUSEUM NATURE AND VICTORIAN EXHIBIT:
Egyptian
Temple Outside: 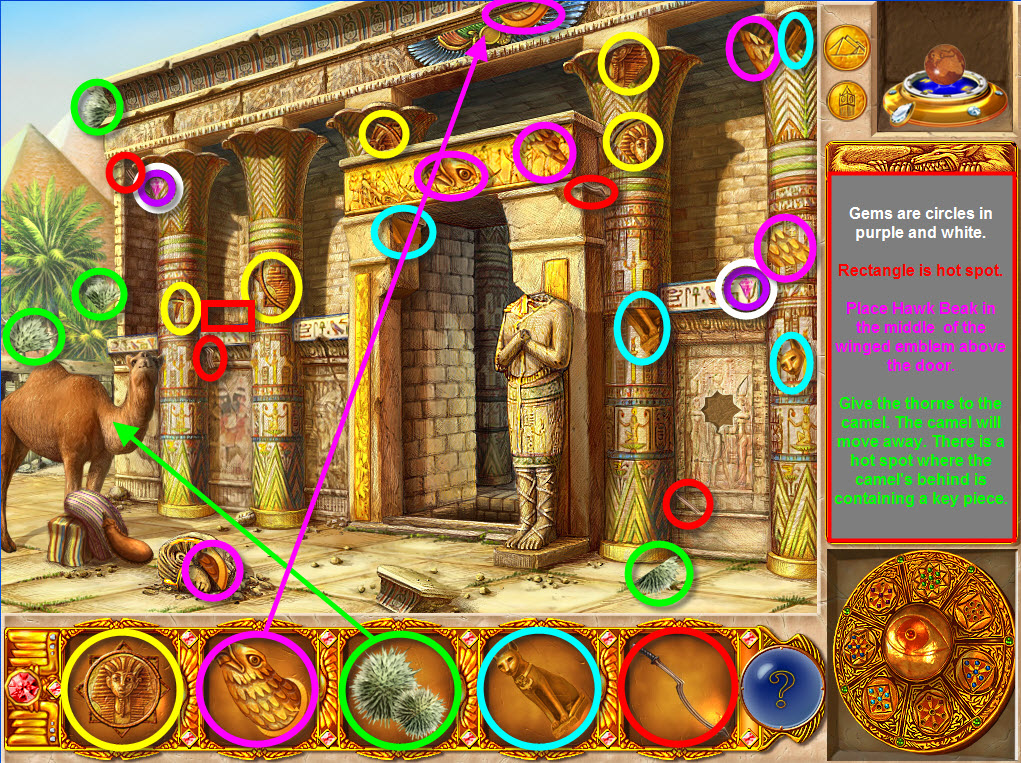
Repair Artifacts: Key, Hawk Beak, Thorns, Cat Statue, Egyptian Sword
Gems: 2 Pink Gems
- Collect the 2 pink gems for the Professor's Amulet. One gem is located on the top of the far left column on the building. The other gem is located on the right of the scene amongst the bar of hieroglyphics.
- Collect all visible repair artifact pieces.
- Collect an Egyptian Sword piece by selecting the hot spot on the wall right of the far left column slightly above the ledge.
- Collect a Thorn piece in a hot spot slightly above the ledge and slightly to the right of the column to the right of the entry way.
- Give the hungry camel the thorns so it will move out of the way to gain access to a hot spot. Select the bottom white column behind where the camel was located to open a hot spot containing a key piece.
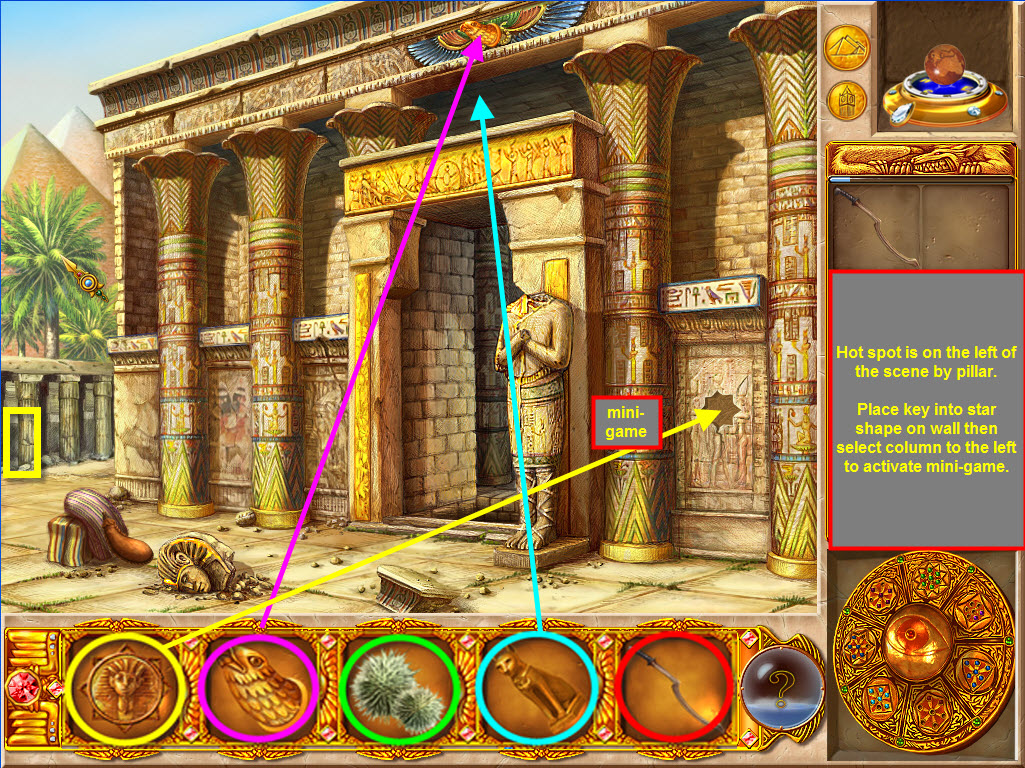
- Place the Hawk Beak in the circle of the winged emblem at the top of the building. A space will light up underneath the hawk beak. When the space is selected the game asks: "What's an Entrance without a Guardian?".
- Place the key into the empty star slot on the right of the scene to trigger a mini-game. Select the column to the left of the key placement to activate the mini-game.
Image Sudoku: 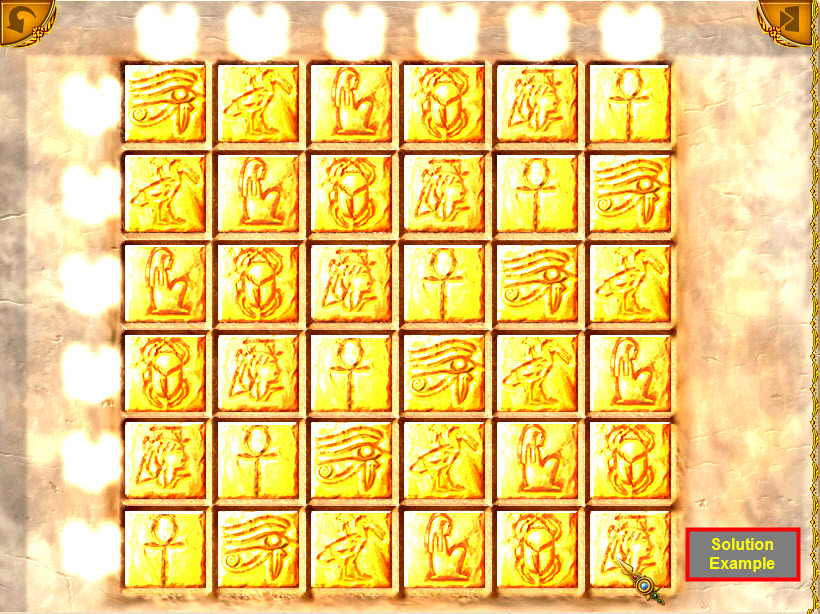
· Click the Tiles to rotate the images until each column and row contains only one of each.
· This is basically a Sudoku puzzle w/images instead of numbers. There was a game similar to this earlier in the game.
· When a column or row has the correct images in order a glyph will light up along the sides of the game.
· There are many solutions to this game. Solution Example:
1. Top Row: Eye, Pelican, Woman, Scarab, Head, Ankh
2. Second Row: Pelican, Woman, Scarab, Head, Ankh, Eye
3. Third Row: Woman, Scarab, Head, Ankh, Eye, Pelican
4. Fourth Row: Scarab, Head, Ankh, Eye, Pelican
5. Fifth Row: Head, Ankh, Eye, Pelican Scarab
6. Bottom Row: Ankh, Eye, Pelican, Scarab, Head
- Collect a cat statue piece after completing the game. Could this be an Egyptian Guardian?
- Place the cat statue under the hawk head to gain building entry access.
- The Egyptian sword should be in inventory.
- Enter the building.
Egyptian Temple Inside the
First Room: 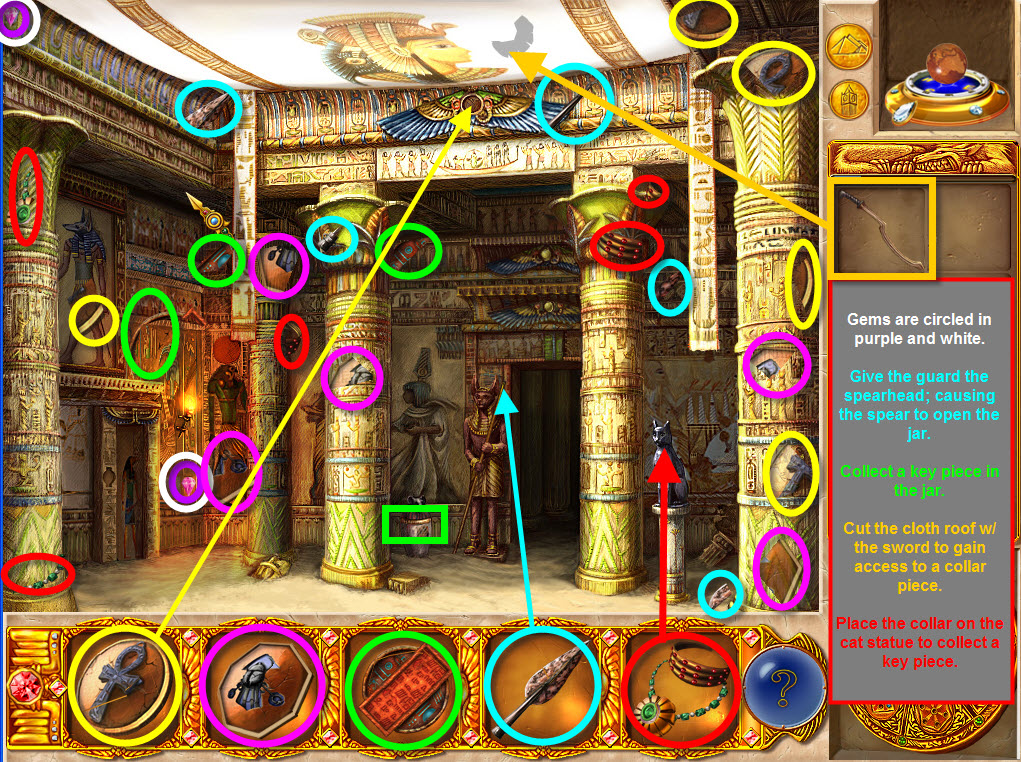
Repair Artifacts: Disk w/Ankh Symbol, Cache symbol, Key, Spear Head, Collar
Gems: 2 Pink Gems
- Collect the gems for the Professor's Amulet. One pink gem in the upper left corner of the scene. One pink gem is under the light on the left of the scene.
- Collect the visible repair artifact pieces.
- Give the spearhead to the guard at the door; the spear will open the jar to the left of the guard. Collect a key piece from the opened jar.
- Place the disk w/symbol (ankh sign) on the wing emblem at the very top of the scene.
- Cut the cloth roof where there is a shadow w/the sword to collect a collar piece.
- Place the collar on the cat statue on the right side to collect a key piece.
- Walk through the doorway into the distant hall.
Distant
Hall Inside the Temple: 
Repair Artifacts: Disc w/Symbol (eye-#1), Disk w/Symbol #2, Nut, Eraser, Chisel
Gem: 1 Pink
- Collect the pink gem is in the middle of the column on the left side of the scene.
- Collect all visible repair artifact pieces.
- Use the chisel on the white spot on the far right wall where most of the wall around the spot has fallen off. Collect an eraser piece after using the chisel.
- Place the cache symbol above the woman's head on the left wall of the alcove to gain access to a mini-game.
- Select the board that is sticking out from the wall to activate the mini-game.
Token Flip:
· Flip the tokens by clicking on them until every token is showing the same side (image).All the tokens need to be showing a pyramid image or a dog image.
· This game is similar to the Symbol Flipping Game.
· Each token selected will affect every token in the row and column in which it is located.
· The tokens will have either a pyramid image or a dog image.
· There is a chargeable hint button on the side of the board that allows you to flip one token without it affecting any other tokens.
· Solutions are random. I chose not to include a screenshot as I didn't feel it would help solve the puzzle or aid in your game play.
· When the game is solved access to a hot spot will be available under the game board that extends out from the wall. Collect a piece of disk w/symbol #2.
· You should have the nut and the eraser in inventory.
· Select the coin in the upper right of the screen to travel to the Art Museum Nature Exhibit.
Art
Museum Nature Exhibit: 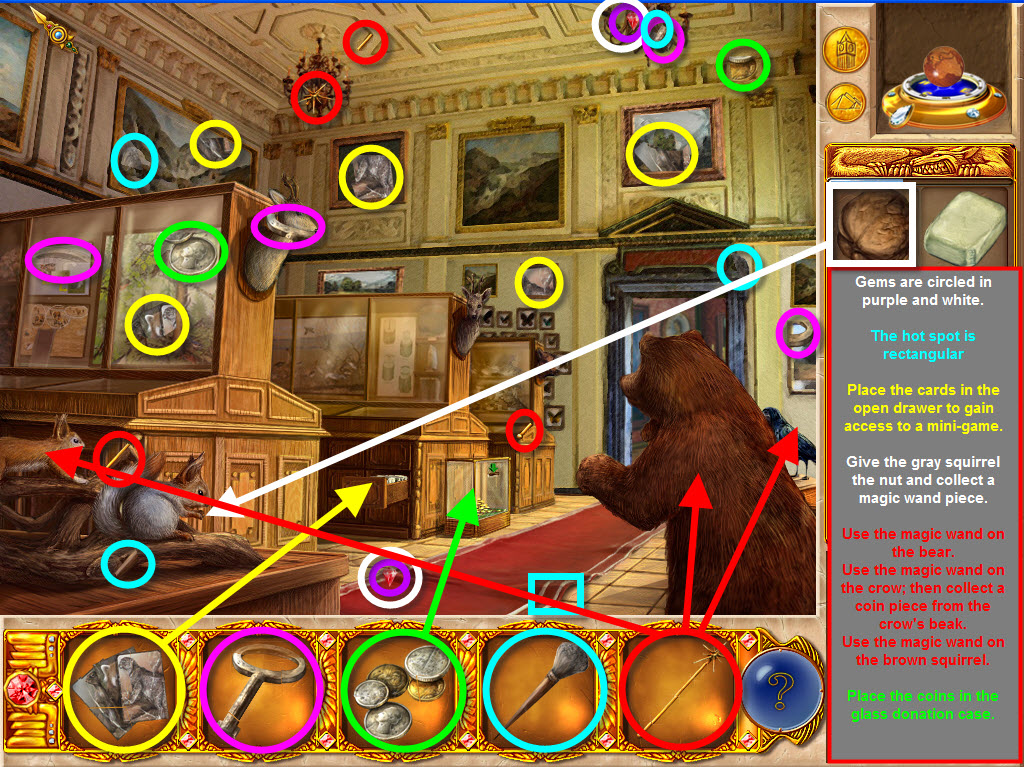
Repair Artifacts: Cards, Key, Coins, Brush, Magical Staff
Gems: 2 Red
- Collect the 2 Red Gems for the Professor's Amulet. One is on the right chandelier on the ceiling on the right side of the scene. One is on the red carpet runner near the center bottom of the scene.
- Collect all visible repair artifact pieces.
- Select the red carpet runner in front of the bear to collect a brush piece.
- Put the cards in the open drawer in the middle of the scene to access a mini-game. Select the drawer again to play the mini-game.
Animal Matching Game:
· Find matching pairs by clicking the cards to flip them over if the cards do not match they will flip back over automatically.
· It the 2 cards match, they will stay lit on the board.
· Card placements and solutions are random. Again I chose not to include a screenshot as a game similar to this was played earlier and providing a screenshot wouldn't affect game play.
- Collect the coin piece after game completion.
- Feed the gray squirrel the nut and collect a magic wand piece.
- Place the magic wand on the bear.
- Use the magic wand on the crow; then collect the coin piece left from the crow.
- Use the magic wand on the brown squirrel.
- Place the coins in the glass donation case next to where you placed the cards and collect a key piece.
- There should be a key and an eraser in inventory.
- Travel through the back doorway.
Art
Museum – Victorian Exhibit: 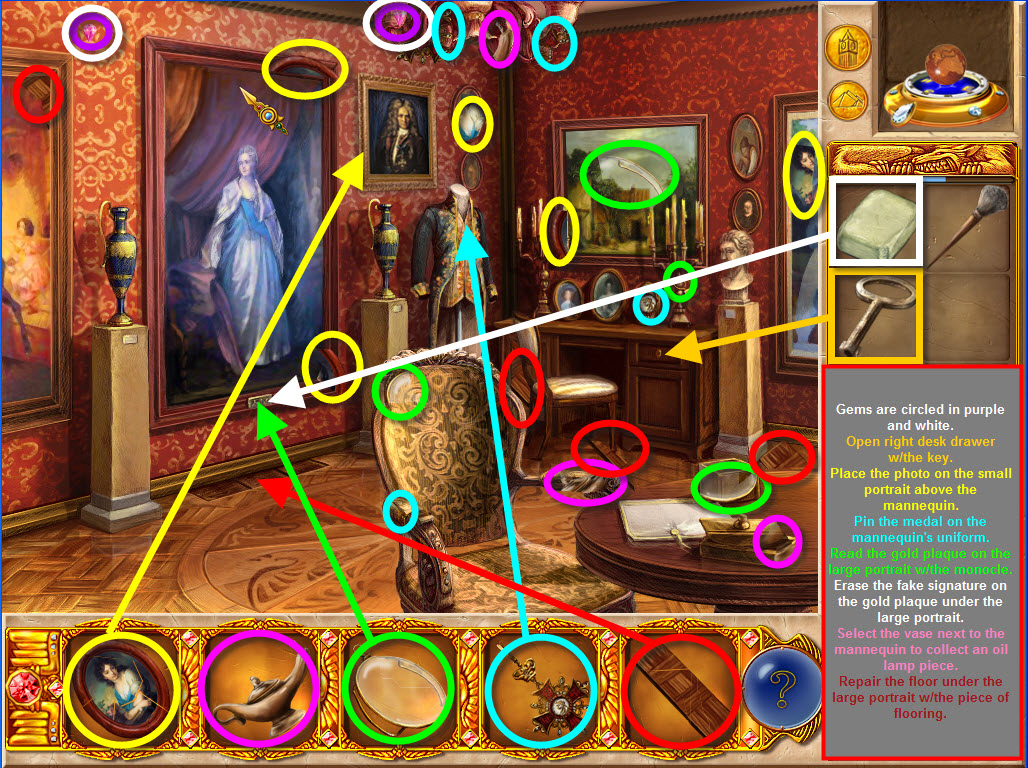
Repair Artifacts: Painting, Empty Oil Lamp, Monocle, Decoration, Piece of Flooring
Gems: 2 Pink Gems (difficult to see)
- Collect the 2 Pink Gems for the Professor's Amulet. One is located at the top left of the scene on the wall. Another gem is located on the chandelier on the left globe.
- Collect the visible pieces.
- Unlock the right desk drawer w/the key and collect a painting piece.
- Place the painting on top of the small painting on the left wall above and slightly to the left of the mannequin to collect a medal piece.
- Pin the medal on the mannequin's uniform to receive a monocle piece.
- Read the gold plaque at the bottom of the large middle portrait w/ the woman and collect a piece of flooring.
- Erase the fake signature on the gold plaque w/the eraser to reveal which vase to select. The woman's arm in the portrait will move pointing to the vase.
- Select the vase next to the mannequin to receive a piece of the empty oil lamp.
- Repair the floor underneath the large middle portrait w/the piece of flooring and collect a piece of the empty oil lamp.
- Return to Egypt using the small coin.
Egypt Outside of Temple – Fill the Oil Lamp: 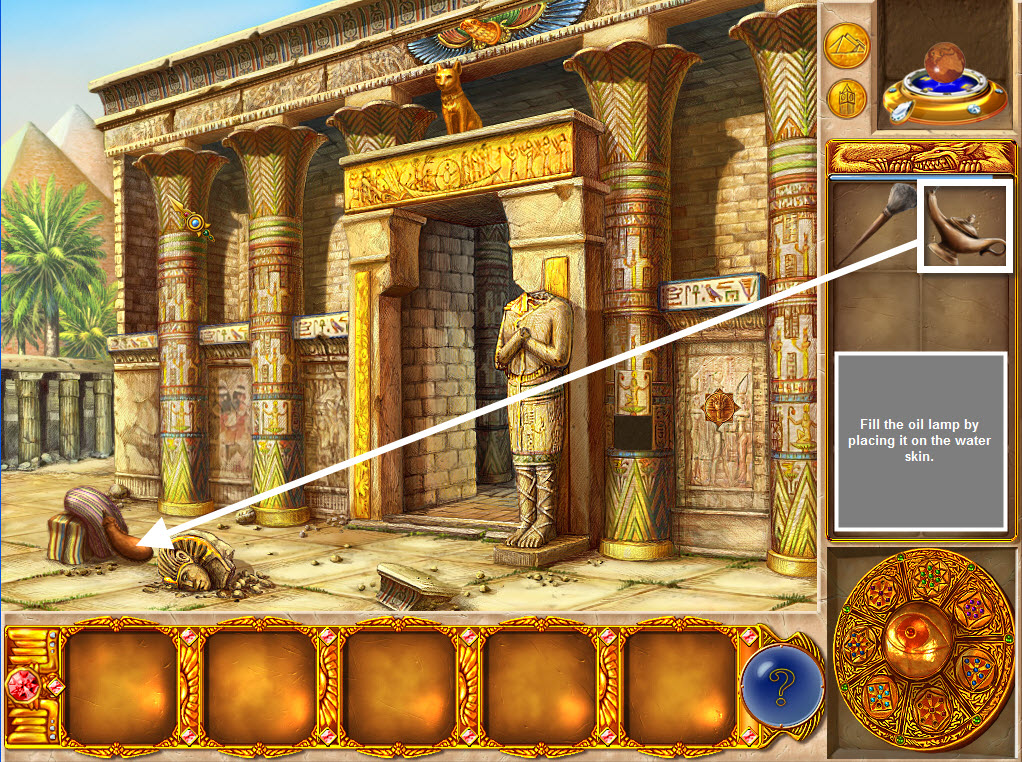
- Fill the Oil Lamp by placing it on the water skin next to the striped cloths on the left of the scene.
- Enter the Temple.
Temple Inside – Light the
Oil Lamp 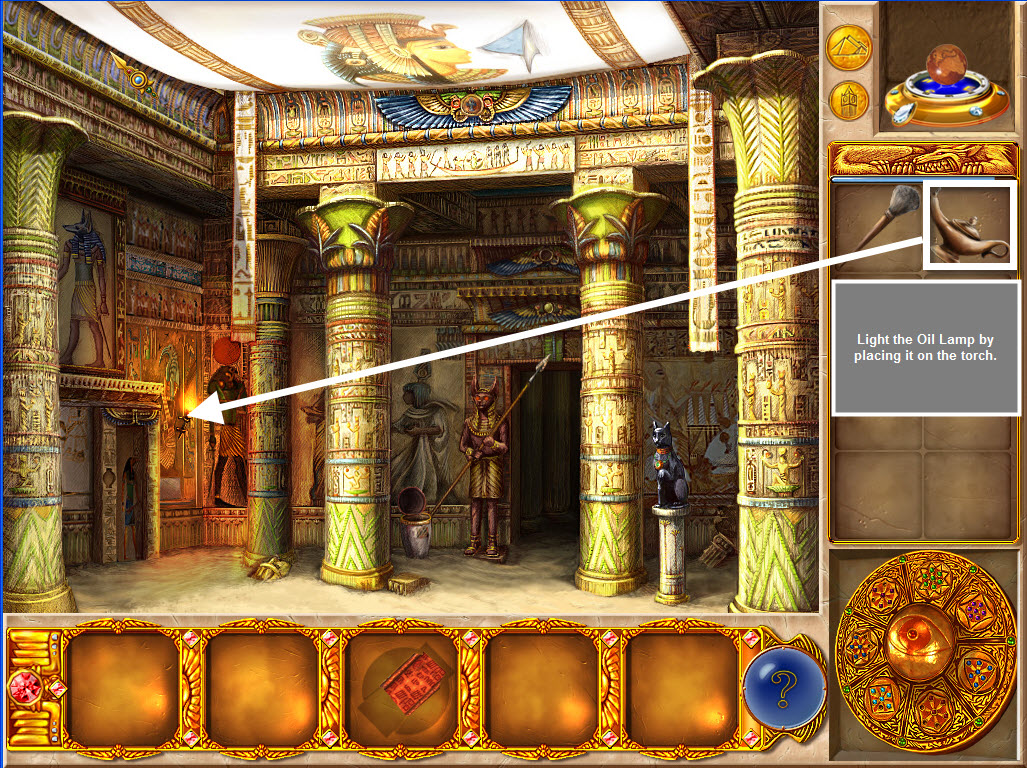
- Light the oil lamp by placing it on the torch on the left of scene.
- Enter the Distant Hall at the back of the room.
Distant
Hall – Lit Oil Lamp Use, Brush Use 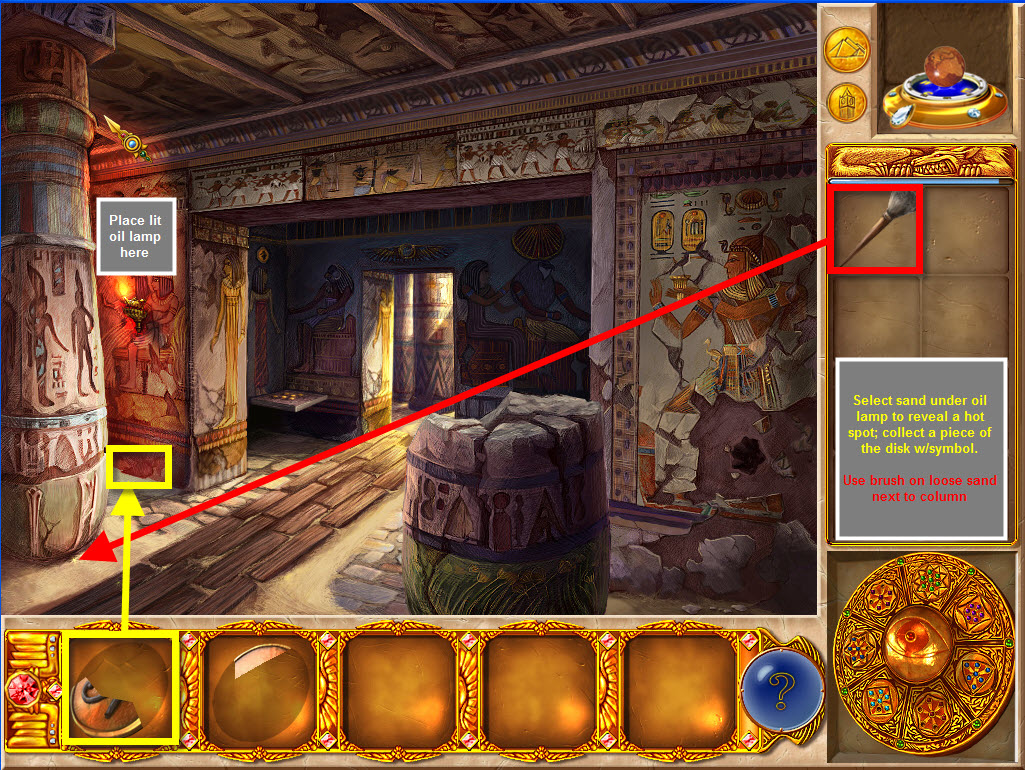
- Place the oil lamp on the gold holder on the wall on the left side to light the room.
- Select the sand underneath the lit oil lamp to reveal a hot spot holding a piece of the disk w/symbol #1.
- Brush away the loose sand in front of the large column w/the brush and collect a piece of the disk w/symbol #2.
- Go through the doorway to enter the temple.
Temple
Inside – Disks w/ Symbol Use, Collect Piece of Key and Key Use:
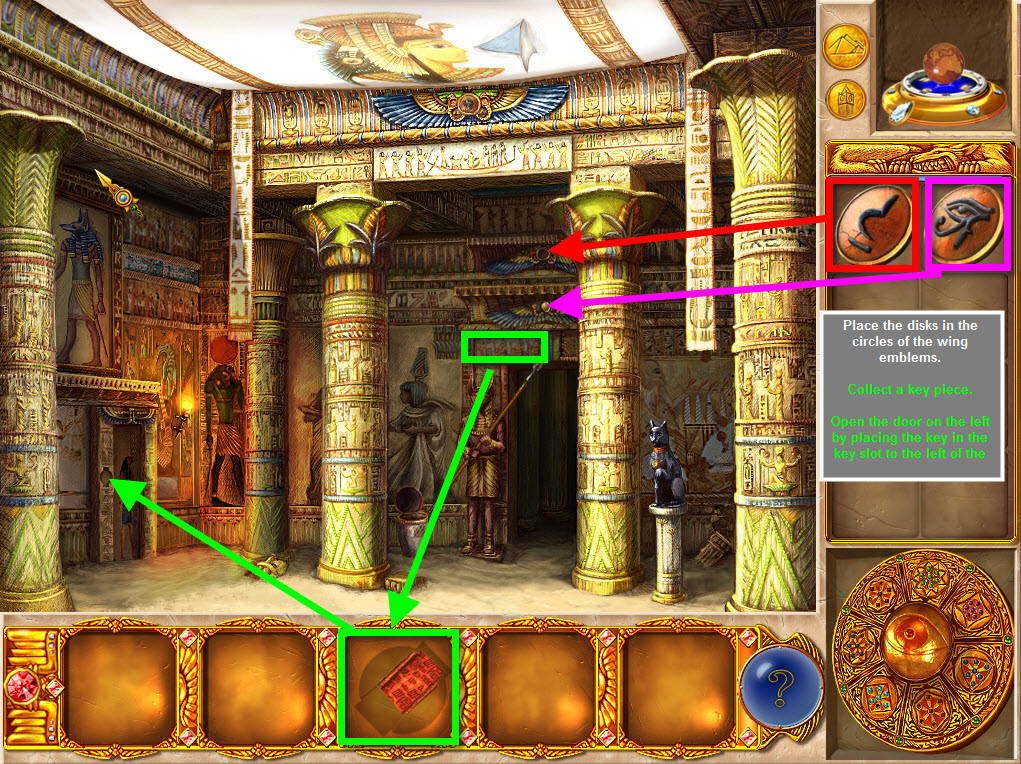
- Place the disk w/ symbol #1 in circle of the middle winged emblem above the doorway.
- Place the disk w/symbol #2 (eye) in circle of the bottom winged emblem above doorway.
- Select the newly acquired hot spot below the bottom winged emblem to collect a key piece.
- Open the door on the left of the scene w/the key.
- Collect the scroll page.
CHAPTER 10 – VENICE AND MYAN OBSERVATORY:
Venice:
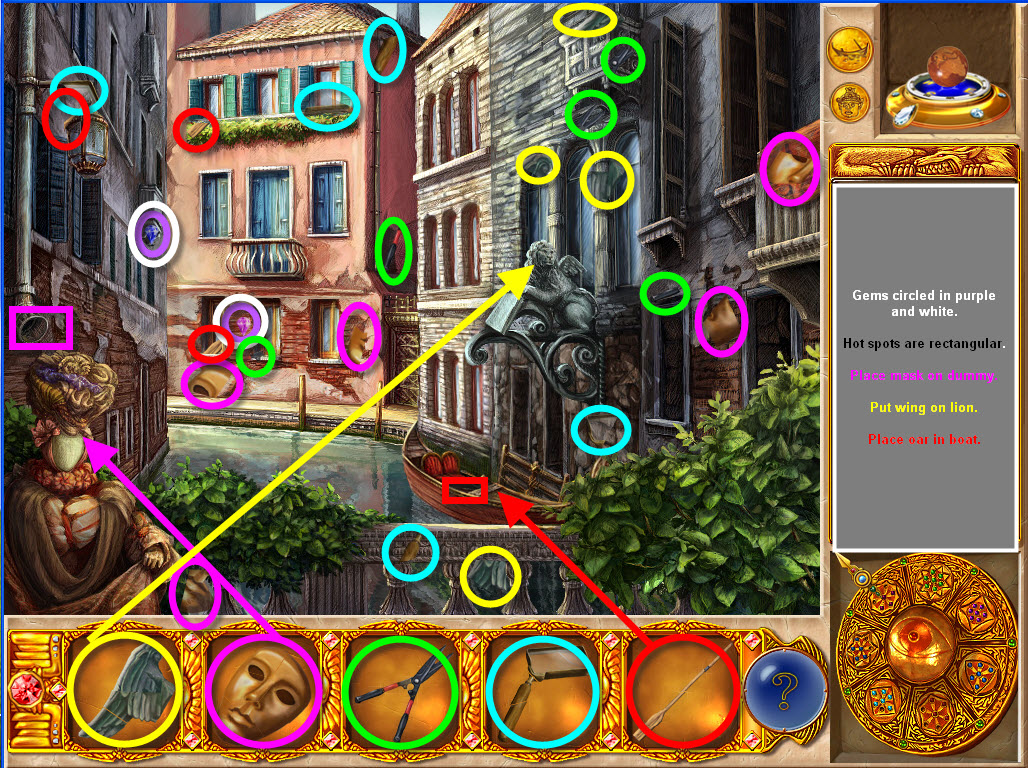
Repair Artifacts: Lion Wing, Mask, Pruning Shears, Magnifying Glass, Oar
Gems: 1 Dark Blue and 1 Pink
- Collect the gems for the Professor's Amulet. The Blue Gem is on the left gray and brick building near the back middle next to the pink building. Collect the Pink Gem on the Pink Building between 2 bottom windows.
- Collect all visible repair artifact pieces.
- Collect a piece of the mask in the drain pipe hot spot at the left of the scene above the dummy. Collect a piece of the oar in the hot spot located in the boat under the seats.
- Place the mask on the dummy in the lower left of the scene and collect a wing piece.
- Place the Lion's Wing on the lion above the boat and collect an oar piece from the book it's holding.
- Move the boat w/the oar. The boat will stop in front of the next entrance.
- Enter the ornate gold doors.
Venice
Room: 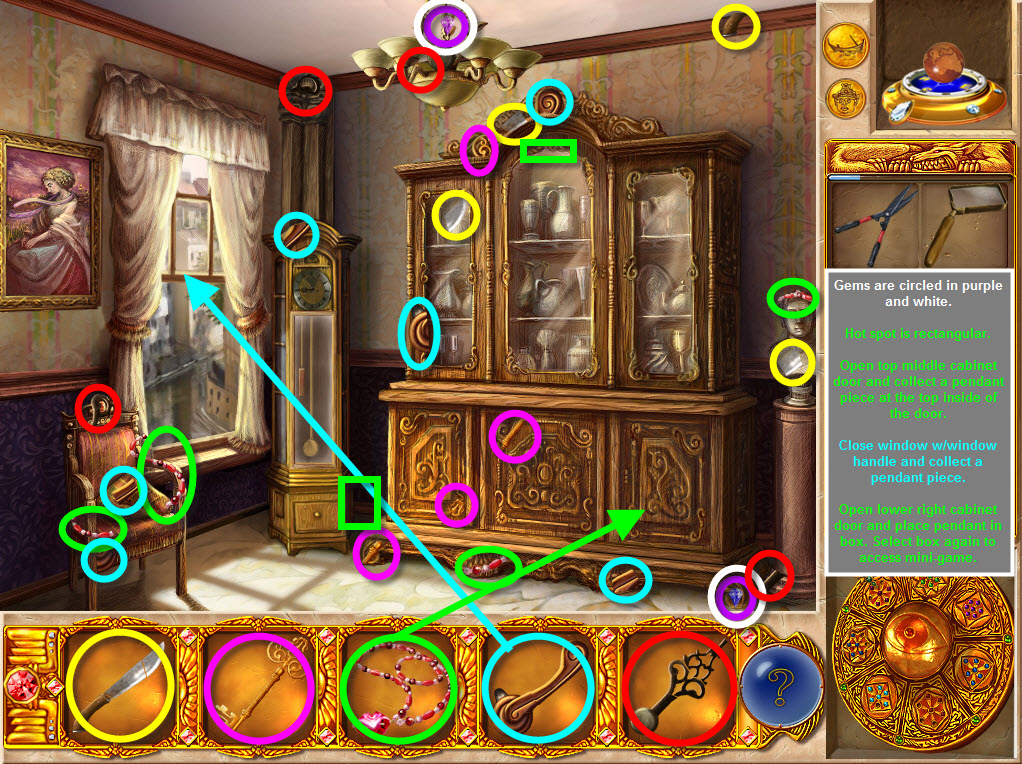
Repair Artifacts: Machete, Key, Pendant, Window Handle, Clock Hand
Gems: 1 Purple and 1 Dark Blue
- Collect the gems for the Professor's Amulet. The purple gem is on the middle chain of the chandelier. Collect the dark blue gem on the bottom right of the china cabinet.
- Collect the visible repair artifact pieces.
- Select the hot spot between the cabinet and the clock on the floor and collect a pendant piece.
- Open the top middle glass cabinet door by selecting it w/ curser and collect a pendant piece from the top inside of the door.
- Close the window on the left w/the window handle and collect a pendant piece.
- Open the lower right door of china cabinet. Place the pendant inside the box. Then select the box again to access a mini-game.
Jewel Box Mini-game:
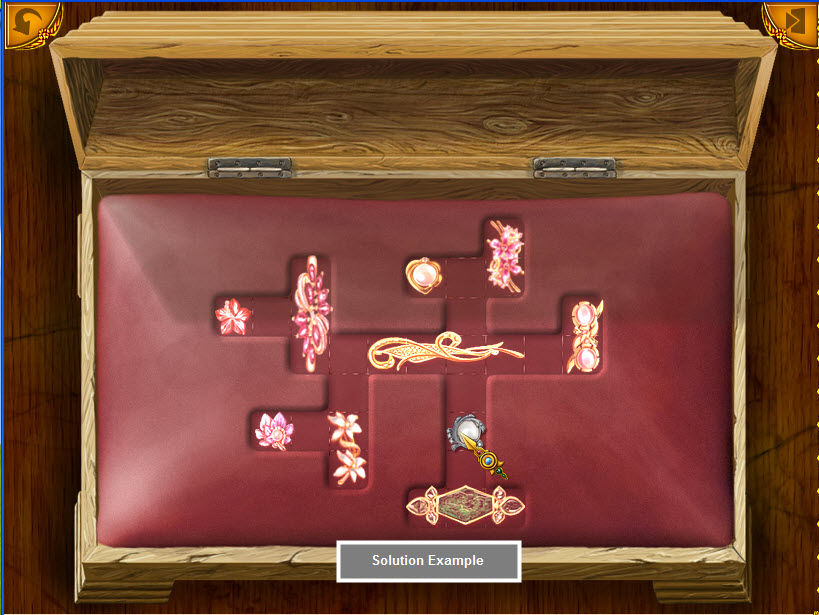
· Arrange the jewels so they're all inside the box but aren't touching anything else. The same as a previous game.
· Click on the jewels to rotate them.
· The jewels will light up when in the correct position. It easiest to start w/the larger pieces, then find the locations for the smaller pieces.
· It's my understanding the puzzle is random, however I played it several times and received the same puzzle...that being said I included a screenshot.
Select the small coin in the upper right of the scene to travel to the Mayan Observatory.
Mayan
Observatory Front Location: 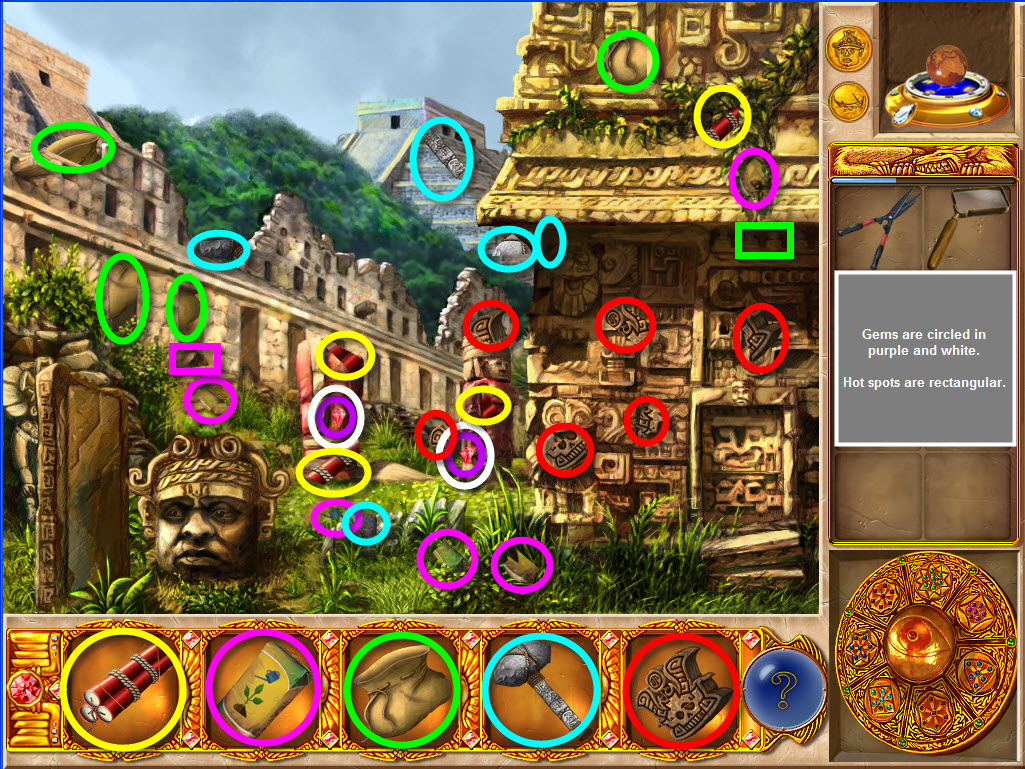
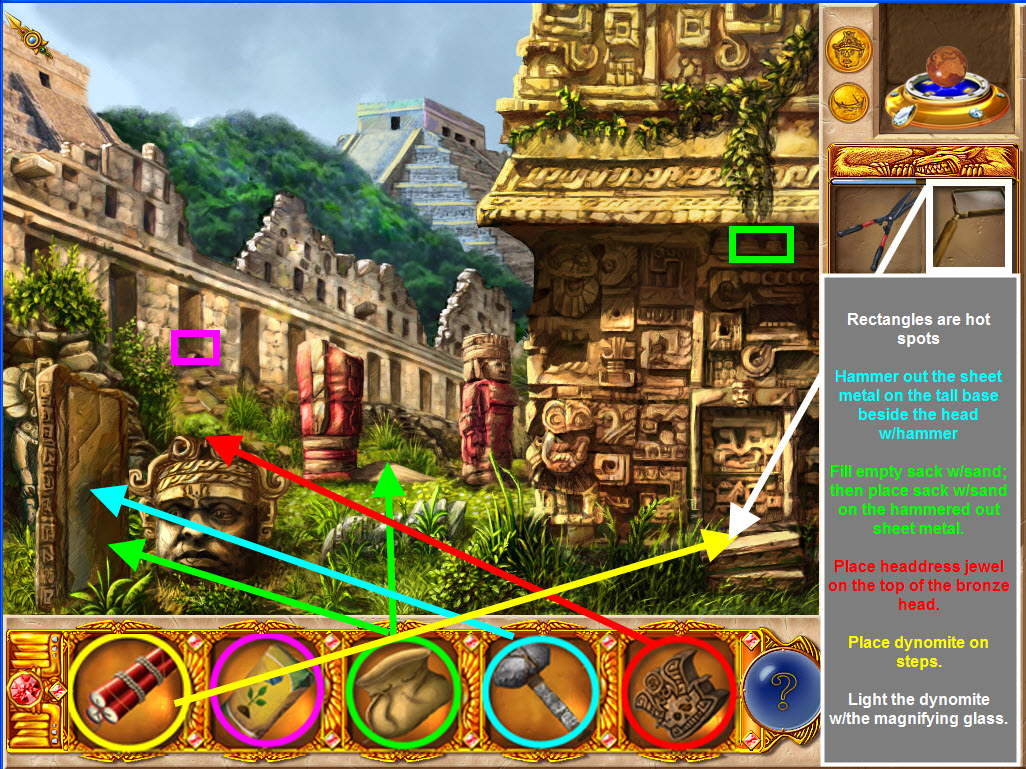
Repair Artifacts: Dynamite, Fertilizer, Empty Sack, Hammer, Headdress Jewel
Gems: 2 Red Gems (very difficult to see)
- Collect 2 Red Gems for the Professor's Amulet. There is a red gem on each of the red statues in the middle of the scene.
- Collect all visible repair artifact pieces.
- Collect a fertilizer piece in the hot spot at the bottom of the window above the bronze head on the building on the left.
- Collect an empty sack piece in the hot spot located right below where the ivy leaves droop down on the right side of the scene.
- Hammer out the metal sheet on the bronze base to the left of the head.
- Fill the empty sack w/the sand located between the 2 red statues.
- Place the sack w/sand on the hammered out metal sheet making a mirror.
- Place the headdress jewel on the large bronze head and collect the dynamite from the mouth.
- Place the dynamite on the steps on the right side.
- Ignite the dynamite w/the magnifying glass to gain access to the Observatory.
Mayan
Observatory Hidden Location: 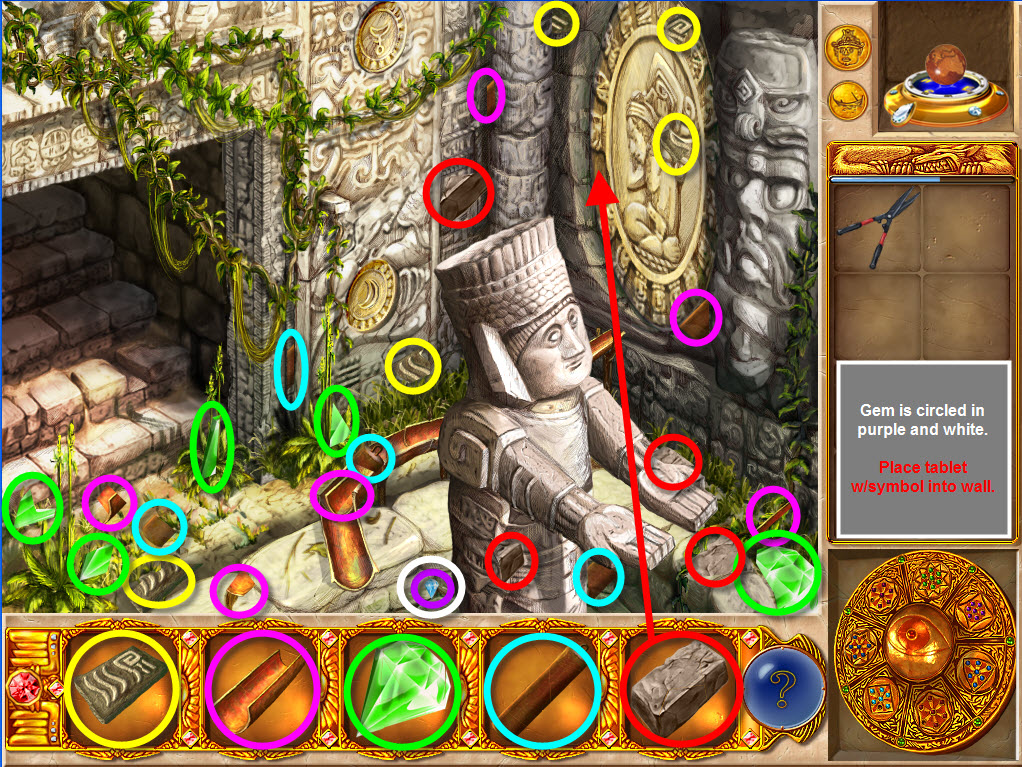
Repair Artifacts: Tablet w/Symbol, Gutter, Gem (green), Weight, Stone Stair
Gems: 1 Light Blue and 1 Red (can only be collected after wall is activated later in the game)
- Collect 1 light blue gem on the central bottom of the scene for the Professor's Amulet. You'll be able to collect the other gem (red) for the Professor's Amulet later.
- Collect all visible repair artifact pieces.
- Place tablet w/Symbol into wall on the left side of the large gold emblem on the right of the scene. The emblem will move and be replaced by a wall of water.
- Return to Venice with the pruning shears, fertilizer and weight in inventory.
Venice Outside - Fertilizer
and Pruning Shears Use: 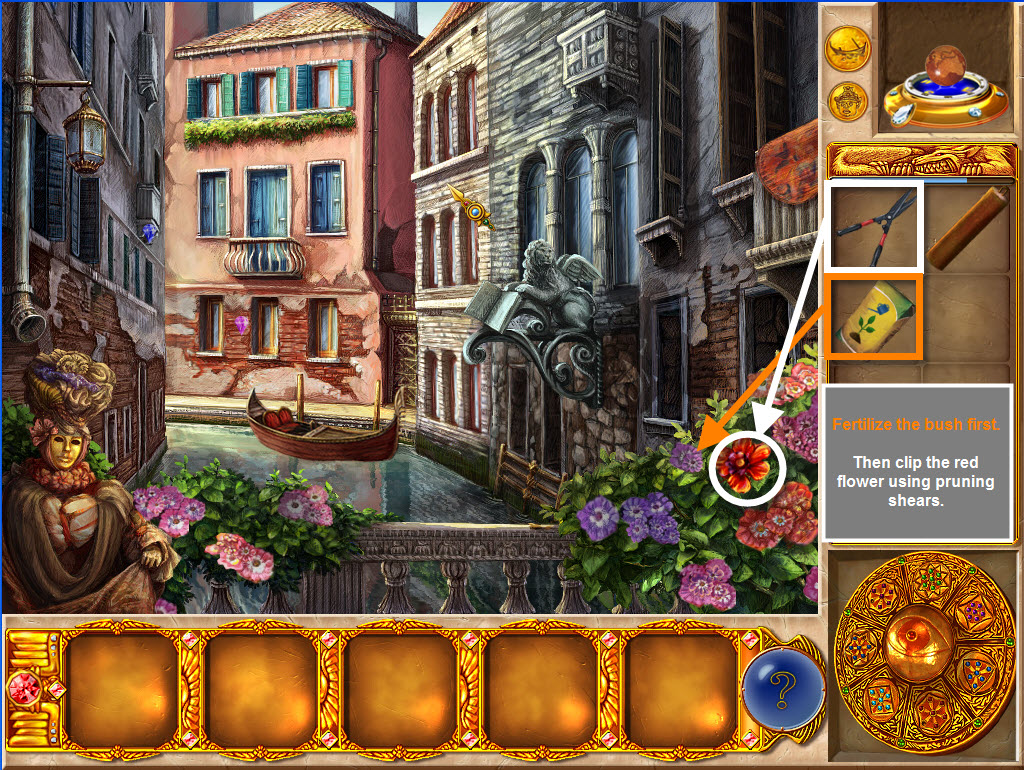
- Fertilize the bush on the right bottom corner of the scene using the Fertilizer.
- Use the pruning shears to clip the large red single flower in the middle of the bush.
- Enter the Venice Room.
Room
in Venice – Weight, Flower, Clock Hand and Key Use: 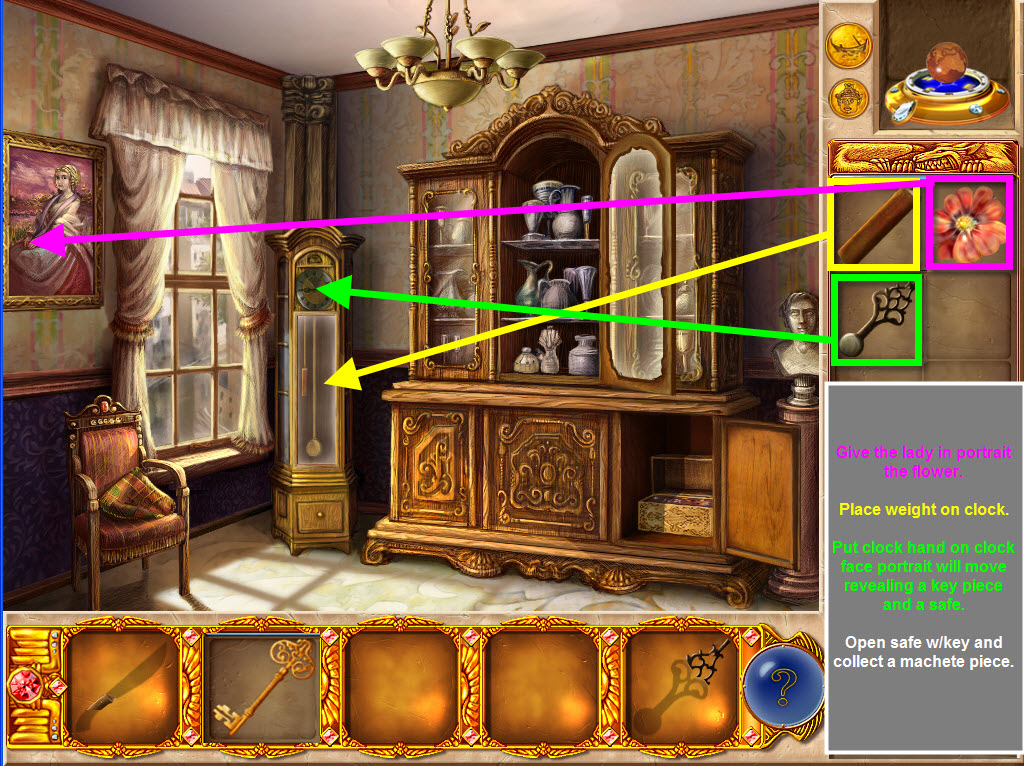
- Give the poor sad woman in the portrait above the chair the flower to start to make her happy. Still not happy...oh, well nice try.
- Open the large glass grandfather clock door and place the weight on the clock and collect a piece of the clock hand.
- Place the clock hand on the face of the grandfather clock and the portrait of the lady will move revealing a key piece and a safe.
- Place the key in the safe and collect a piece of the machete.
- Return to the Mayan Observatory in the hidden location.
Mayan
Observatory Hidden Location – Machete, Stone Stair, Gutter, Green Gem Use AND
Collect the Red Gem. 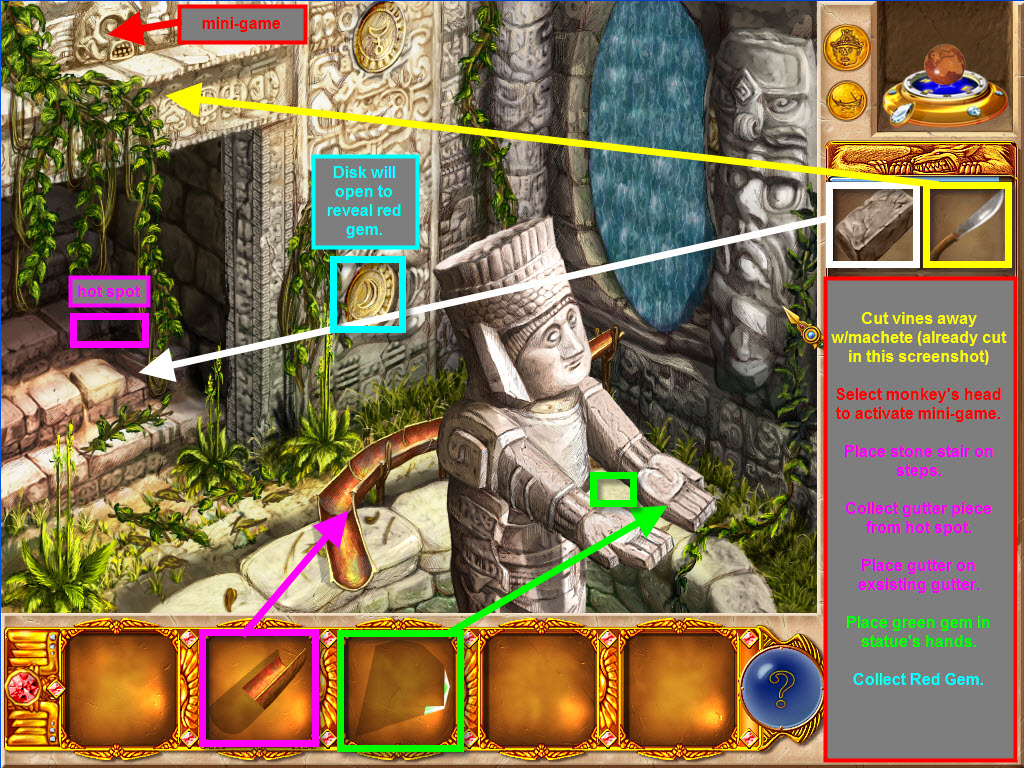
- Cut the vines hanging from the left wall away w/the machete to reveal a stone monkey face.
- Select the stone Monkey face to open a mini-game.
Colored Gem Mini-game:
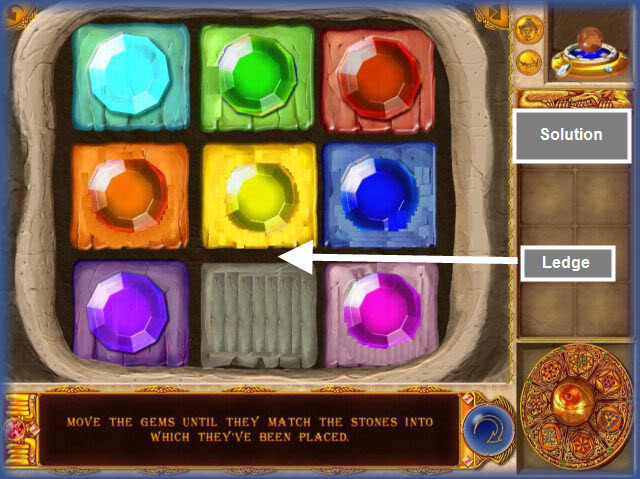
· Move each colored gem into the stone of the same color.
· This is similar to the symbol matching game earlier in the game.
· The bottom gray colored slot will not have a gem as that extra space is needed to be able to move the gems around the board to solve the game.
· The gems will light up when they're in there correct position, they will not lock into place.
· There is a small barrier between the yellow (middle) and gray (bottom middle) stones. Any gems located on the yellow stone can not move directly to the bottom row.
· Any gem located on the gray stone can not move directly to the middle row.
· It's best to place the top row of gems first then work on the middle and bottom row.
- Collect the piece of the Stone Stair after completing the mini-game.
- Repair the steps by placing the stone stair where a brick is missing on the second step from the bottom on the right side making a hot spot available.
- Select the hot spot slightly above where you placed the stone stair and collect a gutter piece.
- Place the gutter on the existing gutter allowing the water to flow through the gutter filling the fountain.
- The fountain statue will raise his arms and a small piece of the green gem will appear on the right ledge of the fountain under the statue's raised arms. Collect the green gem piece.
- Place the green gem into the statue's hands...the disk in the wall behind the statue will open holding a red gem. Collect the red gem for the Professor's Amulet.
- If you've collected all the gems, the game will transport you to Fobros' Basement Vault. If you haven't collected all the gems, select the globe to return to the main map. See the Main Map and Gem Locations Section at the end of walkthrough.
CHAPTER 11 - FOBROS' VAULT AND DRAGON MOUNTAIN:
- If the game doesn't bring you to this location see the Main Map and Gem Locations below, as there is an incomplete chapter/level OR missing gems.
Fobros' Basement Vault:
- Select the Holographic Dragon Mountain (portal) in the center of the room to be transported to the final location.
Dragon Mountain:
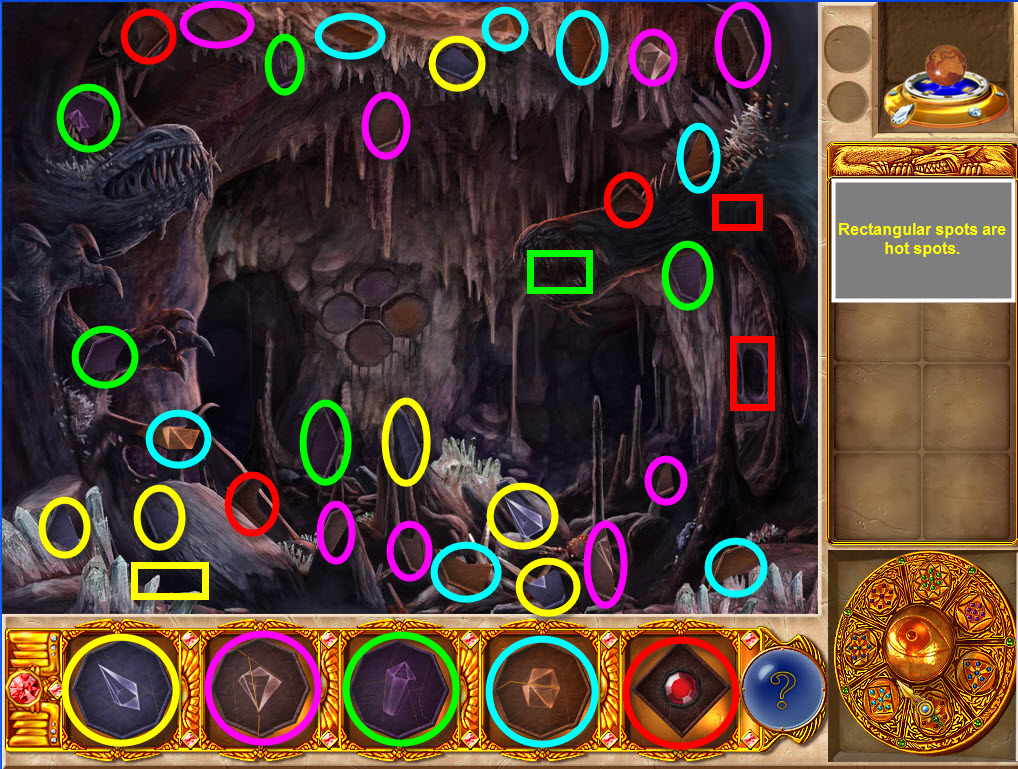
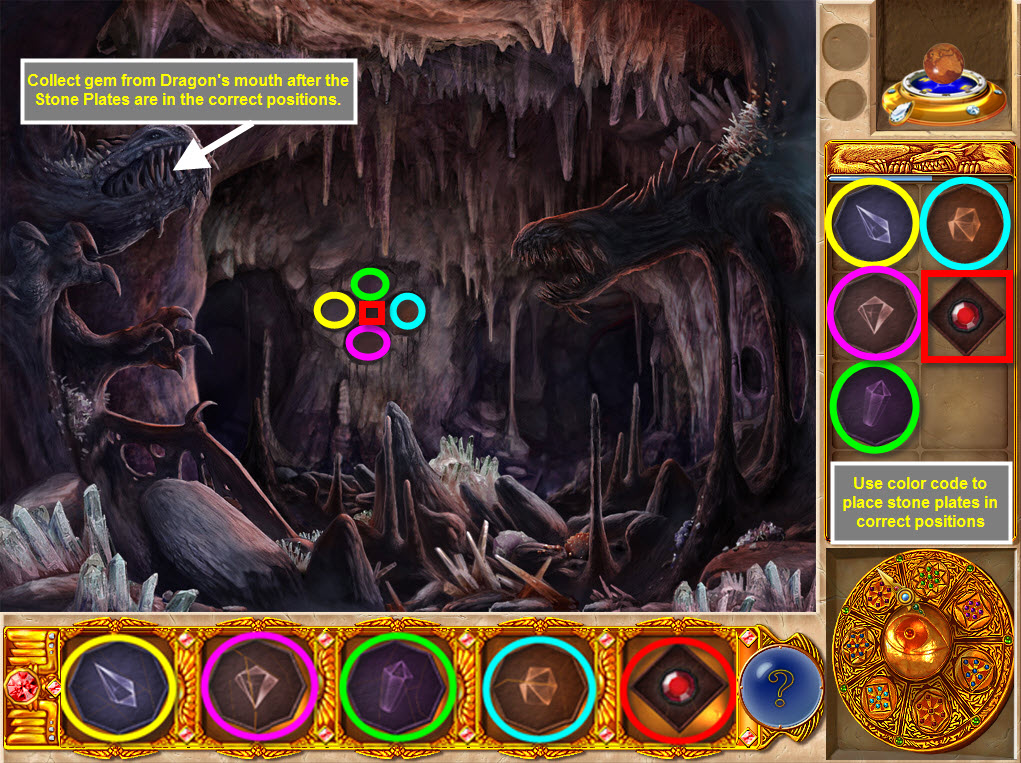
Repair Artifacts: Stone Plate #1, Stone Plate #2, Stone Plate #3, Stone Plate #4, Stone Plate #5
- Collect the repair artifact pieces.
- See rectangular locations on screenshot for hot spots.
- Place the stone plates into the correct order in the back wall. See screenshot.
- Select the peace geml from the left dragon's mouth....the end of the game...sounds like there could be another sequel!
MAIN MAP AND GEM LOCATIONS: 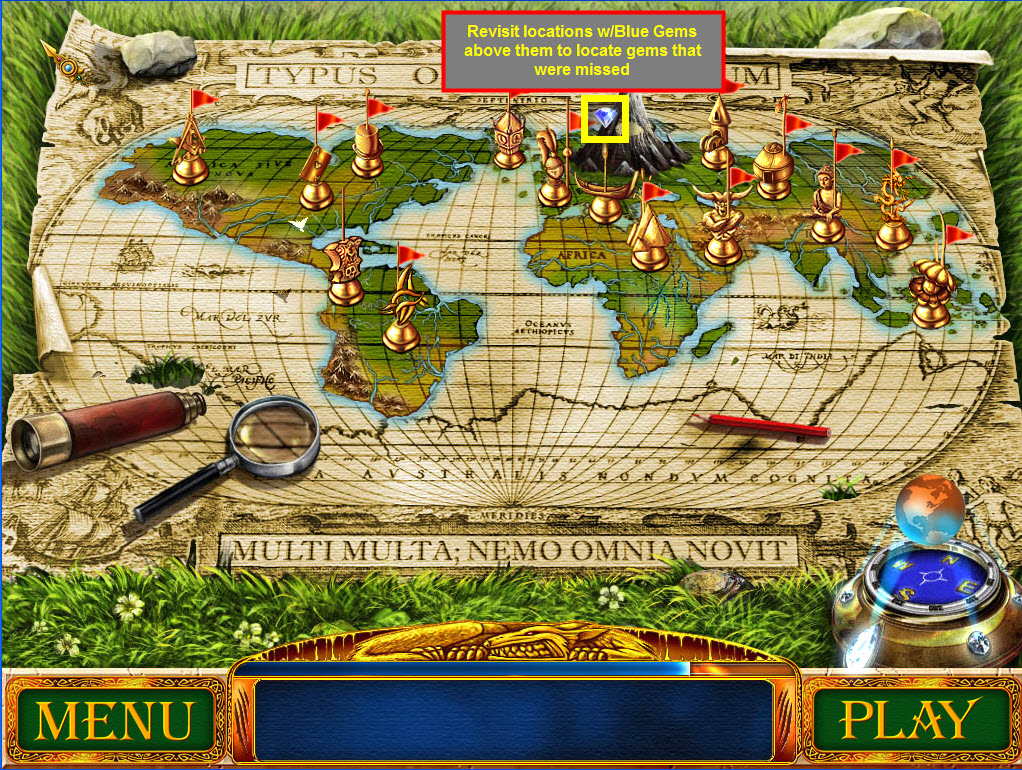
- Revisit all locations that have a blue gem above them on the main map to collect missing gems for the Professor's Amulet to gain access to the final game locations.
- You can use the hint button to locate the missing gems.
Alphabetical listing of locations:
Art Museum:
· Nature Exhibit (2 gems): One Red Gem is on the right chandelier on the ceiling on the right side of the scene. One Red Gem is on the red carpet runner near the center bottom of the scene.
· Victorian Exhibit (2 gems): One Pink Gem is located at the top left of the scene on the wall. Another Pink Gem is located on the chandelier on the left globe.
Asia Tent Site:
· Outside (2 gems): Pink Gem on the tent on the left of the scene. Green Gem on the cart at the right of the scene
· Inside (2 gems): Blue Gem on the floor on the bottom left of the scene. Purple Gem above the door amongst the tassels.
Egyptian Temple:
· Outside (2 gems): One Pink gem is located on the top of the far left column on the building. The other Pink Gem is located on the right of the scene amongst the bar ledge of hieroglyphics.
· Inside First Room (2 gems): One Pink Gem in the upper left corner of the scene. The other Pink Gem under the light on the left of the scene.
· Distant Hall: The Pink Gem is in the middle of the column on the left side of the scene.
Fire Worshipers' Temple (2 gems): Purple gem on the top right of the scene. Blue gem is in the bottom right of the scene.
· Underground (2 gems): The Blue Gem is on the left side in front of the rock wall. The Purple Gem is almost right in the middle of the scene on a figure that is on the Alter.
Fortune Teller's Cottage:
· Outside: Green Gem on the bottom left of the scene in the bushes and left of the wood post.
· Inside: Green Gem for the Professor's Amulet located on the right side of the scene on the top shelf on the right side of the china cabinet.
German Castle:
· Outside: Blue Gem on shield in lower left of scene.
· Inside: Green Gem on candelabra post in middle of scene.
Golden Dragon Palace:
· Outside: Green Gem in the upper right of the scene amongst the tree leaves to the left of the lantern.
· Inside: Green Gem on the Dragon's Tail.
Labyrinth:
· Outside (2 gems): The Light Blue Gem can be difficult to see. It's to the left of the door in the blue painted area. The Dark Blue Gem is below the eagle and slightly to the right.
· Inside (2 gems): The Purple Gem is above the lit torch on the right wall. A Light Blue Gem is on the back wall near the middle of the scene.
Masonic Temple:
· Outside (2 gems): A Dark Blue Gem is above the door in the middle of decorative circle window. A Dark Blue Gem is to the left of the stone walkway which is to the right of the statue.
· Inside (2 gems): A Dark Blue Gem is located on the right side of the Throne mantel. A Dark Blue Gem is on the back wall near the corner.
Mayan Observatory:
· Front (2 gems): There is a red gem on each of the red statues in the middle of the scene.
· Hidden (2 gems): The Light Blue gem is in the central bottom of the scene. The Red Gem is behind the bottom disk in the wall and can be accessed after a green gem is placed into the statue's hands.
Pearl Diver's Hut:
· Outside (2 Gems): The Light Blue Gem is located in the upper left of the scene between the palm leaves. The Dark Blue Gem is on the right side of the scene between the palm trees and slightly above the bushes.
· Inside (2 gems): The Dark Blue Gem is on the stool next to the table. The Light Blue Gem is on the bench seat to the right of the door on the curled up portion of the mat.
Tibetan Monastery:
· Outside – 1 Green Gem on the right dragon on the large gold and bronze statue in the bottom left corner of the scene. Tutorial shows first gem.
· Inside: 1 Blue Gem slightly above and to the left of the statue on the right side of the scene.
Venice:
· Outside (2 gems): A Dark Blue Gem on the left gray and brick building near the back middle next to the pink building. Pink Gem on the Pink Building between 2 bottom windows.
· Inside (2 gems): The Purple Gem is on the middle chain of the chandelier. The Dark Blue gem on the bottom right of the china cabinet.
Wizard's House:
· Outside (2 gems): The Light Blue Gem is in the sky in the upper left of the scene. The Red Gem is on the red carriage to the right of the window above the carriage wheel.
· Inside (2 gems): The Red Gem is difficult to see. It's on the red chair on the left of the scene at the top of the chair. The Light Blue Gem is on the middle shelf of the 3-tier table to the left of the fireplace.
Comments will load when you reach this part of the walkthrough.