
Walkthrough Information
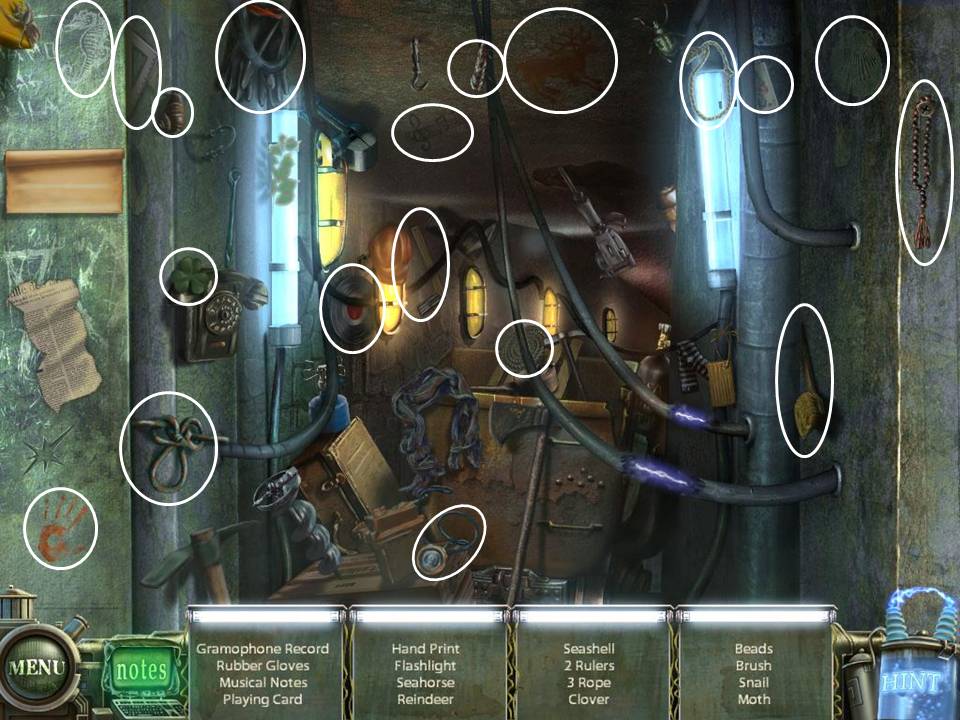
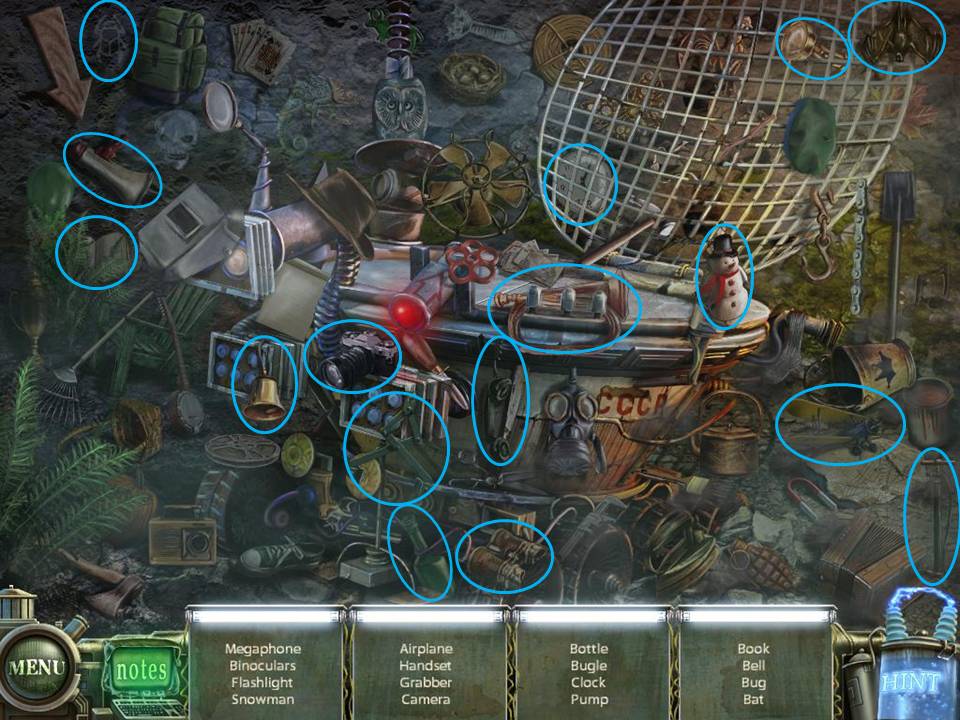
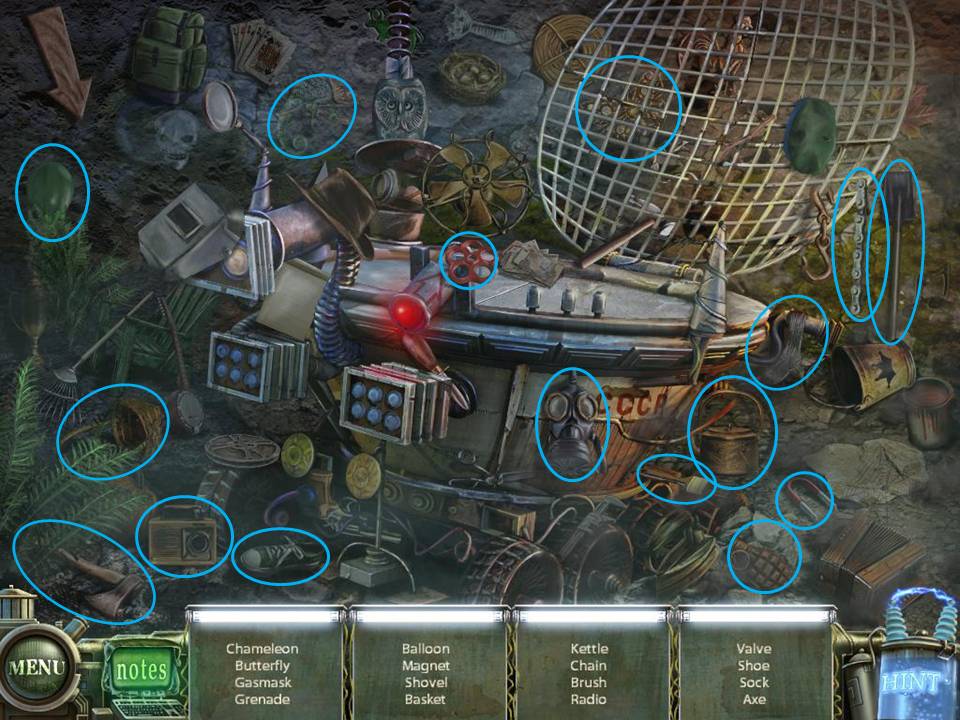
A few important reminders before anything else:- The items you need to look for in Hidden Object Scenes (HOS) are mostly random. I will, however, try to point out all of those in the list on the screen shot.
- If you really can't find what you're looking for, there's a "Hint" button at the bottom right. It takes 1 minute for the Hint button to recharge.
- The "Hint" button changes into a "Skip" icon for other puzzles. Clicking on "Skip" allows you to automatically solve the puzzle. It takes around 2 minutes for the Skip button to light up.
- On certain scenes, you will see Red/Brown sparkles. This means that you have to play the HOS. When you see Blue sparkles, it means there's a Puzzle waiting to be solved.
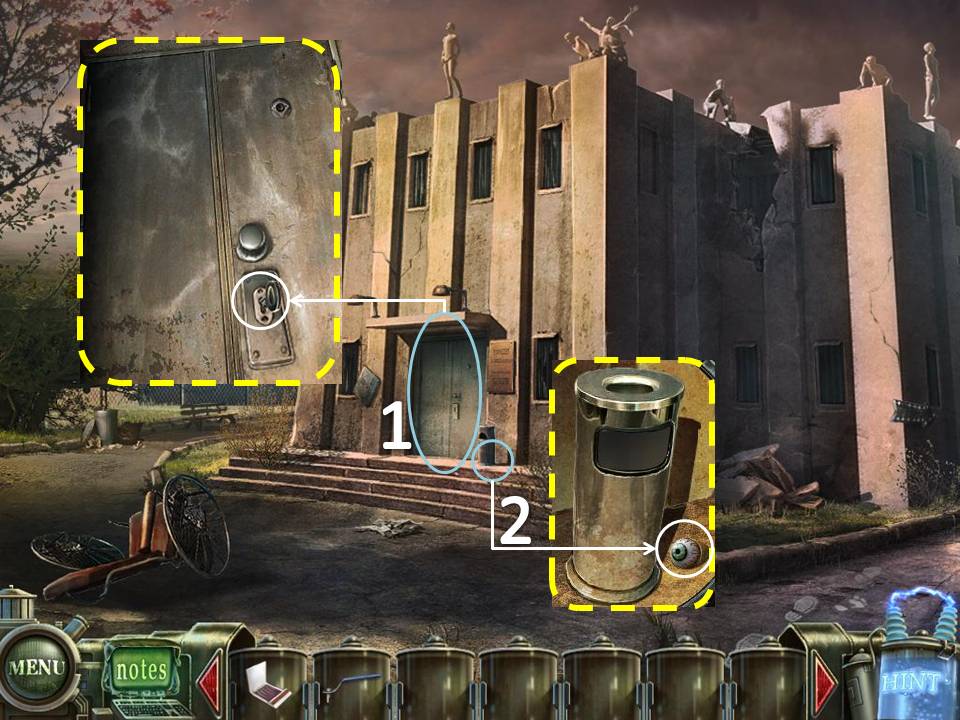
Part 1: Outside The Sanitarium
- Take the Umbrella
- Click under the Trunk of the car on the right. Use the Umbrella to get the Valve
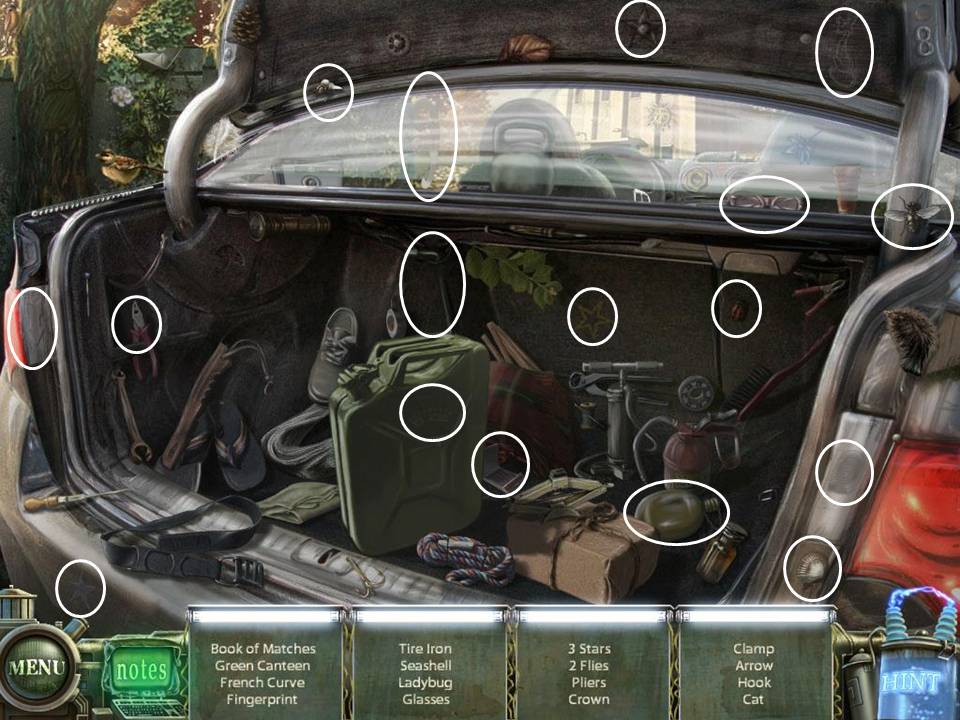
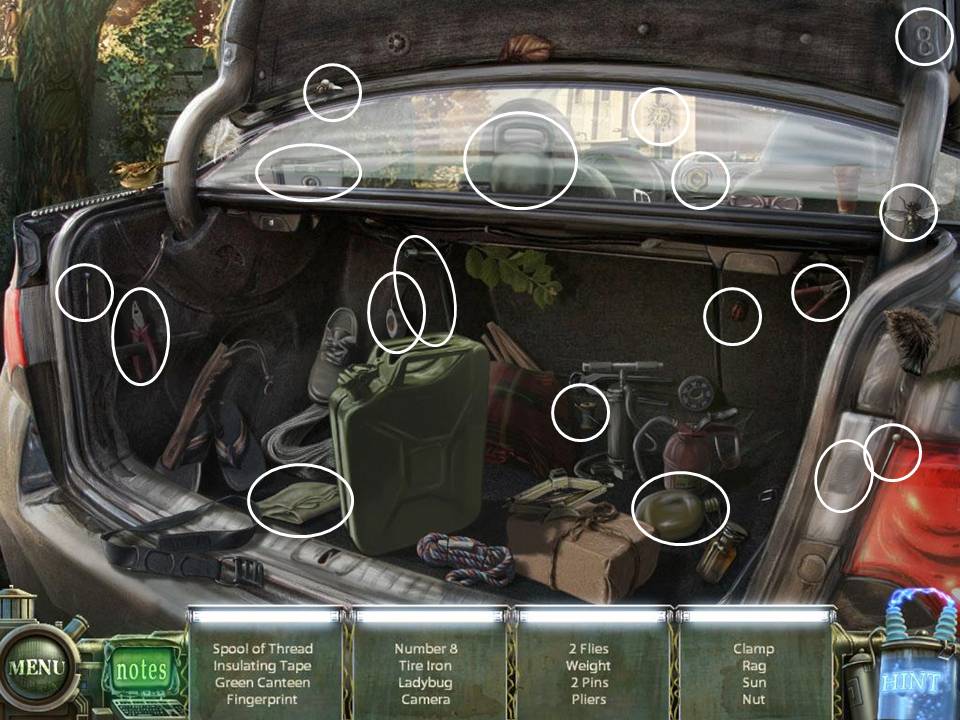
- Open the Trunk of the car on the left. Play the HOS. Book of Matches will be added to your inventory
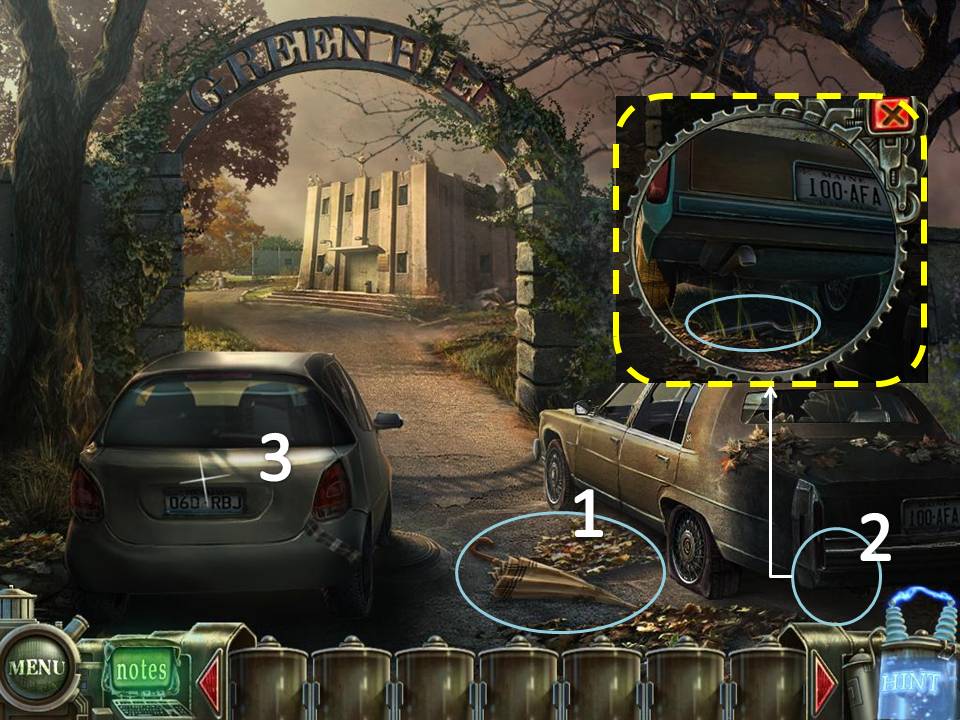
- Take the Newspaper on the ground.
- Go the left side of the building.
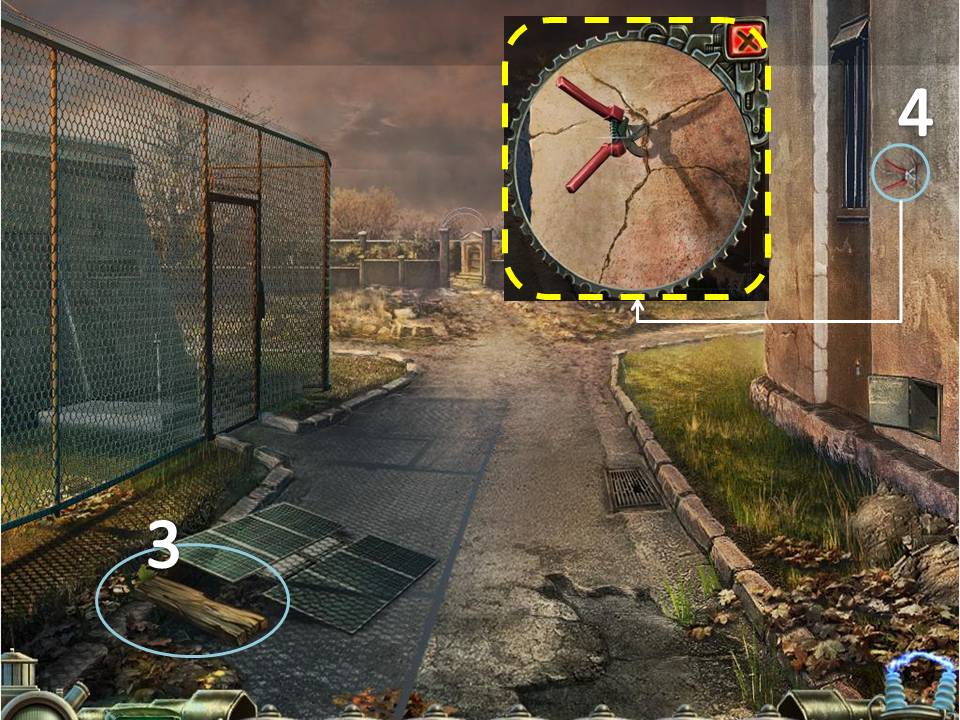
- Take the Board (1/3) on the ground.
- Take the Clippers on the wall
- Go down, then to the right of the building.
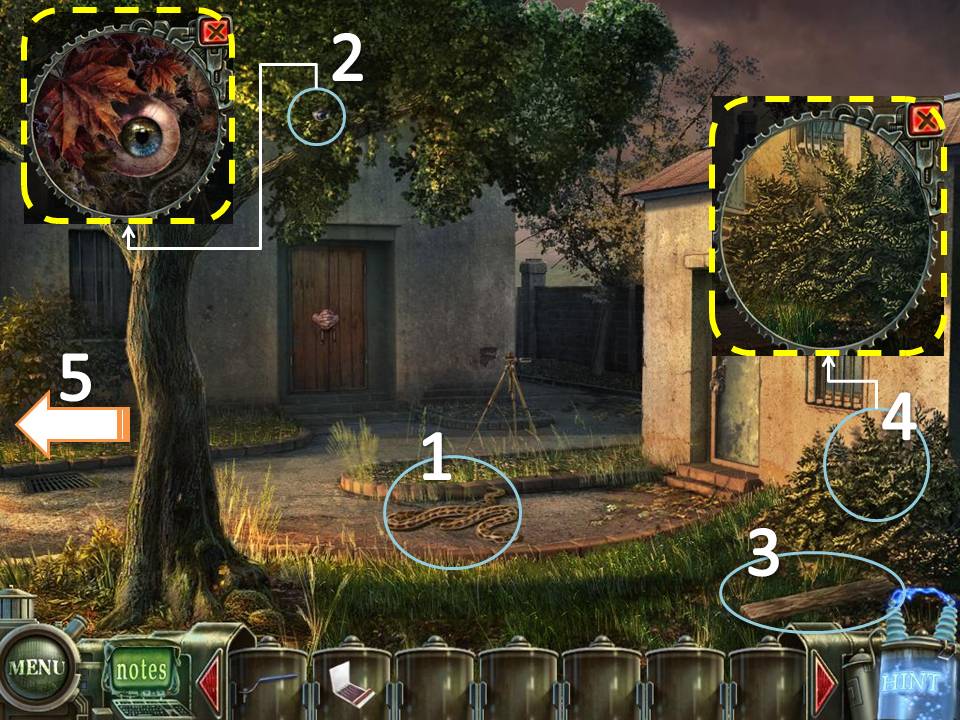
- Click on the Snake on the ground. It will turn into a Hose. Take the Hose
- Examine the Tree. Take the Eye (1/6)
- Take the Board (2/3) on the ground.
- Examine the bushes to the right. Use the Clippers to get the Branches
- Go back to the left side of the building.
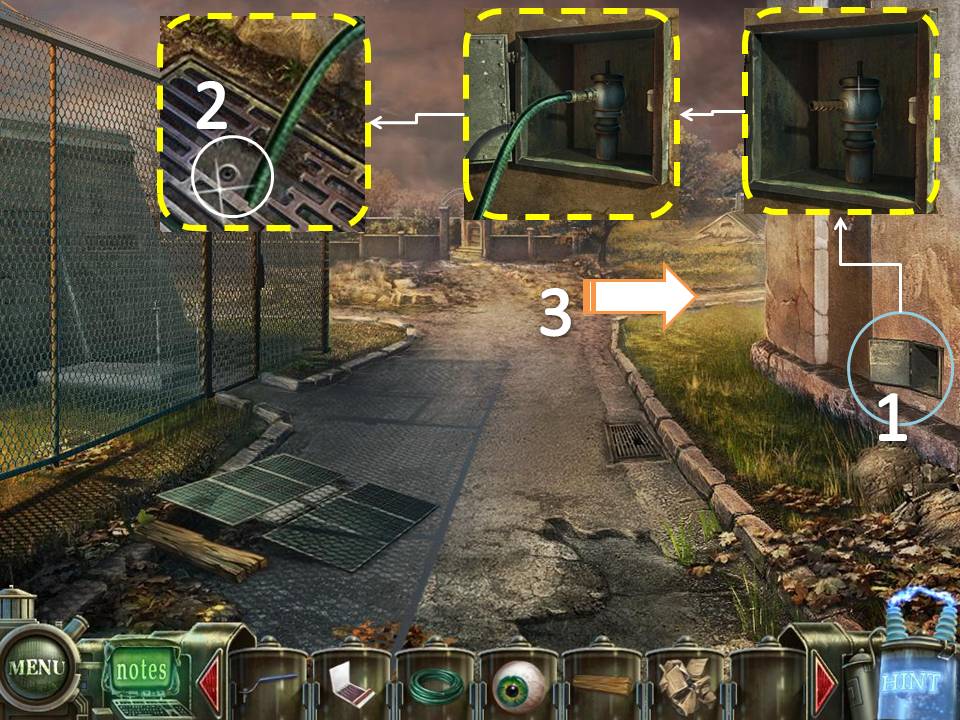
- Examine the niche on the wall. Attach the Valve then the Hose on the spigot.
- Take the Eye (2/6)
- Head right.
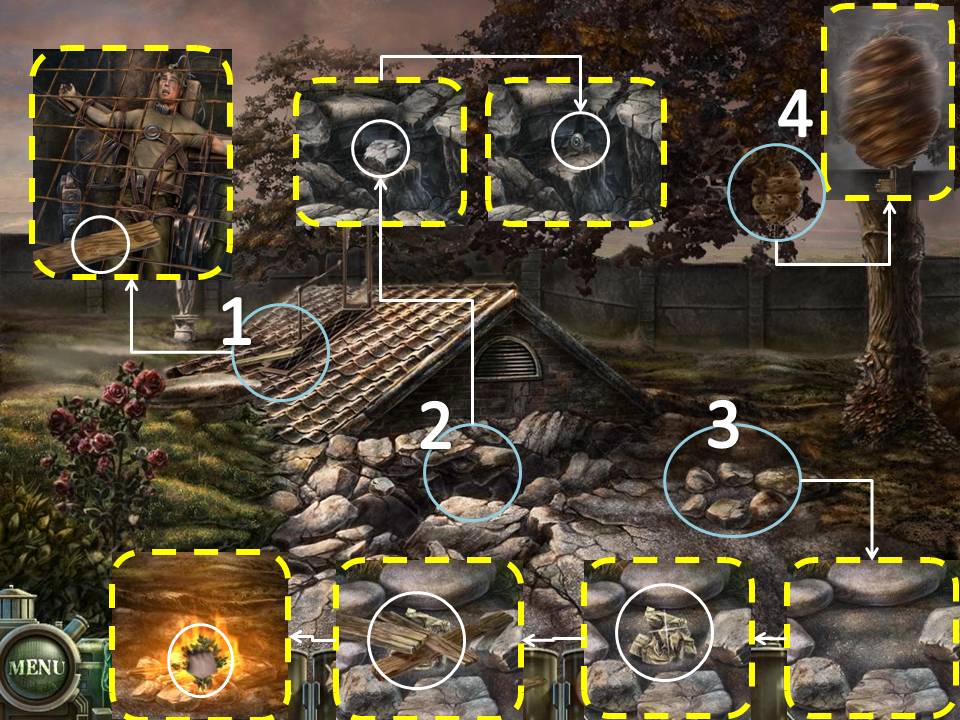
- Examine the Roof. Take the Board (3/3)
- Take the Stone and the Eye (3/6)
- Place the Newspaper. the Boards, and the Book of Matches in that order on the pit. Add the Branches to the Fire.
- Examine the Hive. Take the Key.
- Head Back then head forward to the Graveyard.
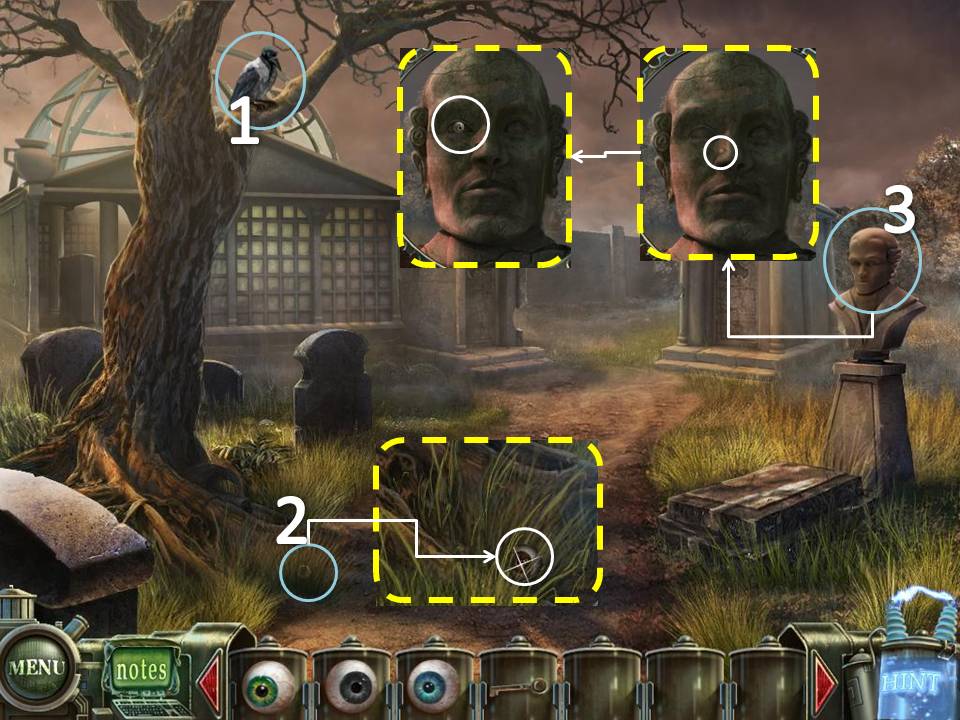
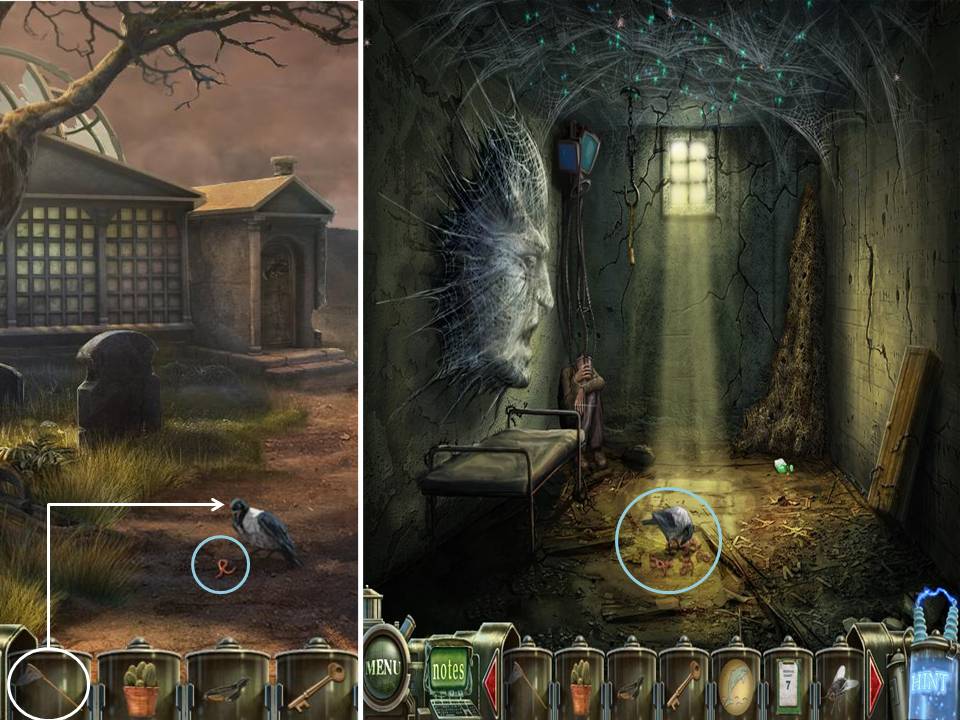
- Use the Stone on the Crow.
- Take the Eye (4/6) on the ground
- Examine the Bust on the right. Click on the mole on the nose. Take the Eye (5/6)
- Head back to the front of the Sanitarium.
- Use the Key on the door.
- Check the Trash Can beside the door. Take the Eye (6/6)
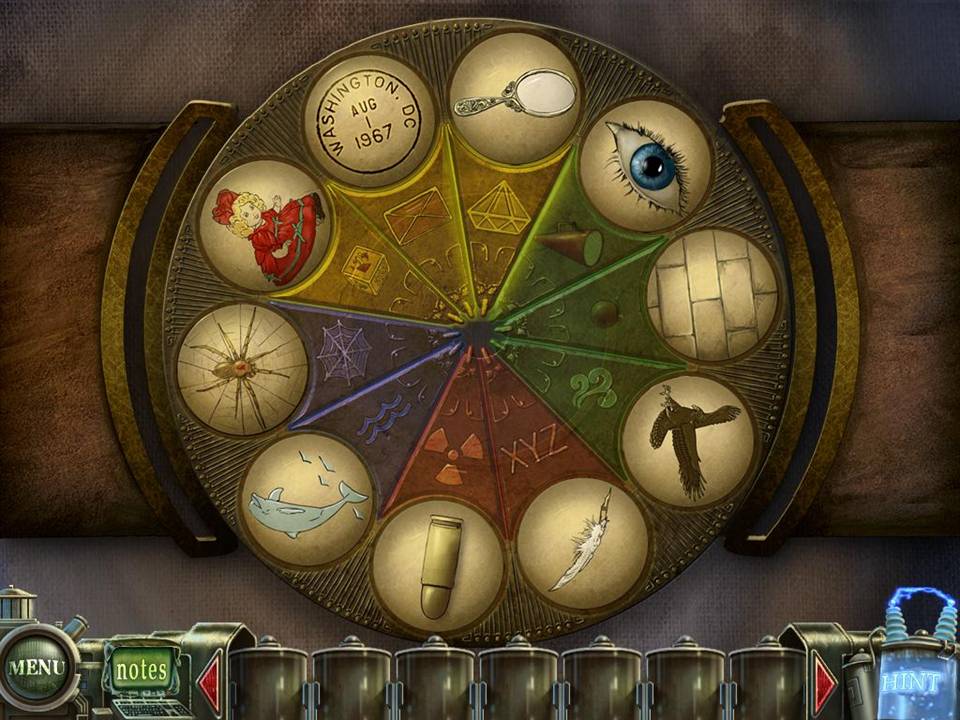
- Play the puzzle on the door.
- Place the Eyes on the slots on their corresponding colors.
Click on the left or the right arrow on the end of each row to move that row accordingly.
The goal is to allow the eyes to drop to the very bottom.
If you cannot solve the puzzle, just wait for the "Skip" icon on the bottom right side to light up. It automatically solves the puzzle for you
The goal is to allow the eyes to drop to the very bottom.
If you cannot solve the puzzle, just wait for the "Skip" icon on the bottom right side to light up. It automatically solves the puzzle for you
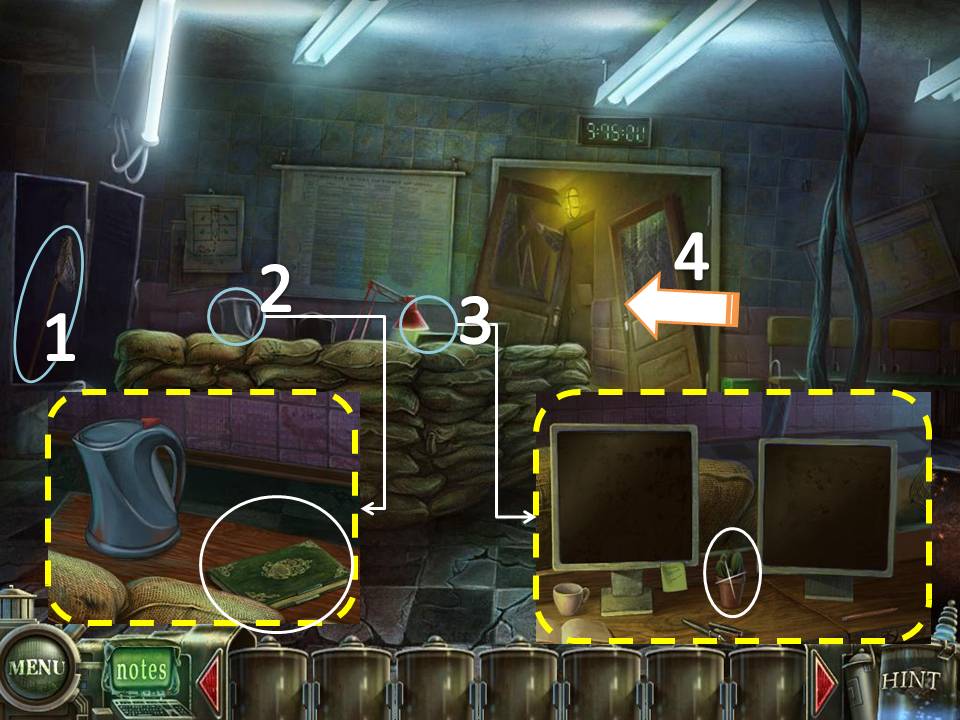
Part 2: Sanitarium, 1st floor
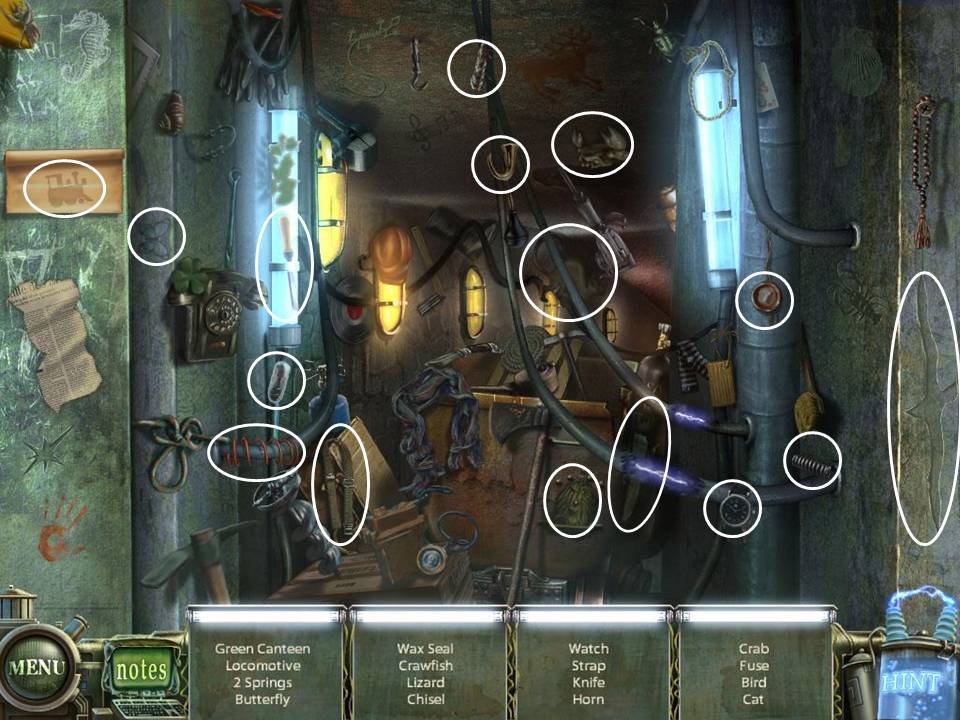
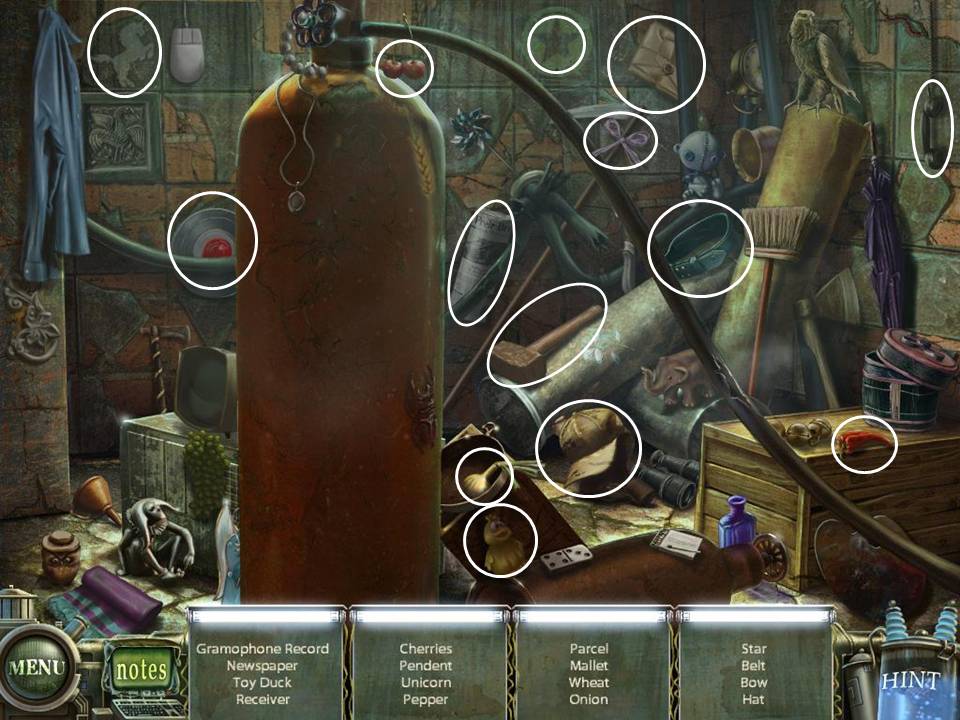
- Play the HOS. Medical Chart 1 will be added to your inventory

- Take the Net on inside the locker
- Examine the coffee pot above the stack of sacks. Take the Book (1/4) beside the pot.
- Click on the lamp beside the coffee pot. Take the Cactus
- Go through the door.
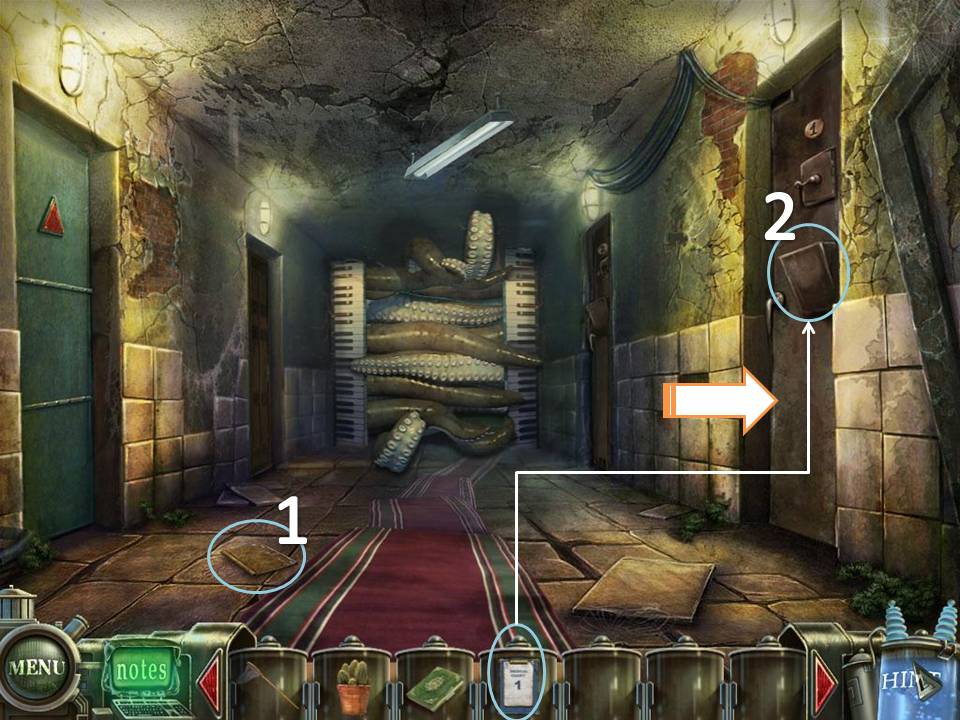
- Take the Book (2/4) on the ground.
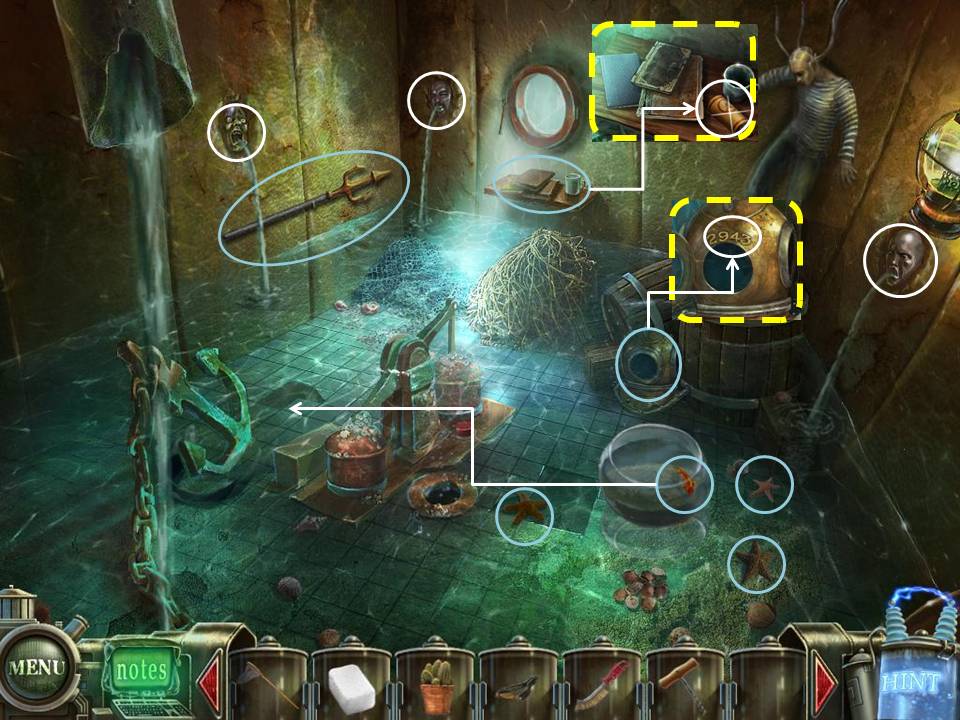
- Use Medical Chart 1 on the first door to the right. Enter through the door.
- Collect the 3 Starfishes on the water using the Net.
- Take the Gold Fish on the bowl using the Net
- Check the Diving Helmet at the bottom of the barrel where the patient is standing on. Take note of the number "2943"
- Plug the Faces using the 3 Starfishes.
- Place the Fish on the water near the anchor.
- Take the Trident on the left wall.
- Examine the shelf on the far end of the room. Take the Flypaper.
- Exit the room. Enter the door to the left nearest to the octopus tentacles.
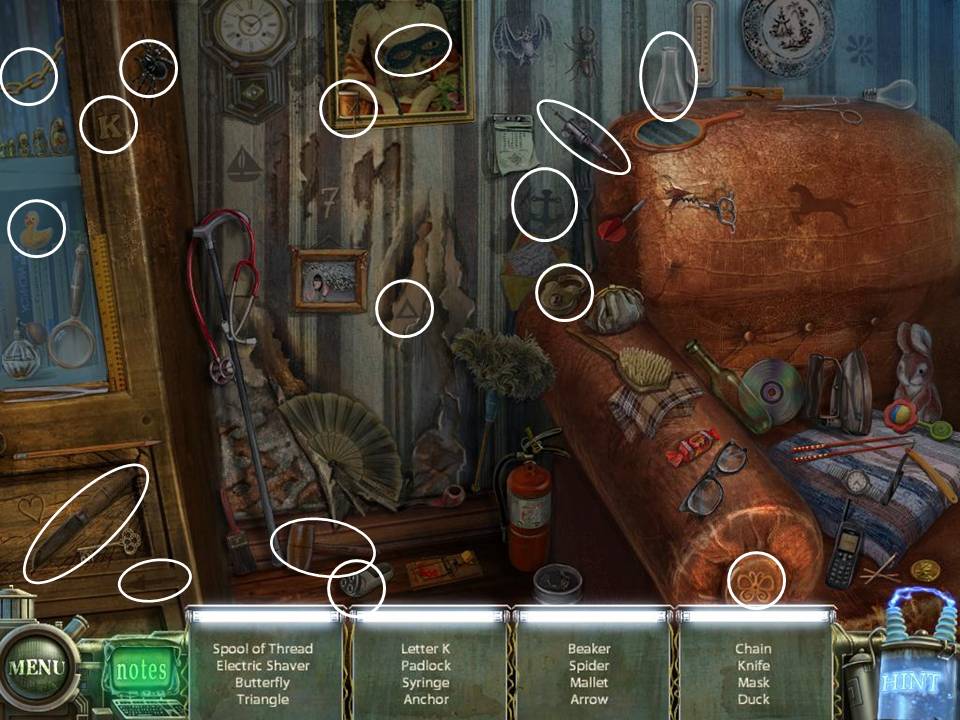
- Play the HOS. Knife will be added to your inventory
- Place the Trident on Neptune's hand.
- Click on the Safe underneath Mona Lisa. Click on the numbers "2943" Take Medical Chart 2 and 7
- Take the Sugar on the lower left table.
- Zoom in to the Desk on the far wall. Take the Book (3/4). Note also the "Per Aspera ad Astera" on the drawer.
- Exit the room. Go back to the reception area
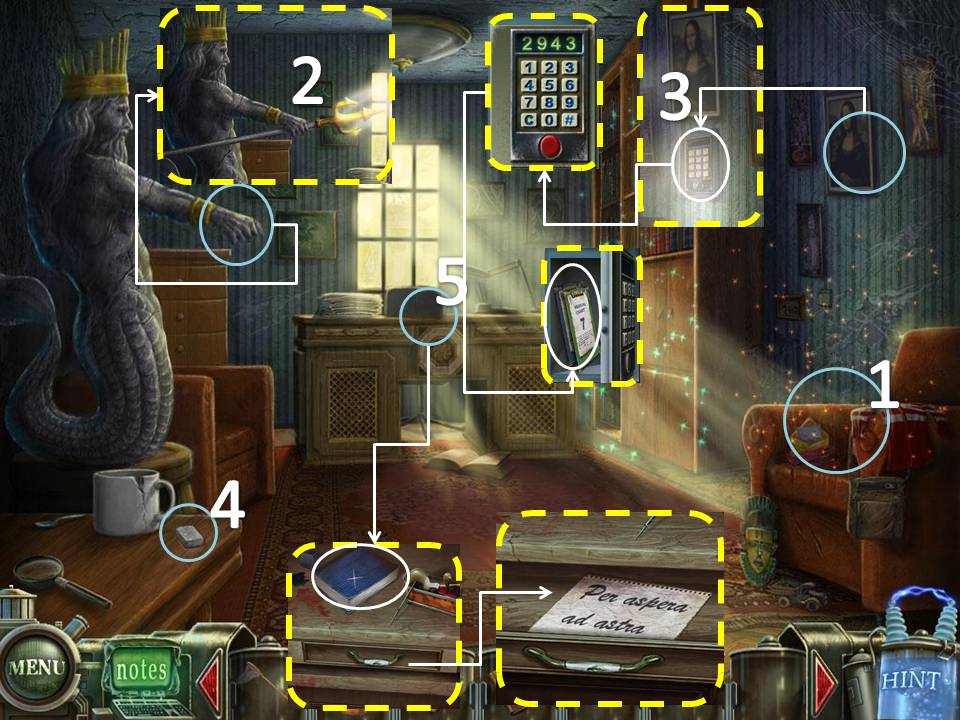
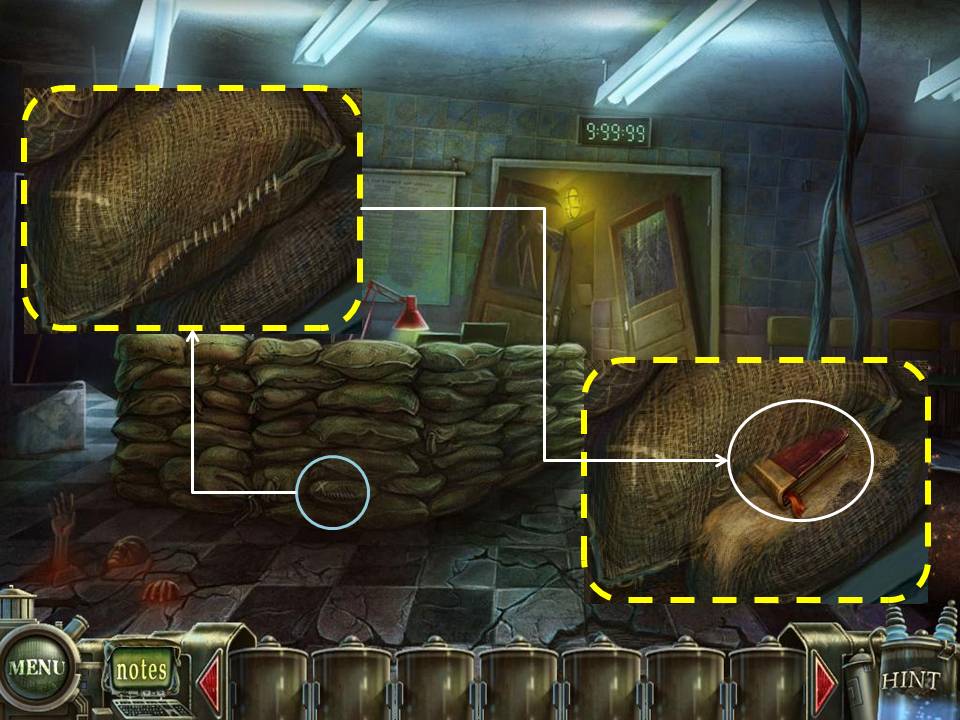
- Examine the stack of Sacks. Look for the X mark. Click on it.
- Use the Knife on the sack.
- Take the Book (4/4)
- Return to Neptune's room
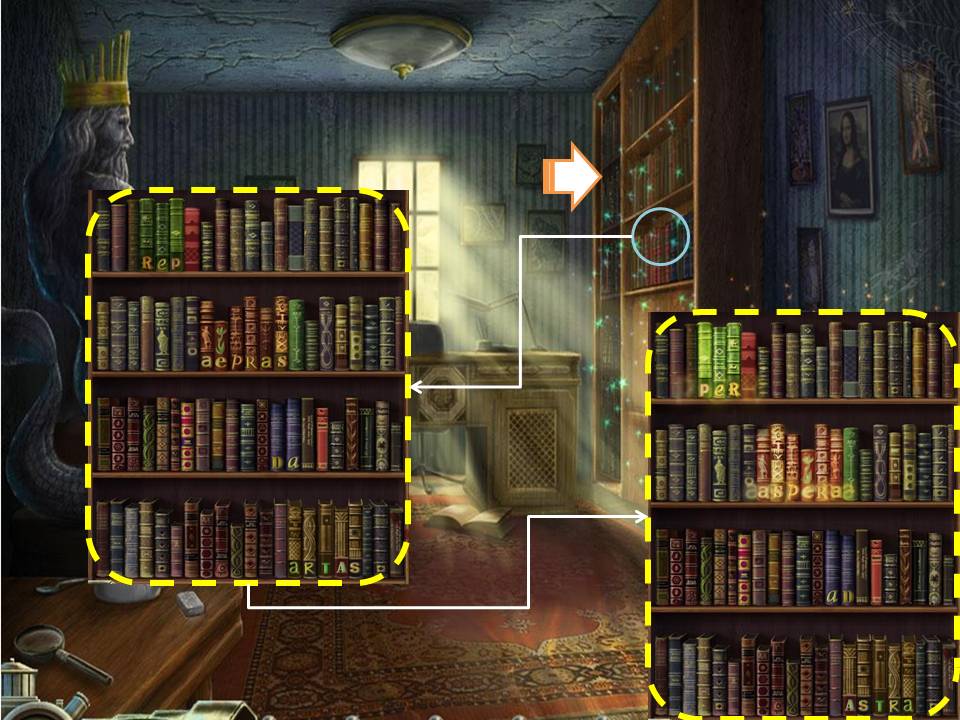
- Zoom in to the Book Case
- Place the 4 Books into the empty slots where their colors match.
- Re-arrange the Books to spell "Per Aspera ad Astera"
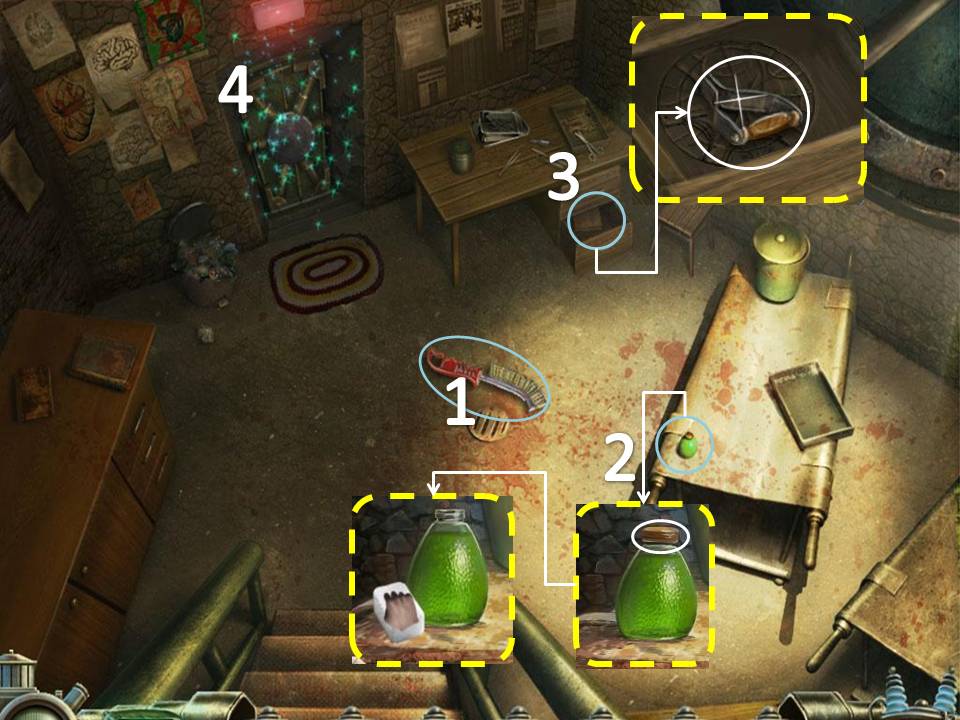
- Go through the opening
- Take the Brush on the ground.
- Zoom in to the Green vial on the table to the right. Take the top off.
- Use the Sugar on the vial to get "Poisoned Sugar"
- Zoom in to the drawer to the far right and take the Switch. Take note of the carved image.
- Play the puzzle on the door. After solving the puzzle, go through the door.
There are 4 disks. You must click two pieces on the same disk to swap their positions.
Once you get their positions right, you can rotate the disk.
Re-arrange and rotate the disks to get the image shown below.
If you cannot solve the puzzle, just wait for the "Skip" icon on the bottom right side to light up. It automatically solves the puzzle for you.

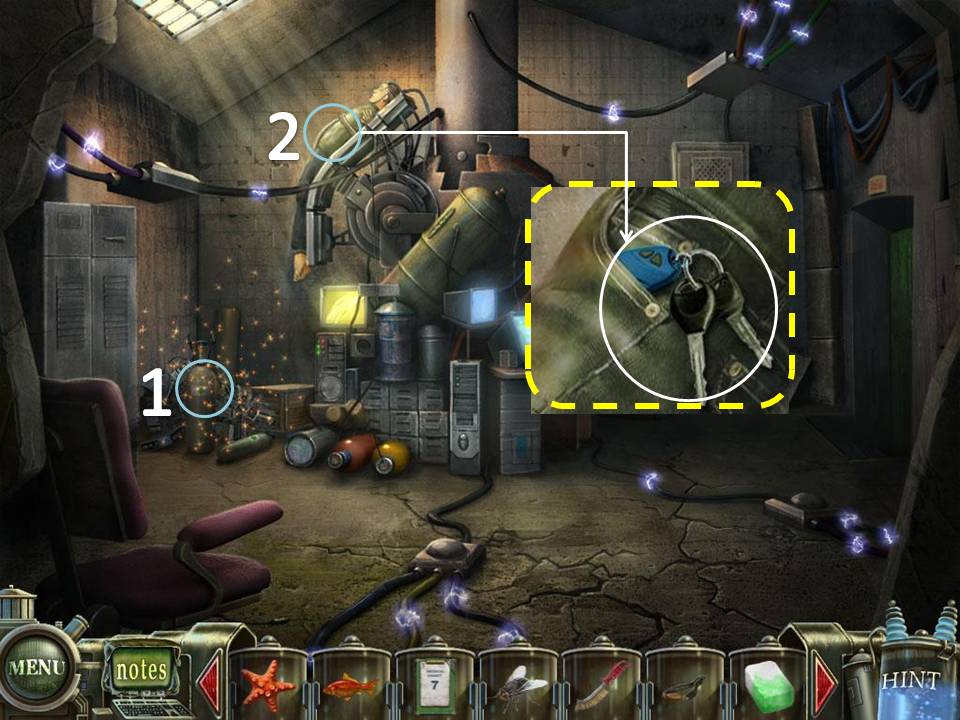
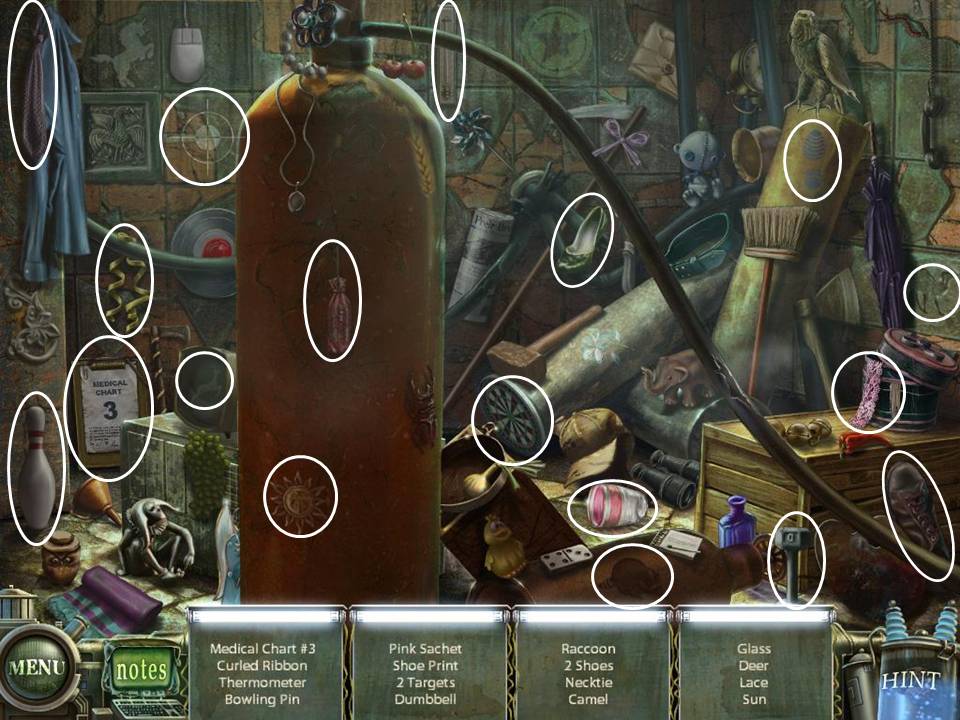
- Play the HOS. Medical Chart 3 will be added to your inventory
- Zoom in on Tim. Take the Keys. Go back to Neptune's Room.
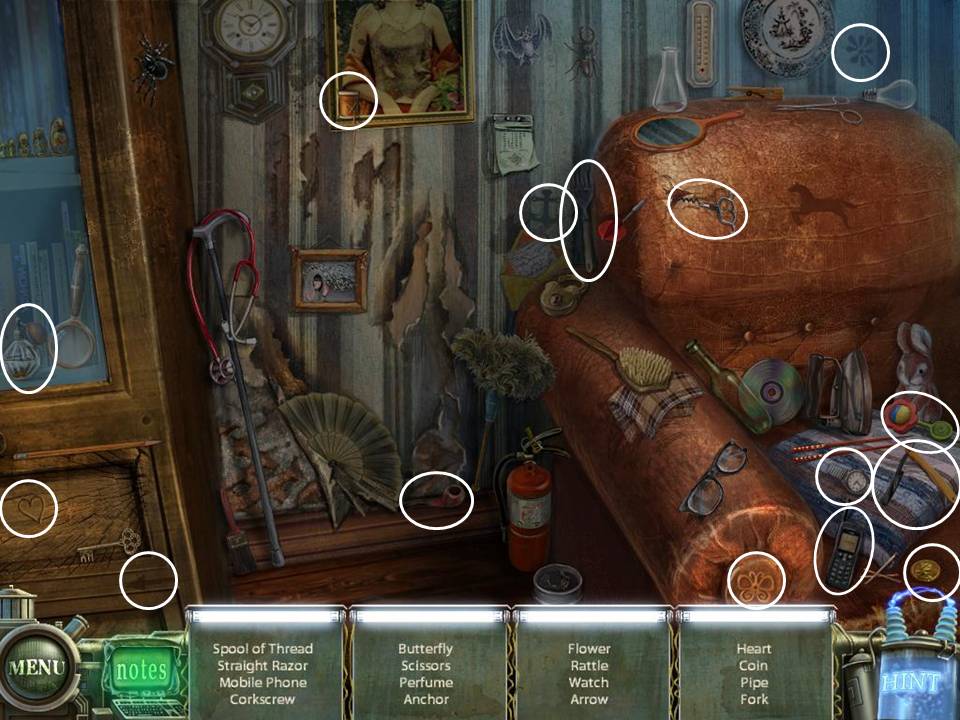
- Play the HOS. Corkscrew will be added to your inventory
- Go back to Tim's car outside the Sanitarium
- Play the HOS. Weight will be added to you inventory.
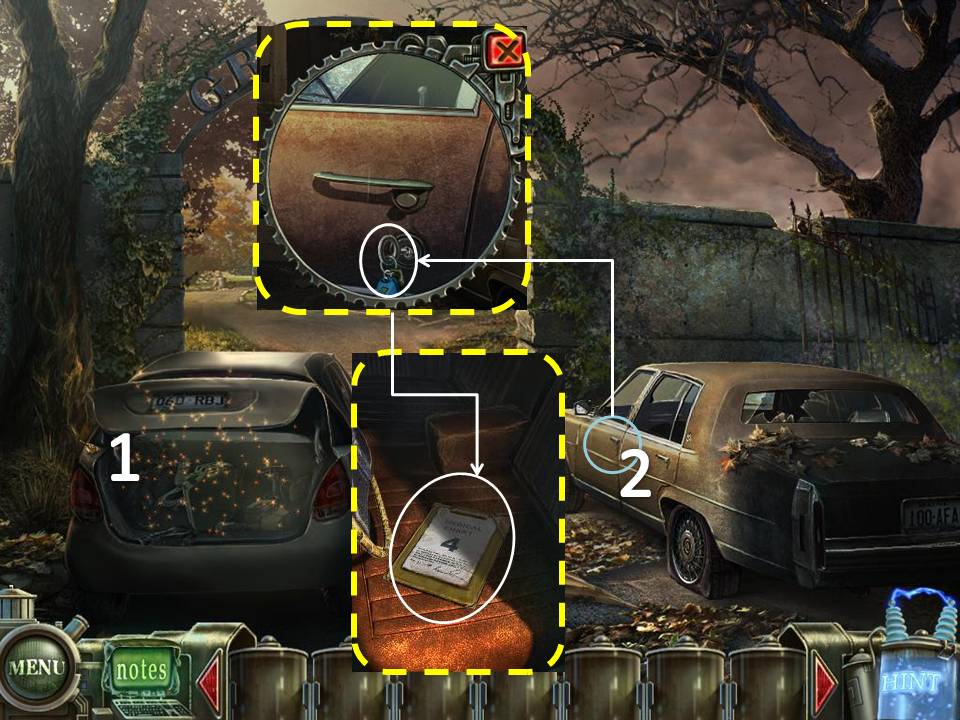
- Zoom in on Tim's Car door. Use the Key
- Take the Medical Chart 4. Go forward.
- Examine the Pipe to the right. Use the Corkscrew to get the Pump Plug.
- Go to the right side of the building.
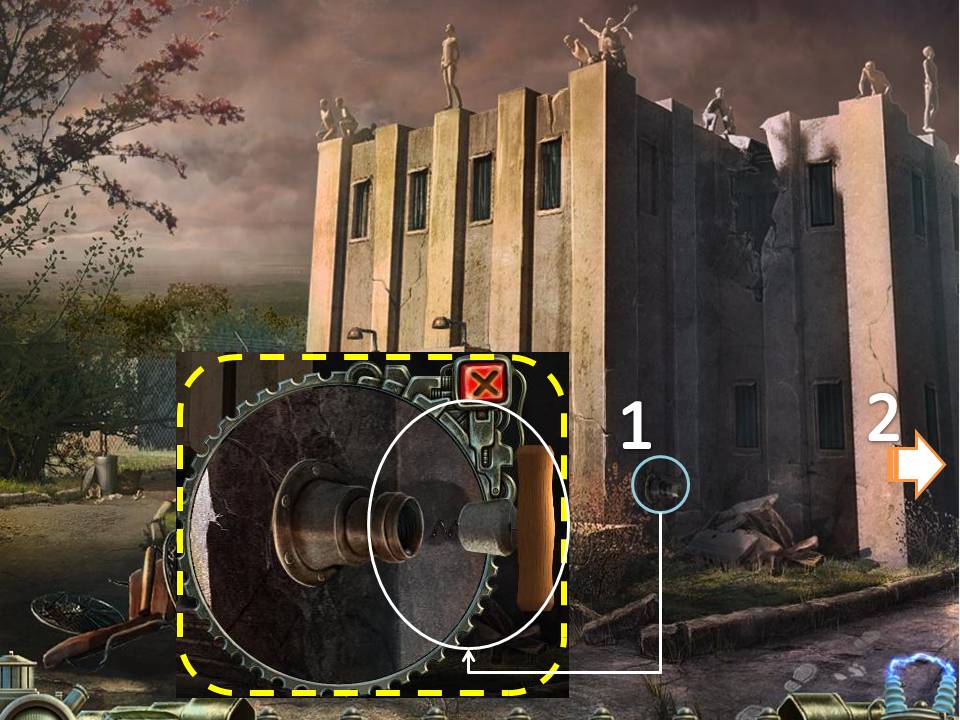
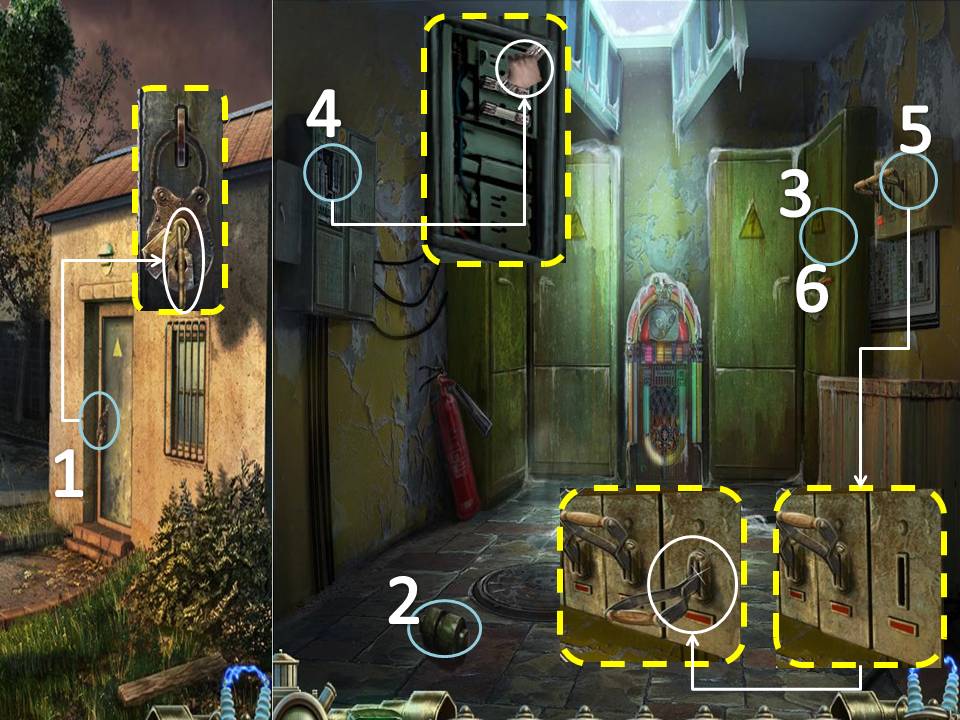
- Use the Key on the Padlock. Turn the key 3x to open the door.
- Take the Dynamo on the floor to the right.
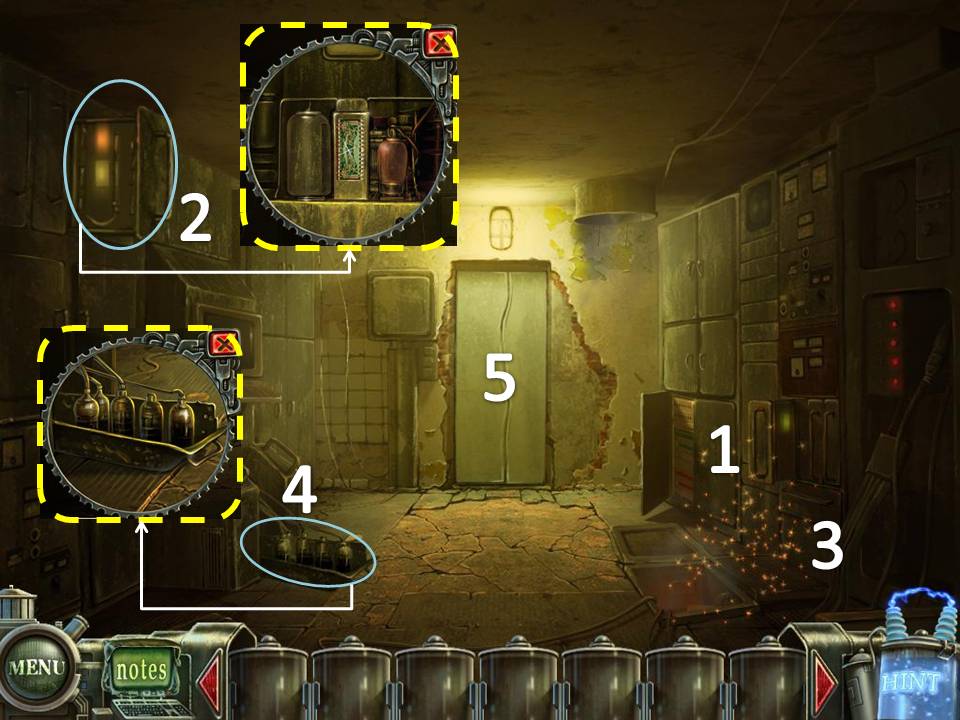
- Open the Locker to the right. Play the HOS. Fuse will be added to you inventory.
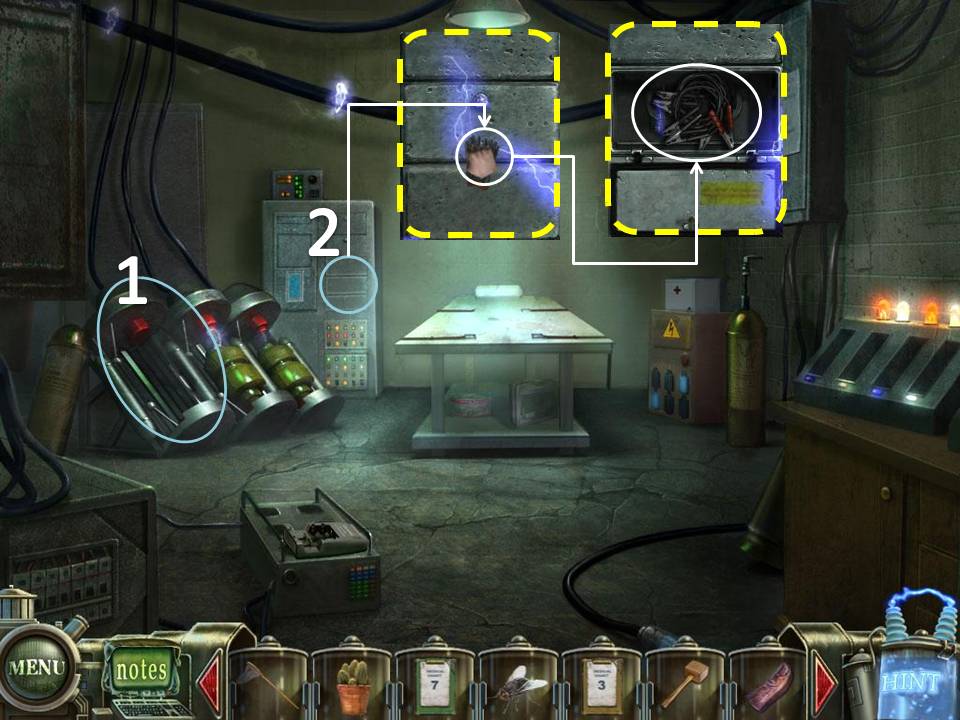
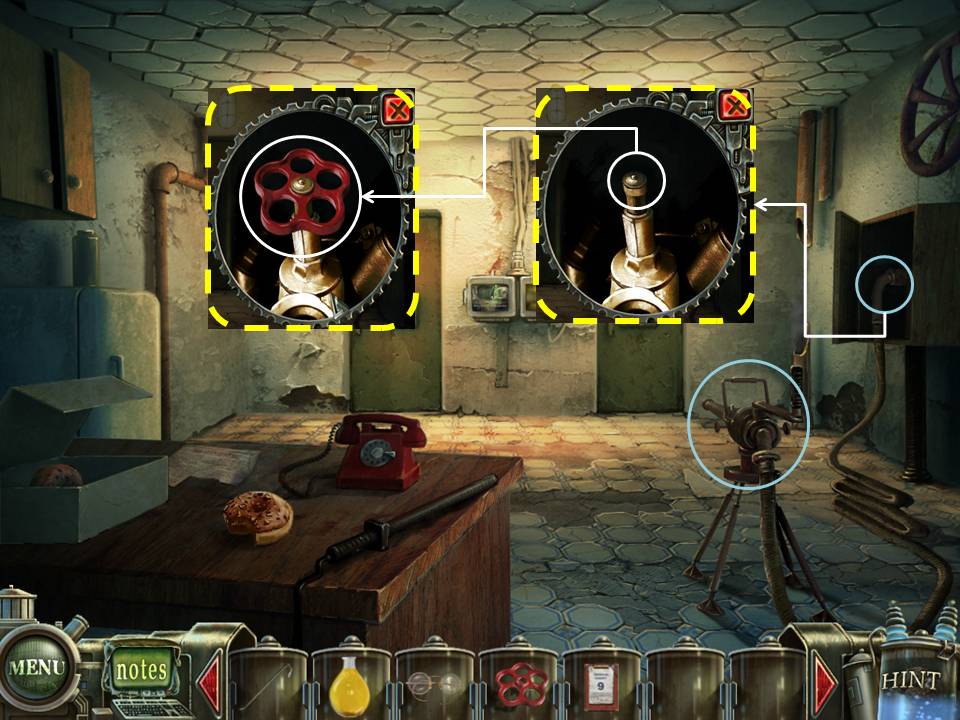
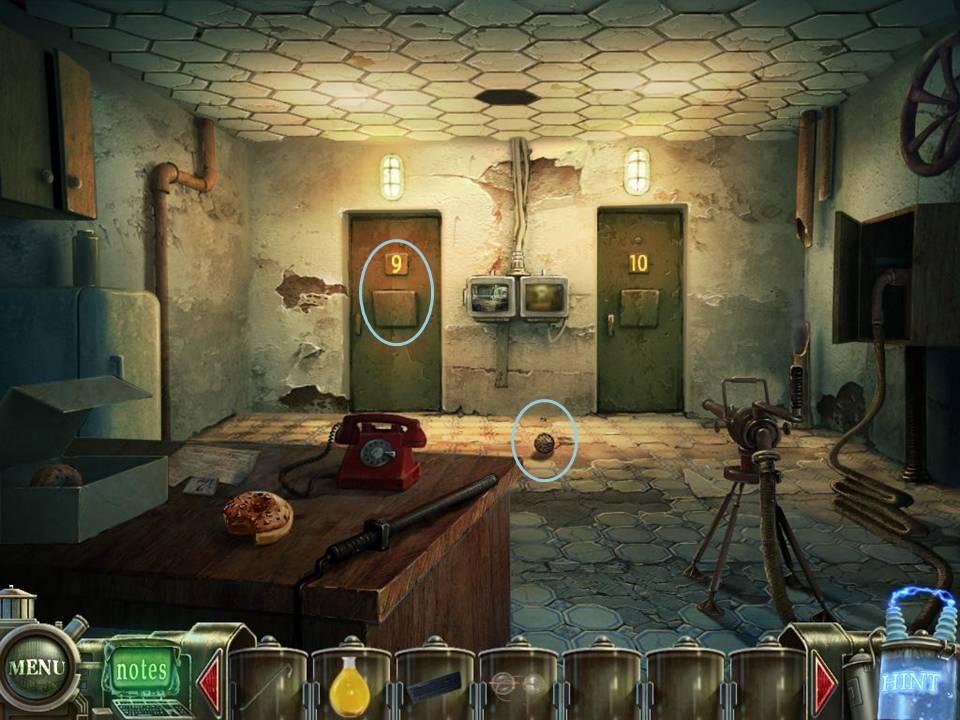
- Check the Fuse box on the upper left side. Place the Fuse on the empty slot.
- Click on the switches to the right. Place the Switch on the empty slot. Flip the Switch.
- Play the HOS. Rubber Gloves will be added to you inventory. Go back inside the Sanitarium.
- Go inside the 1st door to the left.
- Place the Dynamo on the empty slot on mechanism to the left.
- Examine the cabinet on the back wall. USe the Rubber Gloves to take the Wires.
- Exit the room and enter the first room to the right
- Use the Pump Plug on the large pipe on the upper left side.
- Examine the Pump on the ground. Use the Brush on the dirty parts of the Pump.
- Press the Red Button
- Dolphin Puzzle will be added to you inventory. Exit the room
- Place Medical Chart 2 on the door to the far right.

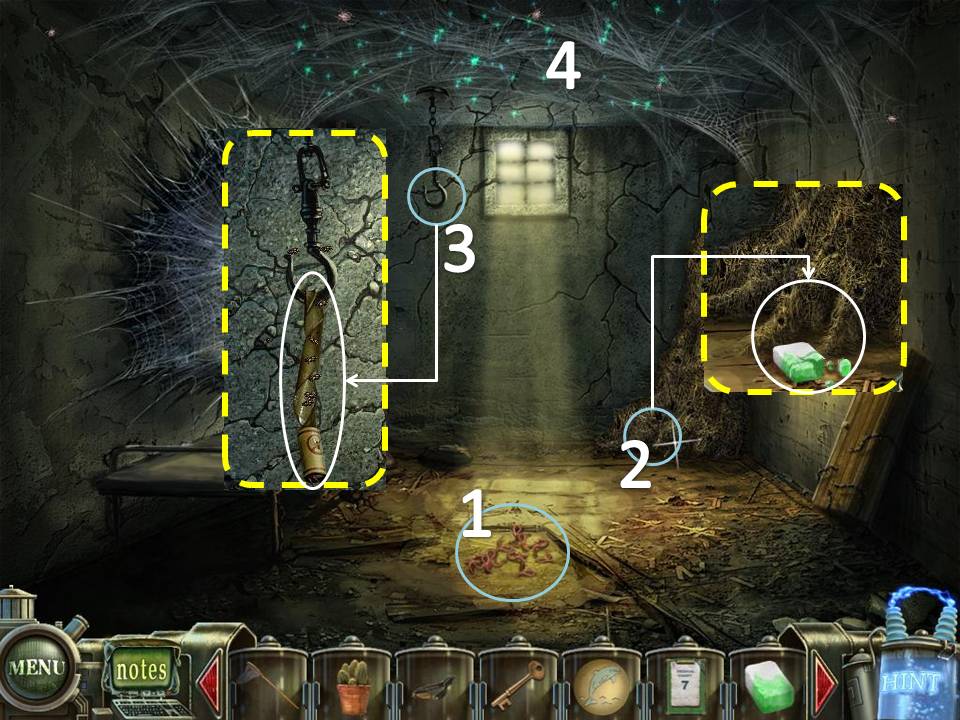
- Click on the Worms on the ground to get Worm.
- Examine the Ant Hill on the right corner of the room. Use the Poisoned Sugar.
- Examine the Hook on the right. Use the Flypaper. Fly will be added to you inventory
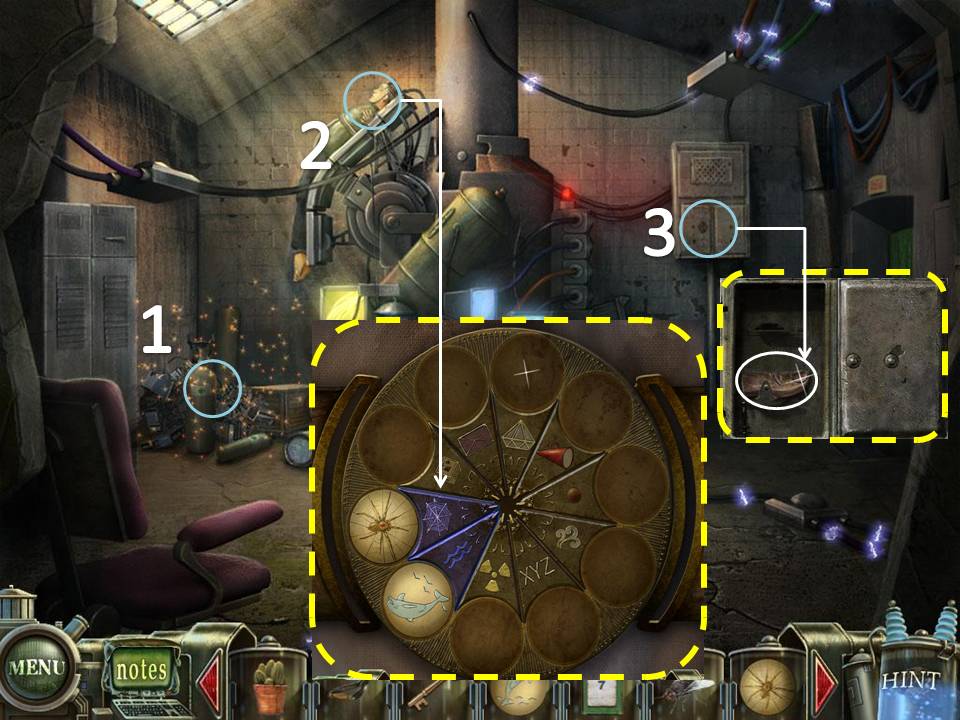
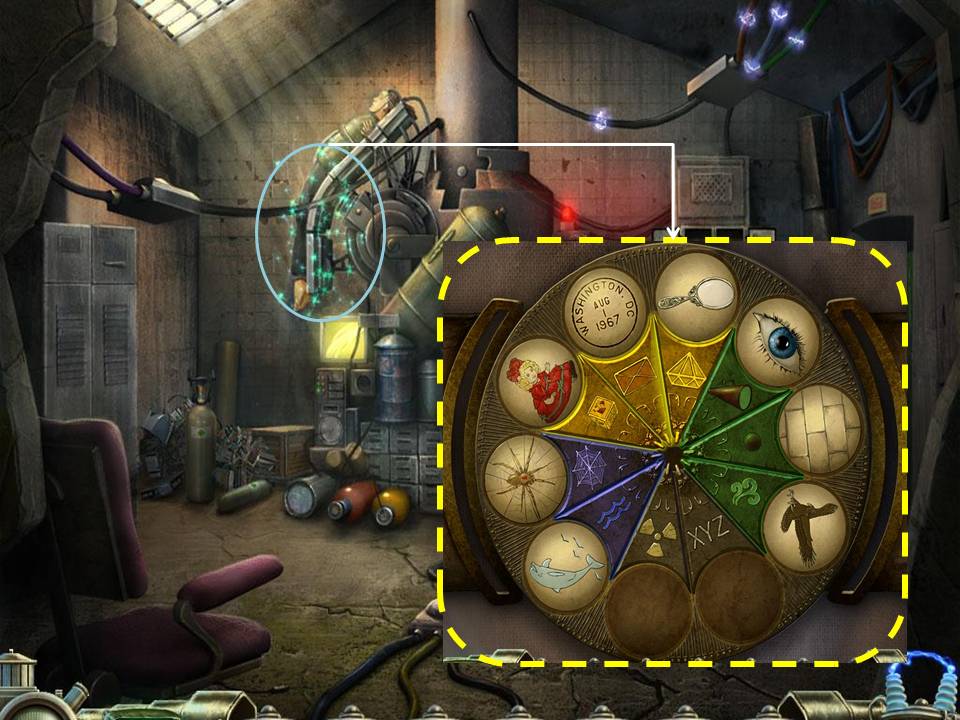
- Click on the ceiling to start a puzzle.
Drag the triangular pieces in the center of the puzzle. Once a piece is in the center, right click on it to rotate it.
Re-arrange the pieces to form the image shown below.
If you cannot solve the puzzle, just wait for the "Skip" icon on the bottom right side to light up. It automatically solves the puzzle for you.
Re-arrange the pieces to form the image shown below.
If you cannot solve the puzzle, just wait for the "Skip" icon on the bottom right side to light up. It automatically solves the puzzle for you.
- Go to the Graveyard outside the Sanitarium
- Use the Worm on the Crow.
- Wait for the Crow to go down on the ground. Use the Net to catch the Crow.
- Go back to Insect Room.
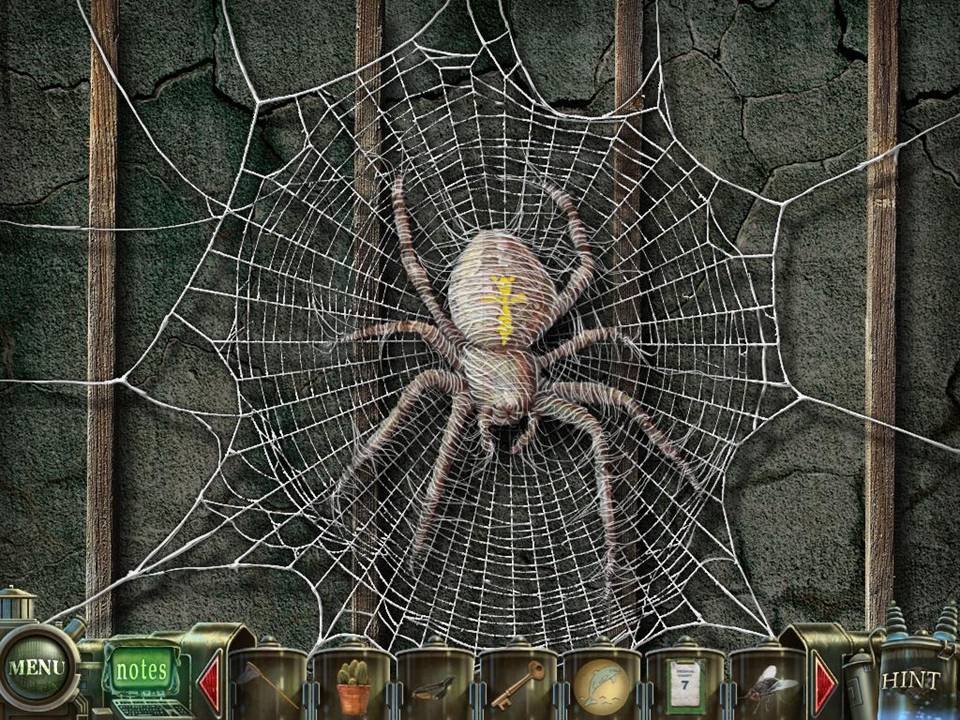
- Place the Crow on the ground where the worms are. The Spider Puzzle will be added to your inventory
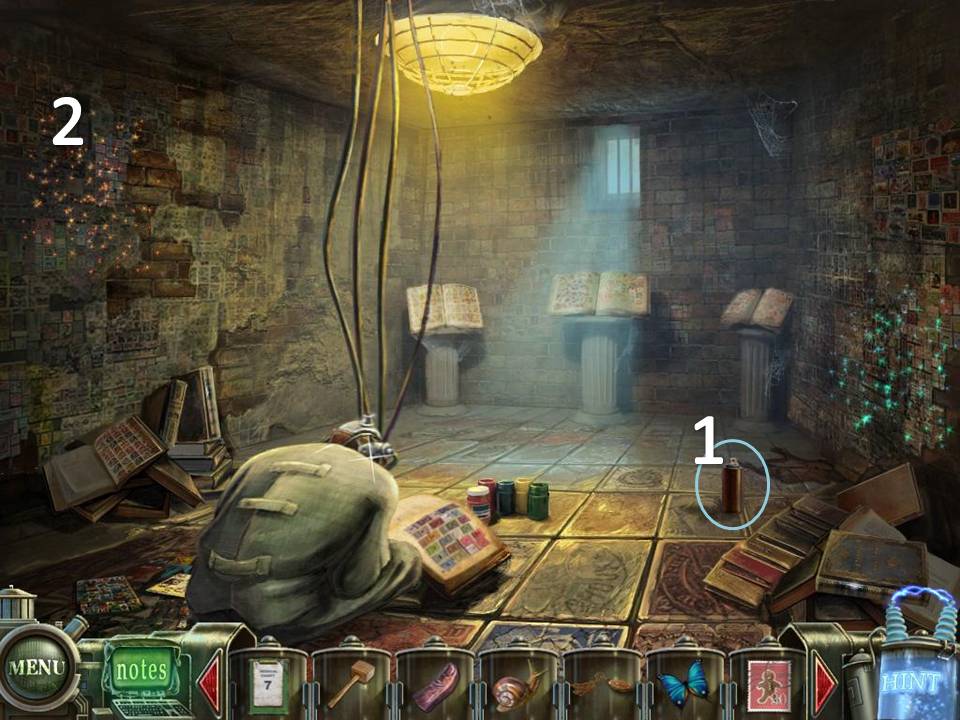
- Go back to the Basement where Tim is.
- Play the HOS. Mallet will be added to you inventory.
- Click on Tim to access a Puzzle. Place the Dolphin and Spider Puzzle as shown below.
- Take the Thumb (1/2) on the cabinet on the back wall.
- Go back upstairs to the Hallway.
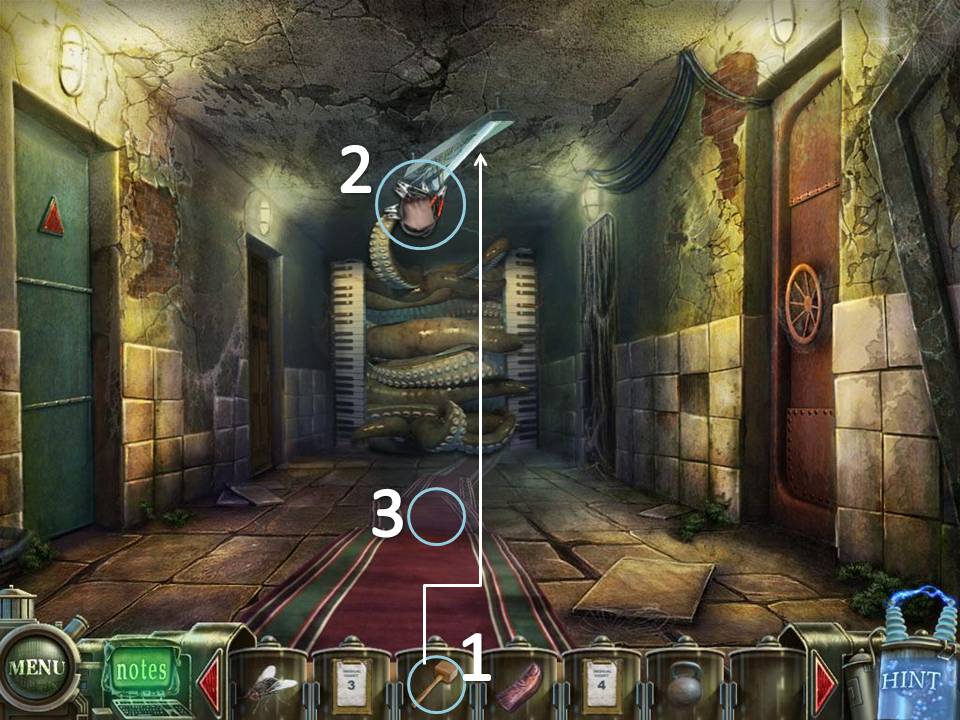
- Smash the Lights with the Mallet.
- Use the Wires on the Lights.
- After the Tentacles leave, take the Rug.
- Go upstairs.
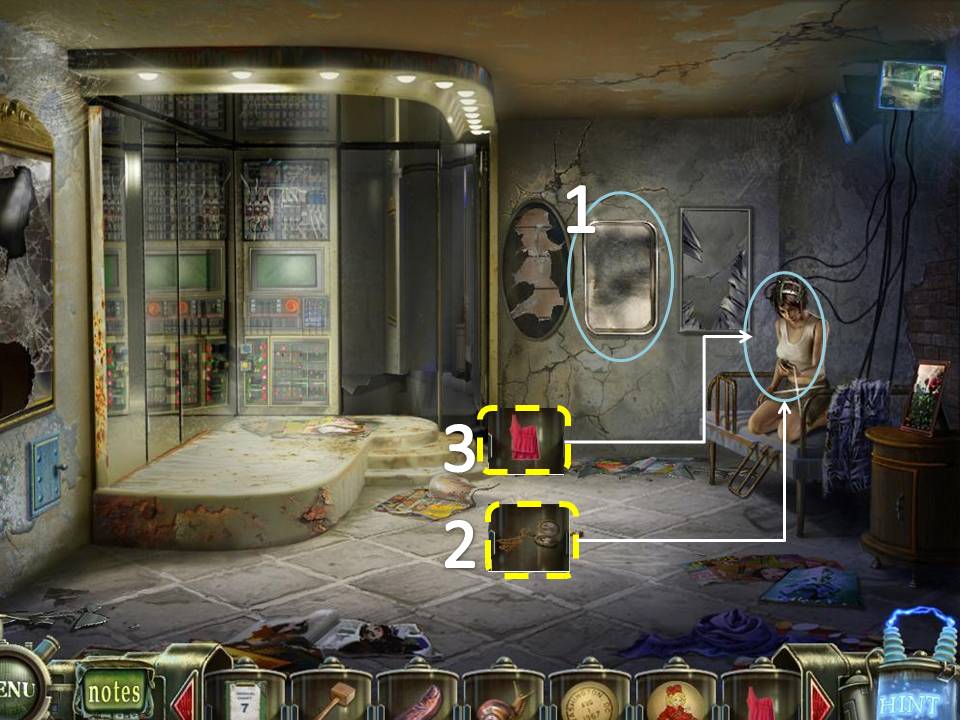
Part 3: Sanitarium, 2nd floor
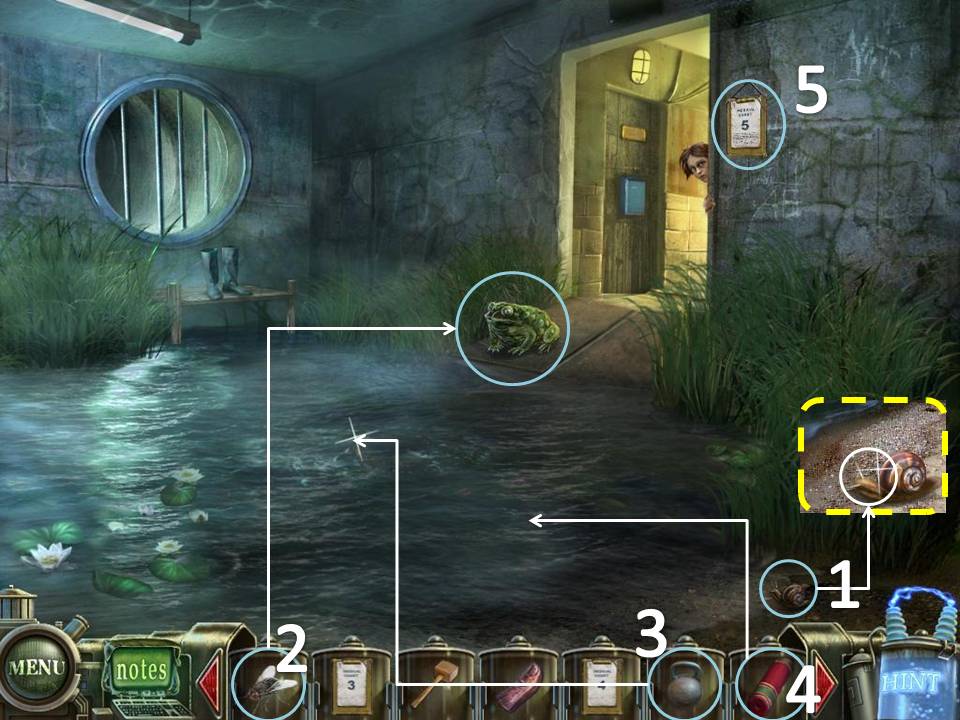
- Click on the lower right corner. Take the Snail.
- Give the Fly to the Frog.
- Use the Weight on the Octopus.
- Put the Rug on the ground.
- Take Medical Chart 5 from the wall.
- Go towards the Hallway
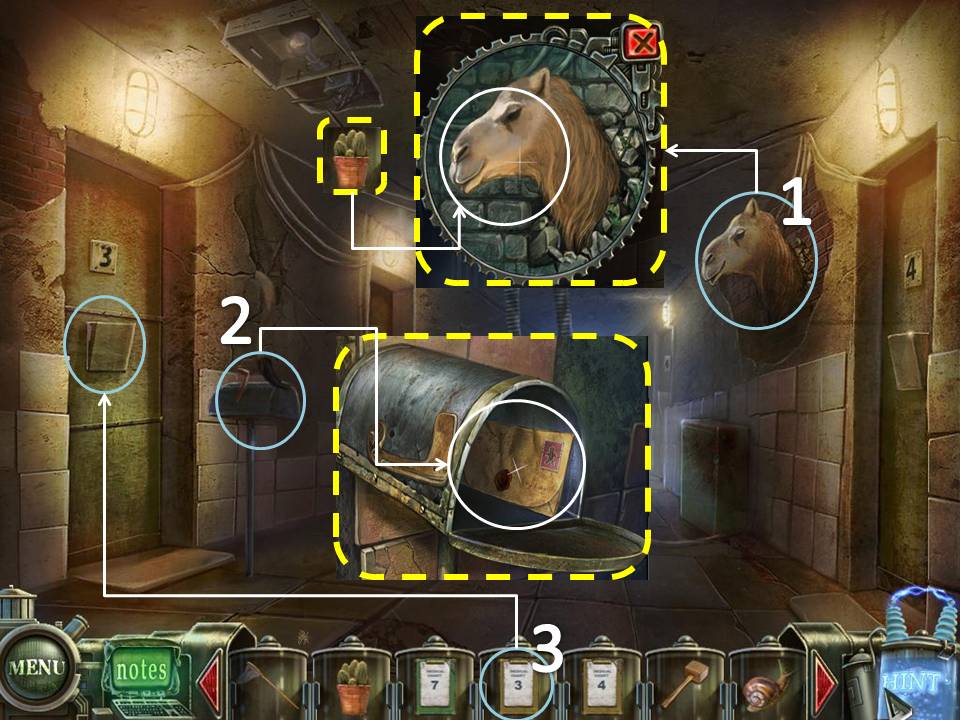
- Zoom in on the Camel head on the upper right wall. Use the Cactus on the Camel.
- Take the Sealed Letter on the mailbox to the left.
- Place Medical Chart 3 on Room #3 to go through the room.
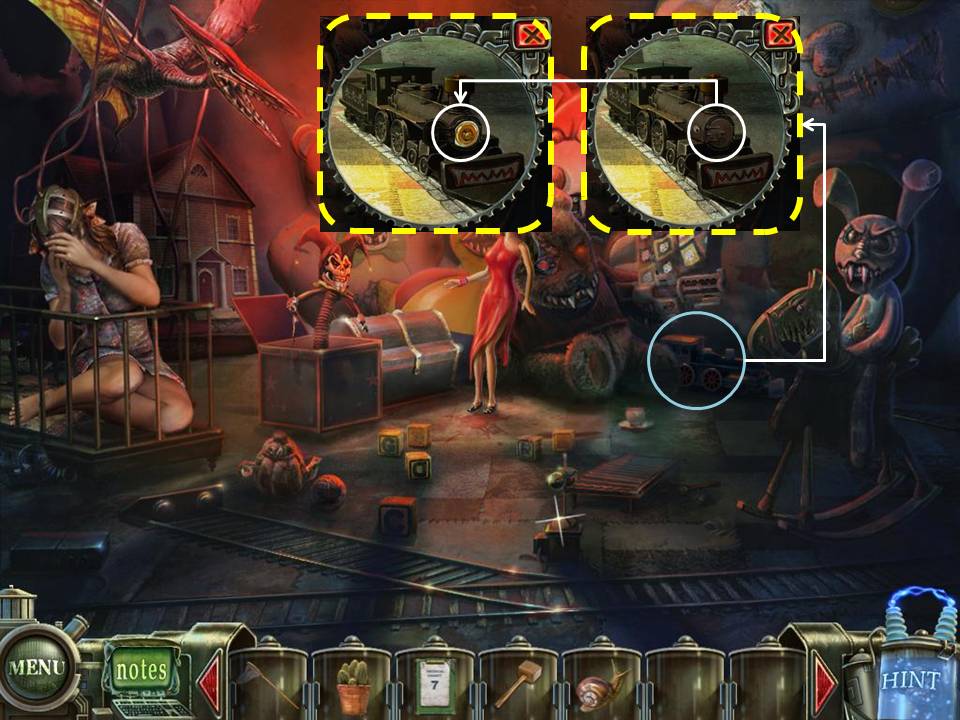
- Click on the Train on the right. Take the Dead Battery.
- Go back to the 1st flr Reception Area.
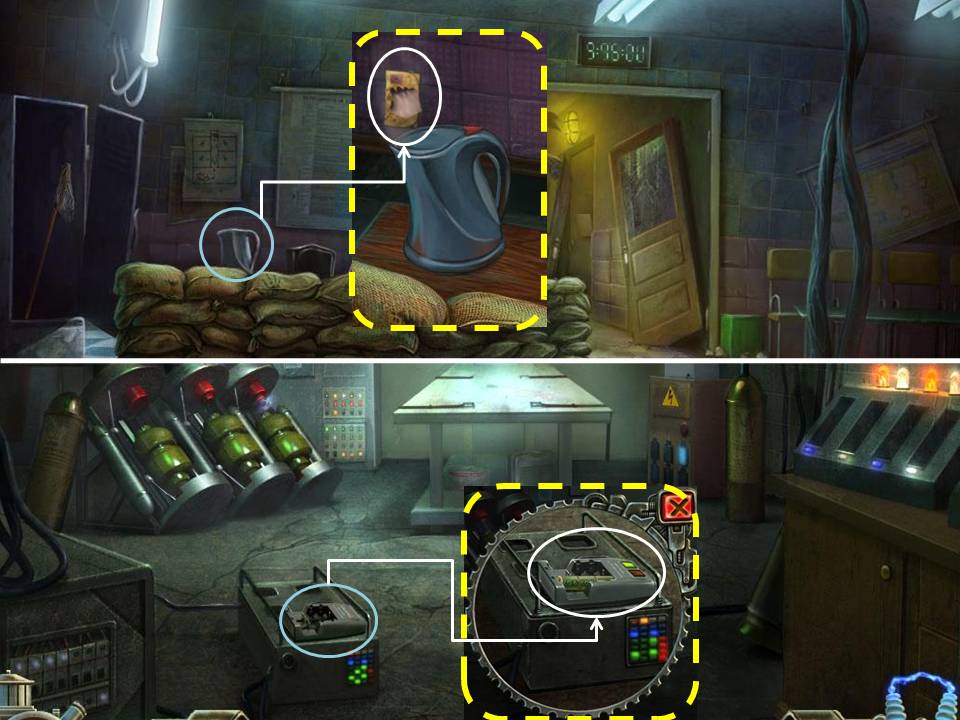
- Zoom in on the Coffee Pot. Click on it to release steam. Place the Sealed Letter above the steam to get the Child's Stamp
- Go back to the 1st flr Hallway. Take the 1st door on to the left.
- Examine the Battery Charger on the bottom of the screen. Place the Dead Battery to get the Charged Battery.
- Go back to the Toy Room
- Click on the Clown. Take the Lever.
- Examine the Control on the ground. Place the Lever on it. Click on the Lever.
- Zoom in on the Train. Place the Charged Battery on it. Close the lid.
- When the Train stops moving, click on its back compartment. Take the Carrot.
- Use the Carrot on the Rabbit.
- Exit the room. Place Medical Chart 4 and 5 on their respective doors. Go through Room 4.
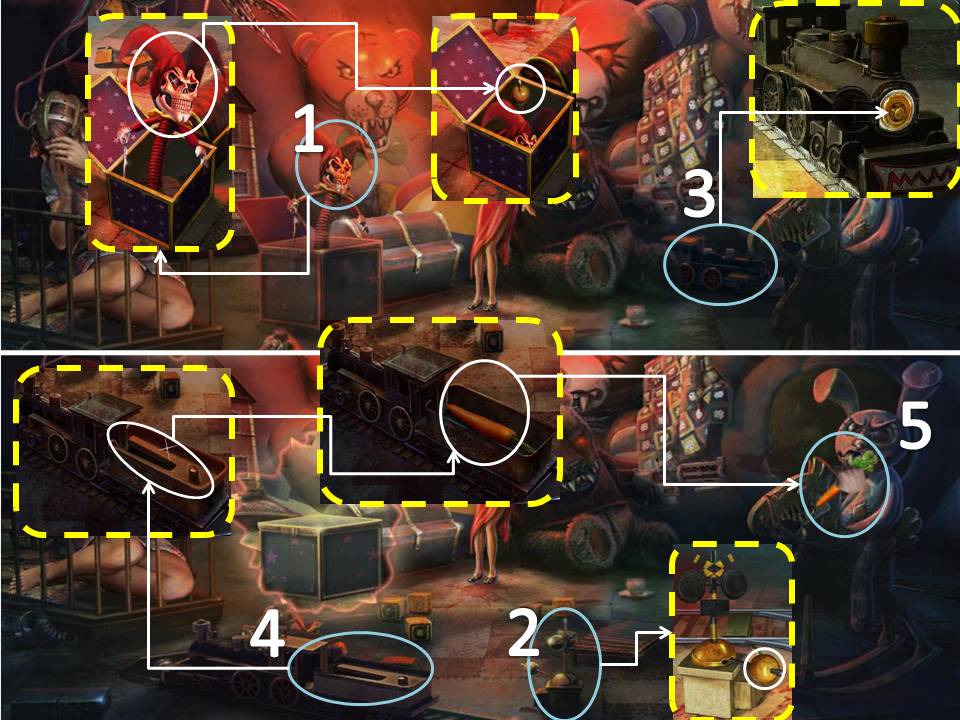
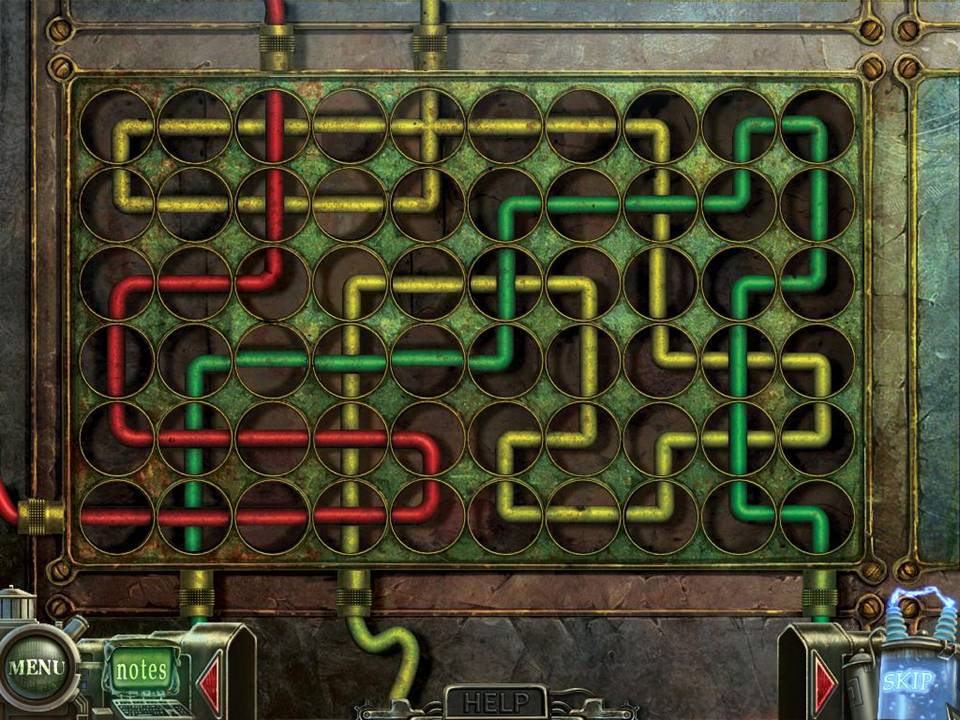
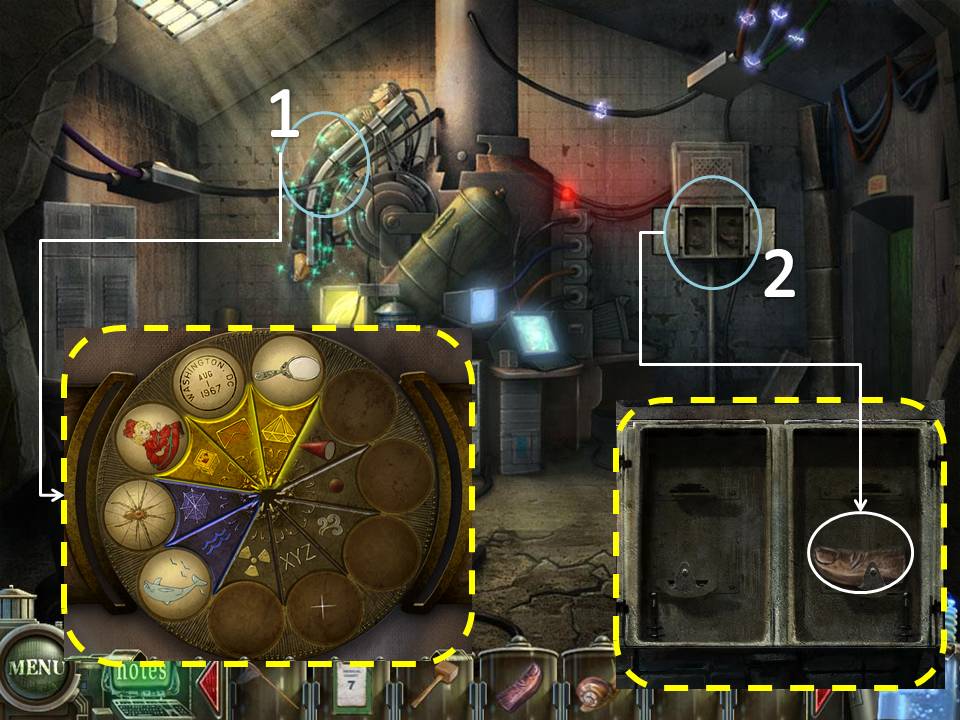
- Play the Puzzle on the far left side of the room.
Rearrange
the circular pieces by rotating them to connect all the wires with the
same color to the port of their designated color.
The picture should look as shown below.
If you cannot solve the puzzle, just wait for the "Skip" icon on the bottom right side to light up. It automatically solves the puzzle for you.
The picture should look as shown below.
If you cannot solve the puzzle, just wait for the "Skip" icon on the bottom right side to light up. It automatically solves the puzzle for you.
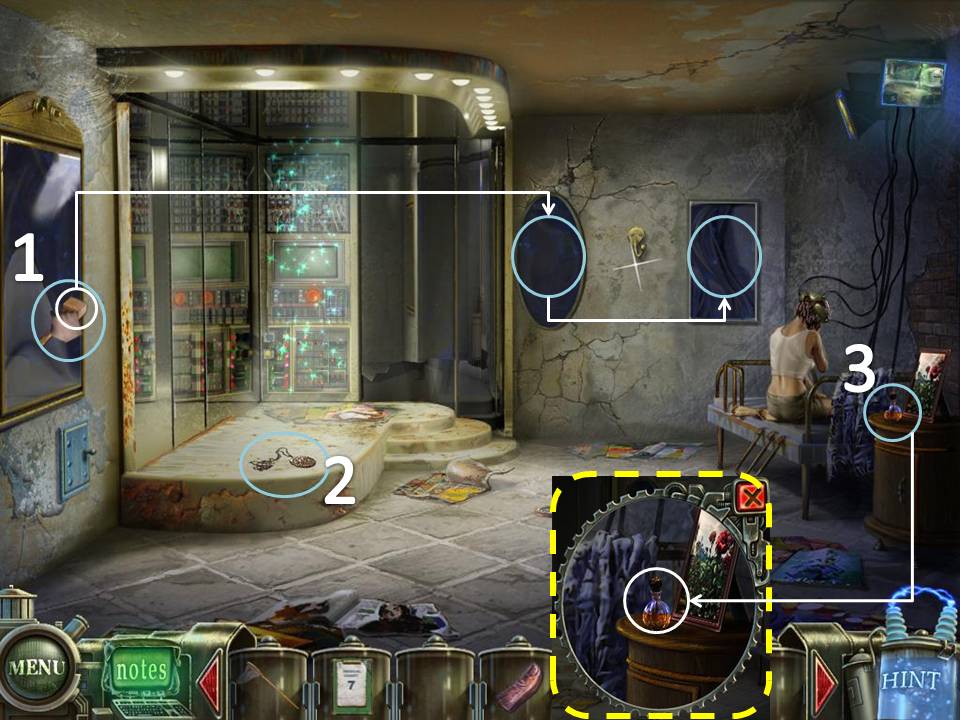
- Break the 3 Mirrors using the Mallet.
- Take the Medallion on the floor.
- Examine the table beside the bed on the right. Take the Rose Oil.
- Head to Room 5
- Play the puzzle on the right wall. Ship Stamp will be added to your inventory after finishing the Puzzle
Move the stamps around so that the Ship Stamp can reach the exit on the other side.
There are 4 Panels to be solved.
The Solutions are shown below.
If you cannot solve the puzzle, just wait for the "Skip" icon on the bottom right side to light up. It automatically solves the puzzle for you.
There are 4 Panels to be solved.
The Solutions are shown below.
If you cannot solve the puzzle, just wait for the "Skip" icon on the bottom right side to light up. It automatically solves the puzzle for you.
- Take the Polish on the ground
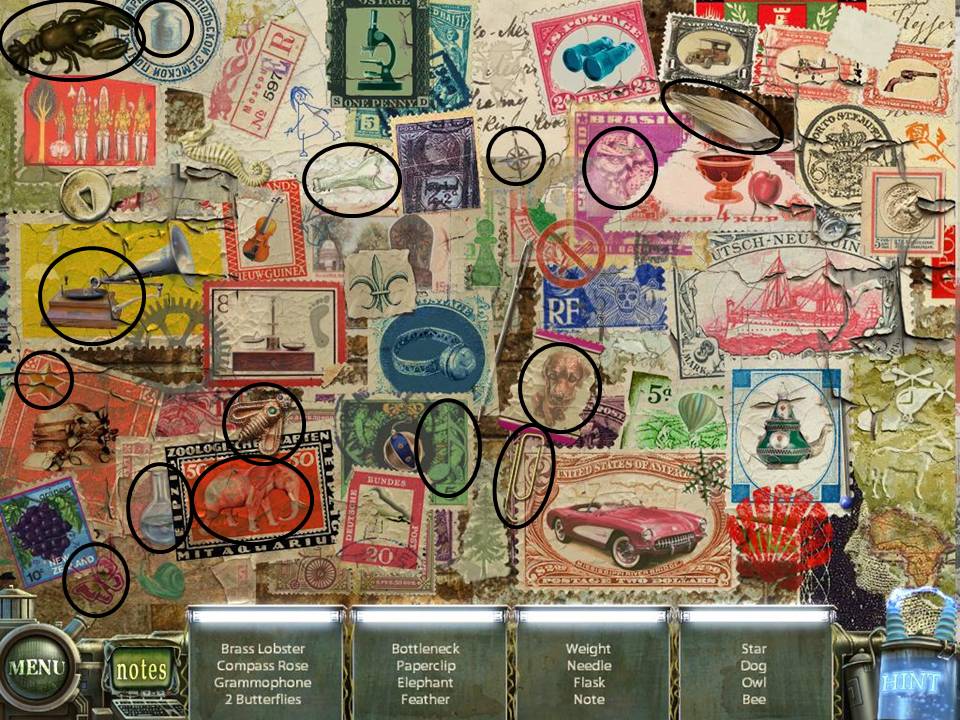
- Play the HOS. Brass Lobster will be added to you inventory.
- Exit the Room and head towards the Graveyard.
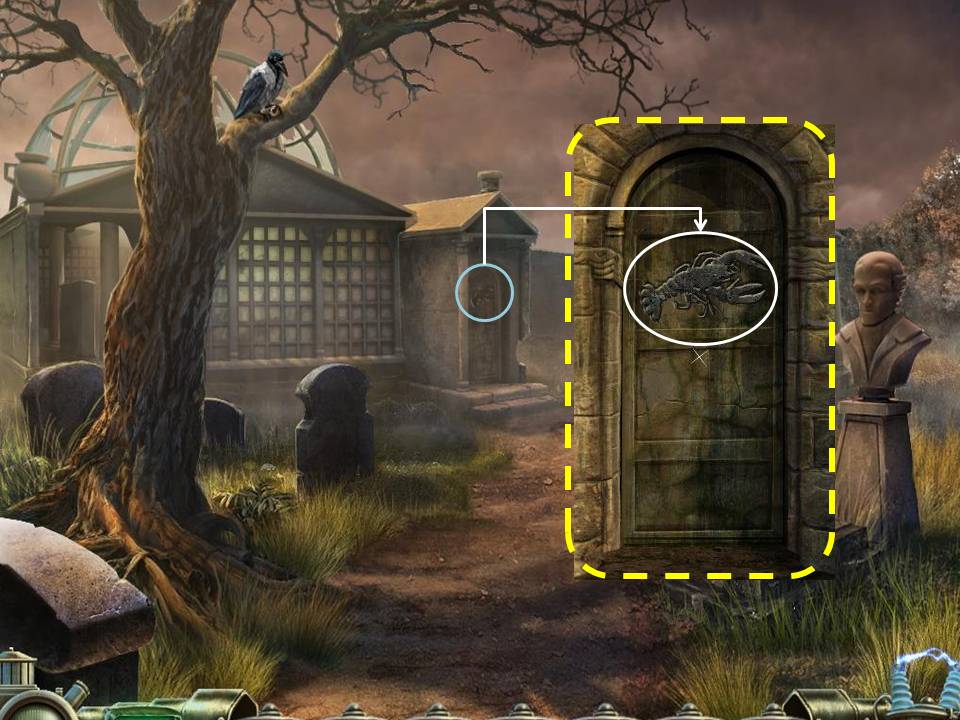
- Zoom in on the Mausoleum to the right.
- Use the Brass Lobster on the door. Go through the door.
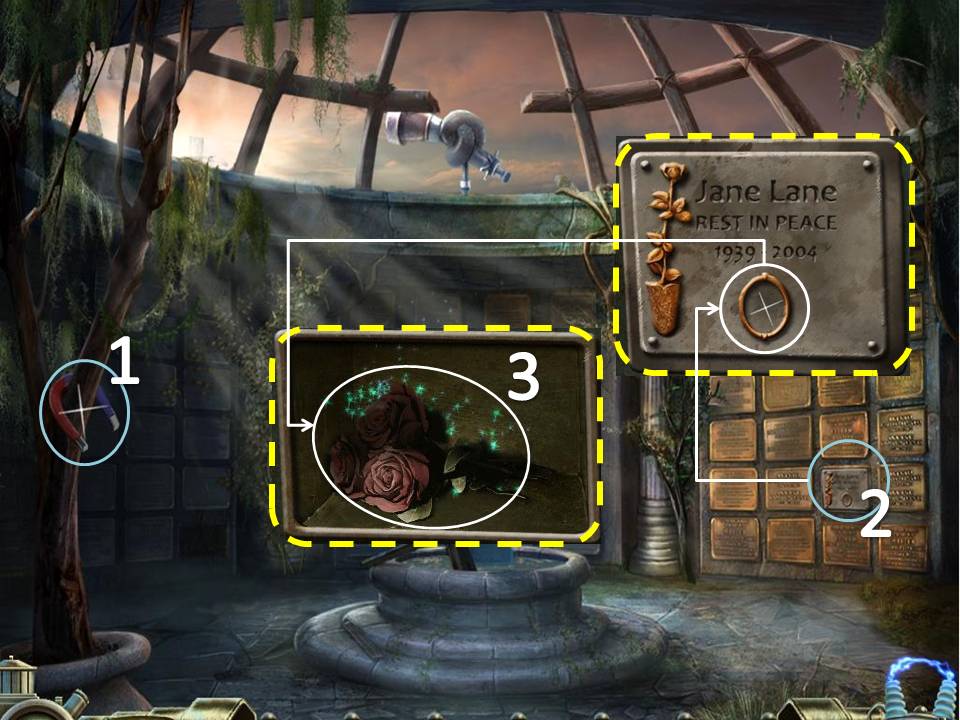
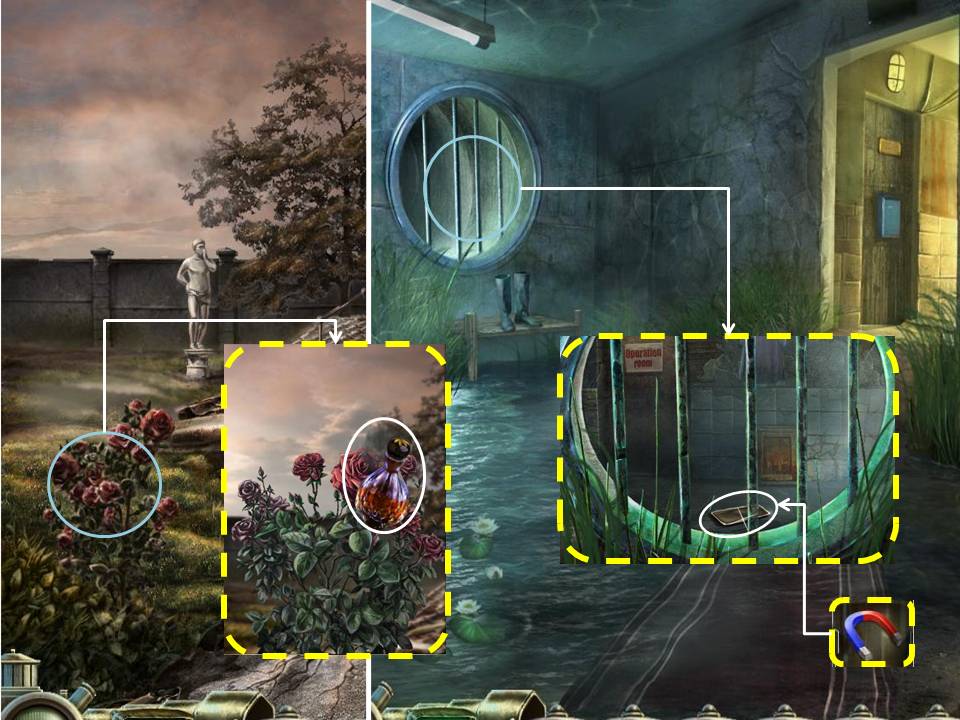
- Take the Magnet on the branches on the left side
- Examine the Plaque on the right with the small circle.
- Place the Medallion in the circle. Get the Dried Flowers
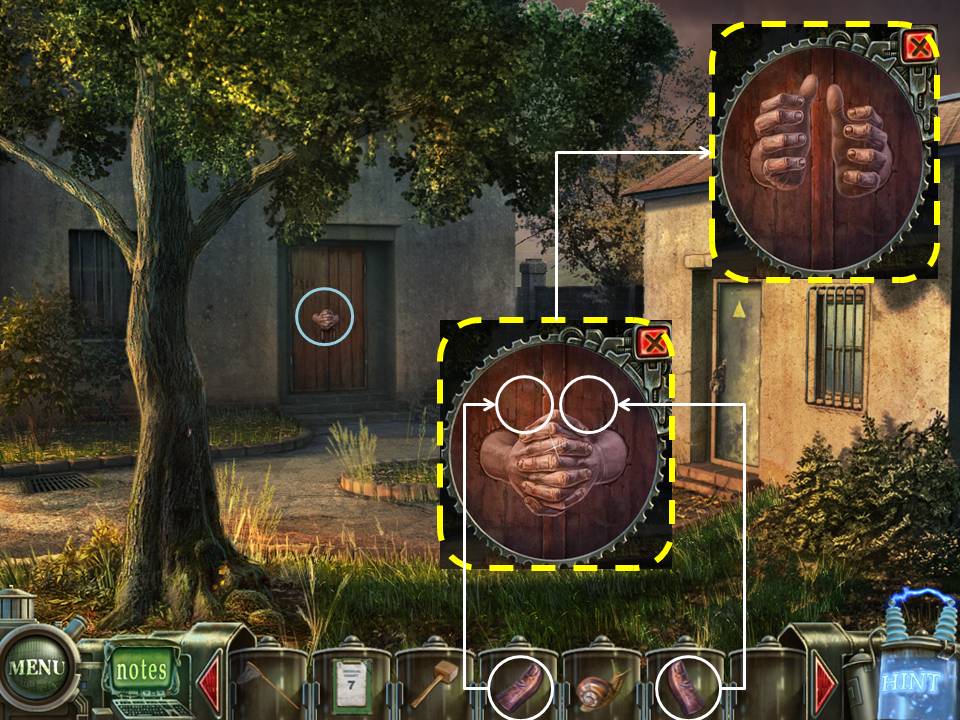
- Click on the Puzzle. Medallion will be added to your inventory after finishing the Puzzle
Rearrange the two pictures on either sides of the locket.
Once you have placed a piece on the correct place, you wont be able to move it.
Arrange the pieces to match the picture shown below
If you cannot solve the puzzle, just wait for the "Skip" icon on the bottom right side to light up. It automatically solves the puzzle for you.
Once you have placed a piece on the correct place, you wont be able to move it.
Arrange the pieces to match the picture shown below
If you cannot solve the puzzle, just wait for the "Skip" icon on the bottom right side to light up. It automatically solves the puzzle for you.
- Exit the Mausoleum and the graveyard. Turn right.
- Examine the Rose bush to the left.
- Use the Rose Oil. Use the Net to get the Butterfly
- Go back to the 2nd floor.
- Zoom in on the Bars.
- Use the Magnet to get the Tray.
- Head towards the 2nd flr Hallway
- Enter the Stamp Room
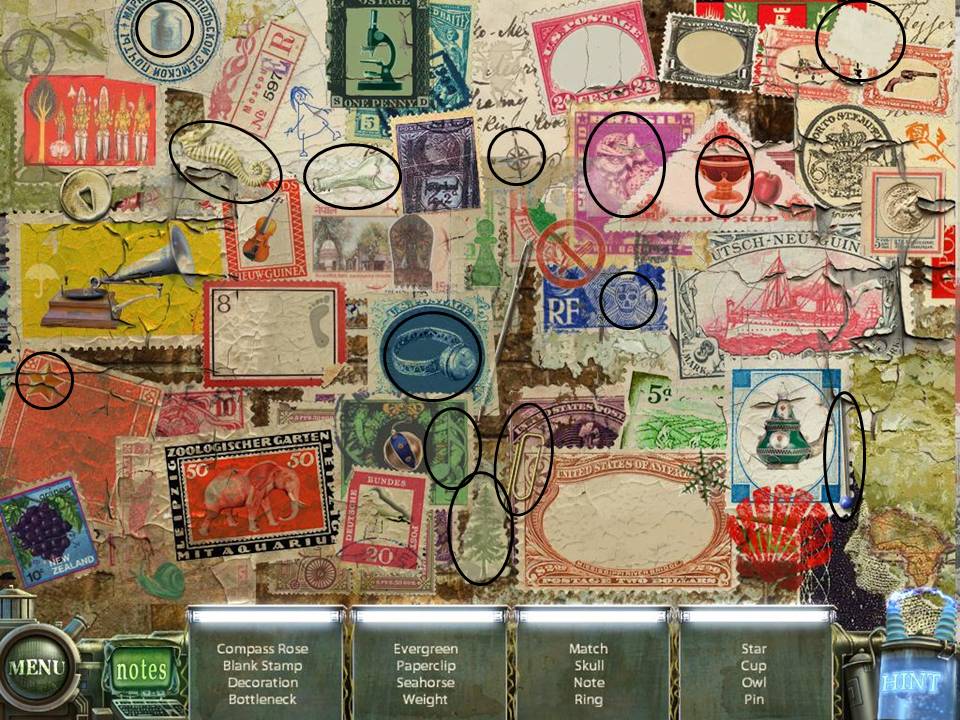
- Play the HOS. Blank Stamp will be added to your inventory.
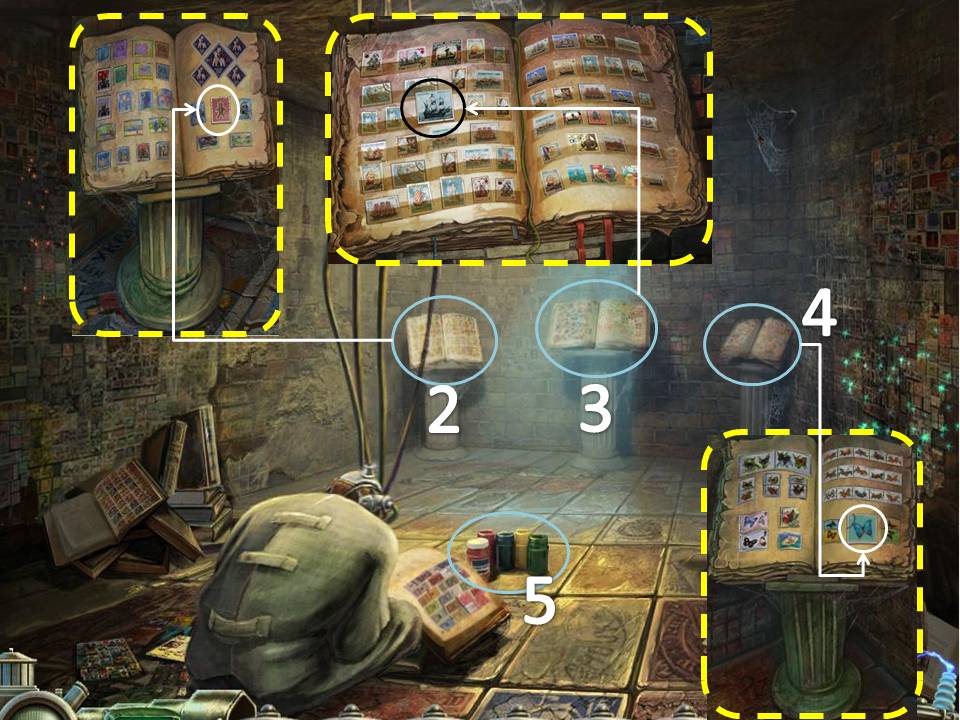
- Examine the left pedestal, place the Child's Stamp on the book.
- Examine the middle pedestal, place the Ship Stamp on the book.
- Examine the right pedestal, place the Blank Stamp on the book. Place the Butterfly over the Blank Stamp. Stamp Puzzle will be added to you inventory.
- Zoom in on the Paint on the floor. Use the Dried Flowers on the Paint to get the Bright Flowers.
- Exit the room and enter the Toy Room.
- Use Bright Flowers on the Doll
- Click on the Doll to get the Dress
- Doll Puzzle will be added to you inventory.
- Exit the Room and enter the Mirror Room.
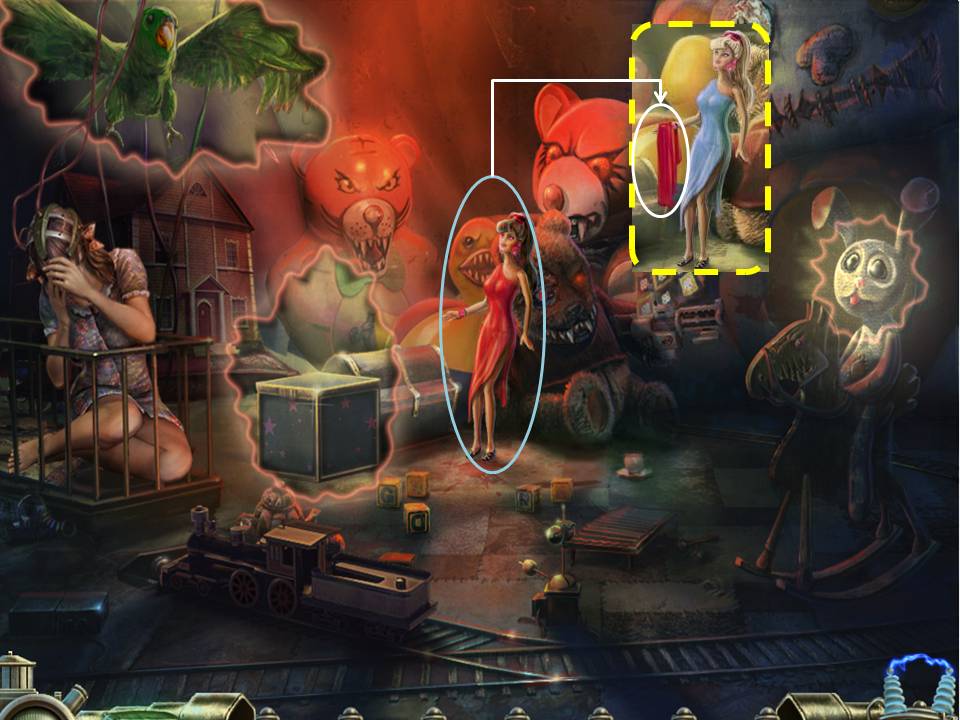
- Place the Tray on the Hook on the far wall. Use the Polish on the Tray.
- Give the Medallion to the Girl
- Give the Dress to the Girl
- Mirror Puzzle will be added to you inventory.
- Go back to the basement where Tim is.
- Click on Tim. Place the Stamp Puzzle, Doll Puzzle and Mirror Puzzle on the device as shown below.
- Take the Thumb (2/2) on the cabinet on the back wall.
- Go outside the Sanitarium. Head to the right of the building.
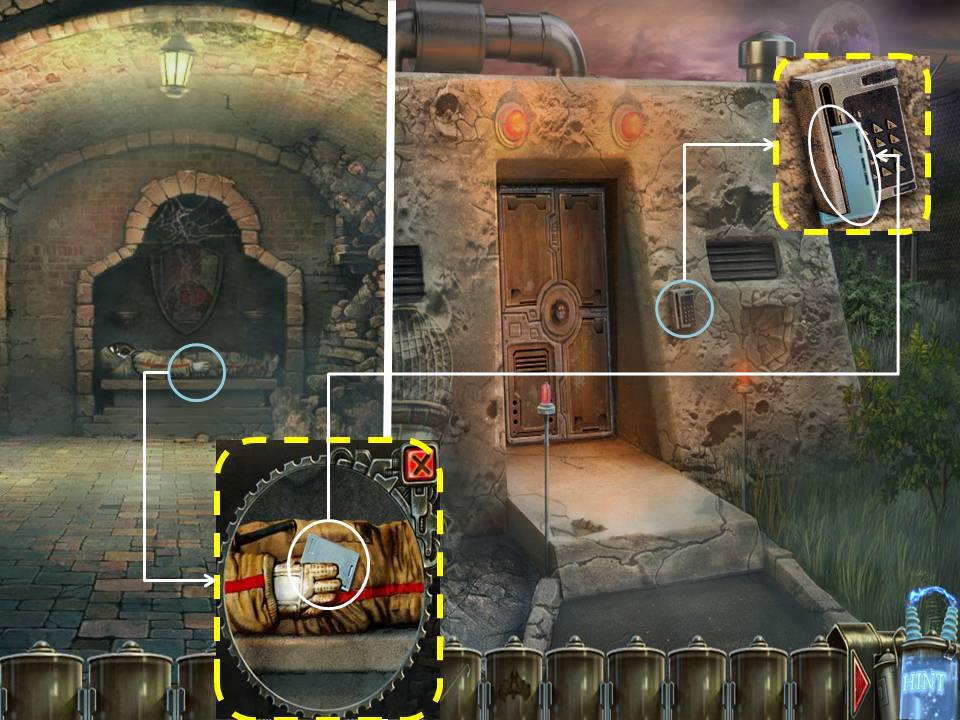
Part 4: Sanitarium, Back Door
- Zoom in on the Door. Place the 2 Thumbs to open the Door and go inside.
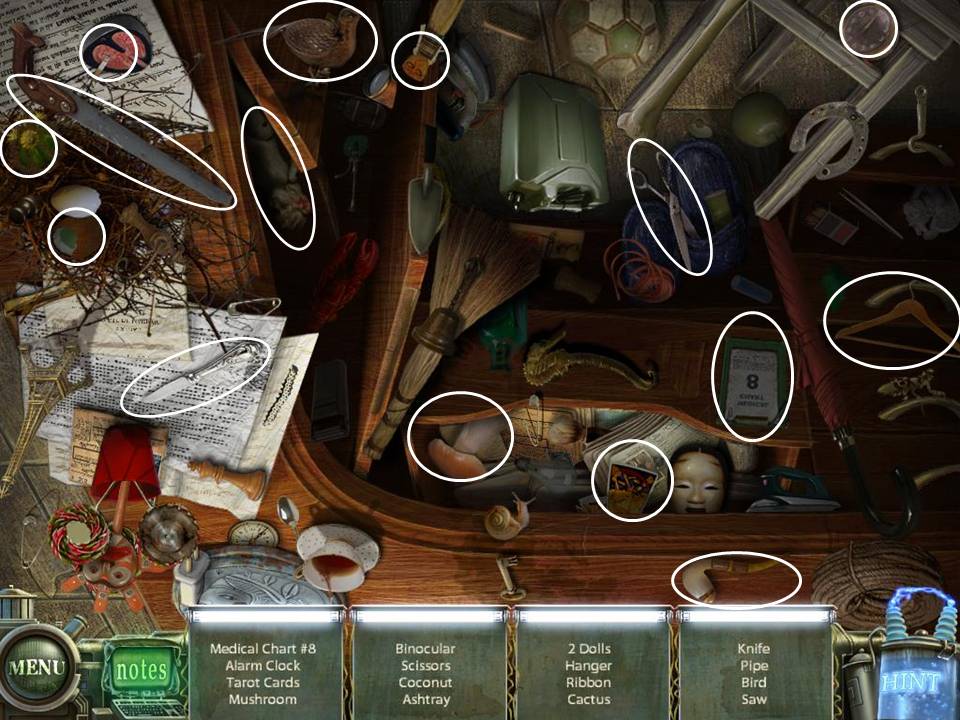
- Play the HOS. Medical Chart 8 will be added to you inventory.
- Click on the left lamp. Remove the cover and take the Lightbulb
- Take the right entrance.
- Take the Engine Rotor on the right corner
- Enter the Operating Room
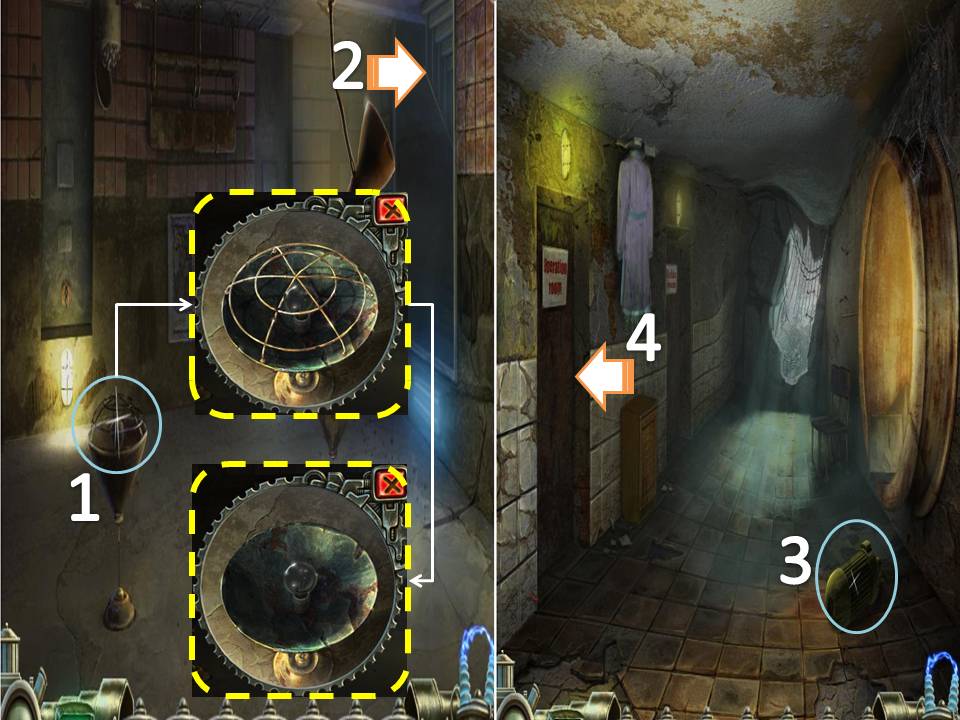
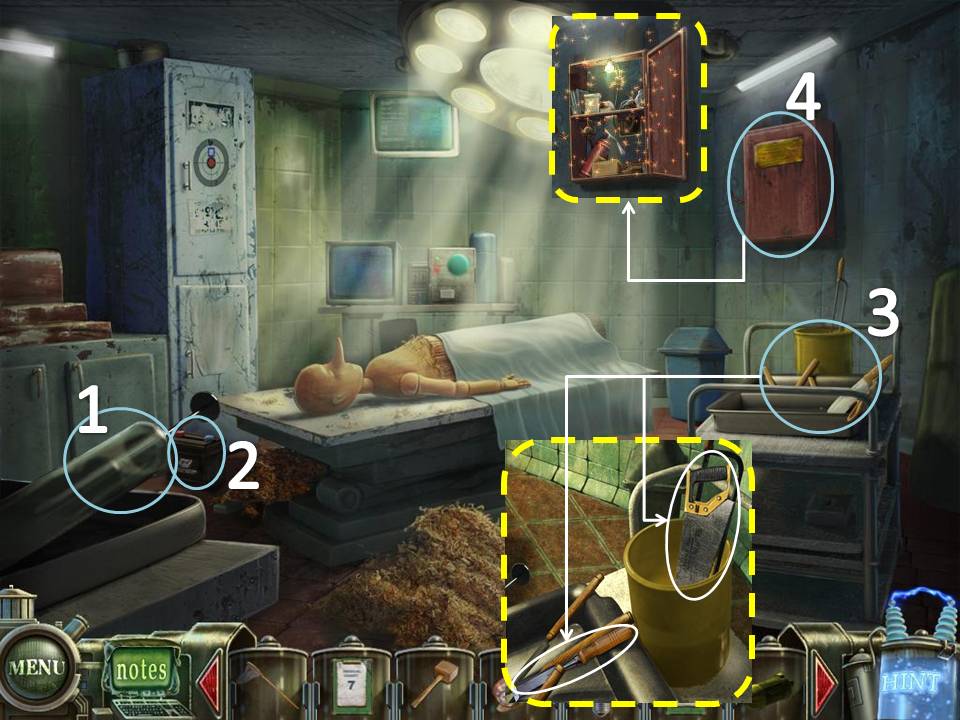
- Take the Syringe on the left.
- Take the Engine Accumulator above the bed
- Examine the tray to the right. Grab the Chisel and the Saw.
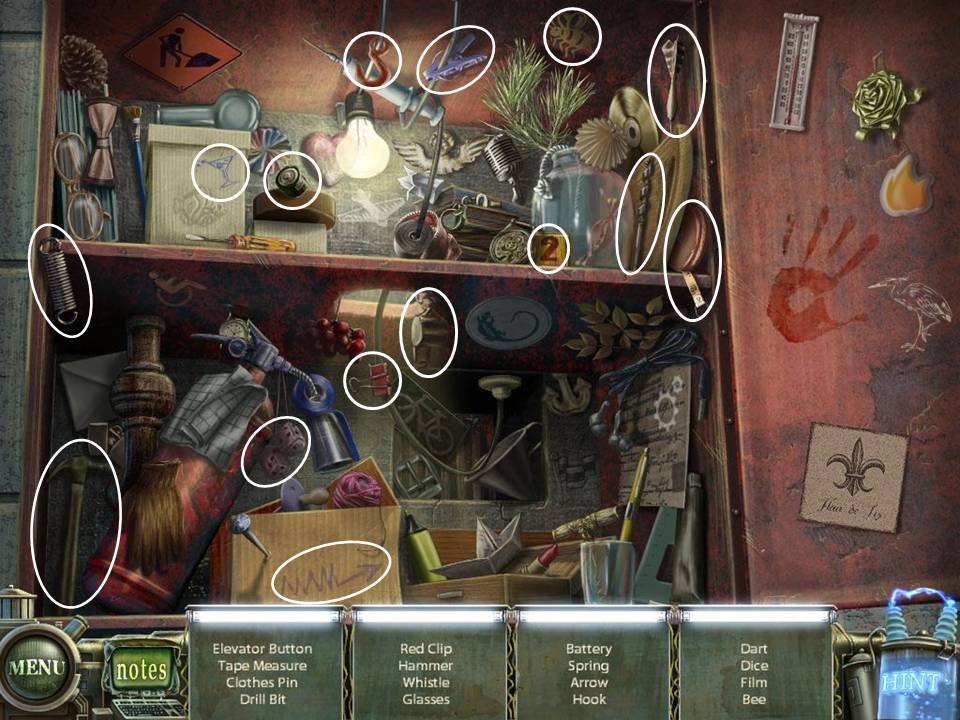
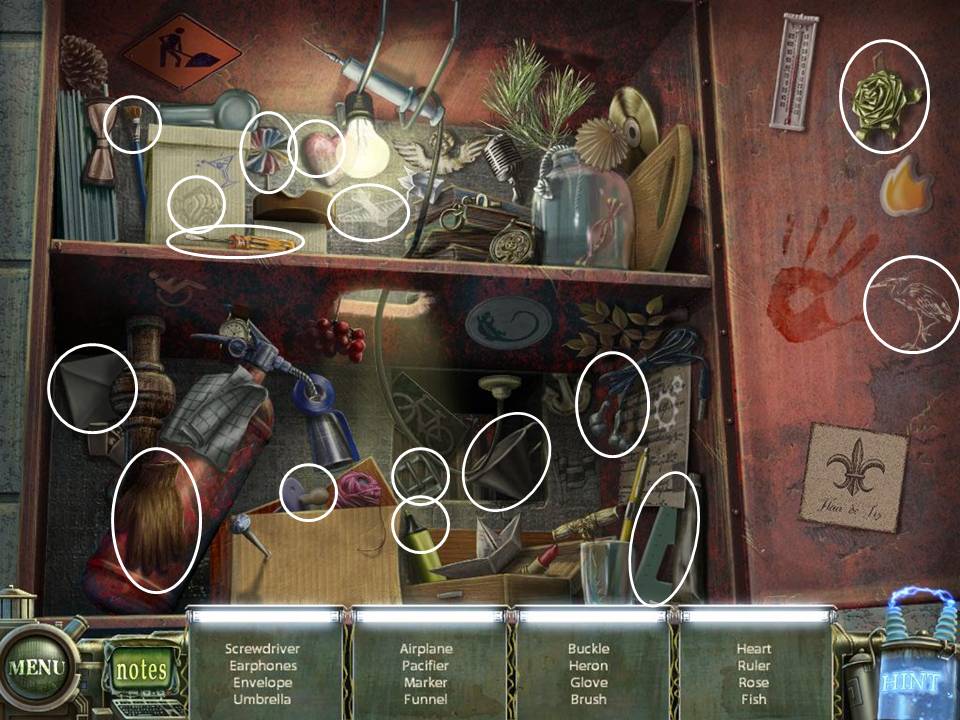
- Open the Red Cabinet. Play the HOS. Elevator Button will be added to you inventory.
- Exit the Operating Room. Enter the 2nd door to the left.
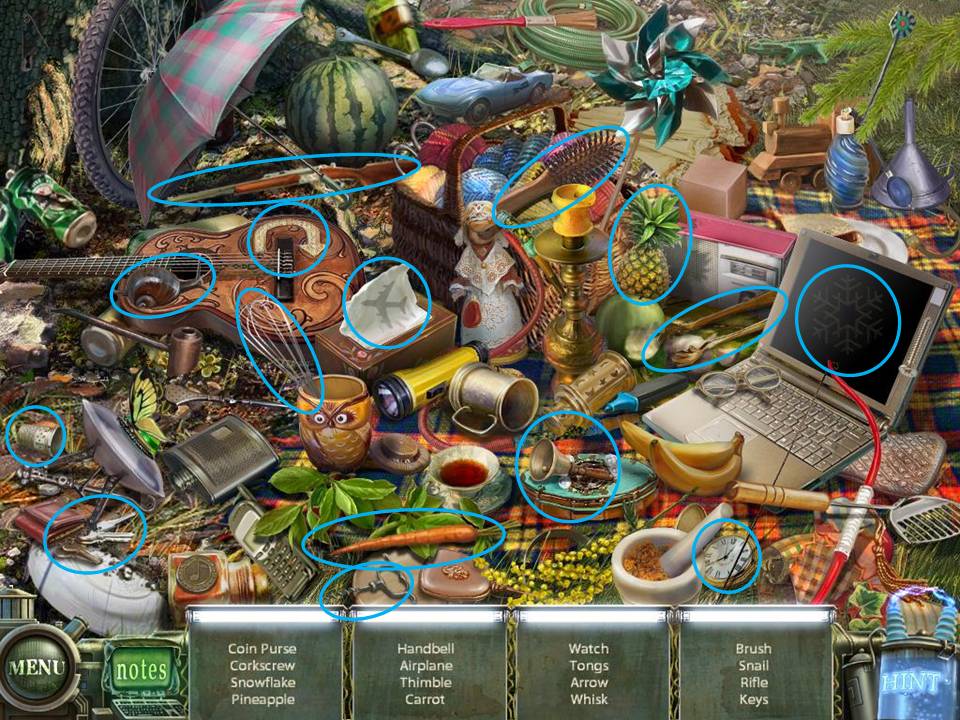
- Play the HOS. Rifle will be added to you inventory.
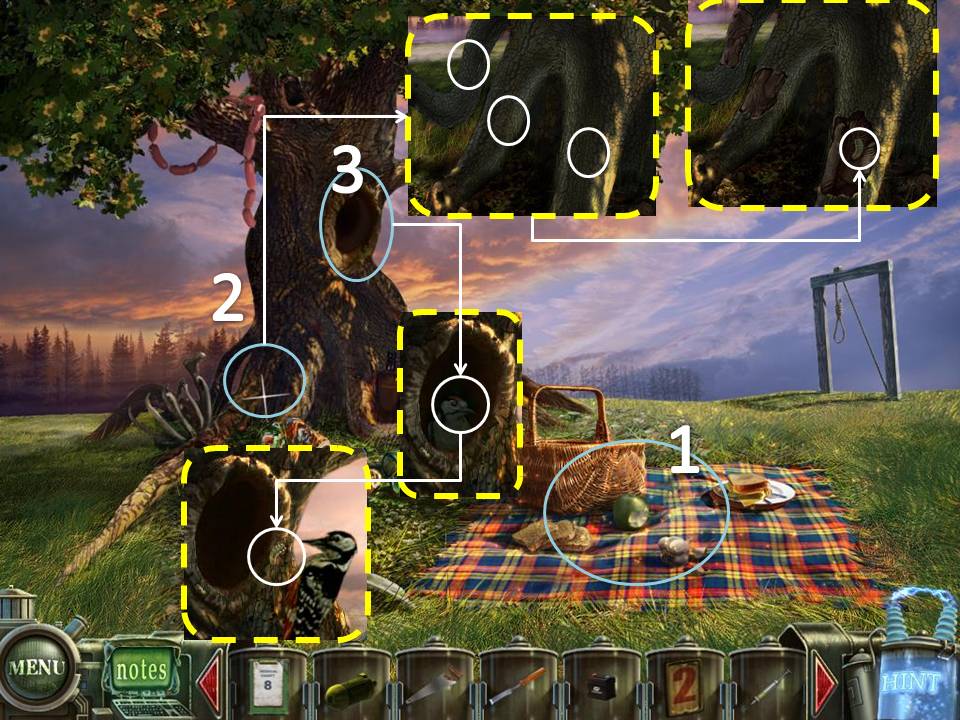
- Examine the Roots of the tree. Use the Chisel on the Barks to get the Bark Beetle.
- Click on the hole in the tree. Give the Bark Beetle to the Woodpecker. Take the Woodpecker using the Net.
- Exit the room.
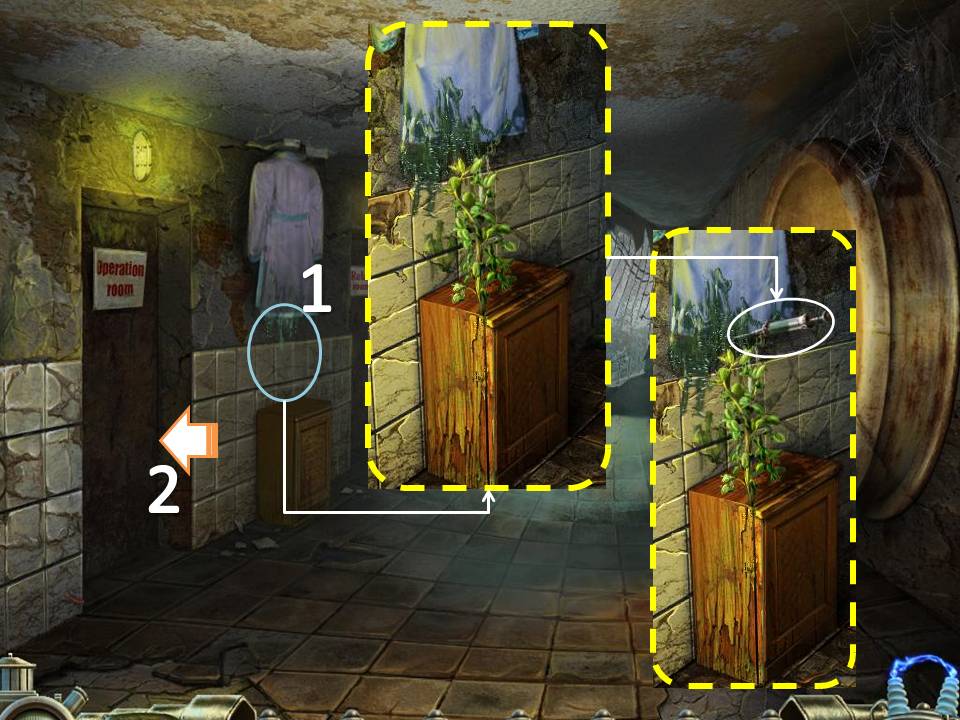
- Click on the Cabinet in between the 2 rooms. Use the Syringe on the green goo to get the Full Syringe
- Enter the Operating Room
- Examine the Puppet on the bed. Use the Full Syringe on the Puppet to get the Half-full Syringe.
- Use the Woodpecker on the Puppet's nose. Cut the Flute with the Saw. Flute will be added to you inventory.
- Use the Rifle on the cabinet on the far wall. Get the Manhole Handle
- Play the HOS. Funnel will be added to you inventory.
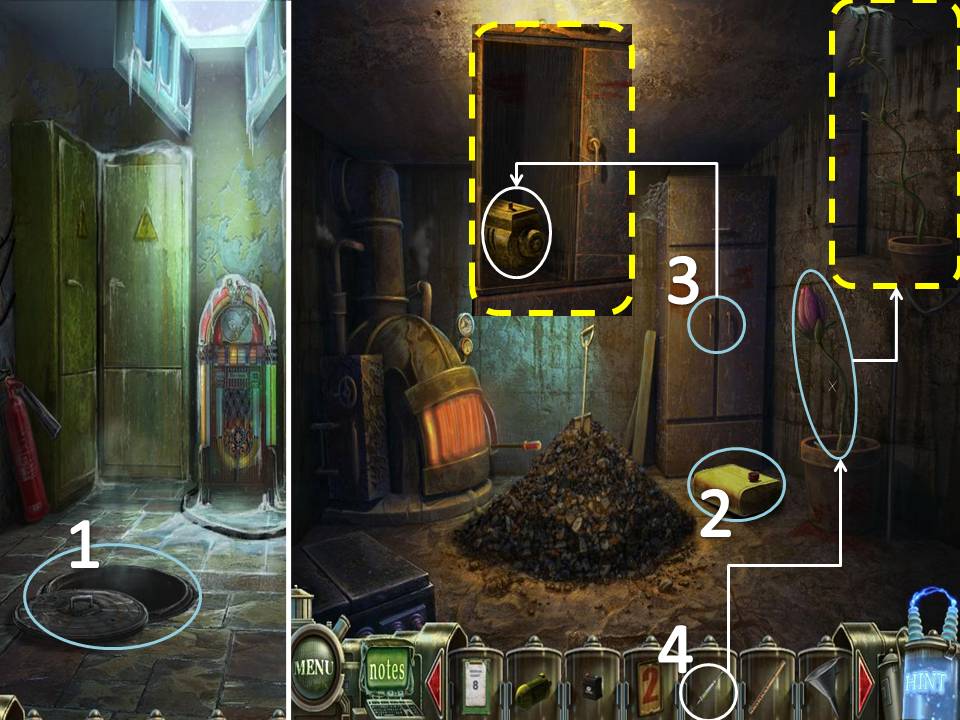
- Exit the Sanitarium. Go to the Jukebox Room

- Use the Manhole Handle on the Manhole to the left.
- Grab the Engine Tank below the cabinet.
- Open the cabinet and take the Engine
- Use the Half-full Syringe on the Plant to the right.
- Exit the Room. Go back to the Picnic Area.
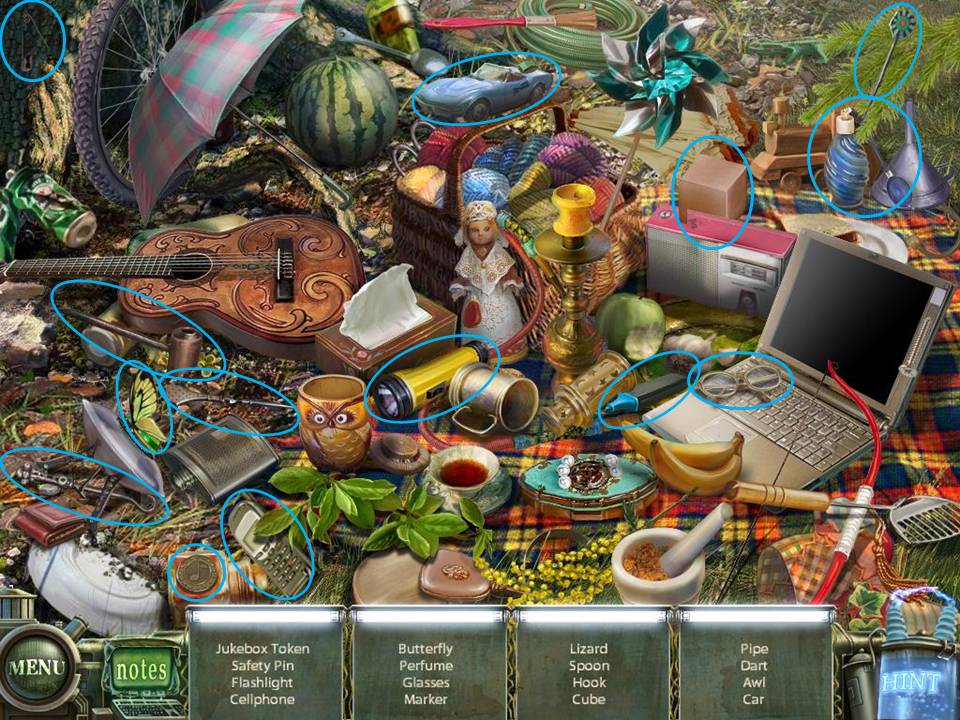
- Play the HOS. Token will be added to your inventory.
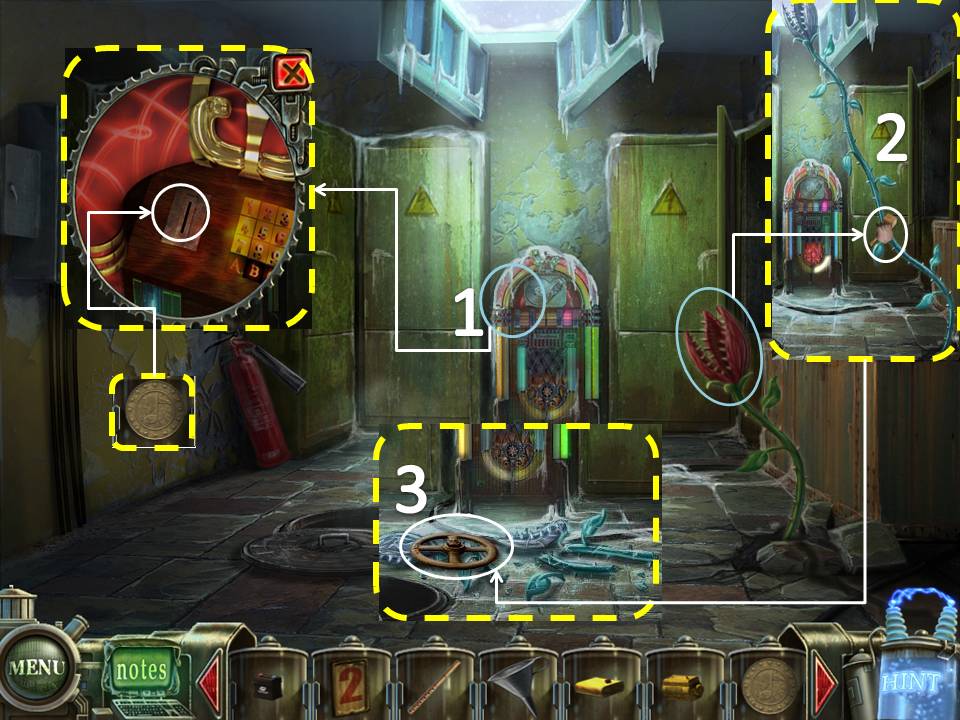
- Go back to the Jukebox Room
- Click on the Jukebox. Use the Token.
- After the plant freezes, break it using the Mallet.
- Take the Valve Handle.
- Exit this room and go through the Sanitarium Back Door.
- Use Medical Chart 7 on the door marked "7" go through it.
- Take the Engine Console
- Take the Engine Generator
- Use the Valve Handle on the Elevator
- Go through the opening.
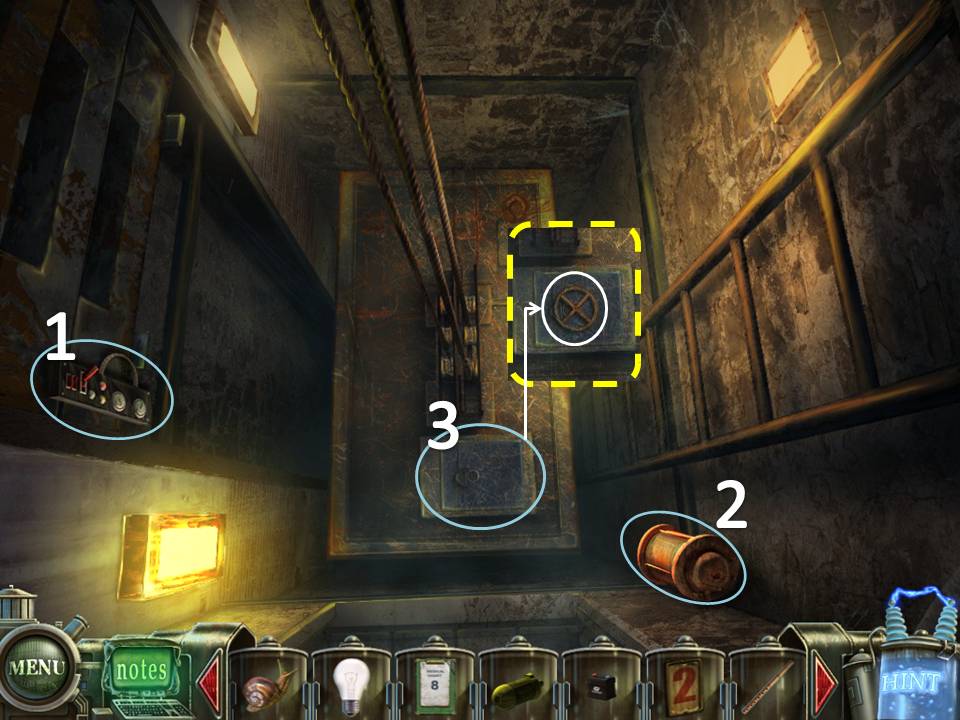
- Take the Engine Filter
- Take the Brush
- Get out of the Elevator.
- Place Medical Chart 8 on the door to the left.
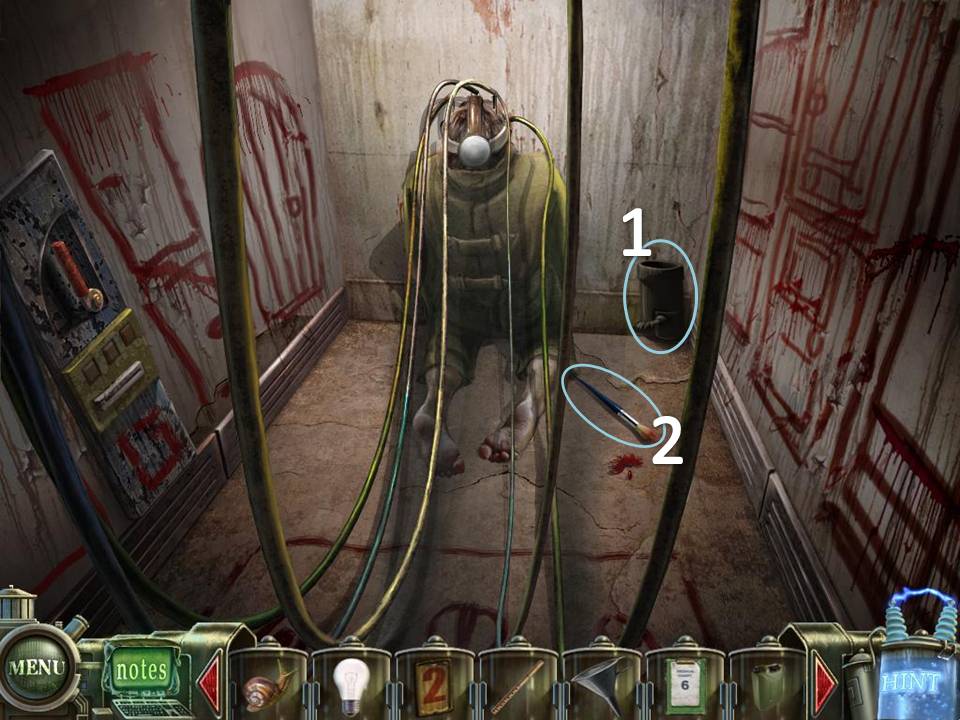
- Take Medical Chart 6 on the ground.
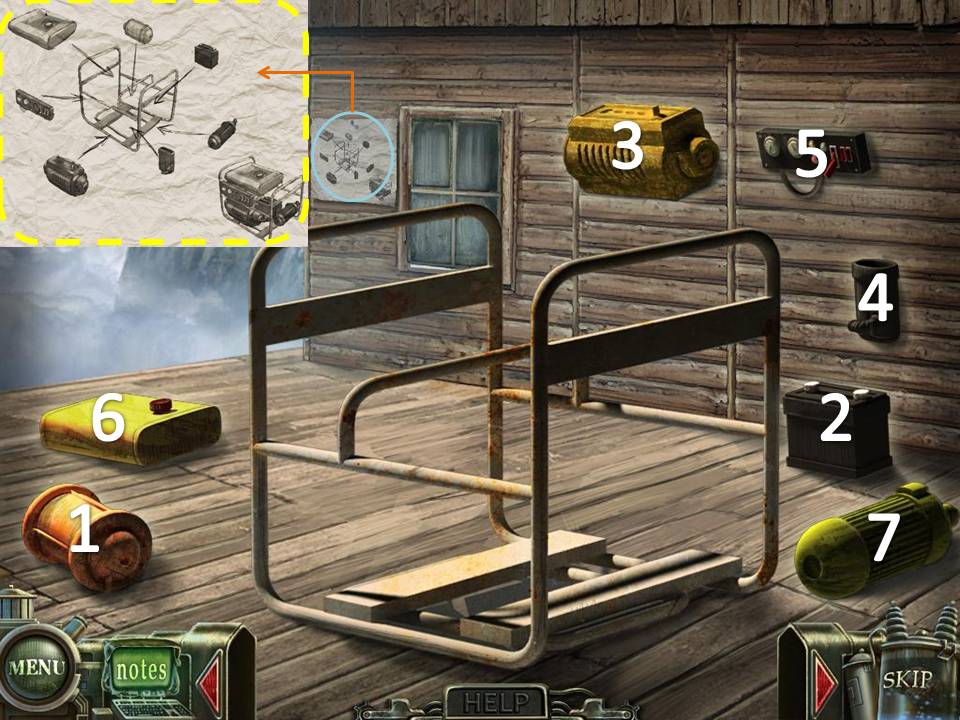
- Examine the Lift on the right to start a puzzle.
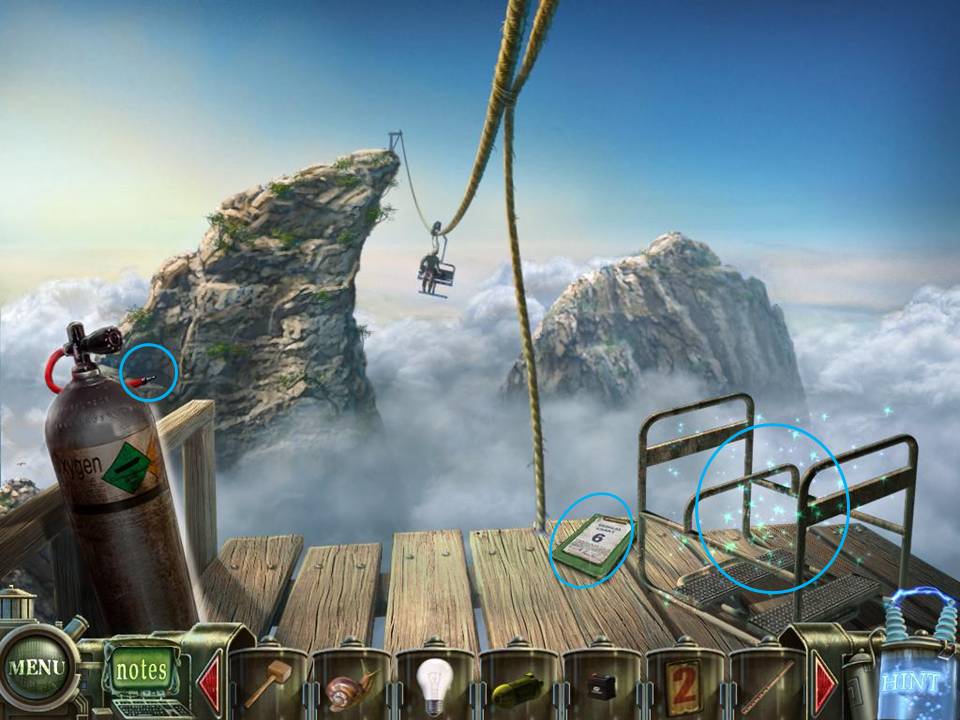
Place the Engine parts you have collected on their appropriate sillhouette.
Assemble the lift by placing the parts in their correct positions.
There is a small piece of paper on the left side of the far wall. This should give you an idea on how to assemble the lift.
The solution is also shown below.
If you cannot solve the puzzle, just wait for the "Skip" icon on the bottom right side to light up. It automatically solves the puzzle for you.
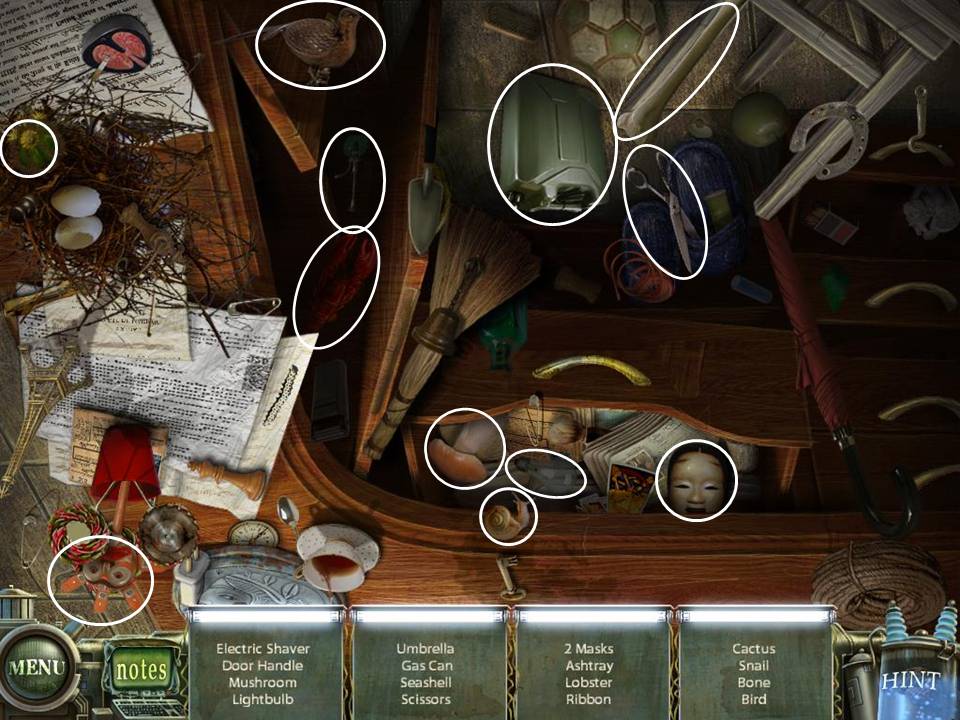
- Exit the room. Play the HOS on the Upside down Reception. Gas Can will be added to your inventory.
- Go back to the Sky Room.
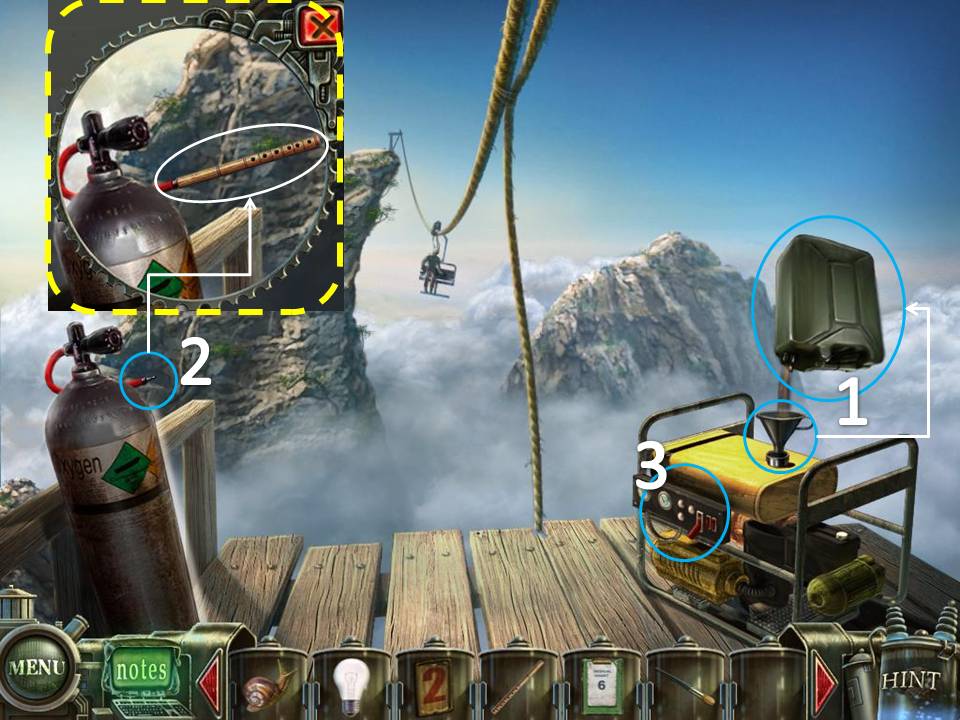
- Place the Funnel on the Generator. Use the Gas Can on the Funnel
- Examine the Tank on the left. Use the Flute on the Tank
- Click on the Generator. Bird Puzzle will be added to your inventory.
- Go back to the Stamp Room, 2nd flr.
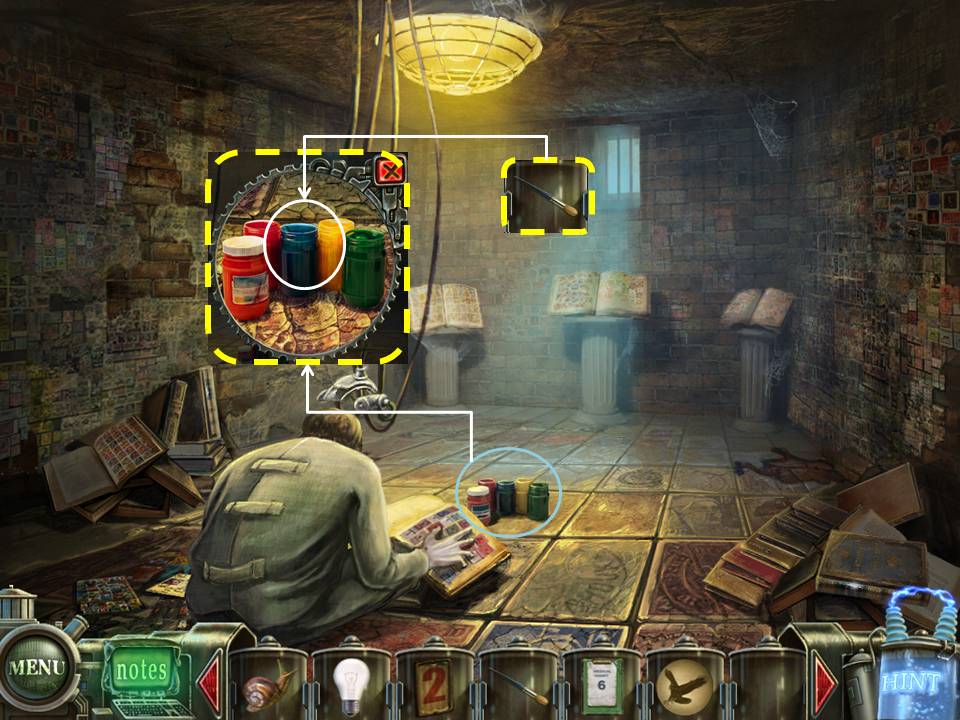
- Click on the Paint.
- Use the Brush on the Paint to get Brush with Paint.
- Exit the Room.
- Use Medical Chart 6 on Room 6 and go through it.
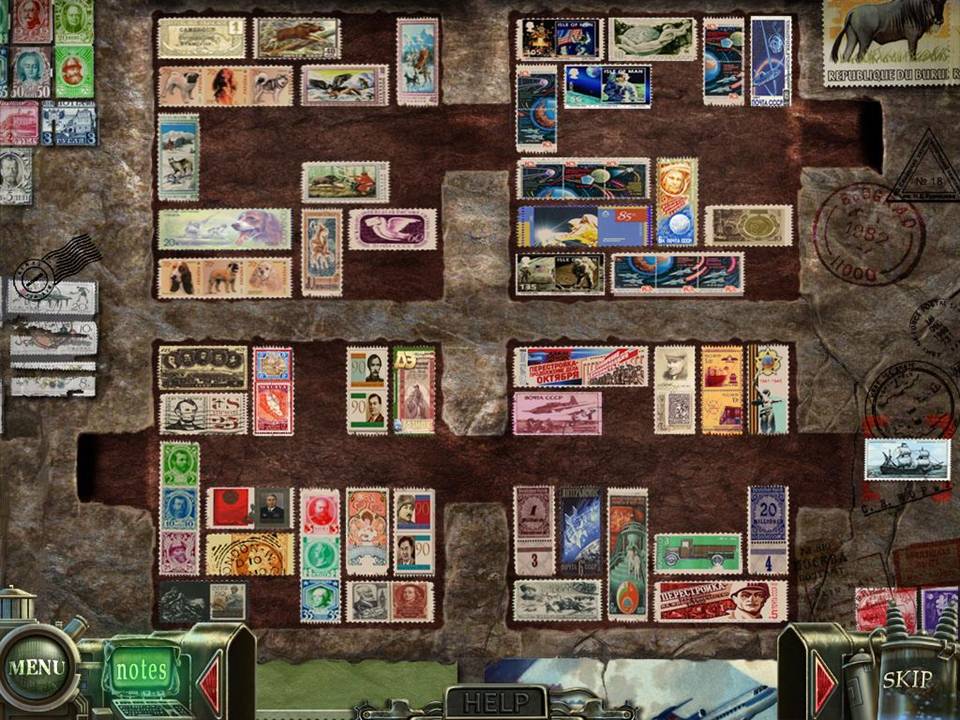
- Click on the door to far right to start a puzzle. After completing the puzzle, enter the door.
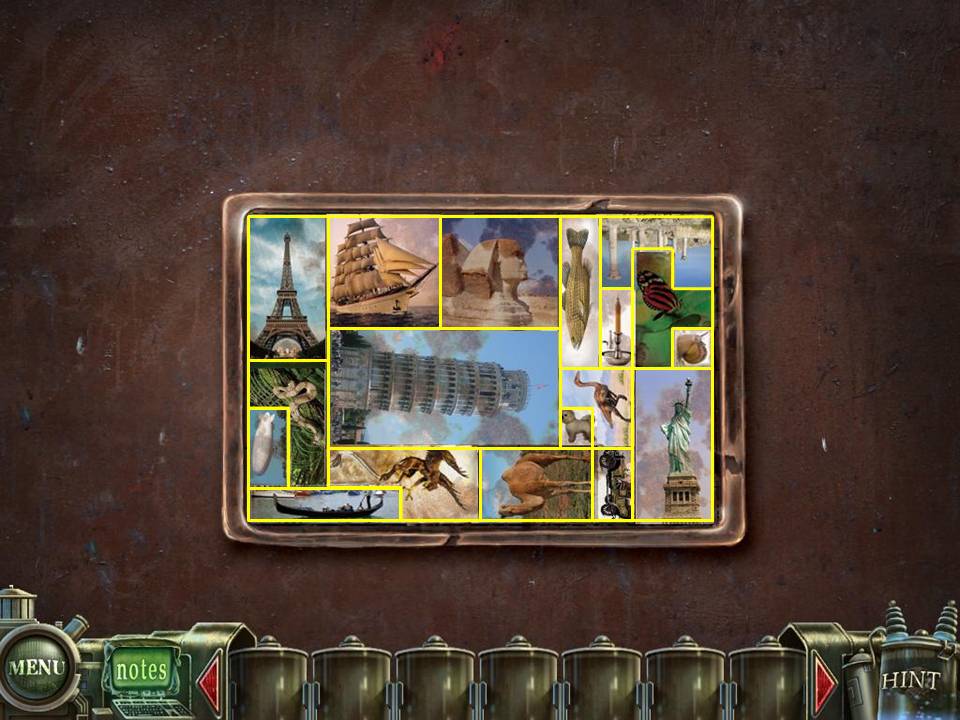
Fit all the stamps in the box provided.
There are many ways to solve this puzzle, one of which is shown below.
If you cannot solve the puzzle, just wait for the "Skip" icon on the bottom right side to light up. It automatically solves the puzzle for you.
There are many ways to solve this puzzle, one of which is shown below.
If you cannot solve the puzzle, just wait for the "Skip" icon on the bottom right side to light up. It automatically solves the puzzle for you.
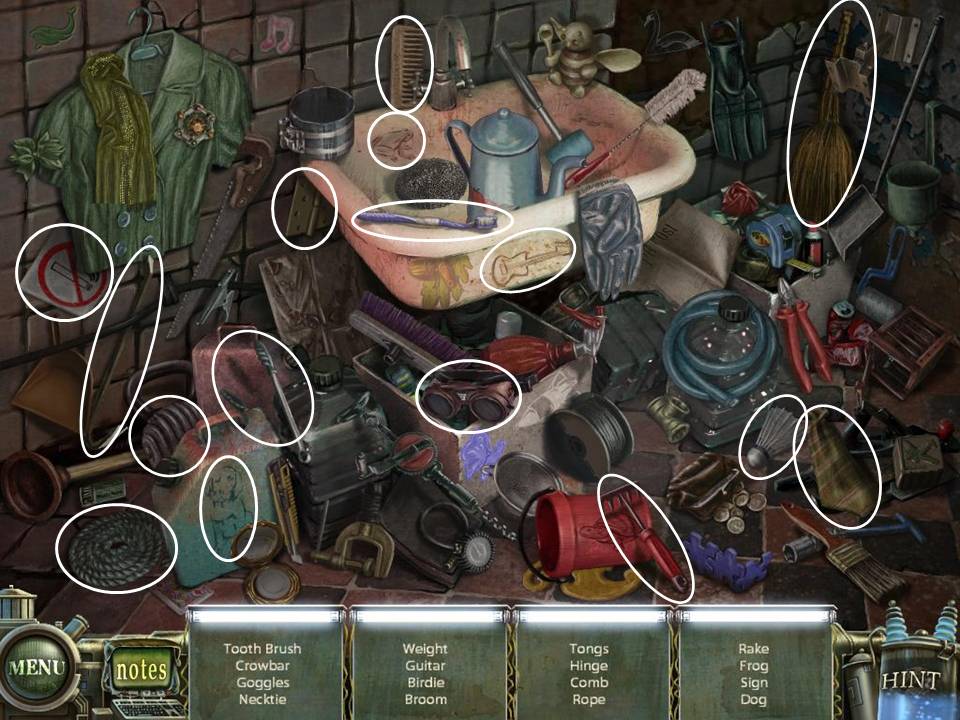
- Play the HOS. Crowbar will be added to your inventory.
- Leave the Room.
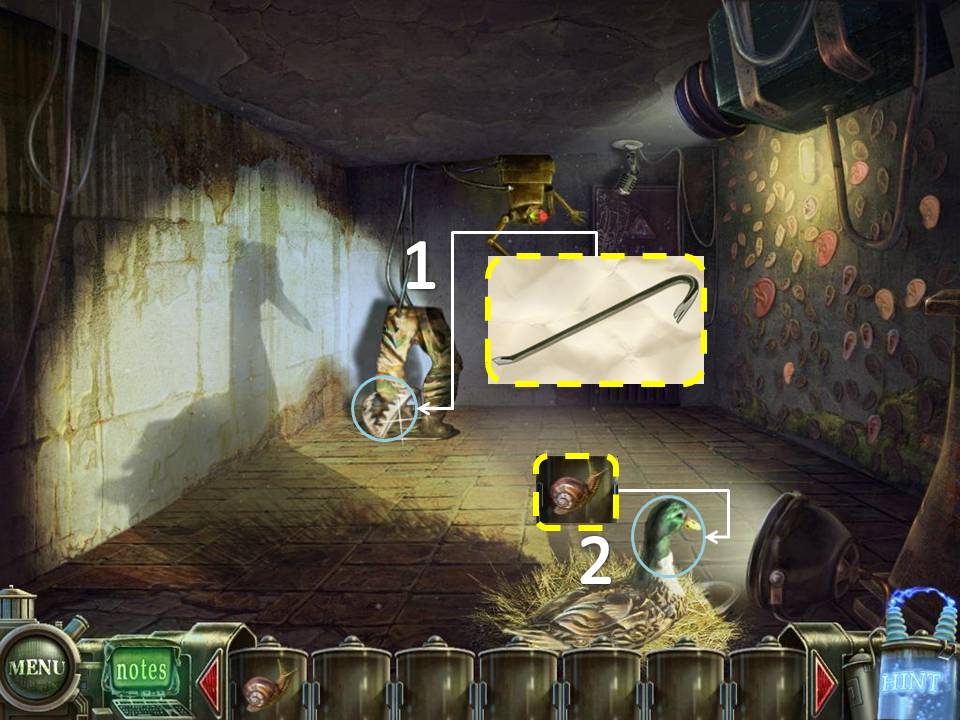
- Use the Crowbar on the leg trap.
- Use the Snail on the Duck.
- Enter the room at the far wall again.
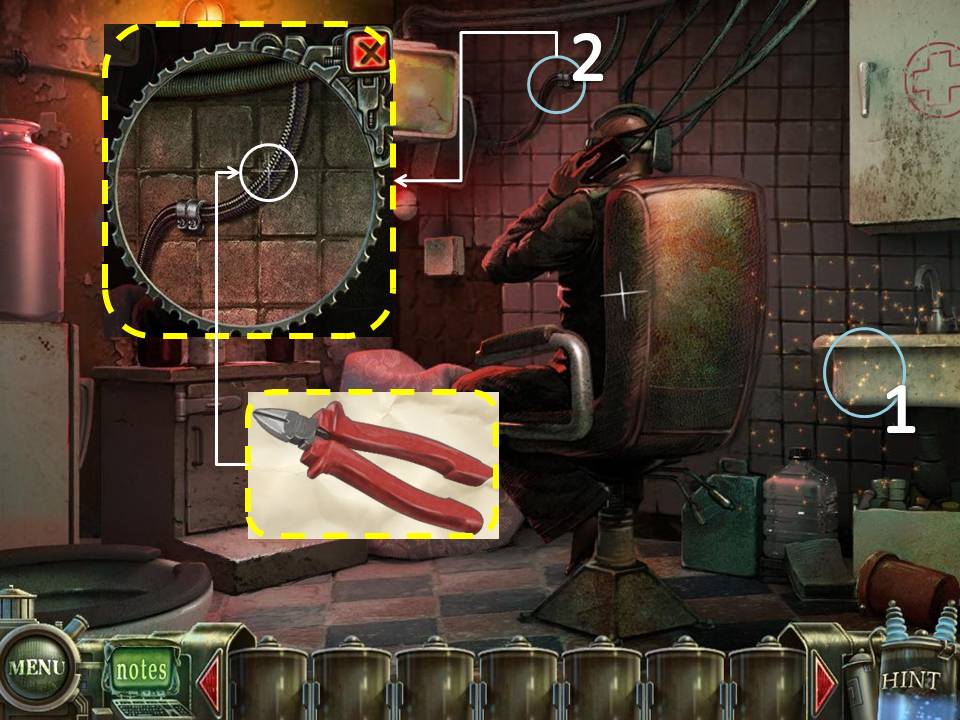
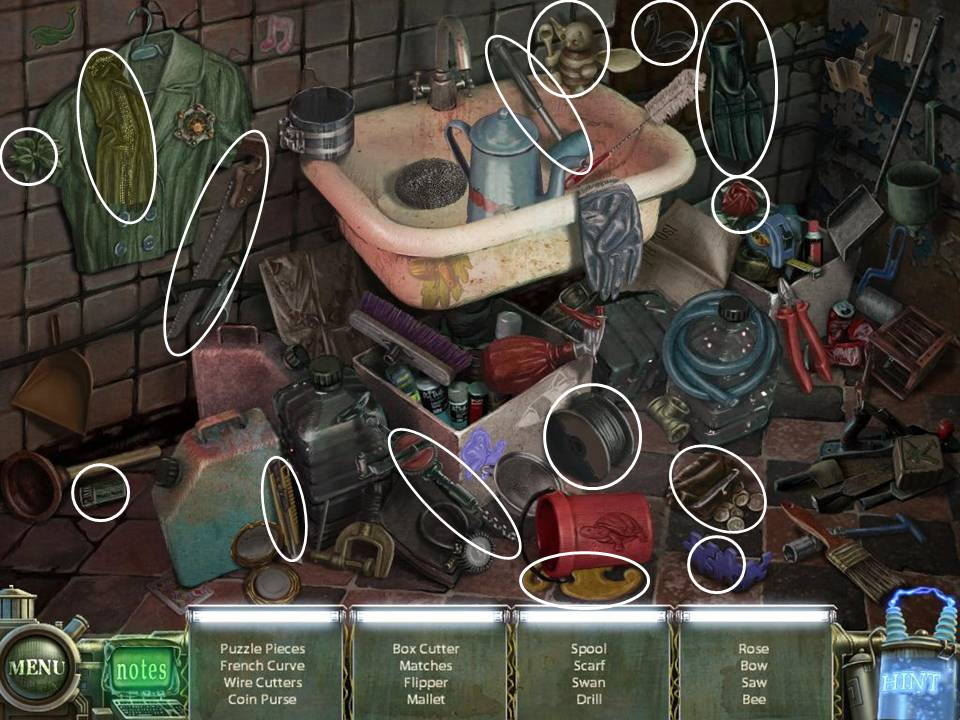
- Play the HOS. Wire Cutters will be added to your inventory.
- Examine the wires beside the TV. Use the Wire Cutter on the wire.
- Eye Puzzle will be added to your inventory.
- Go back to the Elevator at the back of the building
- Give the Brush with Paint to the man. After he paints the elevator doors, click on the Control Panel to the left.
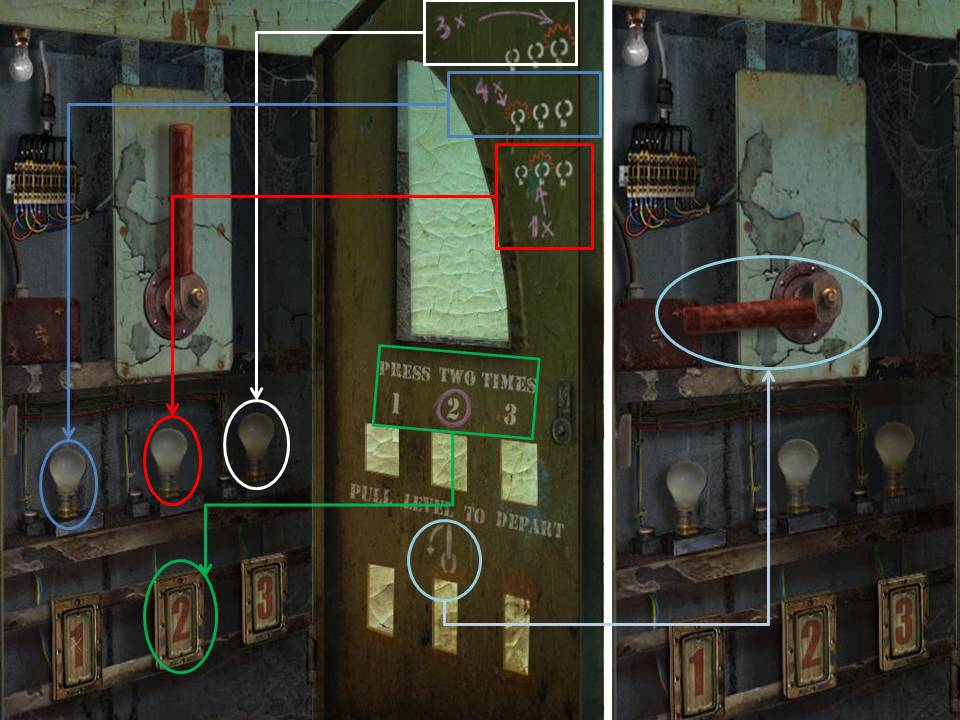
- Use the Lightbulb and Elevator Button to start the puzzle. The Wall Puzzle will be added to your inventory after finishing the puzzle.
Follow the instructions drawn on the right side of the panel. Start from the top most instruction and then work your way down.
Take note of the small lightbulb on the upper left corner of the puzzle. If the bulb turns green, then you've pressed the right button.
If it turns red, then you have to start all over again.
If you cannot solve the puzzle, just wait for the "Skip" icon on the bottom right side to light up. It automatically solves the puzzle for you.
- Go back to the Basement where Tim is.
- Click on Tim and place the Bird, Eye, and Wall puzzle on the correct slots.
- The Electric Fence to the left of the Sanitarium has been diabled. Head there..
Part 5: Moon Probe
- Play the HOS on the left side of the door. Bat will be added to your inventory.
- Exit and go to the Graveyard.
- Click on the Mausoleum with the Bat on its door. Use the Bat on the door. Go through.
- Click on the dead person on the back wall. Take the Access Card in its hands.
- Go back to the Moon Probe
- Zoom in on the keypad to the right of the door. Use the Access Card.
- Go through the door.
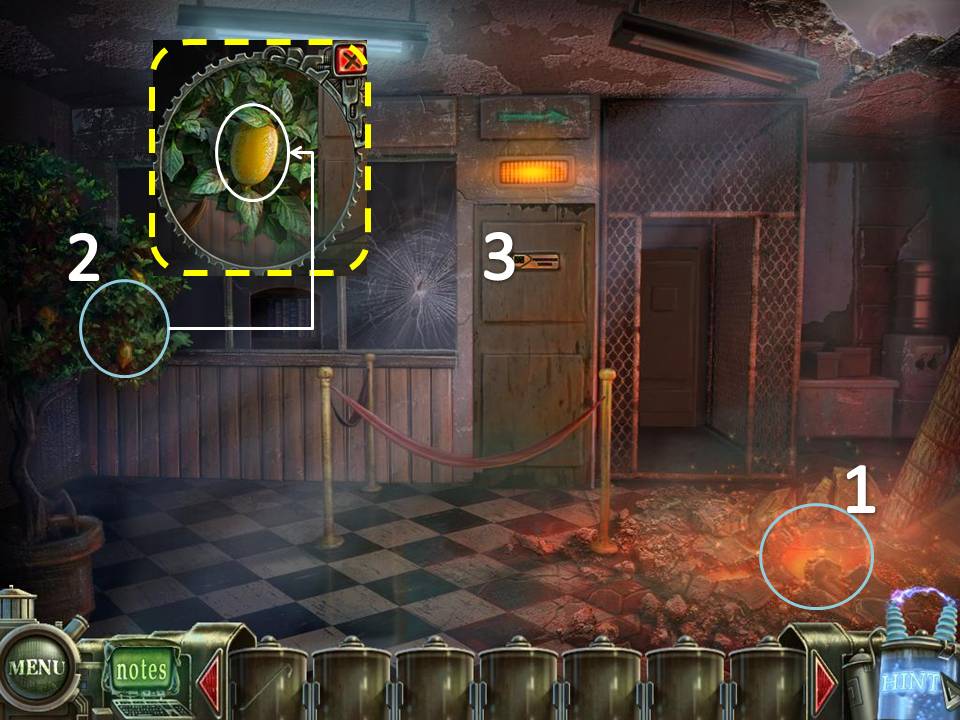
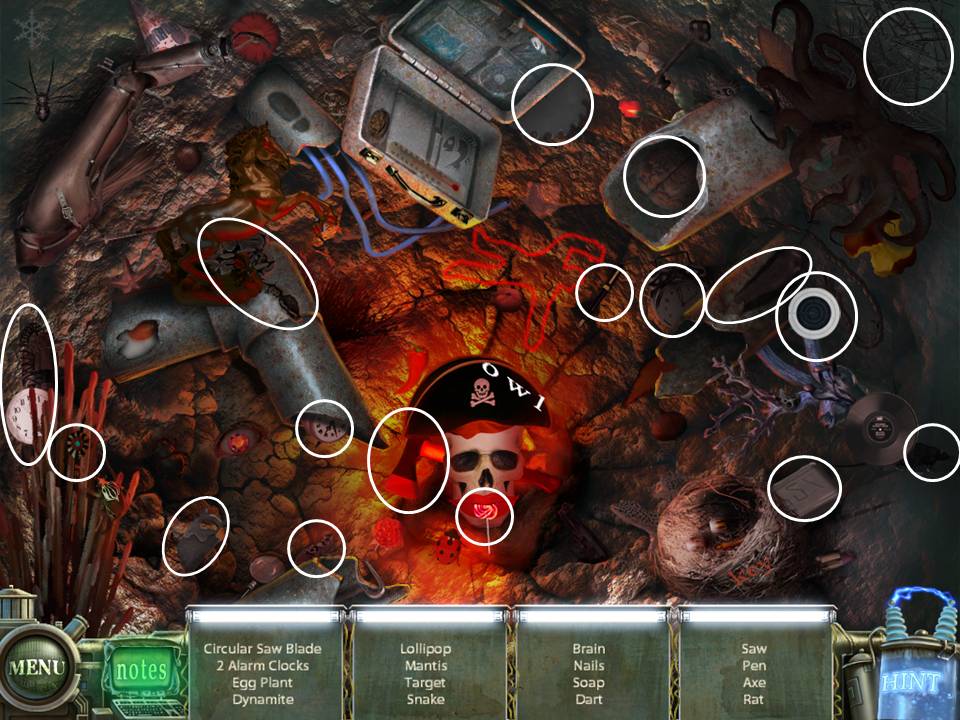
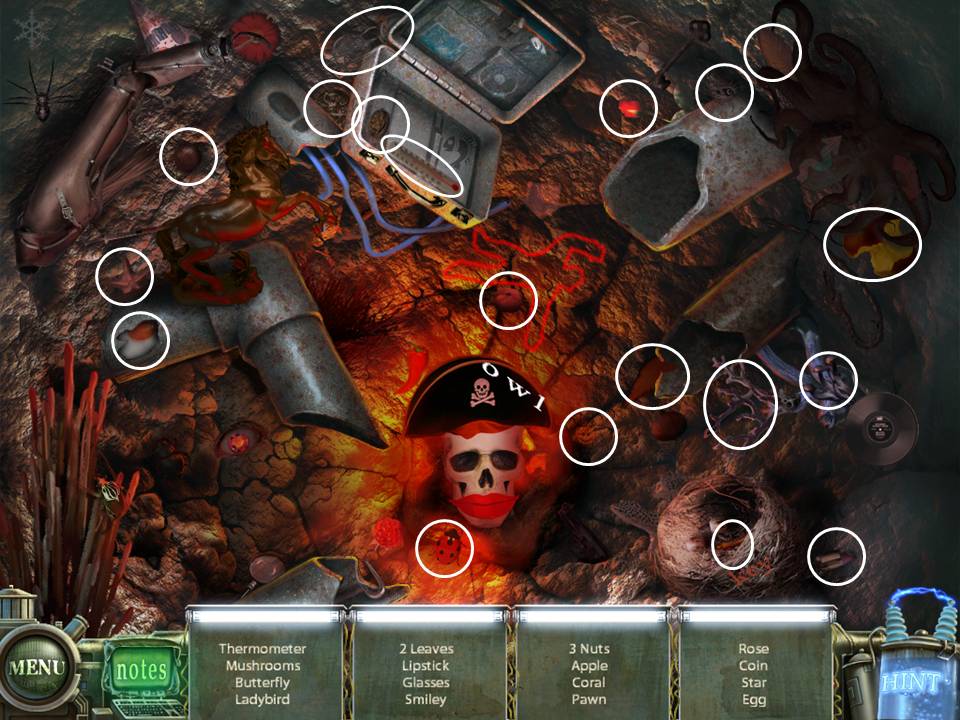
- Play the HOS. Soap will be added to your inventory.
- Click on the plant to the left. Get the Lemon.
- Go through the door to the left.
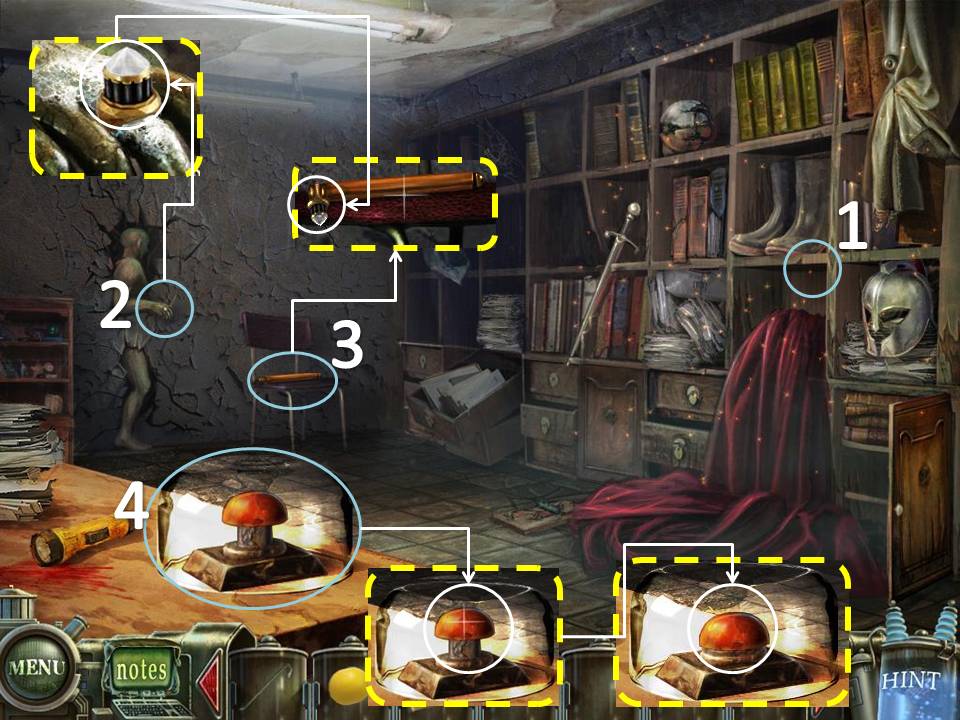
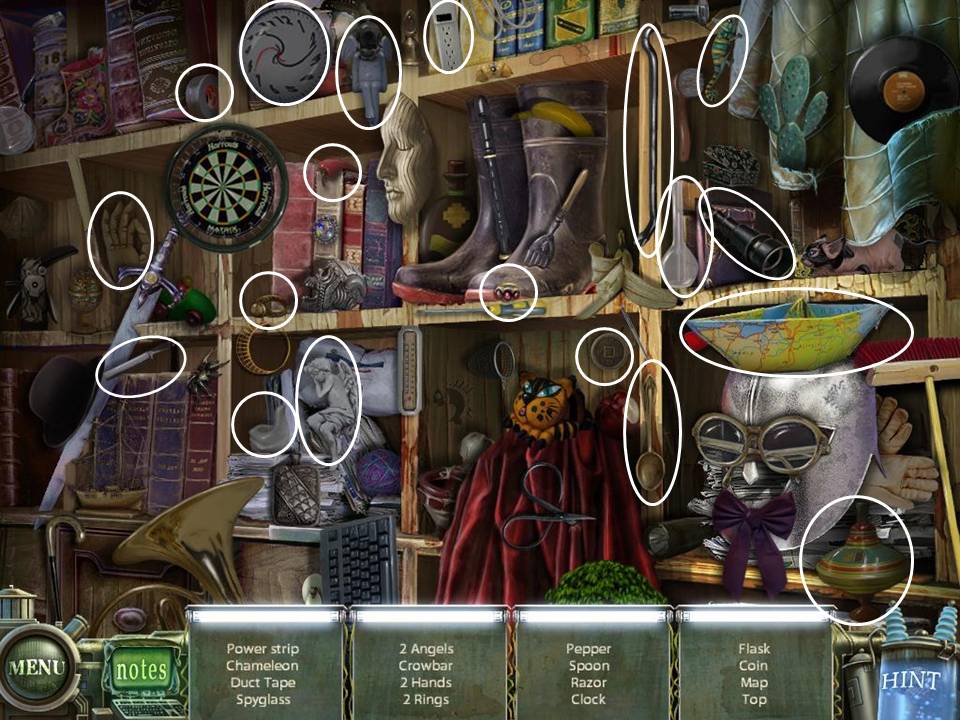
- Play the HOS. Flask will be added to your inventory.
- Click on the Statue to the left. Use the Soap on the hand to get the Ring
- Examine the Chair to the right of the statue. Use the Ring on the pen to get the Glass Cutter.
- Use the Glass Cutter on the glass on the bottom left side of the screen. Press the Button.
- Exit the room.
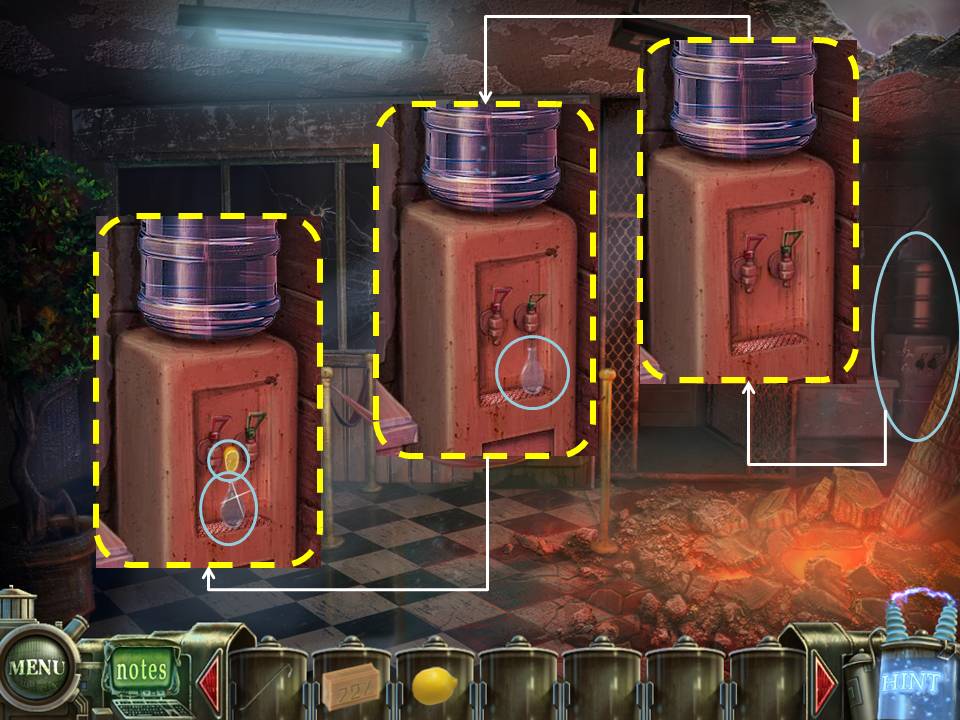
- Examine the Water Dispenser on the far wall to the right.
- Use the Flask on the the dispenser. Use the Lemon on the flask once it is full of water to get the Lemonade.
- Go inside the left door.
- Play the HOS. Keyboard will be added to your inventory.
- Exit the room and head to the door to the right.
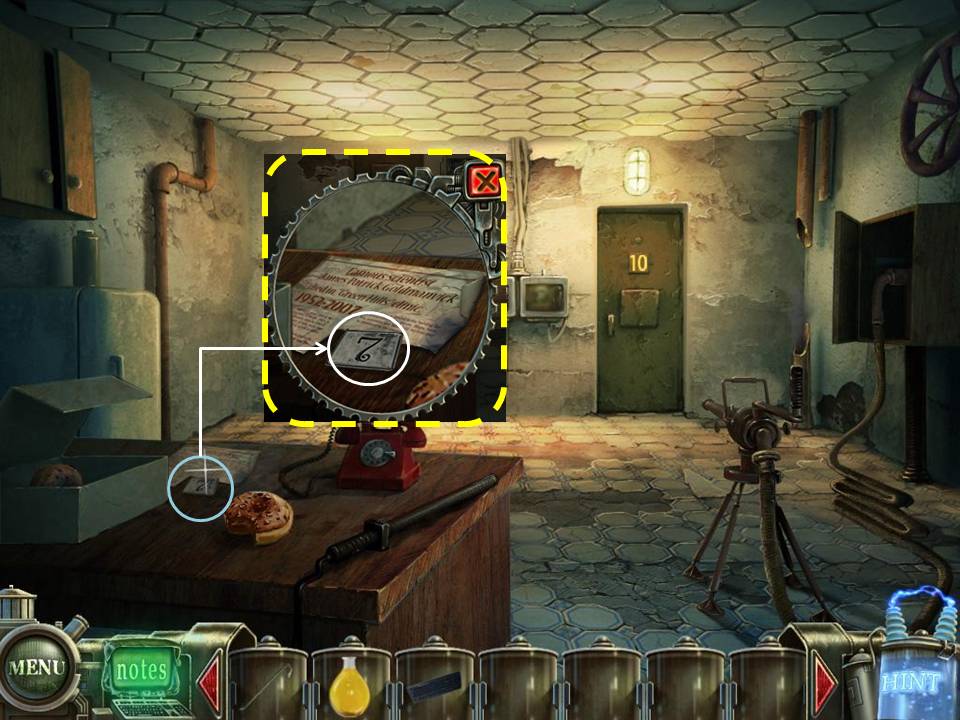
- Take the number 7 from the table.
- Exit the room.
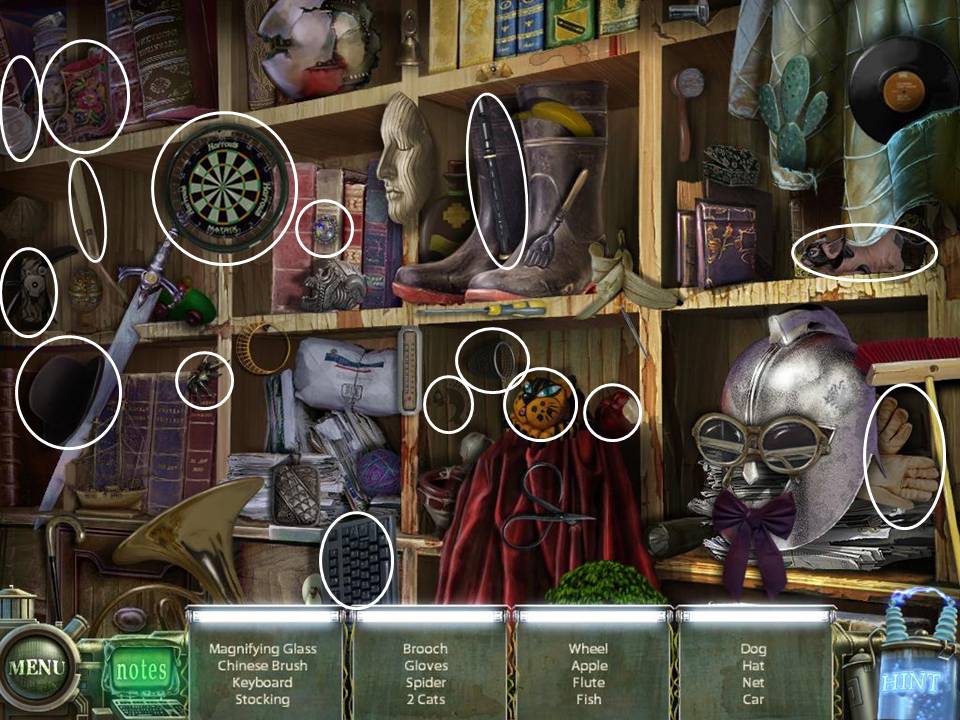
- Play the HOS. Glasses will be added to your inventory.
- Exit the Moon Probe. Play the HOS. Valve will be added to your inventory.
- Go the Graveyard and through the Lobster Door
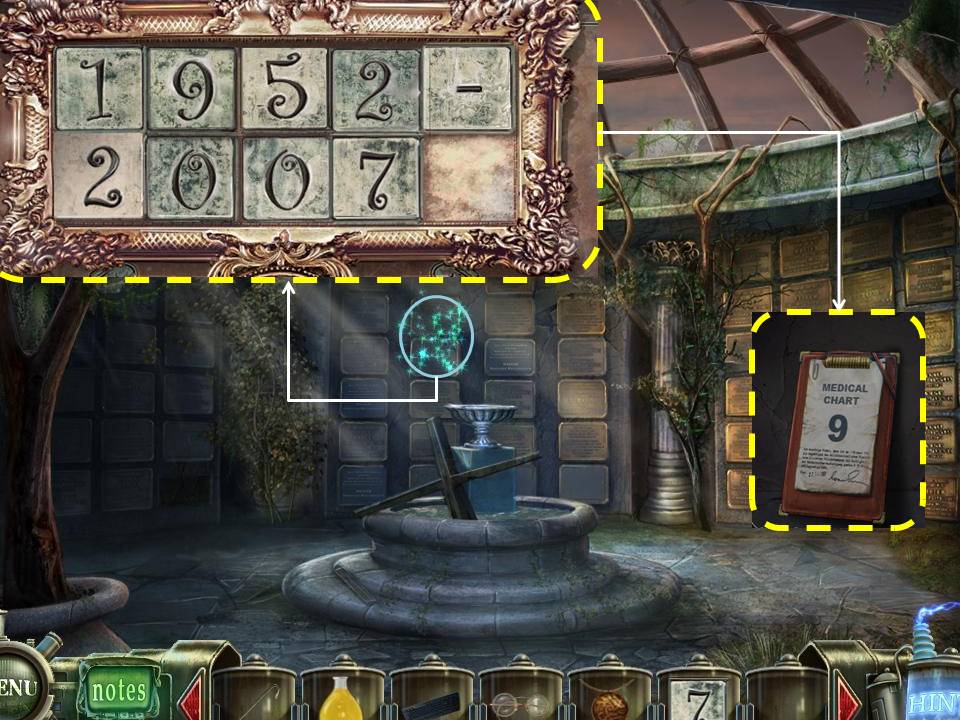
- Click on the Sparkles. Use the Number 7. Get the Medical Chart 9 after finishing the puzzle.
Re-arrange the tiles to form 1952-2007
If you cannot solve the puzzle, just wait for the "Skip" icon on the bottom right side to light up. It automatically solves the puzzle for you.
If you cannot solve the puzzle, just wait for the "Skip" icon on the bottom right side to light up. It automatically solves the puzzle for you.
- Exit the graveyard. Go back to the Moon Probe
- Go inside and go through the right door.
- Zoom in on the cabinet to the right.
- Use the Valve on the Pipe. Click on the Sparkles to start the Puzzle.
Prevent the Moving Tile from getting to the edges of the ceiling.
Do this by clicking on the white tiles.
Once you click on a white tile, water will strike it and turn it gray.
It is best to start from the edges of the puzzle and work your way in to trap the Moving Tile.
The puzzles are random and there are many ways to solve each. One puzzle is shown below.
If you cannot solve the puzzle, just wait for the "Skip" icon on the bottom right side to light up. It automatically solves the puzzle for you.

- Get the Wooden Amulet on the ground.
- Use Medical Chart 9 on the door marked with 9.
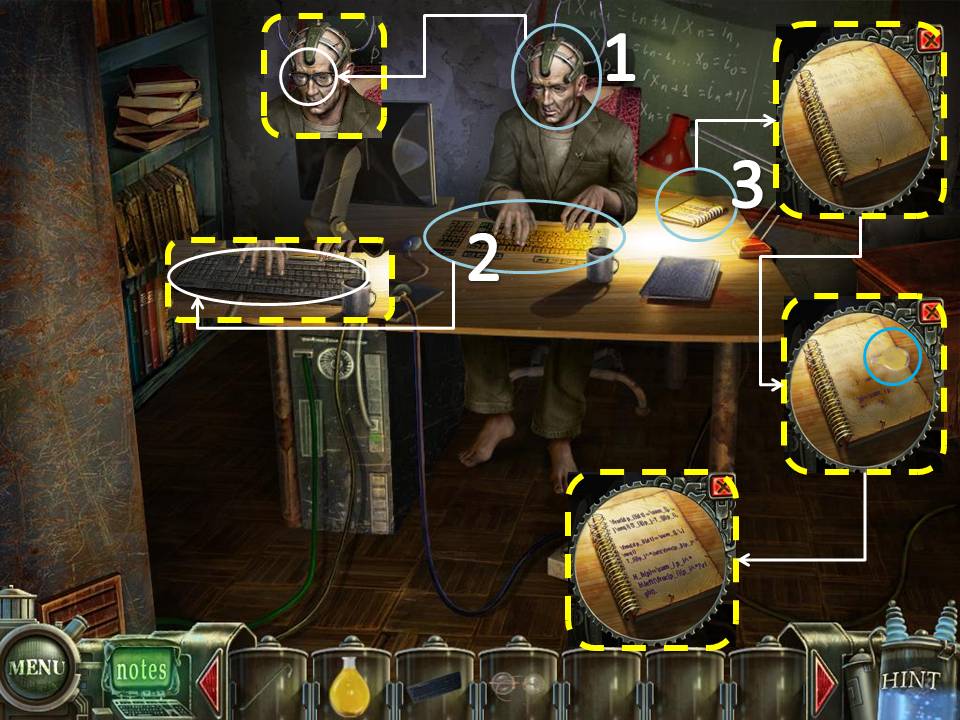
- Use the Glasses on the Man.
- Place the Keyboard on the Table.
- Click on the Notebook under the lamp. Use the Lemonade on the Notebook. Pen Puzzle will be added to your inventory.
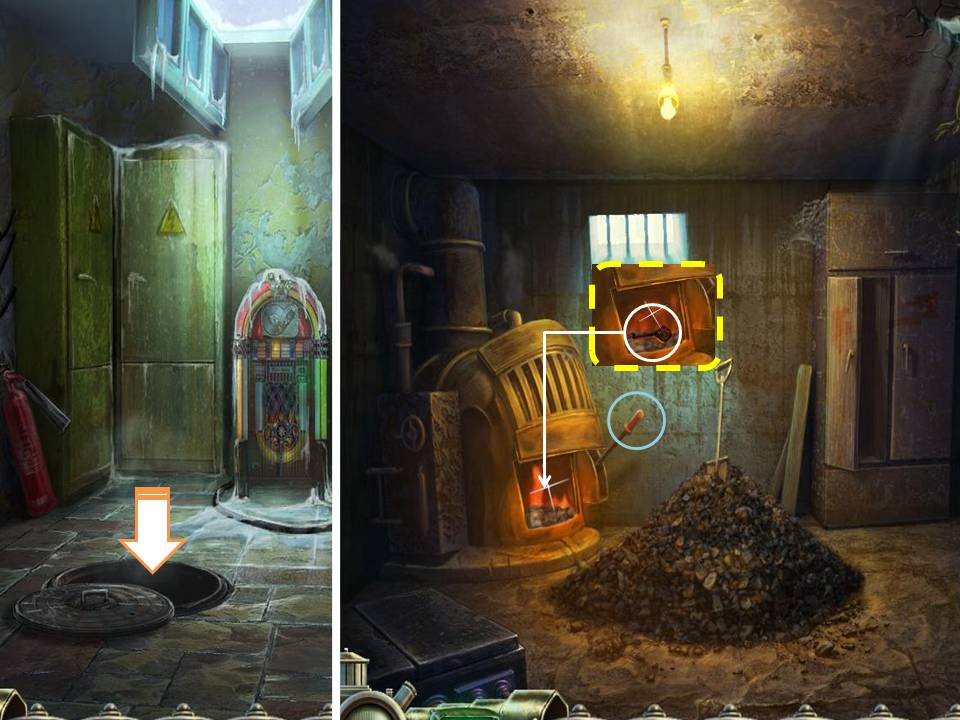
- Go back to the Jukebox Room.
- Go down through the Manhole.
- Click on the Lever on the Stove.
- Place the Wooden Amulet inside the Stove
- Use the Crowbar to take the Key out
- Go to the Graveyard, enter the door marked with a Bat.
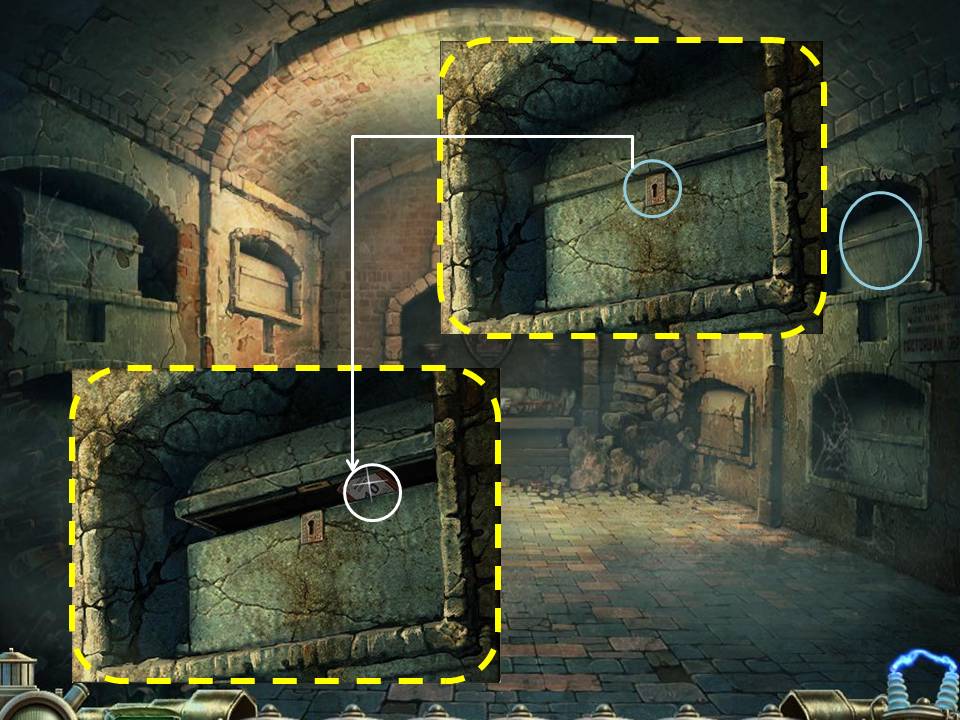
- Click on the Tomb to the right.
- Use the Key to get the Medical Chart 10
- Go back to the Moon Probe. take the door to the right.
- Use Medical Chart 10 on the room marked "10". Go through the door.
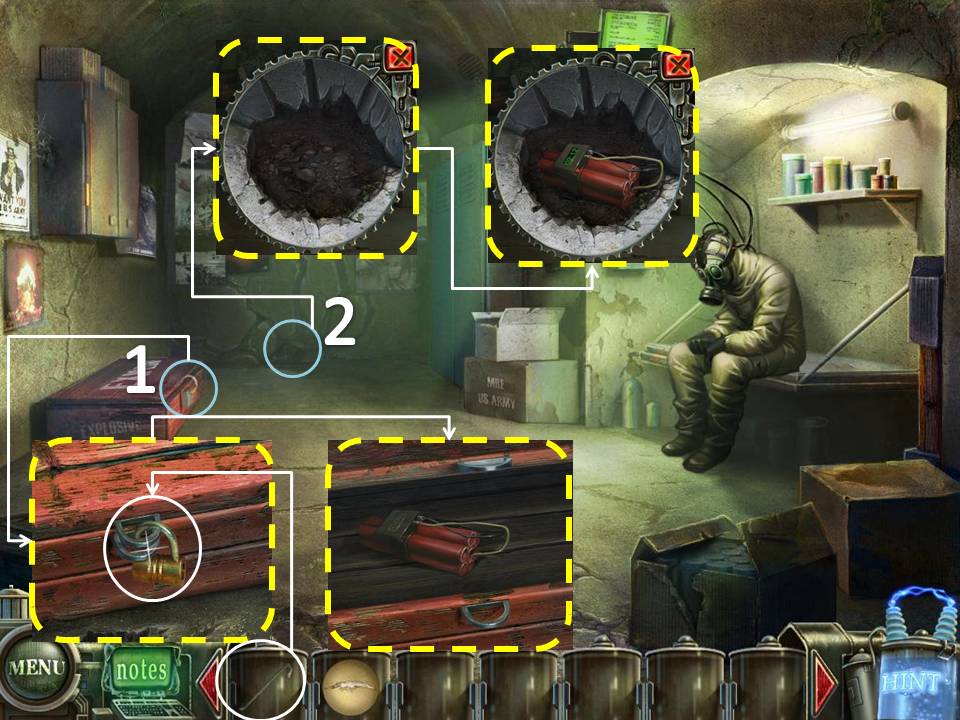
- Click on the Box on the ground to the left. Use the Crowbar to pry the lock open. Take the Dynamite.
- Click on the Hole on the back wall. Place the Dynamite on the Hole. Bullet Puzzle will be added to your inventory.
- Go back to where Tim is.
- Click on Tim and place the Bullet and Pen Puzzle on the appropriate slot.
- Go through the door to the right.
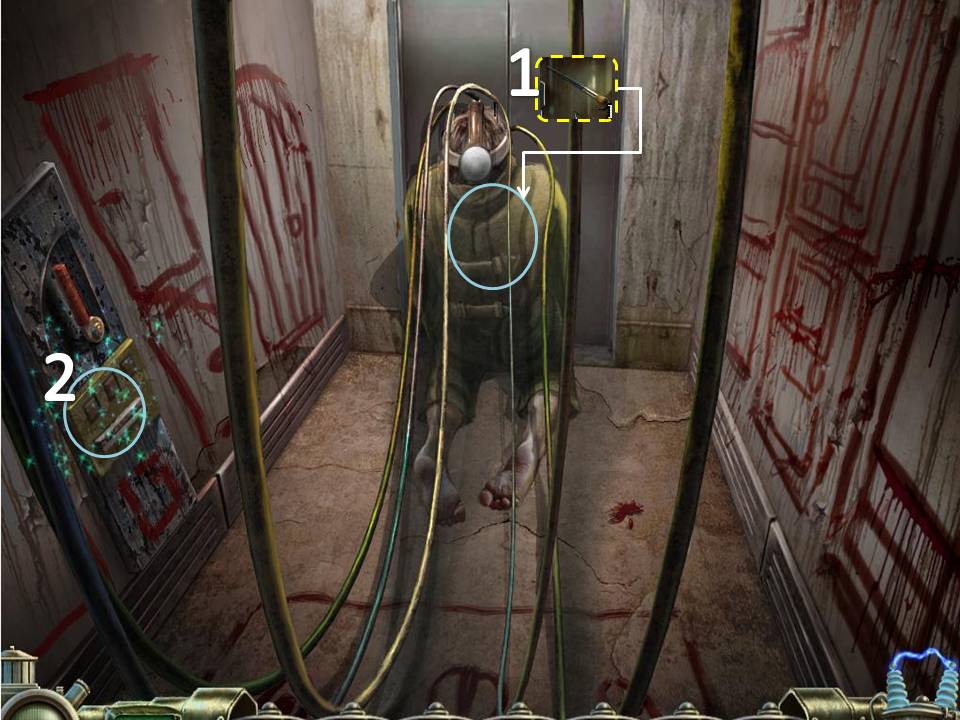
- Play the HOS. Chip will be added to your inventory.
- Click on the panel to the right. Place the Chip on it.
- Play the HOS. Small Light Bulb will be added to your inventory.
- Click on the Panel on the ground.
- Place the Small light Bulb on the Panel.
- Go through the door.
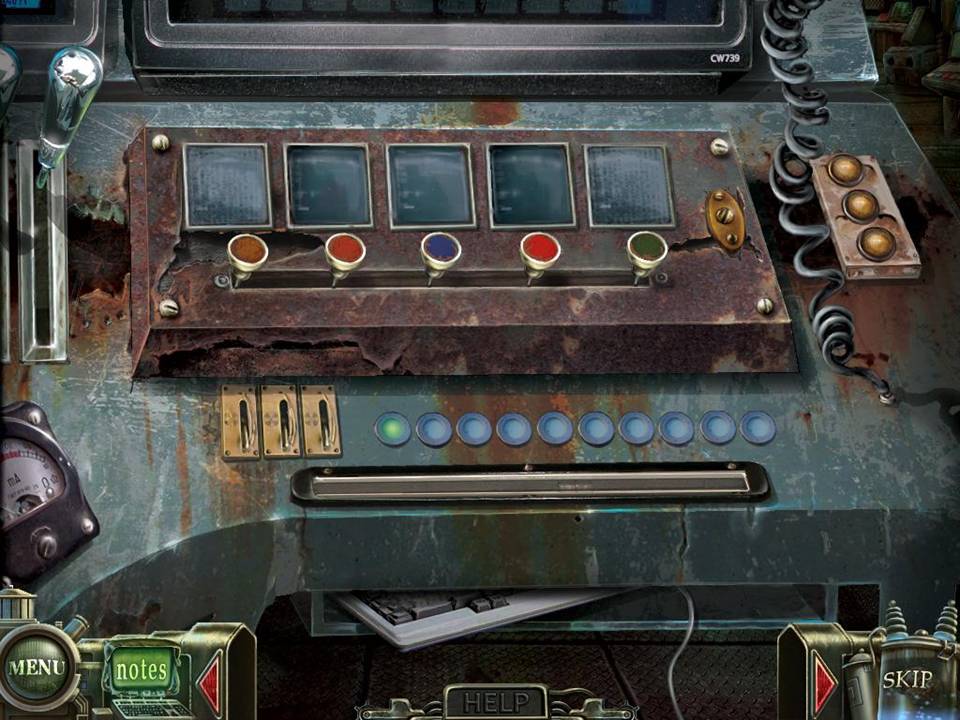
- Click on the puzzle to the left.
There are 5 tiny screens on the console. It lights up with the same color of the buttons below it.
Recreate the light sequence that was shown to you.
Everytime you get a sequence right, a green light will appear below
Once you make a mistake, a red light to the right will light up.
Make 3 mistakes and you have to start all over again.
Solve the puzzle by letting all blue bulbs light up.
All sequences are random
If you cannot solve the puzzle, just wait for the "Skip" icon on the bottom right side to light up. It automatically solves the puzzle for you.
The End!
Comments will load when you reach this part of the walkthrough.