
Walkthrough Information
Dark Tales: Edgar Allan Poe's The Black Cat Walkthrough provides a step-by-step guide with screenshots and video solutions to the most difficult puzzles. The Black Cat is a class hidden object adventure game. This walkthrough is for the PC and Mac versions of the game.Street Corner
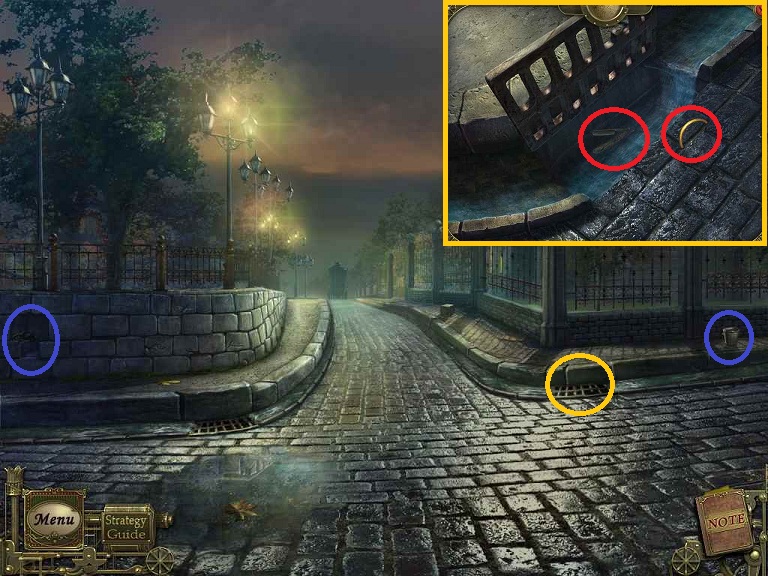
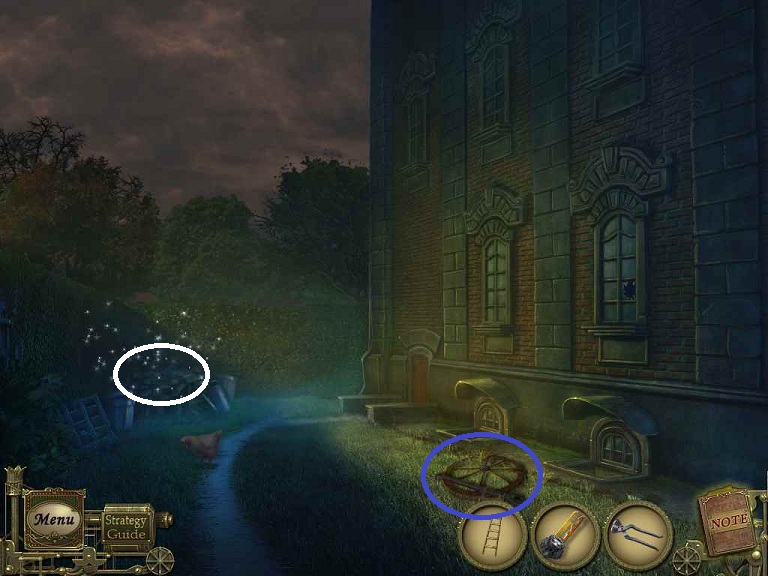
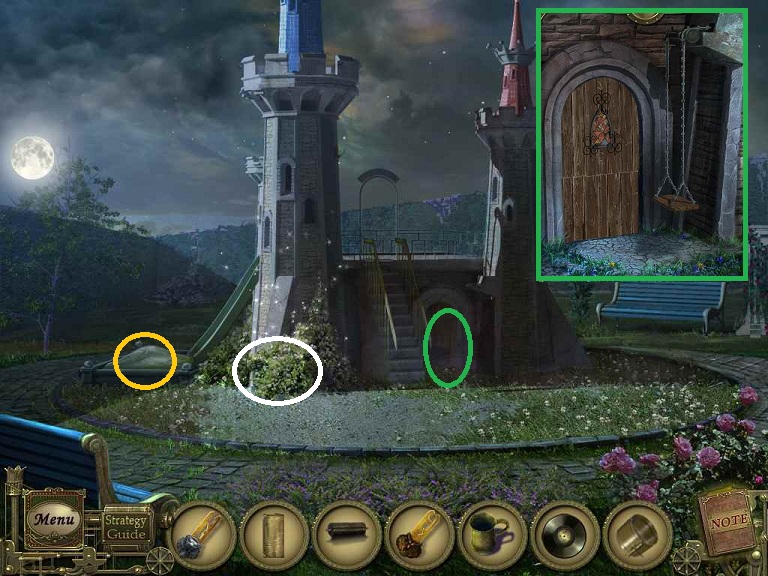
- Click on the black cat.
- Pick up the RAG from the wall on the left
- Pick up the BUCKET on the right
- Examine the grate
- Note the RAZOR; you need something to keep your hands clean
- Note the RING; you need to find something to slip through the ring
- Fill up the BUCKET with water
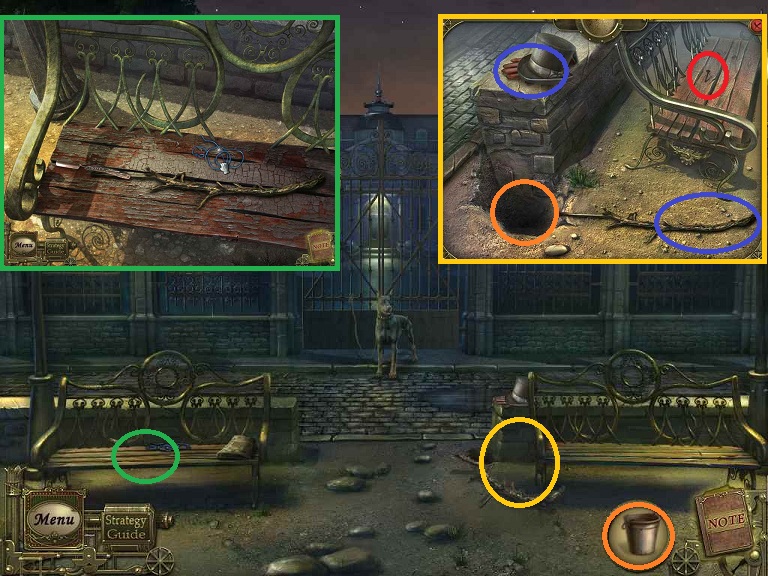
- Head forward
- Examine the right bench
- Click on the hat
- Pick up the GLOVE
- Pick up the BRANCH
- Use the BUCKET on the hole
- Pick up the BALL that floats up
- Return to the Street Corner
- Use the GLOVE on the water in grate area
- Receive the RAZOR
- Return to Front Gate
- Examine the left bench
- Use the BRANCH and RAZOR on the bench
- Click on the RAZOR to open it and then move it to the end of the BRANCH
- Use the blue string laying on the bench to tie everything together
- Receive the RAZOR TOOL
- Give the BALL to the dog
- Use the RAZOR TOOL on the leash
- Click on the gate to open it
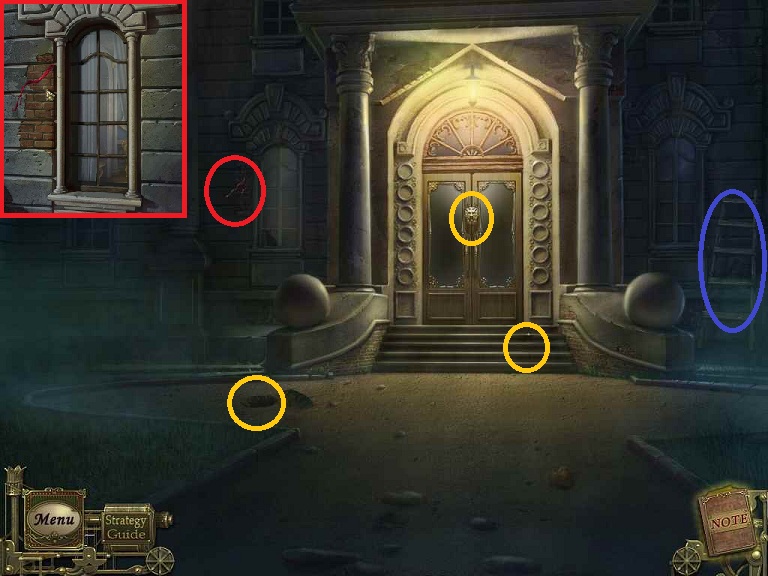
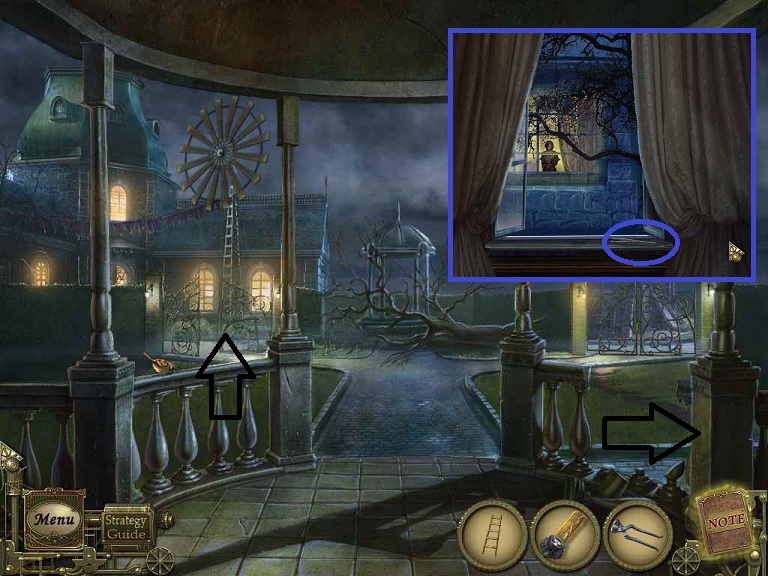
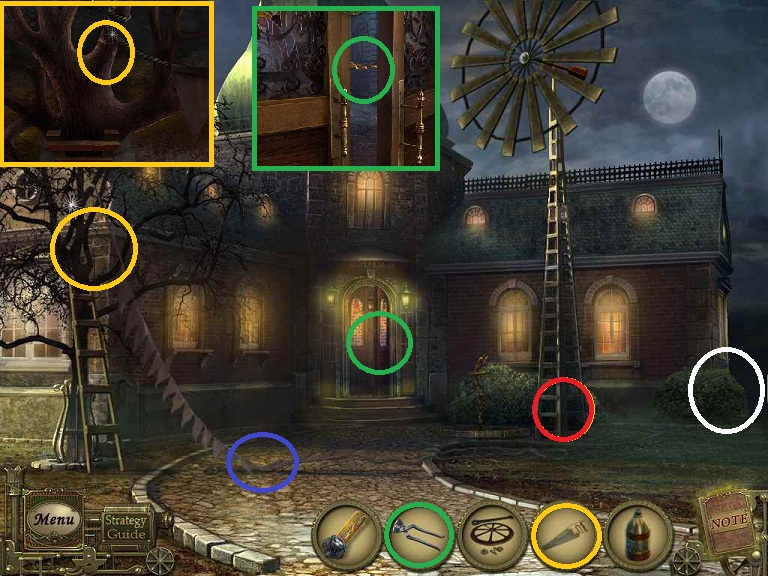
- Examine the window to the left
- Click on the window
- Pick up the RIBBON
- Pick up the LADDER to the right of the door
- Examine the hole in the ground; note you need a shovel
- Examine the front steps; note you need something to
- Back up twice to the Street Corner
- Use the RIBBON on the RING
- Return to the front door
- Use the RING on the door and click on the knocker
- Enter the house
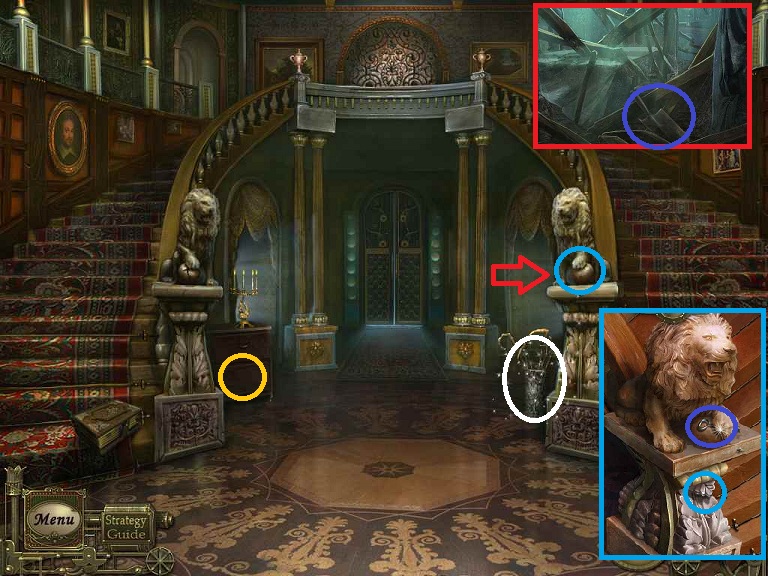
- Examine the lion to the right; it has a key under its paw.
- There is a piece of the pedestal that is active; click on that and the paw will lift
- Pick up the GARDEN KEY
- Note that the small chest of drawers to the left is missing a drawer handle
- Note that there are 5 directions you can go from this point.
- Head straight; the garden has something stuck in the lock and you cannot use the key
- Head to the downstairs right and pick up a SPADE HEAD
- Head to the upstairs right; note there is nothing to do
here.
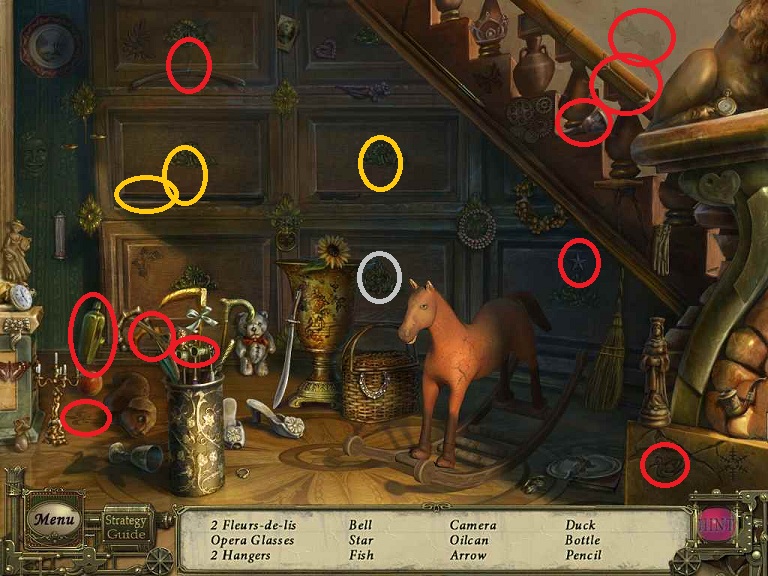
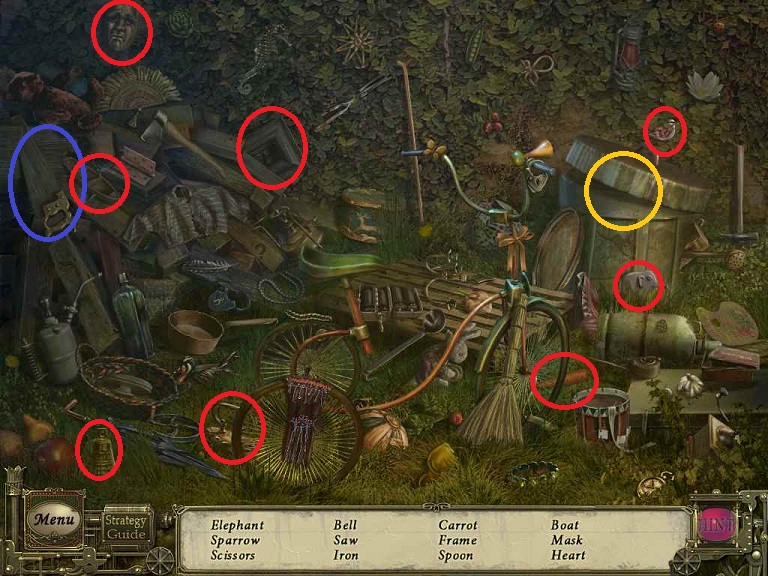
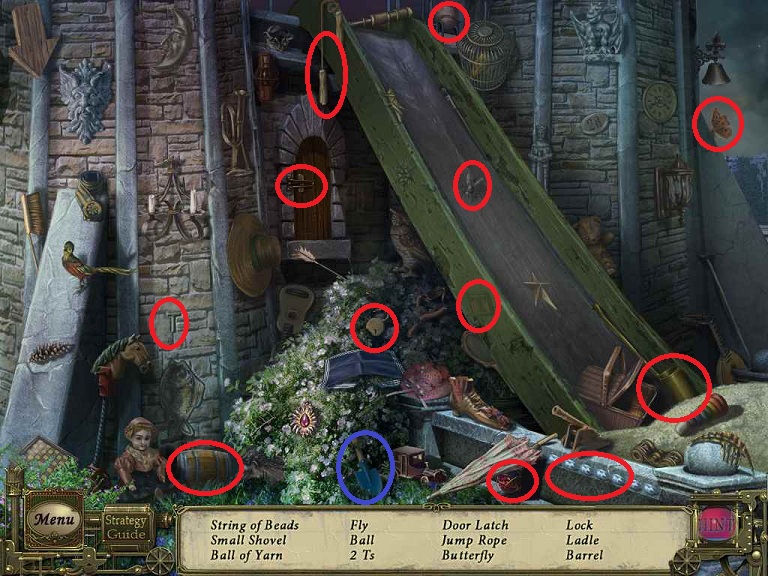
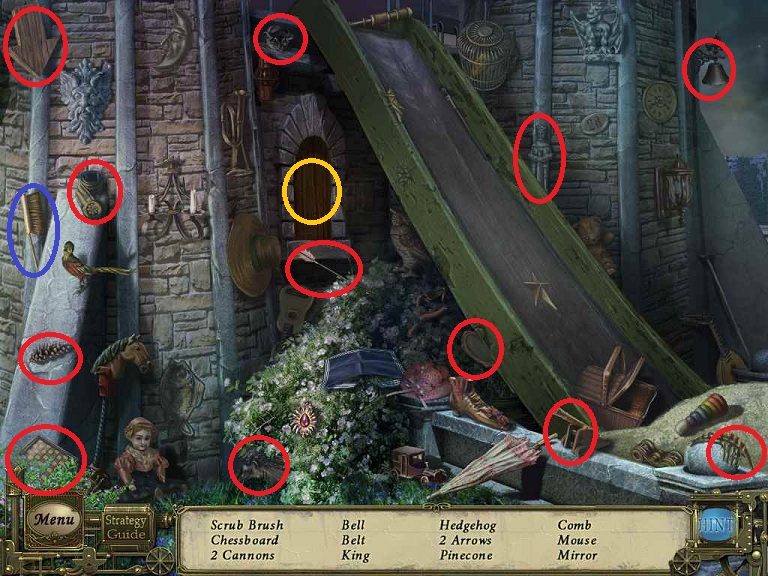
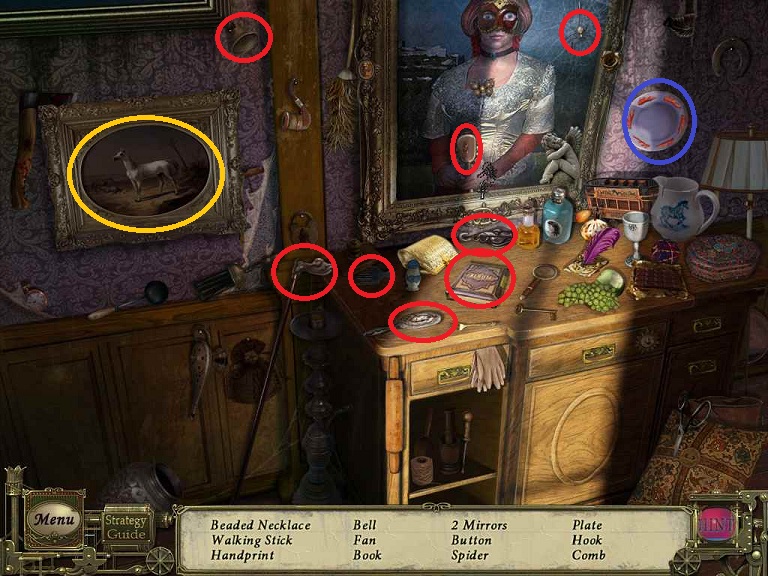
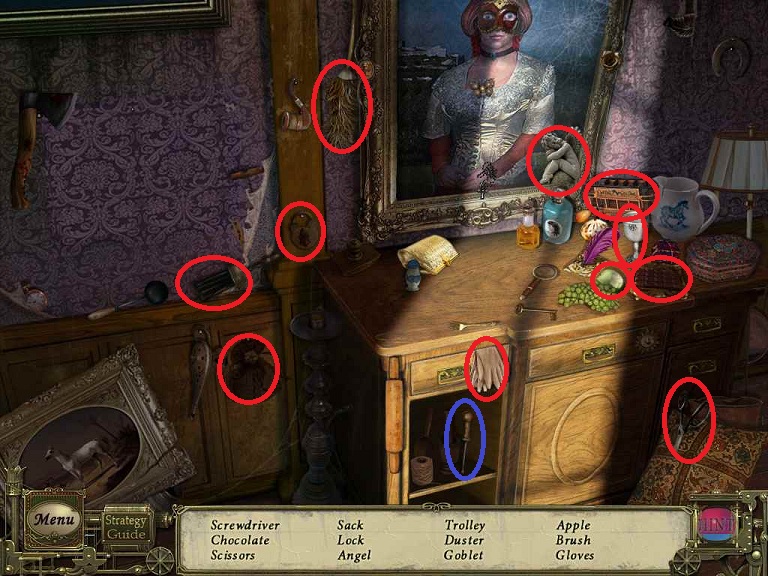
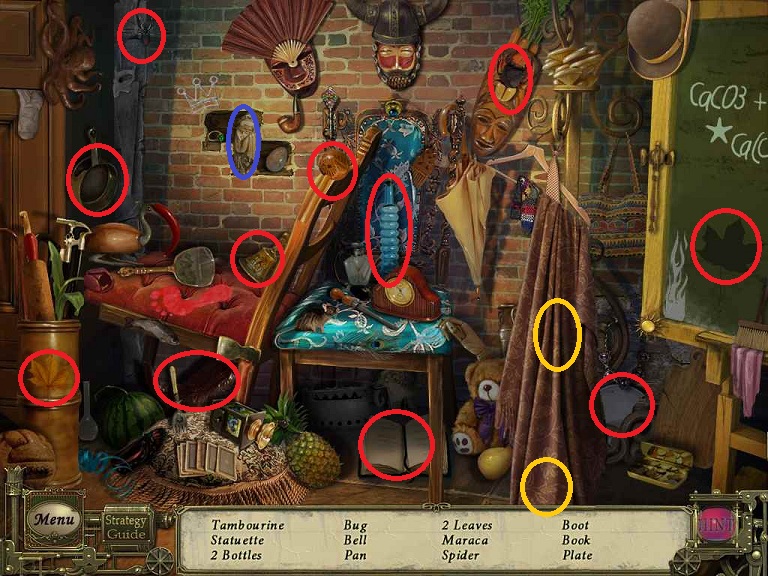
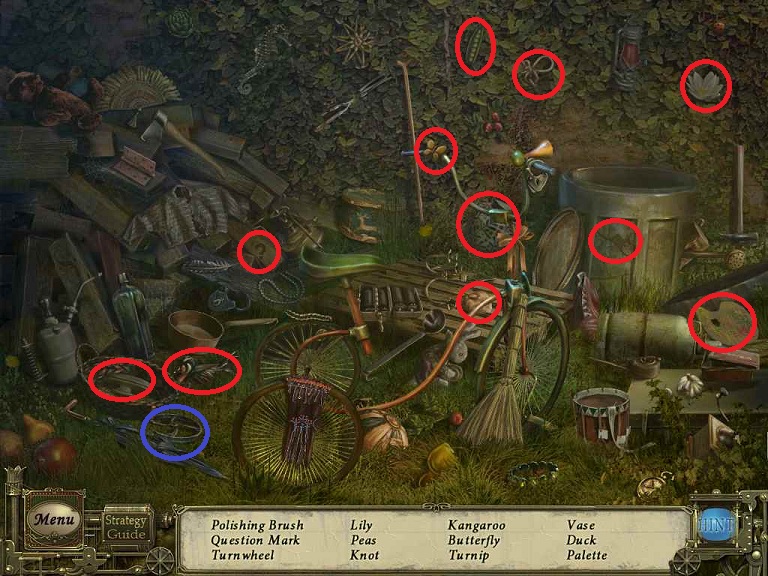
- Do the hidden object scene by the umbrella stand; the items required are somewhat variable
- There are 2 areas you need to open to find items
- Receive the OIL CAN when finished
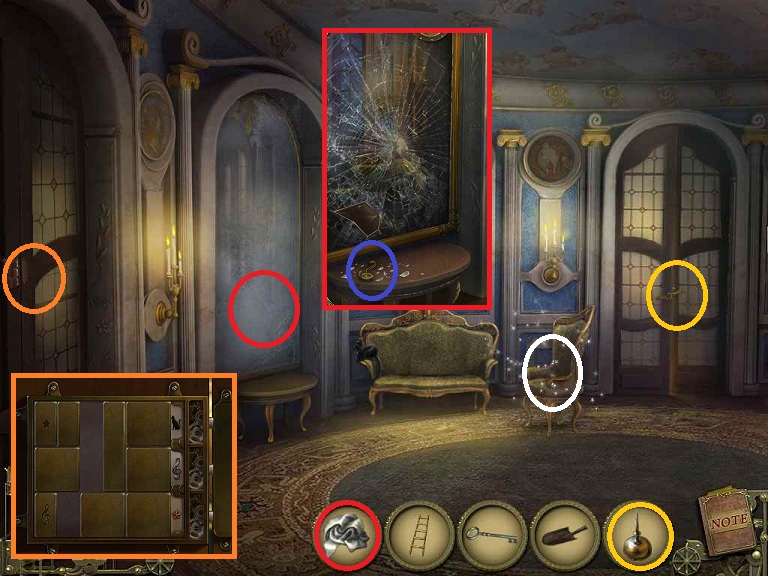
- Examine the door to the left; note the lock puzzle is missing a piece
- Examine the mirror
- Use the RAG on the mirror 3 times; the mirror will break
- Pick up the WINDOW HANDLE
- Examine the door to the right
- Use the OIL CAN on the door hinges
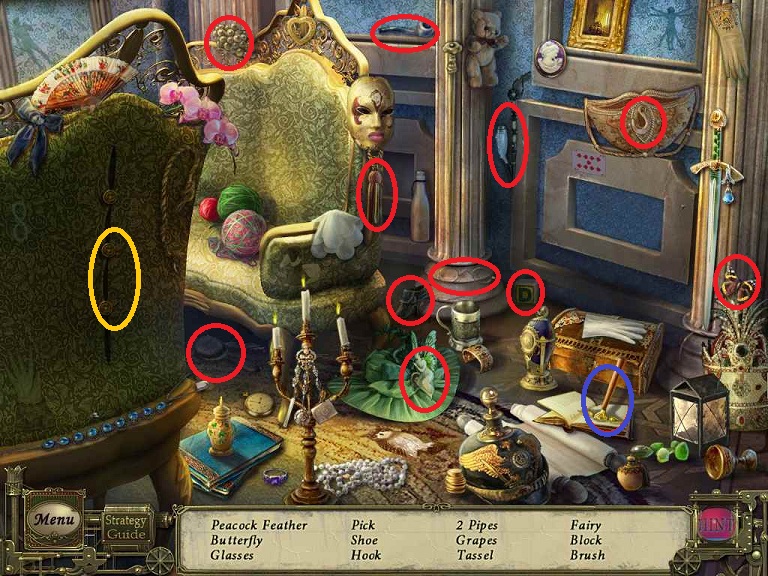
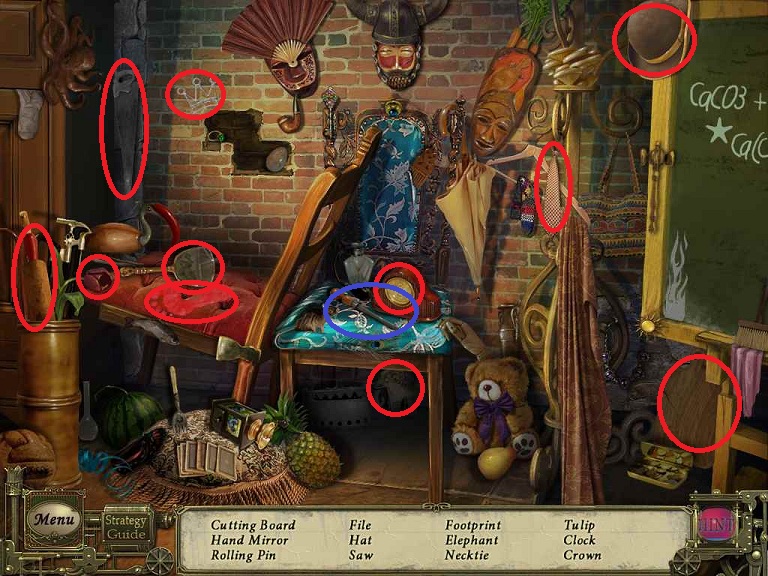
- Do the hidden object scene on the chair
- Click on the 3 buttons on the back of the chair to expose the peacock feather
- Receive the HAND PICK
- Enter the door to the right
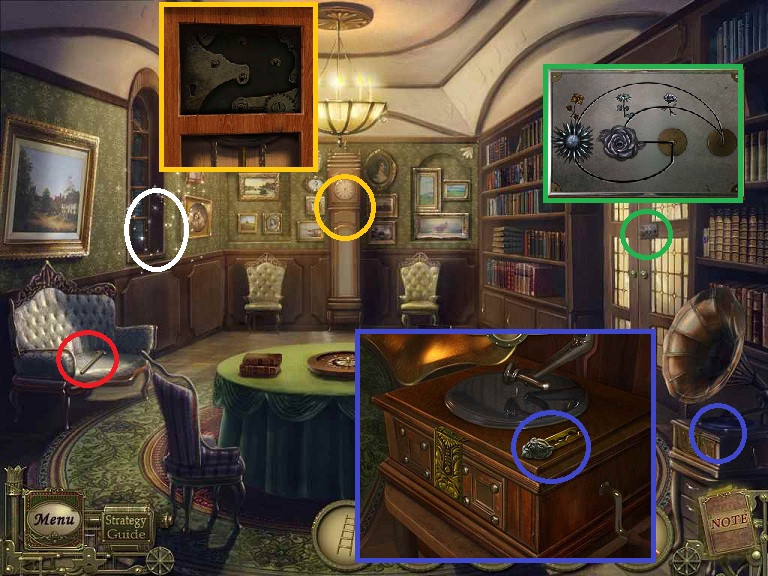
- Examine the gramophone; note it is missing a record and has a locked area
- Pick up the LION KEY
- Note the door to the right; it is missing a lock puzzle piece
- Note the clock; it is missing gears and a winding key
- Note the sofa; it has an area to put together the SPADE.
- Put the SPADE HEAD down; note you need a NAIL and HAMMER
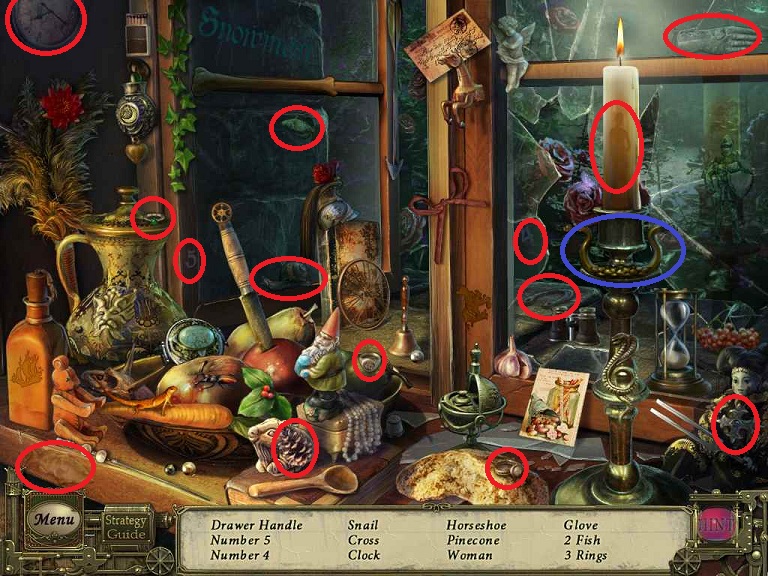
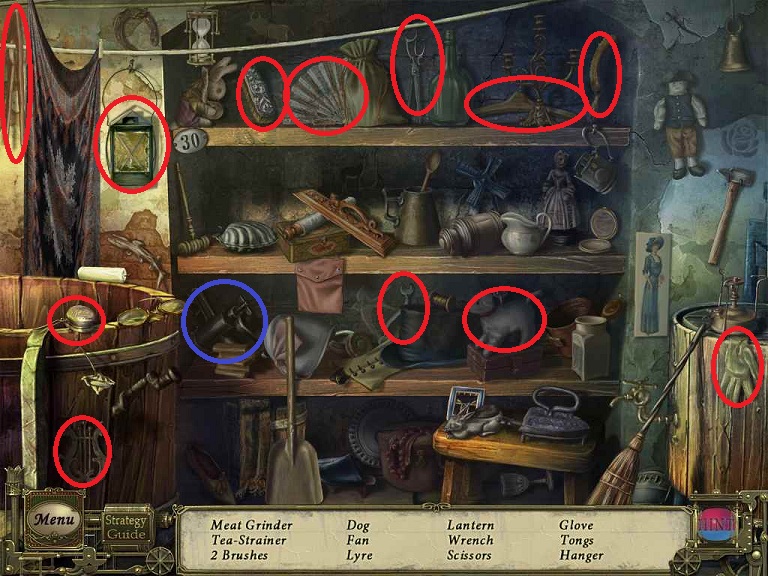
- Do the hidden object scene
- Receive the DRAWER HANDLE
- Return to the Foyer
- Use the DRAWER HANDLE on the chest of drawers
- Pick up the HAMMER
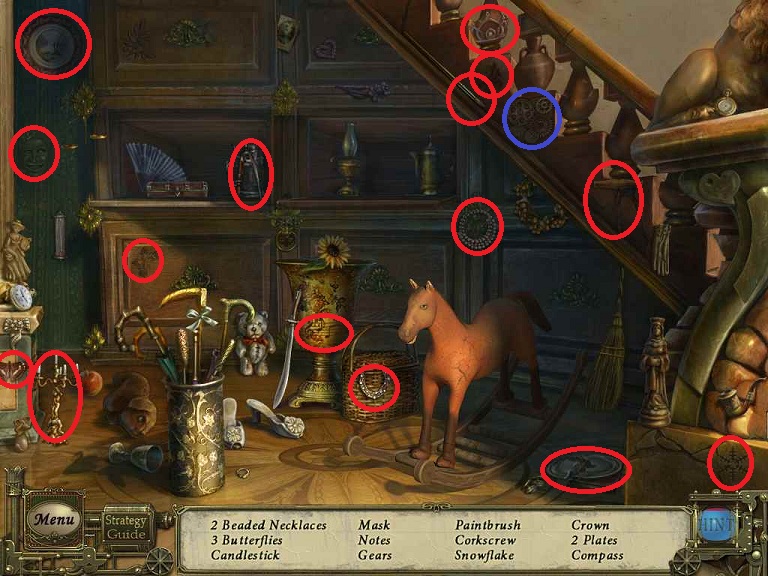
- Do the hidden object scene
- Pick up GEARS
- Return to the front entrance
- Use the HAND PICK on the front steps
- Pick up the CLOCK KEY
- Examine the bench to the right
- Use the HAMMER on the NAIL on the bench
- Receive the NAIL
- On the way to the Library, do hidden object scene in the sitting room
- The key is behind the panel in the wall.
- Receive CAGE KEY
- Return to the Library
- Examine the couch
- Place the SPADE HEAD, NAIL, and HAMMER on the couch
- Put the SPADE HEAD on the handle
- Put the NAIL on the spade
- Use the HAMMER on the nail
- Receive the SPADE
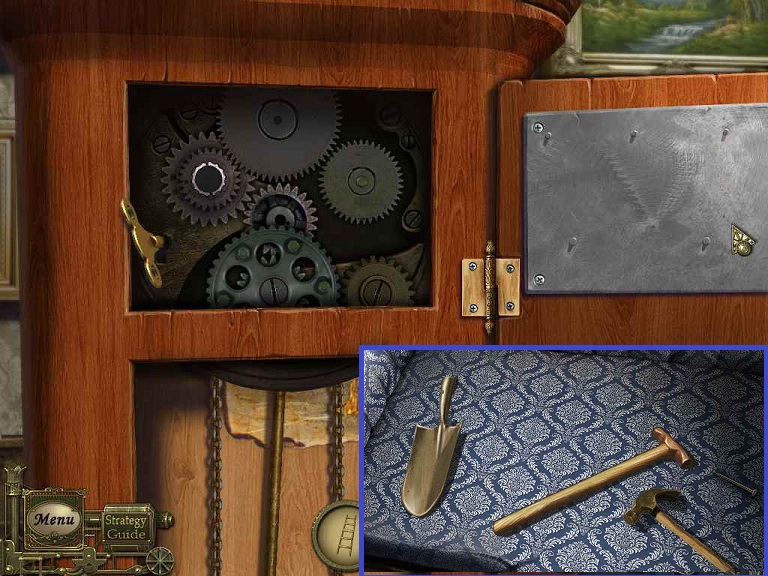
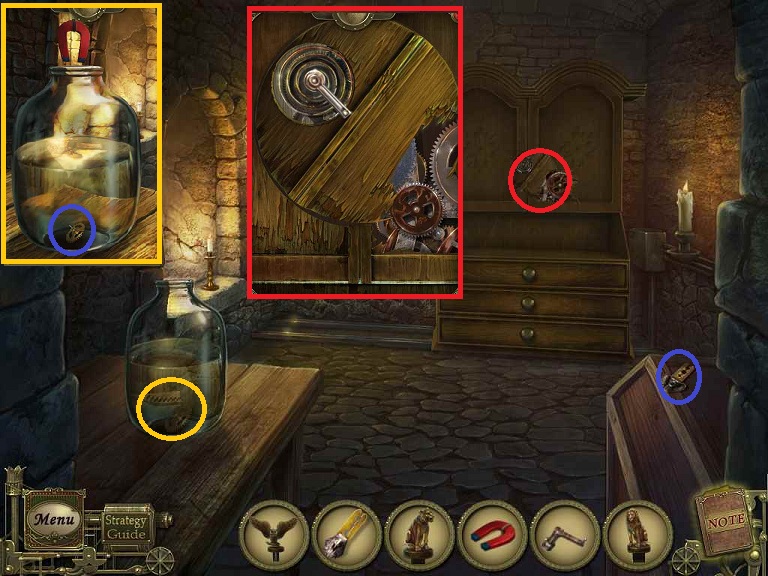
- Examine the clock
- Place the GEARS on the clock
- Place the CLOCK KEY on the clock and click it twice
- The gears will start to move, which makes it easier to place them.
- Put the GEARS in the proper place (see image)
- Receive the MYSTERIOUS PAPER
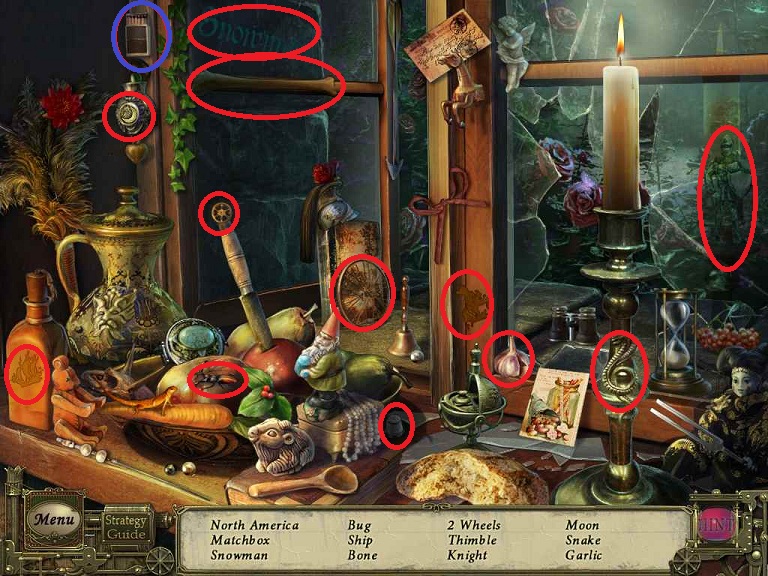
- Do the hidden object scene
- Receive MATCHES
- Return outside
- Use the SPADE on the hole
- Dig up the FLOWER
- Return to the Library
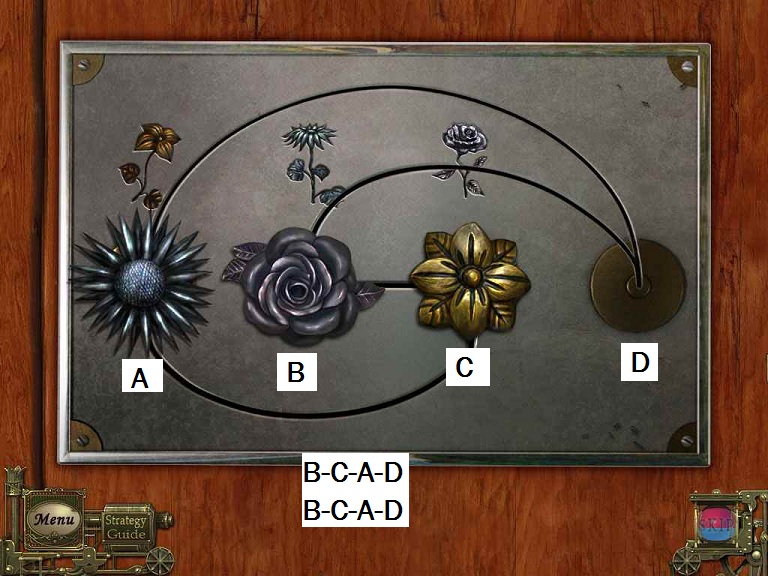
- Examine the door to the right
- Place the FLOWER
- Match the pieces to the door, starting with the second flower.
- Head out the door
- Examine the table; you need some missing puzzle pieces
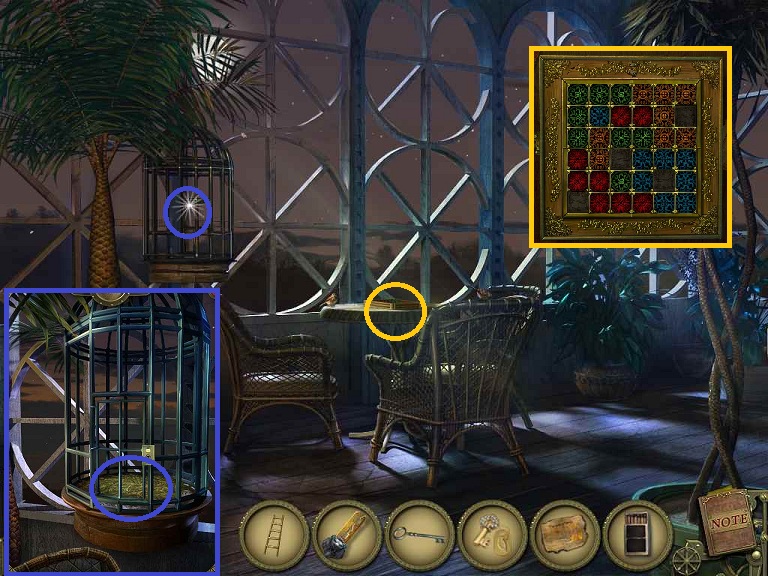
- Examine the birdcage
- Use the CAGE KEY on the birdcage
- Click on the floor to clean it off and then a button
- The bottom of the cage will open; pick up the TILE
- Return to Sitting Room
- Examine the door to the left
- Place the TILE
- Move the tiles around so the 3 small tiles are lined up with the same images
Living Room
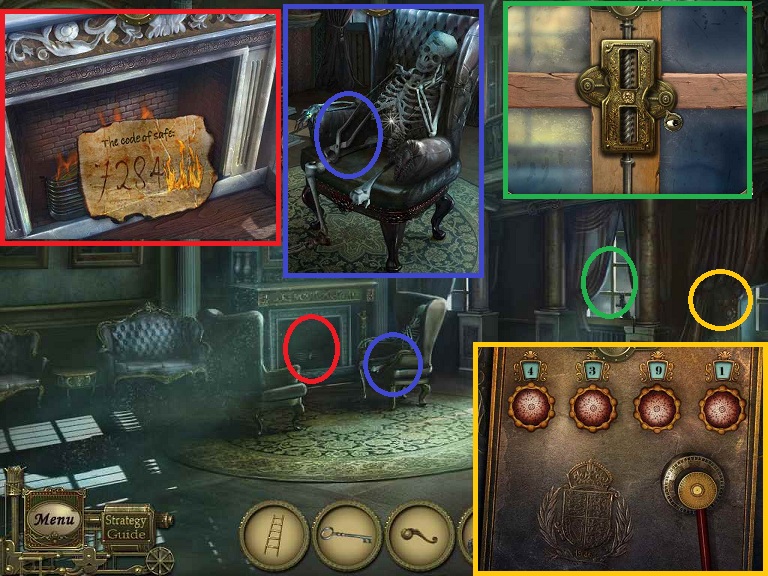
- Examine the fireplace
- Use the MATCHES on the firewood
- Use the MYSTERIOUS PAPER on the firewood to get a code (7284)
- Examine the skeleton in the chair
- Pick up the BOLT CUTTER
- Note the skeleton missing a leg
- Examine the window; note you need two handles.
- Examine the safe; enter the code
- Pick up the COLORED TILES
- Return to the porch (through the library)
- Examine the table
- Place the COLORED TILES
- Solve the puzzle by matching the tiles to the drawing
- Clicking one tile will cause the 8 tiles touching it to move clockwise (right-clicking will cause them to move counter-clockwise)
- Start with the red tiles first and then the orange
- Pick up the WINDOW HANDLE
Living Room
- Return to the Living Room
- Place the WINDOW HANDLES on the window
- The cat will jump out
- Pick up the TWEEZERS that the cat happened to be sitting on
- Return to the Foyer
- Examine the Garden Door
- Use the TWEEZERS in the lock
- Use the GARDEN KEY in the lock
- Go through the door to the Garden Porch and head right
- Pick up the SPARE BOILER PARTS
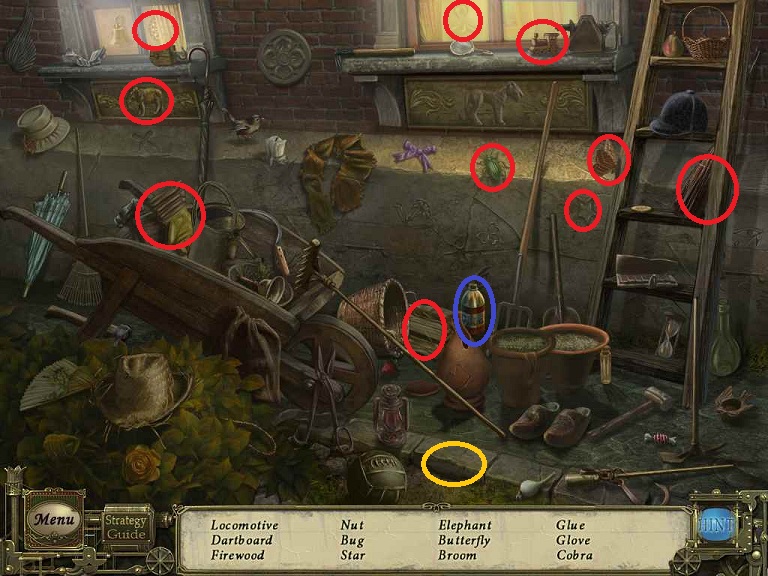
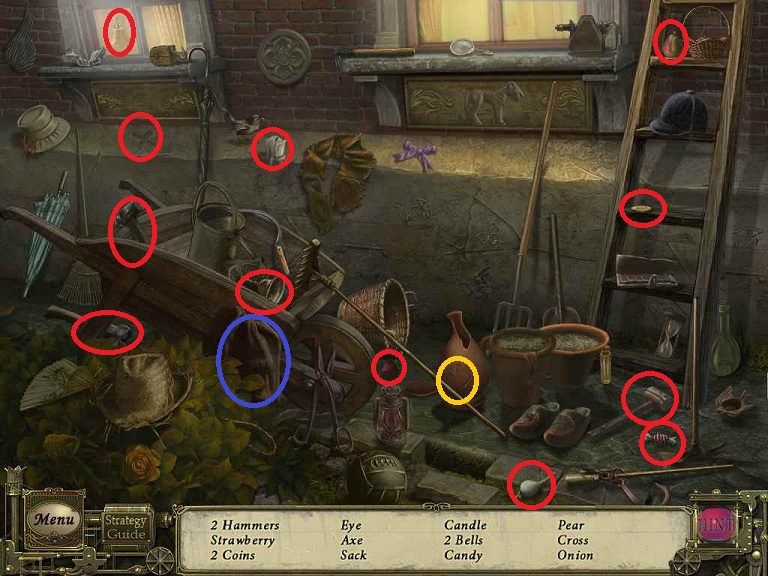
- Do the hidden object scene
- Click on the trashcan to look inside for items
- Receive the SAW
- Return to the Garden Porch and go forward
- Touch the bottom of the Windmill; the flags will drop
- Examine the Tree
- Place the LADDER
- Use the SAW on the branches
- Pick up the ROPE
- Examine the Fountain; note the broken fountain and gnome
- Examine the door
- Use the BOLT CUTTER on the door
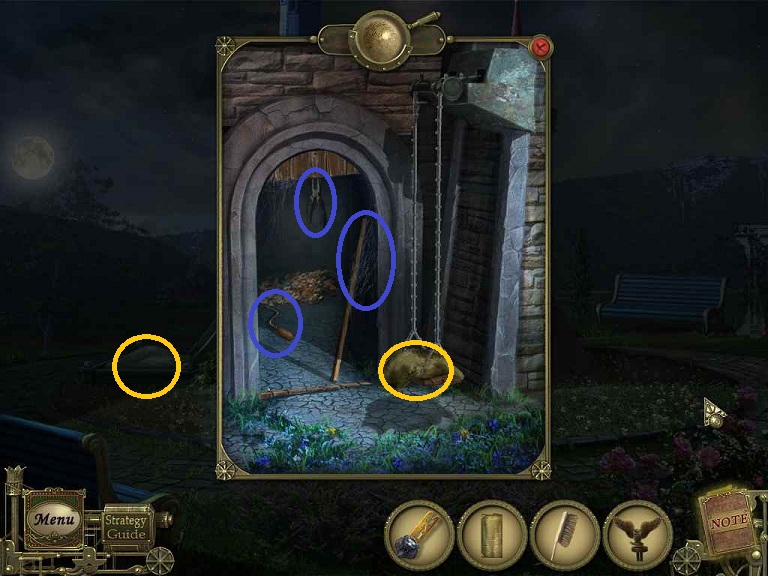
- Do the hidden object scene to the right
- There is a loose stone on the ground where some items may be hiding
- Receive GLUE
- Enter the building
- Go through the rightmost door
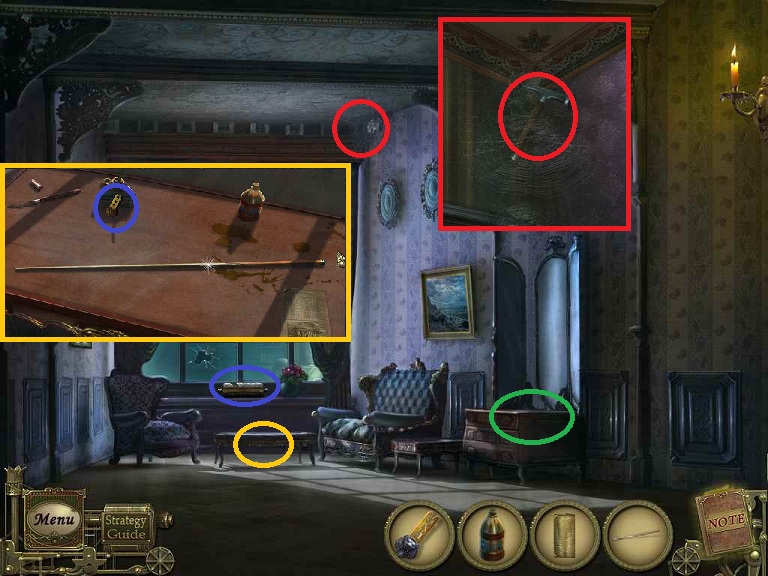
- Examine the pool table
- Pick up the NEWSPAPER and BROKEN BILLIARD CUE
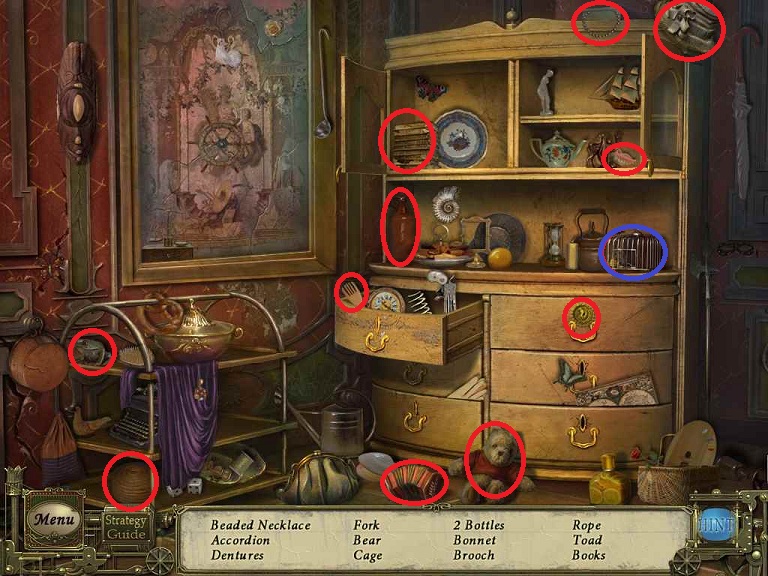
- Examine the chest to the right
- There is a scrap missing from the top
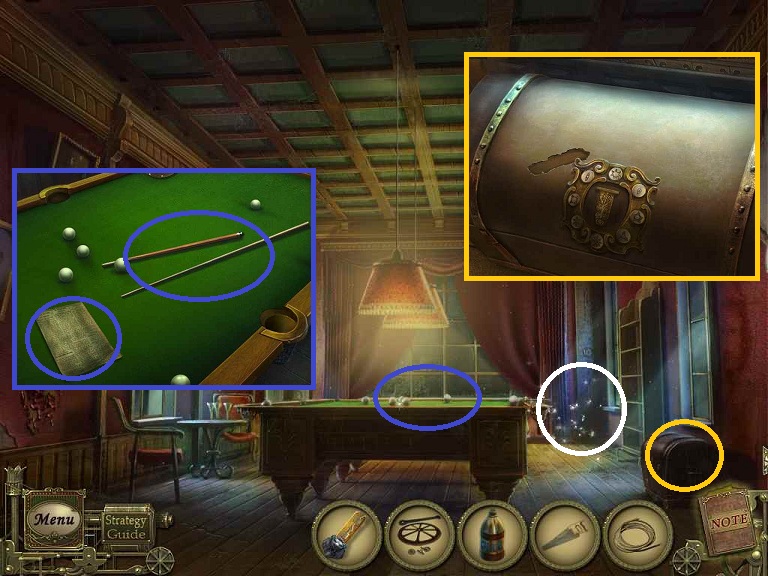
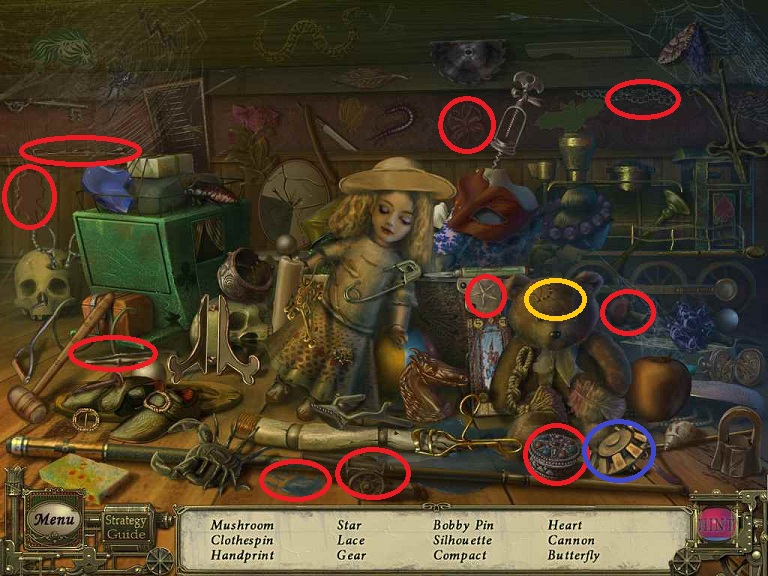
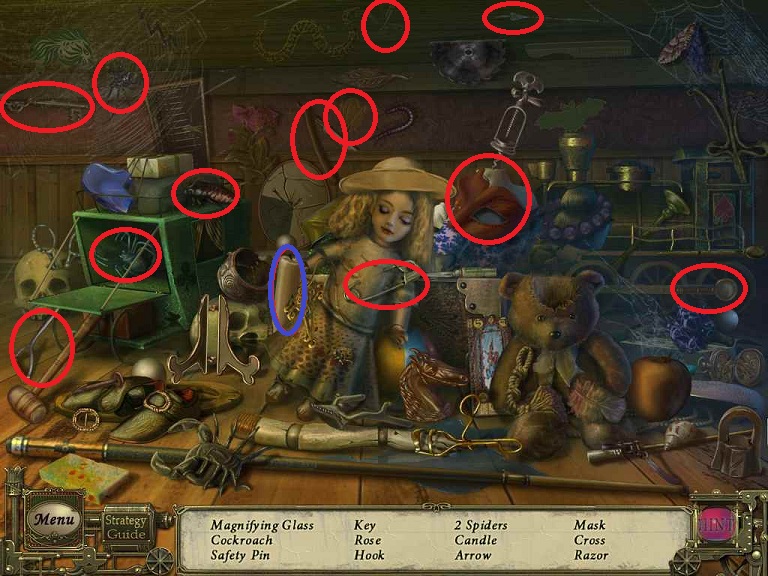
- Do the hidden object scene
- The top of the teddy bear will open as will the green box
- Receive the GEAR
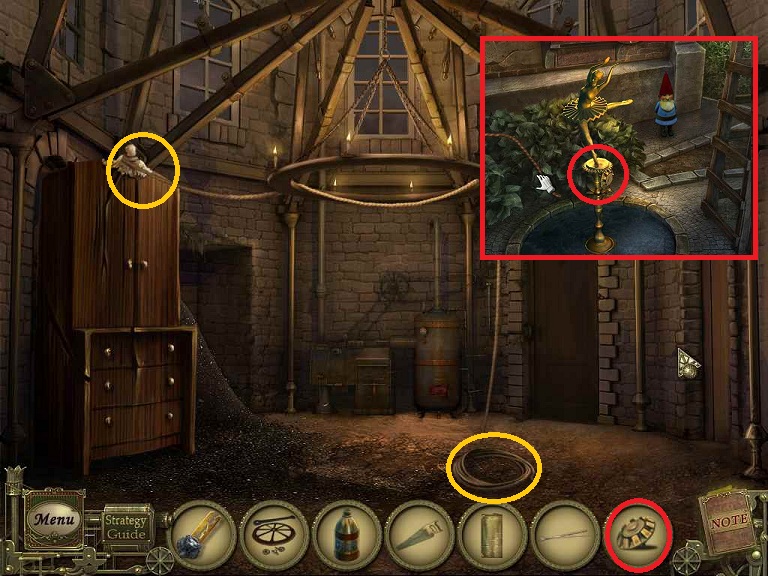
- Place the ROPE on top of the cabinet to the right
- Click on the bottom of the rope
- You will end up outside
- Examine the fountain
- Use the GEAR
- Click on the ballet dancer
- Drag the end of the ROPE to the dancer
- The rope will wind up
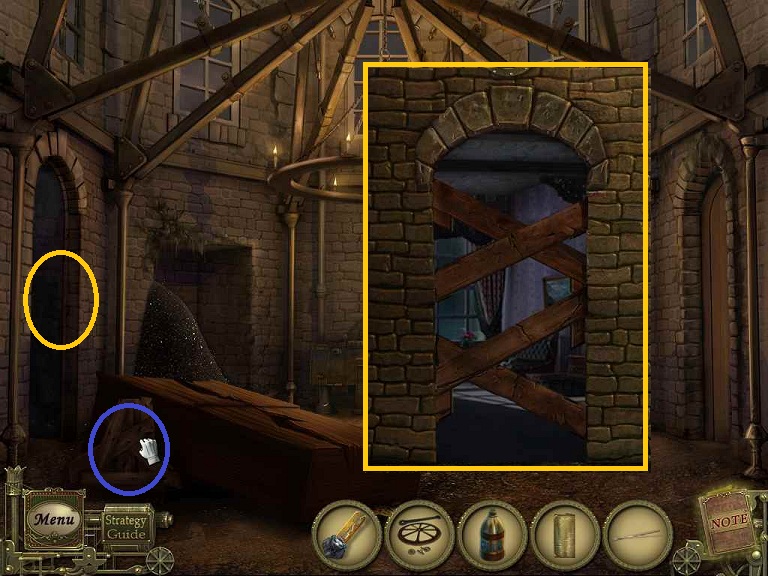
- Enter the boiler room and head left
- Use the SAW on the boards blocking the doorway
- Pick up the BOARDS
- Enter the room
Arbor Sitting Room
- Examine the dressing table; note the missing piece to the lock
- Pick up the ROLLER ORGAN PART
- Examine the table
- Pick up OWL KEY
- Place the BROKEN BILLIARD CUE and GLUE on the table
- Drag the long end of the cue onto the other end
- Use the GLUE on the joint
- Receive a BILLIARD CUE
- Examine the far corner
- Use the BILLIARD CUE on the spider web
- Receive the ICE PICK
- Note the picture of the gnome
- Return outside
- Examine the fountain area
- Use the ICE PICK on the gnome
- Pick up the CODE SCRAP
- Return to the pool room
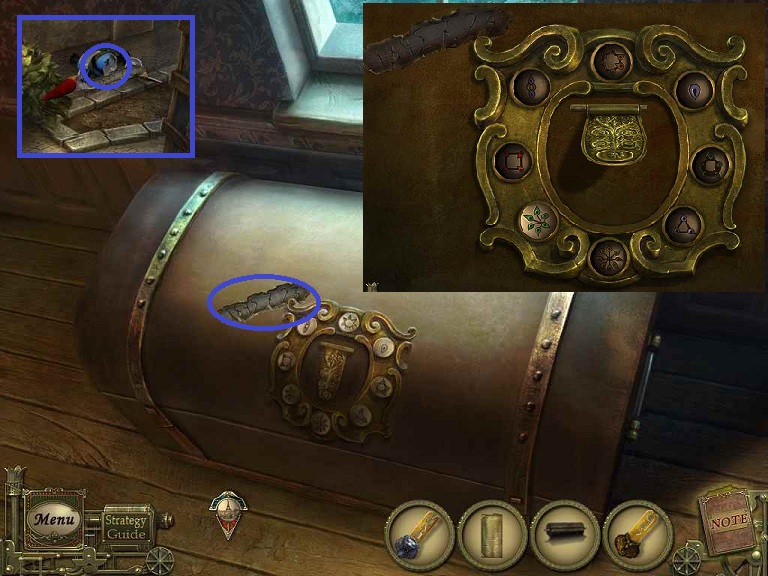
- Examine the chest
- Place the CODE SCRAP on the chest
- Press the buttons in order matching the number in the code to the number of points on the buttons (1, 8, 4, 5, 7, 2, 3)
- Pick up a LOCK PIECE
- Do the hidden object scene
- Receive the CANDLE
- Return to the sitting room
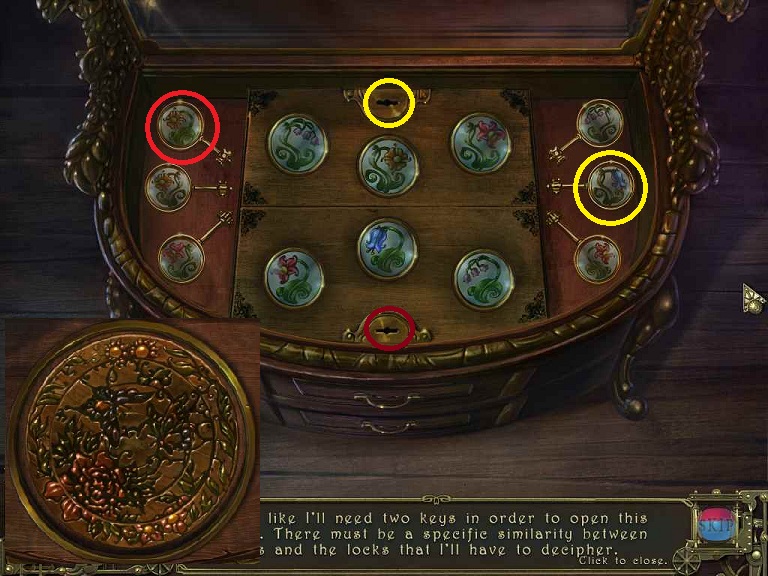
- Examine the dressing table
- Place the LOCK PIECE on the table
- All pieces spin but they also lock together from the center out
- You need to now select the proper keys; match the plant leaves and stems
- Receive the PAWL
- You should now have all the pieces to fix the boiler and the door
- The parts were off to the right when you exited the house
- The FIREWOOD came off the door
- The CANDLE came from the Pool Room
- Use the CANDLE on the chandelier in the boiler room to light the CANDLE
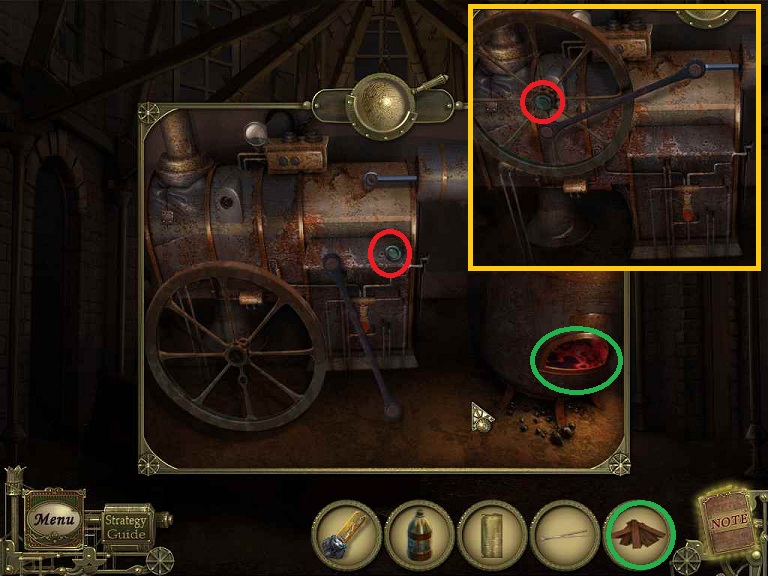
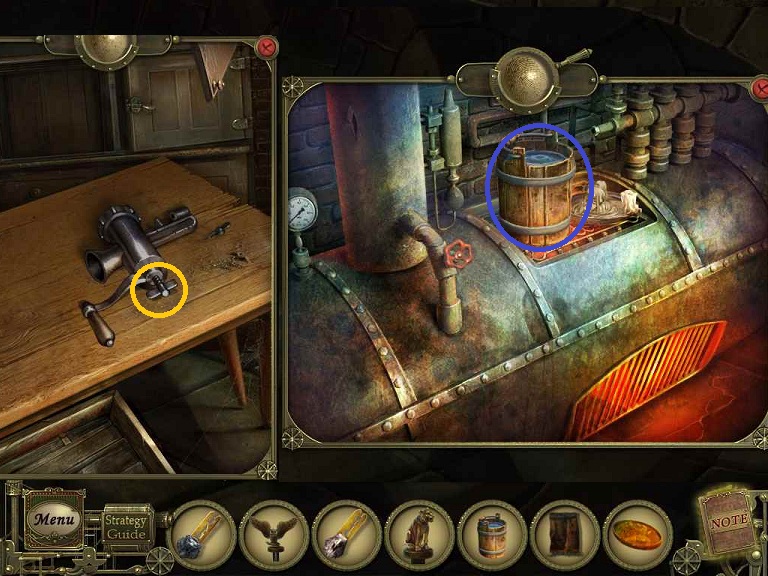
- Examine the boiler
- Place the SPARE PARTS on the boiler
- Move the Wheel and Rod to their spots
- Pick up the nut that is in the middle and drag it to the center of the wheel
- Place the FIREWOOD in the boiler
- Use the CANDLE on the boiler
- The boiler now works
- Examine the locked door
- Place the PAWL on the door and it will now open
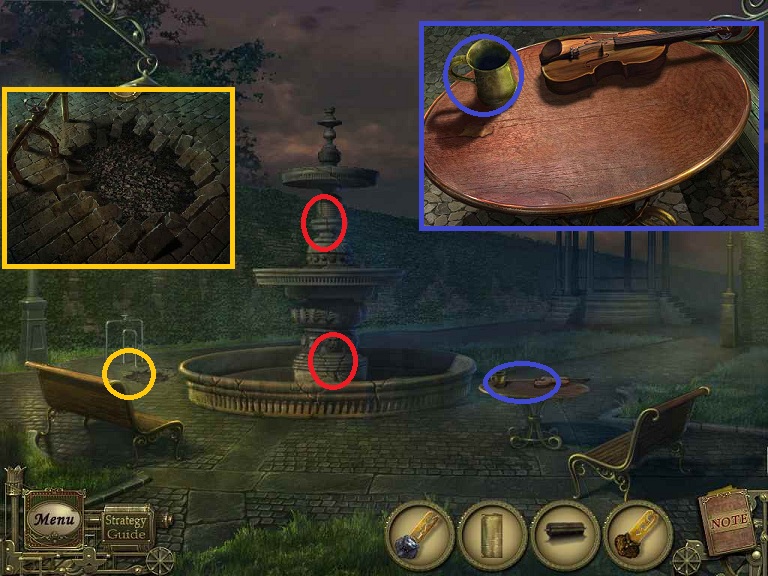
- Examine the Fountain near the bottom; you need to turn it back on
- Examine the Fountain near the top; you need to get something to clean of the moss
- Examine the pipes to the left
- You need something to dig out the pipe and repair it
- Examine the table; note you can put something together here
- Pick up the CUP
- Head forward
- Examine the organ; you need some pieces
- Examine the mirror; you need something to clean it
- Pick up the RECORD
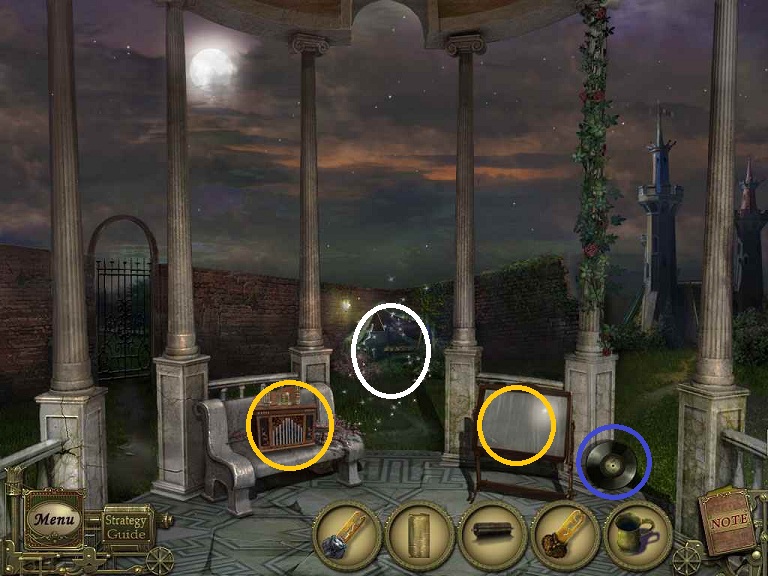
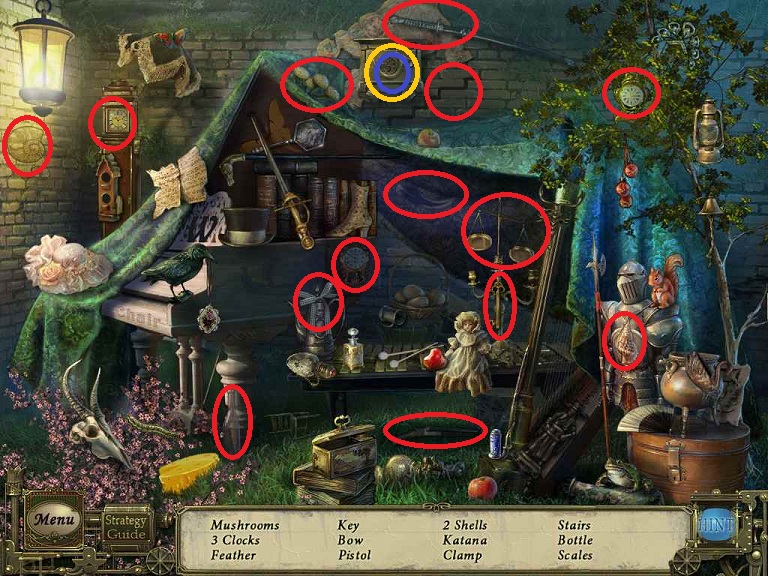
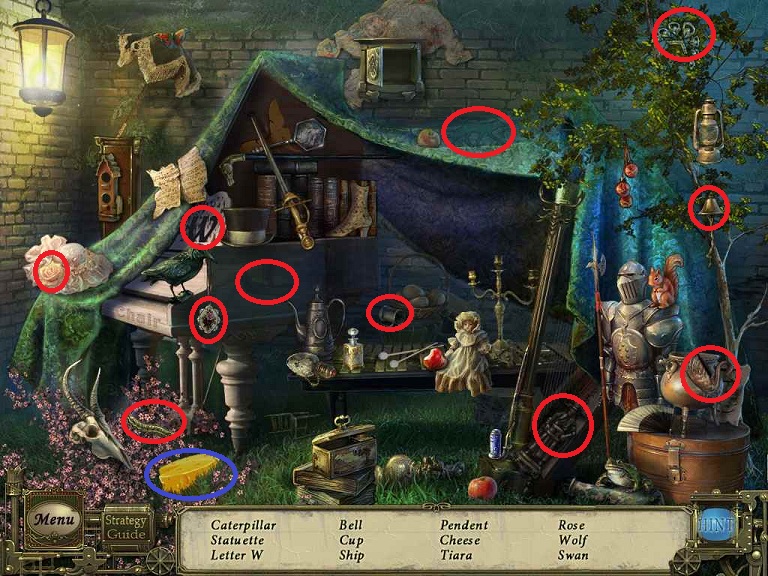
- Do the hidden object scene
- The metal box with the horn opens
- Receive a CLAMP
- Head forward
- Examine the door; note the swing needs a weight on it
- Note the sandbox
- Do the hidden object scene
- Pick up a SMALL SHOVEL
- Return to the fountain
- Examine the pipes
- Use the SMALL SHOVEL
- Use the CLAMP
- Click on the valve wheel
- Return through the arbor to the windmill
- Do the hidden object scene
- Receive a SACK
- Return to the Folly
- Use the SACK on the sand
- Use the SACK of SAND on the fountain water to get a WET SACK OF SAND
- Use the CUP on the water to get a CUP OF WATER
- Use the WET SACK OF SAND on the swing by the door
- Pick up the ROLLER ORGAN HANDLE, STICK, and PLIERS
- Do the hidden object scene
- Receive a BRUSH
- Examine the roller organ
- Place the CUP OF WATER on the table to start the puzzle
- You need to fill the 3 containers with the correct amount of water. These amounts are shown with Roman numerals and red lines
- Fill the center container and pour into the right container
- Pour the right container back into the cup
- Fill the left container and then pour into the right container
- Pour the one unit of water in the left container into the center container
- Pour out the right container
- Fill the left container and pour into the right container
- Pour out the right container into the mug
- Pour the one unit of water in the left container into the right container
- Fill the left container and pour into the right container
- Place the HANDLE and ROLLER ORGAN PART
- Click on the handle
- Pick up a PAPER CLIP and HANDKERCHIEF
- Use the HANDKERCHIEF on the mirror
Fountain
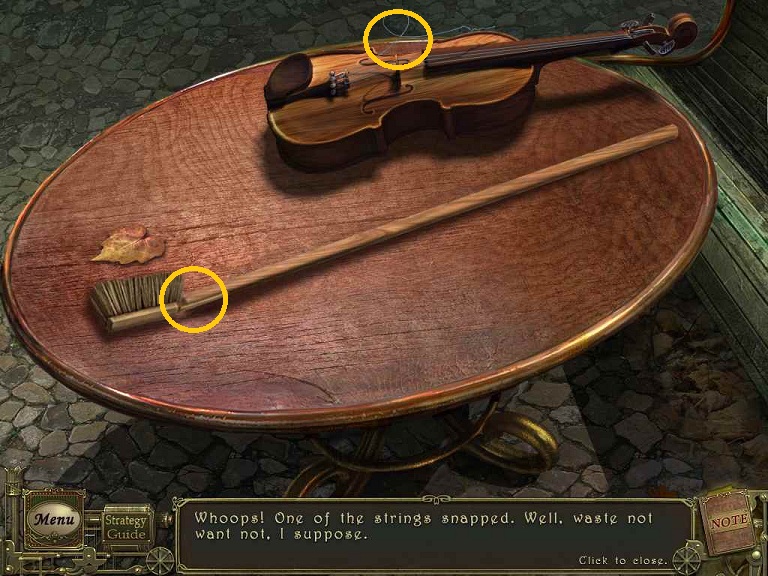
- Examine the table
- Place the STICK and BRUSH on the table
- Drag the BRUSH onto the end of the STICK
- Click on the violin pegs and a string will pop
- Click on the broken string and it will go onto the table
- Drag the string onto the joint
- Receive the LONG BRUSH
- Use the LONG BRUSH on the moss on the fountain
- You now need a TIGER key (which is not the same
as a LION key)
- Return to the Library inside the house
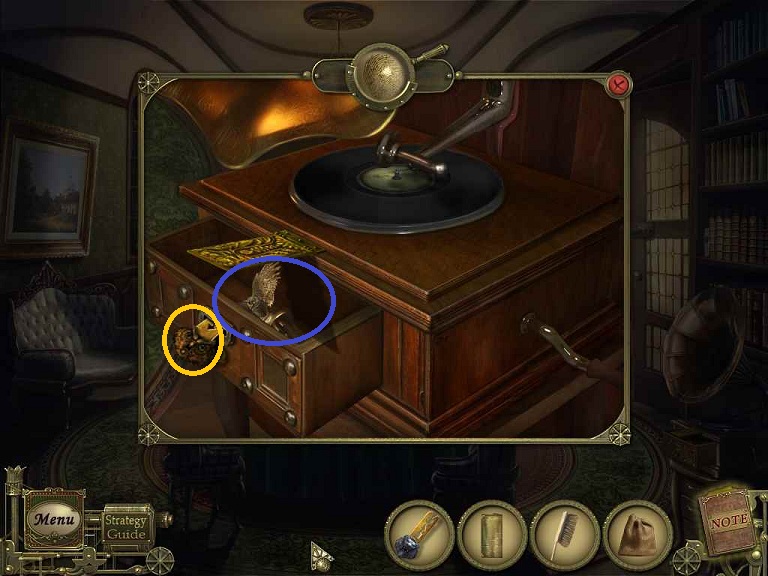
- Examine the gramophone
- Place the RECORD onto it and click the handle
- Use the OWL KEY (from the Arbor Sitting Room)
- Pick up the OWL STATUETTE
- Click on the drapes to the left
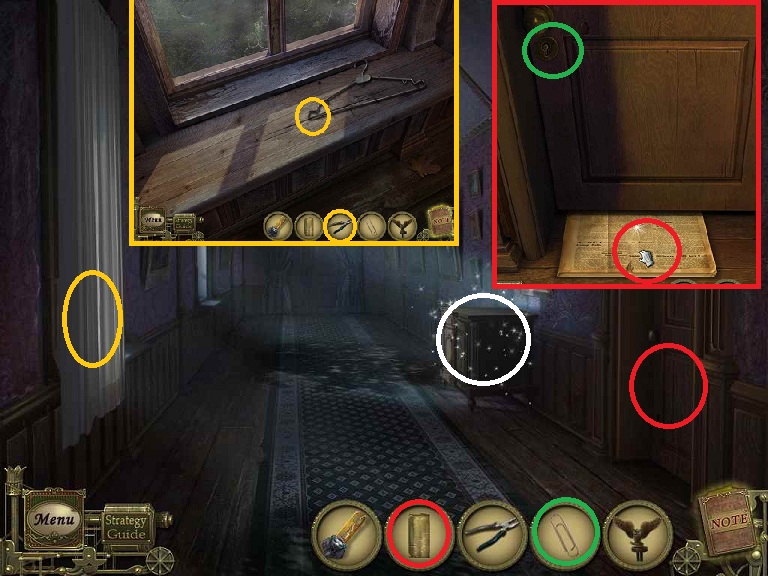
- Examine window area
- Use the PLIERS on the CLOTHES HANGER twice
- Receive the CLOTHES HANGER
- Examine the door to the right
- Place the NEWSPAPER under the door and click it to slide it under
- Use the PAPER CLIP on the door lock
- Click on the newspaper to pull it out
- Pick up the KEY and use it in the lock
- Do the hidden object scene
- Click on the painting of the horse for some items
- Pick up the PLATE
- Return to the Living Room, left in the foyer, and left in the sitting room
- Use the PLATE on the fire
- You will get the clue for the upstairs door
- Do the hidden object scene again
- Receive a SCREWDRIVER
 .
. - Examine the door down the hall.
- Note that the solution from the PLATE is tacked up next to the lock.
- Simply match the images to open the
lock.
- Enter the office
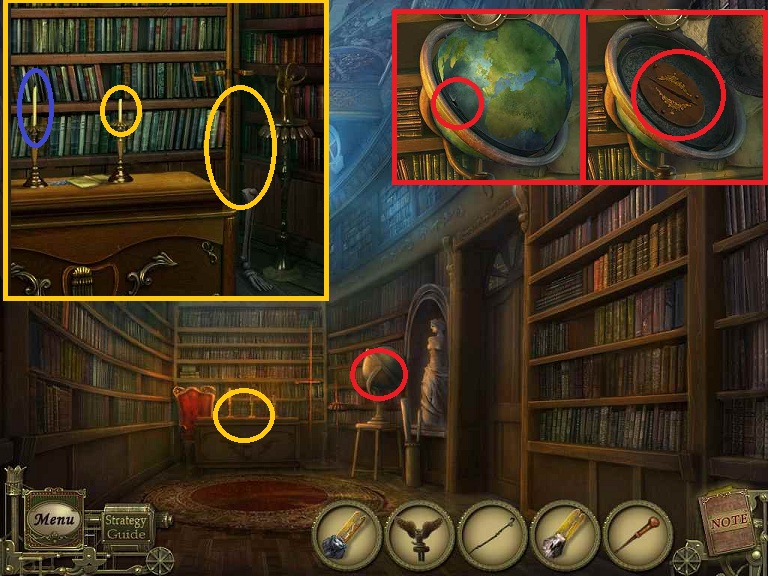
- Examine the globe
- Use the SCREWDRIVER on the hole in the globe
- Pick up the PEN
- Use the SCREWDRIVER on the 3 screws
- Note you need a COBRA KEY
- Examine the desk
- Note the area to the right which is missing part of a skeleton
- Pick up the CANDLE
- Return to the Living Room and pick up the SKELETON from the chair
- Light the CANDLE in the fireplace
- Return to the Office
- Place the SKELETON on the base
- Light the other candle on the desk with the CANDLE
- Click on the ring on the skeleton
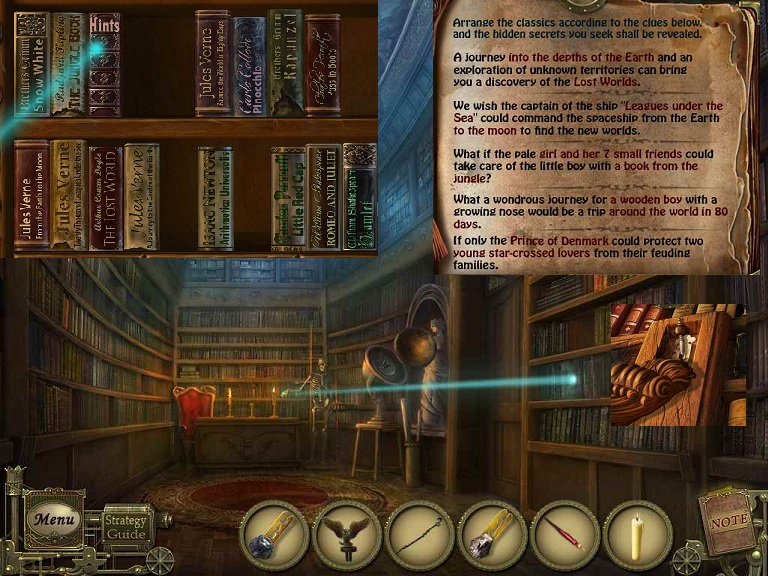
- Examine the bookshelf where the blue light is shining
- Look at the Hints book
- Simply place the books indicated next to each other. It does not matter where
- Examine the handle out of reach after solving the puzzle
- Use the CLOTHES HANGER to pull it
- Examine the desk
- Place the PEN in the holder
- Pick up the HORSE, BENT GEAR, and LAMP
- Examine the Fireplace
- Place the LAMP in the bracket on the left
- Pull the lever on the right
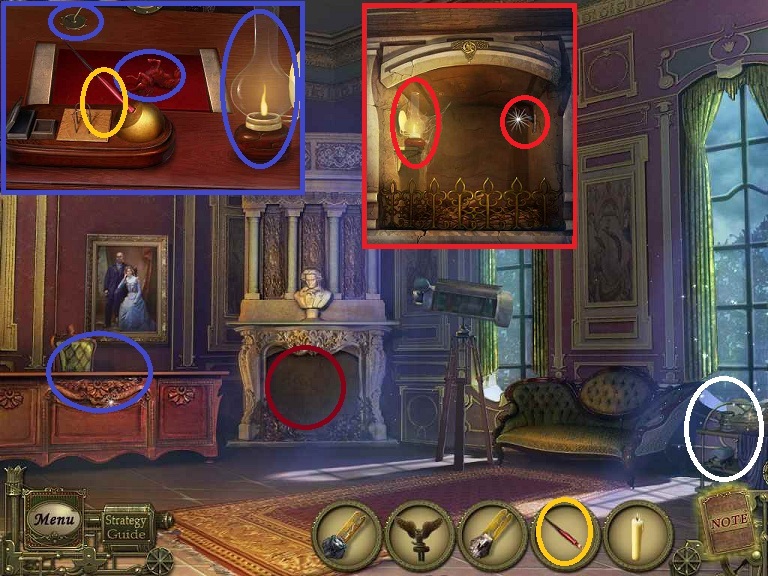
- Do the hidden object scene
- Click on the 2 doors and 1 drawer on the cupboard
- Receive INCENSE STICKS
- Enter the bedroom
- Pick up the EAGLE KEY on the bed
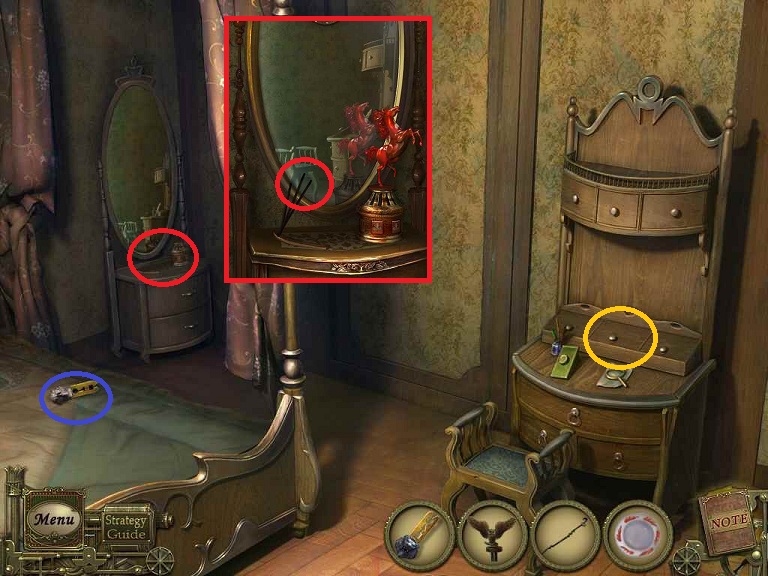
- Examine the dressing table
- Place the HORSE statue and the INCENSE STICKS
- Light the incense with the CANDLE
- After the cutscene, examine the dresser
- Solve the Flower Puzzle
- Receive a TELESCOPE LENS
Basement
- Go back to the hidden room and down the secret passage
- Enter the workshop in the back of the cellar
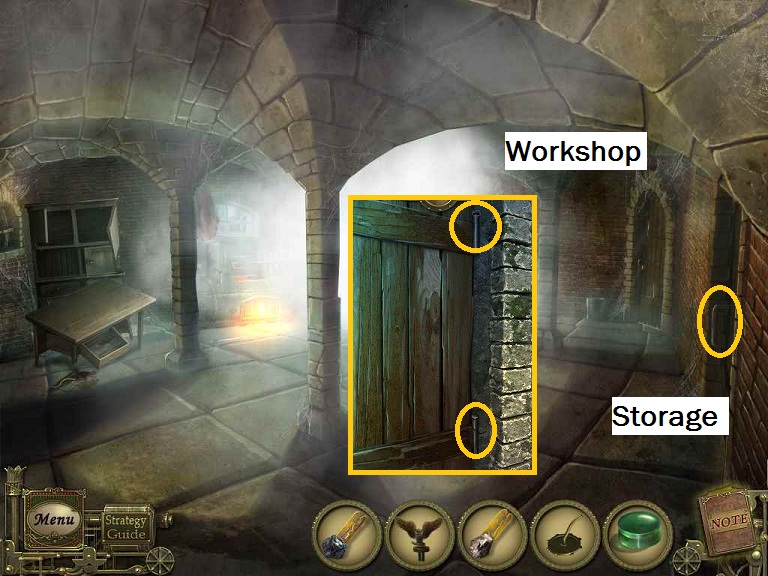
- Pick up the POLE HOOK
- Examine the vise, which needs a handle
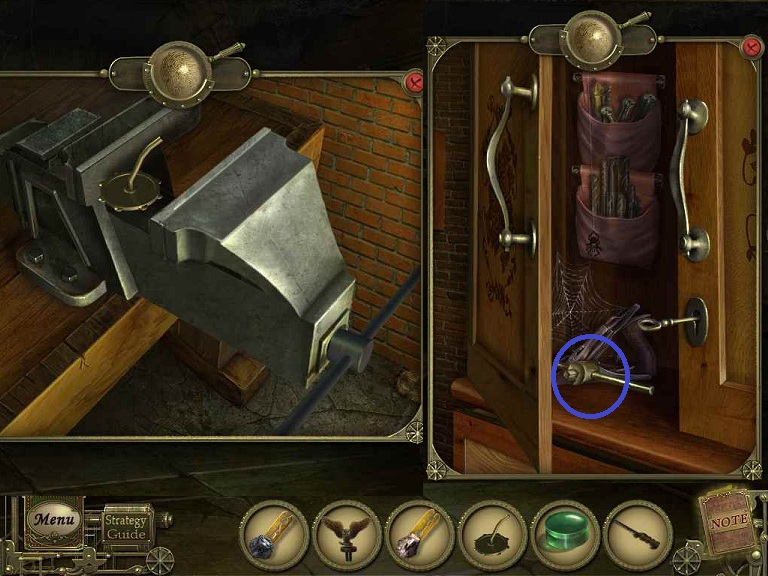
- Examine the dresser
- Open the bottom drawer and pick up a WRENCH
- Note the locked door
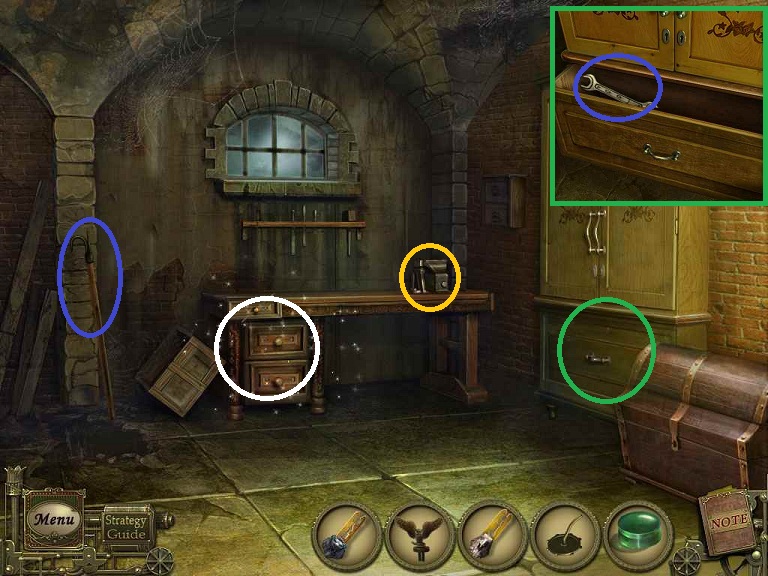
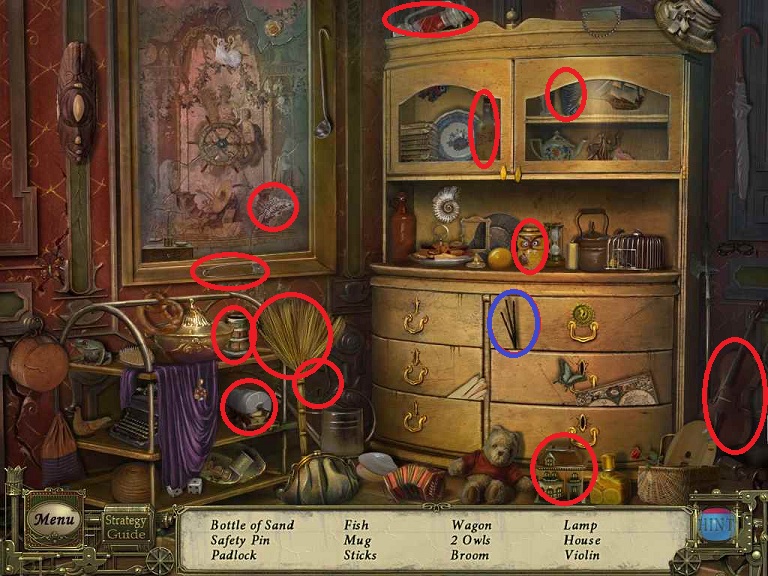
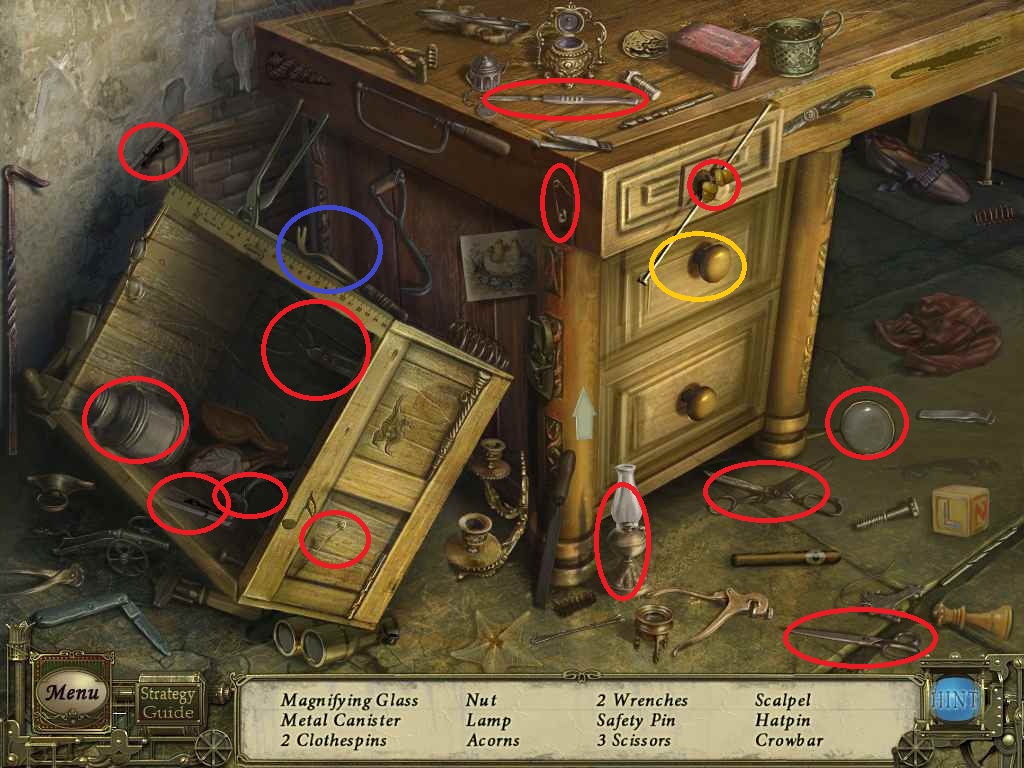
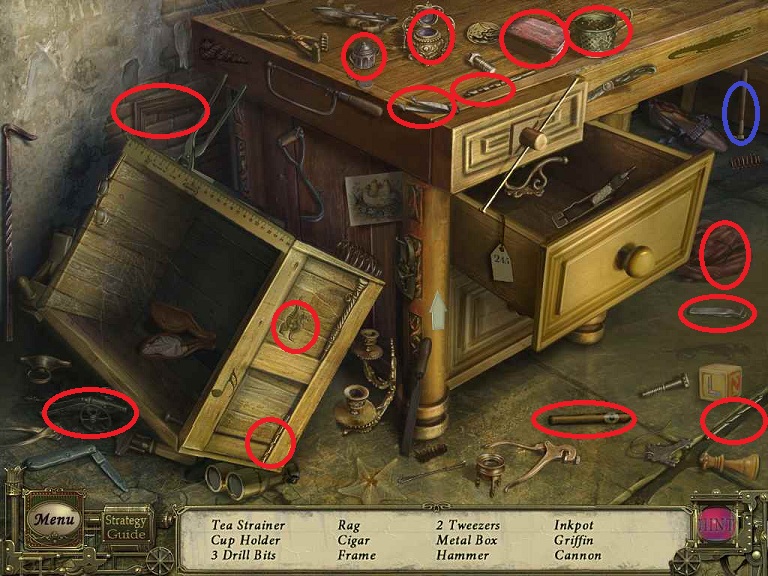
- Do the hidden object scene
- Open the middle drawer
- Receive the CROWBAR
- Return to the main room
- Examine the storage door
- Use the CROWBAR on both hinges
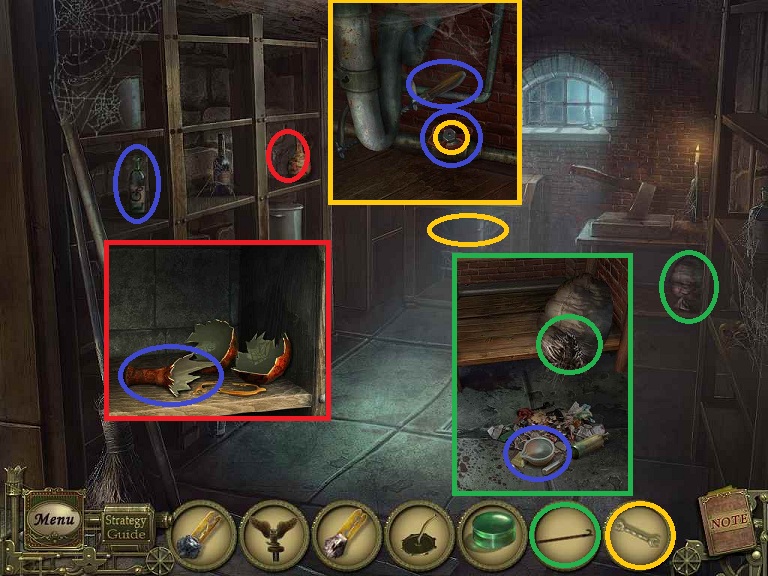
- Enter the storage room
- Pick up the VINEGAR BOTTLE
- Examine the vase on the shelf
- Use the WRENCH on the vase
- Pick up the VASE SHARD
- Examine under the sink
- Use the WRENCH on the valve
- Pick up the VALVE and FRETSAW
- Examine the bag under the worktable
- Use the POLE HOOK on the bag
- Use the VASE SHARD on the bag
- Pick up the MORTAR/PESTLE
- Examine the boiler
- Place the VALVE on the boiler and click on it
- Examine the table
- Place the FRETSAW on the table
- Click on the 2 wingnuts
- Drag the wrapping in the drawer onto the blade
- Pick up the SAW BLADE
- Examine the far door
- Use the SAW BLADE on the door

- Do the hidden object scene
- Click on the shawl
- Receive the WAX STATUE
- Return to the boiler
- Place the WAX STATUE in the pan on the boiler
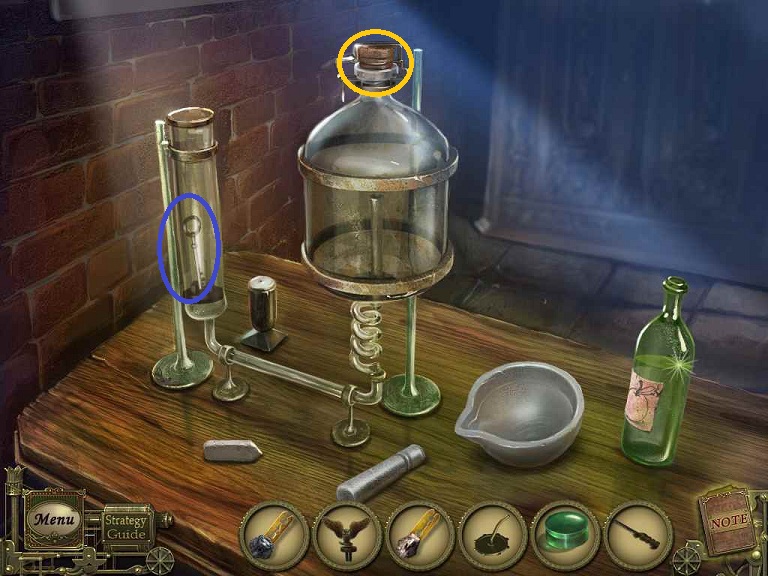
- Pick up the CHEMISTRY PLATE
- Examine the panel to the right
- Place the CHEMISTRY PLATE
- Make the chemical formulas listed
- There are only 2 sides to the plates
- Clicking on one plate will rotate that one and the ones to the left and right (if they are there!).
- After solving one formula, you can use the reset button.
- It will not reset the solved formula.
- Pick up the CHALK
- Examine the table
- Place the CHALK, MORTAR/PESTLE, and VINEGAR
- Drag the CHALK into the MORTAR
- Use the PESTLE on CHALK
- Click on the top of the large container
- Place the CHALK into the large container
- Place the VINEGAR into the large container
- Click on the top again
- Pick up the KEY
- Examine the cupboard
- Use the KEY in the lock
- Pick up the VISE HANDLE
- Do the hidden object scene
- Receive the HAMMER
- Examine the Vise
- Place the VISE HANDLE
- Place the BENT GEAR
- Click on the vise handle
- Use the HAMMER on the gear
- Pick up the GEAR
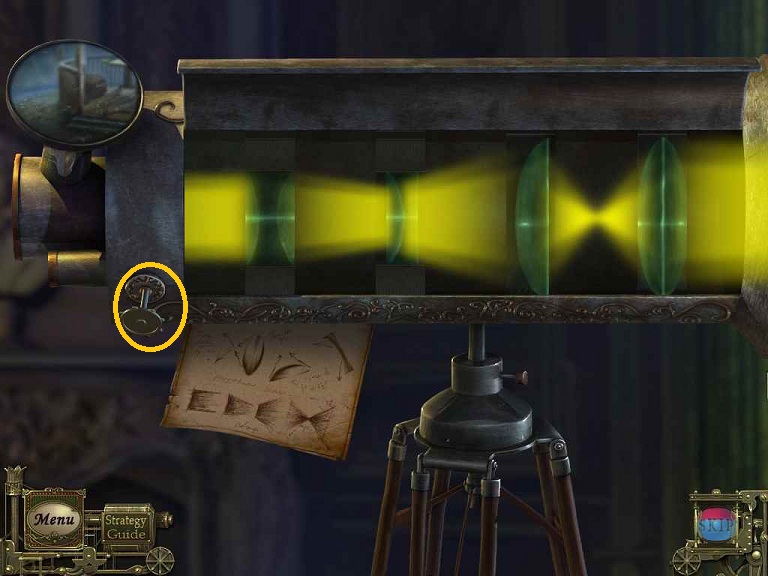
- Return to the telescope room
- Examine telescope
- Place the GEAR and the TELESCOPE LENS
- Move the lenses around as indicated on the diagram
- Do the hidden object scene
- Pick up the CAGE WITH MOUSE
- Return through the garden and arbor house to the gazebo
- Do the hidden object scene
- Pick up the CHEESE
- Examine the gate
- Use the SAW BLADE 3 times on the gate
- Examine the door
- Pick up the STEEL BAR
- Note the missing door handle
- Examine the statue to the left
- Use the STEEL BAR on the statue
- Pick up the NAIL PULLER
- Do the hidden object scene
- Click on a brick to the right and the corner of the driver's seat
- Pick up the ARM
- Pick up the RAPIER
- Examine the statue
- Pick up the ARM
- Place the ARMS on the statue
- Examine the exposed base
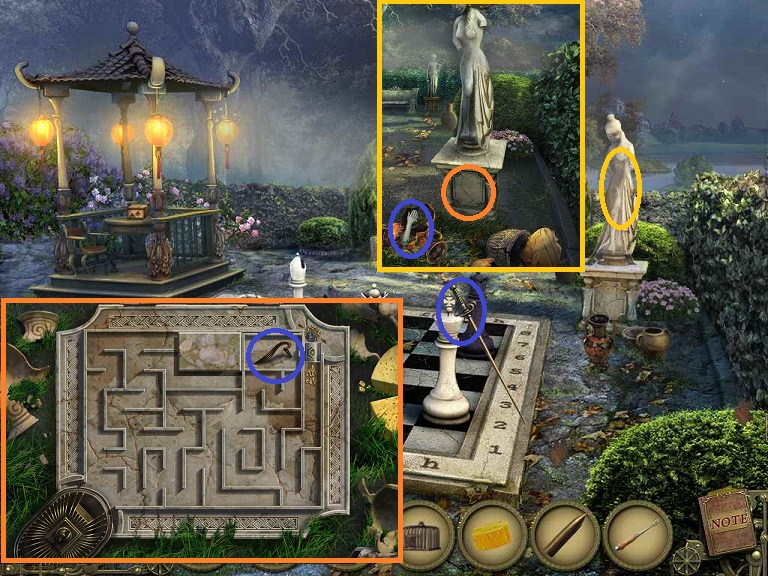
- Place the CAGE and CHEESE on the maze
- Place pieces of cheese to entice the mouse through the maze
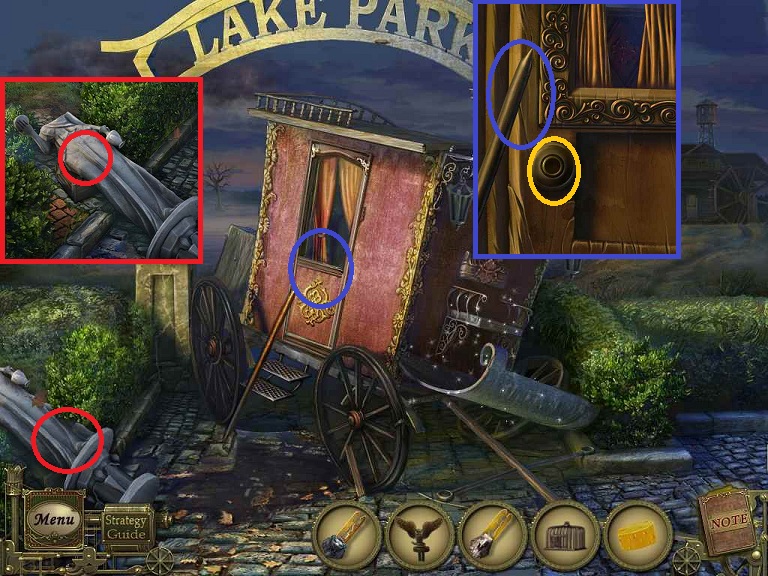
- You have to place the cheese at the next turn so that the mouse can see it.
- Pick up the HANDLE
- Place the HANDLE on the coach door
- Examine inside the coach
- Pick up the CHESS BOARD
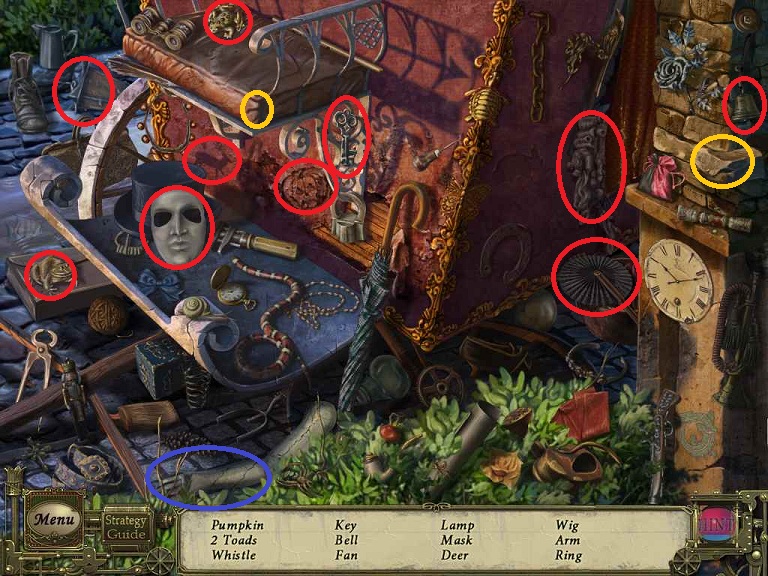
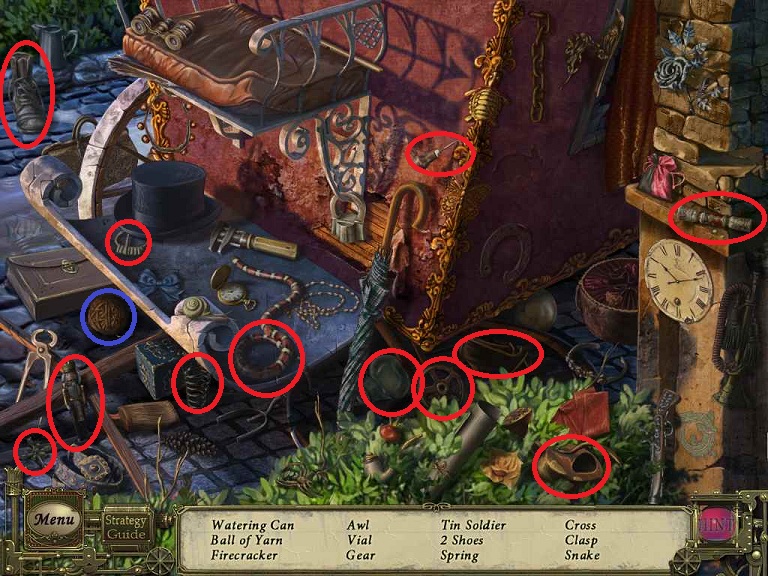
- Do the hidden object scene
- Pick up the BALL OF YARN
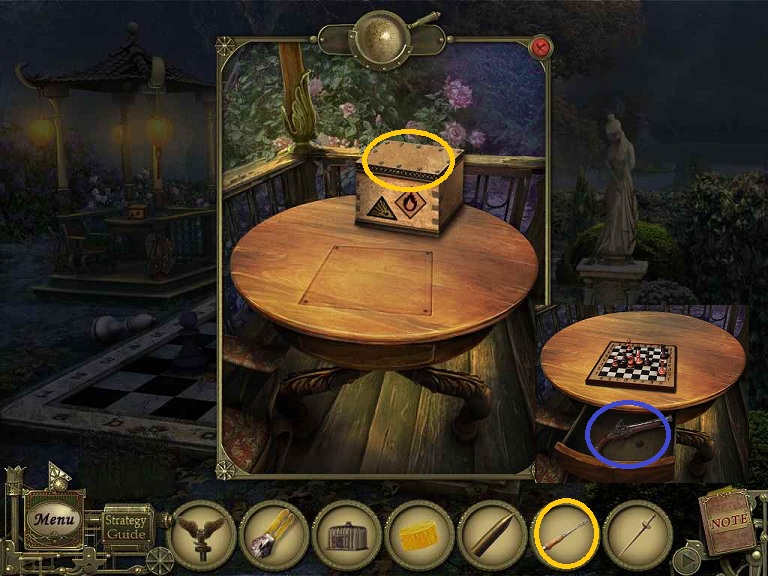
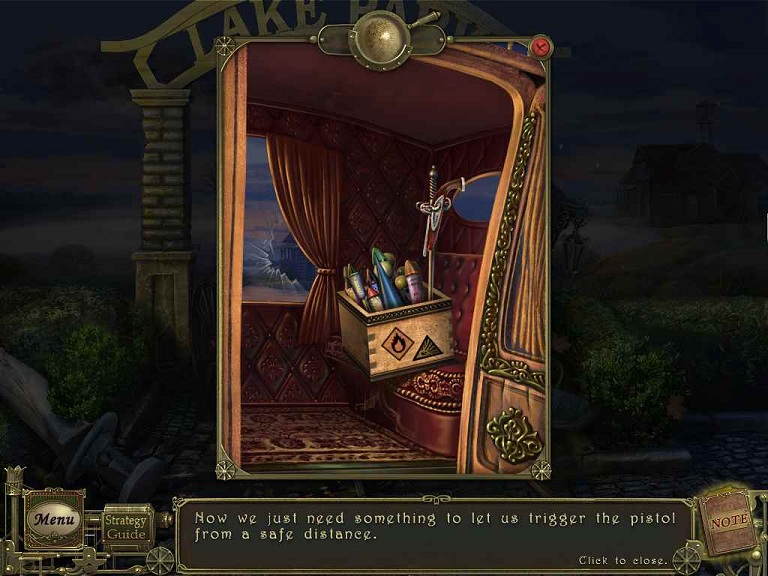
- Examine the gazebo
- Use the NAIL PULLER on the box
- Pick up the FIREWORKS
- Place the CHESS BOARD
- Drag the chess pieces on the board
- Pick up the PISTOL from the drawer
- Examine the coach again
- Place the FIREWORKS on the seat
- Place the RAPIER in the FIREWORKS
- Place the PISTOL on the RAPIER
- Place the BALL OF YARN on the PISTOL
- The pistol will go off and thus the fireworks
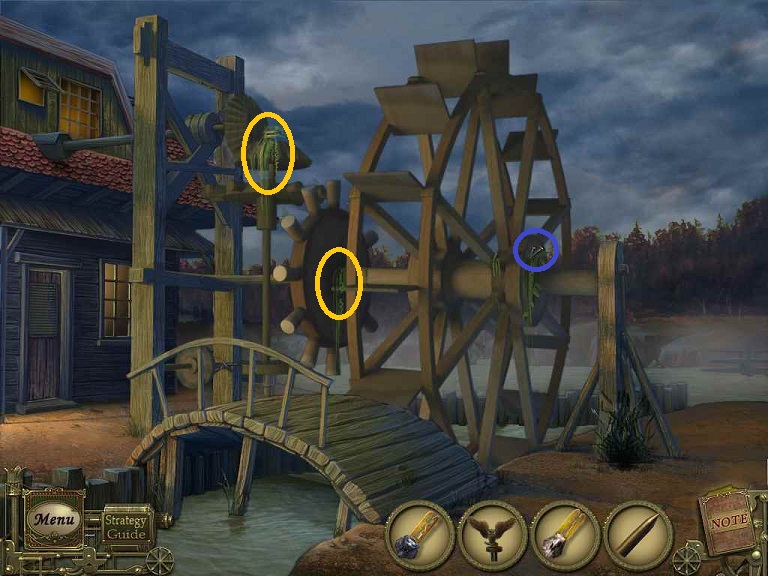
- You can now step through the coach and then head right
- Pick up the NAILS on the right side of the water wheel
- Remove 2 pieces of weed and the wheel will start up
- Go left
- Pick up a BOARD
- Examine the door
- Use the STEEL BAR on the lock
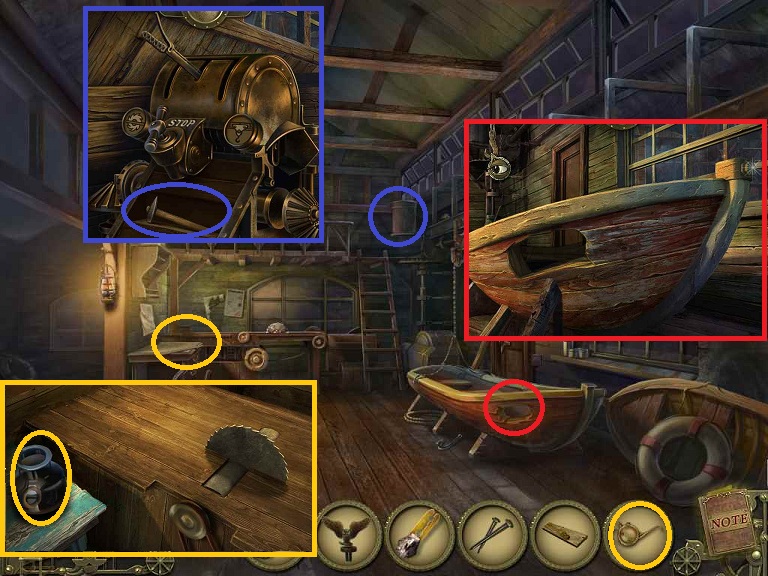
- Examine the boat hoist; you need to get it working
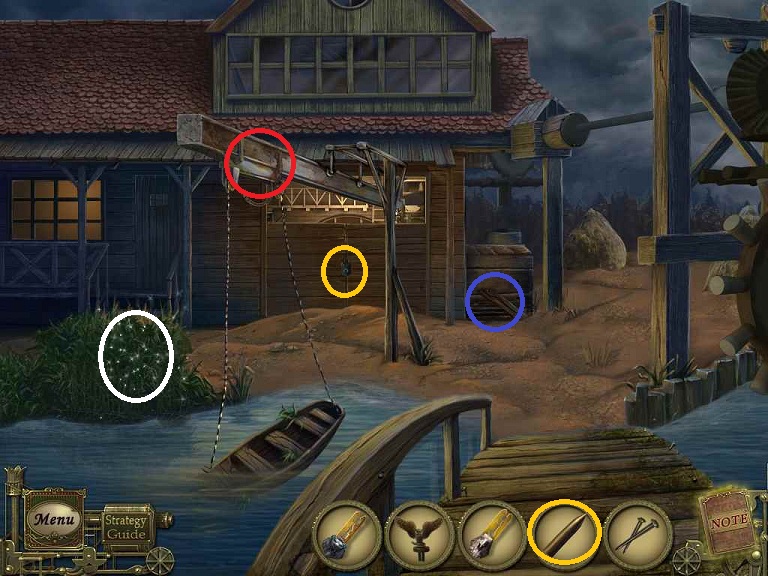
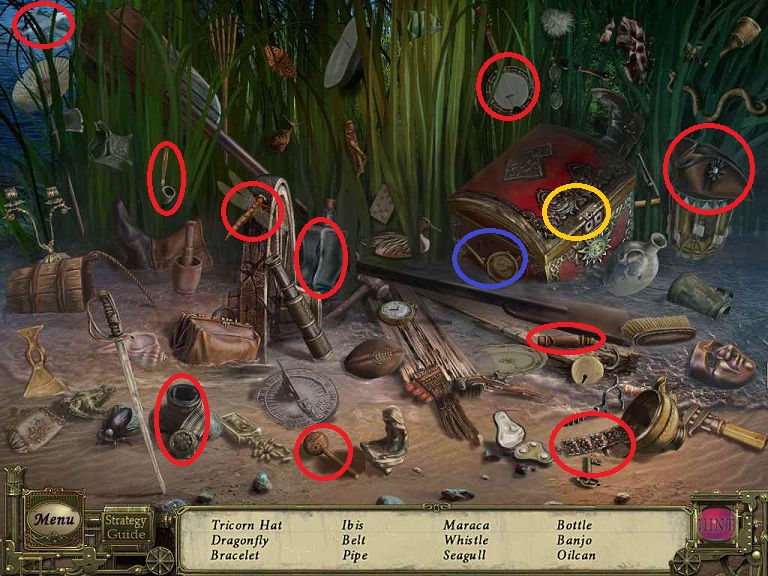
- Do the hidden object scene
- Open the chest
- Pick up the OIL CAN
- Examine the machinery at the top of the ladder
- Click on the stop handle
- Pick up the HAMMER
- Click on the lever; it will move to the left
- Examine the saw bench
- Use the OIL CAN on the jar of oil
- Use the HAMMER on the jar
- Pick up the BOAT HOOK
- The saw should be running
- Use the BOARD on the saw
- Pick up the cut BOARD
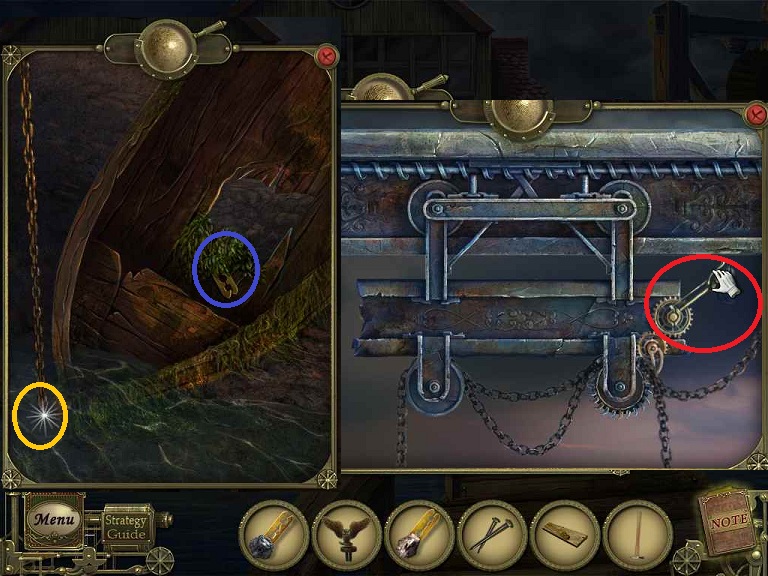
- Examine the boat hoist
- Use the OIL CAN
- Click on the handle
- Return inside
- Click on the lever to switch over to the hoist
- Return outside
- Examine the boat
- Pick up the TIGER KEY
- Click on the end of the chain
- Examine the boat
- Put the BOARD on the boat
- Place the NAILS
- Use the HAMMER on the NAILS
- Place the BOAT HOOK on the bow of the boat
- Drag the hook and chain onto the BOAT HOOK
- You will end up outside with the boat in the water
- Go back inside and note the locked box now exposed
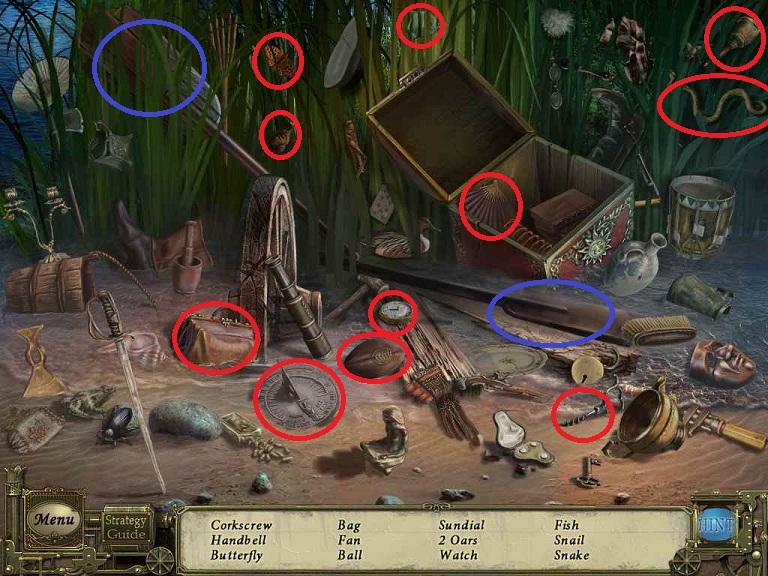
- Do the hidden object scene
- Pick up OARS
- Put the OARS onto the boat
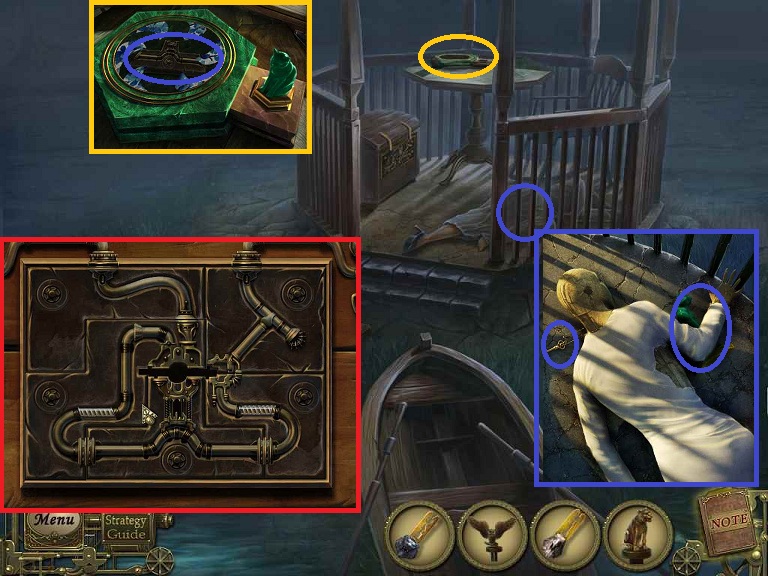
- Examine the body
- Pick up the KEY and CAT STATUETTE
- Examine the table
- Place the CAT STATUETTE in the hexagon hole
- Pick up the LOCK PART
- Examine the chest
- Use the LOCK PART
- Place the different pieces by right clicking to turn them in the correct direction
- There are few options here as you will see the holes in the parts and the posts in the lock
- When finished, use the KEY and click on it
- Pick up the letter
- Pick up the PLUTO NAMETAG
- Follow the cat by heading to the left.
- Examine the mirror
- Give the NAMETAG to the black cat
- Follow the black cat
- Do the hidden object scene
- Check the trash can
- Pick up the TURNWHEEL
- Examine the small cabinet
- Note the lock
- Pick up the BUCKET HANDLE
- Open the door
- Nothing to do now
- Immediately head left
- Examine the bucket to the right
- Place the BUCKET HANDLE
- Examine the laundry tub; note all the missing pieces
- Click on the hatch and then ladder to drop it down

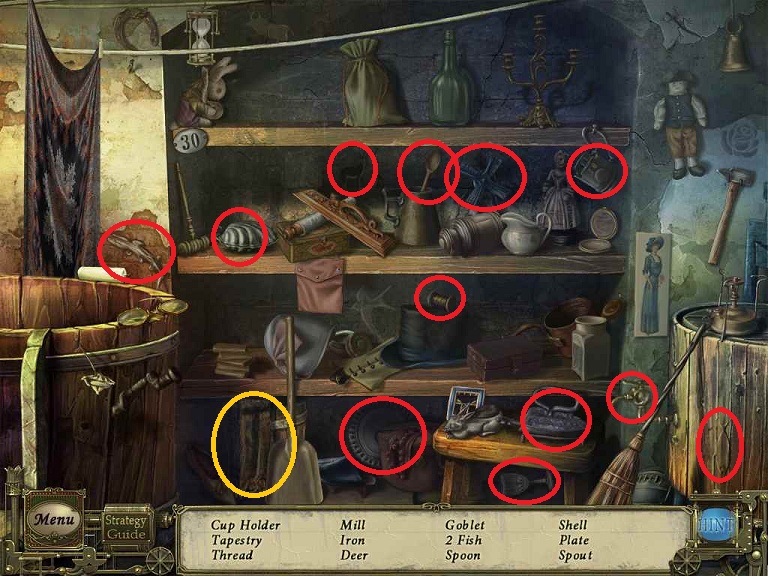
- Do the hidden object scene
- Click on 2 items on the clotheslines
- Pick up the MEAT GRINDER
- Head down the ladder
- Do the hidden object scene
- Pick up the FILE.
- Head back up the ladder
- Return to the outside
- Examine the cabinet
- Use the FILE on the lock
- Pick up the SOAP
- Return through the laundry room and chemistry room and basement into the storage room.
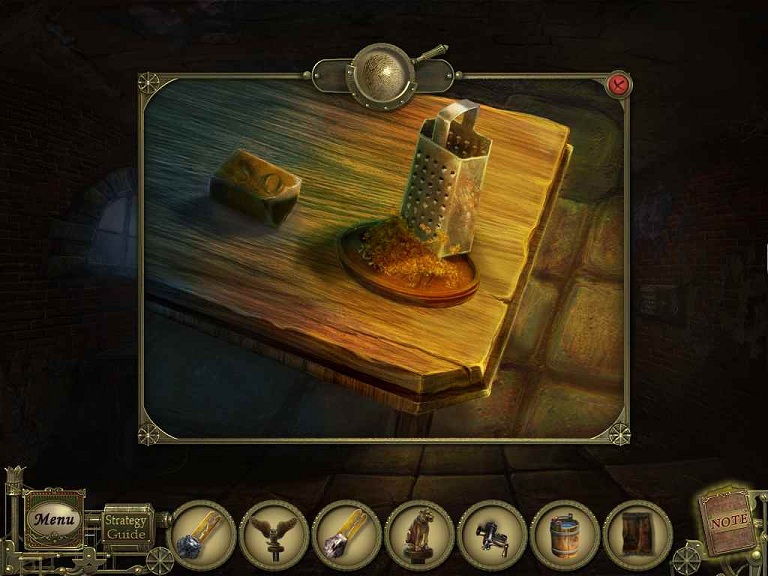
- Examine the sink
- Pick up the GRATER
- Place the BUCKET
- Turn on the water
- Pick up the BUCKET WITH WATER
- Examine the table
- Place the MEAT GRINDER on the table
- Remove the wingnut
- Pick up the MEAT GRINDER HANDLE
- Examine the boiler
- Place the BUCKET OF WATER on the boiler
- Pick up the BUCKET OF WARM WATER
- Return to the Chemistry Room
- Examine the table
- Place the GRATER and SOAP on the table
- Drag the SOAP onto the GRATER
- Pick up SOAP SHAVINGS
- Head up the ladder
- Do the hidden object scene
- Pick up the DIRTY TAPESTRY
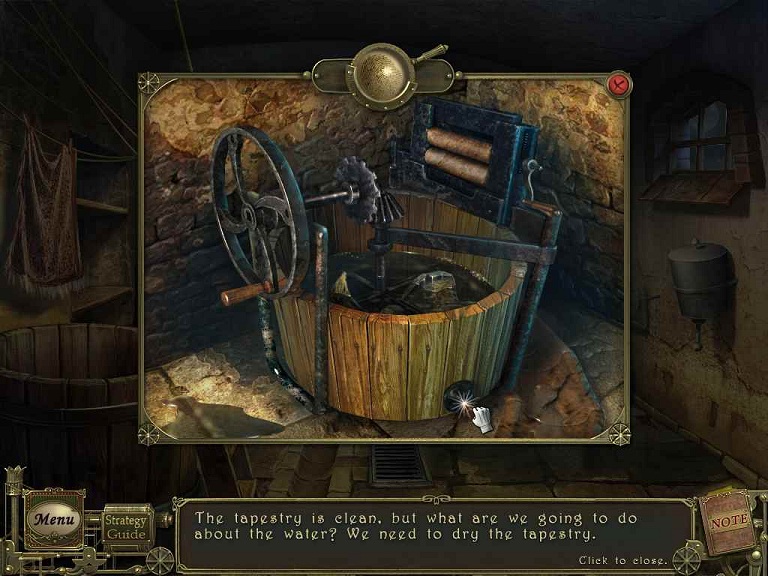
- Examine the laundry tub
- Place the TURNWHEEL and HANDLE
- Place the WARM WATER and SOAP SHAVINGS
- Place the DIRTY TAPESTRY
- Click on the TURNWHEEL
- Remove the drain plug
- Pick up WET TAPESTRY
- Put the WET TAPESTRY in the wringer and click the handle
- Pick up the TAPESTRY PIECE
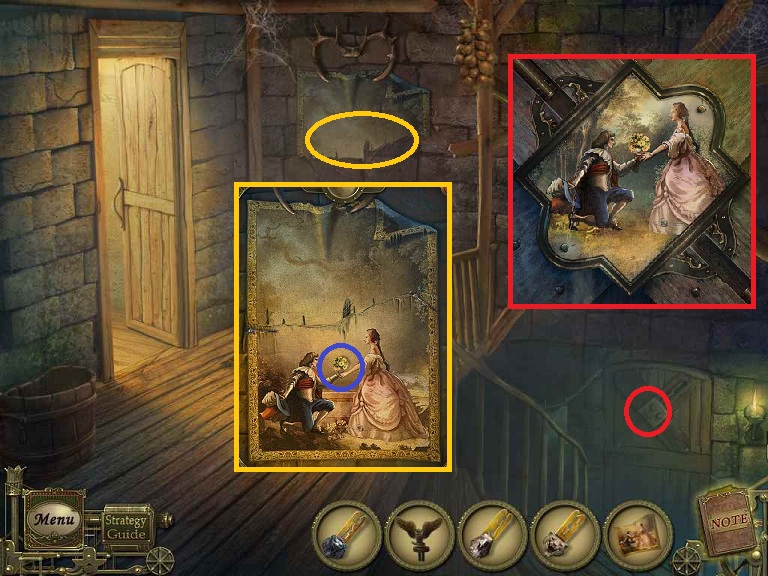
- Return to the Cellar Steps
- Examine the tapestry on the wall
- Place the TAPESTRY PIECE
- Pick up the BOUQUET OF FLOWERS
- Examine the door at the bottom of the steps
- Place the BOUQUET OF FLOWERS
- Click on the arm joints to match the tapestry
- Enter the door
- In the first room, pick up the WINE GLASS and HOOK
- Note the locked door
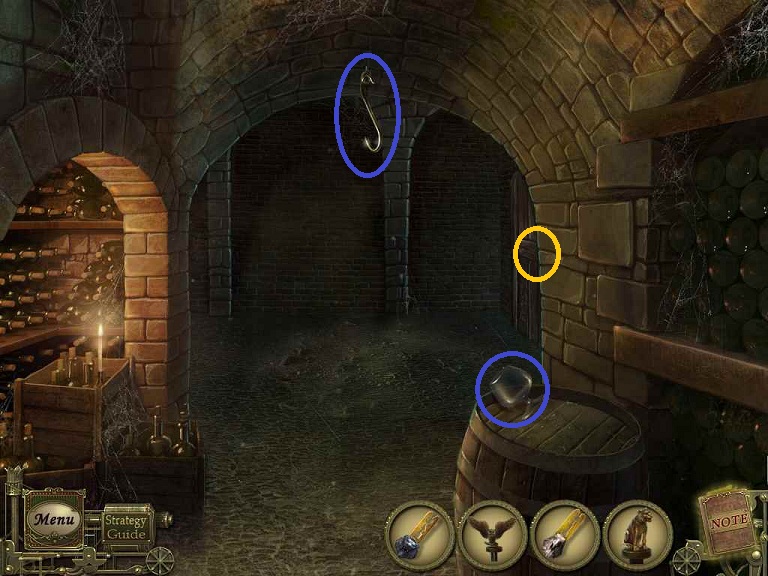
- Go into the next room to the left
- Examine the cart of the wine barrel and note the missing wheel
- Examine the table
- Click on the magnet twice
- Pick up the MAGNET and WINE GLASS

- Head into the next room
- Do the hidden object scene
- Pick up the WEIGHT
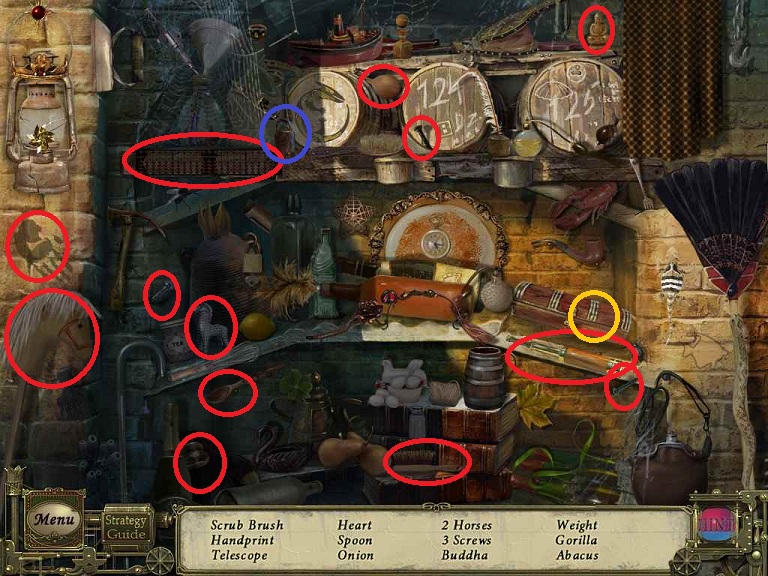
- Pick up the WINE GLASS from the table
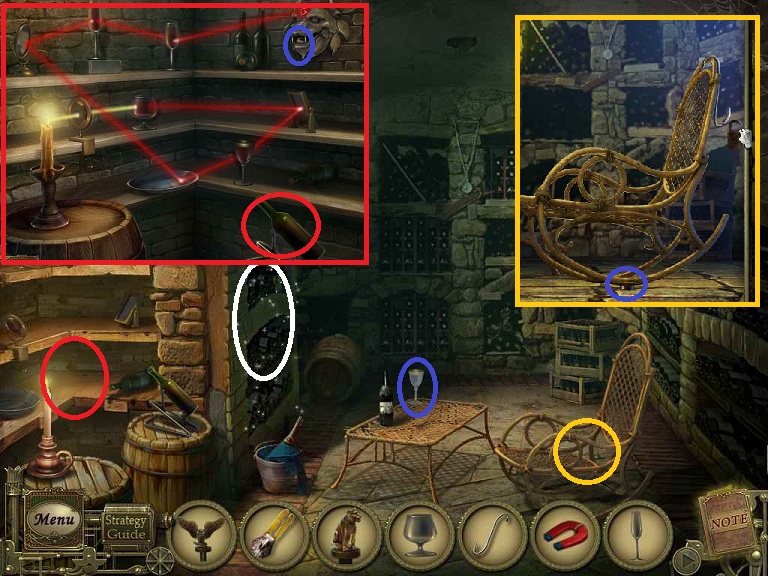
- Examine the rocking chair
- Hang the HOOK on the back and hang the WEIGHT on the HOOK
- Pick up the WHEEL
- Examine the shelves to the left
- Place the 3 WINE GLASSES
- Pour wine into the 4 wine glasses
- Click on each mirror as the red light shines on it
- Pick up the KEY out of the statue's mouth
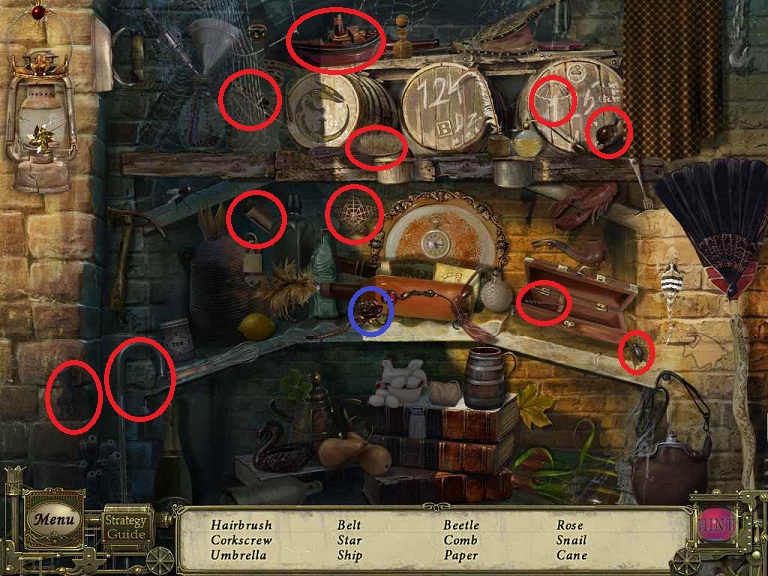
- Do the hidden object scene
- Pick up the HANDLE
- Return to the second room
- Place the WHEEL on the cart
- Push the barrel
- Examine the floor
- Pick up the HANDLE
- Place the HANDLE from the last hidden object scene
- Click on the chain
- Place the LION KEY
- Pick up the LION STATUETTE
- Examine the door and use the KEY
- Pick up the SNAKE KEY
- Examine the bottle to the left
- Use the MAGNET
- Pick up the GEAR
- Examine the cupboard
- Place the GEAR and HANDLE
- Click on the HANDLE
- Note that you need the rest of the statuettes; you can make a big loop
- Return to the Boat House for the EAGLE
- Return to the Fountain for the TIGER
- Return to the Office for the SNAKE
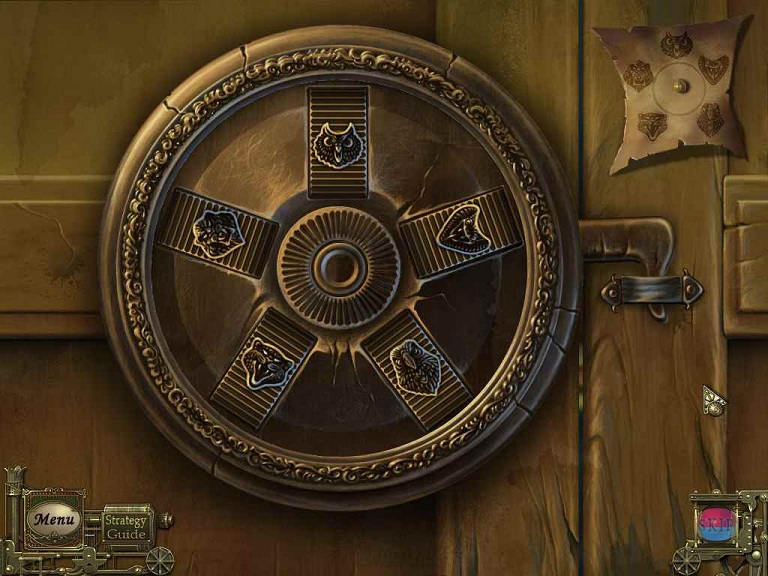
- Place all 5 statues matching the bases
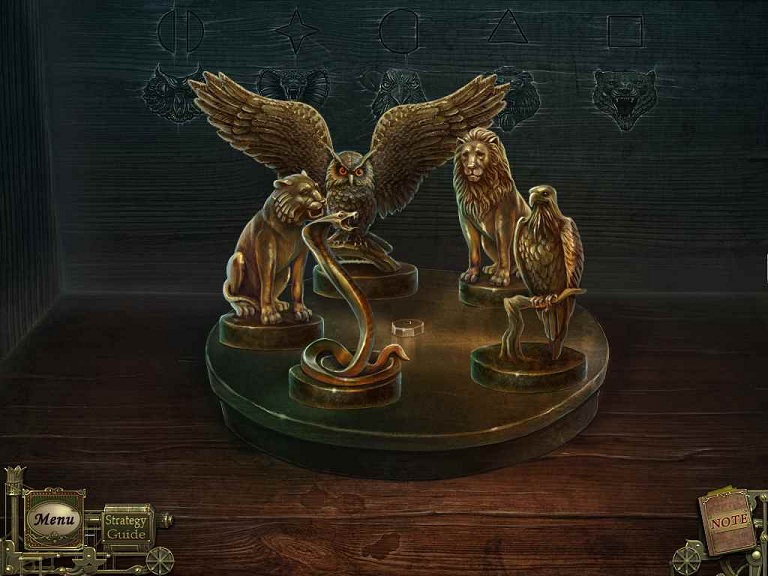
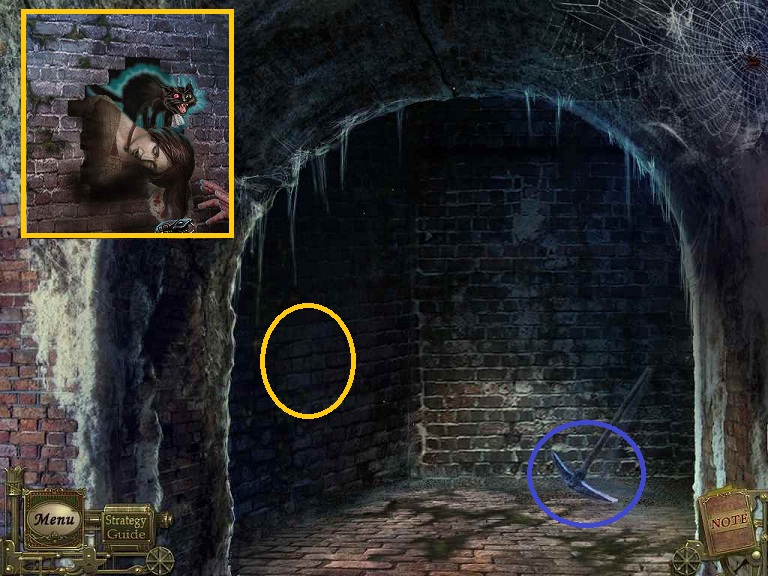
- Pick up the PICK AXE
- Use the PICK AXE on the wall
Comments will load when you reach this part of the walkthrough.